
Using CircuitPython with a Particle Xenon
This page is no longer maintained and is provided for historical reference only
This document details steps for using a Particle Xenon as a standalone dev kit running CircuitPython. The steps below will completely remove the Particle Device OS from the Xenon, completely disconnecting the device from the Particle Cloud and device ecosystem.
To complete the steps below, you'll need the following tools:
- a Particle Xenon
- Two available USB ports on your computer
- One Debugger for programming the Xenon, either:
- A Segger J-Link (]Commercial or EDU Version). Note that if you use this approach, you'll also need a JTAG to SWD Cable Adapter Board and a 10-pin 2.5 Socket Cable to connect to the debugger pins on the Xenon.
- A Particle Debugger
In addition, you'll need to install the following software:
- J-Link Software if using a Segger J-Link for this tutorial.
- nRF Command-Line Tools
- arm gcc compiler. Note: Make sure that the GCC Compiler is in your PATH
- OpenOCD unless you've already installed Particle Workbench, in which case OpenOCD will have been installed for you.
- Lastly, you will need to download a CircuitPython release
Replacing the default bootloader
The first step to using your Xenon with CircuitPython is to replace the Particle bootloader on the device with an nRF52-friendly bootloader. This replacement process is often referred to as "burning a bootloader."
NOTE: If you want to build the bootloader yourself, follow the instructions below. Alternatively, you can download the latest bootloader from Adafruit directly on the releases page for the Adafruit_nRF52_Bootloader repo. Scroll down and look for a file with a name that starts with particle_xenon_bootloader-. Click here for a direct link to the 0.3.1 version.
If you choose to download the bootloader directly, you can skip to burning the bootloader with OpenOCD
Cloning the GitHub repo
In a development folder on your machine, use a terminal to clone the
Adafruit_nRF_Bootloaderrepository.git clone https://github.com/adafruit/Adafruit_nRF52_Bootloader && cd Adafruit_nRF52_BootloaderUpdate dependent modules
git submodule update --init --recursive
Next, you'll want to build and burn this new bootloader to your Xenon. The approach differs depending on whether you're using the Particle Debugger or Segger J-Link, so be sure to only follow the steps for the debugger you're using.
Option 1: Burning a new Bootloader with the Particle Debugger
If you're using the Particle Debugger to burn a new bootloader to your Xenon, you'll need to build a hex binary, and then use OpenOCD to flash the binary to your device.
Build a bootloader hex file
From a terminal window, create a
hexfile for the bootloader using the followingMAKEcommand. Make sure you're still in theAdafruit_nRF52_Bootloaderdirectory and run the following command.make BOARD=particle_xenon all combinehexYou'll see output similar to the following once the command runs
❯ make BOARD=particle_xenon all combinehex LD particle_xenon_bootloader-0.2.13-21-g454b281-nosd.out text data bss dec hex filename 30020 212 22370 52602 cd7a _build-particle_xenon/particle_xenon_bootloader-0.2.13-21-g454b281-nosd.out CR particle_xenon_bootloader-0.2.13-21-g454b281-nosd.hex CR particle_xenon_bootloader-0.2.13-21-g454b281_s140_6.1.1.hex- The
hexfile will be created in a_build-particle_xenondirectory in the bootloader project. Keep track of this path as you'll need it for the next step.
Use OpenOCD to burn the bootloader to your Xenon
Next, we'll use OpenOCD to burn this bootloader hex file to your Xenon.
First, put your Xenon into DFU Mode by holding down the
MODEandRESETbuttons. Then, let go ofRESET, but continue to hold down theMODEbutton until the RGB LED on the device is blinking yellow.Connect the Particle Debugger to the debug port on your Particle device using the provided ribbon cable, and plug both into your computer. The debug port consists of ten exposed pins protected by some plastic, and you can find it next to the LiPo battery port near the top of the device.

Open a terminal window in the directory where you've installed OpenOCD. Alternatively, if you've installed Particle Workbench, you'll find OpenOCD in a directory under
.particle/toolchains/openocd. For instance, at the time of writing, the OpenOCD binary is in the0.11.2-adhoc6ea4372.0directory.cd ~/.particle/toolchains/openocd/0.11.2-adhoc6ea4372.0From the OpenOCD directory, run the
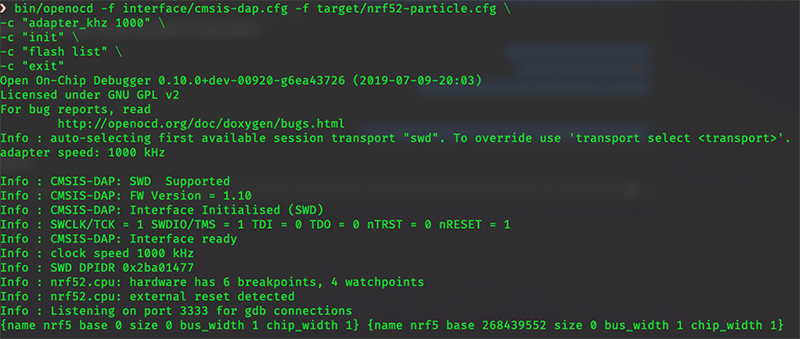
flash listcommand to make sure the debugger is correctly connected.bin/openocd -f interface/cmsis-dap.cfg -f target/nrf52-particle.cfg \ -c "adapter_khz 1000" \ -c "init" \ -c "flash list" \ -c "exit"If you see something like what's in the image below, you're on the right track.
Install the Hex file from the step above using the
programcommand. Replace the path to the hex file with your own path NOTE: If using Mac OS, the the~path shortcut will fail, so be sure to use your entire path from/Users/userin the statement below.bin/openocd -f interface/cmsis-dap.cfg -f target/nrf52-particle.cfg \ -c "adapter_khz 1000" \ -c "init" \ -c "program /Users/bsatrom/Development/Adafruit_nRF52_Bootloader/_build-particle_xenon/particle_xenon_bootloader-0.2.13-21-g454b281_s140_6.1.1.hex 0x000000 verify reset" \ -c "exit"Don't worry if you get an error on this step, you should be able to ignore it.
Once the command completes, hit the
RESETbutton on your Xenon. After it reboots, the RGB LED will blink red and then turn Green. The blue D7 LED will remain on, and a new drive namedXENONBOOTwill show up on your computer. You can now unplug the Particle Debugger from your Xenon and computer an continue with the Installing CircuitPython steps below.
Option 2: Burning a new Bootloader with the Segger J-Link
If you're using a Segger J-Link Debugger to burn a new bootloader, you'll first need to disable mass storage support. Then you'll erase the flash of the Xenon, and use make commands to flash the bootloader to your device.
Disable mass storage support
If this is your first time using the Segger J-Link for burning a bootloader, you'll want to disable Mass Storage support.
Open a terminal window and run the
JLinkExecommand, which was created when you installed the J-Link tools.The first thing this command will do is update the firmware on your device. Once done, you'll be dropped into a
J-Linkprompt.Type
MSDDisableand hit enter. Then typeexitand hit enter.
Note: If you ever need to re-enable Mass Storage support, you can do so with the MSDEnable command.
Build and burn a new bootloader
Make sure you're still in the
Adafruit_nRF52_Bootloaderdirectory and run the following command to erase the underlying Nordic chip on the Xenon. At this point, the RGB LED on your Xenon will stop blinking, which is expected as the Particle Bootloader and Device OS has been removed.nrfjprog -f nrf52 --eraseall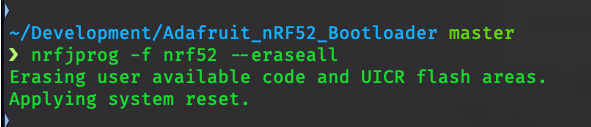
Clean the build artifacts, and flash a new SoftDevice to the Xenon.
make BOARD=particle_xenon clean
make BOARD=particle_xenon sd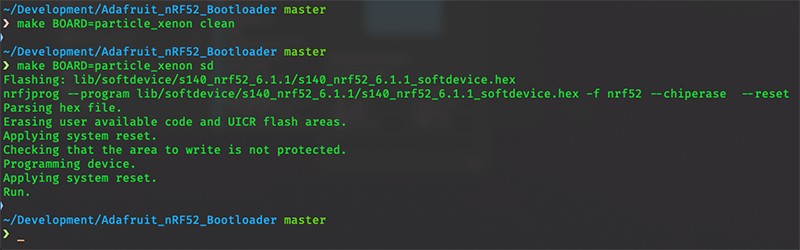
Burn a new bootloader with the flash command. This will take a few moments, and once done, the RGB LED will blink red and then turn Green. The blue D7 LED will remain on, and a new drive named
XENONBOOTwill show up on your computer. You can now unplug the J-Link Debugger from your Xenon and computer an continue with the Installing CircuitPython steps below.make BOARD=particle_xenon flash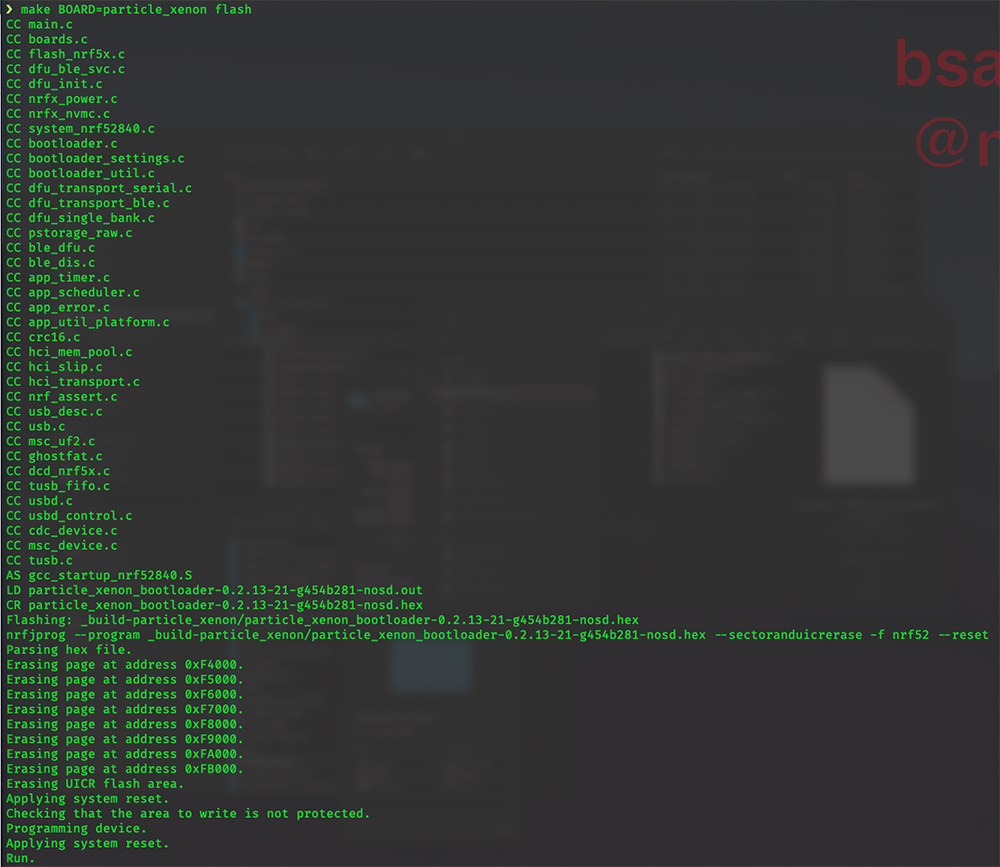
Installing CircuitPython
Once you've burned a new bootloader to your Xenon and a XENONBOOT drive shows up on your machine, there are only a few steps left to get CircuitPython running on your device.
Download the latest version of CircuitPython for the Xenon from here. We used the current stable version (4.1.2 at the time of writing), but you can try any beta versions available and those should work as well.
Find the
.uf2file you downloaded in the last step. Drag and drop it onto theXENONBOOTmount on your filesystem.
The file will be copied and after a few seconds, your device will restart. The RGB LED will come on solid white and instead of a XENONBOOT mount, a mount named CIRCUITPY will show up on your machine. When you see that, you're all set to write CircuitPython code on your Xenon.
Running CircuitPython projects
To run CircuitPython on your Xenon, use any text editor of your choosing and create a new file in the CIRCUITPY mount called code.py. Whenever you save this file, your device will be restarted.
For example, here's a short snipped that blinks the built-in D7 LED on and off every half a second.
import time
import board
from digitalio import DigitalInOut, Direction, Pull

led = DigitalInOut(board.BLUE_LED)
led.direction = Direction.OUTPUT

while True:
    led.value = False
    time.sleep(0.5)
    led.value = True
    time.sleep(0.5)
For more information on using CircuitPython with your Xenon, check out Adafruit's extensive guide as well as the CircuitPython Essentials guide. Both have everything you need to get up to speed!