
Session 5 - Controlling your devices from the cloud
This page is no longer maintained and is provided for historical reference only
| Project Goal | Process sensor data in the cloud, and publish events to control an RGB LED on your Photon. |
|---|---|
| What you’ll learn | How to control an RGB LED from a Photon; Subscribing to Device Cloud events; Publishing events from Azure. |
| Tools you’ll need | build.particle.io, A Particle Photon and Maker Kit; Microsoft Azure Account |
| Time needed to complete | 30 minutes |
In this session, we're going to tie everything together by adding an RGB LED to our project that can be controlled from the cloud. Our Azure instance will monitor the incoming temperature readings, and with the help of an Azure Function, we can fire events that will tell our RGB LED which colors to use based on the temp we pass along.
If you get stuck at any point, click here for the completed source.
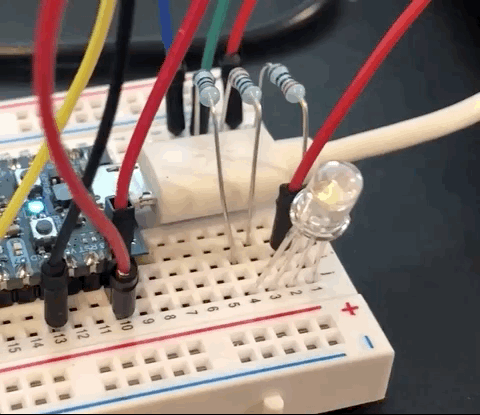
Wire up the status RGB LED to your Photon
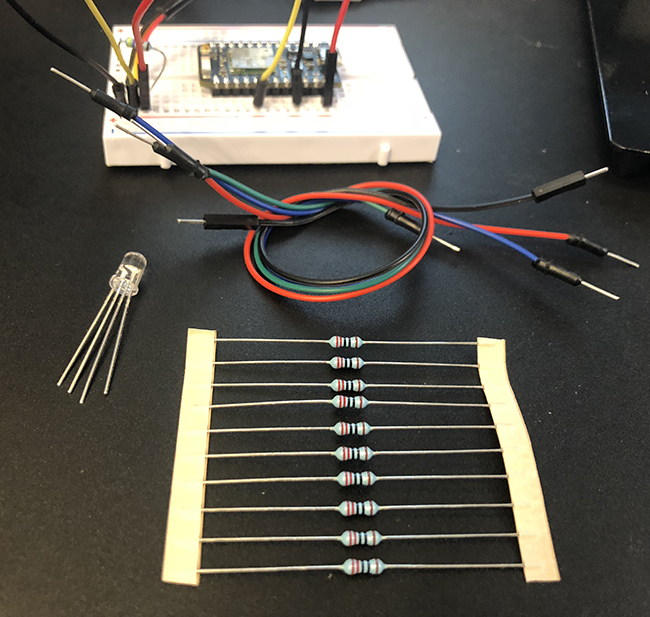
To build this circuit, you'll need the following items:
- Photon in breadboard (this is how it comes in the Maker Kit)
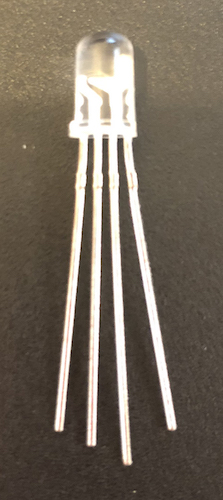
- 1x Clear cap RGB LED. The RGB LED has four leads: the left lead is for the blue light, second for green and the right lead for the red light. The longest lead is the common anode, which we'll connect to our power source.
- 2x red, green, and blue jumper wires.
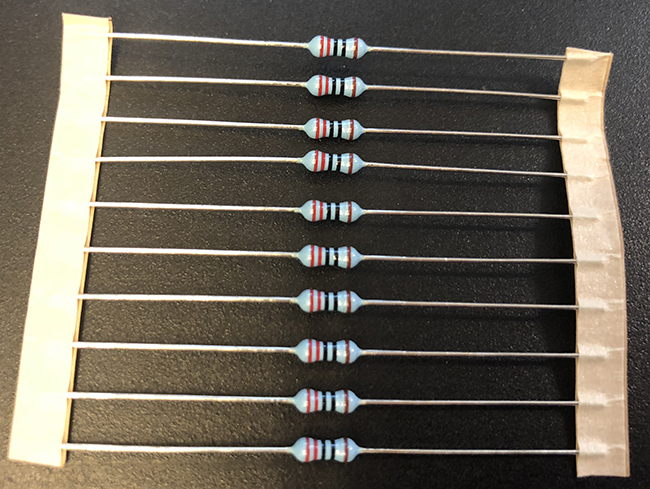
- 3x 330 Ohm Resistors. The maker kit includes four different types of resistors (220, 1k, 4.7k and 10k ohm). The one you need is blue, with red, red, black, black and brown bands, as depicted below.
The RGB LED has four leads. One common anode lead, and one each for the red, green and blue diodes inside the LED. Start by plugging the four legs into the first four rows of column J on your breadboard. Make sure the LED is oriented where the longest leg, the common anode, is the second from the right before you plug it in.
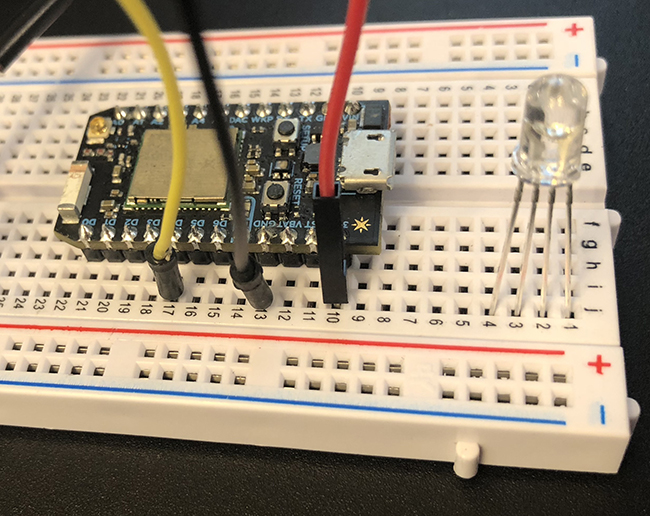
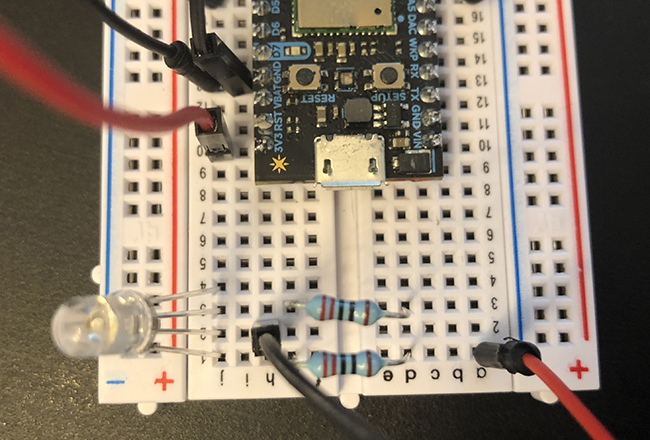
For each LED led, we'll need to wire a resistor in series to keep the LED safe. Grab the first resistor and plug one leg into the first row of column G, then plug the other led into the first row of column D.
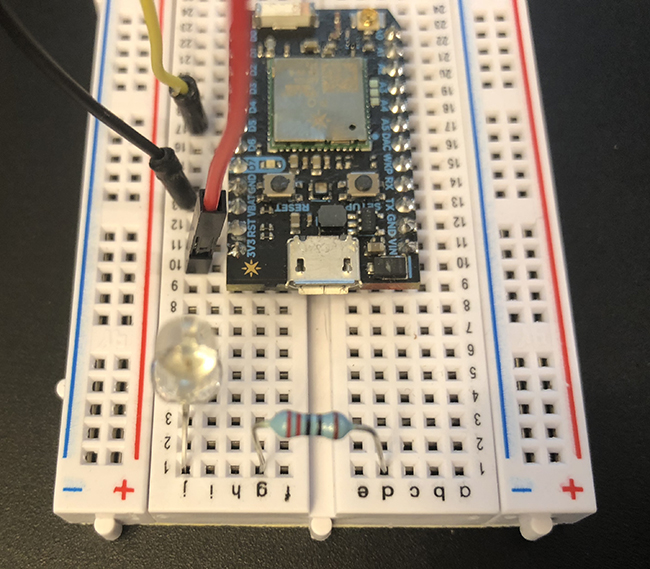
The lead at A1 is the red LED, so take a red jumper wire and place one end into the first row of column A. Place the other end into the
D2pin on the Photon.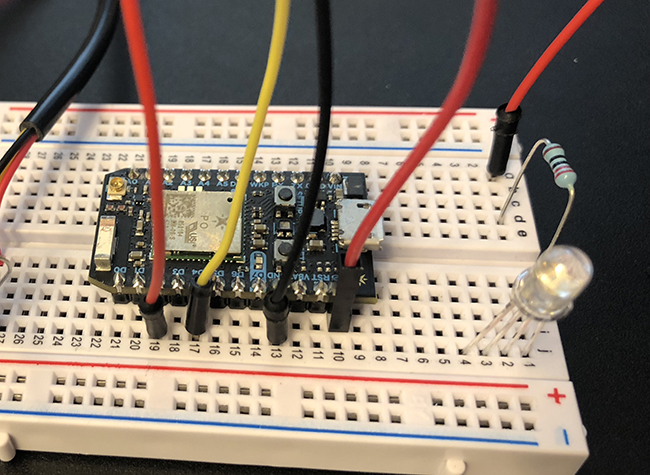
The second lead is the common anode lead, which we'll plug into our power source. Take the red jumper wire and plug it into row two of column H. Plug the other end into the
3V3pin of the Photon.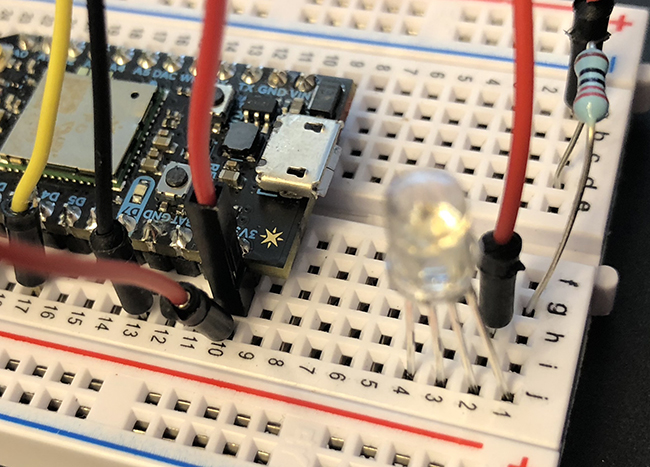
Take the second resistor and plug one leg into the third row of column G, then plug the other led into the third row of column D.
The third lead is the green LED, so take a green jumper wire and place one end into the third row of column A. Plug the other end into the
D1pin on the Photon.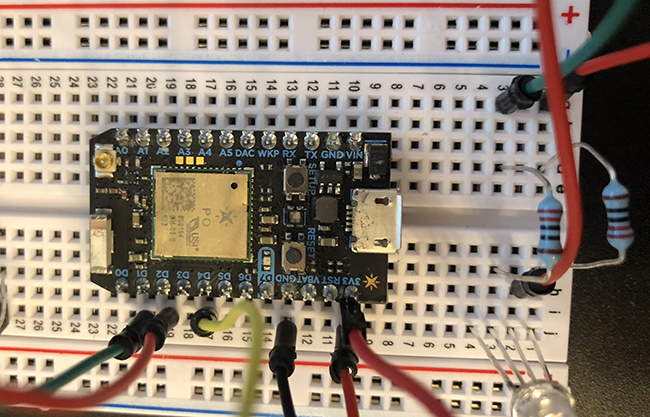
Take the third resistor and plug one leg into the fourth row of column G, then plug the other led into the fourth row of column D.
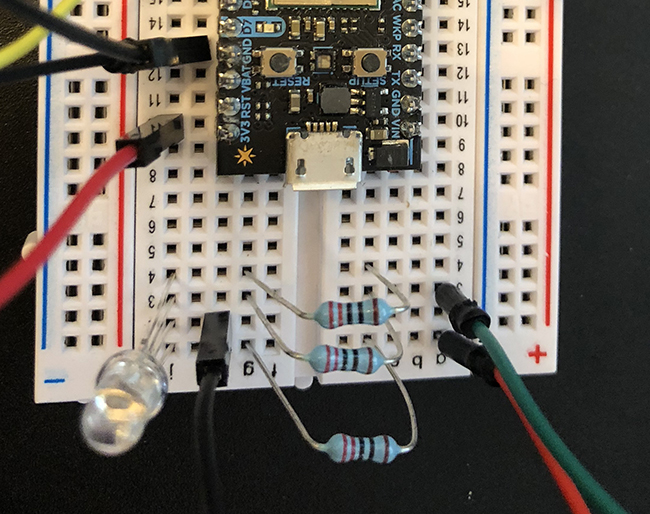
Finally, The fourth lead is the blue LED, so take a blue jumper wire and place one end into the fourth row of column A. Plug the other end into the
D1pin on the Photon.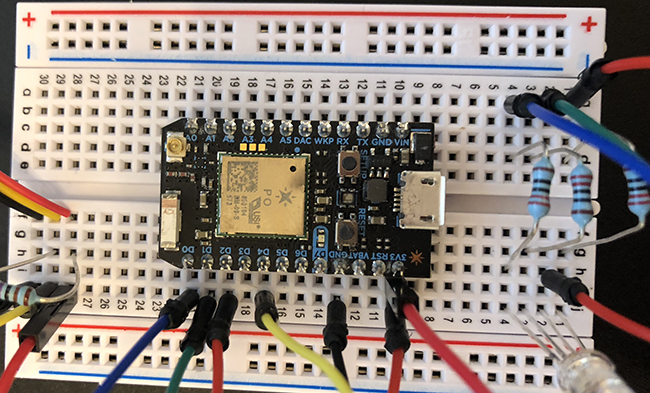
With our RGB LED circuit all wired up, let's write the firmware code for lighting it up when we receive an event from the cloud.
Add an event subscription to capture events from Azure
First, let's create some
#definestatements to manage the pins of our RGB LED. Add these three lines after the#definewe created in part two of this workshop.#define RED_PIN D2 #define GREEN_PIN D1 #define BLUE_PIN D0Now let's set the
pinModeof each pin on the RGB LED to be an output by adding the following lies to the beginning of oursetupfunction.pinMode(RED_PIN, OUTPUT); pinMode(GREEN_PIN, OUTPUT); pinMode(BLUE_PIN, OUTPUT);Next, let's add the
subscribeprimitive.subscribetells the device cloud to watch for events that match a name and, like aParticle.functiondefines a handler to call when that event is received. Add the following line tosetup.Particle.subscribe("setLED", setLEDColor, MY_DEVICES);At the end of
setupwe'll also initialize the RGB LED to be totally off. Since the RGB LED in the maker kit is a common anode LED, all three leads receive power by default. To turn them off, we pass in the max analog value or 255. Add the following to the end of thesetupfunction.analogWrite(RED_PIN, 255); analogWrite(BLUE_PIN, 255); analogWrite(GREEN_PIN, 255);analogWriteis a standard Arduino-style function for setting analog values on a GPIO pin. UnlikedigitalWrite, which sets a pin eitherHIGH(digital 0 or 0 volts) orLOW(digital 1 or 3.3 volts on the Photon),analogWritetakes an integer value between 0 and 255 and converts that to a voltage in the operating range of the device (0 to 3.3 volts in the case of the Photon). This allows us to do some pretty cool stuff like turning a servo or motor, or controlling the brightness of an LED!Finally, let's add the
setLEDColorfunction for oursubscribehandler. LikeParticle.functiona subscribe handler needs to have a precise signature. It returns void and takes two char arrays for the event name and any data provided by the event. Copy the following into your program.void setLEDColor(const char *event, const char *data) { int red, green, blue; int result = sscanf(data, "%02x%02x%02x", &red, &green, &blue); if (result == 3) { analogWrite(RED_PIN, 255 - red); analogWrite(BLUE_PIN, 255 - blue); analogWrite(GREEN_PIN, 255 - green); } }The key piece here is the
sscanffunction in the third line. In short, this function allows us to provide a C-style string (a char array) and a format string to use to extract multiple values from the input string into the variables provided by the remaining parameters (red, green, and blue, in this case). The format string (%02x%02x%02x) tells the function to read each pair of input values (%02) as a hexadecimal value (x) and place the result in the red, green, and blue variables, respectively.Once we have those values extracted, we'll perform an
analogWriteon each pin to set each color. Again, because this is a common anode RGB LED, we subtract the hex value from 255 in order to get the correct value for the LED.Flash the firmware to your device.
Navigate to your device page in the Particle Console. Under Event Logs, there's a
Publish Eventbutton. Click on it to open the event publishing UI.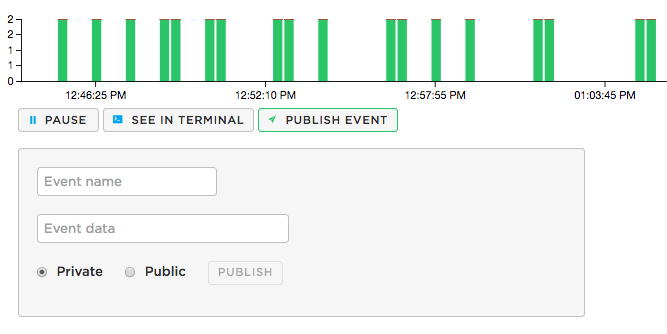
In the event name textbox, enter "setLED" and a six character hex string for a color, like
FF0000, in the Event data textbox.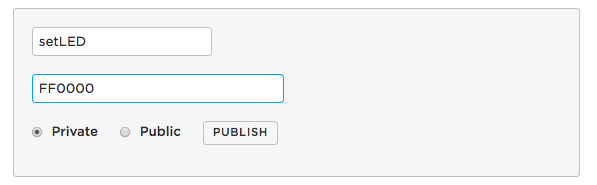
Click the "Publish" button. Your RGB LED should light up with the color you provided.
Try changing the color string to other hex values like
00FF00,0000FF,808080analogWriteis a standard Arduino-style function for setting analog values on a GPIO pin. UnlikedigitalWrite, which sets a pin eitherHIGH(digital 0 or 0 volts) orLOW(digital 1 or 3.3 volts on the Photon),analogWritetakes an integer value between 0 and 255 and converts that to a voltage in the operating range of the device (0 to 3.3 volts in the case of the Photon). This allows us to do some pretty cool stuff like turning a servo or motor, or controlling the brightness of an LED! To turn the light back off, you can publish an event with000000in the Event data field.
Now that we have everything wired up on our device, lets publish events from the cloud!
Processing sensor data in Azure and publishing events
We can use Azure to process sensor events as they come in to IoT Hub. We can really do anything we want with the data once it's in Azure. That's the magic of the cloud. Let's setup an Azure Function which fires each time the temperature changes and then calls back to the Particle Cloud with the color to change the RBG bulb to.
Add new consumer group
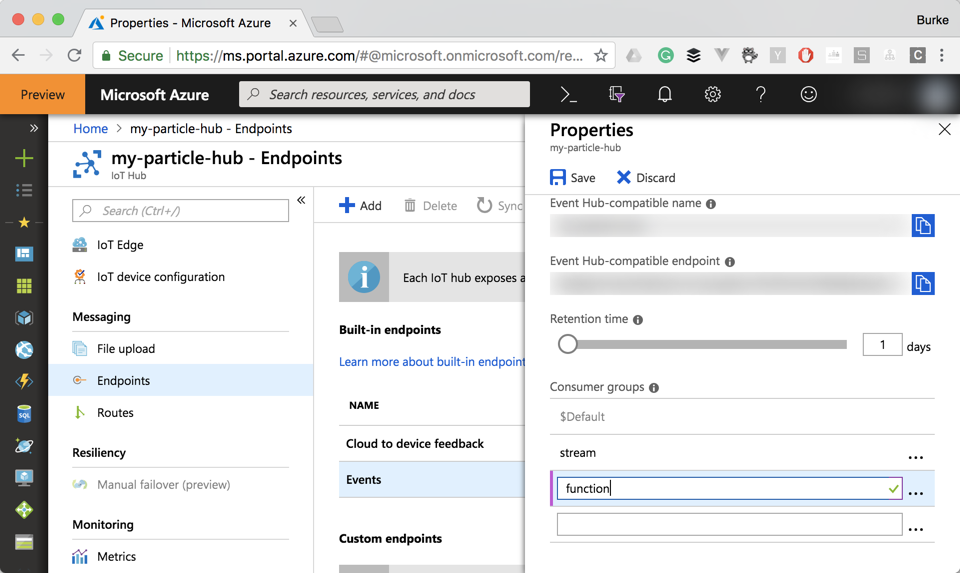
Each time you add a new endpoint or service which will interact with IoT Hub, it's a best practice to give that it's own Consumer Group. We're going to wire up an Azure Function, so let's create a new Consumer Group in IoT Hub for this Serverless Function.
In your IoT Hub, select the "Events"
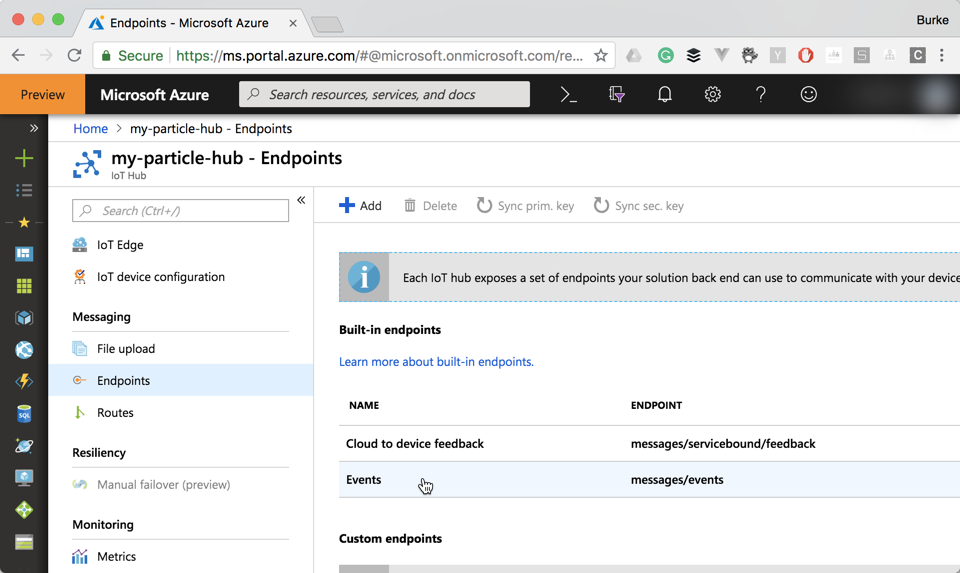
Create a new Consumer Group called "function". Don't forget to click "save".
Create a new Azure function
Azure Functions are the Azure Serverless platform. It allows you to write Node functions that run in the cloud without having to deploy Node or any runtime at all. You just write your code and let it run.
Create a new resource in Azure and select "Function App".
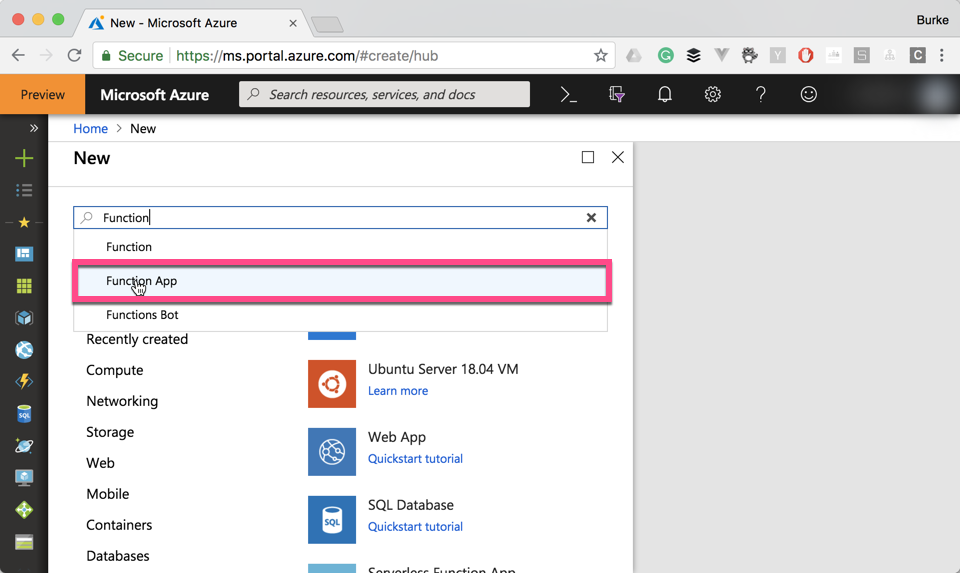
Name it "ParticleFunctionApp" and select whichever Resource Group you have been using so far. Click the "Create" button at the bottom.
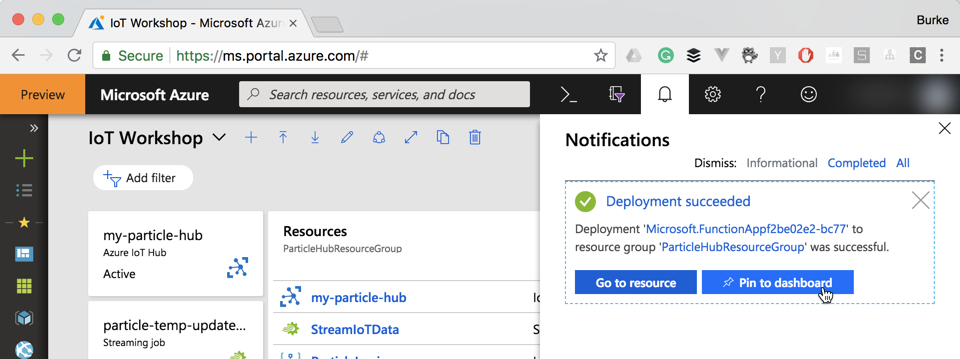
When you create a new resource in Azure, you can find it under the bell icon in the right-hand corner. You will be notified when the resource is created. It's a good idea to click the "Add to dashboard" button at that time.
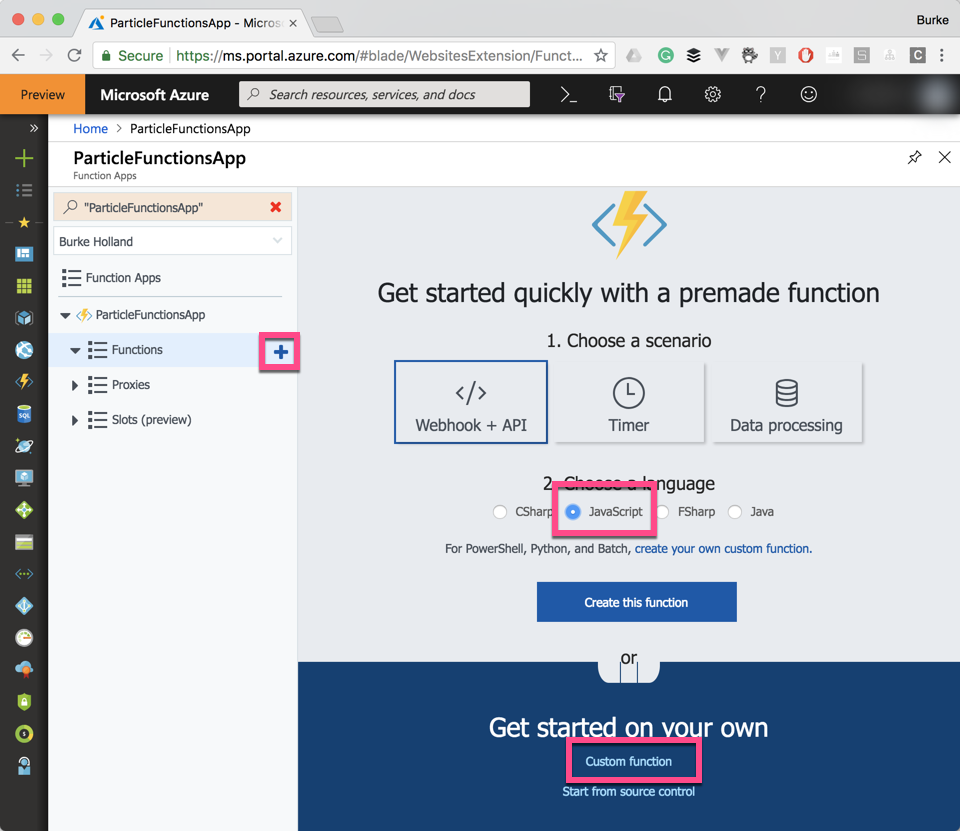
In your new Function App, click the + button next to "Functions" in the sidebar, then change the language to "JavaScript" and select "Custom Function".
Scroll down until you see the "IoT Hub (Event Hub)" card. Select "JavaScript" on that card.
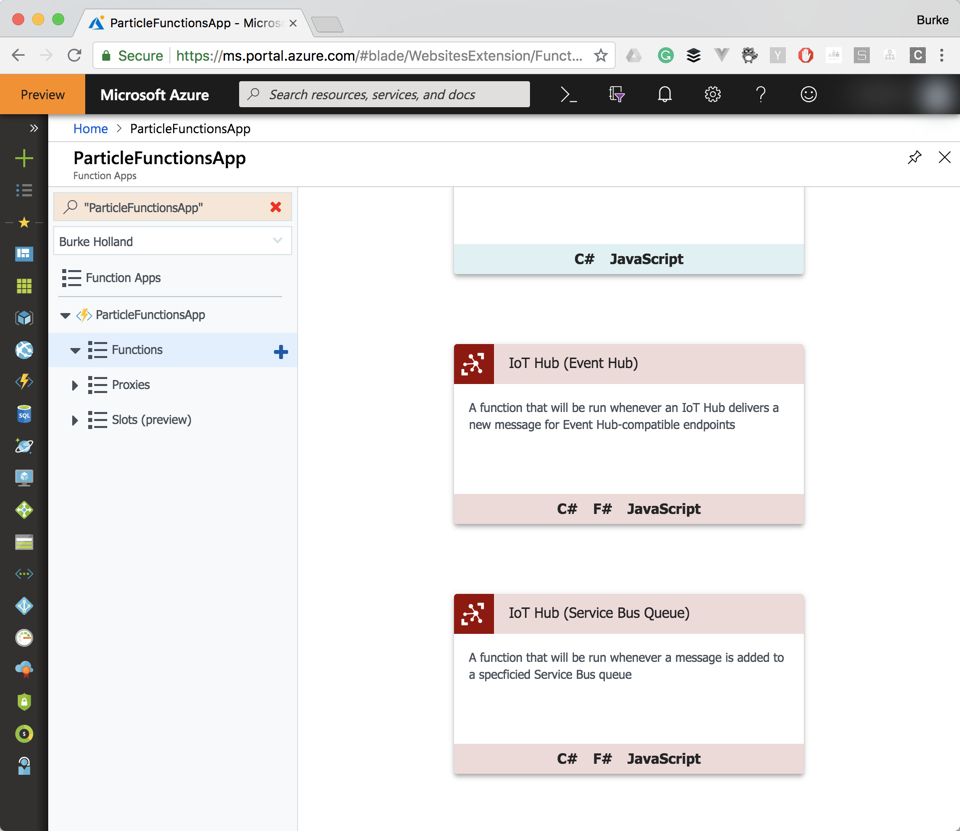
Name it "particle_event_hub_function" and select "new" under the "Event Hub Connection" option.
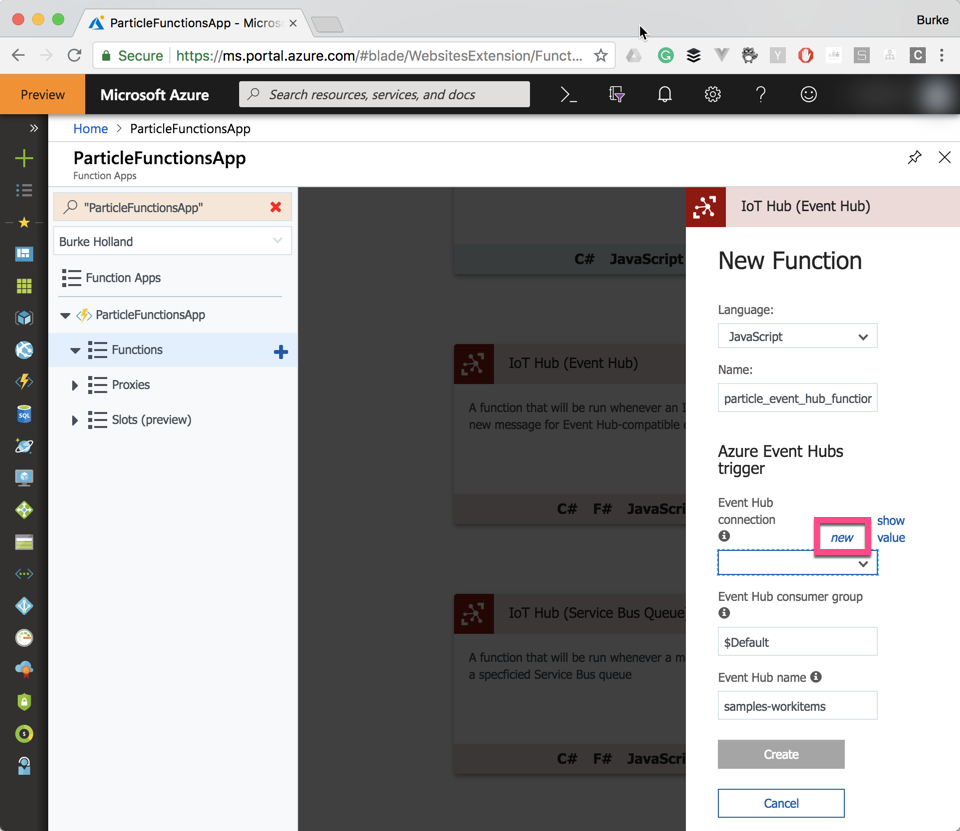
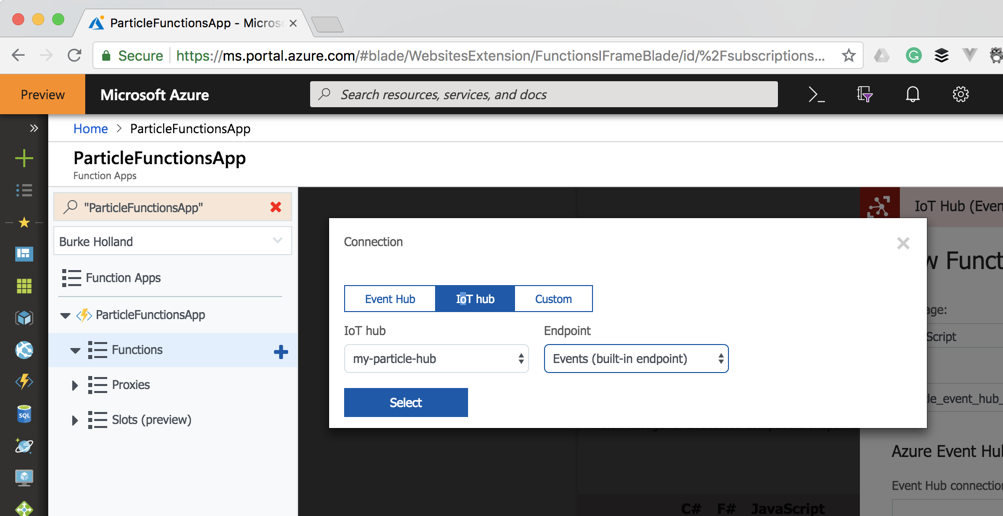
Select your IoT Hub in the dropdown list and leave the Endpoint at "Events (built-in endpoint)"
Set the Consumer Group to "function" and the Event Hub Name to the name of your IoT Hub. Click "Create".
Your new Azure Function will be loaded up.
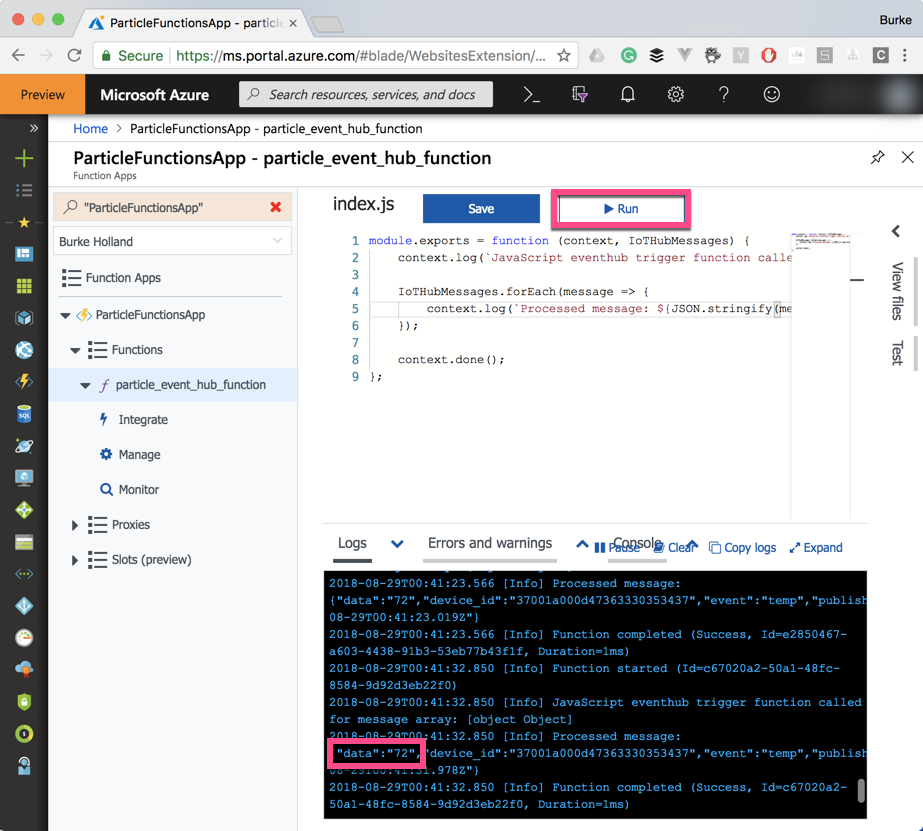
Change the code for your function so that the message is stringified
module.exports = function(context, IoTHubMessages) {
 context.log(
   `JavaScript eventhub trigger function called for message array: ${IoTHubMessages}`
 );

 IoTHubMessages.forEach(message => {
   context.log(`Processed message: ${JSON.stringify(message)}`);
 });

 context.done();
};
Hit the "Run" button to run your function. Every ten seconds you should see your temperature come through as the "data" property in the console.
This function will be fired every time we receive temperature data. We want to make a call back to our Particle Photon when we receive a temperature update. To do that, we need to make an HTTP call. The
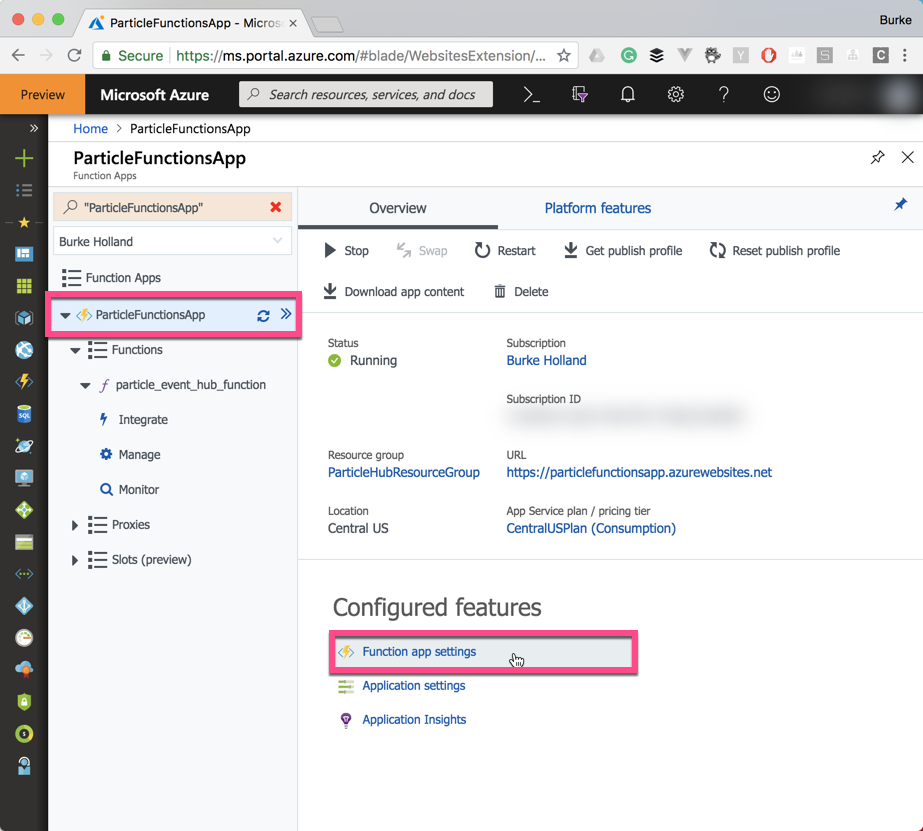
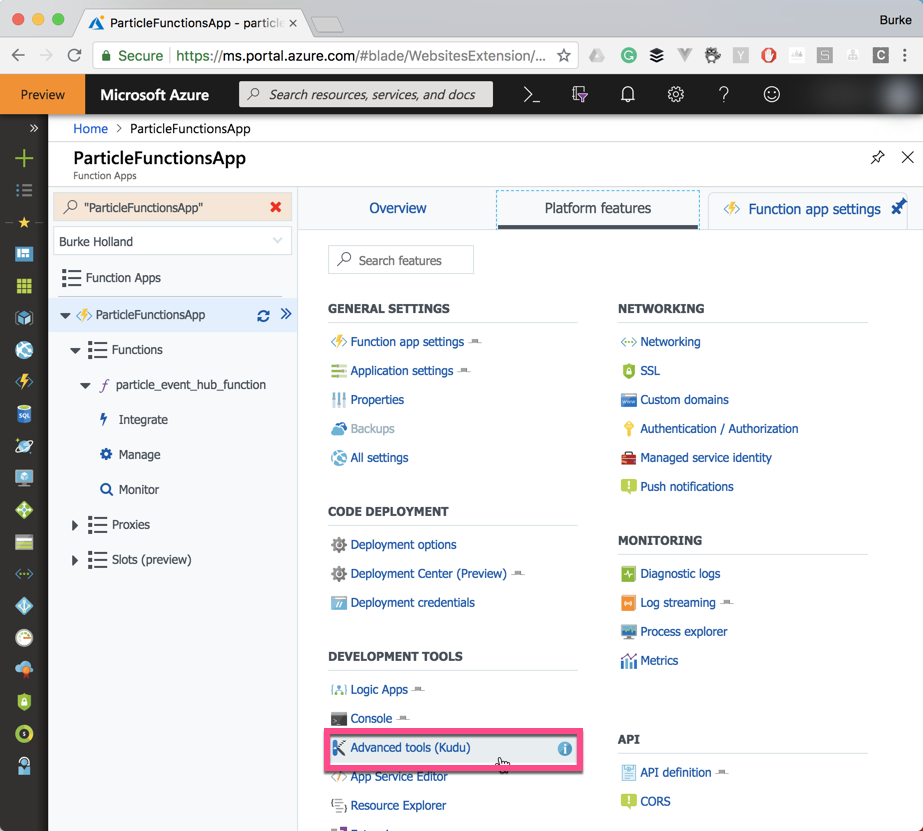
httppackage in Node is verbose and tedious, so we're going to install theparticle-api-jsnpm package.Select the main Function App in the sidebar and then select the "Platform features" option.
Select the "Advanced Tools (Kudu)" option.
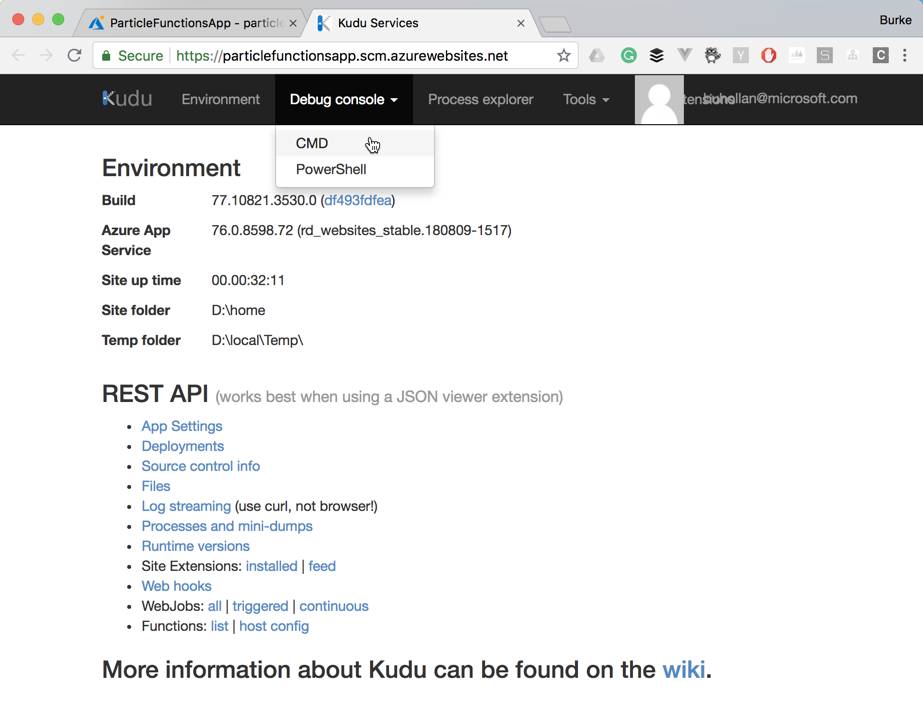
Select the "Debug Console" and the "CMD" options.
In the prompt that comes up, switch to the
site/wwwrootdirectorycd site/wwwroot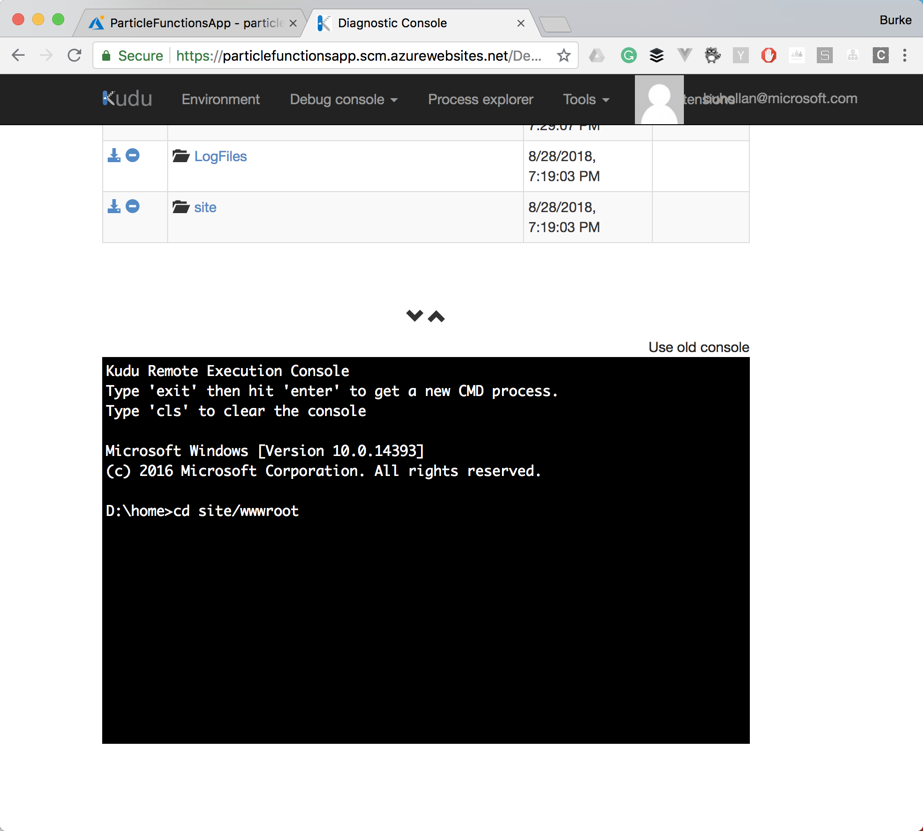
We want to install the
requestpackage from npm that will make our HTTP request a lot easier. Type the following in the prompt...npm install particle-api-jsThis will install the
particle-api-jsnpm package into your Azure Functions project. It can take a few minutes to finish. It will report an error about there being nopackage.jsonfile, but this is ok. The package is still installed.
Close the tab for the Kudu tools to return to the original Functions project.
Now we're ready to make a request to change the color of the LED. To do that, you are going to need your Particle token.
Open a browser tab and navigate to the Particle IDE at build.particle.com

Return to the original Functions project and include the
particle-api-jspackage at the top of the project.var Particle = require('particle-api-js');Now create a new instance of the Particle API inside of the
module.exportsline.var Particle = require('particle-api-js'); module.exports = function(context, IoTHubMessages) { var particle = new Particle(); context.log( `JavaScript eventhub trigger function called for message array: ${IoTHubMessages}` ); IoTHubMessages.forEach(message => { context.log(`Processed message: ${message}`); }); context.done(); };Now you need to send an event to the Photon to change the light color. It looks like this...
particle
.publishEvent({
  name: 'setLED',
  data: 'ff0000',
  isPrivate: true,
  auth: '[YOUR ACCESS KEY HERE]'
})
.then(
  function(data) {
    if (data.body.ok) {
      context.log('Event published succesfully');
    }
  },
  function(err) {
    context.log('Failed to publish event: ' + err);
  }
);
Add this code to your function inside of the loop that checks our IoTHub Messages.
var Particle = require('particle-api-js');

module.exports = function(context, IoTHubMessages) {
var particle = new Particle();

context.log(
  `JavaScript eventhub trigger function called for message array: ${IoTHubMessages}`
);

IoTHubMessages.forEach(message => {
  context.log(`Processed message: ${message}`);

  particle
    .publishEvent({
      name: 'setLED',
      data: 'ff0000',
      isPrivate: true,
      auth: '[YOUR ACCESS KEY HERE]'
    })
    .then(
      function(data) {
        if (data.body.ok) {
          context.log('Event published succesfully');
        }
      },
      function(err) {
        context.log('Failed to publish event: ' + err);
      }
    );
});

context.done();
};
That should turn your LED red. Now evaluate the incoming message to see if your temp is less than 90. If so, turn it blue. If it's greater than 90, make it red. Here is the complete code.
var Particle = require('particle-api-js');

module.exports = function(context, IoTHubMessages) {
context.log(
  `JavaScript eventhub trigger function called for message array: ${IoTHubMessages}`
);

var particle = new Particle();

IoTHubMessages.forEach(message => {
  // set the color to blue
  let hex = '336699';

  // if the temp
  if (message.data > 80) {
    hex = 'ff0000';
  }

  particle
    .publishEvent({
      name: 'setLED',
      data: hex,
      isPrivate: true,
      auth: '210c758918922015c2f98f3155743a9c2fb68567'
    })
    .then(
      function(data) {
        if (data.body.ok) {
          context.log('Event published succesfully');
        }
      },
      function(err) {
        context.log('Failed to publish event: ' + err);
      }
    );
});

context.done();
};