
Finite State Machines
Finite State Machines (FSM) are a great way to organize your code on embedded devices. The basic concepts are:
- Each step is organized into a state, with defined exit conditions that cause it to transfer to other state(s).
- State handlers should return quickly, rather than blocking.
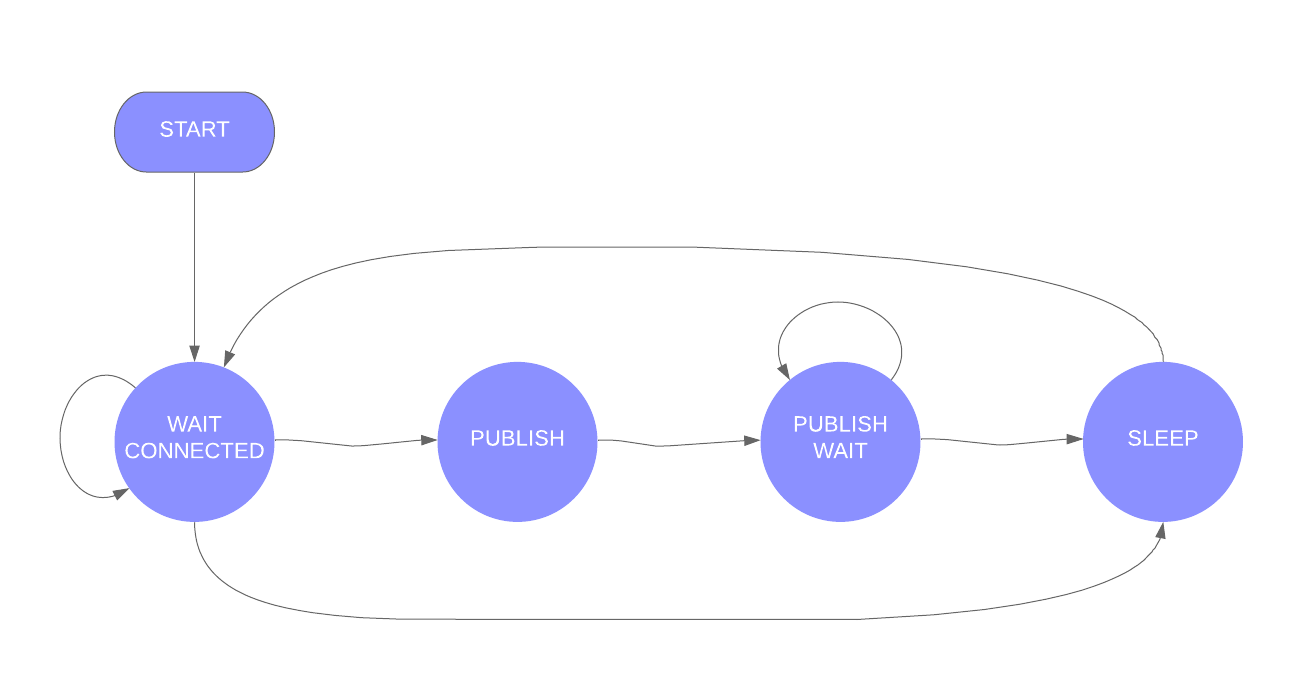
Our simple example here has four states:
In reality, this example is so simple you could do it linearly, with blocking. That's example 02-Linear, but as you get more complicated code a finite state machine can keep your code simpler and easier to understand.
While this example only has a single state machine, where they really shine is when you need to handle multiple state machines. For example, something like a web server on a Photon. You really have one state machine that's accepting new connections, and one for each concurrent connection. Doing that linearly would be crazy!
You can download the files associated with this app note as a zip file.
01-Simple
This is the simplest example of a state machine, which we'll walk through:
This is just the standard stuff to set the modes:
#include "Particle.h"

#ifndef SYSTEM_VERSION_v620
SYSTEM_THREAD(ENABLED); // System thread defaults to on in 6.2.0 and later and this line is not required
#endif
SYSTEM_MODE(SEMI_AUTOMATIC);
It's best to use the log handler instead of directly writing to the serial port. In addition to adding thread safety and timestamps, it also makes it easy to switch between Serial1 (TX/RX) and Serial (USB). When debugging sleep mode, it's better to use TX and an external TTL serial to USB serial converter (FT232) because the USB serial port disconnects when the device goes to sleep and takes a while to reconnect (especially under Windows). Using an external USB serial converter keeps the USB serial connection up even when the device is in sleep mode.
But to switch between the two, you just need to comment out one line or the other here:
Serial1LogHandler logHandler(115200);
// SerialLogHandler logHandler;
These are our configurable parameters. This uses Chrono Literals which is a great feature of Device OS 1.5.0 and later. Instead of setting 6 minutes in milliseconds (360000 or 6 60 1000), you can just use 6min. You can also use 30s for seconds. Or 2h for hours.
// This is the maximum amount of time to wait for the cloud to be connected in
// milliseconds. This should be at least 5 minutes. If you set this limit shorter,
// on Gen 2 devices the modem may not get power cycled which may help with reconnection.
const std::chrono::milliseconds connectMaxTime = 6min;

// How long to sleep
const std::chrono::seconds sleepTime = 1min;

// Maximum time to wait for publish to complete. It normally takes 20 seconds for Particle.publish
// to succeed or time out, but if cellular needs to reconnect, it could take longer, typically
// 80 seconds. This timeout should be longer than that and is just a safety net in case something
// goes wrong.
const std::chrono::milliseconds publishMaxTime = 3min;
These are the state numbers. In an enum, the values are sequential, so STATE_PUBLISH is 1.
// These are the states in the finite state machine, handled in loop()
enum State {
    STATE_WAIT_CONNECTED = 0,
    STATE_PUBLISH,
    STATE_PUBLISH_WAIT,
    STATE_SLEEP
};
These are two state machine variables. One is the current state, which is one of the enumerated constants above. The other is a generic millis value that we use to time certain operations.
// Global variables
State state = STATE_WAIT_CONNECTED;
unsigned long stateTime;
A few more global variables. We'll talk about publishFuture more below, but it's a technique for using Particle.publish() asynchronously (non-blocking) while still getting the success or failure indication.
// The publishFuture is used to find out when the publish completes, asynchronously
particle::Future<bool> publishFuture;

// A buffer to hold the JSON data we publish.
char publishData[256];
Our setup() function. Since we used SEMI_AUTOMATIC mode we connect in setup(). Also remember the millis() value when we started up. This will be pretty close to 0.
void setup() {
    Cellular.on();
    Particle.connect();
    stateTime = millis();
}
Our loop() function. This example uses a big switch statement, based on the state number. There are other techniques that you may prefer in the other examples, including:
ifstatements instead ofswitchswitchbut with a separate function for each state- Using function pointers instead of state numbers
- Using a separate class
These will be described below.
For the specific state, STATE_WAIT_CONNECTED, it does the following:
- If the connection to the cloud has been established, go into
STATE_PUBLISHstate. - If it's taken too long to connect (based on the value of
connectMaxTime) go intoSTATE_SLEEPstate. - Otherwise hang out in this state.
void loop() {
    switch(state) {
        case STATE_WAIT_CONNECTED:
            // Wait for the connection to the Particle cloud to complete
            if (Particle.connected()) {
                Log.info("connected to the cloud in %lu ms", millis() - stateTime);
                state = STATE_PUBLISH;
            }
            else
            if (millis() - stateTime >= connectMaxTime.count()) {
                // Took too long to connect, go to sleep
                Log.info("failed to connect, going to sleep");
                state = STATE_SLEEP;
            }
            break;
The next state is STATE_PUBLISH. This just makes up some JSON data by reading an analog value from pin A0, the publishes it.
Note the result of Particle.publish() is stored in the publishFuture global variable. This is a particle::Future<bool>, not a plain bool. What's the difference?
Particle.publish() normally returns a bool indicating whether the publish succeeded or not. This is especially useful when also using WITH_ACK to make sure the cloud received the publish. However, this is a little annoying because it blocks until complete. This normally can take up to 20 seconds, but might take up to 5 minutes!
By storing the value in a Future instead of a bool, the Particle.publish() will still be able to find out the value, but in the future, without blocking!
We always go into STATE_PUBLISH_WAIT state next to wait for the result to come in.
        case STATE_PUBLISH:
            {
                // This is just a placeholder for code that you're write for your actual situation
                int a0 = analogRead(A0);

                // Create a simple JSON string with the value of A0
                snprintf(publishData, sizeof(publishData), "{\"a0\":%d}", a0);
            }

            Log.info("about to publish %s", publishData);

            publishFuture = Particle.publish("sensorTest", publishData, PRIVATE | WITH_ACK);
            state = STATE_PUBLISH_WAIT;
            stateTime = millis();
            break;
In STATE_PUBLISH_WAIT we wait until the Particle.publish() call completes. Because the call is asynchronous, we also have an opportunity to have an additional timeout.
There are two parts to the future of interest:
publishFuture.isDone()is true when theParticle.publish()call would have returned.publishFuture.isSucceeded()istrueif the publish succeed. It isfalseif the publish failed. This should only be checked afterisDone()istrue.
        case STATE_PUBLISH_WAIT:
            // When checking the future, the isDone() indicates that the future has been resolved,
            // basically this means that Particle.publish would have returned.
            if (publishFuture.isDone()) {
                // isSucceeded() is whether the publish succeeded or not, which is basically the
                // boolean return value from Particle.publish.
                if (publishFuture.isSucceeded()) {
                    Log.info("successfully published %s", publishData);
                    state = STATE_SLEEP;
                }
                else {
                    Log.info("failed to publish, will discard sample");
                    state = STATE_SLEEP;
                }
            }
            else
            if (millis() - stateTime >= publishMaxTime.count()) {
                Log.info("failed to publish, timed out, will discard sample");
                state = STATE_SLEEP;
            }
            break;
The final state is STATE_SLEEP. We put the device into stop mode sleep in this state, for the length of time specified in sleepTime.
Upon waking up from sleep, we go into STATE_WAIT_CONNECTED state. We'll almost always still be connected, but going into this state will catch a few fringe cases.
        case STATE_SLEEP:

            Log.info("going to sleep for %ld seconds", (long) sleepTime.count());

            {
                // This is the equivalent to:
                // System.sleep(WKP, RISING, SLEEP_NETWORK_STANDBY);

                SystemSleepConfiguration config;
                config.mode(SystemSleepMode::STOP)
                    .gpio(WKP, RISING)
                    .duration(sleepTime)
                    .network(NETWORK_INTERFACE_CELLULAR);

                SystemSleepResult result = System.sleep(config);
            }

            Log.info("woke from sleep");

            state = STATE_WAIT_CONNECTED;
            stateTime = millis();
            break;
    }
}
02-Linear
This example just shows what the code would look like if we didn't use a state machine. For a simple example like this it may look cleaner, but as your code gets more complex it can get unwieldy quickly!
One example of the subtle gotchas that can occur: Say you decide to enable the ApplicationWatchdog. In each of the two inner delay loops you'd also have to add a call to checkin() otherwise the device could end up resetting if it was having trouble connecting. That's not necessary in the state machine examples because the code returns from loop() frequently.
03-If-Statement
This is basically the same as the 01-Simple example except if uses an if statement instead of switch.
void loop() {
    if (state == STATE_WAIT_CONNECTED) {
        // Wait for the connection to the Particle cloud to complete
        if (Particle.connected()) {
            Log.info("connected to the cloud in %lu ms", millis() - stateTime);
            state = STATE_PUBLISH;
        }
        else
        if (millis() - stateTime >= connectMaxTime.count()) {
            // Took too long to connect, go to sleep
            Log.info("failed to connect, going to sleep");
            state = STATE_SLEEP;
        }
    }
    else
    if (state == STATE_PUBLISH) {
It's mostly just a matter of preference.
04-Case-Function
While this example is pretty simple, you can imagine if you have a complex program, putting everything in loop() with a switch or if statement can get unwieldy!
One common solution to this is to separate every state out into a separate function.
void loop() {
    switch(state) {
        case STATE_WAIT_CONNECTED:
            stateWaitConnected();
            break;

        case STATE_PUBLISH:
            statePublish();
            break;

        case STATE_PUBLISH_WAIT:
            statePublishWait();
            break;

        case STATE_SLEEP:
            stateSleep();
            break;
    }
}


void stateWaitConnected() {
    // Wait for the connection to the Particle cloud to complete
    if (Particle.connected()) {
        Log.info("connected to the cloud in %lu ms", millis() - stateTime);
        state = STATE_PUBLISH;
    }
    else
    if (millis() - stateTime >= connectMaxTime.count()) {
        // Took too long to connect, go to sleep
        Log.info("failed to connect, going to sleep");
        state = STATE_SLEEP;
    }

}
05-Function-Pointer
One annoyance of the 04-Case-Function example is that every time you add a new state you need to add an enum value, a case in the switch statement, and a function.
One solution to this is to just dispense with the enum and use function pointers. This is used instead of the State variable in the previous examples.
typedef void (*StateHandler)();

StateHandler stateHandler = stateWaitConnected;
Now the only thing in loop() is:
void loop() {
    stateHandler();
}
Disadvantage of this are that you can't easily print the state number to your debug log. You also can't increment state to go to the next state.
06-Class
This is the method I prefer. It uses a style similar to the 05-Function-Pointer but instead of using plain C++ functions, use C++ class members!
06-Class.cpp
This really empties out the main source file!
#include "MainStateMachine.h"

#ifndef SYSTEM_VERSION_v620
SYSTEM_THREAD(ENABLED); // System thread defaults to on in 6.2.0 and later and this line is not required
#endif
SYSTEM_MODE(SEMI_AUTOMATIC);

Serial1LogHandler logHandler(115200);

MainStateMachine mainStateMachine;

void setup() {
    mainStateMachine.setup();
}

void loop() {
    mainStateMachine.loop();
}
MainStateMachine.h
We have a new header file MainStateMachine.h. Here's what's in it:
You normally declare the MainStateMachine as a global variable in your main source file. You should avoid doing much in the constructor, as there are limitations on what is safe at global object construction time.
Instead, you do most setup in the setup() method, which you call from the application setup(). Same with loop().
class MainStateMachine {
public:
    MainStateMachine();
    virtual ~MainStateMachine();

    void setup();
    void loop();
In this example we have these methods to override the default values. You use them fluent-style.
    MainStateMachine &withConnectMaxTime(std::chrono::milliseconds connectMaxTime) { this->connectMaxTime = connectMaxTime; return *this;};

    MainStateMachine &withSleepTime(std::chrono::seconds sleepTime) { this->sleepTime = sleepTime; return *this;};

    MainStateMachine &withPublishMaxTime(std::chrono::milliseconds publishMaxTime) { this->publishMaxTime = publishMaxTime; return *this;};
You use these like this in your main application file:
void setup() {
    mainStateMachine
        .withConnectMaxTime(10min)
        .withSleepTime(30min)
        .setup();
}
You can chain zero or more of these and then call setup() with the changed values.
There are also class member definitions for each of our states:
protected:
    void stateWaitConnected();
    void statePublish();
    void statePublishWait();
    void stateSleep();
And this scary looking definition! This declares stateHandler to be a class member function instead of a plain C++ function.
std::function<void(MainStateMachine&)> stateHandler = 0;
MainStateMachine.cpp
The MainStateHander.cpp file has as few interesting features.
This Logger statement allows the log statements in this file to be tagged and adjustable.
static Logger log("app.msm");
Note the app.msm (Main State Machine) log statements in the serial log:
0000018272 [app.msm] INFO: woke from sleep
0000018273 [app.msm] INFO: connected to the cloud in 0 ms
0000018276 [app.msm] INFO: about to publish {"a0":1606}
0000018512 [app.msm] INFO: going to sleep for 60 seconds
0000018557 [comm.protocol] INFO: Posting 'S' describe message
0000018656 [comm.dtls] INFO: session cmd (CLS,DIS,MOV,LOD,SAV): 4
0000018665 [comm.dtls] INFO: session cmd (CLS,DIS,MOV,LOD,SAV): 3
0000018665 [comm.protocol] INFO: rcv'd message type=1
Using logging categories you can also set the level level for these messages independently of other messages.
The only thing you need to remember to do is use log.info() (lower case l in log) instead of Log.info(). Of course you can use other things like log.trace(), log.error(), etc. as well as using sprintf-style formatting.
void MainStateMachine::setup() {
    log.info("MainStateMachine::setup()");

    Cellular.on();
    Particle.connect();
The other thing is how you need to specify the state handler class member function. It really does need to be written like that, or it won't work.
    stateTime = millis();
    stateHandler = &MainStateMachine::stateWaitConnected;
}
The loop function looks like this and calls the state handler member function (if not null). The *this parameter is necessary because it's a non-static class member function, so it needs to have this (the class instance) available to it.
void MainStateMachine::loop() {
    if (stateHandler) {
        stateHandler(*this);
    }
}
The rest of the code should look similar to the other examples (except for the weird syntax for setting stateHandler):
void MainStateMachine::stateWaitConnected() {
    // Wait for the connection to the Particle cloud to complete
    if (Particle.connected()) {
        log.info("connected to the cloud in %lu ms", millis() - stateTime);
        stateHandler = &MainStateMachine::statePublish;
        stateTime = millis();
    }
    else
    if (millis() - stateTime >= connectMaxTime.count()) {
        // Took too long to connect, go to sleep
        log.info("failed to connect, going to sleep");
        stateHandler = &MainStateMachine::stateSleep;
    }
}