


 Go to console

 Change theme


 Edit Account
 Logout
Muon setup
This page walks you through unboxing and assembling a Muon carrier board with an M-SoM or B-SoM. By the end, the Muon will be powered up and ready to add to your Particle account.
Unboxing
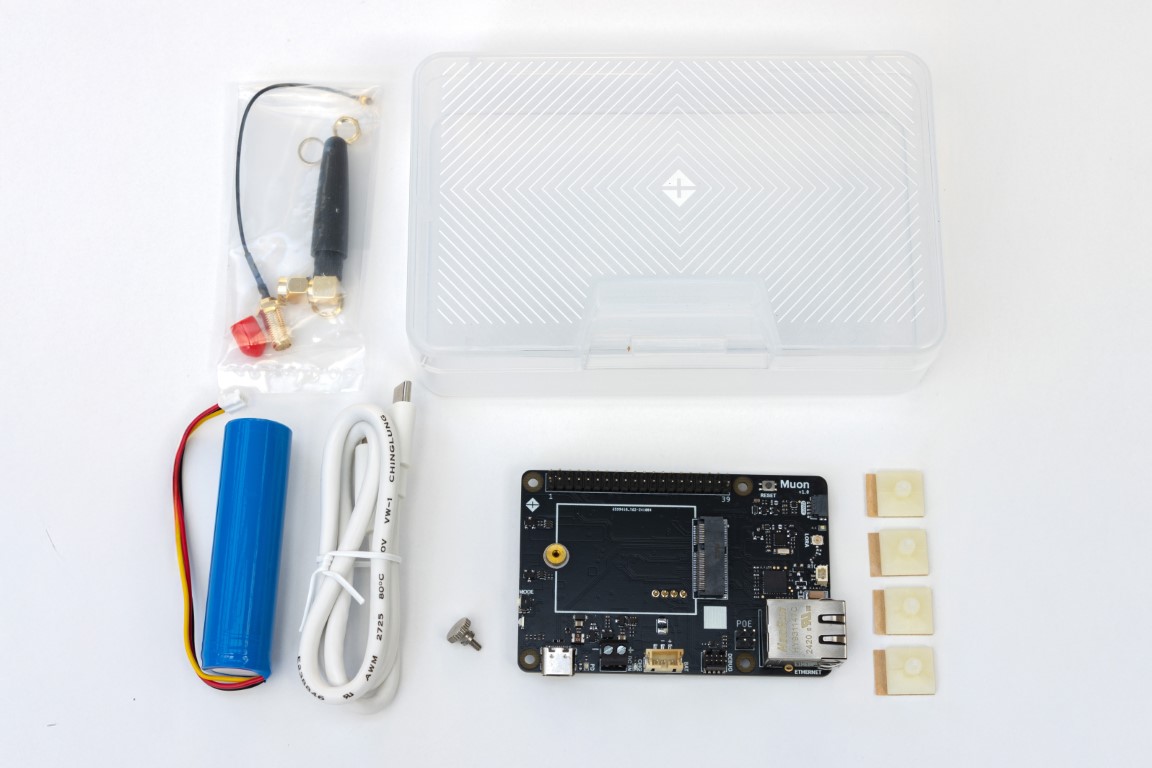
You can purchase the Muon as a carrier board only (MUONCB), as a kit (MUONCBKIT), or together with an M-SoM. This page uses the Muon Kit as the reference. Carefully remove each component from the packaging. The kit contains:
- Muon carrier board
- Plastic case for easy prototype setup
- LoRaWAN antenna
- USB 2.0 Type-C to Type-C PD cable
- SMA female to IPEX MHF1 cable
- Single-cell 3250 mAh battery with a 3-pin connector
- Standoffs
To complete your setup, you also need a B-SoM or M-SoM module, which includes:
- M-SoM or B-SoM
- Cellular antenna
- Optional Wi-Fi/BLE antenna
- Optional GNSS antenna
Note:
The Muon and M-SoM can also be purchased together as a combined kit.
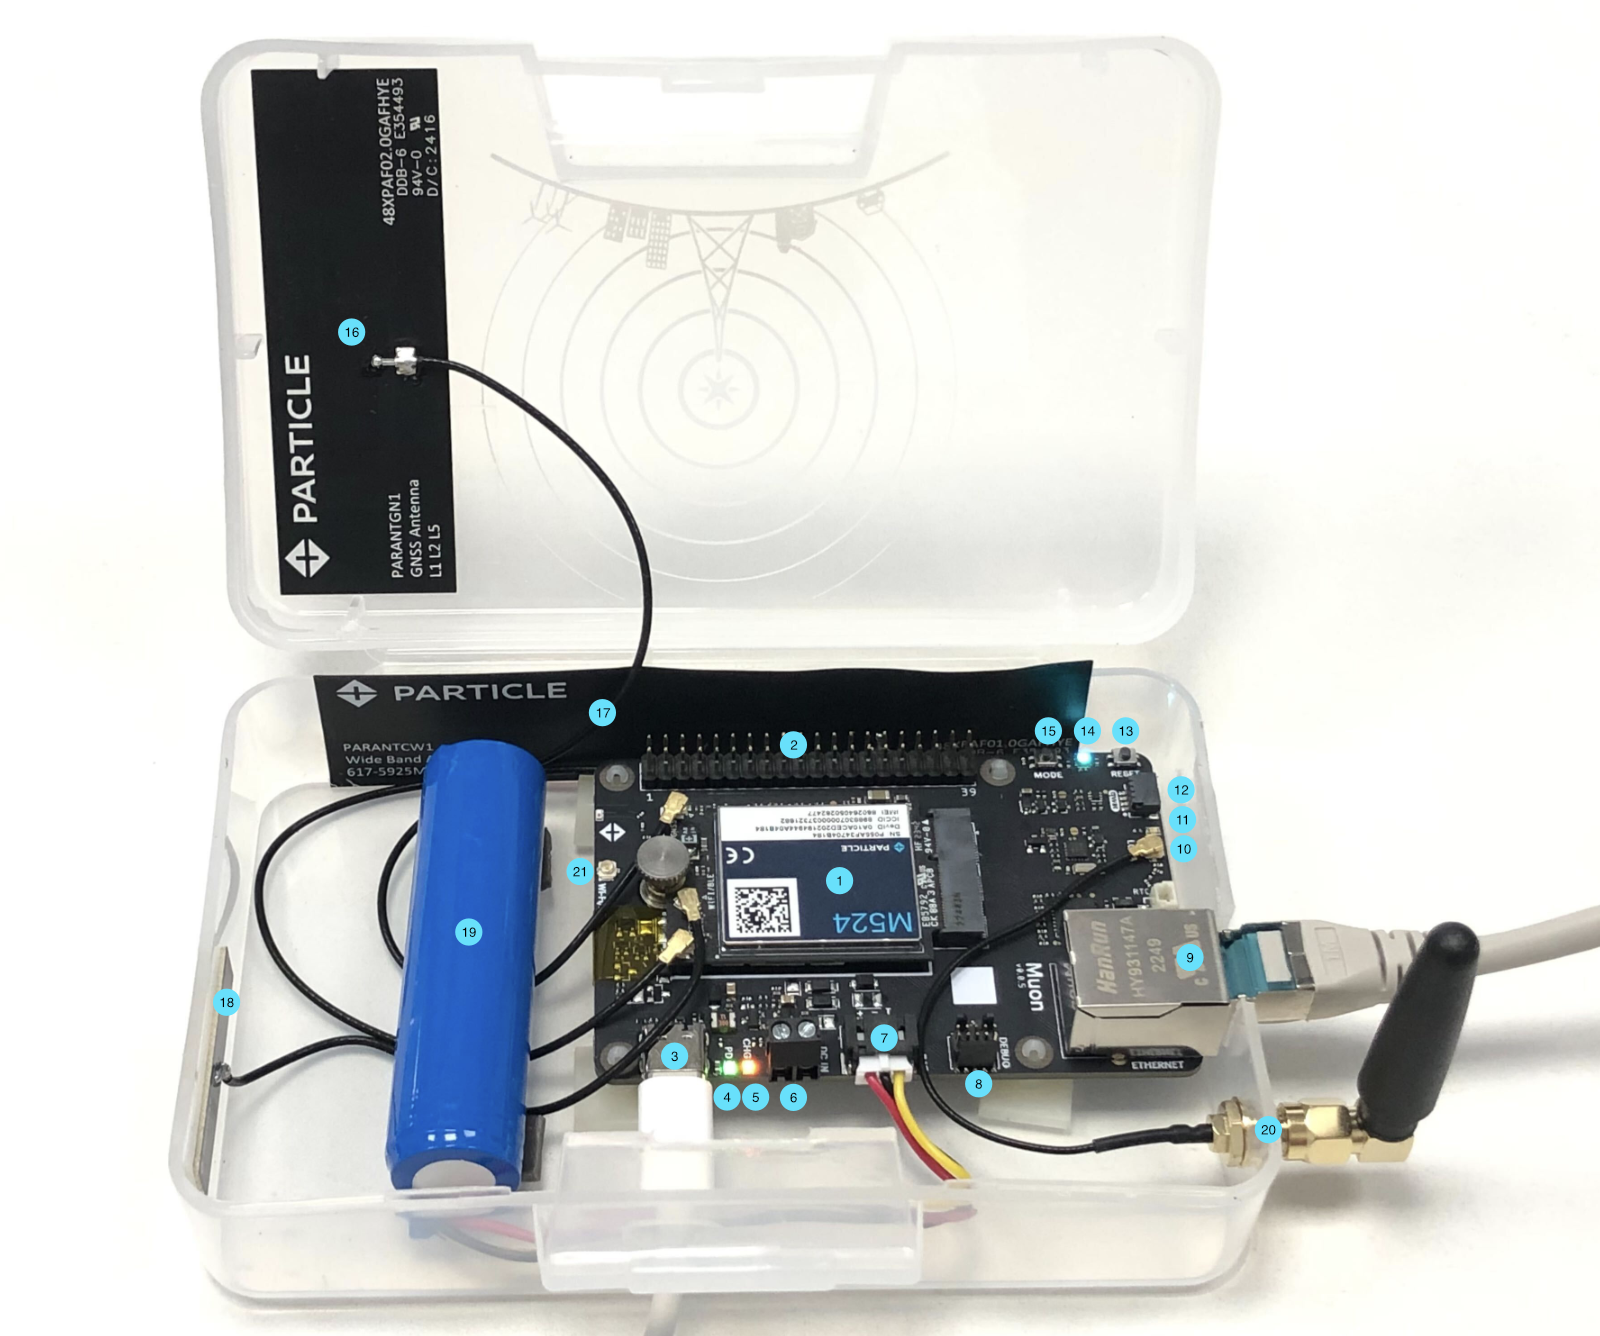
Here's a labeled diagram of the Muon with an M-SoM and all of the accessories:
| Label | Feature |
|---|---|
| 1 | M-SoM |
| 2 | Expansion connector |
| 3 | USB-C |
| 4 | USB power LED ("PD") |
| 5 | Charge LED ("CHG") |
| 6 | VIN (6 - 12 VDC) |
| 7 | LiPo battery connector (3-pin) |
| 8 | SWD/JTAG debugging connector |
| 9 | Ethernet RJ-45 connector |
| 10 | LoRaWAN antenna |
| 11 | LoRaWAN status LED |
| 12 | Qwiic (3.3V I2C) connector |
| 13 | RESET button |
| 14 | RGB status LED |
| 15 | MODE button |
| 16 | GNSS antenna |
| 17 | Cellular antenna |
| 18 | Wi-Fi/BLE antenna |
| 19 | LiPo battery with temperature sensor |
| 20 | LoRa antenna connector (SMA) |
| 21 | Muon Wi-Fi/BLE connector |
The Muon box doubles as a project enclosure, but you'll need to make a few modifications. If you plan to use it long-term, you'll need to drill or cut holes to route connectors or secure components. To get started quickly, remove the components and assemble them on your desk.
Assemble the Muon
You can assemble the components on your desk using the configuration in the diagram above. At a minimum, make sure:
- The SoM is installed in the M.2 socket and secured with the screw post.
- The cellular antenna (label 17) is attached. It must be connected before you power up the device. If you are using a module with Wi-Fi/BLE, also connect the Wi-Fi/BLE antenna (label 18).
- The USB-C cable is connected to your computer, for power and programming.
All other accessories are optional and are not needed for initial setup.
A few notes on the connectors:
- The battery only fits in one direction. A keyed guide prevents incorrect insertion, so gently align and insert it. To remove it, carefully pull straight back.
- The USB-C connector is reversible, so there is no wrong way up.
Powering the Muon
The Muon can boot and operate using just the USB-C connection, which is useful for early development and testing. There are three ways to power it:
- USB-C port: Connect this directly to your computer to power the board and program the device. It also charges the battery when the system is running.
- LiPo battery connector: A standard 3-pin connector for a LiPo battery. It is not required for setup or development, but it is useful for mobile operation.
- 5V power in (via expansion/HAT): Power can also be provided through a HAT or breakout board, commonly from a 12 - 24 VDC supply converted down. This input can charge the battery as well.
Warning:
To power the Muon by USB, you must use a USB-C to USB-C connection from a USB-C port or a USB-C PD power adapter. A USB-A to USB-C cable will not work because it cannot deliver the required voltage or current.
The Muon uses USB Power Delivery (PD) to request 9V and adequate current from the host. Most USB-A ports and USB-A to USB-C cables are limited to 5V. Also beware of wall adapters labeled as "Raspberry Pi" power supplies. Many of these only support 5V and do not support USB-C PD, making them incompatible with the Muon.
Add to your account
To add the device to your account and install the latest Device OS, go to setup.particle.io in a Chromium-based browser such as Chrome, Edge, or Opera. The setup tool uses WebUSB, so Safari and Firefox are not supported.
The guided setup will:
- Sign you in, or create a Particle account if you do not have one yet
- Install the latest Device OS over USB
- Install and activate the SIM profiles, and optionally configure Wi-Fi
- Let you assign the device to a product, or use your sandbox if you're an individual developer, and optionally give it a name
This takes about 3 - 5 minutes. When setup completes, the device boots, connects to the network, and then connects to the Particle cloud. The first cellular registration can take up to 5 minutes as the device negotiates with the network and activates the eSIM profile.
Next steps
Once setup is complete, continue with the getting started guide to explore the Particle console and program your device.