Tracker setup
Hardware setup
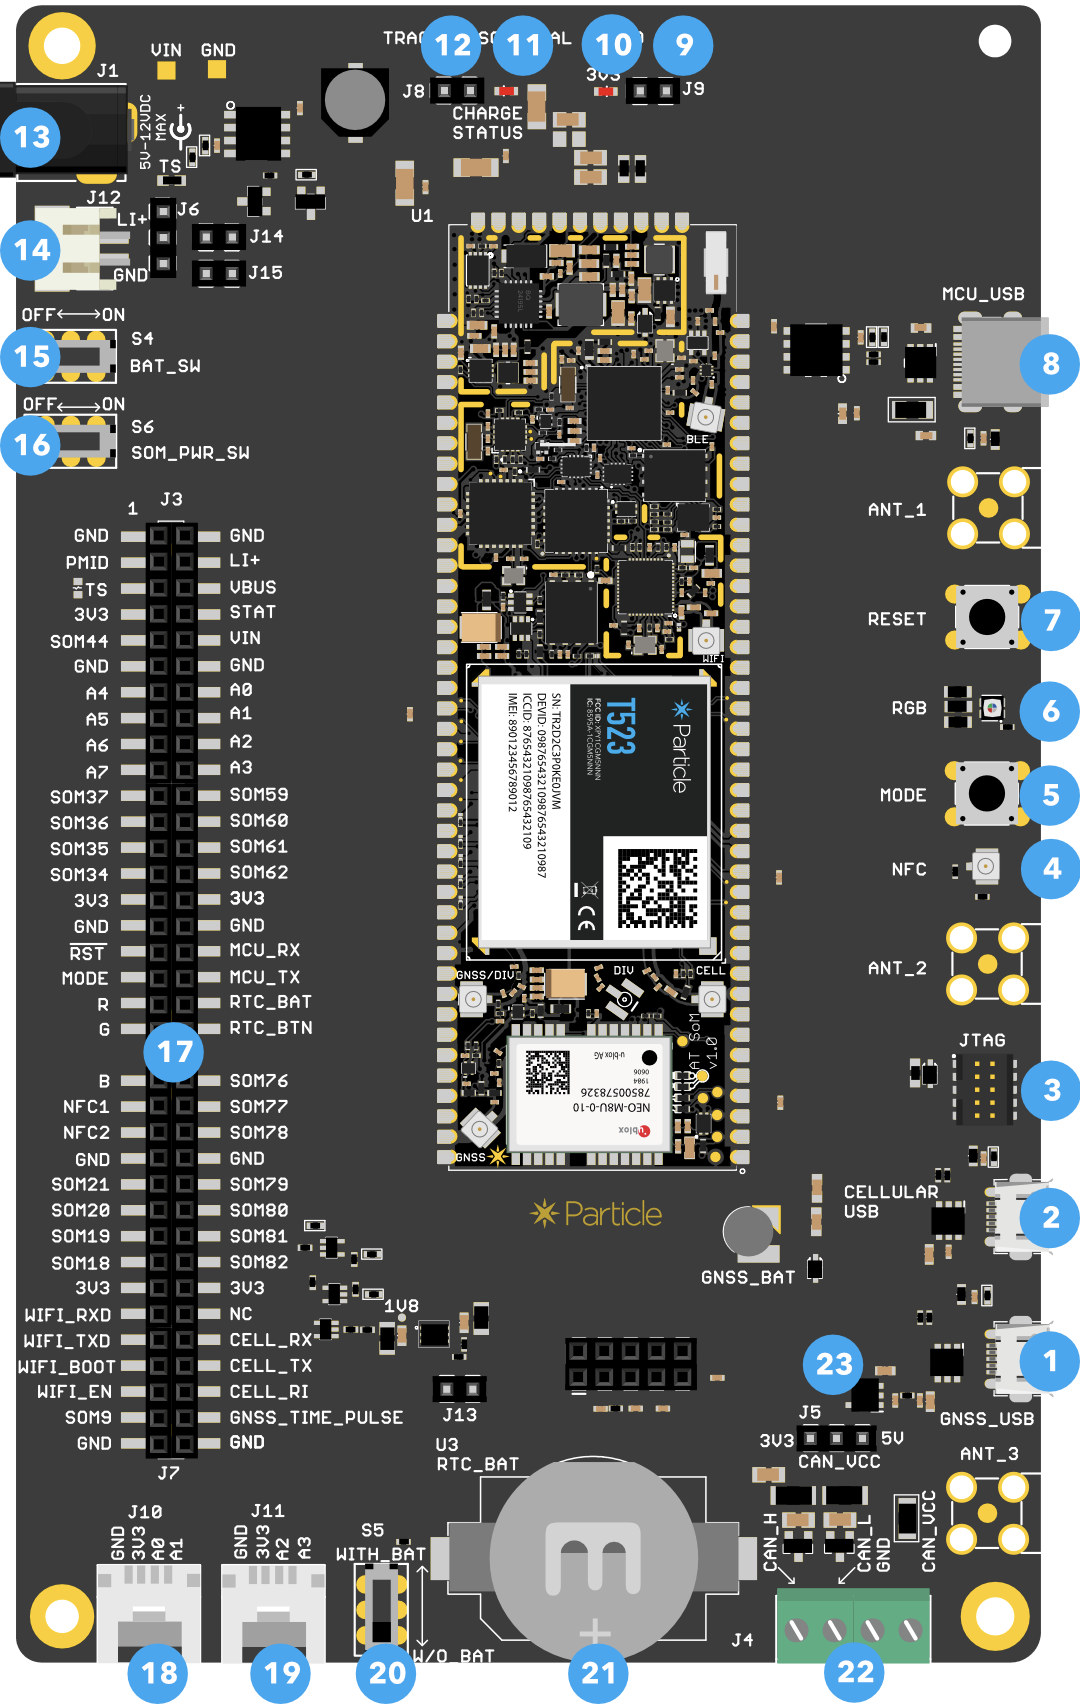
Tracker evaluation board
| Num | ID | Description |
|---|---|---|
| 1 | GNSS USB | u-blox GNSS USB connection |
| 2 | CELL USB | Quectel cellular modem USB connection |
| 3 | JTAG | JTAG/SWD debugging connector for nRF52 MCU |
| 4 | NFC | NFC antenna connection for NFC tag feature |
| 5 | MODE | MODE button |
| 6 | RGB | RGB status LED |
| 7 | RESET | RESET button |
| 8 | MCU USB | nRF52 MCU USB-C for debugging or power. |
| 9 | J8 | 3V3 LED jumper. Normally installed, remove to disable 3V3 LED. |
| 10 | 3V3 LED | Power LED, indicates 3.3V supply is enabled. |
| 11 | STAT LED | Charge status indicator. |
| 12 | J9 | STAT LED jumper. Normally installed, remove to disable STAT LED. |
| 13 | VIN | External power 5-12 VDC |
| 14 | LiPo | JST-PH connector for LiPo battery |
| 15 | S4 | Battery switch |
| 16 | S6 | SoM power switch |
| 17 | Expansion connector | |
| 18 | J10 | Grove connector (A0, A1 or I2C) |
| 19 | J11 | Grove connector (A2, A3) |
| 20 | S5 | RTC battery switch |
| 21 | RTC battery | Optional battery |
| 22 | J4 | CAN data connection and 3.3V power output |
| 23 | J5 | CAN power jumper (selects 3.3V or 5V) |
Antennas
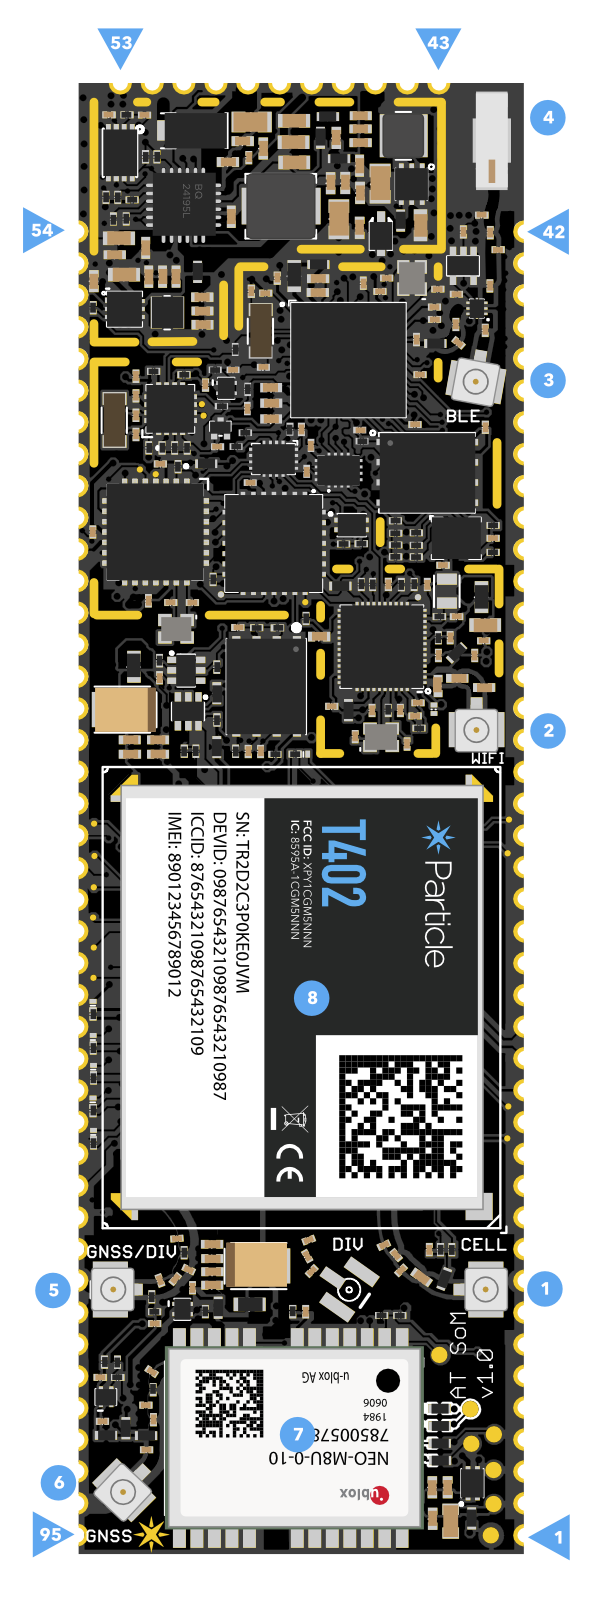
The Tracker SoM Evaluation board requires several external antennas that connect to the Tracker SoM directly:
- Cellular antenna (1)
- GNSS antenna (6)
- Wi-Fi antenna (2) (optional, needed for Wi-Fi geolocation)
| Label | Purpose |
|---|---|
| 1 | Quectel cellular modem antenna |
| 2 | Wi-Fi antenna for Wi-Fi geolocation (optional) |
| 3 | External Bluetooth (optional) |
| 4 | Built-in Bluetooth chip antenna |
| 5 | Quectel GNSS antenna (optional) |
| 6 | u-blox GNSS antenna (GPS) |
| 7 | u-blox Neo M8 GNSS (GPS) |
| 8 | Quectel cellular modem |
Powering
- Connect the LiPo battery to the battery connector (14).
- Connect the Tracker Evaluation board to your computer by USB. Use the included USB-C to USB-A cable, or a if your computer includes a USB-C port, your own USB-C to USB-C cable and connect to the MCU_USB connector (8).
- Turn on the SoM Power (16) switch and the Battery switch (15).
Status LEDs
The STAT LED (9) indicates the charge status:
- Off: Not charging or no power
- On: Charging
- Blinking: Charge fault
- Flickering: No battery
The 3V3 LED (11) indicates that the 3.3V MCU power supply is enabled. Jumper J8 disconnects the power LED.
The RGB LED (6) can be configured for the standard Particle color scheme (blinking green, blinking cyan, breathing cyan) or the color scheme used by the Tracker One.
The standard LED pattern for Tracker SoM Evaluation Boards devices is the standard Particle LED scheme (blinking green, breathing cyan). You can find more information here.
Tracker One
Powering
- Connect the Tracker One to your computer by USB. Use the included USB-C to USB-A cable, or a if your computer includes a USB-C port, your own USB-C to USB-C cable and connect to the external USB C connector.
- Power by the M8 connector.
- Connecting power will take the device out of shipping mode. The shipping mode allows the device to be safely shipped with the battery attached and without discharging the battery. It can only be exited by supplying external power.
Status LEDs
The standard LED pattern for Tracker One devices is:
- Fast breathing red while trying to connect to cellular.
- Once connected to cellular, will show relative signal strength of yellow (weaker), or green (stronger).
- Breathing signal strength color indicator while connecting to the cloud (yellow or green)
- Solid signal strength indicator (yellow/green) once connected.
You can find more information here.
Powering off
The Tracker One does not have a power switch. You can turn it off from the cloud by using Shipping Mode.
When viewing a device in the console, in the functions and variables area on the right, is the cmd box.
In this box, enter {"cmd":"enter_shipping"} and click the Call button.
Shipping mode powers off the device by disconnecting the battery. This allows a Tracker One to be shipped in a way that the battery does not discharge without having to open the case and disconnect the battery. Note that you can only get out of shipping mode by connecting the device to USB power or power by the M8 connector.
On a successful cmd request, the result is 0. A result of -22 indicates the JSON is invalid. Be sure that you've included the surrounding curly brackets {} and the double quotes are the "straight quotes" not the “typographical quotes.”
In the future, it will also be possible to enter shipping mode by USB, but this command is not yet available in the Particle CLI.
Warning: Particle has discovered an issue with GPIO current leakage through Tracker One's M8 connector that affects Tracker One v1.0 devices manufactured prior to August 31, 2020 and can adversely affect the use of shipping mode for devices that use the M8 connection to an external peripheral device. For more information see TAN002 - Tracker One v1.0 Shipping Mode.
Resetting configuration
To reset all of the settings stored locally on device, use the same techique as above to call the cmd function handler, but instead pass:
{"cmd":"reset_to_factory"}
Other functions
Other functions that would normally be performed by button presses can be done using the Particle CLI when connected by USB. For example:
particle usb reset
particle usb dfu
particle usb safe-mode
particle usb start-listening
particle usb stop-listening
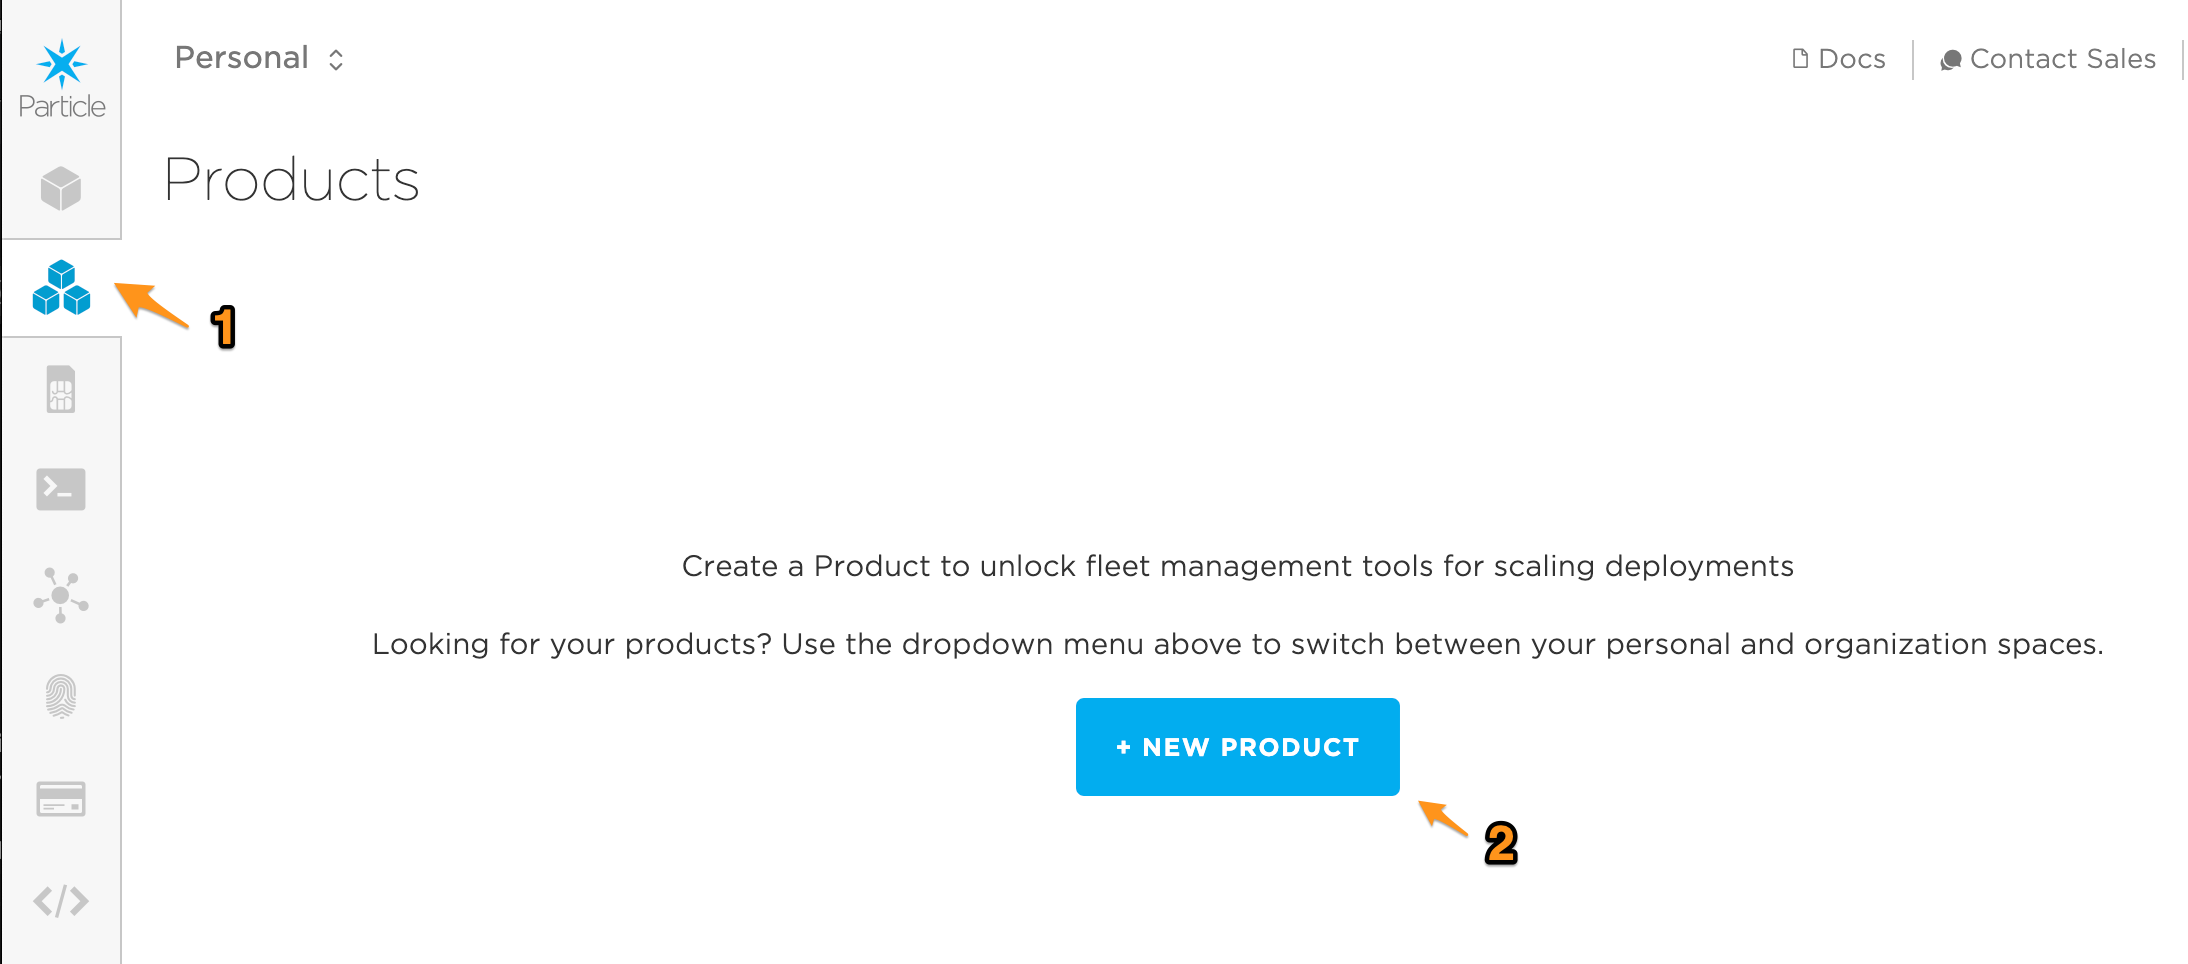
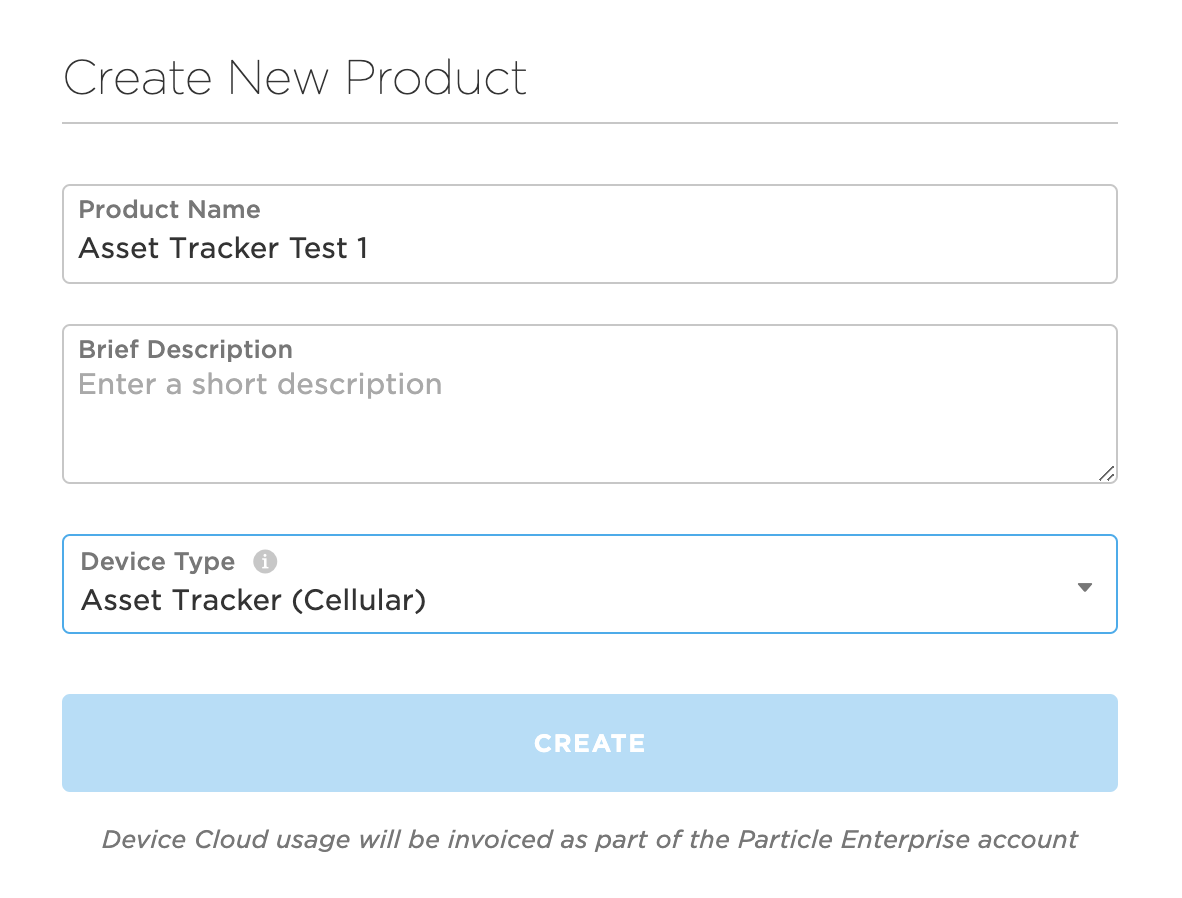
Setup
To set up your device, go to https://setup.particle.io. This will guide you through the steps needed to activate your SIM and set up your device.
If you prefer to manually set up your device, click on the triangle to open the manual setup instructions:


Device firmware
One difference between the Tracker One and other Particle devices is that the Tracker One firmware can be used in three different ways:
- Completely off-the-shelf. With its cloud-based configuration, you can use the firmware as-is with no modifications in some cases.
- Semi-custom. The Tracker One firmware is customizable on-device making it possible to add new sensors and customize behavior while still making it easy to upgrade the base firmware.
- Custom. The Tracker One firmware is open-source so you can duplicate and modify it for completely custom applications. Or build your own completely from scratch.
The Tracker firmware is included on the device from the factory instead of Tinker.
Previously, product firmware needed to have the product ID embedded in the binary. As long as you add the Device ID of your Tracker SoM to the product first, this is no longer necessary. The factory binary can be used with your product without having to recompile. Using setup.particle.io to set up your device will take care of this for you automatically.
Map view
One good place to get started is the map view in the console.