
Adafruit Feather accessories
The Gen 3 prototyping devices (Argon and Boron) use the Adafruit Feather form-factor. You can easily add displays, sensors, easily, even if the FeatherWing was not made by Particle.
Doubler and Tripler
The Doubler and Tripler boards allow easy integration with feather accessories:
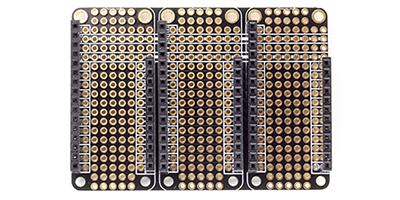
The Tripler has three breakouts for each pin on a Feather, as well as plain grid proto holes. In addition, three sets of pins are cross connected with a full strip of connected pads for GND and 3.3V.
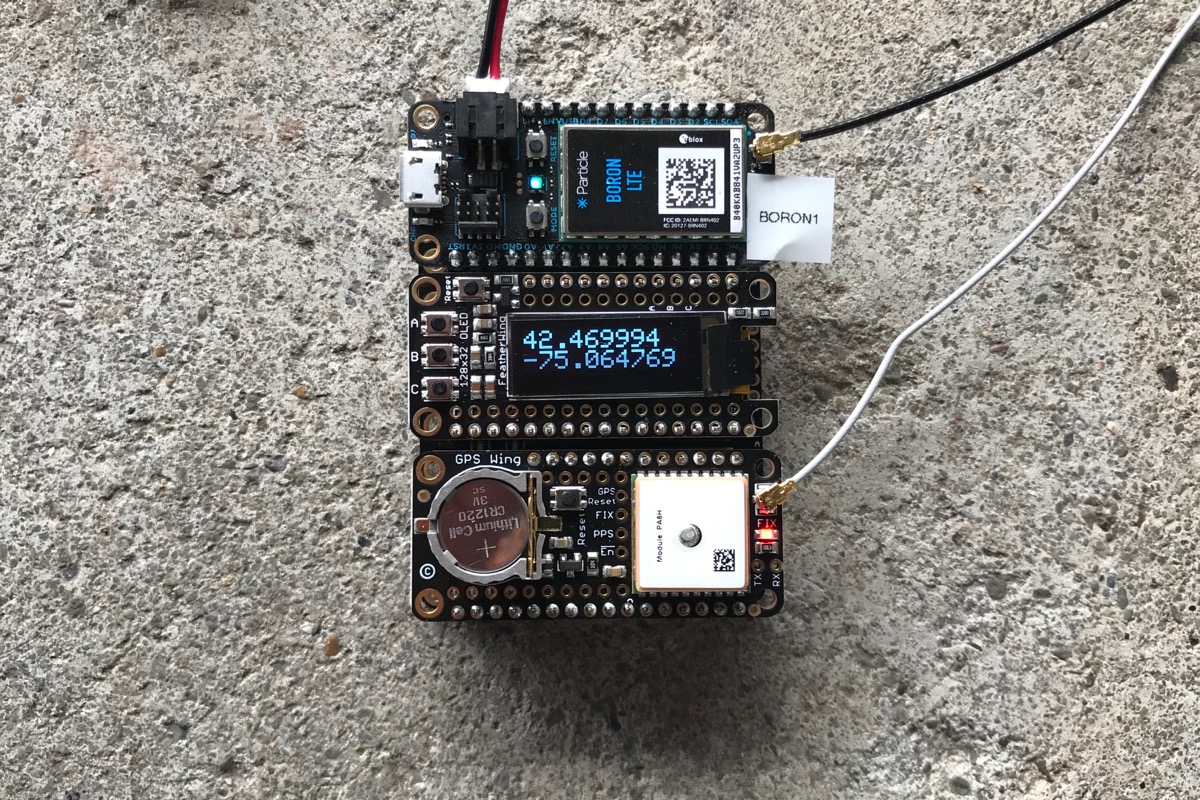
For example, you can easily build a GPS with display by using a tripler with the Adafruit Ultimate GPS FeatherWing and the FeatherWing OLED Display 128x32, no soldering necessary!
- The Tripler is available from the Particle Online Store or Adafruit.
- The Doubler is available from Adafruit.
Note that you can only include one Particle device in a double or tripler. Putting both an Argon and a Boron, for example, in two of the slots can cause permanent damage to the devices. This also applies to other Feather compatible MCUs, for example you couldn't include both a Boron and a ESP8266 Feather, either.
Displays
Adafruit FeatherWing OLED Display 128x32
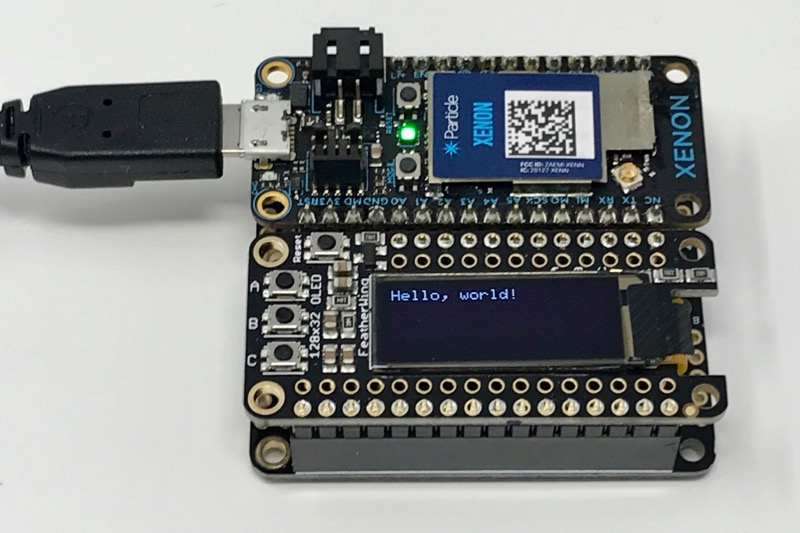
The Adafruit OLED display FeatherWing makes it easy to add a small text and graphics display to your project. Built in a FeatherWing form-factor, you can use a FeatherWing Doubler or FeatherWing Tripler to add a display to your Argon or Boron project with no loose wires. And it includes three handy momentary push-buttons.
You can purchase one from the Particle Store or from Adafruit. You can find more technical information at Adafruit.
The library is available in the Web IDE as oled-wing-adafruit. You can find additional documentation here.
The display is a SSD1306 and connects by I2C (pins D0 and D1).
The three buttons are:
| Button | Pin | Notes |
|---|---|---|
| A | D4 | No pull-up. Can't be used with Ethernet. |
| B | D3 | 100K pull-up. Can't be used with Ethernet. |
| C | D2 | No pull-up. |
The library takes care of setting the appropriate input modes and debouncing the buttons for you.
Note that if you are using the Adafruit OLED display and the Particle Ethernet FeatherWing, you cannot use buttons A or B as those pins are used by Ethernet.
Adafruit TFT FeatherWing - 2.4" 320x240 Touchscreen
If you need a bigger display, the Adafruit TFT FeatherWing - 2.4" 320x240 Touchscreen works great.
This does not work with the doubler or tripler; you insert the Argon or Boron in the back of the unit. It also includes an SD card reader.
- The Adafruit_ILI9341_RK library supports the touchscreen and display.
- The SdFat library supports the SD card reader.
The following pins are used:
| Pin | Notes |
|---|---|
| SCK | SPI Clock |
| MISO | SPI Master In |
| MOSI | SPI Master Out |
| D2 | SD Card CS (chip select) |
| D3 | Touchscreen CS |
| D4 | Display CS |
| D5 | Display D/C |
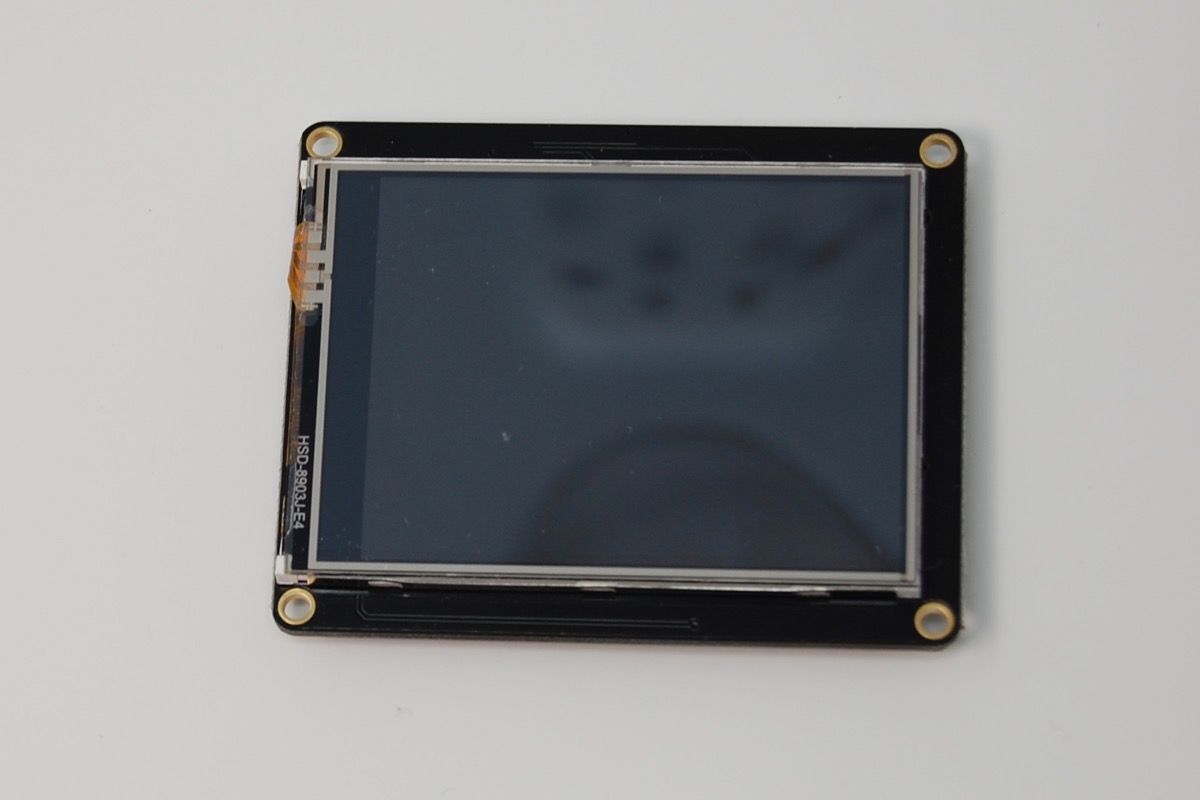
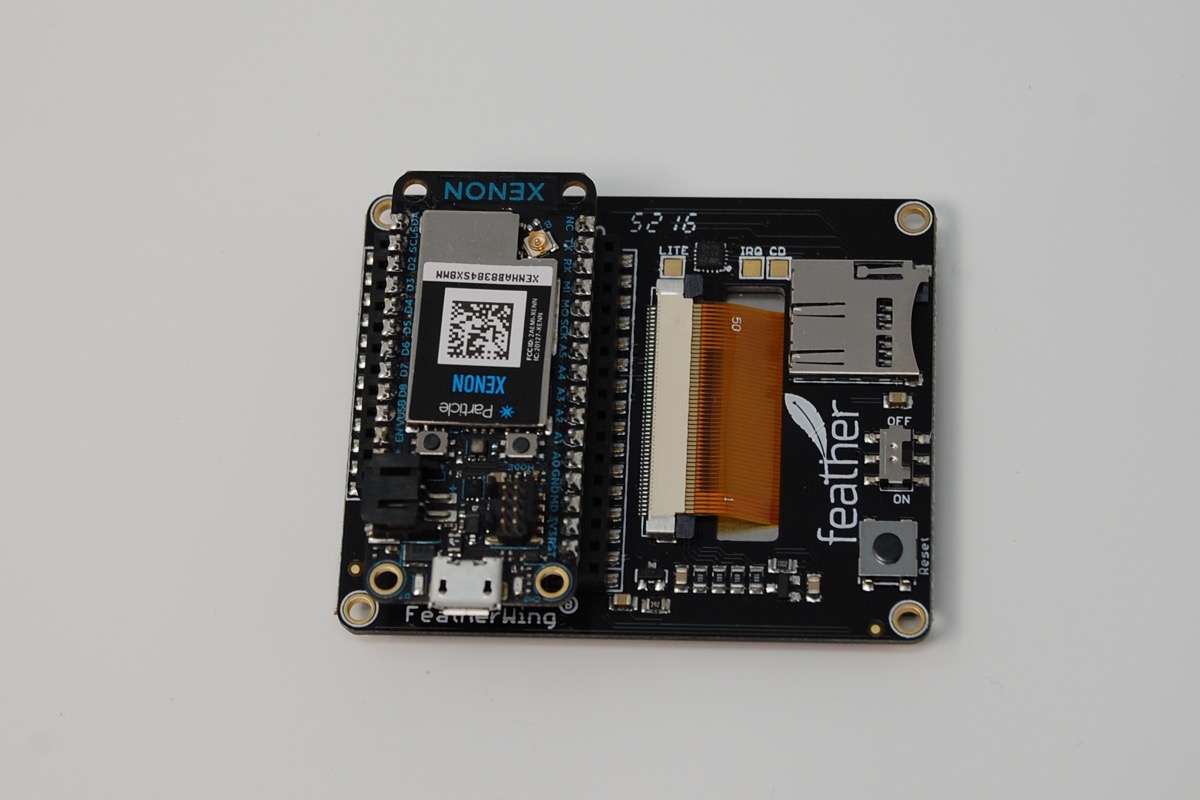
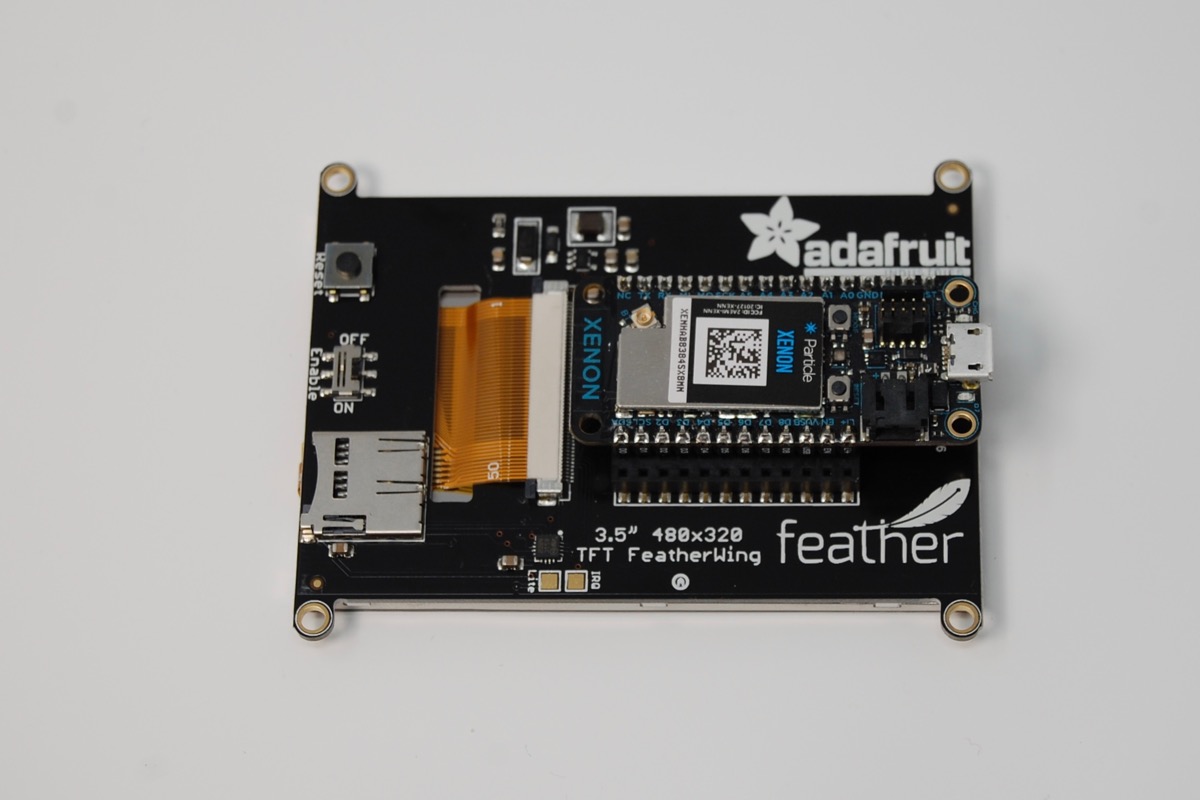
Adafruit TFT FeatherWing - 3.5" 480x320 Touchscreen
If you need an even bigger display, the Adafruit TFT FeatherWing - 3.5" 480x320 Touchscreen works great. This does not work with the doubler or tripler; you insert the Argon or Boron in the back of the unit. It also includes an SD card reader.
- The Adafruit_HX8357_RK library supports the touchscreen and display.
- The SdFat library supports the SD card reader.
| Pin | Notes |
|---|---|
| SCK | SPI Clock |
| MISO | SPI Master In |
| MOSI | SPI Master Out |
| D2 | SD Card CS (chip select) |
| D3 | Touchscreen CS |
| D4 | Display CS |
| D5 | Display D/C |
Adafruit DotStar FeatherWing - 6 x 12 RGB LEDs
The Adafruit DotStar FeatherWing - 6 x 12 RGB LEDs provides 72 individually controllable RGB LEDs. This provides for a bright matrix display that can be powered either by USB or the LiPo battery.

- Use the "Adafruit_DotStarMatrix_RK" library
| Pin | Notes |
|---|---|
| D8 | Clock |
| D6 | Data |
You can learn more about using the DotStarMatrix library from the Adafruit Tutorial. You can use it to draw graphics and text on the display.
Adafruit Color TFT joystick FeatherWing
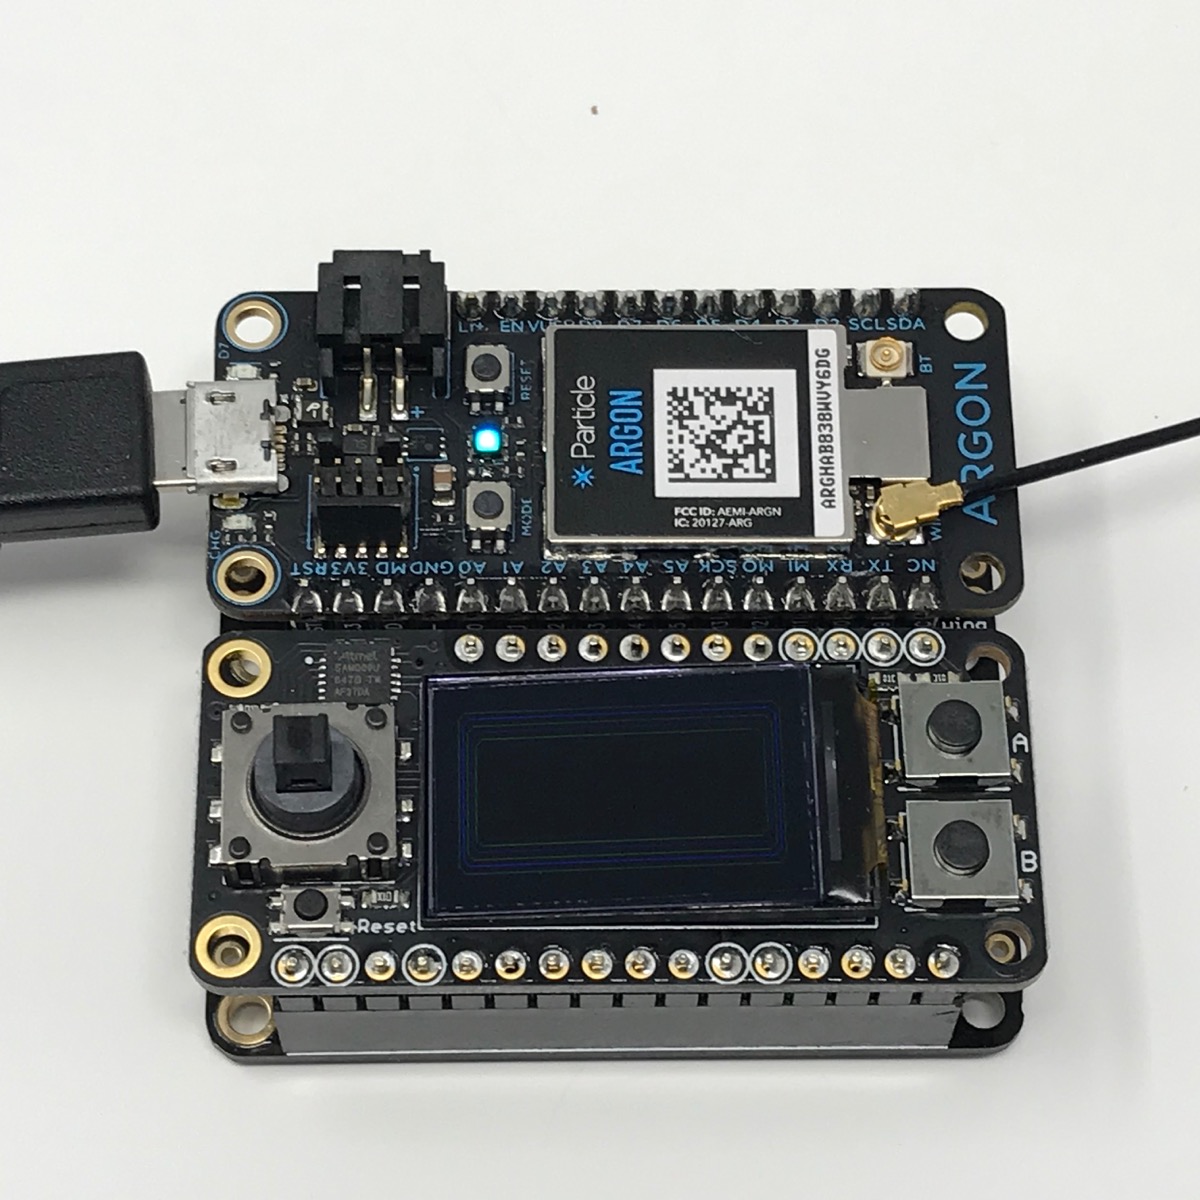
The AdafruitColorTFTJoystickFeatherWing library makes it easy to use the Adafruit Mini Color TFT with Joystick FeatherWing. Additional information the board is available here.
| Pin | Function |
|---|---|
| D2 | TFT CS |
| D3 | TFT CD |
| SCK | TFT SCK |
| MOSI | TFT DI |
This library basically just pulls in the necessary libraries and provides working examples. It directly depends on:
The ST7735_RK library further depends on:
The examples in the AdafruitColorTFTJoystickFeatherWing show how to read the joystick and buttons, and how to do graphic operations on the color TFT display.
Adafruit eInk/ePaper display FeatherWing
If you want a small display that remains even with no power, and it doesn't need to be updated very often, the Adafruit 2.13" tri-color eInk/ePaper display is great!

| Particle Pin | Display Pin | Description |
|---|---|---|
| D2 | SDCS | SD card Chip Select, required for communicating with the onboard SD card holder |
| D3 | SRCS | SRAM Chip Select, required for communicating with the onboard RAM chip |
| D4 | ECS | E-Ink Chip Select, required for controlling the display |
| D5 | D/C | E-Ink Data/Command pin, required for controlling the display |
| MISO | MISO | SPI master in, slave out |
| MOSI | MOSI | SPI master out, slave in |
| SCK | SCK | SPI clock |
To use it, use the Adafruit_EPD_RK library.
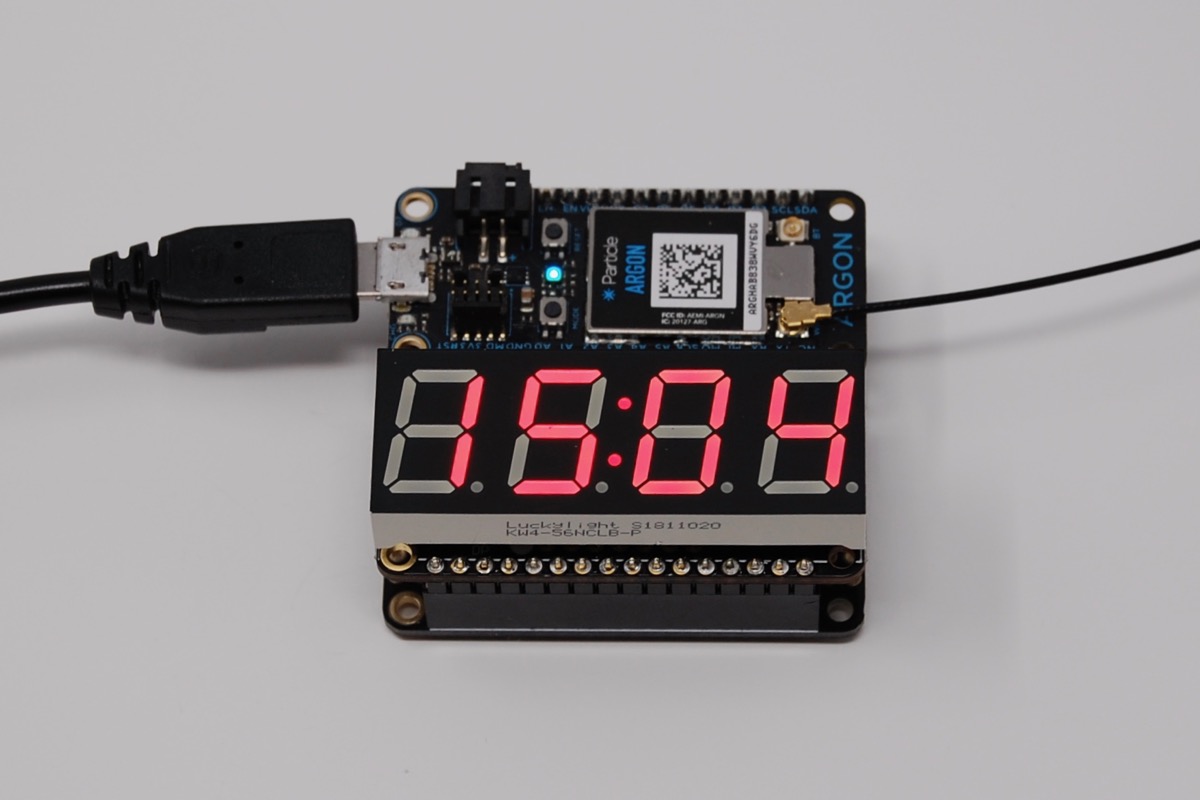
Adafruit 4-Digit 7-Segment LED matrix display FeatherWing
The Adafruit 4-Digit 7-Segment LED Matrix Display FeatherWing provides a numeric clock-like 0.56" high display and is available in several colors (blue, green red, white, and yellow).
It connects by I2C:
| Pin | Notes |
|---|---|
| D0 | SDA (I2C Data) |
| D1 | SCL (I2C Clock) |
The default I2C address is 0x70 but by closing the solder jumpers, you can change the address to avoid conflicts or to add more than one display:
| A0 | A1 | A2 | Address |
|---|---|---|---|
| Open | Open | Open | 0x70 |
| Closed | Open | Open | 0x71 |
| Open | Closed | Open | 0x72 |
| Closed | Closed | Open | 0x73 |
| Open | Open | Closed | 0x74 |
| Closed | Open | Closed | 0x75 |
| Open | Closed | Closed | 0x76 |
| Closed | Closed | Closed | 0x77 |
You can learn more about this display at the Adafruit Tutorial.
Use the Adafruit_LEDBackpack_RK library. The object to use for this display is:
Adafruit_7segment matrix = Adafruit_7segment();
There's Particle sample code to use it as a digital clock in the Feather Clock Example.
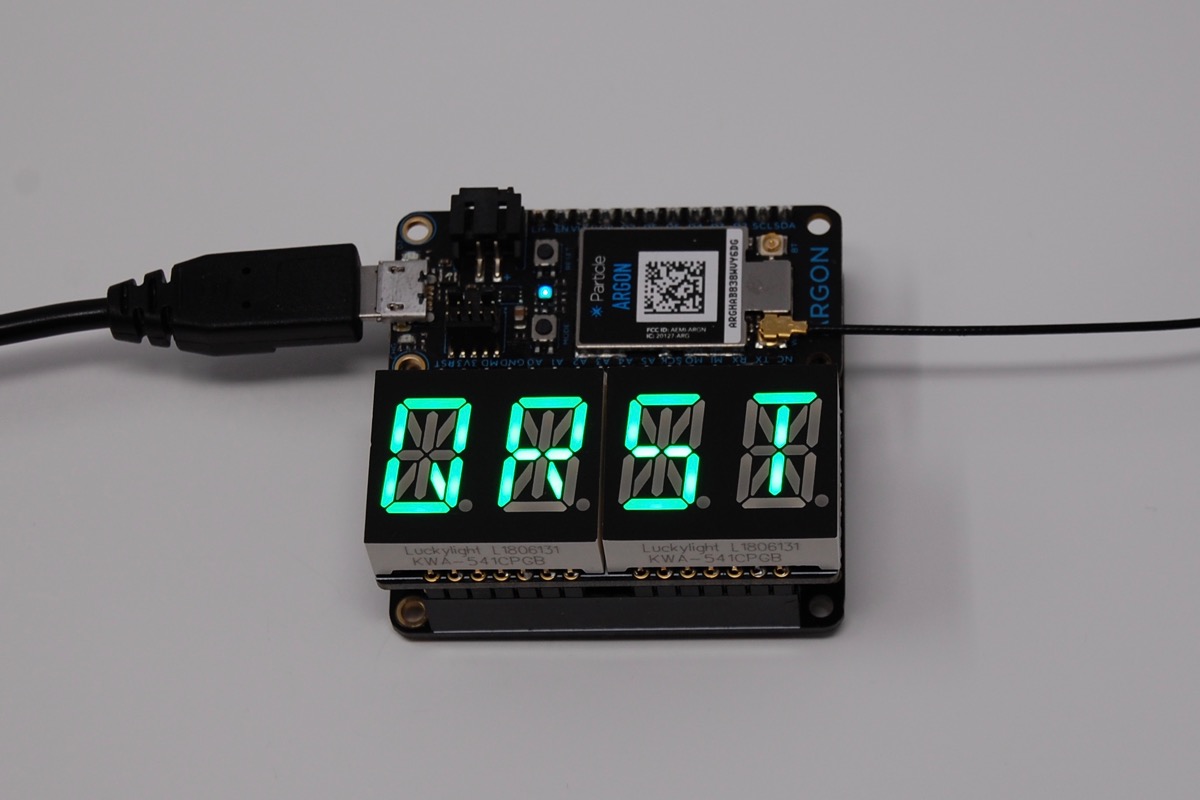
Adafruit 14-Segment Alphanumeric LED FeatherWing
The Adafruit 14-Segment Alphanumeric LED FeatherWing is similar to the previous one, except it can also display alphabetic characters.
It connects by I2C:
| Pin | Notes |
|---|---|
| D0 | SDA (I2C Data) |
| D1 | SCL (I2C Clock) |
The default I2C address is 0x70 but by closing the solder jumpers, you can change the address to avoid conflicts or to add more than one display:
| A0 | A1 | A2 | Address |
|---|---|---|---|
| Open | Open | Open | 0x70 |
| Closed | Open | Open | 0x71 |
| Open | Closed | Open | 0x72 |
| Closed | Closed | Open | 0x73 |
| Open | Open | Closed | 0x74 |
| Closed | Open | Closed | 0x75 |
| Open | Closed | Closed | 0x76 |
| Closed | Closed | Closed | 0x77 |
Use the Adafruit_LEDBackpack_RK library. The object to use for this display is:
Adafruit_AlphaNum4 alpha4 = Adafruit_AlphaNum4();
There's Particle sample code to use it as a small ticker display in the Feather Ticker Example.
You can change the message by calling the setMessage function. And adjust the speed using the setSpeed function. The default speed is 250 (milliseconds between updates). Smaller number make it go faster.
particle call argon2 setMessage "HELLO WORLD!"
particle call argon2 setSpeed 100
Replace argon2 with the name of your device. You can also do this from https://console.particle.io.
Relays
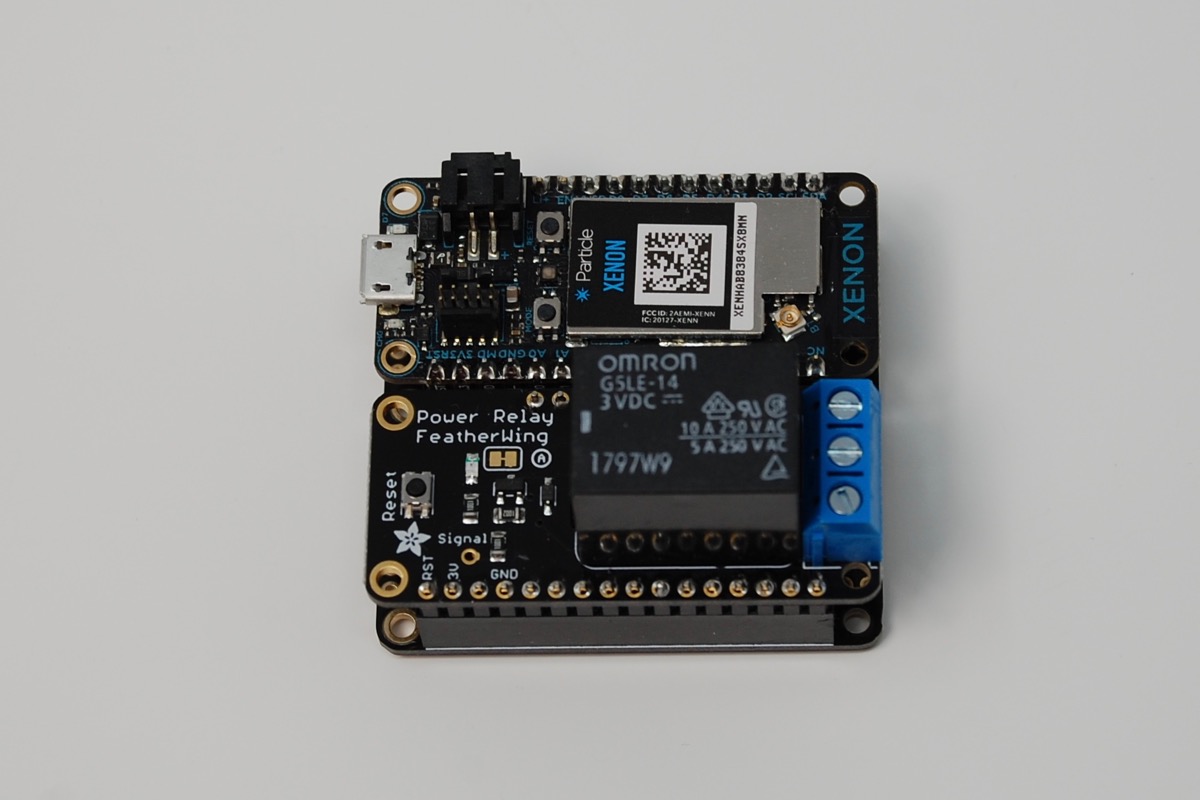
Adafruit power relay FeatherWing
The Adafruit Power Relay FeatherWing can switch 10A at 120VAC or 5A at 240 VAC with a SPDT power relay.
In order to configure which GPIO controls the relay, you need to solder closed one of the solder jumpers on the bottom. Only solder one closed!
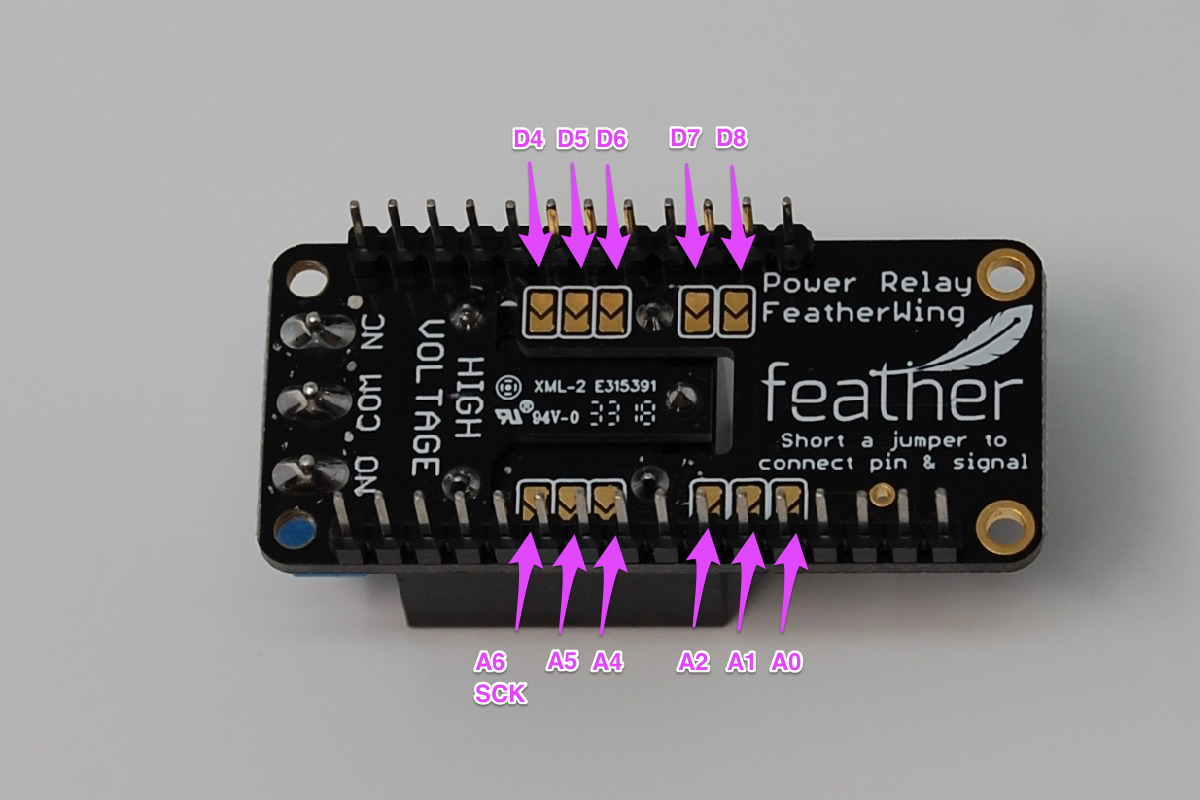
Top row (12-pin side), left to right, viewed from the bottom:
| Pin | Notes |
|---|---|
| D4 | Do not use if using Ethernet |
| D5 | Do not use if using Ethernet |
| D6 | |
| D7 | This is also the blue LED next to the USB connector |
| D8 |
Bottom row (16-pin side), left to right, viewed from the bottom:
| Pin | Notes |
|---|---|
| A6 | SCK, do not use if using SPI or Ethernet |
| A5 | |
| A4 | |
| A2 | |
| A1 | |
| A0 |
To control the LED, set the pin to output mode, typically in setup():
pinMode(D6, OUTPUT);
To close the relay, use:
digitalWrite(D6, HIGH);
To open the relay, use:
digitalWrite(D6, LOW);
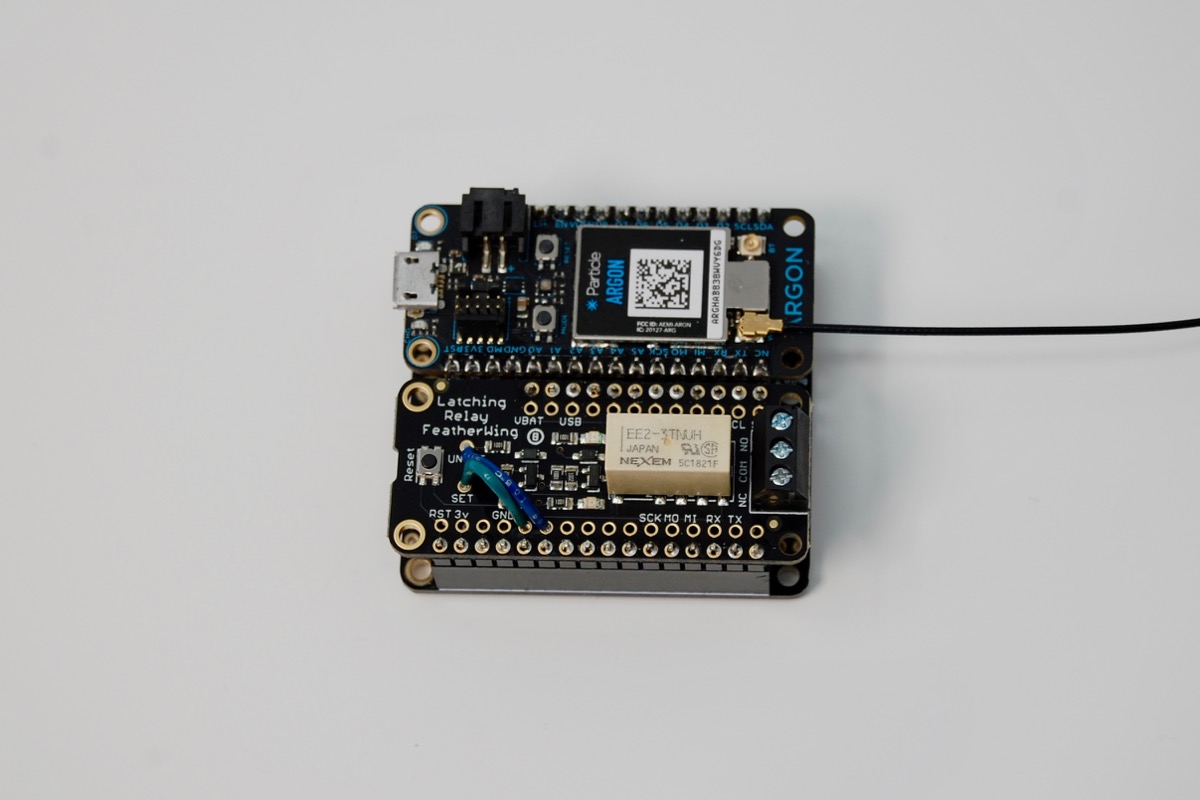
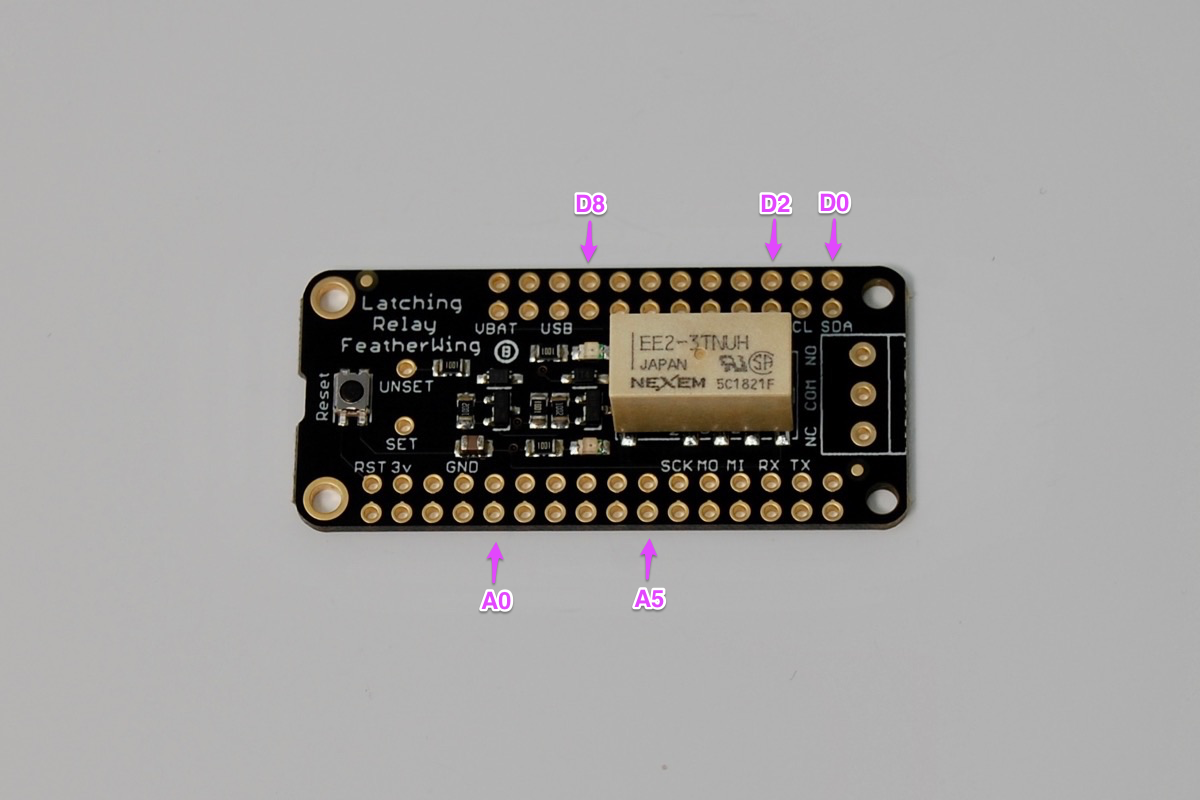
Adafruit latching mini relay FeatherWing
The Adafruit Latching Mini Relay FeatherWing provides a small 2 amp SPDT relay that you can include on on your Feather doubler or tripler. This is a latching (bistable) relay. You can set it (NO and COM connected) or unset it (NC and COM are connected), and it will stay in that state, even if you disconnect the power.
There is a great deal of information about this relay in the Adafruit FeatherWing Relay Tutorial.
You must connect the SET and UNSET holes (next to the Reset button) to actual pins. The most common are D8-D2 on the top row and A0-A5 on the bottom row:
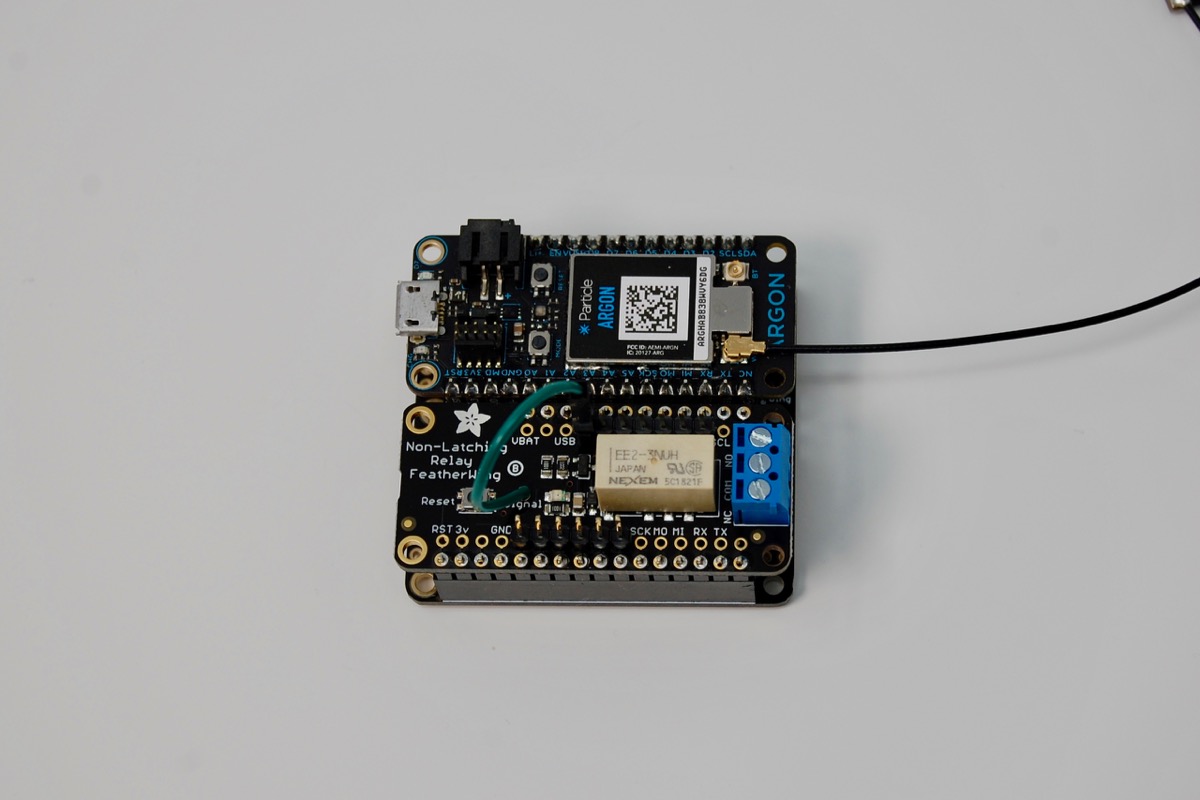
In the picture above, SET is connected to A0 with a green wire and UNSET is connected to A1 with a blue wire.
You must not use D3, D4, and D5 if you are using the Particle Ethernet FeatherWing, as those pins are used by Ethernet. Pin D7 is also the blue LED next to the USB connector.
There's a Particle sample app FeatherLatchingRelay.
You can control the relay from the cloud.
Calling the "relay" function can perform two different functions:
particle call argon2 relay on
particle call argon2 relay off
Replace argon2 with the name of your device. You can also do this from https://console.particle.io.
When you turn the relay on the upper red LED will blink briefly. Turning it off will cause the lower red LED to blink briefly. If the relay actually changes state, it will make an audible click.
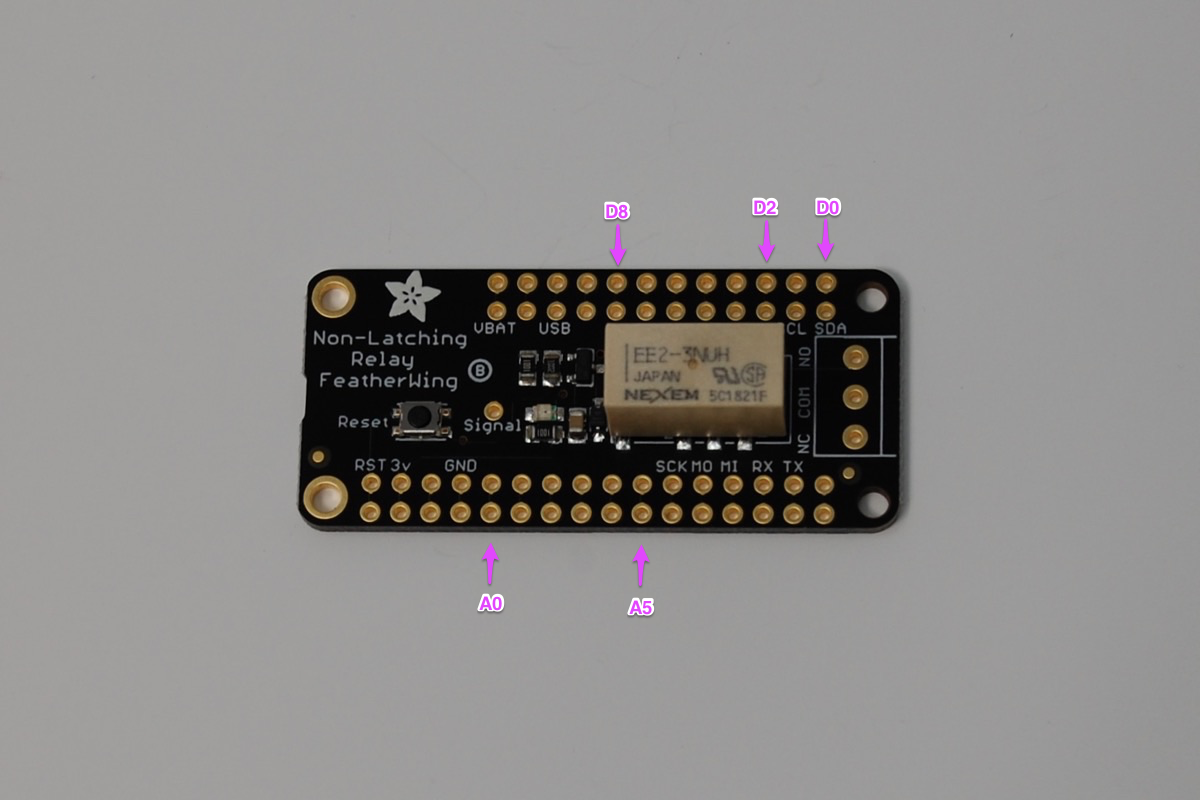
Adafruit non-latching mini relay FeatherWing
The Adafruit Non-Latching Mini Relay FeatherWing provides a small 2 amp SPDT relay that you can include on on your Feather doubler or tripler.
In order to choose which pin to use to activate the relay, you must solder a jumper wire between the Signal line (in the middle of the board) to one of the on the FeatherWing.
On the top row, the most common choices are D8-D2, and on the bottom row A0-A5.
If you want to keep your choice of pin flexible, you can do something like the former picture: I soldered male header pins on D8-D2 and also on A0-A5. I then soldered a small piece of flexible wire with a female socket (from a ribbon cable) to the Signal hole. This allows any of these pins to be easily selected.
You must not use D3, D4, and D5 if you are using the Particle Ethernet FeatherWing, as those pins are used by Ethernet. Pin D7 is also the blue LED next to the USB connector.
There is a great deal of information about this relay in the Adafruit FeatherWing Relay Tutorial.
There's a Particle sample app FeatherRelay.
You can control the relay from the cloud or locally with the MODE button.
Pressing the MODE button will toggle the relay state.
Calling the "relay" function can perform three different functions:
particle call argon2 relay on
particle call argon2 relay off
particle call argon2 relay toggle
Replace argon2 with the name of your device. You can also do this from https://console.particle.io.
Storage
Adafruit AdaLogger SD card and RTC
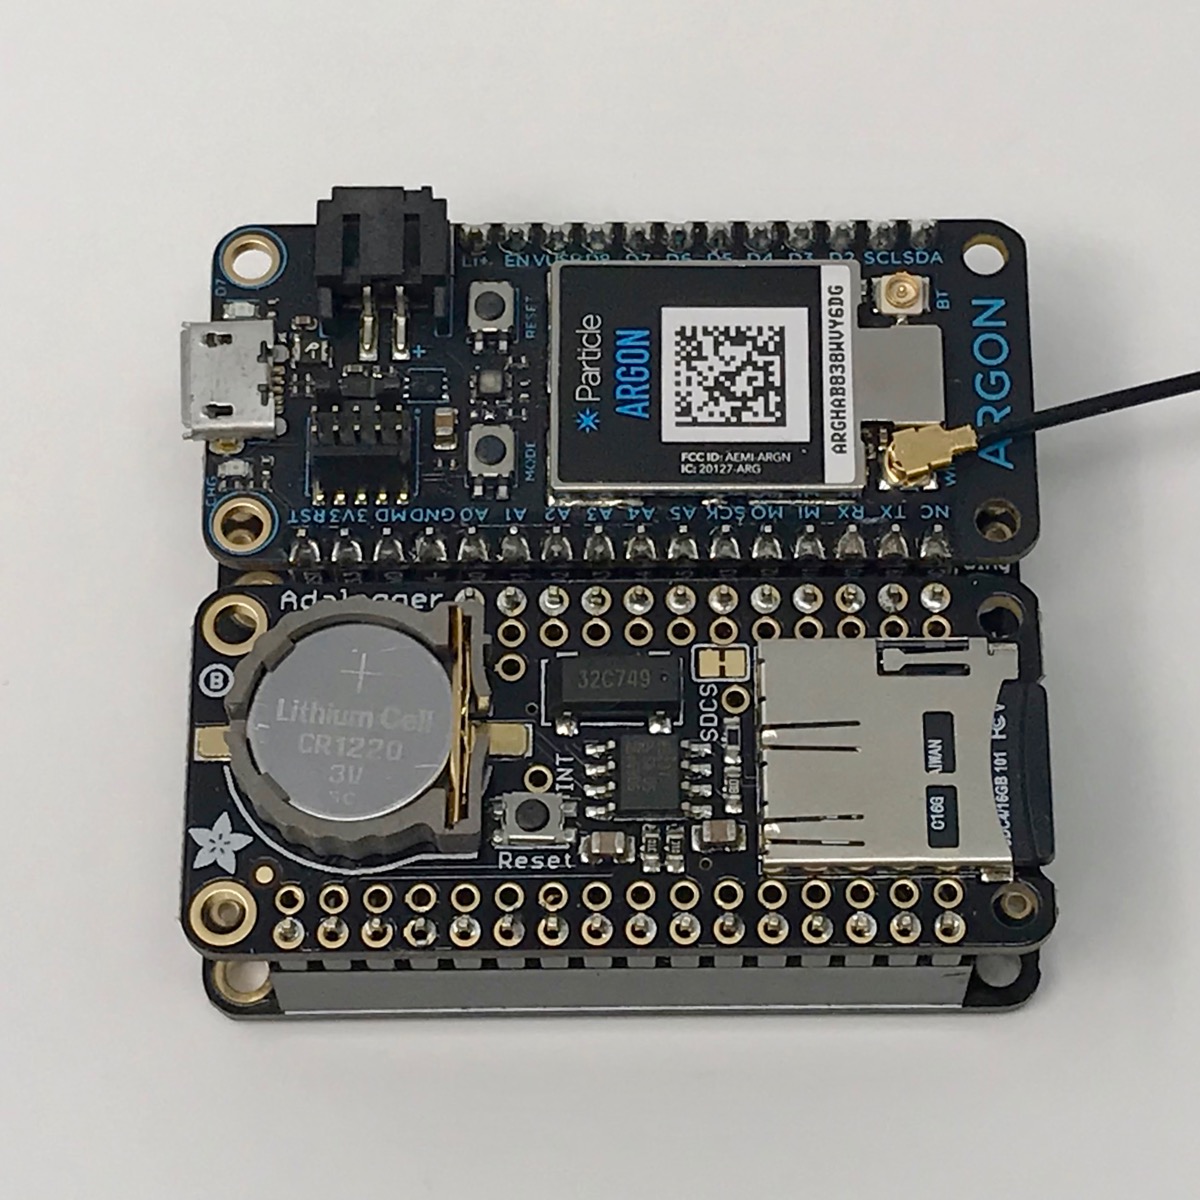
The Adafruit AdaLogger FeatherWing is an SD card and real-time-clock (RTC). You can find more about the board here.
The AdafruitDataLoggerRK library allows you to use both features easily, or you can directly use the libraries for the two things on the FeatherWing:
- Adafruit_RTClib_RK, a port of the Adafruit RTCLib (real time clock)
- SdFat, version 1.0.16 or later.
The SD card is connected to the SPI bus and the default connection for the CS pin is D5.
| Pin | Usage |
|---|---|
| MISO | SD Card DO |
| MOSI | SD Card DI |
| SCK | SD Card SCK |
| D5 | SD Card CS |
The RTC can only be used if the CR1220 battery is inserted. It connects by I2C and uses address 0x68.
| Pin | Usage |
|---|---|
| D0 | RTC I2C SDA |
| D1 | RTC I2C SCL |
The AdafruitDataLoggerRK library includes a class to synchronize the RTC and the Time class clock in both directions, depending on which one has a valid time. This is especially useful on the 3rd-generation devices which don't maintain the time clock when powered down or in deep sleep modes.
The AdafruitDataLoggerRK library also includes the SdCardLogHandlerRK, an optional class that makes it easy to write to a rotating log file. Each file is sequentially numbered. The largest number is newest, and writing appends to this file.
The maximum size of the file can be specified, as can the maximum number of files to keep.
This is intended to be used with text-based information, as data is written to the card by lines (ending with \n).
Sensors
Adafruit INA219 FeatherWing
The Adafruit INA219 FeatherWing is used to sense voltage and current.
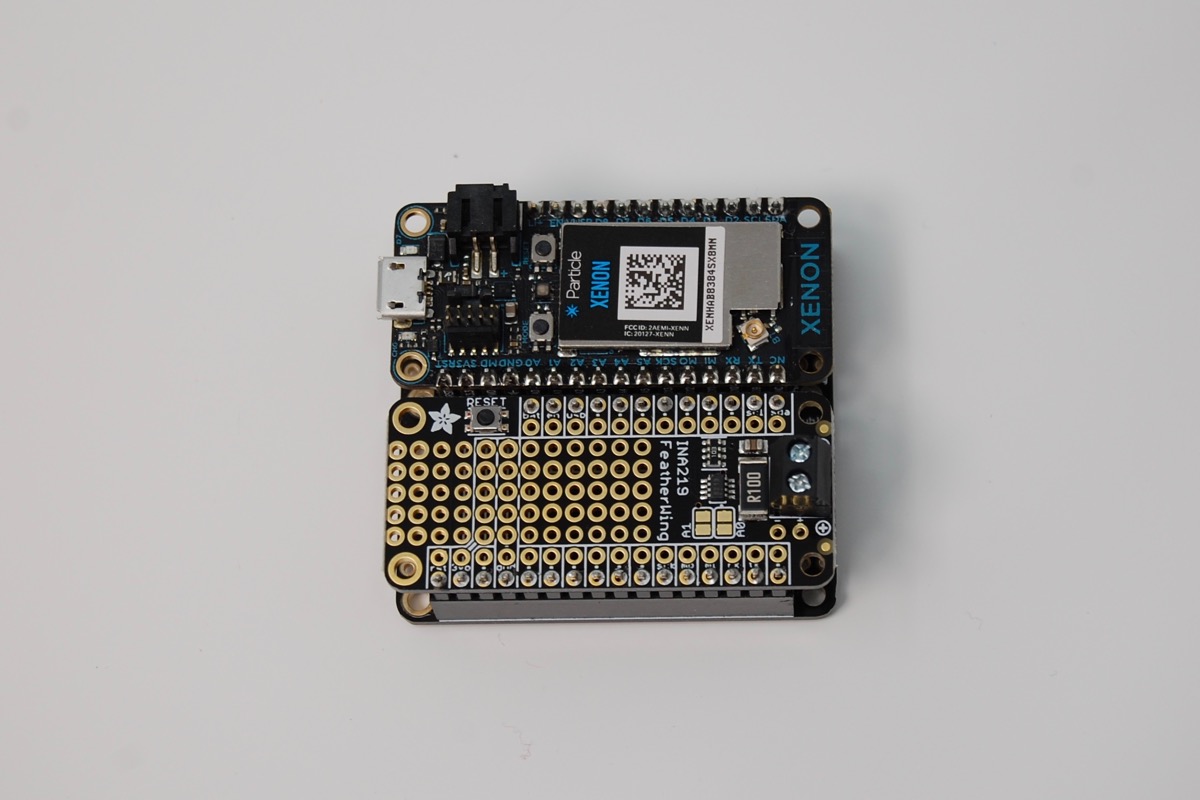
It connects by I2C:
| Pin | Notes |
|---|---|
| D0 | SDA (I2C Data) |
| D1 | SCL (I2C Clock) |
There is a port of the Adafruit library available:
- adafruit-ina219 library
The default I2C address is 0x40 but by closing the solder jumpers, you can change the address to avoid conflicts or to add more than one sensor:
| A0 | A1 | Address |
|---|---|---|
| Open | Open | 0x40 |
| Closed | Open | 0x41 |
| Open | Closed | 0x42 |
| Closed | Closed | 0x43 |
Other accessories
Adafruit Ultimate GPS FeatherWing
The Adafruit Ultimate GPS FeatherWing provides an easy way to add GPS (Global Positioning System) capabilities to your project.
The PA6H GPS chip connects to Serial1 (RX and TX). You can use either of these libraries (only include one):
- The official Electron "AssetTracker" library
- The "AssetTrackerRK" library
Sample code for the GPS with LCD display can be found here.
Particle Ethernet FeatherWing
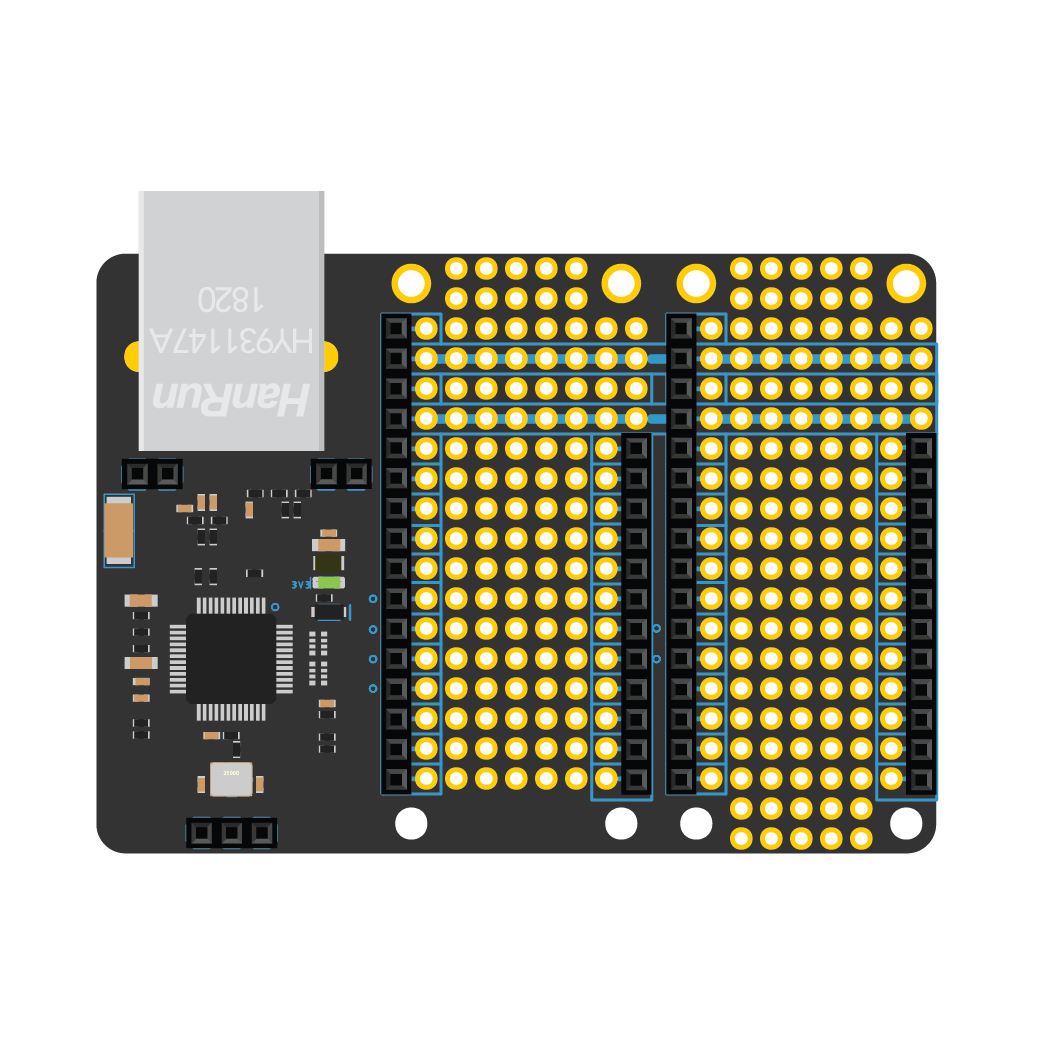
The Ethernet Featherwing has been deprecated and is no longer available for sale. The Adafruit Ethernet Featherwing can be used instead by following the instructions here.
The Ethernet FeatherWing is the fastest way to add wired connectivity to your Argon or Boron and turns any Particle Gen 3 developer kit into an Ethernet gateway. Based on the WIZnet W5500 chip, this side-by-side FeatherWing maintains great RF performance even while adding Ethernet connectivity to any Particle Gen 3 device.
The form-factor is based around the Adafruit FeatherWing Tripler. The two side connectors allow you to plug in one Particle Gen 3 device along with a Feather accessory.
| Particle Pin | Ethernet FeatherWing Pin |
|---|---|
| MISO | SPI MISO |
| MOSI | SPI MOSI |
| SCK | SPI SCK |
| D3 | nRESET[1] |
| D4 | nINTERRUPT[1] |
| D5 | nCHIP SELECT[1] |
Notes:
[1] These pins are connected via jumper pads on the bottom. You can cut these jumper traces and rewire them to a different pin on the Gen 3 device if the need arises.
The Ethernet driver for this wing is baked into the Device OS. When you set up a new Particle Gen 3 device that is plugged into an Ethernet FeatherWing, simply select the USE WITH ETHERNET? option on your Particle mobile app and it should recognize and talk over Ethernet automagically. It's that simple.
The hardware design for this wing is completely open source. All the files are available on our GitHub repository here.
If you are using the Adafruit Ethernet Feather Wing, be sure to connect the nRESET and nINTERRUPT pins (on the small header on the short side) to pins D3 and D4 with jumper wires. These are required for proper operation.