
Sparkfun Qwiic Accessories
One convenient way to connect sensors is using I2C, the Inter-Integrated Circuit bus also known as I2C, pronounced "eye squared see," or sometimes IIC. This bus uses two bi-directional data lines (SDA and SCL), and often includes power (either 3.3V or 5V) and ground.
Sparkfun has created a whole line of accessories including:
- Environment sensors (pressure, temperature, humidity) like the BME280
- Buttons and indicator buttons
- Load cell adapter (weight sensor)
- Distance and proximity sensors
- Thermocouple adapters
- Relays
- Keypads
- Small displays
Each of the devices is a small board with two Qwiic connectors, tiny JST 1mm-pitch 4-pin connectors. The connector is keyed so you don't need to worry about connecting it backwards, and the devices can be daisy-chained, one after the other. They're intended to be used over relatively small distances, under a meter, though there is also long-distance differential version that requires more wires.
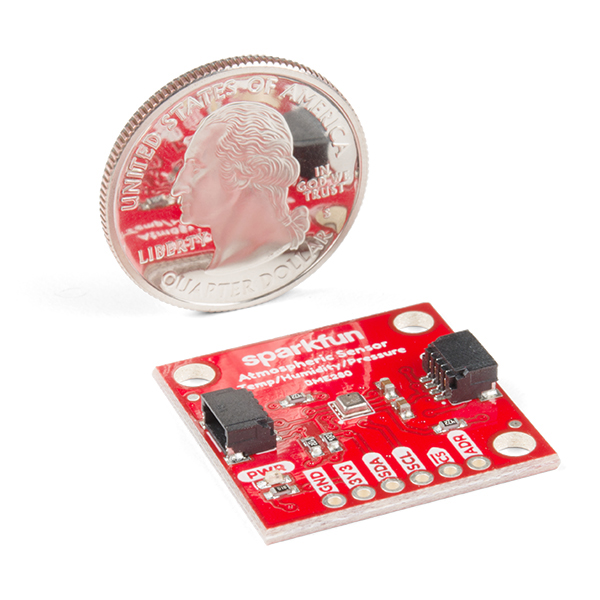
Here's a BME280 temperature, humidity, and atmospheric pressure sensor board, pictured next to a US quarter coin:
Additionally, the Adafruit STEMMA QT line of sensors is compatible with Qwiic! Makes sure you have a STEMMA QT sensor (4-pin 1mm JST connector) as the non-QT STEMMA sensors are different.
These are some of the products and libraries available:
While this is ideal for hobbyists and prototyping, the Sparkfun boards are open-source and you could easily adapt the design for your own custom circuit boards at scale.
https://github.com/sparkfun/SparkFun_ICM-20948_ArduinoLibrary
You can learn more about I2C in the I2C Tutorial.
Connecting
All Qwiic devices use I2C at 3.3V. You'll need to connect four pins:
| Color | Pin | Purpose |
|---|---|---|
| Blue | D0 | SDA (I2C data) |
| Yellow | D1 | SCL (I2C clock) |
| Red | 3V3 | Power 3.3V |
| Black | GND | Ground |
If you are using a prototyping breadboard with your Particle Argon, Boron, Electron, or Photon, you'll probably want to use the Qwiic connector to prototyping wires or the cable assortment that includes it.

The Qwiic boards have I2C pull-ups (typically 4.7K) on each board on both SDA and SCL. You do not need to add them to your breadboard as well.
The Qwiic bus can only be used at 3.3V. Running it at higher voltages can damage both the Qwiic devices and Gen 3 devices like the Argon, Boron, B-Series SoM, and Tracker SoM. Do not connect the red wire to VUSB or Li+ or permanent damage will likely occur.
Evaluation boards
The E-Series, B-Series SoM, and Tracker SoM evaluation boards can either use the wires above to the expansion header, or the Grove I2C to Qwiic adapter cable.
Gen 3 feather (Argon, Boron)
Another option for the Argon and Boron is to use the SparkFun Qwiic Shield for Thing Plus, which uses the Adafruit Feather form-factor.
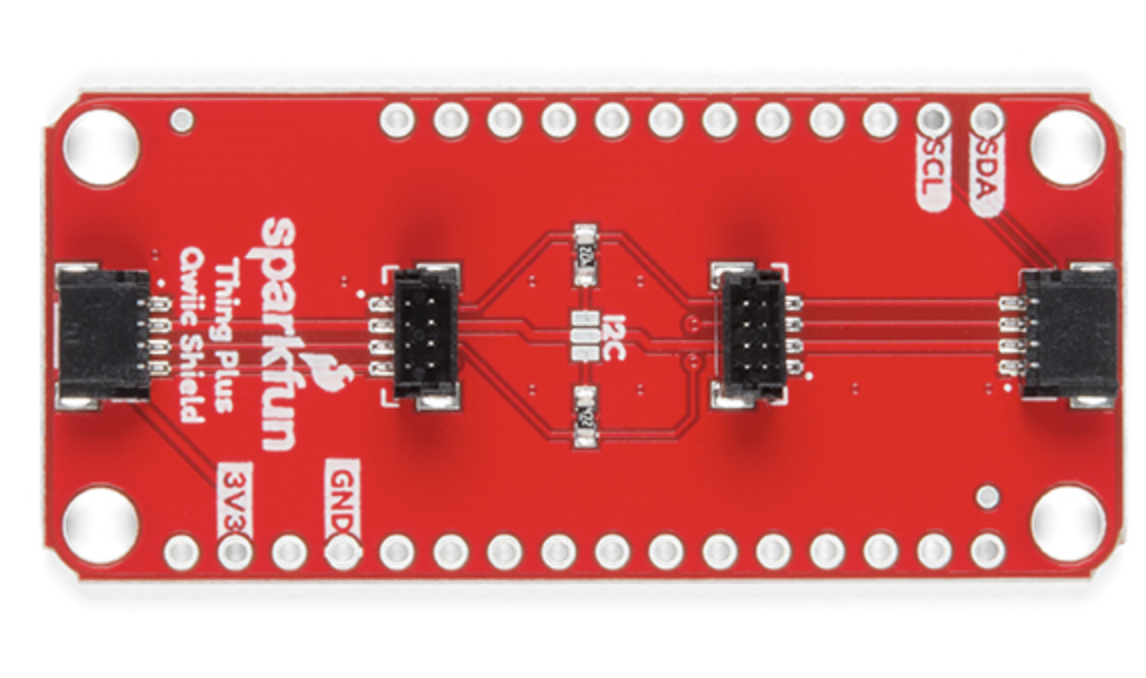
You can use this in a Feather Doubler or Tripler by soldering male header pins on the bottom of the Qwiic Feather adapter.
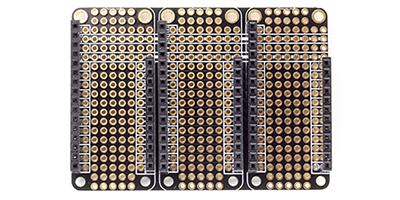
- The Tripler is available from the Particle Online Store or Adafruit.
- The Doubler is available from Adafruit.
You can also solder female sockets on the top of the Qwiic Feather adapter and place your Argon or Boron on top of it. You should not use the two center (upward facing) Qwiic connectors, but you can still use the end connectors.
Examples
Publish BME280
This simple example reads temperature, pressure, and humidity sensors and publishes it to the cloud. It uses the SparkFun Atmospheric Sensor Breakout - BME280 (Qwiic).
If you are building a project from scratch using Particle Workbench:
- Create a new project using the command palette (Ctrl-Shift-P or Command-Shift-P on the Mac) and the Particle: Create New Project command.
- Find the library in the table above. In this case, it's SparkFun_BME280_Arduino_Library.
- From the command palette, Particle: Install Library.
- From the command palette, Particle: Configure Project for Device.
This is the sample code:
#include "Particle.h"

// Library: SparkFun_BME280_Arduino_Library
#include "SparkFunBME280.h"

#ifndef SYSTEM_VERSION_v620
SYSTEM_THREAD(ENABLED); // System thread defaults to on in 6.2.0 and later and this line is not required
#endif

// Log to USB debug serial log
SerialLogHandler logHandler;

// How often to publish. Parameter is a chrono literal, so
// you can use things like:
// 30s   = 30 seconds
// 10min = 10 minutes
// 1h    = 1 hour
const std::chrono::milliseconds publishPeriod = 30s;

// Event name for publish
const char *publishEventName = "testEnvironment";

// millis value for the last time we published
unsigned long lastPublish = 0;

// The global object for the sensor interface
BME280 mySensor;

// Once the sensor has been successfully initialized, this will
// be true.
bool mySensorValid = false;

// temporary buffer used for publishing
char buf[256];

void publishNow(); // forward declaration

void setup() {
    // Initialize Wire (I2C)
    Wire.begin();
}

void loop() {
    // Only publish as often as the publishPeriod, and also
    // only when connected to the cloud.
    if (Particle.connected()) {
        // When written like this, this calculation also works
        // correctly when millis() rolls over to 0, which
        // happens every 49 days.
        if (millis() - lastPublish >= publishPeriod.count()) {
            lastPublish = millis();
            publishNow();
        }
    }
}

void publishNow() {
    // Put the check to detect the sensor here so if you boot
    // with the sensor disconnected, and subsequently plug it
    // in, it will work.
    if (!mySensorValid) {
        mySensorValid = mySensor.beginI2C();
        if (!mySensorValid) {
            Log.error("BME280 sensor not found");
            return;
        }
    }

    // Read data from the sensor
    float humidity = mySensor.readFloatHumidity();

    float pressure = mySensor.readFloatPressure();

    float altitude = mySensor.readFloatAltitudeMeters();
    // or: mySensor.readFloatAltitudeFeet()

    float temperature = mySensor.readTempC();
    // or: mySensor.readTempF()

    // Prepare the JSON data to send in the event. This creates
    // a string that looks like:
    //
    // {"h":38.9,"p":97797.69,"a":297.85,"t":28.9}
    //
    // The parameter after the variable like (, 1) is the number
    // of decimal places to include, which is why "h" is 38.9
    // with only one decimal place, but the others have two.
    JSONBufferWriter writer(buf, sizeof(buf) - 1);
    writer.beginObject();
        writer.name("h").value(humidity, 1);
        writer.name("p").value(pressure, 2);
        writer.name("a").value(altitude, 2);
        writer.name("t").value(temperature, 2);
    writer.endObject();

    // Add a null terminator to the buffer (required)
    writer.buffer()[std::min(writer.bufferSize(), writer.dataSize())] = 0;

    // Publish and log to USB serial debugging log
    Particle.publish(publishEventName, buf, PRIVATE);
    Log.info(buf);
}
If you monitor the console in the Events tab, you'll see the events published:

If you monitor the USB debug serial, you'll see something like:
0000030040 [app] INFO: {"h":38.6,"p":93227.48,"a":696.98,"t":28.90}
0000060004 [app] INFO: {"h":38.5,"p":97804.72,"a":297.25,"t":28.92}
0000090005 [app] INFO: {"h":38.4,"p":97810.67,"a":296.74,"t":28.92}
Temperature display
This example adds a SparkFun Micro OLED Breakout (Qwiic) to show the temperature on the display.
#include "Particle.h"

// Library: SparkFun_BME280_Arduino_Library
#include "SparkFunBME280.h"

// Library: SparkFun_Micro_OLED_Arduino_Library
#include "SFE_MicroOLED.h"

#ifndef SYSTEM_VERSION_v620
SYSTEM_THREAD(ENABLED); // System thread defaults to on in 6.2.0 and later and this line is not required
#endif

// Log to USB debug serial log
SerialLogHandler logHandler;

// How often to update display. Parameter is a chrono literal, so
// you can use things like:
// 30s   = 30 seconds
// 10min = 10 minutes
// 1h    = 1 hour
const std::chrono::milliseconds updatePeriod = 2s;

// Event name for publish
const char *publishEventName = "testEnvironment";

// millis value for the last time we updated the display
unsigned long lastUpdate = 0;

// The global object for the sensor interface
BME280 mySensor;

// The first parameter is the reset pin, which must be a valid
// pin, but  b
MicroOLED oled(D2, 1);

// Once the sensor has been successfully initialized, this will
// be true.
bool mySensorValid = false;

// temporary buffer used for publishing
char buf[256];

// This is so the temperature can be accessed from a Particle variable
double temperature = 0.0;

void updateNow(); // forward declaration

void setup() {
    // Initialize Wire (I2C)
    Wire.begin();

    Particle.variable("temperature", temperature);

    // Initialize the temperature sensor
    mySensorValid = mySensor.beginI2C();

    // Initialize display
    oled.begin();    // Initialize the OLED
    oled.clear(ALL); // Clear the display's internal memory
    oled.display();  // Display what's in the buffer (splashscreen)
}

void loop() {
    // When written like this, this calculation also works
    // correctly when millis() rolls over to 0, which
    // happens every 49 days.
    if (millis() - lastUpdate >= updatePeriod.count()) {
        lastUpdate = millis();
        updateNow();
    }
}

void updateNow() {
    // Put the check to detect the sensor here so if you boot
    // with the sensor disconnected, and subsequently plug it
    // in, it will work.
    if (!mySensorValid) {
        Log.error("BME280 sensor not found");
        return;
    }

    // Read data from the sensor
    temperature = mySensor.readTempF();
    // or: mySensor.readTempC()

    // Update display
    oled.setFontType(3);  // Large font
    oled.clear(PAGE);     // Clear the page
    oled.setCursor(0, 0); // Set cursor to top-left

    snprintf(buf, sizeof(buf), "%.1lf", temperature);
    oled.print(buf);

    oled.display();
    Log.info(buf);
}
project.properties:
name=PublishBME280
dependencies.SparkFun_BME280_Arduino_Library=2.0.8
dependencies.SparkFun_Micro_OLED_Arduino_Library=1.2.7
Indicator button
The Indicator Button example uses the SparkFun Qwiic Button - Red LED. When you press the button, the LED goes on. When you press it again, it toggles off. You can also find out the state of the button LED from the cloud.
#include "Particle.h"

// Product: https://sparkfun.com/products/15584
// Library: SparkFun_Qwiic_Button_Arduino_Library
#include "SparkFun_Qwiic_Button.h"


#ifndef SYSTEM_VERSION_v620
SYSTEM_THREAD(ENABLED); // System thread defaults to on in 6.2.0 and later and this line is not required
#endif

SerialLogHandler logHandler;

QwiicButton button;


bool buttonReady = false;
bool wasPressed = false;
bool indicatorState = false;

void setup() {
    Wire.begin();

    // Make indicatorState available as a particle variable. You can
    // query the state of "button" from the console or API.
    Particle.variable("button", indicatorState);

    buttonReady = button.begin();
    button.LEDoff();
}

void loop() {
    // The QwiicButton class handles debouncing the button so you
    // don't have to handle it manually
    if (button.isPressed()) {
        if (!wasPressed) {
            wasPressed = true;

            // Button was pressed, toggle state
            indicatorState = !indicatorState;

            if (indicatorState) {
                button.LEDon();
            }
            else {
                button.LEDoff();
            }
        }
    }
    else {
        wasPressed = false;
    }
}
project.properties:
name=IndicatorButton
dependencies.SparkFun_Qwiic_Button_Arduino_Library=2.0.4
One way to find the button state is to log into the console, Devices tab, and select the device. On the right side is a panel to view variables, and getting the variable value will show the current button state:
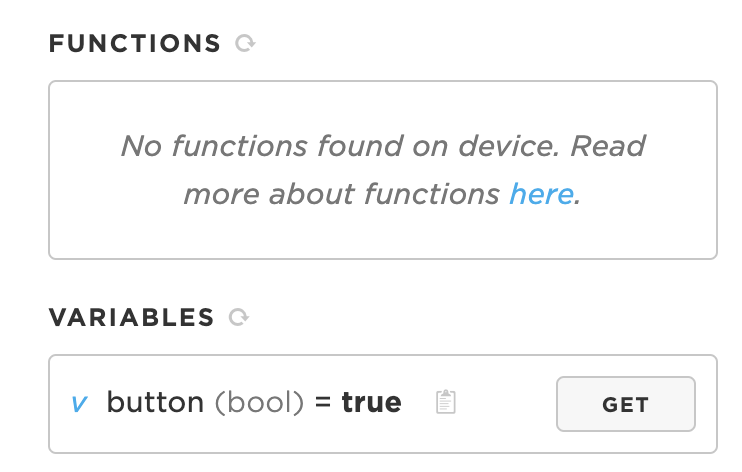
It uses a Particle.variable, so the button state is only managed on the device itself. You can click the button as much as you want, and it will only use data when the value is queried, not when the value changes. This also means that you can only query the value when the device is online.
Relay button
You may have difficulty using the SparkFun Qwiic Single Relay or multiple relay boards with the Photon, Argon, Boron, and Tracker SoM. These devices do not provide enough current on the 3V3 pin to power the relay coils. An external 3.3V power supply will be necessary; connect all of the Qwiic devices to the external 3.3V supply. The external supply ground must be connected to the the Particle device GND pin, but make sure 3V3 is not connected to the external 3.3V supply.
You must not run the Qwiic bus at 5V so never connect the red power line to VUSB!
The alligator clips are connected to a bench power supply at 3.3V and this configuration works as expected:
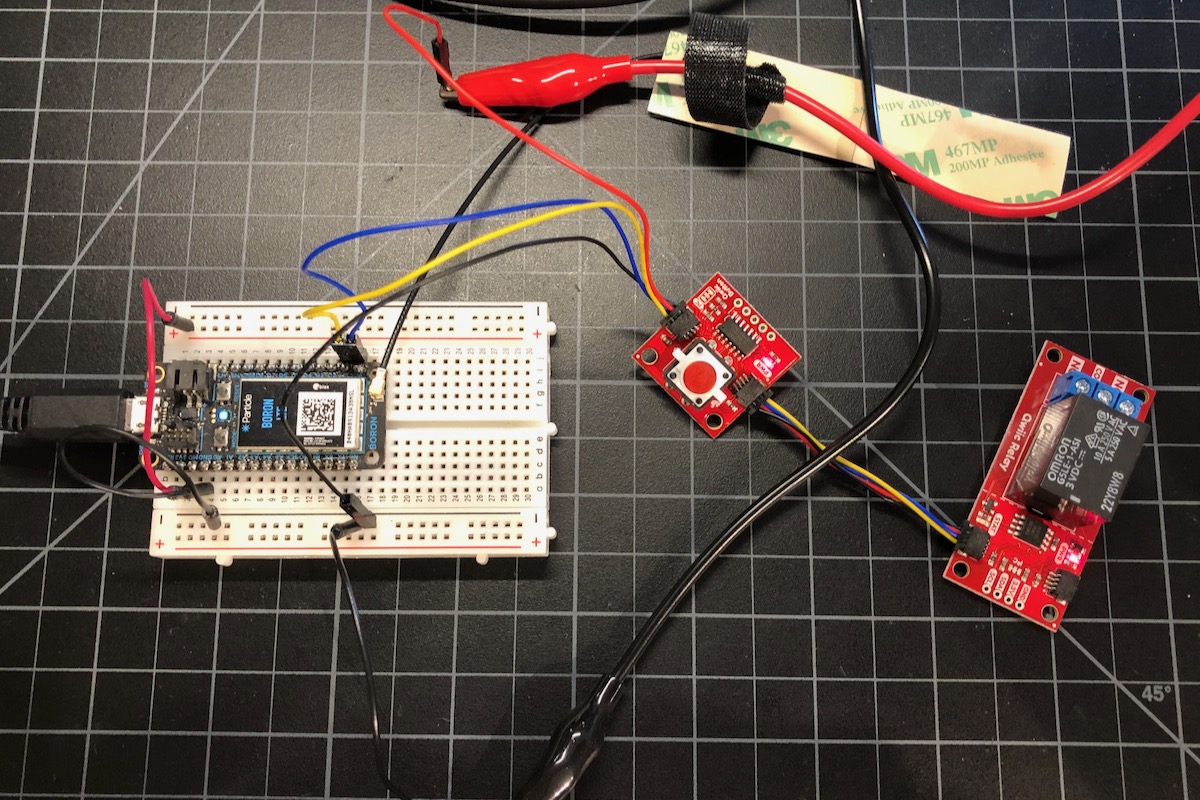
Pressing the button turns on the red indicator LED in the button and also turns on the relay. Pressing the button again turns the LED and relay off.
#include "Particle.h"

// Product: https://sparkfun.com/products/15584
// Library: SparkFun_Qwiic_Button_Arduino_Library
#include "SparkFun_Qwiic_Button.h"

// Product: https://www.sparkfun.com/products/15093)
// Library: SparkFun_Qwiic_Relay_Arduino_Library
#include "SparkFun_Qwiic_Relay.h"

#ifndef SYSTEM_VERSION_v620
SYSTEM_THREAD(ENABLED); // System thread defaults to on in 6.2.0 and later and this line is not required
#endif

SerialLogHandler logHandler;

QwiicButton button;

#define RELAY_ADDR 0x18 // Alternate address 0x19
Qwiic_Relay relay(RELAY_ADDR);

bool relayReady = false;
bool buttonReady = false;
bool wasPressed = false;
bool relayState = false;

void setup() {
    Wire.begin();

    relayReady = relay.begin();

    buttonReady = button.begin();
    button.LEDoff();
}

void loop() {
    if (button.isPressed()) {
        if (!wasPressed) {
            wasPressed = true;

            // Button was pressed, toggle state
            relayState = !relayState;

            if (relayState) {
                relay.turnRelayOn();
                button.LEDon();
            }
            else {
                relay.turnRelayOff();
                button.LEDoff();
            }
        }
    }
    else {
        wasPressed = false;
    }

}
project.properties:
name=RelayButton
dependencies.SparkFun_Qwiic_Relay_Arduino_Library=1.1.1
dependencies.SparkFun_Qwiic_Button_Arduino_Library=2.0.4
I2C Scanner
If you are having troubles, you may want to try the I2C scanner to see if the device is visible on the I2C bus.