
Memfault Integration
The integration between Memfault and Particle provides:
- Dashboard of fleet status at a glance
- Configurable filters and alerts
- Crash and reboot detection
- Stack traces after crashes
There are a few caveats:
- An additional Memfault subscription is required.
- Gen 3 cellular devices (Boron, B-Series SoM, Tracker SoM, Tracker One) only at this time.
- The Memfault integration will use additional data operations for each device.
- You must build Memfault-enabled firmware using Particle Workbench local compile. You cannot use the CLI or cloud compilers.
- Requires Device OS 3.3.0 or later.
- The Memfault service is intended for large device fleets, not individual developer devices.
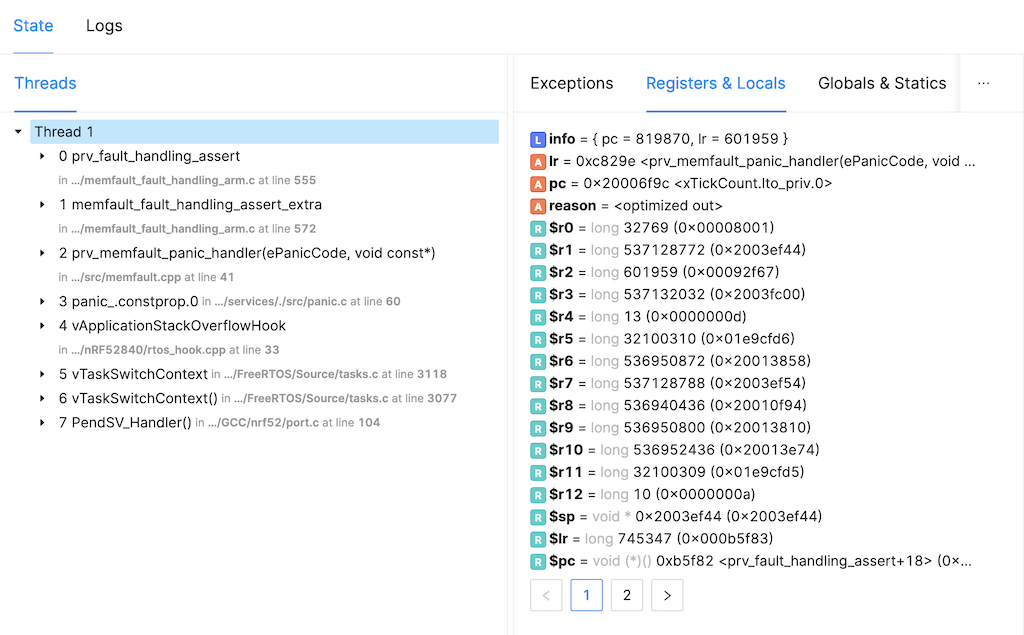
Viewing the details for a specific panic in the fleet, this example shows that a stack overflow occurred. The information is saved on the device, uploaded on the next successful cloud connection, sent to Memfault, and finally displayed in the Memfault dashboard for further review.
Tracker Edge
Tracker Edge (v18 and later) include built-in support for the Memfault library. You will still need to set up the integration to point to your Memfault instance, but you will not need to configure the firmware library as it is already included in Tracker Edge.
Memfault configuration
Use the Create Project option in the left side of the Memfault dashboard.
In the MCUs tab, select:
- Embedded MCU
- Primary: nRF52
- No additional MCUs
In the OS tab, select FreeRTOS
In the Connectivity tab, select Cellular/LTE.
In the Tooling tab, select:
- Compiler: GCC
- Build Toolchain: Make
- Debugging toolchain: GDB
Copy the Project Key for your new project as you will need this to configure the integration
Memfault integration
Since Memfault is intended for use with device fleets you will typically configure it as a product integration.
Go to the Particle console
Select the product you want to integrate with Memfault, then Integrations.
Create a new Webhook integration.
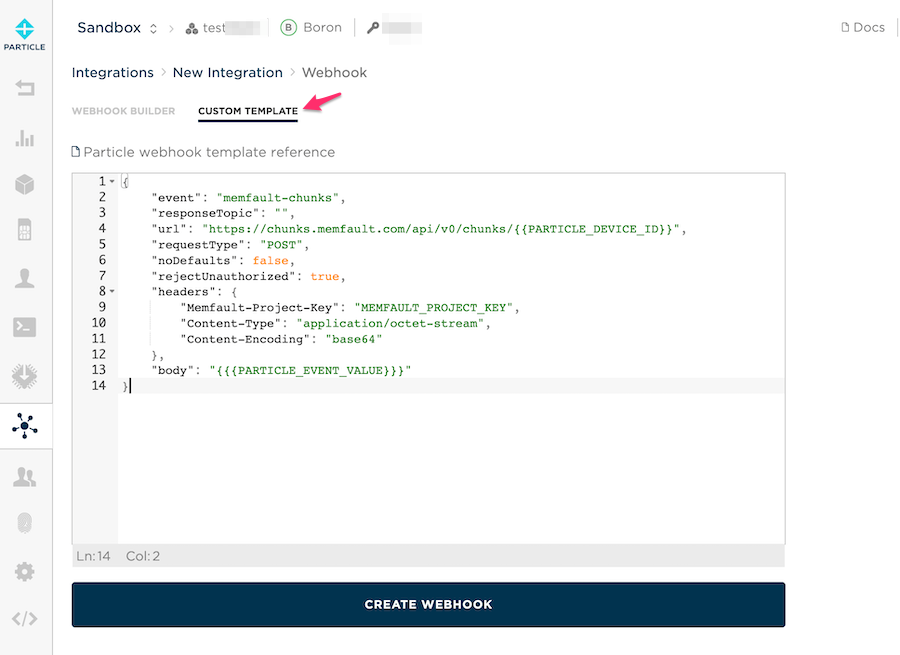
Click the Custom Template option at the top of the window and paste the following:
{
    "event": "memfault-chunks",
    "responseTopic": "",
    "url": "https://chunks.memfault.com/api/v0/chunks/{{PARTICLE_DEVICE_ID}}",
    "requestType": "POST",
    "noDefaults": false,
    "rejectUnauthorized": true,
    "headers": {
        "Memfault-Project-Key": "MEMFAULT_PROJECT_KEY",
        "Content-Type": "application/octet-stream",
        "Content-Encoding": "base64"
    },
    "body": "{{{PARTICLE_EVENT_VALUE}}}"
}
Replace
MEMFAULT_PROJECT_KEYwith the one specific to your your project. It's available in the Settings in your Memfault dashboard.Leave
{{PARTICLE_DEVICE_ID}}and{{{PARTICLE_EVENT_VALUE}}}unchanged; these are templates that are filled in when the integration is run.
Tracker setup
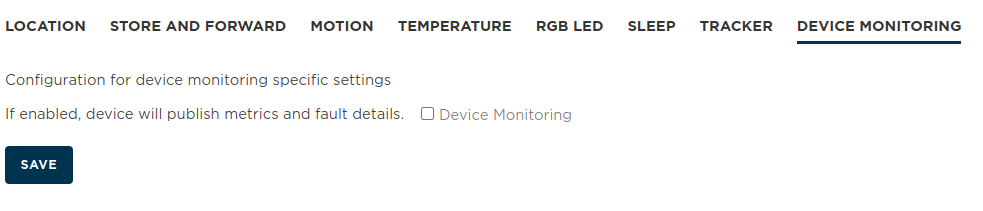
For Tracker devices running Tracker Edge v18 or later, you only need to enable the Device Monitoring feature in the Particle console.
Non-tracker setup
The Particle Memfault library is available on Github from Memfault. It is designed to work with Particle Workbench but can only be used as a Github submodule. It is not in the Particle community libraries, and can only be built by the Particle Workbench local compiler, not the cloud or CLI compilers.
To add it to your Gen 3 cellular device project, at the top directory of your project, where the project.properties files is:
git submodule add https://github.com/memfault/particle-firmware-library lib/memfault
A minimal application will look like:
#include "Particle.h"
#include "memfault.h"

#ifndef SYSTEM_VERSION_v620
SYSTEM_THREAD(ENABLED); // System thread defaults to on in 6.2.0 and later and this line is not required
#endif

SerialLogHandler logHandler;

static Memfault *s_memfault = NULL;

PRODUCT_VERSION(1)

void setup() {
    s_memfault = new Memfault(__system_product_version);
}

void loop() {
    s_memfault->process();
}
Of note:
- Add
#include "memfault.h"to for the function definitions - Add
static Memfault *s_memfault = NULL;to hold the instance of the Memfault object - In
setup()add the call to initialize the Memfault object. Note that__system_product_versionis the version you set with thePRODUCT_VERSIONmacro, and is reported in the Memfault dashboard. - In
loop()call theprocess()method. This is required!
If you want to customize the behavior, add the file memfault_particle_user_config.h in the src directory:
#pragma once

//! @file
//!
//! Copyright (c) Memfault, Inc.
//! See License.txt for details
//!
//! @brief
//! Application specific configuration overrides for memfault library

#ifdef __cplusplus
extern "C" {
#endif

//! WARNING: This should only be set for debug purposes. For production fleets, the
//! value must be >= 3600 to avoid being rate limited
#define MEMFAULT_METRICS_HEARTBEAT_INTERVAL_SECS 3600

//! This exposes debug commands that can be called for testing Memfault at the cost of using
//! some extra code space. For production builds, it is recommended this flag be set to 0
#define MEMFAULT_PARTICLE_PORT_DEBUG_API_ENABLE 0

//! The software_type name to be displayed in the Memfault UI
#define MEMFAULT_PARTICLE_PORT_SOFTWARE_TYPE "mflt-test-fw"

#define MEMFAULT_PARTICLE_PORT_CLOUD_METRICS_ENABLE 1
#define MEMFAULT_PARTICLE_PORT_HEAP_METRICS_ENABLE 1

#ifdef __cplusplus
}
#endif
- This allows you to configure various Memfault settings. In particular
MEMFAULT_METRICS_HEARTBEAT_INTERVAL_SECSshould be set to a reasonable value.
Uploading debugging symbols
As set up thus far, Memfault will monitor heartbeat, reboots, reset reasons, and crash indications. However it will not be able to tell you where in your code the crash occurred unless you upload debugging information.
This is done using the elf, executable and link format, files that are produced during the firmware build process. These are also referred to generically as symbol files, as they match the named symbols in your firmware source code to addresses in RAM.
- Encapsulates binaries and debugging information into one file
- Matches addresses of variables and functions to symbol names
Your user firmware has one elf file, and one elf file is generated during the build of Device OS. These need to be combined into a single file and uploaded to the Memfault servers to allow it to produce crash stack dumps and detailed debugging information for both your firmware and Device OS.
From the Particle Workbench command palette (Ctrl-Shift-P or Command-Shift-P), select Particle: Launch Compiler Shell. This is different than Launch CLI or the Terminal pane as it sets the paths include the necessary compiler tools. You will need this in the next two steps.
System elf files
You will need to locate the elf file for system-part-1 of the version of Device OS you are using.
If you used Particle: Compile application and Device OS (local):
ls -l $DEVICE_OS_PATH/build/target/system-part1/platform-13-m/system-part1.elf
The second to last path component will vary depending on the device you are building for:
| Platform | Directory |
|---|---|
| boron | platform-13-m |
| bsom | platform-23-m |
| b5som | platform-25-m |
| tracker | platform-26-m |
You can also use the local compiler shell variable $PLATFORM_ID:
ls -l $DEVICE_OS_PATH/build/target/system-part1/platform-$PLATFORM_ID-m/system-part1.elf
If you only flashed your application and used a production version of Device OS, you will need to locate the .elf files.
- Go to the Device OS Gitub Release Site.
- Find the version you are using
- Download the .zip file for all platforms, or your platform (argon, boron, tracker, etc.)
- Extract the zip file
- The elf files are in the
releasedirectory. For example:tracker-system-part1@4.0.0.elf.
Combining elf files
Locate your project's .elf file. For example:
ls -l target/4.0.0/boron/test-memfault.elf
- Replace
4.0.0with the version of Device OS you are targeting - Replace
boronwith the platform you are targeting - Replace
test-memfaultwith your project name
The command is generically:
arm-none-eabi-objcopy --add-section .mflt_aux_symbols.system-part1=<PATH-TO-system-part1.elf> <PATH-TO-APP.elf>
For example:
arm-none-eabi-objcopy --add-section .mflt_aux_symbols.system-part1=$DEVICE_OS_PATH/build/target/system-part1/platform-$PLATFORM_ID-m/system-part1.elf target/4.0.0/boron/test-memfault.elf
Note that this updates the test-memfault.elf file in place, and it will become significantly larger so you can tell if the operation worked by examining the size.
In this example, the target/4.0.0/boron/test-memfault.elf is the one you'd upload to Memfault. Be sure to update the Device OS version and the project name in this path.
Uploading elf files
- In the Memfault dashboard, your project, select Software, Symbol files, then Upload symbol file.
- Upload the .elf file you created in the previous step.
Additional resources
At Memfault: