Publish to Google sheets
You can download the files associated with this page as a zip file.
If you have relatively small amounts of data to store, and don't want to implement a more complex database scheme, using a Google G Suite spreadsheet might be a good solution. For more complex or large amounts of data using Google Cloud Datastore or Firebase might be more appropriate. It's also possible to use a third-party service like IFTTT to save to Google Sheets, but this technique is faster and more reliable.
One big advantage of using this technique over Publish to Firebase using webhooks is that you have the ability to manipulate the data using Google Apps Script (Javascript) before storing it in the sheet. This provides a great flexibility, as shown in some of the examples below.
If you're like to learn more about Google Apps Script, these two resources are a good starting point:
Getting started
Create the script
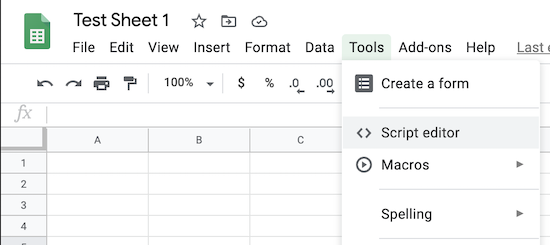
The first step is to create a regular Google G Suite Spreadsheet. In this case, I named mine Test Sheet 1.
Click on the Extensions menu and select Apps Script this opens a new tab.
The first time you open the script there will be an empty function in the Code.gs tab. Replace it with this code:
function test() {
  var e = {};
  e.parameter = {};
  e.parameter.event = 'sheetTest1';
  e.parameter.data = '[1,1234]';
  e.parameter.coreid = '1f0030001647ffffffffffff';
  e.parameter.published_at = new Date().toISOString();
  doPost(e);
}

function doPost(e) {
  // e.parameter.event
  // e.parameter.data
  // e.parameter.coreid
  // e.parameter.published_at "2016-04-16T13:37:08.728Z"

  var publishedAt = new Date(e.parameter.published_at);

  var dataArray = [];
  try {
    dataArray = JSON.parse(e.parameter.data);
  }
  catch(e) {
  }

  var sheet = SpreadsheetApp.getActiveSheet();

  var row = [e.parameter.coreid, publishedAt];

  row = row.concat(dataArray);

  sheet.appendRow(row);

  var result = {};
  result.ok = true;

  return ContentService.createTextOutput(JSON.stringify(result))
    .setMimeType(ContentService.MimeType.JSON);
}
The test() function is used for testing within the Apps Script Editor, described below.
When the function is called, it will have POST arguments from the webhook. These are parsed into e.parameter before calling doPost().
The standard Particle webhook files are included:
event: The event namedata: The data as a stringcoreid: The Device ID (24-character hexpublished_at: The date and time the event was published as a string in ISO 8601 format
This converts the date string in ISO 8601 format to a Javascript Date. This allows the date to be shown in the correct format in the spreadsheet.
var publishedAt = new Date(e.parameter.published_at);
This bit of code assumes that the event data will be a JSON array of values. However, when you use the Test button in the Particle console, the data is "test-event" which is not valid JSON. This just causes the data to be treated as empty but continue to allow the script to run so a new row will still be created.
var dataArray = [];
try {
    dataArray = JSON.parse(e.parameter.data);
}
catch(e) {
}
This bit of code gets the active spreadsheet, makes the first two columns be the device ID and event date/time, then the remaining columns from the event data. Finally, the row is appended to the spreadsheet.
var sheet = SpreadsheetApp.getActiveSheet();

var row = [e.parameter.coreid, publishedAt];

row = row.concat(dataArray);

sheet.appendRow(row);
This bit of code just returns a JSON value from the server. It's not really used for anything, but you should return something.
var result = {};
result.ok = true;

return ContentService.createTextOutput(JSON.stringify(result))
.setMimeType(ContentService.MimeType.JSON);
Run a test in the apps script editor
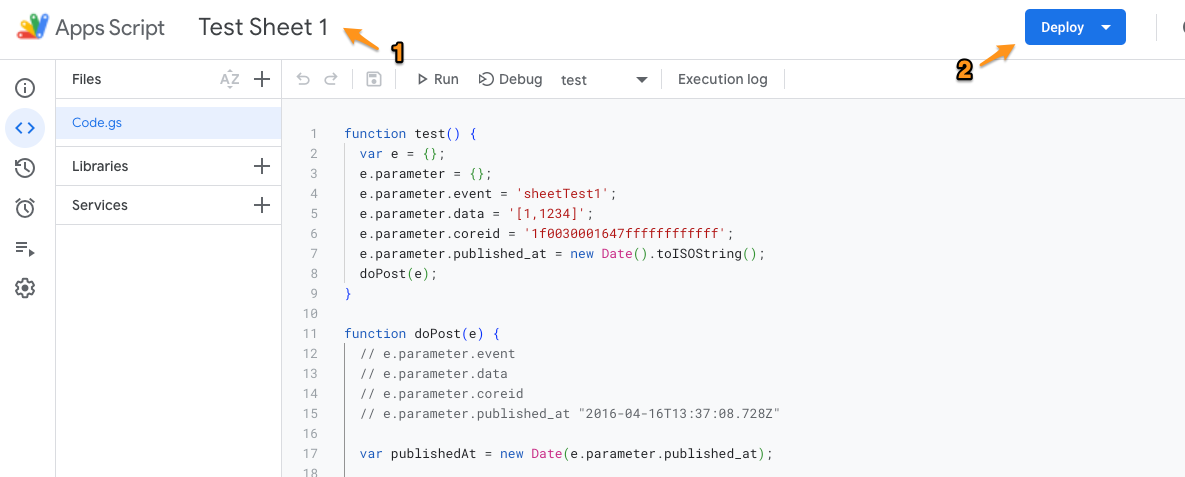
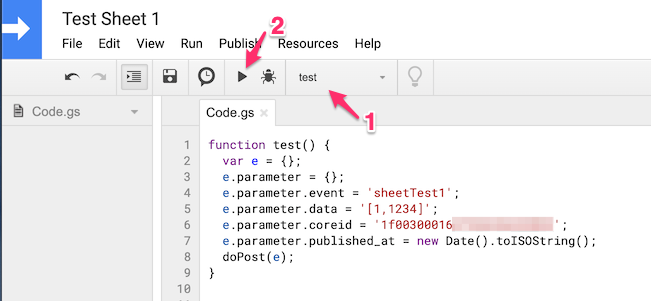
Click on the untitled item at the top of the tab, to the right of Apps Script to name the script (1). I used Test Sheet 1.
Click the blue Deploy (2) button at the top of the tab for a New deployment.
Click Select type and Web app.
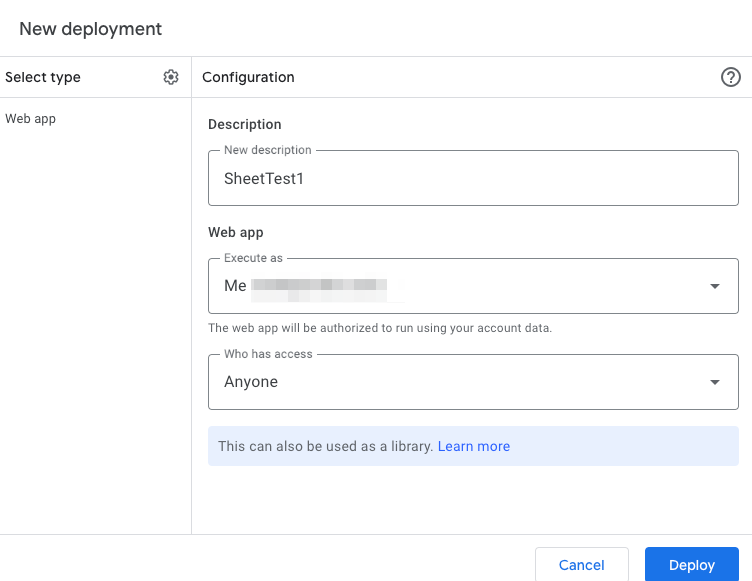
Enter a description, and select:
- Execute as: must be set to Me. Because the Particle webhook server is the sender of the event, it will not be logged into Google so the other options cannot be used.
- Who has access must be set to Anyone. This seems a little scary, but it only means that anyone with the web app URL will be able to post values to the script. They won't be able to do anything with the document itself or other files in your Google Drive.
When you click Deploy you may be asked to Authorize access. Follow the prompts to authorize, if requested.
Using the test() function makes it much easier to troubleshoot code! Exceptions are shown in the Apps Script Editor.
function test() {
  var e = {};
  e.parameter = {};
  e.parameter.event = 'sheetTest1';
  e.parameter.data = '[1,1234]';
  e.parameter.coreid = '1f0030001647ffffffffffff';
  e.parameter.published_at = new Date().toISOString();
  doPost(e);
}
In the Apps Script Editor make sure test is the selected function (1) and click Run (2).
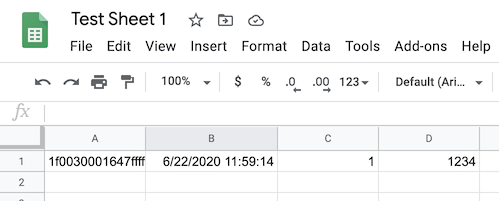
Now if you switch to the Test Sheet 1 you should see a newly added row!
Create the webhook
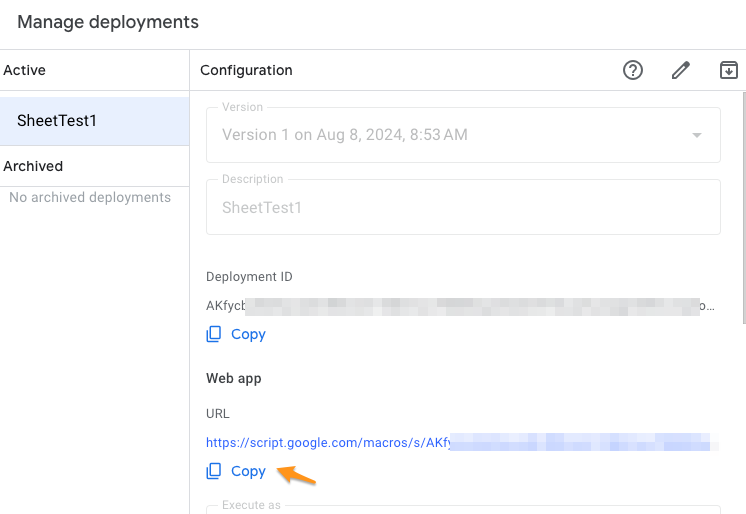
Before you leave the Google Apps Script editor, click the blue Deploy button, then Manage deployments.
Copy the Web app URL to the clipboard as you will need it to create the webhook. Keep this a secret as anyone with this URL will be able to append to your spreadsheet.
The next step is to create the webhook.
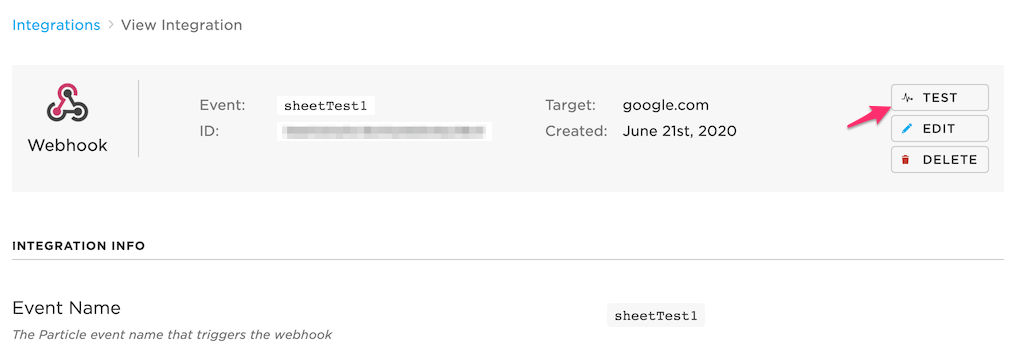
Log into the Particle console and open Integrations.
Use the New Integration button (+ icon) to create a new integration.
Select the Custom Webhook option for the kind of integration to create.
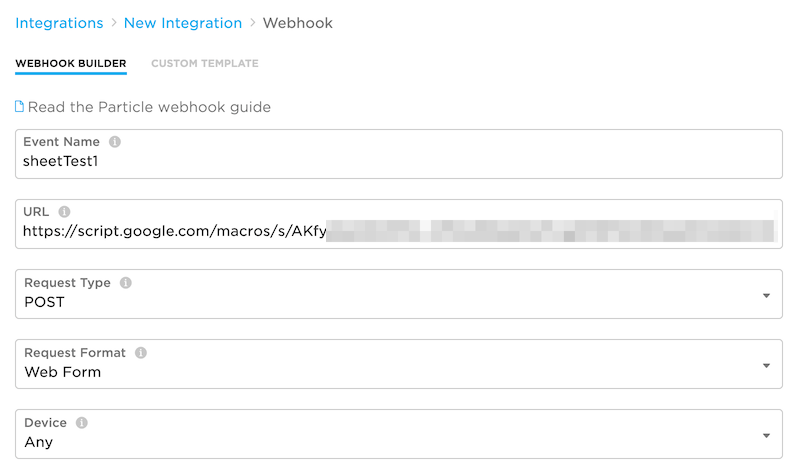
Set the Event Name. For this test I used sheetTest1 but you can use any event name as long as you match the webhook and device firmware. Remember that the event name is a prefix, so the event name sheetTest10 will also trigger this event!
Set the URL field to the URL of the webapp you just deployed.
Set the Request Type to POST.
Set the Request Format to Web Form.
If you expand the Extra Settings make sure the Form Fields are set to Default.
Save the webhook
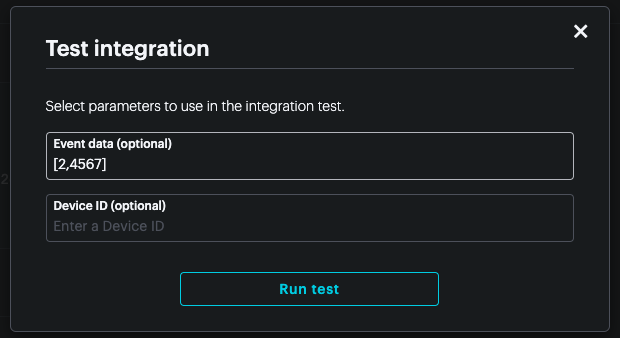
- In the View Integration window, use the Test button to test your new webhook
- In the test parameters window, enter
[2,4567]in the Event data box and leave the Device ID field blank.
- Go back to your spreadsheet, there should be a new row!
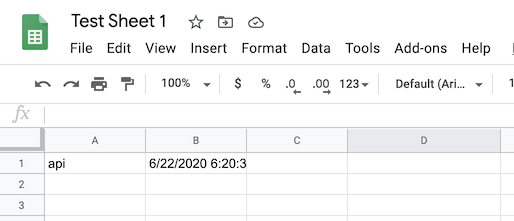
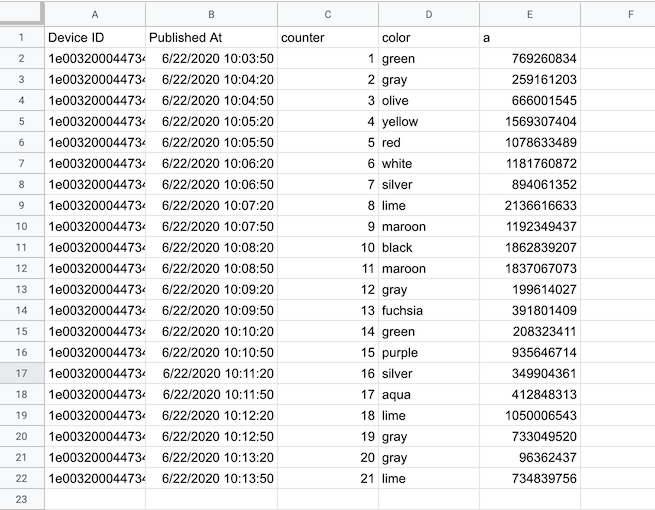
If you left the Device ID field in the Test Parameters window blank, column A will be api.
Column B is the date and time the event was received by the cloud.
Columns C and to the right have the data that you entered in the event data box (if it was valid JSON).
Updating the Apps Script code
When you make a change to the Apps Script code in the Google Apps Script Editor, you must deploy the changed version.
Click Deploy then Manage Deployments.

- Click the pencil icon (1) to edit the deployments
- Select New version
- Click Deploy
You always want to create a new version, not a new deployment. Creating a new deployment changes the URL, which requires that you update the webhook.
Device firmware
Here's the publishing test firmware. There's not much to it, and it mainly does one thing:
Periodically (default: 30 seconds) it publishes an event with a counter value and a random number. It's not very useful but is enough to demonstrate using the Google sheet.
#include "Particle.h"

#ifndef SYSTEM_VERSION_v620
SYSTEM_THREAD(ENABLED); // System thread defaults to on in 6.2.0 and later and this line is not required
#endif

SerialLogHandler logHandler;

// How often to publish a value
const std::chrono::milliseconds publishPeriod = 30s;

// The event name to publish with
const char *eventName = "sheetTest1";

unsigned long lastPublish;
int counter = 0;

void publishTest();

void setup() {
}

void loop() {
    if (Particle.connected()) {
        if (millis() - lastPublish >= publishPeriod.count()) {
            lastPublish = millis();

            publishTest();
        }
    }
}

void publishTest() {
    char buf[128];

    snprintf(buf, sizeof(buf), "[%d,%d]", ++counter, rand());

    Particle.publish(eventName, buf, PRIVATE);
    Log.info("published: %s", buf);
}
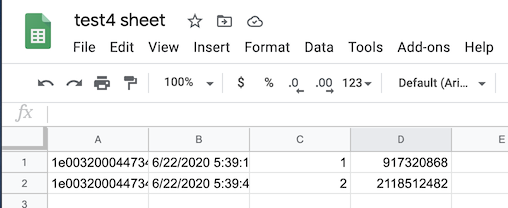
Flash this to a device and then switch back to your Google sheet. 30 seconds or so later, you should start seeing rows!
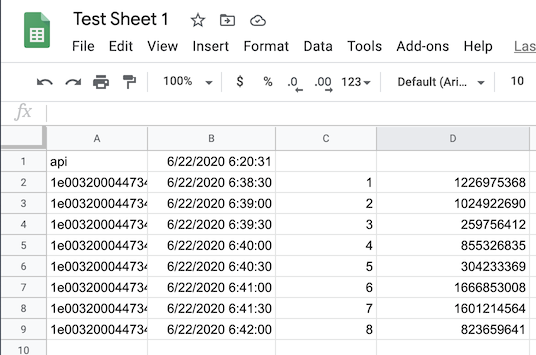
Of note:
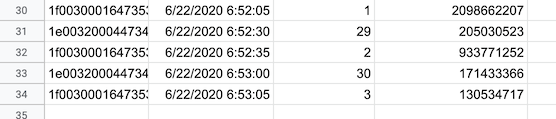
- The first column now contains a device ID (24 character hex) instead of "api".
- The timestamps indicate that it really is publishing every 30 seconds.
- The timestamps sent by the webhook are UTC, but Google Sheets correctly converted it to my local timezone.
Digging into the device code:
This is just the standard stuff in most device firmware.
#include "Particle.h"

#ifndef SYSTEM_VERSION_v620
SYSTEM_THREAD(ENABLED); // System thread defaults to on in 6.2.0 and later and this line is not required
#endif

SerialLogHandler logHandler;
This sets how often to publish. In this example, it's 30 seconds ("30s"). You could set it to 5 minutes ("5min") or once an hour ("1h").
// How often to publish a value
const std::chrono::milliseconds publishPeriod = 30s;
// The event name to publish with
const char *eventName = "sheetTest1";
These are just some variables used internally and a forward declaration for publishTest(), allowing it to be called before it's implemented in the file.
unsigned long lastPublish;
int counter = 0;

void publishTest();
The standard setup() function doesn't do anything.
void setup() {
}
In loop() we check that we are connected to the Particle cloud before publishing. In SYSTEM_THREAD(ENABLED) mode, loop always runs, even before connecting is complete.
If connected, and the publish period has been met, publishTest() is called.
void loop() {
    if (Particle.connected()) {
        if (millis() - lastPublish >= publishPeriod.count()) {
            lastPublish = millis();

            publishTest();
        }
    }
}
This function prepares a JSON array of two integers in buf, then publishes it. It also logs it to the serial log.
void publishTest() {
    char buf[128];

    snprintf(buf, sizeof(buf), "[%d,%d]", ++counter, rand());

    Particle.publish(eventName, buf, PRIVATE);
    Log.info("published: %s", buf);
}
I flashed this code to second device, and now both are logging to the spreadsheet!
That should be enough to log simple data to a Google sheet, but there's much more you can do. See the following examples for more elaborate scripts.
One sheet per device
What if instead of mixing all of the values on a single sheet, you had one sheet per device? That might be better for some use cases.
Here's the code:
function test() {
  var e = {};
  e.parameter = {};
  e.parameter.event = 'sheetTest1';
  e.parameter.data = '[1,1234]';
  e.parameter.coreid = '1f0030001647ffffffffffff';
  e.parameter.published_at = new Date().toISOString();
  doPost(e);
}

function doPost(e) {
  // e.parameter.event
  // e.parameter.data
  // e.parameter.coreid
  // e.parameter.published_at "2016-04-16T13:37:08.728Z"

  var publishedAt = new Date(e.parameter.published_at);

  var dataArray = [];
  try {
    dataArray = JSON.parse(e.parameter.data);
  }
  catch(e) {
  }

  var sheet = createNewSheet_(e.parameter.coreid);

  var row = [e.parameter.coreid, publishedAt];

  row = row.concat(dataArray);

  sheet.appendRow(row);

  var result = {};
  result.ok = true;

  return ContentService.createTextOutput(JSON.stringify(result))
    .setMimeType(ContentService.MimeType.JSON);
}


/**
 * Helper function that creates a new sheet, or returns an existing
 * sheet that has the same name.
 *
 * @param {string} name The name of the new sheet.
 * @return {object} The newly-created sheet or existing sheet
 *   of the same name. This sheet becomes active.
 */
function createNewSheet_(name) {
  var ss = SpreadsheetApp.getActiveSpreadsheet();

  // Returns an existing sheet if it has the specified
  // name. Activates the sheet before returning.
  var sheet = ss.getSheetByName(name);
  if (sheet) {
    return sheet.activate();
  }

  // Otherwise make a new sheet, set its name, and return it.
  // New sheets created this way automatically become the active
  // sheet.
  sheet = ss.insertSheet(name);
  return sheet;
}
Don't forget to:
- Create a save a new version from File - Manage Versions.
- Publish a version from Publish - Deploy as web app. You only need to update the version number to the newly created version.
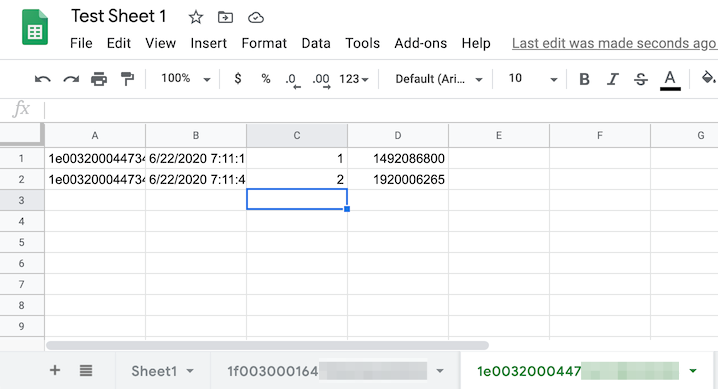
And here's the spreadsheet. Note the two tabs at the bottom, one per device:
Of note in the code:
Before, the sheet variable was set like this:
var sheet = SpreadsheetApp.getActiveSpreadsheet();
Now, it calls the internal function createNewSheet_() instead:
var sheet = createNewSheet_(e.parameter.coreid);
The code for createNewSheet_() is at the bottom of the script and is copied from the Google CodeLab example #4.
That's it! Now you have one sheet per device within the spreadsheet.
Mapping device IDs to names (manually)
One problem with the example above is that the sheet names are really unwieldy! It would be nice to use the device name instead of the device ID
While it is possible to use the API to map device ID to name, this example uses the simpler technique of putting the table in the sheet itself. This sidesteps some security issues of accessing the Particle API from a sheet's App Script.
To do this:
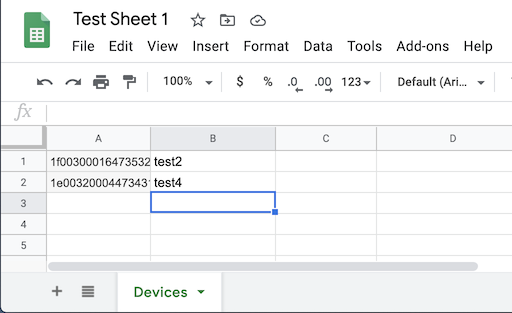
- Rename Sheet 1 to be Devices
- Put the device IDs in column A and the name in column B.
Set the script code to:
function test() {
  var e = {};
  e.parameter = {};
  e.parameter.event = 'sheetTest1';
  e.parameter.data = '[1,1234]';
  e.parameter.coreid = '1f0030001647ffffffffffff';
  e.parameter.published_at = new Date().toISOString();
  doPost(e);
}


function doPost(e) {
  // e.parameter.event
  // e.parameter.data
  // e.parameter.coreid
  // e.parameter.published_at "2016-04-16T13:37:08.728Z"

  var publishedAt = new Date(e.parameter.published_at);

  var dataArray = [];
  try {
    dataArray = JSON.parse(e.parameter.data);
  }
  catch(e) {
  }

  var ss = SpreadsheetApp.getActiveSpreadsheet();

  var mappingSheet = ss.getSheetByName('Devices');
  if (!mappingSheet) {
    Logger.log('Missing Devices sheet');
    return;
  }
  var mappingSheetRange = mappingSheet.getDataRange();
  var mappingSheetValues = mappingSheetRange.getValues();

  // Create a mapping from deviceID (column A) to name (column B)
  var mapping = {};
  for(var row = 0; row < mappingSheetValues.length; row++) {
    mapping[mappingSheetValues[row][0]] = mappingSheetValues[row][1];
  }

  // Use the device name if known, otherwise use Device ID
  var name = mapping[e.parameter.coreid];
  if (!name) {
    name = e.parameter.coreid;
  }

  var sheet = createNewSheet_(name);

  var row = [e.parameter.coreid, publishedAt];

  row = row.concat(dataArray);

  sheet.appendRow(row);

  var result = {};
  result.ok = true;

  return ContentService.createTextOutput(JSON.stringify(result))
    .setMimeType(ContentService.MimeType.JSON);
}


/**
 * Helper function that creates a new sheet, or returns an existing
 * sheet that has the same name.
 *
 * @param {string} name The name of the new sheet.
 * @return {object} The newly-created sheet or existing sheet
 *   of the same name. This sheet becomes active.
 */
function createNewSheet_(name) {
  var ss = SpreadsheetApp.getActiveSpreadsheet();

  // Returns an existing sheet if it has the specified
  // name. Activates the sheet before returning.
  var sheet = ss.getSheetByName(name);
  if (sheet) {
    return sheet.activate();
  }

  // Otherwise make a new sheet, set its name, and return it.
  // New sheets created this way automatically become the active
  // sheet.
  sheet = ss.insertSheet(name);
  return sheet;
}
And then the tabs should be named instead of having the device ID!
First we get the Devices sheet of the spreadsheet. mappingSheetValues will be filled in with the values. The first array index is the row, and then the nested array is one entry for each column.
var mappingSheet = ss.getSheetByName('Devices');
if (!mappingSheet) {
    Logger.log('Missing Devices sheet');
    return;
}
var mappingSheetRange = mappingSheet.getDataRange();
var mappingSheetValues = mappingSheetRange.getValues();
Then we create a Javascript hash of device ID to name.
// Create a mapping from deviceID (column A) to name (column B)
var mapping = {};
for(var row = 0; row < mappingSheetValues.length; row++) {
    mapping[mappingSheetValues[row][0]] = mappingSheetValues[row][1];
}
And finally look up our device ID. If it does not exist, we use the Device ID. And finally use that as our sheet, creating the sheet if necessary.
// Use the device name if known, otherwise use Device ID
var name = mapping[e.parameter.coreid];
if (!name) {
    name = e.parameter.coreid;
}

var sheet = createNewSheet_(name);
Don't forget to:
- Create a save a new version from File - Manage Versions.
- Publish a version from Publish - Deploy as web app. You only need to update the version number to the newly created version.
Mapping device IDs to names (Using Particle Cloud API)
It's also possible to query the Particle Cloud API to get the device ID to name mapping. The downside to this is that you must include a Particle account access token in your script. This token grants full access to your account, so beware!
If you are using the same example from before, you can delete the Devices sheet, or you can leave it. It won't be used.
Update the script code. Note you will need to make some modifications to it before using!
function test() {
  var e = {};
  e.parameter = {};
  e.parameter.event = 'sheetTest1';
  e.parameter.data = '[1,1234]';
  e.parameter.coreid = '1f0030001647ffffffffffff';
  e.parameter.published_at = new Date().toISOString();
  doPost(e);
}

function doPost(e) {
  // e.parameter.event
  // e.parameter.data
  // e.parameter.coreid
  // e.parameter.published_at "2016-04-16T13:37:08.728Z"

  // particle token create --never-expires
  var particleApiToken = 'afd38dc999ee0ad9ffffffffffffffffffffffff';

  var publishedAt = new Date(e.parameter.published_at);
  var cacheKey = 'deviceName';

  var dataArray = [];
  try {
    dataArray = JSON.parse(e.parameter.data);
  }
  catch(e) {
  }

  var ss = SpreadsheetApp.getActiveSpreadsheet();

  var cache = CacheService.getScriptCache();
  var deviceNameCache = cache.get(cacheKey);
  if (!deviceNameCache) {
    // The device name was not cached, so use the Particle Cloud API
    var result = UrlFetchApp.fetch('https://api.particle.io/v1/devices', {headers: {'Authorization': 'Bearer ' + particleApiToken}});
    var resultJson = JSON.parse(result.getContentText());

    deviceNameCache = {};

    for(var ii = 0; ii < resultJson.length; ii++) {
      deviceNameCache[resultJson[ii].id] = resultJson[ii].name;
    }
    cache.put(cacheKey, JSON.stringify(deviceNameCache));
  }
  else {
    deviceNameCache = JSON.parse(deviceNameCache);
  }

  // Use the device name if known, otherwise use Device ID
  var deviceName = deviceNameCache[e.parameter.coreid];
  if (!deviceName) {
    Logger.log('Unknown device ID');
    return;
  }

  var sheet = createNewSheet_(deviceName);

  var row = [e.parameter.coreid, publishedAt];

  row = row.concat(dataArray);

  sheet.appendRow(row);

  var result = {};
  result.ok = true;

  return ContentService.createTextOutput(JSON.stringify(result))
    .setMimeType(ContentService.MimeType.JSON);
}

/**
 * Helper function that creates a new sheet, or returns an existing
 * sheet that has the same name.
 *
 * @param {string} name The name of the new sheet.
 * @return {object} The newly-created sheet or existing sheet
 *   of the same name. This sheet becomes active.
 */
function createNewSheet_(name) {
  var ss = SpreadsheetApp.getActiveSpreadsheet();

  // Returns an existing sheet if it has the specified
  // name. Activates the sheet before returning.
  var sheet = ss.getSheetByName(name);
  if (sheet) {
    return sheet.activate();
  }

  // Otherwise make a new sheet, set its name, and return it.
  // New sheets created this way automatically become the active
  // sheet.
  sheet = ss.insertSheet(name);
  return sheet;
}
- Create a new API token using the Particle CLI. The first example creates a token that expires in 1 hour, which is good for testing.
particle token create --expires-in=3600
This example creates a token that never expires, which is what you want when using it in production.
particle token create --never-expires
Take the returned token and save it in this line in the script. Remember the token is very sensitive so don't publish it to source code control or share the script with others!
var particleApiToken = 'afd38dc999ee0ad9ffffffffffffffffffffffff';
In the Apps Script Editor make sure test is the selected function (1) and click Run (2). This is necessary because the new script makes an external API call and you must authorize it, or it won't work.
Rather that hit the Particle API on every event, we cache the result using the Google App Script cache service.
var cache = CacheService.getScriptCache();
var deviceNameCache = cache.get(cacheKey);
If the cache does not exist because it never existed, or it expired, then we use the Particle API to get the device list.
The UrlFetchApp is part of Google Apps Script and makes it easy to get data from a REST API.
The result of the device list Particle Cloud API call is an array of JSON, which we then parse.
if (!deviceNameCache) {
    // The device name was not cached, so use the Particle Cloud API
    var result = UrlFetchApp.fetch('https://api.particle.io/v1/devices', {headers: {'Authorization': 'Bearer ' + particleApiToken}});
    var resultJson = JSON.parse(result.getContentText());
For each of the objects in resultJson we map the device ID to the device name in the deviceNameCache. Then we store it in the cache as a string.
    deviceNameCache = {};

    for(var ii = 0; ii < resultJson.length; ii++) {
        deviceNameCache[resultJson[ii].id] = resultJson[ii].name;
    }
    cache.put(cacheKey, JSON.stringify(deviceNameCache));
If the cache was returned, then we use it. Note that the cache service returns a string but when we use the cache we expect it to be a hash to map device ID to device name, so we do that here:
else {
    deviceNameCache = JSON.parse(deviceNameCache);
}
Finally, we use this mapping for the tab name.
// Use the device name if known, otherwise use Device ID
var deviceName = deviceNameCache[e.parameter.coreid];
if (!deviceName) {
    Logger.log('Unknown device ID');
    return;
}

var sheet = createNewSheet_(deviceName);
Separate spreadsheets by Device ID
What if you wanted to have separate spreadsheet files for each device? You might want to do this if you have a lot of data, or if you want to control access to the spreadsheets on a per-user basis.
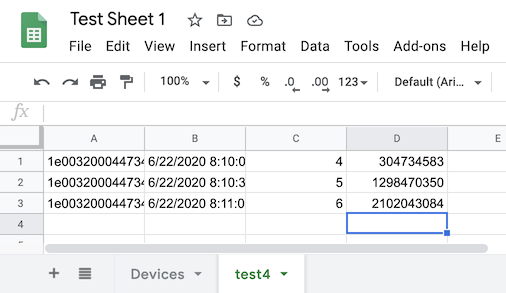
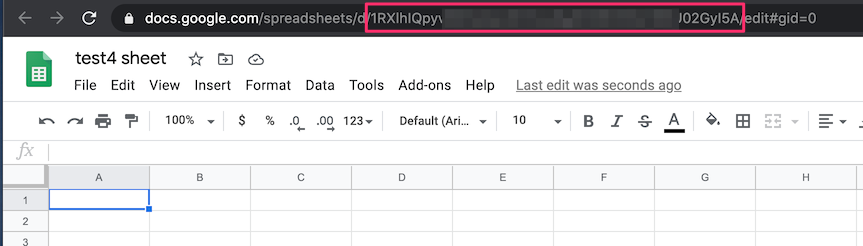
Create a new spreadsheet. I named mine test4 sheet because I'm going to use it to store the data from device test4.
Note the spreadsheet ID in the URL. It's the long string after a / and before the /edit.
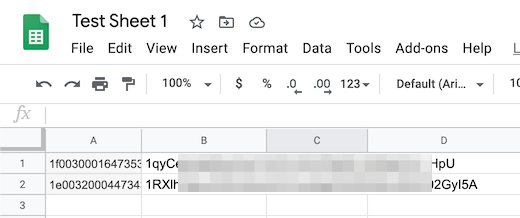
- Go back to Test Sheet 1 and update the Devices sheet so the second column is the spreadsheet ID instead of device name.
- Update the code to this:
function test() {
  var e = {};
  e.parameter = {};
  e.parameter.event = 'sheetTest1';
  e.parameter.data = '[1,1234]';
  e.parameter.coreid = '1f0030001647ffffffffffff';
  e.parameter.published_at = new Date().toISOString();
  doPost(e);
}


function doPost(e) {
  // e.parameter.event
  // e.parameter.data
  // e.parameter.coreid
  // e.parameter.published_at "2016-04-16T13:37:08.728Z"

  var publishedAt = new Date(e.parameter.published_at);

  var dataArray = [];
  try {
    dataArray = JSON.parse(e.parameter.data);
  }
  catch(e) {
  }

  var ss = SpreadsheetApp.getActiveSpreadsheet();

  var mappingSheet = ss.getSheetByName('Devices');
  if (!mappingSheet) {
    Logger.log('Missing Devices sheet');
    return;
  }
  var mappingSheetRange = mappingSheet.getDataRange();
  var mappingSheetValues = mappingSheetRange.getValues();

  // Create a mapping from deviceID (column A) to spreadsheet ID (column B)
  var mapping = {};
  for(var row = 0; row < mappingSheetValues.length; row++) {
    mapping[mappingSheetValues[row][0]] = mappingSheetValues[row][1];
  }

  // Look up device ID to spreadsheet
  var sheetId = mapping[e.parameter.coreid];
  if (!sheetId) {
    Logger.log('Unknown device ID');
    return;
  }

  ss = SpreadsheetApp.openById(sheetId);

  var sheet = ss.getActiveSheet();

  var row = [e.parameter.coreid, publishedAt];

  row = row.concat(dataArray);

  sheet.appendRow(row);

  var result = {};
  result.ok = true;

  return ContentService.createTextOutput(JSON.stringify(result))
    .setMimeType(ContentService.MimeType.JSON);
}
Create a save a new version from File - Manage Versions.
Publish a version from Publish - Deploy as web app. You only need to update the version number to the newly created version.
Now the data goes into a completely separate spreadsheet file!
Most of the code should be similar but there are a few differences. If the device ID is not found, we now exit.
// Look up device ID to spreadsheet
var sheetId = mapping[e.parameter.coreid];
if (!sheetId) {
    Logger.log('Unknown device ID');
    return;
}
We now open the other spreadsheet by ID and then use its active sheet.
ss = SpreadsheetApp.openById(sheetId);

var sheet = ss.getActiveSheet();
Note that you only have to have the scripts in Test Sheet 1. The per-device pages are just blank sheets.
Setting columns by key
In all of the examples so far we've just used a JSON array of items to store in columns in the spreadsheet. This works OK, but sometimes you want more flexibility. Instead of having an array, you could use a JSON object so the items would not need to be ordered, and you have the flexibility of reordering the columns in the spreadsheet without having to update the device firmware!
This example requires an updated spreadsheet, script, and device firmware.
Update sheet
Optionally remove the sheets you've created, but it won't hurt to leave them. But in any case start with a new sheet.
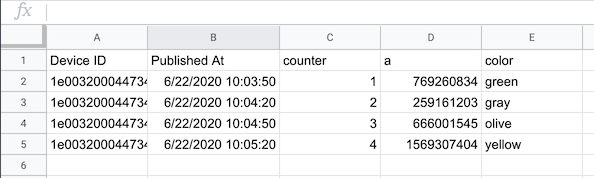
Make a label row in row 1 with the following values. They are case-sensitive and the spaces matter.
Device IDPubished Atcounteracolor
Update script
Here's the new script:
function test() {
  var e = {};
  e.parameter = {};
  e.parameter.event = 'sheetTest1';
  e.parameter.data = '{"counter":1,"a":1234}';
  e.parameter.coreid = '1f0030001647ffffffffffff';
  e.parameter.published_at = new Date().toISOString();
  doPost(e);
}

function doPost(e) {
  // e.parameter.event
  // e.parameter.data
  // e.parameter.coreid
  // e.parameter.published_at "2016-04-16T13:37:08.728Z"

  var publishedAt = new Date(e.parameter.published_at);

  var dataObject = {};
  try {
    dataObject = JSON.parse(e.parameter.data);
  }
  catch(e) {
  }

  var ss = SpreadsheetApp.getActiveSpreadsheet();

  var sheet = ss.getActiveSheet();

  var labelRange = sheet.getRange("A1:1");

  var labels = labelRange.getValues();

  var row = [];

  for(var ii = 0; ii < labels[0].length; ii++) {
    var label = labels[0][ii];
    if (label === 'Device ID') {
      row.push(e.parameter.coreid);
    }
    else
    if (label == 'Published At') {
      row.push(publishedAt);
    }
    else {
      Logger.log('label=' + label + ' value=' + dataObject[label]);
      if (dataObject[label] != undefined) {
        row.push(dataObject[label]);
      }
      else {
        row.push('');
      }
    }
  }

  sheet.appendRow(row);

  var result = {};
  result.ok = true;

  return ContentService.createTextOutput(JSON.stringify(result))
    .setMimeType(ContentService.MimeType.JSON);
}
Of interest in this script:
In test, note the data is now a JSON object instead of a JSON array:
function test() {
  var e = {};
  e.parameter = {};
  e.parameter.event = 'sheetTest1';
  e.parameter.data = '{"counter":1,"a":1234}';
In doPost() the dataObject takes the place of the dataArray and is an object:
  var dataObject = {};
  try {
    dataObject = JSON.parse(e.parameter.data);
  }
  catch(e) {
  }
We grab the labels out of the first row:
  var labelRange = sheet.getRange("A1:1");

  var labels = labelRange.getValues();
And we build the row differently. For each label:
- If it's a special case (
Device IDorPublished At) we handle that - If it's not, then we check and see if this object has that label in the event data
- If it does, the value is appended.
  var row = [];

  for(var ii = 0; ii < labels[0].length; ii++) {
    var label = labels[0][ii];
    if (label === 'Device ID') {
      row.push(e.parameter.coreid);
    }
    else
    if (label == 'Published At') {
      row.push(publishedAt);
    }
    else {
      Logger.log('label=' + label + ' value=' + dataObject[label]);
      if (dataObject[label] != undefined) {
        row.push(dataObject[label]);
      }
      else {
        row.push('');
      }
    }
  }
Create a save a new version from File - Manage Versions.
Publish a version from Publish - Deploy as web app. You only need to update the version number to the newly created version.
Device firmware
This example requires new device firmware.
#include "Particle.h"

#ifndef SYSTEM_VERSION_v620
SYSTEM_THREAD(ENABLED); // System thread defaults to on in 6.2.0 and later and this line is not required
#endif

SerialLogHandler logHandler;

// How often to publish a value
const std::chrono::milliseconds publishPeriod = 30s;

// The event name to publish with
const char *eventName = "sheetTest1";

unsigned long lastPublish;
int counter = 0;
char buf[256];

const char *colorNames[] = {
    "white", "silver", "gray", "black", "red", "maroon", "yellow", "olive", "lime", "green", "aqua", "teal", "blue", "navy", "fuchsia", "purple"
};

void publishTest();

void setup() {
}

void loop() {
    if (Particle.connected()) {
        if (millis() - lastPublish >= publishPeriod.count()) {
            lastPublish = millis();

            publishTest();
        }
    }
}

void publishTest() {
    JSONBufferWriter writer(buf, sizeof(buf) - 1);

    // This just picks a random color name from the table above. It's just
    // to illustrate adding a string to the JSON as well as numbers.
    size_t numColors = sizeof(colorNames) / sizeof(colorNames[0]);
    const char *colorName = colorNames[rand() % numColors];

    writer.beginObject();
    writer.name("counter").value(++counter);
    writer.name("a").value(rand());
    writer.name("color").value(colorName);
    writer.endObject();
    writer.buffer()[std::min(writer.bufferSize(), writer.dataSize())] = 0;

    Particle.publish(eventName, buf, PRIVATE);
    Log.info("published: %s", buf);
}
Finishing up
One of the biggest advantages of this technique is that you are free to reorder the columns! Grab the color column and drag it to the left and the publishing still works without having to edit the device firmware.