
Pushover (push notifications)
If you thinking about using SMS for sending notifications to yourself, you may want to consider Pushover. They have versions for iOS, Android, and desktop that allow you to send push notifications easily, using a Particle webhook. It's not free, but the cost is low.
Using SMS is becoming more complicated due to A2P 10DLC registration requirements. This is designed to reduce SMS spam, however the downside is that if you are using a web service like Twilio to send SMS, you will need to register yourself and a campaign, which doesn't cost extra, but can take a few weeks to be approved. This is required even to send to yourself as the mobile carriers will block SMS from unregistered sources.
If you are using Papertrail for remote logging, it also integrates with Pushover so you can be notified when your devices generate certain logging messages, or don't generate logging messages, because they have gone offline.
Pushover setup
Follow the instructions on the Pushover website. Basically, you install the app on your iOS device from the Apple App Store or Android from Google Play. You can start with a 30-day trial, but to continue past that you will need to make the $5 in-app purchase for a perpetual license.
When you create a new account, either from the mobile apps or from the web site, you will get two necessary items:
APP_TOKENwhich allows the holder to make REST API calls to PushoverUSER_KEYwhich identifies your mobile device.
If you want to send to multiple users, you can do so using a comma-separated list of USER_KEYs, or you can create a group. The
GROUP_KEY can be used interchangeably with USER_KEY. This is a good option because it's easy to reconfigure the group members
on the Pushover web site.
If you are sending to a single user that user has multiple devices registered with Pushover, it's possible to send to all or a comma separated list of devices. The default is all devices.
In this example, we embed the USER_KEY or GROUP_KEY in the webhook, as this is the most common scenario. If the device
needs to send to different users under firmware control, you may want to have the device send up the user or group key along with the
message payload. This requires encoding the payload in JSON, and of course means user or group keys will be embedded in your
firmware, which may be less convenient.
Webhook setup
Go to the Integrations page in the Particle console and create a new webhook:
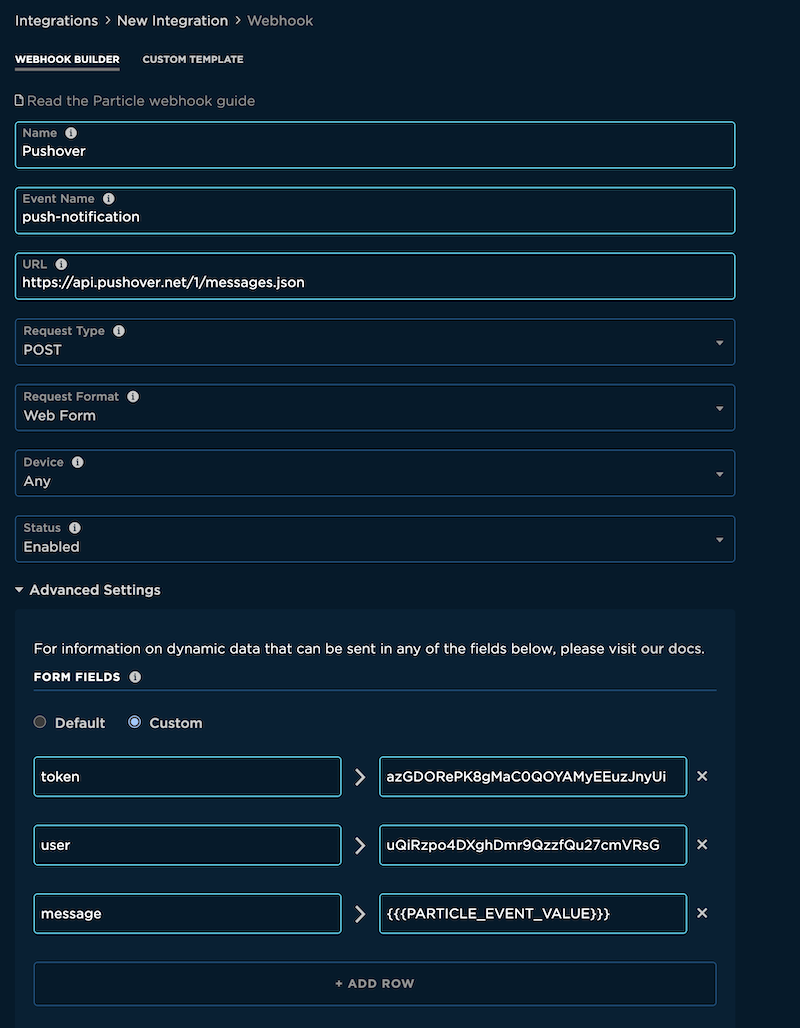
Name is descriptive for your own use.
Event Name is the event that your device sends to initiate a push message. It must be 1 to 64 ASCII characters. You should only use letters, numbers, underscores, dashes and slashes in event names. Also remember that the event name is a prefix match, so if you set your Event Name to
testthan a device publishing the eventtest2will also trigger thetestwebhook.URL is the server URL. This must be
https://api.pushover.net/1/messages.json.Request Type must be POST.
Request Format must be Web form. Note that this is true even though the URL contains
messages.json; the request must be a web form, not JSON. The result will be JSON.Device is typically Any but you can restrict to a single device if you are using a developer sandbox integration. This option is not present for product integrations.
Enabled is typically Enabled.
You will also need to expand the Advanced Settings.
Under Form Fields click Custom, then enter:
token > Your
APP_TOKENuser > Your
USER_KEYorGROUP_KEY. Can be a comma-separated list ofUSER_KEYs.message >
Note that there are three curly brackets and underscores. This must match exactly.
If you prefer to set up your webhook using JSON, this matches the example in the picture. Of course replace the token and user values with the ones for your account.
{
    "name": "Pushover",
    "event": "push-notification",
    "url": "https://api.pushover.net/1/messages.json",
    "requestType": "POST",
    "noDefaults": true,
    "rejectUnauthorized": true,
    "form": {
        "token": "azGDORePK8gMaC0QOYAMyEEuzJnyUi",
        "user": "uQiRzpo4DXghDmr9QzzfQu27cmVRsG",
        "message": "{{{PARTICLE_EVENT_VALUE}}}"
    }
}
The are a bunch of other options available! See the Pushover API documentation. You can optionally specify a clickable URL in the push notification, customize the sound that is played, specify a list of devices for a user to send to, and more.
Device firmware
In your application firmware, you will need to publish an event when you want to generate a push notification. It might look something like this:
if (Particle.connected()) {
    Particle.publish("push-notification", "Alarm activated");
}
- The string
push-notificationmust match the Event Name in your webhook. - The other string is the message that will be contained in the push notification.
In this case, the message is a static string but you can dynamically create one using snprintf or String::format if desired.
Make sure you code your logic to avoid sending out a stream of these in rapid succession! Event publishes are limited to 1 per second on average. The normal Pushover plan allows up to 10,000 push notifications per month, but mostly sending off a stream of many notifications will be very annoying.