The air quality monitoring kit
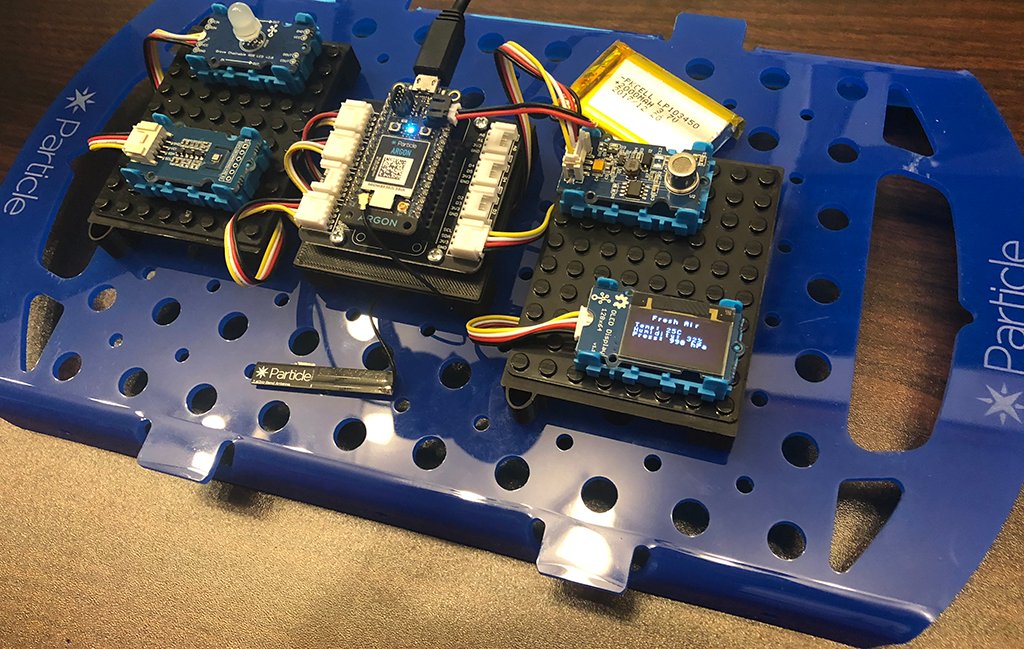
Air quality monitoring is a common IoT use case, whether gauging dust levels in a workshop or industrial setting, or measuring overall air quality in a public space. In this tutorial, you’ll learn how to perform air quality monitoring with the Particle Air Quality Monitoring kit, display readings on a screen, and publish data to the Particle Device Cloud.
The air quality monitoring kit has been deprecated. This page is no longer maintained and is provided for historical reference only
The Particle mobile app for iOS will be deprecated in the future. The Android app has been deprecated. You should use web-based or CLI setup instead.
The air quality kit comes with the following things:
- 1x Particle Argon or Boron
- 1x LiPo Battery
- 1x Grove Adapter for Particle Gen3 or Feather devices
- 1x Grove Dust Sensor
- 1x Grove Air Quality Sensor
- 1x Grove (BME280) Temperature and Humidity Sensor
- 1x Grove 0.96in OLED
If you want to jump ahead to the completed code, see the full listing and download instructions, below.
For this tutorial, you’ll need the following Particle tools and services:
- A Particle account
- The Particle mobile app
- Particle Workbench
Claiming your particle device
Before putting the kit together, you’ll need to claim your new Particle device. To do that, click the button below and follow the prompts to configure the device and assign it to your Particle account.
Assembling the kit
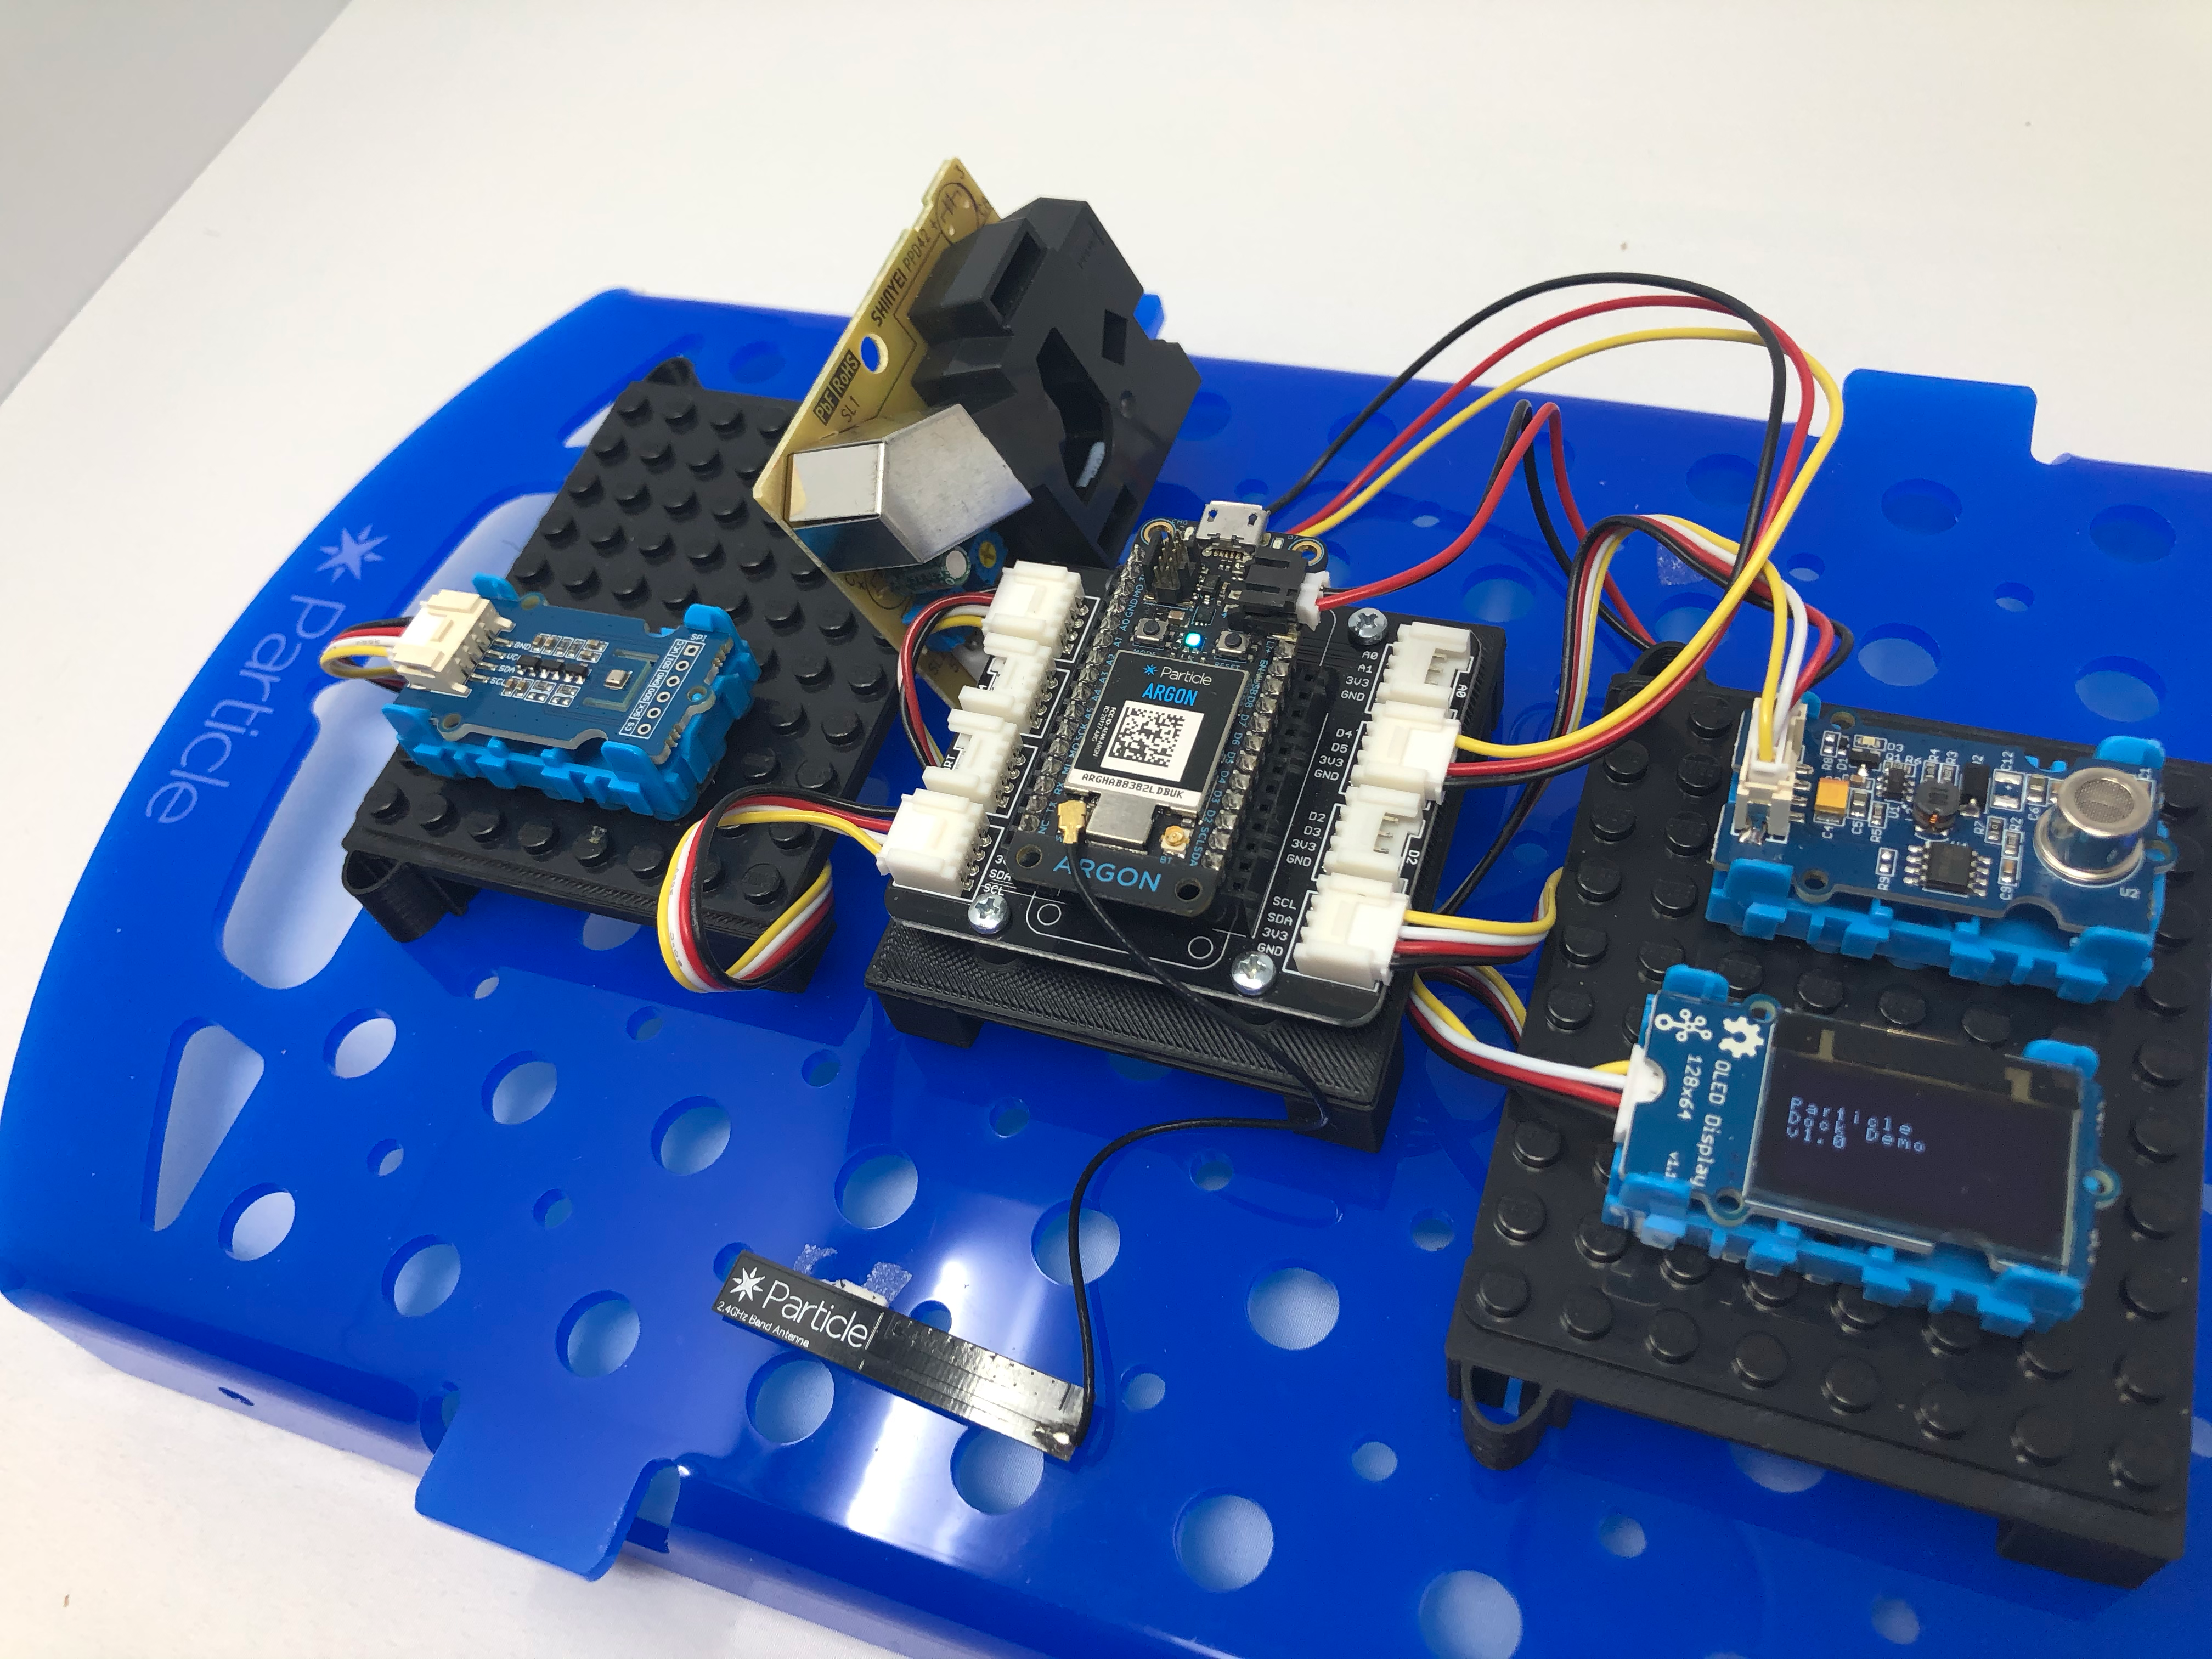
Now, let’s connect everything together. Remove the power from your device before continuing.
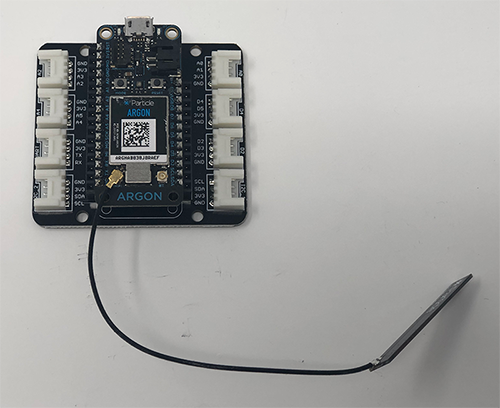
First, plug the Argon or Boron into the Grove shield, aligning the short row of pins with the short header row on the shield.
Next, connect a 4-wire Grove cable to the Grove OLED screen. Plug the other side into the shield on the port labeled
I2C_1.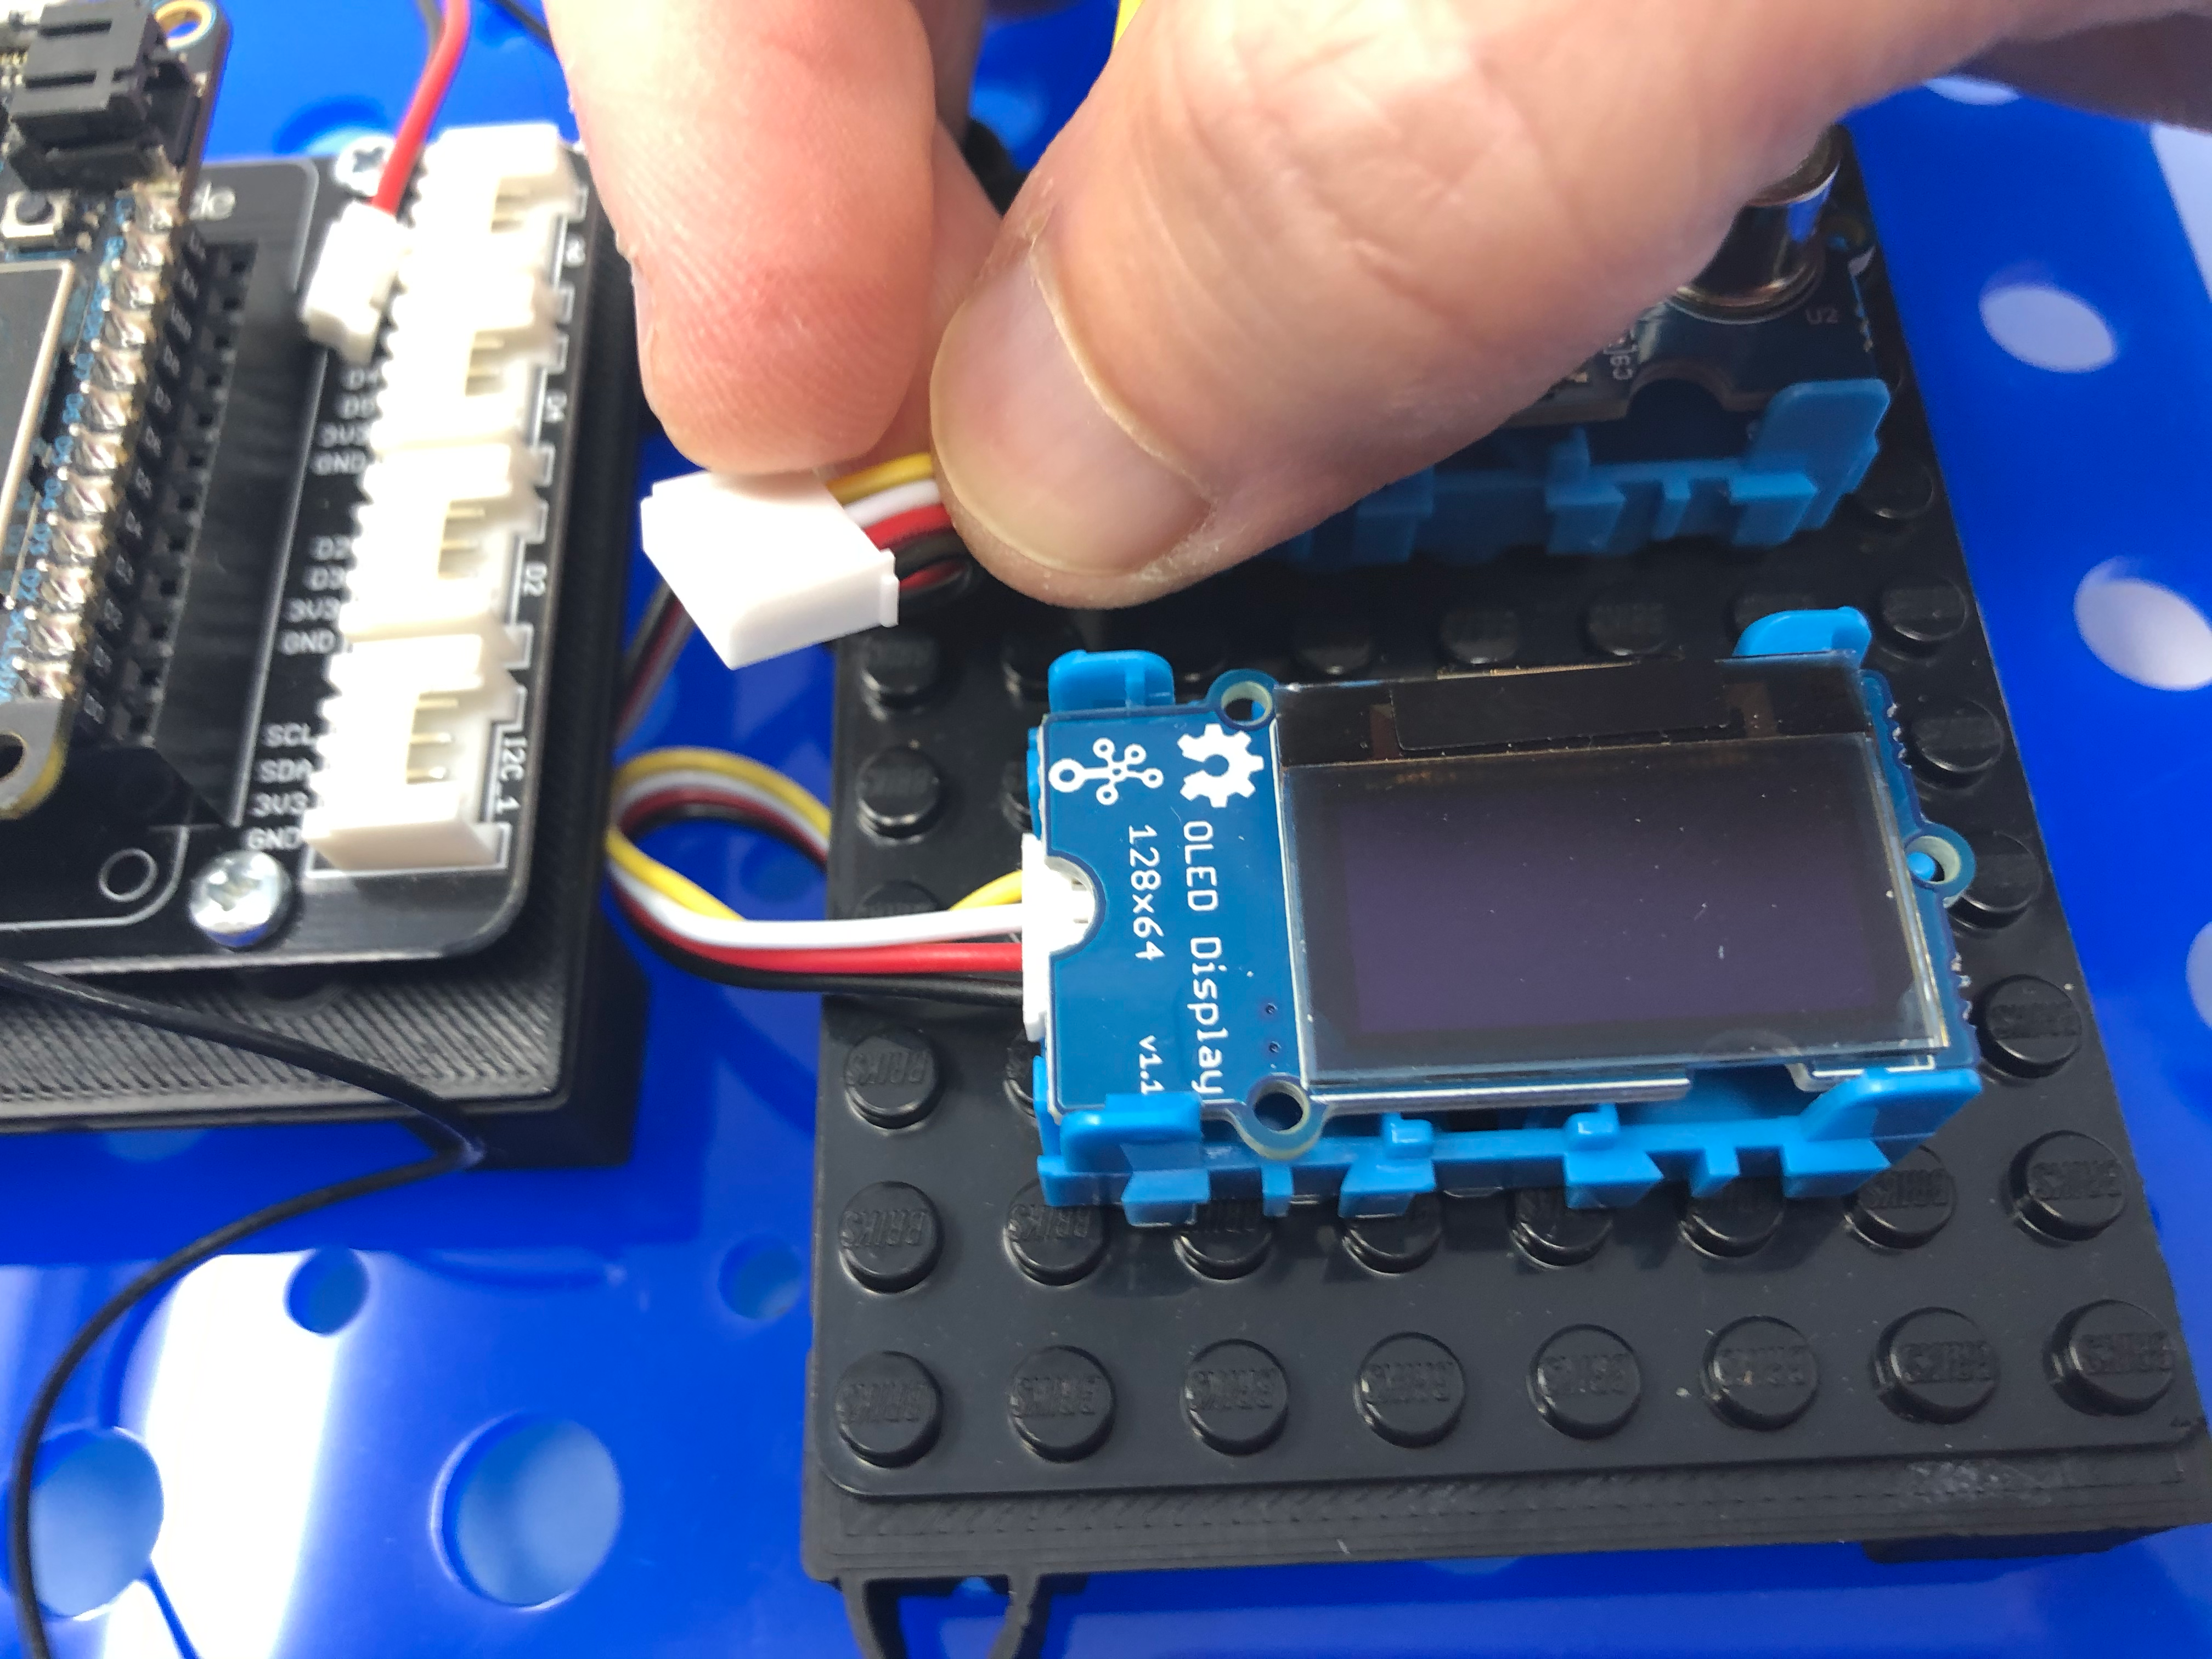
Connect another 4-wire Grove cable to the BME280 temperature and humidity sensor. Plug the other side into the shield on the port labeled
I2C_2.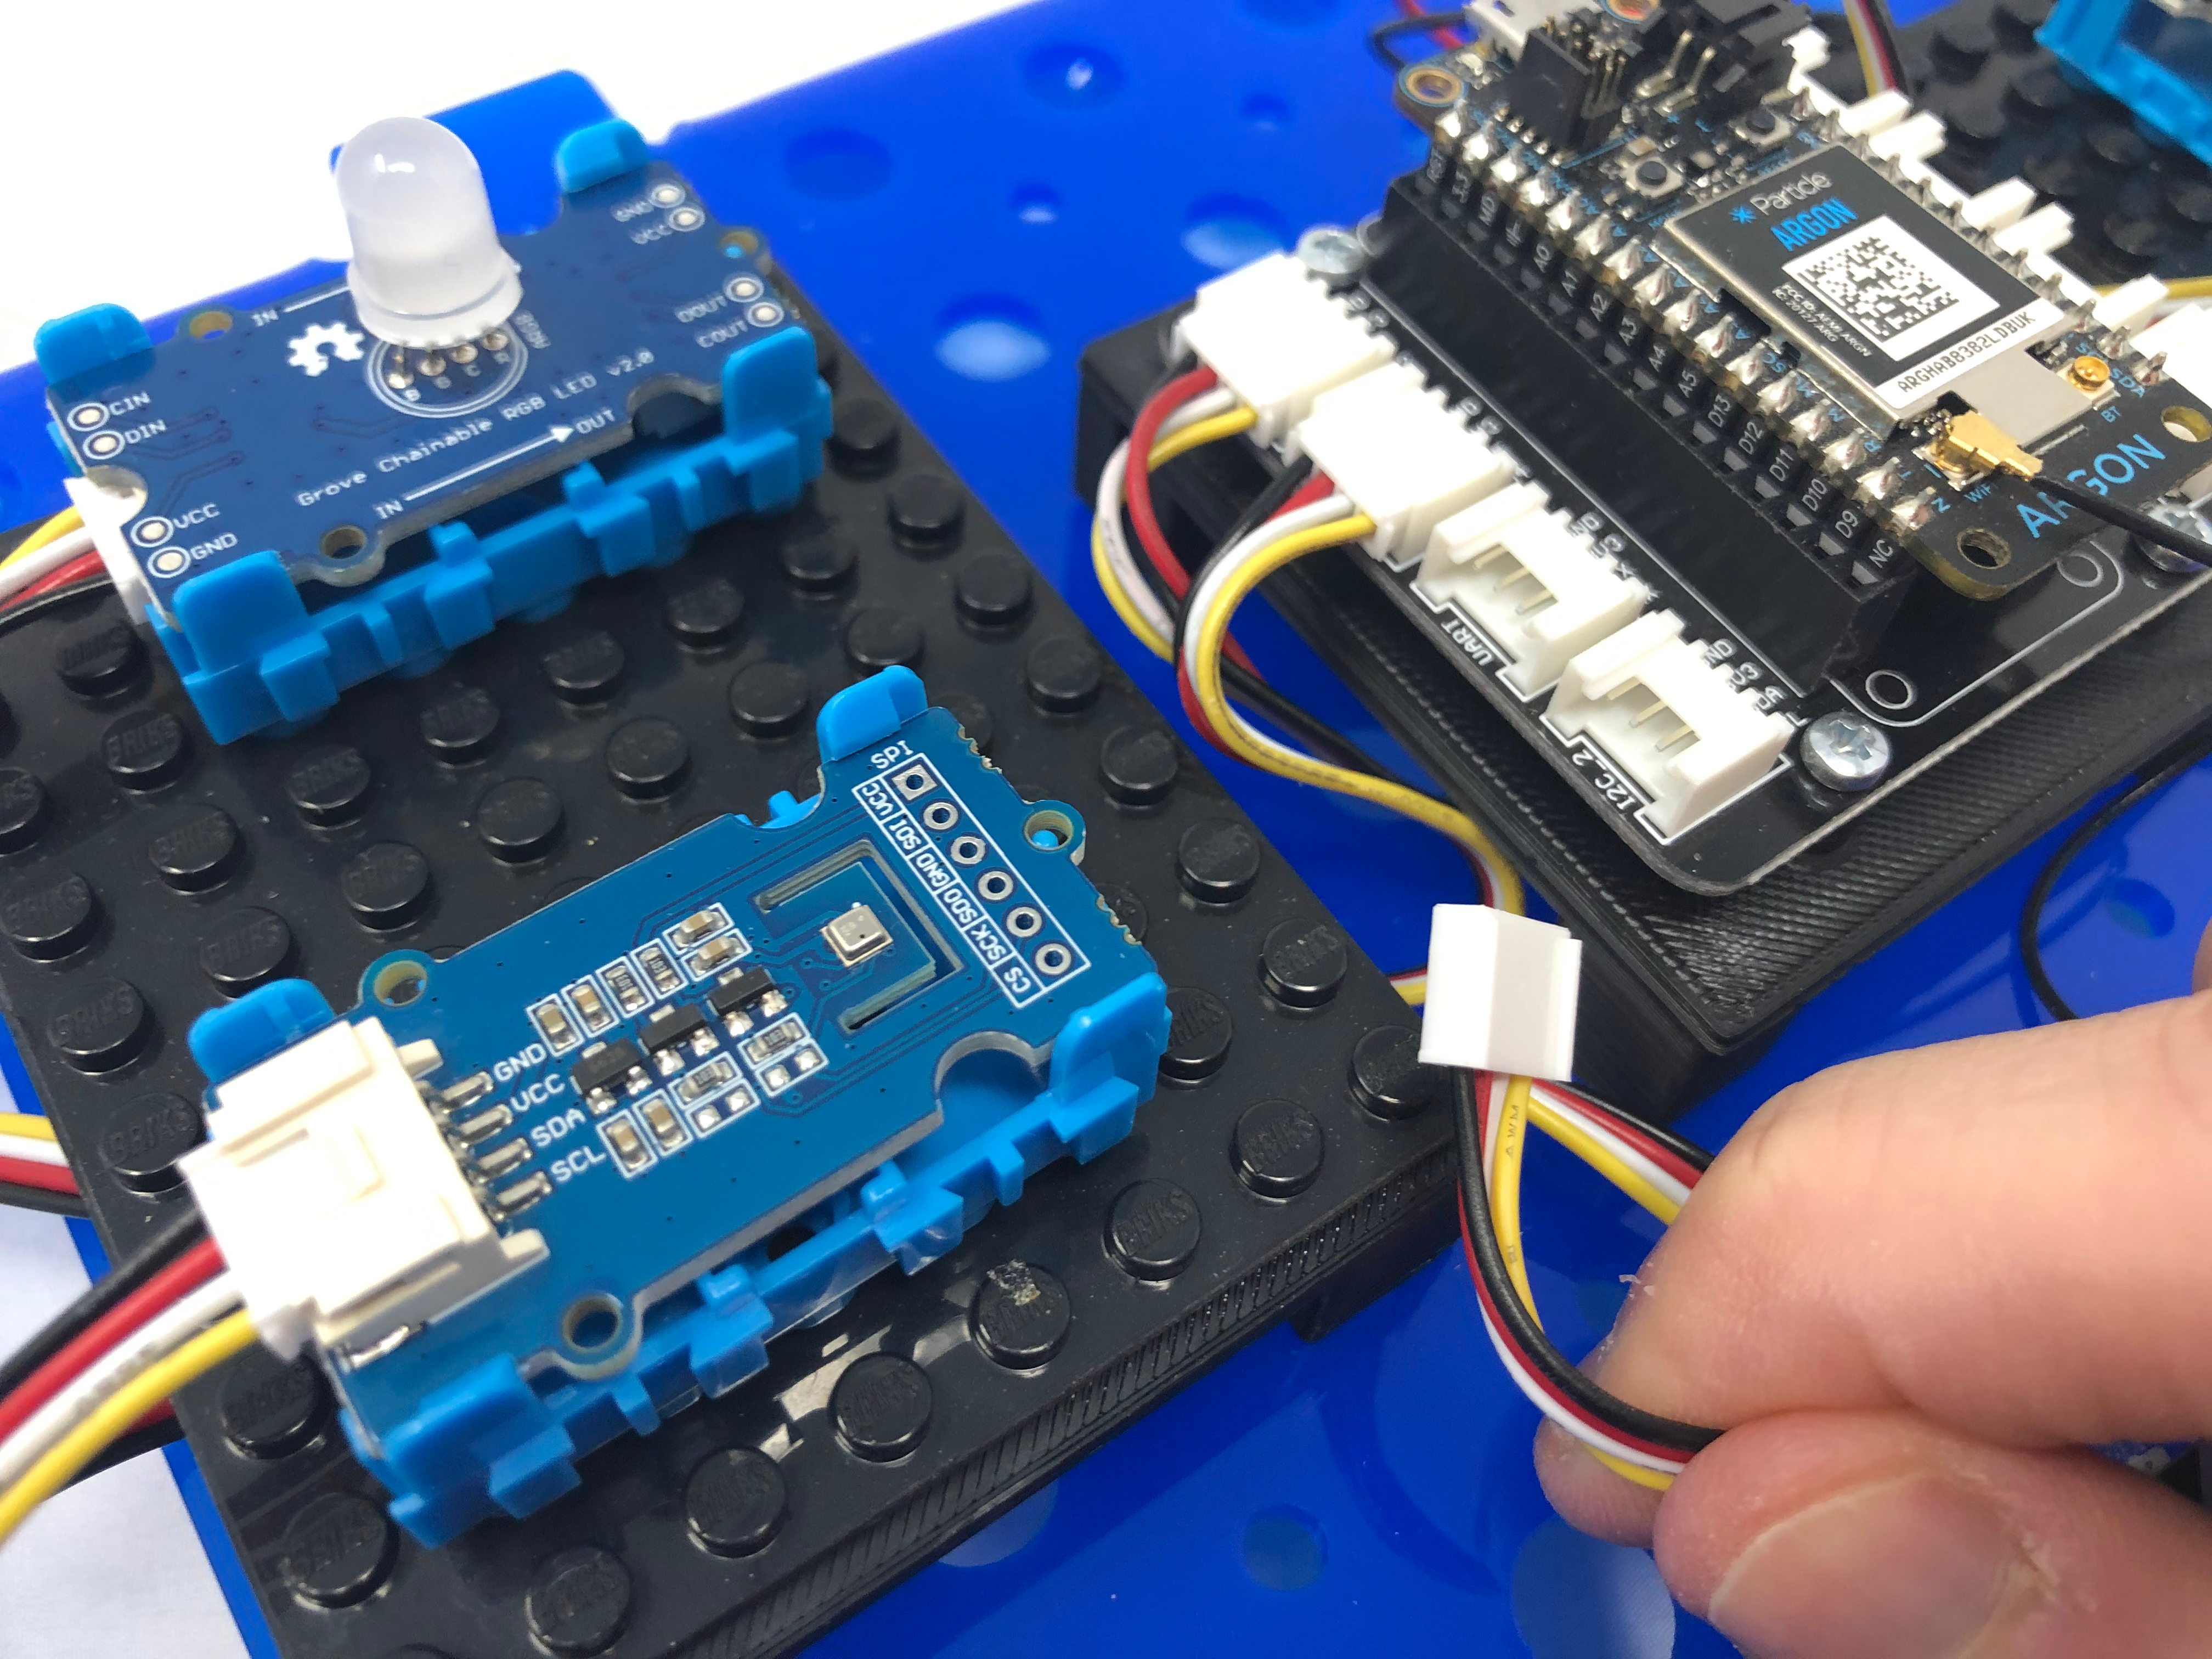
Next, connect another 4-wire Grove cable to the Air Quality sensor. Plug the other side into the shield on the port labeled
A2.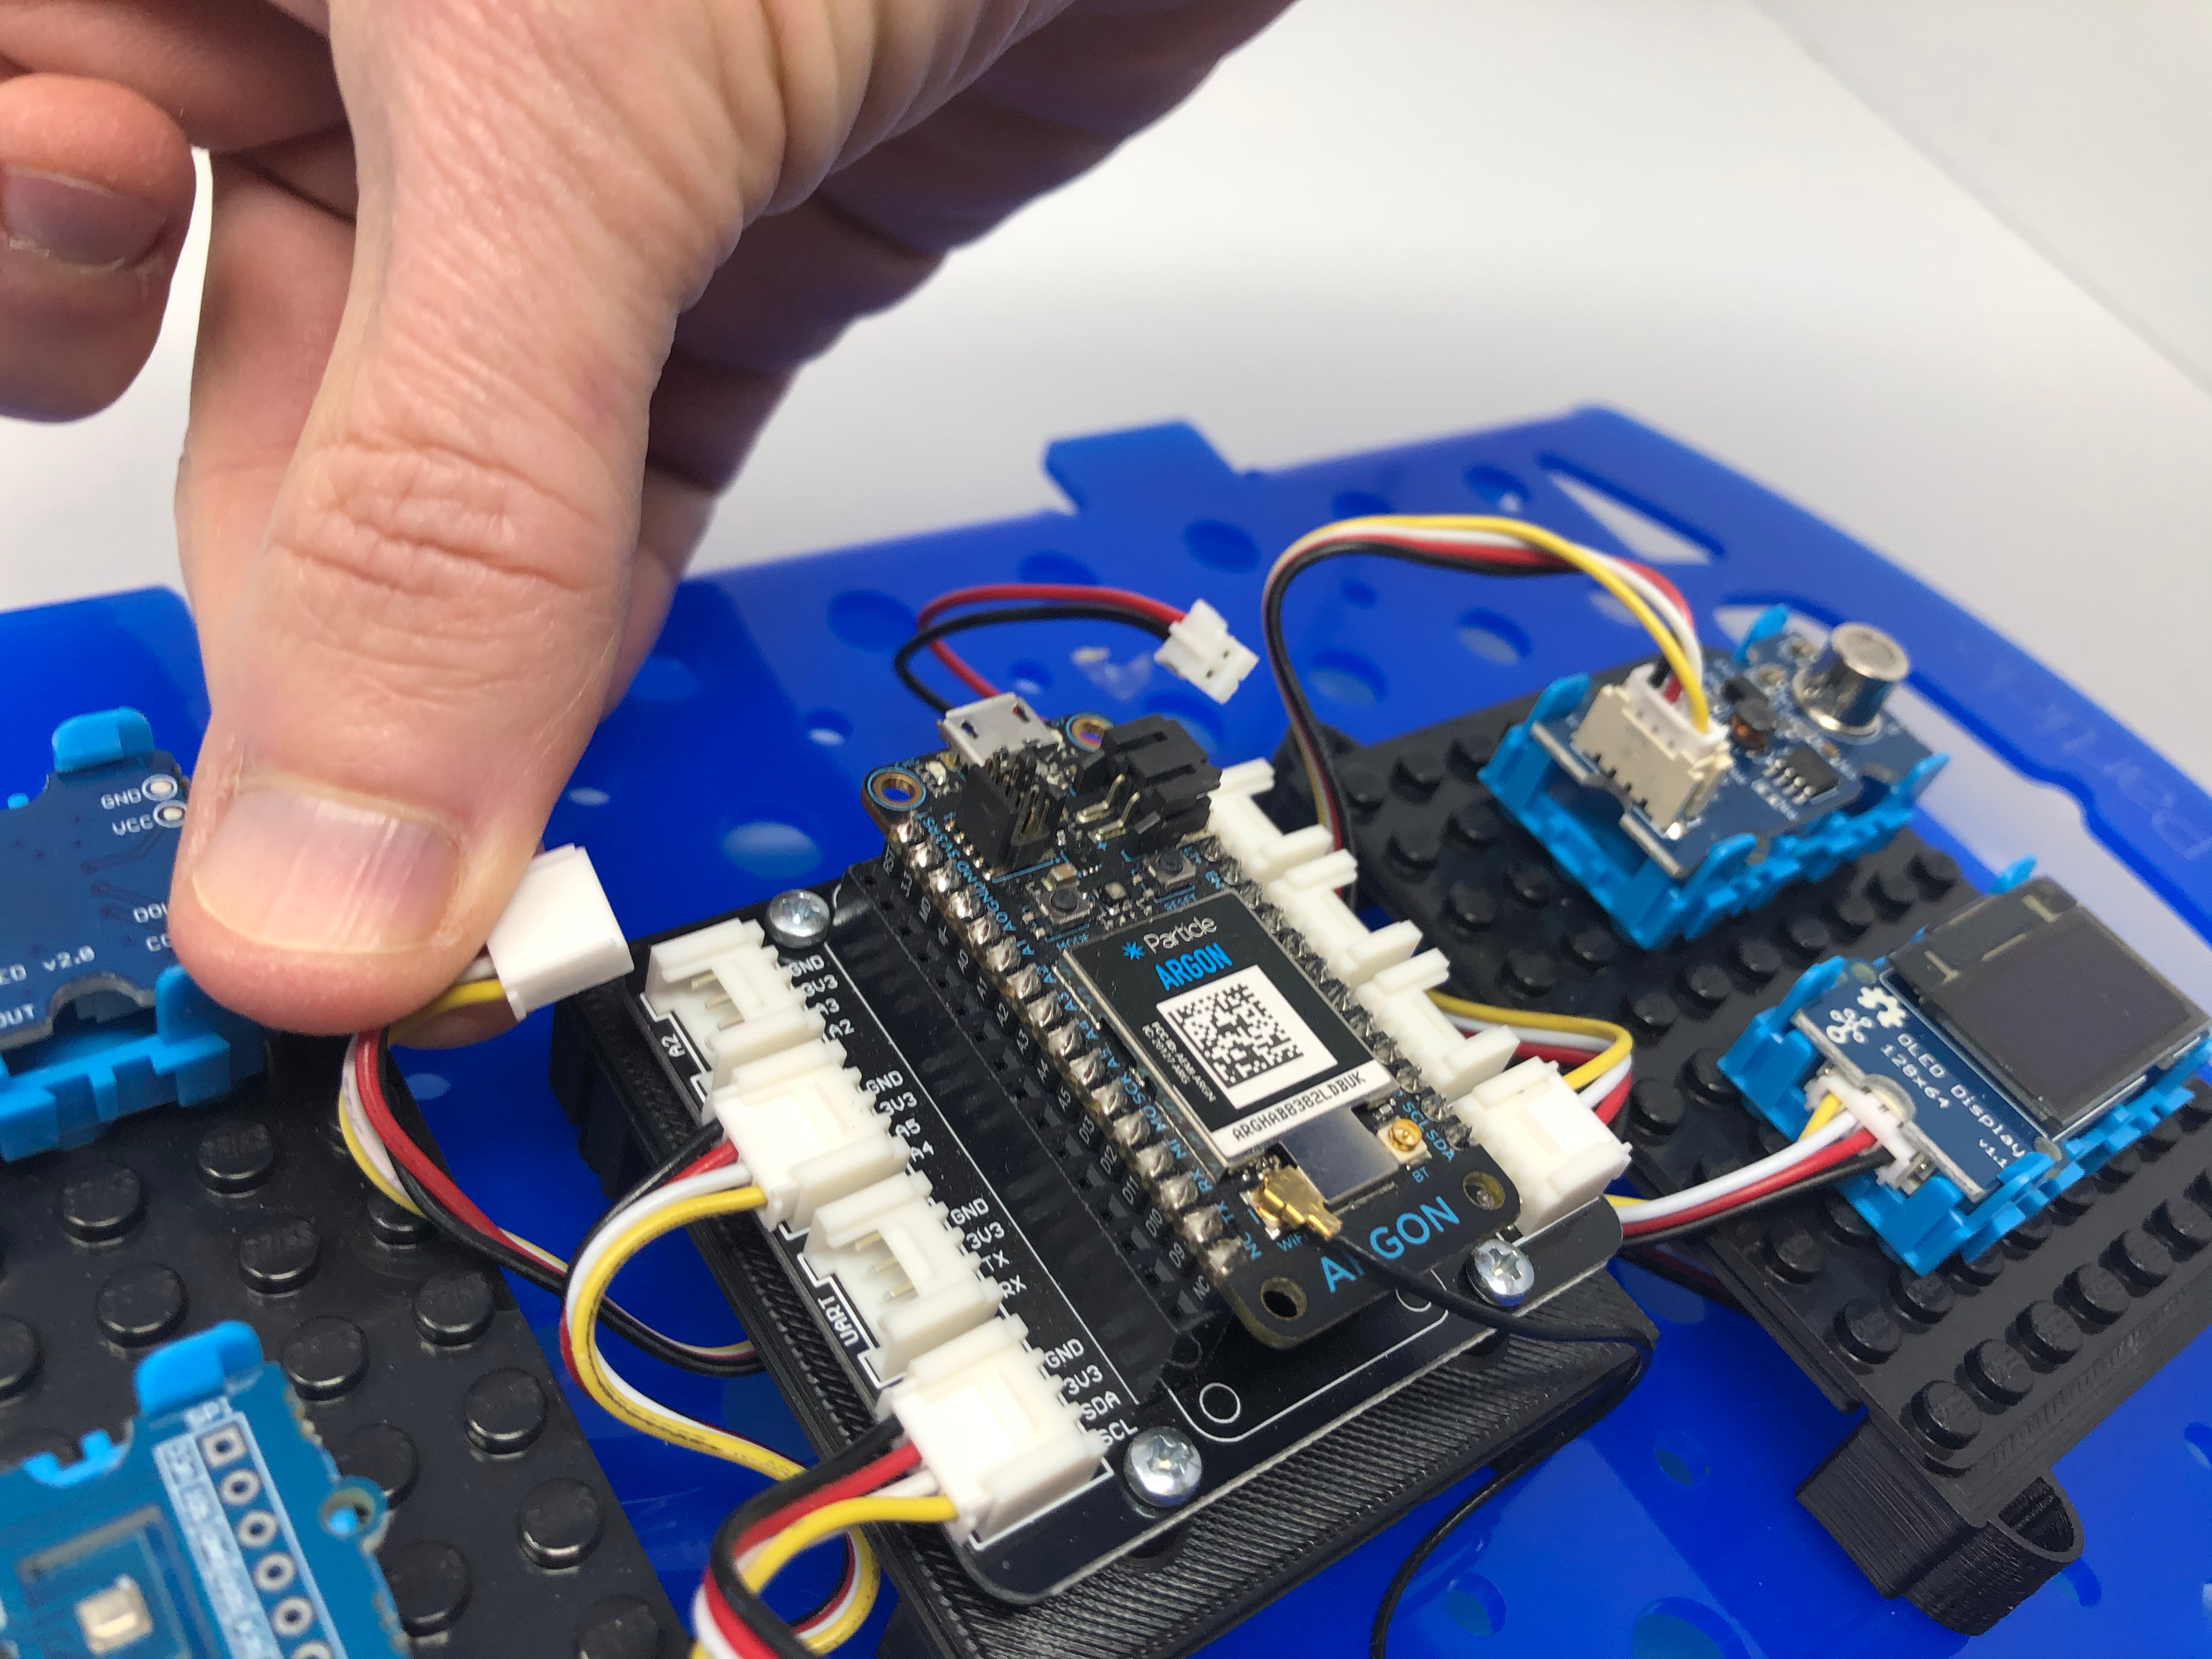
Finally, let’s connect the Dust sensor. The 3-wire grove cable comes pre-connected to the device, so take the other end and plug it into the shield at the port labeled
D4.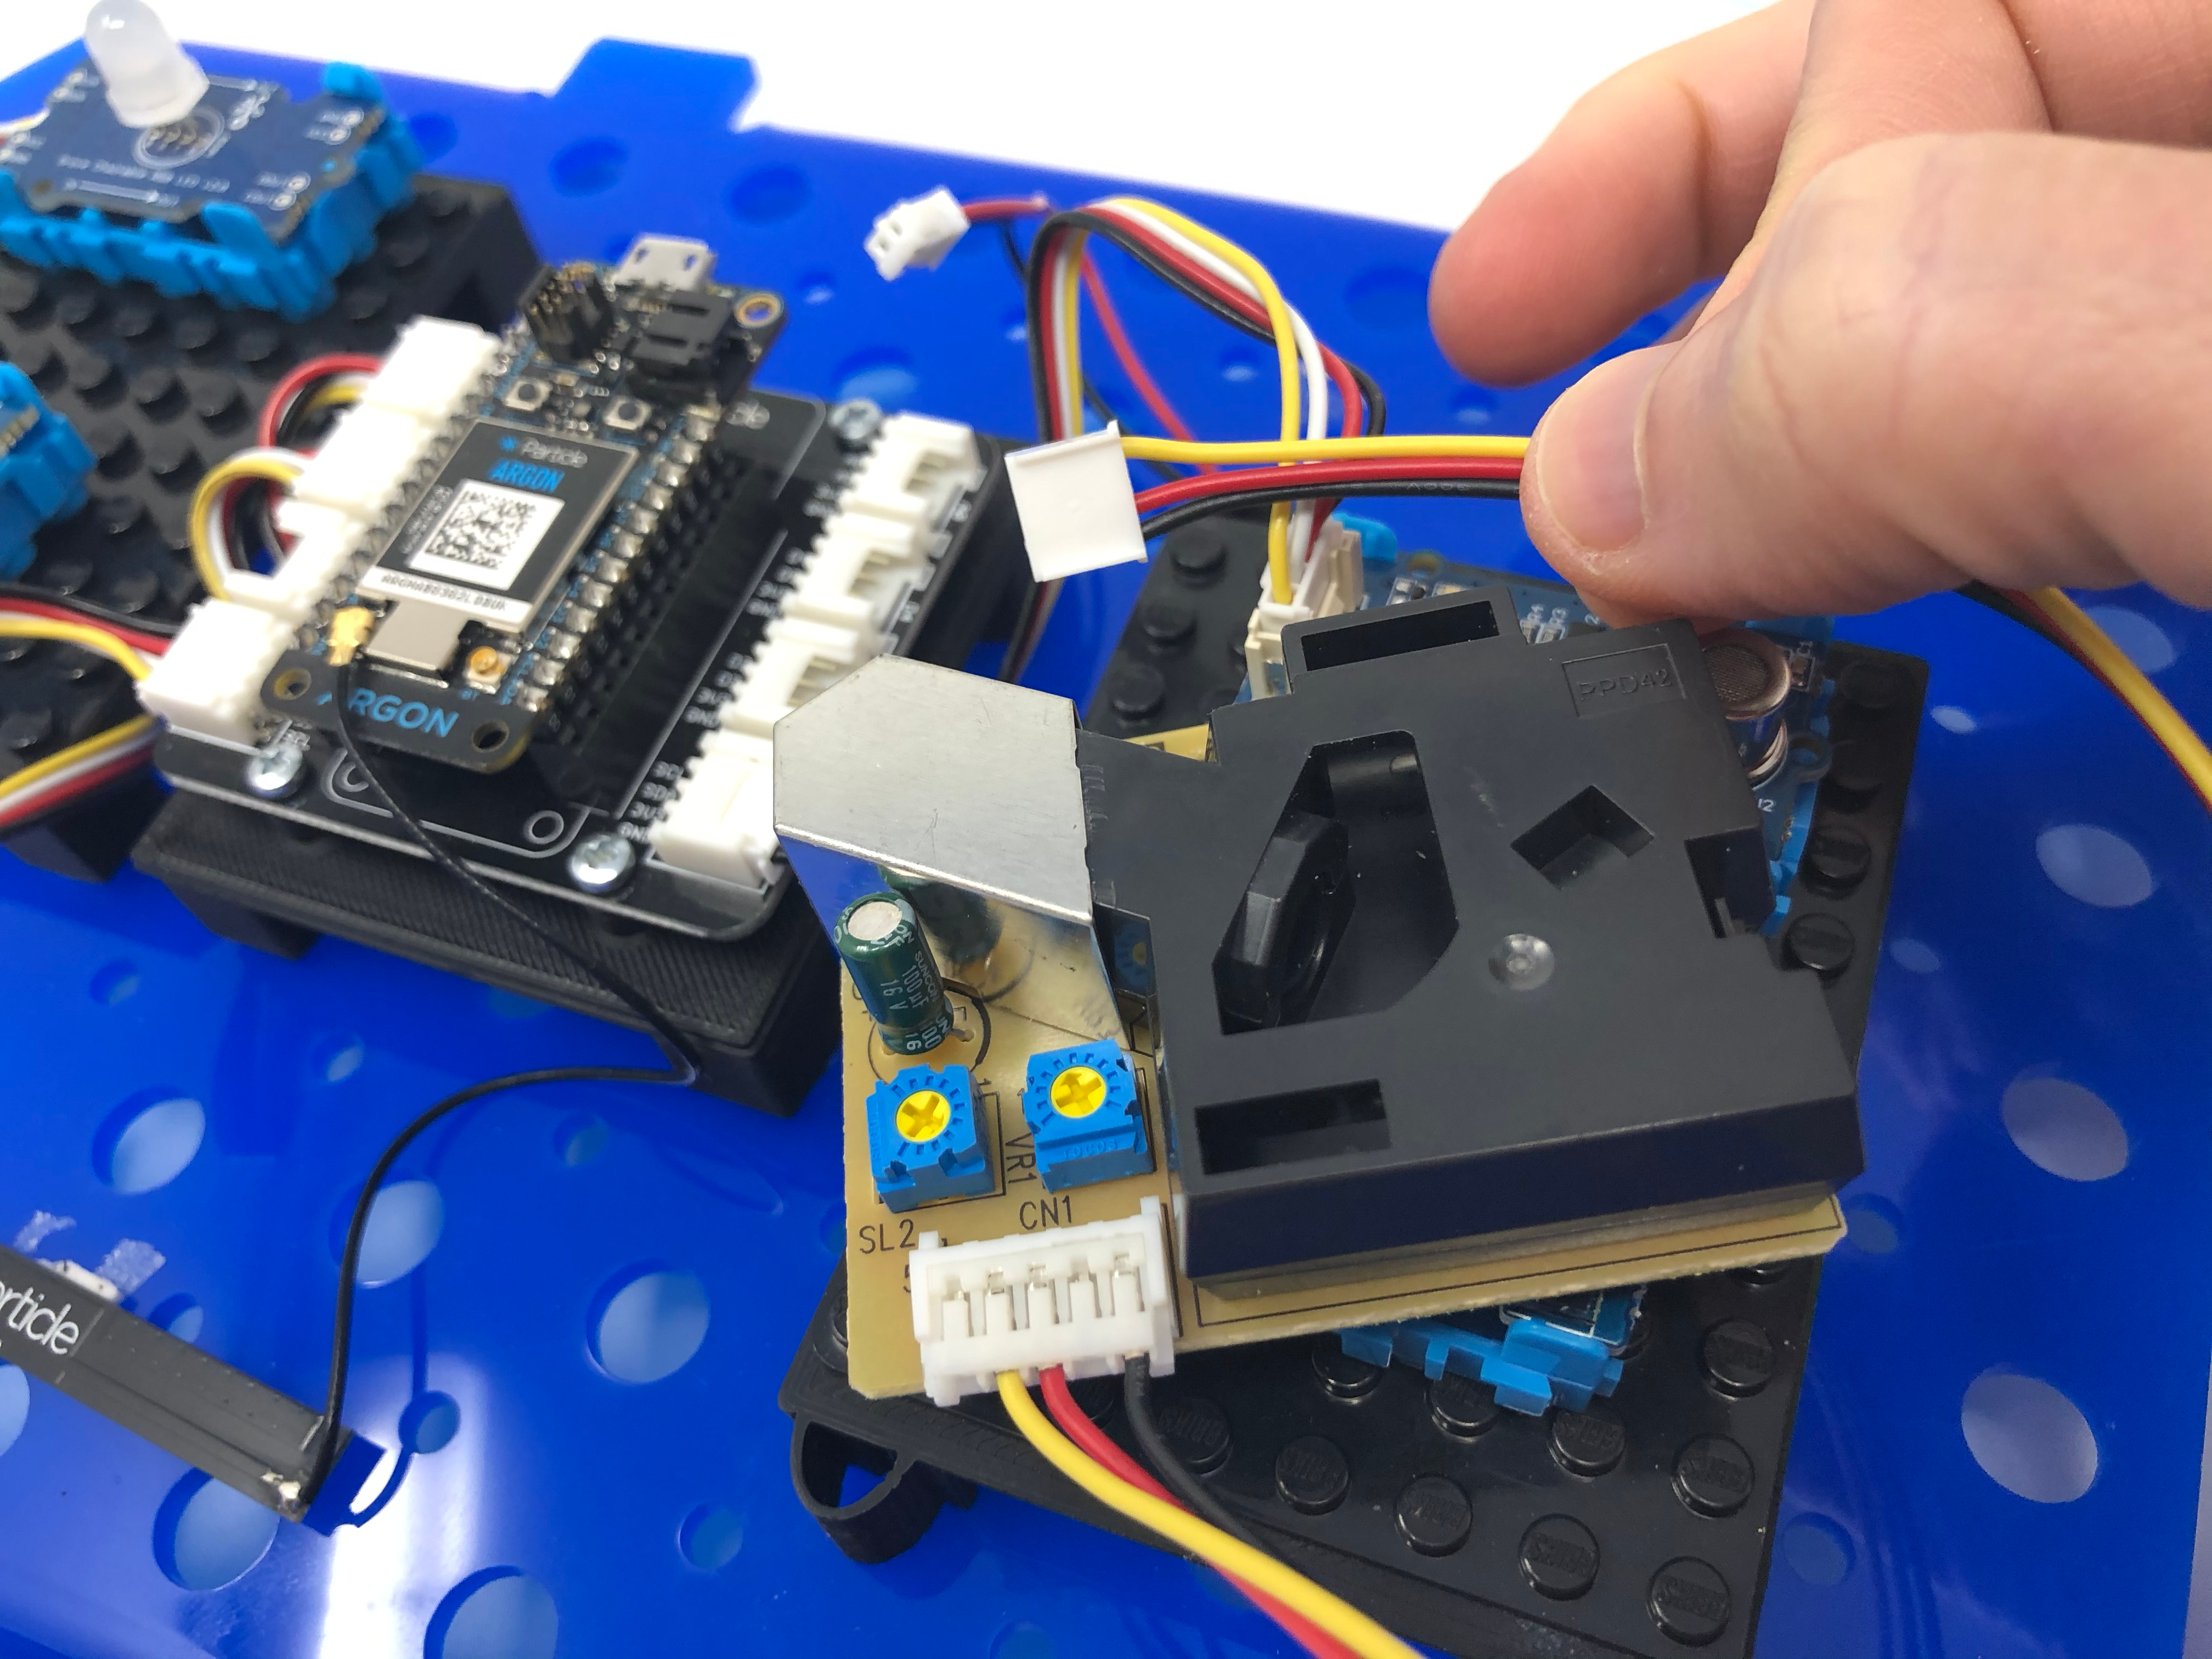
Note: To operate effectively, the dust sensor must be placed in a vertical orientation, so make sure to prop it up with the grove cable port pointing down before continuing.
Creating a new project
Now, let’s create a new project for the application firmware. The steps below assume you’re using Particle Workbench, though you can do all of the following using the Particle Web IDE.
Open Particle Workbench.
Open the Command Palette using the
CTL+SHIFT+P(Windows, Linux) orCMD+SHIFT+P(Mac OS, Linux) shortcut.In the text box, type "Particle: Create New Project" and hit enter.
Follow the prompts to choose a folder in which to create your new project and set the project name.
Once the project loads, let’s configure things so that you can easily compile and flash firmware. Open the command palette again (
CTL/CMD+SHIFT+P), type "Particle" and select the "Configure Project for Device" option. In the prompts, chose a DeviceOS version (the latest at the time of writing was 1.4.2), select "argon" or "boron" as your target device, and enter the name or Device ID of the device you’re using for this tutorial.
Measuring dust levels
Now that we have everything set-up, let’s connect the Dust sensor. The Grove Dust sensor is a Shinyei PPD42 device that uses Static light scattering with a red LED, a phototransistor, and an infrared LED to measure the amount of dust particles in the air. It’s a clever little digital device, and is easy to set-up if you have a few formulas in hand.
In the project you just created, we need to add some items at the top of your firmware, before the
setupandloop. First, add a reference to use the newlib Math functions by including the Math.h header file. This lets us use the pow() function with our first sensor. Next, add a couple #define directives. The first is for the digital pin of your dust sensor, and the second is the number of milliseconds that we want to elapse between sensor readings.#include <math.h> #define DUST_SENSOR_PIN D4 #define SENSOR_READING_INTERVAL 30000Next, add some global variables to hold a few of the intermediate and final values we’ll use to capture sensor readings. Add the following just below the line you created in step #1.
unsigned long lastInterval;
unsigned long lowpulseoccupancy = 0;
unsigned long last_lpo = 0;
unsigned long duration;

float ratio = 0;
float concentration = 0;
In the
setupfunction, add a line to start the serial monitor, another to set the Dust sensor pin as an input so we can read from it, as well as a line to hold the current number of milliseconds that our program has been running. ThelastIntervalvariable will be used to ensure that we take new sensor readings for all our devices every 30 seconds.Serial.begin(9600); pinMode(DUST_SENSOR_PIN, INPUT); lastInterval = millis();Now, in the
loopfunction, add a line to read from the sensor into thedurationvariable. ThepulseInfunction waits for the Dust sensor to go from digital HIGH (its default state) to LOW. When that happens, it starts a timer, waits for the pin to return to HIGH, stops timing and returns either a 0 for a timeout/no reading or the number of microseconds that have elapsed.duration = pulseIn(DUST_SENSOR_PIN, LOW);Next, just below the
durationadd a line for a runninglowpulseoccupancycount. This line will create a running total of duration readings from the Dust sensor, which we’ll use every 30 seconds to calculate dust concentration.lowpulseoccupancy = lowpulseoccupancy + duration;Still in the
loopfunction, add an if statement for an interval check, which ensures that the code inside the statement only runs on theSENSOR_READING_INTERVALwe set above, which is every 30 seconds. Inside the if statement, we’ll include a call to a function we’ll define in the next step, then reset thelowpulseoccupancyto zero, and thelastIntervalto the currentmillisto push the next check out 30 seconds.if ((millis() - lastInterval) > SENSOR_READING_INTERVAL) { getDustSensorReadings(); lowpulseoccupancy = 0; lastInterval = millis(); }Next, create the
getDustSensorReadingsfunction to process the raw data into a dust ratio and concentration.void getDustSensorReadings() { }The Dust sensor we’re using can return 0 values from time-to-time, which are false positives we want to filter out. So the first thing we’ll put in the function is an if statement to check for a 0 value and, if so, use the last good reading. Note that this will still produce zeros if the sensor reads a zero to start, but once we have a good value, the last good value will be preserved.
if (lowpulseoccupancy == 0)
{
 lowpulseoccupancy = last_lpo;
}
else
{
 last_lpo = lowpulseoccupancy;
}
Next, calculate the ratio and concentration values. The ratio value calculates the percentage from dust filled air that the sensor detected by dividing the cumulative lowpulseoccupancy value by the reading interval in microseconds. Once that value is obtained, we can calculate the concentration of dust in the air by using a formula obtained from the dust sensor datasheet.
ratio = lowpulseoccupancy / (SENSOR_READING_INTERVAL * 10.0);
concentration = 1.1 * pow(ratio, 3) - 3.8 * pow(ratio, 2) + 520 * ratio + 0.62;
Further information on the formula for calculating the ratio and concentration can be found in Chris Nafis' 2012 Air Quality Monitoring Project at http://www.howmuchsnow.com/arduino/airquality/grovedust/.
Finally, add a few lines to the bottom of this function to print the values out to the Serial terminal.
Serial.printlnf("LPO: %d", lowpulseoccupancy);
Serial.printlnf("Ratio: %f%%", ratio);
Serial.printlnf("Concentration: %f pcs/L", concentration);
We’re ready to flash and test out our program. Make sure your device is connected to a USB port on your development machine. Then, Open the command palette (
CMD/CTRL+SHIFT+P)Type "Particle" and select "Flash application (local)". This will open a terminal window in Workbench and put your device into Device Firmware Update (DFU), at which point it will start flashing yellow. Then, your app will be compiled locally and flashed onto the device. Once done, your device will start breathing cyan again.
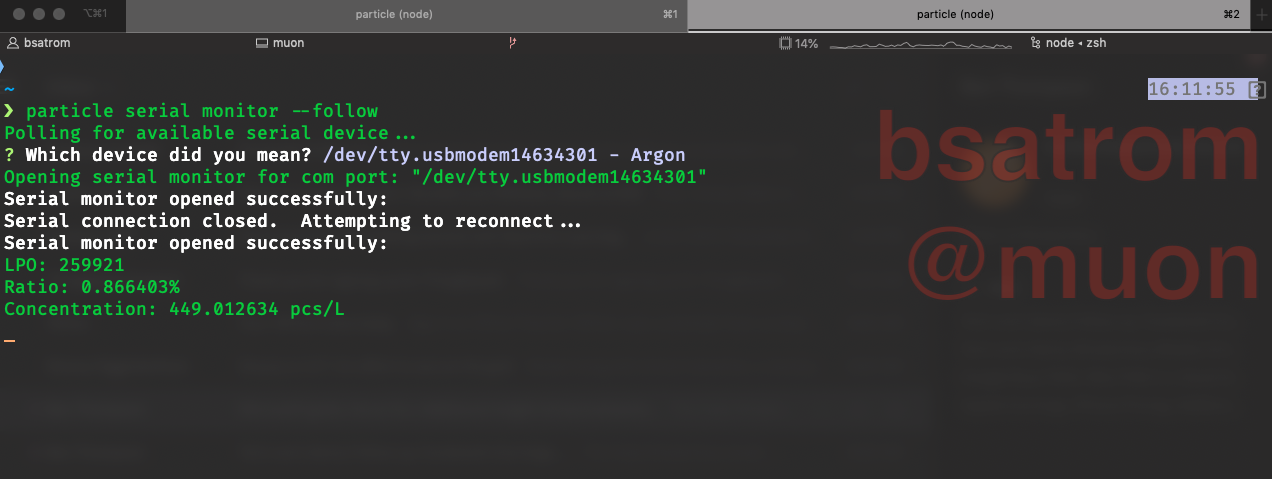
Now, let’s open a serial monitor session to see readings from the dust sensor. Open the command palette (
CMD/CTRL+SHIFT+P), type "Particle" and select the "Serial monitor" option. Follow the prompts and a new terminal window will be opened. After a few moments, sensor readings will be printed to the window.
Measuring air quality
Now, let’s configure the Air Quality sensor. For this sensor, we’ll use a firmware library, which you’ll install using Workbench.
Open the command palette (
CMD/CTRL+SHIFT+P), type "Particle" and select the "Install Library" option.In the textbox, type "Grove_Air_quality_Sensor" and hit enter. The library will be installed into a
libdirectory at the same level as your project’ssrcdirectory.To use the library, start by adding an
includestatement to the top of your project, before the#definestatements from the last section.#include "Air_Quality_Sensor.h"Then, add another
definedirective to specify the pin for the sensor#define AQS_PIN A2Just below the
definedirectives, declare a global object for the air quality sensorAirQualitySensor aqSensor(AQS_PIN);Next, in the
setupfunction, add a few lines to initialize the sensor, and log an error if we have an issue during initialization.if (aqSensor.init()) { Serial.println("Air Quality Sensor ready."); } else { Serial.println("Air Quality Sensor ERROR!"); }Then, in the
loopadd a call to a function to obtain a reading from the air quality monitor. We’ll add this function in the next step. Place the following inside the interval check if statement.String quality = getAirQuality(); Serial.printlnf("Air Quality: %s", quality.c_str());Now, create a new function to read from the sensor. The
aqSensor.slope()function returns an integer that represents the level of toxic gases like carbon monoxide, acetone, alcohol, and the like. In the function, we can compare that return value to static class members to determine if the air is fresh or polluted. We’ll then set a readable string value based on those comparisons and return the result.String getAirQuality() { int quality = aqSensor.slope(); String qual = "None"; if (quality == AirQualitySensor::FORCE_SIGNAL) { qual = "Danger"; } else if (quality == AirQualitySensor::HIGH_POLLUTION) { qual = "High Pollution"; } else if (quality == AirQualitySensor::LOW_POLLUTION) { qual = "Low Pollution"; } else if (quality == AirQualitySensor::FRESH_AIR) { qual = "Fresh Air"; } return qual; }Now, flash your device using the same process as the dust sensor. After the device comes back online, navigate back to your serial monitor window (or re-open it) and you’ll see air quality readings along with the dust sensor readings in the terminal.

Measuring temperature, humidity, and pressure
Now, let’s configure the temperature, humidity, and pressure sensor. Like the air quality sensor, we’ll need a library for this one.
Open the command palette (
CMD/CTRL+SHIFT+P), type "Particle" and select the "Install Library" option.In the textbox, type "Adafruit_BME280" and hit enter. The library will be installed into a
libdirectory at the same level as your project’ssrcdirectory.To use the library, start by adding an
includestatement to the top of your project, just after the air quality include statement.#include "Adafruit_BME280.h"Now, just below the
aqSensorglobal object, declare an object for the temp sensor.Adafruit_BME280 bme;The BME280 is an I2C Sensor, so we don’t need to specify a pin to use it, but we still do need to initialize it. In the
setupfunction, add a few lines to initialize the sensor, and log an error if we have an issue during initialization.if (bme.begin()) { Serial.println("BME280 Sensor ready."); } else { Serial.println("BME280 Sensor ERROR!"); }Now, at the top of the
loopfunction, add variables to hold the temperature, pressure, and humidity readings.int temp, pressure, humidity;Next, add a call to a function to obtain a reading from the BME280 and print the readings out to the Serial monitor. We’ll add this function in the next step. Place the following inside the interval check if statement.
getBMEValues(temp, pressure, humidity); Serial.printlnf("Temp: %d", temp); Serial.printlnf("Pressure: %d", pressure); Serial.printlnf("Humidity: %d", humidity);Finally, add the
getBMEValuesfunction. Note that the ampersand (&) before each parameter means that we’re passing these values in by-reference, so when they are updated in the function, their values inside theloopare updated as well. This allows us to perform the Serial logging in theloop, and use these values for future steps.int getBMEValues(int &temp, int &pressure, int &humidity) { temp = (int)bme.readTemperature(); pressure = (int)(bme.readPressure() / 100.0F); humidity = (int)bme.readHumidity(); return 1; }Now, flash your device using the same process as the previous sensors. After the device comes back online, navigate back to your serial monitor window (or re-open it) and you’ll see temp, pressure, and humidity readings along with the air quality and dust sensor readings in the terminal.
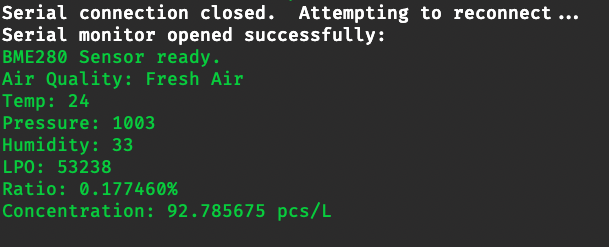
Nice work! You’ve completed wiring up and programming all of the sensors, and are outputting these values to a serial console. Next up, let’s un-tether this device from your computer and show values on the Grove OLED before finally posting them to the Particle Device Cloud.
Displaying data on a screen
The Grove OLED included with this kit is a small 128x64 screen that’s perfect for showing readings from your sensors. As with a few of our other sensors, you’ll need a library to use it.
Open the command palette (
CMD/CTRL+SHIFT+P), type "Particle" and select the "Install Library" option.In the textbox, type "OLED_Display_128X64" and hit enter. The library will be installed into a
libdirectory at the same level as your project’ssrcdirectory.To use the library, start by adding an
includestatement to the top of your project, just after the other library include statements.#include "SeeedOLED.h"The Grove OLED is another I2C device, so you don’t need to set a pin for it, but you will need to configure it with the following two lines in the
setupfunctionWire.begin(); SeeedOled.init();Then, configure the display with a few settings, right after the
init. The final option, in particular, will make text positioning a bit easier.SeeedOled.clearDisplay(); SeeedOled.setNormalDisplay(); SeeedOled.setPageMode();Next, let’s draw some text to the screen to serve as a splash. With the OLED in page mode from the last step, we can use the
setTextXYto position the cursor at a given row or column on the screen before drawing text. SosetTextXY(2, 0)moves the cursor to the third row, first column before writing the first word. We then repeat with the rest of the phrase.SeeedOled.setTextXY(2, 0); SeeedOled.putString("Particle"); SeeedOled.setTextXY(3, 0); SeeedOled.putString("Air Quality"); SeeedOled.setTextXY(4, 0); SeeedOled.putString("Monitor");Now let’s use the screen to write out sensor values. Add a call to a to-be-defined function to your
loopfunction after all your sensor reading functions.updateDisplay(temp, humidity, pressure, quality);Then, define the function and write values out to the screen. This function is a bit long, but should be straightforward. For each value, we set the cursor and write things out to the screen.
void updateDisplay(int temp, int humidity, int pressure, String airQuality) { SeeedOled.clearDisplay(); SeeedOled.setTextXY(0, 3); SeeedOled.putString(airQuality); SeeedOled.setTextXY(2, 0); SeeedOled.putString("Temp: "); SeeedOled.putNumber(temp); SeeedOled.putString("C"); SeeedOled.setTextXY(3, 0); SeeedOled.putString("Humidity: "); SeeedOled.putNumber(humidity); SeeedOled.putString("%"); SeeedOled.setTextXY(4, 0); SeeedOled.putString("Press: "); SeeedOled.putNumber(pressure); SeeedOled.putString(" hPa"); if (concentration > 1) { SeeedOled.setTextXY(5, 0); SeeedOled.putString("Dust: "); SeeedOled.putNumber(concentration); // Cast our float to an int to make it more compact SeeedOled.putString(" pcs/L"); } }Now, flash your device using the same process as the previous sensors. After the device comes back online, you’ll see the splash screen, followed by sensor readings about 30 seconds later. After each interval, the screen will be updated with new values.
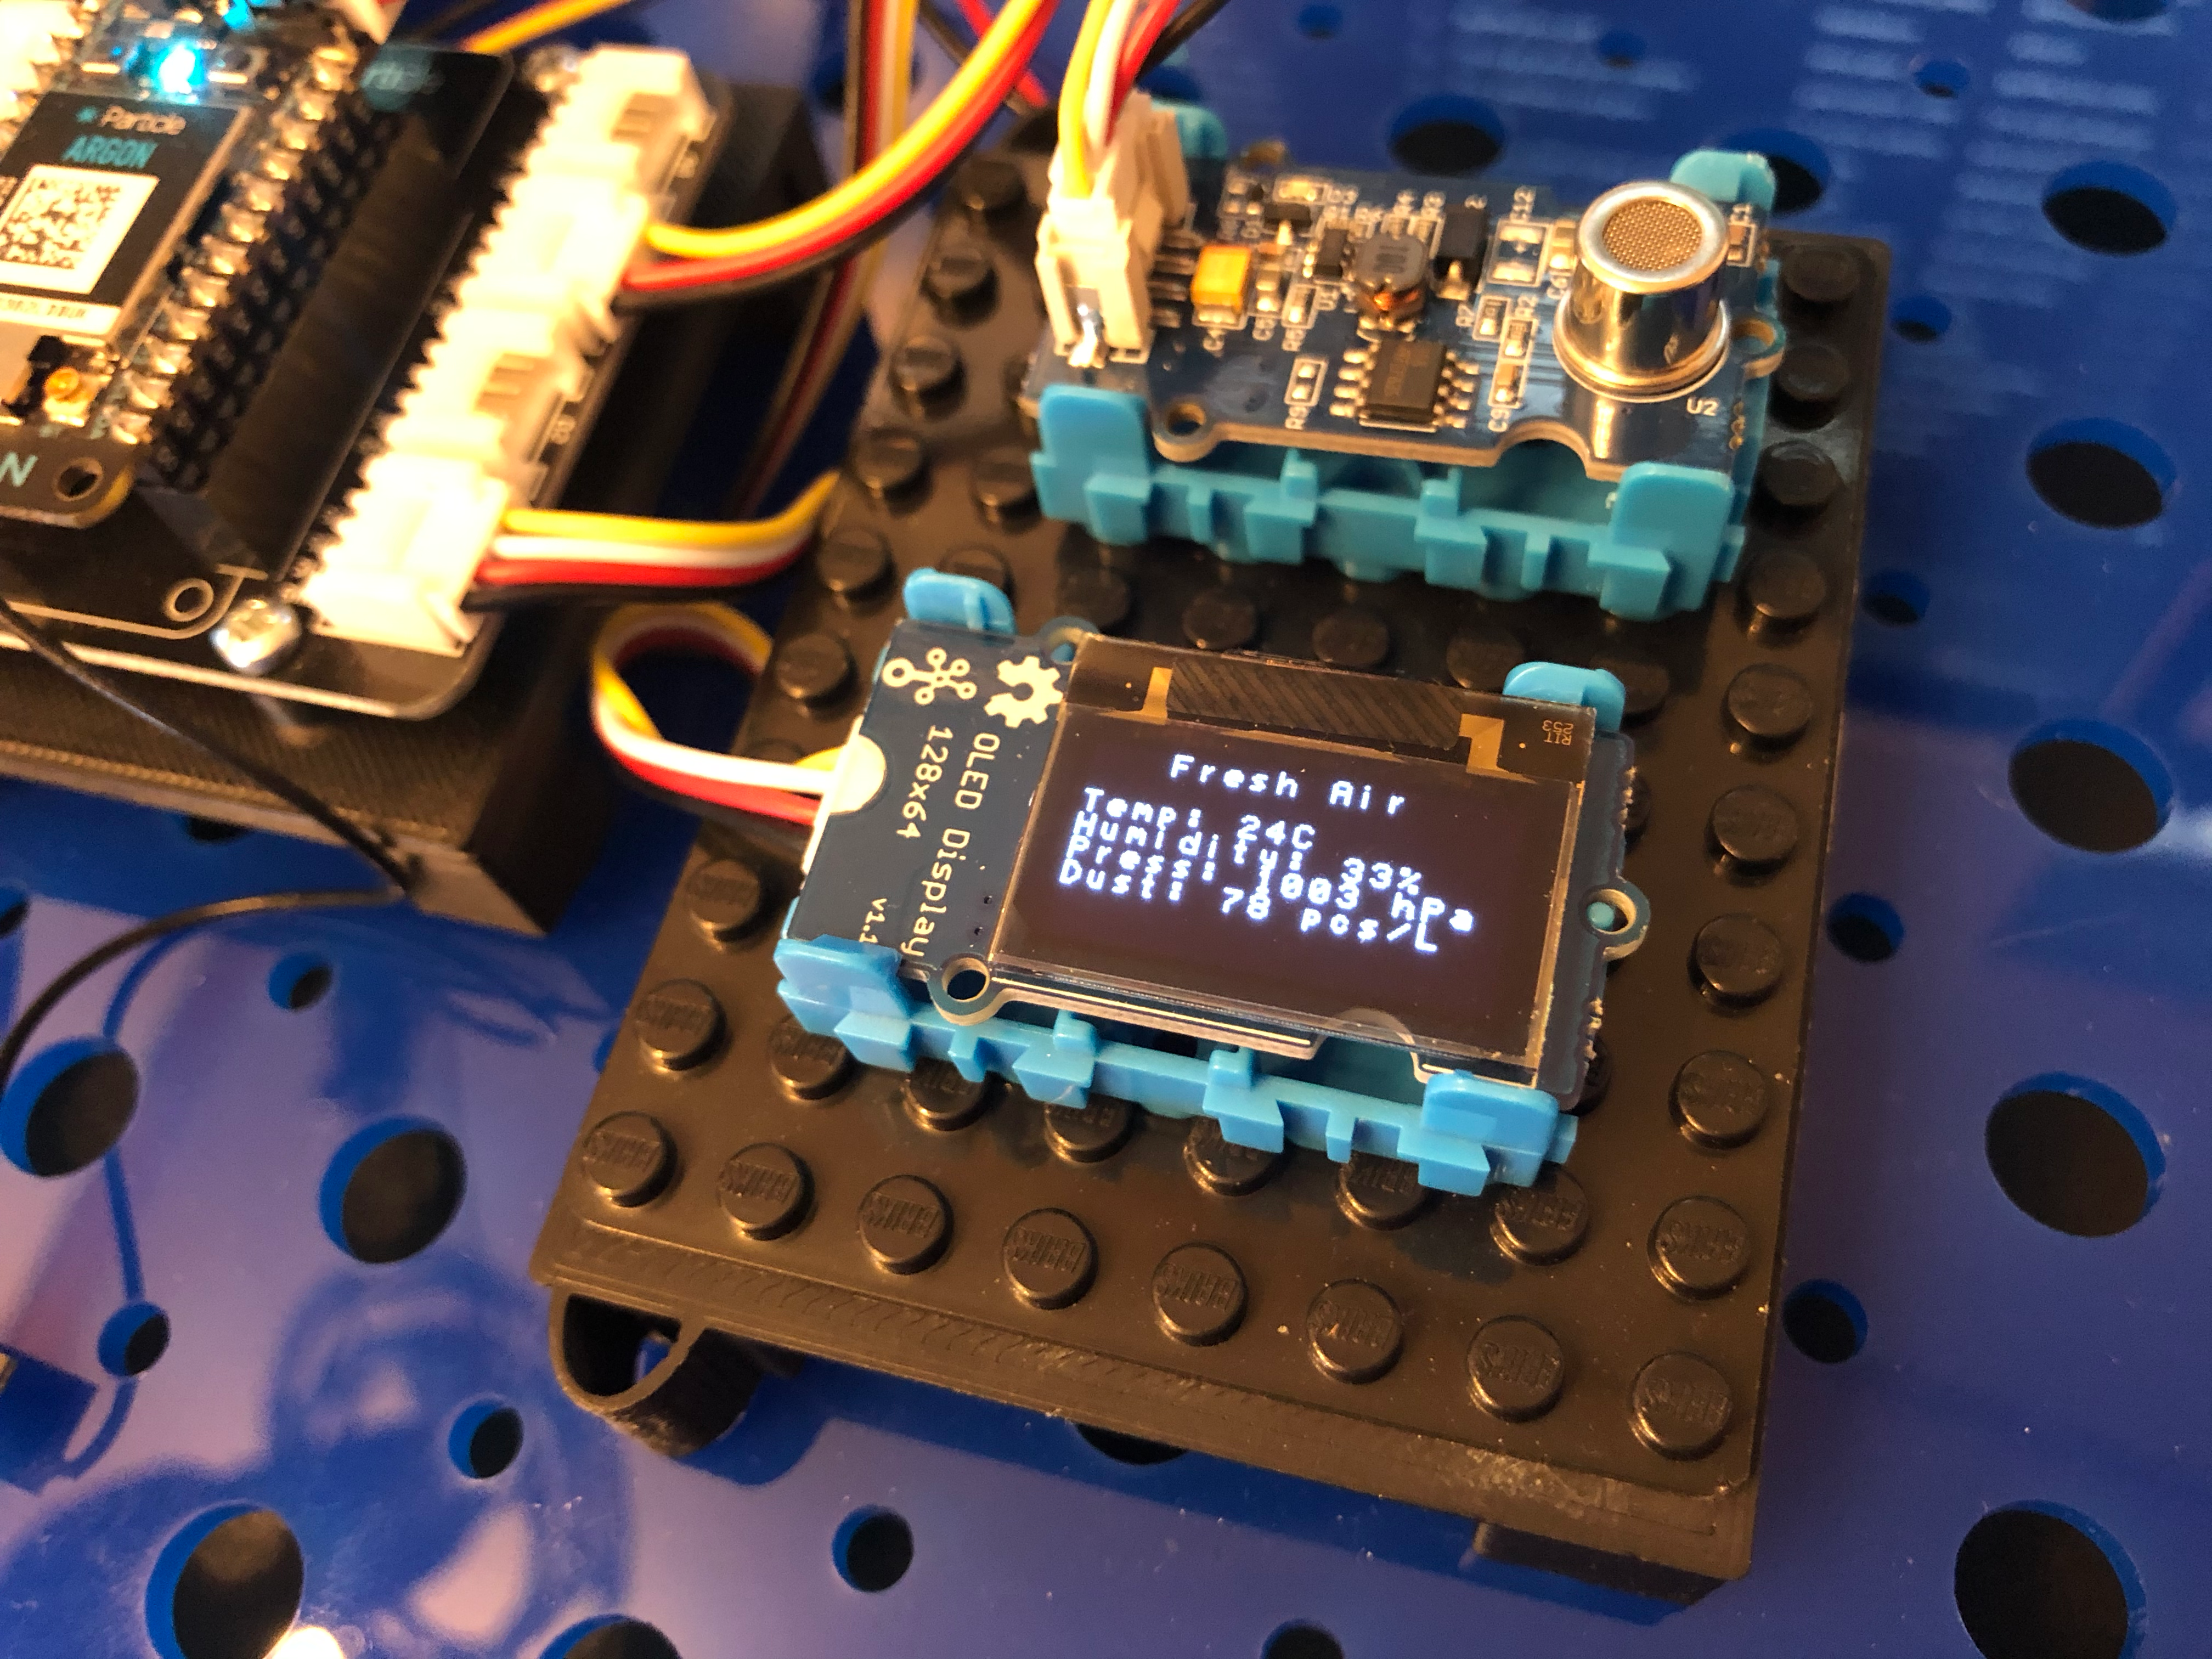
At this point, you no longer need to tether your device to your computer. Unplug the USB cable, plug in a LiPo battery and you can take this kit anywhere! Before we finish this tutorial, let’s take these sensor readings all the way to the cloud!
Publishing data to the Particle device cloud
For this last section, we’re going to take the data from our sensors, and publish that information to the Particle Device Cloud using the publish API. As usual, we’ll start with a firmware library. This one will make it easier for us to create a nice JSON object out of our sensor data.
Open the command palette (
CMD/CTRL+SHIFT+P), type "Particle" and select the "Install Library" option.In the textbox, type "JsonParserGeneratorRK" and hit enter. The library will be installed into a
libdirectory at the same level as your project’ssrcdirectory.To use the library, start by adding an
includestatement to the top of your project, just after the other library include statements.#include "JsonParserGeneratorRK.h"Next, just after the
updateDisplaycall in yourloopadd a new function call, which we’ll define in the next step.createEventPayload(temp, humidity, pressure, quality);Now, add the
createEventPayloadfunction.void createEventPayload(int temp, int humidity, int pressure, String airQuality) { }In this function, we’ll do two things, build up a JSON object with all of our sensor values, and publish that data to the Particle Device Cloud. For the first, we’ll create a new JsonWriterStatic object, which is a buffer that will hold all of our data as we build things up.
JsonWriterStatic<256> jw;Next, we’ll open a new scope with curly braces, create a
JsonWriteAutoObjectand insert key value pairs for each sensor value. The curly-braces scope is there to tell theJsonWriterAutoObjectwhen we’re done adding values to the JSON object.{ JsonWriterAutoObject obj(&jw); jw.insertKeyValue("temp", temp); jw.insertKeyValue("humidity", humidity); jw.insertKeyValue("pressure", pressure); jw.insertKeyValue("air-quality", airQuality); if (lowpulseoccupancy > 0) { jw.insertKeyValue("dust-lpo", lowpulseoccupancy); jw.insertKeyValue("dust-ratio", ratio); jw.insertKeyValue("dust-concentration", concentration); } }Finally, add a call to the
Particle.publishfunction, which takes a string for the event name, passes the JSON object buffer as the payload, and specifies that the event should be private and subscribe-able by only devices or services I own.Particle.publish("env-vals", jw.getBuffer(), PRIVATE);Let’s flash this code to your device. Since you’re no longer connected to your device via USB, you can use Particle OTA to cloud flash your device. Open the command palette (
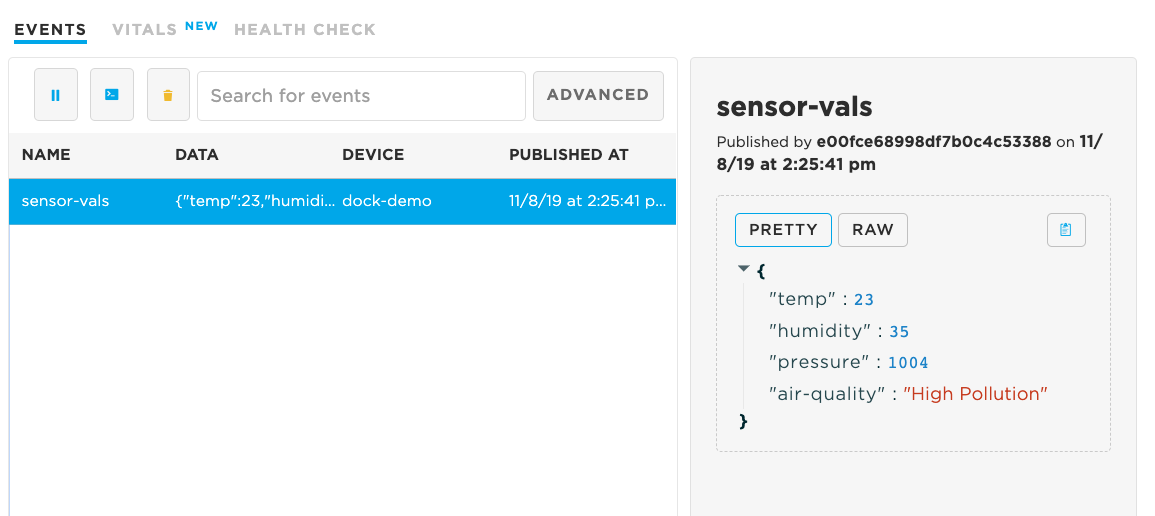
CMD/CTRL+SHIFT+P), type "Particle" and select the "Cloud flash" option. Your device’s LED will flash and the device will restart during this process.Once your device comes back online, navigate to the Particle Console and click on your device in the list. After a few moments, you’ll see sensor readings show up in the "Events" list. To see the JSON payload in detail, click on an event name, and you’ll see a formatted view on the right side of the screen.
Final code
You can download the full project, ready to import into Particle Workbench from the GitHub air-quality-kit repository.
If you are using the Web IDE, you can load a copy of the source in Web IDE.
It uses the following libraries (from project.properties):
name=air-quality-kit
dependencies.OLED_Display_128X64=1.0.0
dependencies.Grove_Air_quality_Sensor=1.0.1
dependencies.Adafruit_BME280=1.1.5
dependencies.JsonParserGeneratorRK=0.0.7
And the following source code:
/*
* Project env-sensor-kit
* Description: Basic Tutorial project for the Particle Envrionmental Sensor Kit
* Author: Brandon Satrom <brandon@particle.io>
* Date: 09/16/2019
*/
#include "Particle.h"
#ifndef SYSTEM_VERSION_v620
SYSTEM_THREAD(ENABLED); // System thread defaults to on in 6.2.0 and later and this line is not required
#endif
#include "Air_Quality_Sensor.h"
#include "Adafruit_BME280.h"
#include "SeeedOLED.h"
#include "JsonParserGeneratorRK.h"
#define AQS_PIN A2
#define DUST_SENSOR_PIN D4
#define SENSOR_READING_INTERVAL 30000
AirQualitySensor aqSensor(AQS_PIN);
Adafruit_BME280 bme;
unsigned long lastInterval;
unsigned long lowpulseoccupancy = 0;
unsigned long last_lpo = 0;
unsigned long duration;
float ratio = 0;
float concentration = 0;
int getBMEValues(int &temp, int &humidity, int &pressure);
void getDustSensorReadings();
String getAirQuality();
void createEventPayload(int temp, int humidity, int pressure, String airQuality);
void updateDisplay(int temp, int humidity, int pressure, String airQuality);
void setup()
{
Serial.begin(9600);
delay(50);
// Configure the dust sensor pin as an input
pinMode(DUST_SENSOR_PIN, INPUT);
if (aqSensor.init())
 {
   Serial.println("Air Quality Sensor ready.");
 }
 else
 {
   Serial.println("Air Quality Sensor ERROR!");
 }
Wire.begin();
SeeedOled.init();
SeeedOled.clearDisplay();
SeeedOled.setNormalDisplay();
SeeedOled.setPageMode();
SeeedOled.setTextXY(2, 0);
SeeedOled.putString("Particle");
SeeedOled.setTextXY(3, 0);
SeeedOled.putString("Air Quality");
SeeedOled.setTextXY(4, 0);
SeeedOled.putString("Monitor");
if (bme.begin())
{
Serial.println("BME280 Sensor ready.");
}
else
{
Serial.println("BME280 Sensor ERROR!");
}
lastInterval = millis();
}
void loop()
{
int temp, pressure, humidity;
duration = pulseIn(DUST_SENSOR_PIN, LOW);
lowpulseoccupancy = lowpulseoccupancy + duration;
if ((millis() - lastInterval) > SENSOR_READING_INTERVAL)
{
String quality = getAirQuality();
Serial.printlnf("Air Quality: %s", quality.c_str());
getBMEValues(temp, pressure, humidity);
Serial.printlnf("Temp: %d", temp);
Serial.printlnf("Pressure: %d", pressure);
Serial.printlnf("Humidity: %d", humidity);
getDustSensorReadings();
updateDisplay(temp, humidity, pressure, quality);
createEventPayload(temp, humidity, pressure, quality);
lowpulseoccupancy = 0;
lastInterval = millis();
}
}
String getAirQuality()
{
 int quality = aqSensor.slope();
 String qual = "None";

 if (quality == AirQualitySensor::FORCE_SIGNAL)
 {
   qual = "Danger";
 }
 else if (quality == AirQualitySensor::HIGH_POLLUTION)
 {
   qual = "High Pollution";
 }
 else if (quality == AirQualitySensor::LOW_POLLUTION)
 {
   qual = "Low Pollution";
 }
 else if (quality == AirQualitySensor::FRESH_AIR)
 {
   qual = "Fresh Air";
 }

 return qual;
}
int getBMEValues(int &temp, int &pressure, int &humidity)
{
 temp = (int)bme.readTemperature();
 pressure = (int)(bme.readPressure() / 100.0F);
 humidity = (int)bme.readHumidity();

 return 1;
}
void getDustSensorReadings()
{
// This particular dust sensor returns 0s often, so let's filter them out by making sure we only
// capture and use non-zero LPO values for our calculations once we get a good reading.
if (lowpulseoccupancy == 0)
{
lowpulseoccupancy = last_lpo;
}
else
{
last_lpo = lowpulseoccupancy;
}
ratio = lowpulseoccupancy / (SENSOR_READING_INTERVAL * 10.0); // Integer percentage 0=>100
concentration = 1.1 * pow(ratio, 3) - 3.8 * pow(ratio, 2) + 520 * ratio + 0.62; // using spec sheet curve
Serial.printlnf("LPO: %d", lowpulseoccupancy);
Serial.printlnf("Ratio: %f%%", ratio);
Serial.printlnf("Concentration: %f pcs/L", concentration);
}
void createEventPayload(int temp, int humidity, int pressure, String airQuality)
{
JsonWriterStatic<256> jw;
{
 JsonWriterAutoObject obj(&jw);

 jw.insertKeyValue("temp", temp);
 jw.insertKeyValue("humidity", humidity);
 jw.insertKeyValue("pressure", pressure);
 jw.insertKeyValue("air-quality", airQuality);

 if (lowpulseoccupancy > 0)
 {
   jw.insertKeyValue("dust-lpo", lowpulseoccupancy);
   jw.insertKeyValue("dust-ratio", ratio);
   jw.insertKeyValue("dust-concentration", concentration);
 }
}
Particle.publish("env-vals", jw.getBuffer(), PRIVATE);
}
void updateDisplay(int temp, int humidity, int pressure, String airQuality)
{
SeeedOled.clearDisplay();
SeeedOled.setTextXY(0, 3);
SeeedOled.putString(airQuality);
SeeedOled.setTextXY(2, 0);
SeeedOled.putString("Temp: ");
SeeedOled.putNumber(temp);
SeeedOled.putString("C");
SeeedOled.setTextXY(3, 0);
SeeedOled.putString("Humidity: ");
SeeedOled.putNumber(humidity);
SeeedOled.putString("%");
SeeedOled.setTextXY(4, 0);
SeeedOled.putString("Press: ");
SeeedOled.putNumber(pressure);
SeeedOled.putString(" hPa");
if (concentration > 1)
{
SeeedOled.setTextXY(5, 0);
SeeedOled.putString("Dust: ");
SeeedOled.putNumber(concentration); // Will cast our float to an int to make it more compact
SeeedOled.putString(" pcs/L");
}
}
Where to go from here
Now that you’ve completed this tutorial, you have a fully-operational cloud-connected air quality monitoring project. If you’re looking to go further, you can explore integrating with a Cloud service like Azure, Google Cloud, or AWS, or connecting your solution to countless other solutions via IFTTT.
