Authentication
Introduction
Cellular devices
For cellular devices, we recommend:
- Adding all devices to your product in advance.
- Flashing your product firmware and Device OS to devices in advance.
- Leaving devices unclaimed, as claimning is no longer necessary.
If you wish to provide a mobile app or web app for your customers, we recommend that you implement your own user management features on your front and back-end. You may want to use common third-party login features such as login with Google, Facebook, Twitter, etc. instead of implementing your own from scratch, but this not required.
Instead of issuing Particle access tokens to your users, encapsulate all Particle REST API calls within your back-end. This will greatly simplify your implementation and eliminate the need to manage user-specific Particle access tokens and device claiming.
Wi-Fi devices
For Wi-Fi devices (P2, Photon 2, and Argon), we recommend:
- Adding all devices to your product in advance.
- Flashing your product firmware and Device OS to devices in advance.
- Leaving devices unclaimed, as claimning is no longer necessary.
- Providing a mobile app or web app to allow your customers to configure the device Wi-Fi.
We recommend that you implement your own user management features on your front and back-end. You may want to use common third-party login features such as login with Google, Facebook, Twitter, etc. instead of implementing your own from scratch, but this not required.
Instead of issuing Particle access tokens to your users, encapsulate all Particle REST API calls within your back-end. This will greatly simplify your implementation and eliminate the need to manage user-specific Particle access tokens and device claiming.
For more information, see Wi-Fi setup options.
Older information
Previously, Particle recommended using various features like customer accounts, the Device Setup SDK, and various authentication tokens for customer devices. This is no longer recommended. The original information is available below for reference, but should not be used for new designs.
For new designs:
- Do not use the device setup SDK, as it is not compatible with current devices and will be deprecated.
- Avoid the iOS SDK and Android SDKs, as these will be deprecated in the future. Instead make Particle REST API calls from your back-end.
- Do not claim devices to customer accounts. This eliminates the need for simple auth and two-legged shadow customers.


Introduction
For any Particle-powered product to function properly, there are four involved parties:
- Particle
- Your product's applications
- A device
- The customer

Each of the four parties plays a critical role in how your product will function
Understanding how all four interact, manage data, and secure information is critical to launching a successful product on the Particle platform. Specifically, this section of the guide will go deep into decisions you must make on authentication and security with regards to your product. The results of these decisions will impact where and how data is stored as well as the ways in which your product's applications interact with Particle to control devices and manage customers.
Note: Many of the implementation details discussed in this document are still under development. We will add specific code examples and context as they become available in the mobile and JavaScript SDKs.
OAuth
Particle tightly adheres to OAuth specifications to ensure secure and correct access to private data and devices. OAuth is an open standard for authorization, providing client applications "secure delegated access" to server resources on behalf of a resource owner (Wikipedia).
Integral to OAuth is the concept of clients, and client credentials. An OAuth client generally represents an application, like a native iOS application running on an iPhone or a web app running in a browser. As part of the setup process for your product, you will need to create one or more OAuth clients for your product.
Your product's OAuth client will be needed when hitting the Particle API to perform actions that only your product's team members or applications should be able to perform. An example of this is creating a customer that belongs to your product via the Particle API. Only those with a valid OAuth client will be able to perform this action, protecting your product from fake or erroneous new customer accounts.
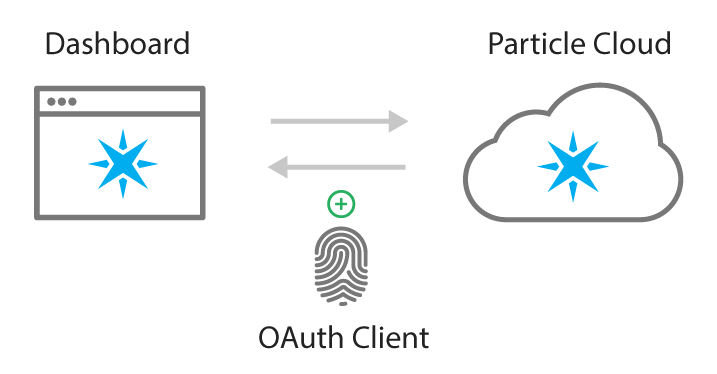
Your OAuth Client will ensure secure communication between your devices and the Particle cloud
Client credentials are comprised of two pieces of information: A client ID, and a secret. Passing these two pieces of data to the Particle API will allow you to create access tokens, which are described in detail in the next section.
Scopes
Scopes allow you to specify exactly what type of access the client (and tokens created using the client) should have. Scopes are used for security reasons to limit the allowed applications of OAuth client credentials. Depending on which authentication method you choose, you may need to specify a scope when creating your OAuth client. More on scopes.
Creating an OAuth client
You can use the Particle Console to create and manage your OAuth clients. To get started, click on the Authentication icon in your sidebar.
You can create OAuth clients on behalf of your Particle user (to interact with devices your account has claimed), or on behalf of a Particle product (to interact withe devices in the product fleet).
Scoping the client to a user or product account does impact which devices the client can interact with, and which permissions are available—so please choose mindfully. If you'd like to create an OAuth client for your product, visit the Authentication view within the Console's management context for your product.
![]()
To create a new client, click the + New Client button in the top right corner of the screen.
This will launch a modal allowing you to configure an OAuth client that suits your particular use case.
The configuration of your OAuth client will depend both on what type of interface your end-users will use to interact with their Particle devices (i.e. mobile vs. web app) in addition to what authentication method you choose for your product. You can skip to choosing an authentication method if you'd like to create an OAuth client now.
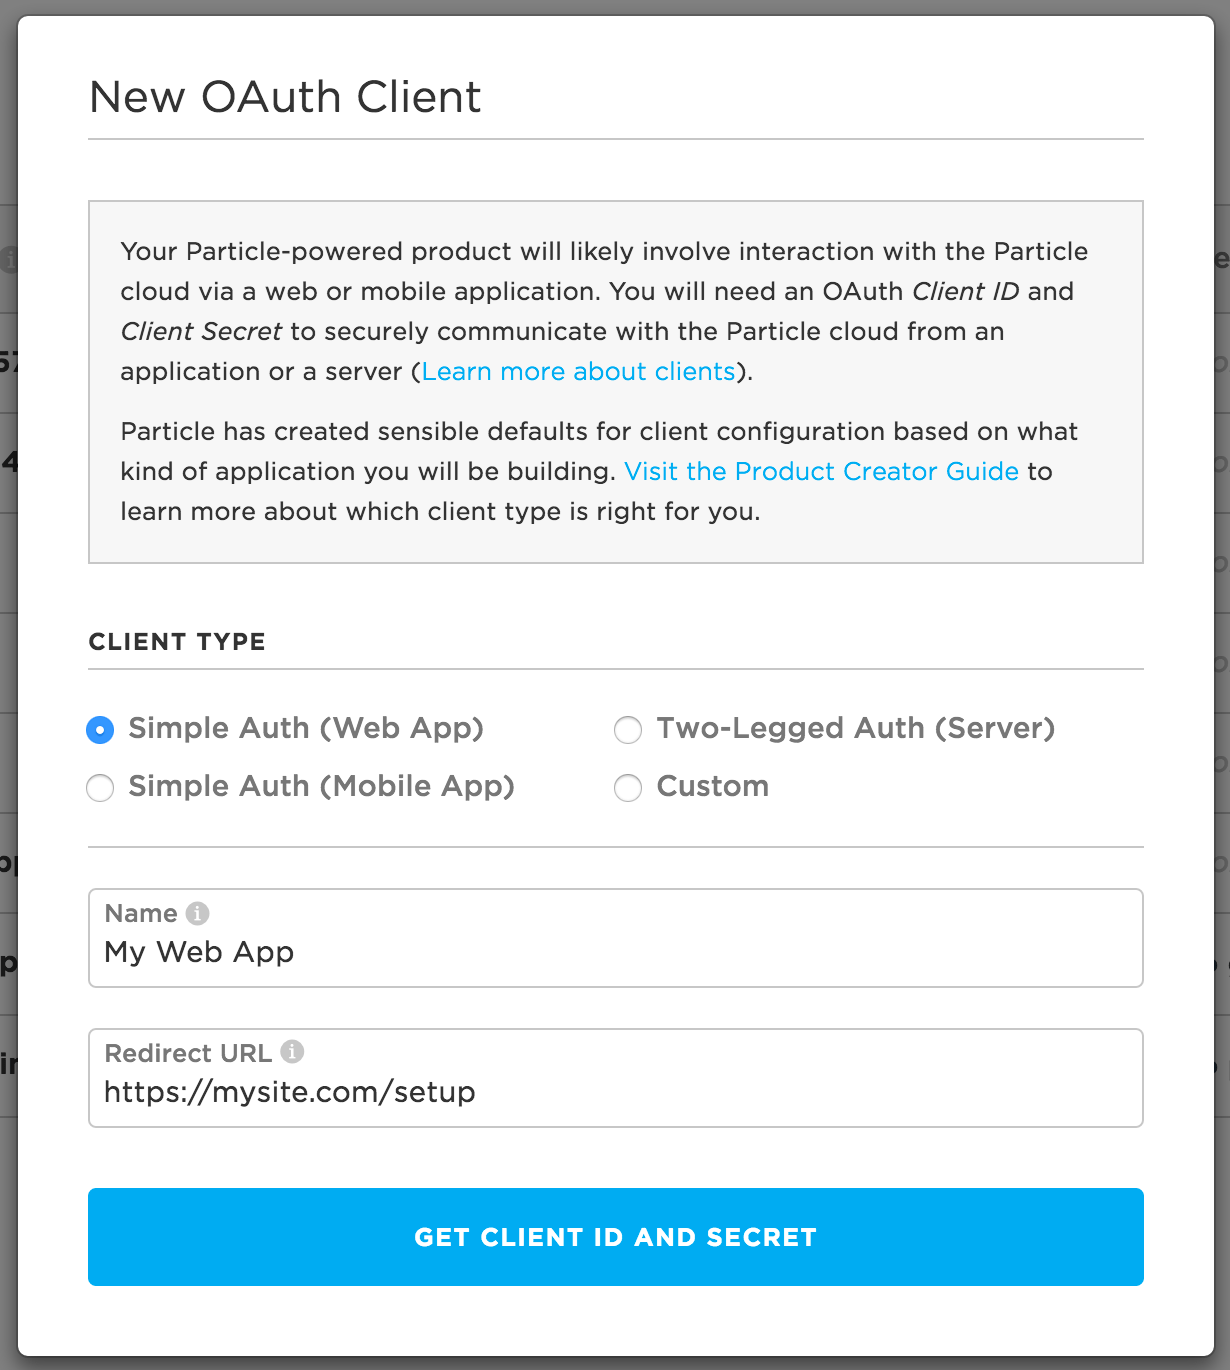
The Console provides an easy way to manage OAuth clients
The Console will provide you with a client ID and secret once you create your client. Your client secret will only be shown once for security purposes. Ensure that you copy it for your records to be used in your mobile or web app.
Never expose your client credentials, especially if the client has full permissions. Credentials are sensitive pieces of information that, if exposed, could allow unauthorized people or applications to interact with your product's data and devices.
Note: You may also manage OAuth clients programmatically, using the Device Cloud REST API.
Access tokens
A related concept to understand is how Particle uses access tokens for authentication and security. If you have ever logged into the Web IDE, called a function on a Particle device, or read a variable via the API, you are already using access tokens! It is important to note that OAuth credentials are needed to create access tokens.
What's an access token?
An access token is a special code that is tied to a Particle customer or user, that allows reading data from and sending commands to that person's device(s). Any API endpoint that returns private information, or allows control of an individual's device requires an access token. Tokens inherit scopes from the OAuth clients used to create them, and can have more specific scopes of their own.
Here's a specific example. Let's say that on one of your own personal
devices (with device ID 0123456789abcdef01234567), you want to call the lightsOn function. Here is how you would
do this using the API:
curl -X POST -H "Authorization: Bearer 1234" \
https://api.particle.io/v1/devices/0123456789abcdef01234567/lightsOn \
-d arg=livingRoom
In order for the API to call the function on your device, you must
include a valid access token for the user that is the owner of the
device. In this case, you include your access token of 1234. Behind
the scenes, the API looks up the access token in our database, checks to
make sure that the user who created the access token is the owner of the
device included in the request, and will only continue if the token has
the proper permissions to call the function.
The easiest way to create tokens is using the Particle CLI and the
particle token create option.
If you have multi-factor authentication (MFA) enabled on your account, you will be required to supply the authentication code when you create the token using your username and password, however the authentication code is not necessary to use the token, so make sure you keep your tokens secure, especially non-expiring tokens.
Customer access tokens
Similarly, your customers will have access tokens that provide verification of ownership of a particular device. As a product creator, you will be creating a web or mobile application for your customers to use your product. As part of your application, you will generate access tokens on behalf of your customers, and use these access tokens to make the desired calls to the Particle API to successfully read data from and control that customer's device.
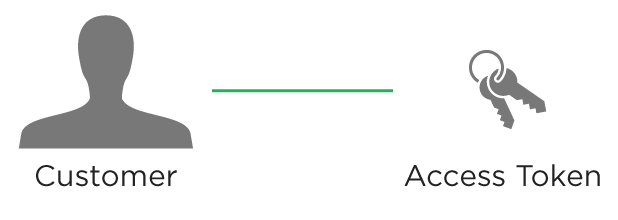
The access token is linked to the customer and used to control the customer's device(s)
Luckily, the mobile SDKs and ParticleJS will expose helper methods to handle token creation and management, without much/any additional code needed from you or your engineers.
Choosing an authentication method
Take a deep breath. We've covered a lot so far and you're picking things up quick! This section will help you determine the best place for you to go next.
As described earlier, end-users of your product are referred to as customers in the Particle ecosystem. As a product creator, you will need to make a strategic decision about how you will want to handle authentication for your customers. Your choice will likely be influenced by how much you would like to hide Particle from your customers, as well as how you would like your product to function.
There are three ways to manage authentication for your customers.
- Simple Authentication: Customers are created and managed directly by Particle. This is the simplest and fastest way to get your connected product app working.
- Two-legged Authentication: You create and manage accounts for your customers yourself, and request scoped access to control customers' devices from Particle. This provides the maximum amount of flexibility and security for your application.
Typically you will use an iOS or Android mobile app to allow your customers to authenticate, setup their devices, and interact with their product. More info
Other techniques such as a web-browser based setup and on-device setup are possible, as well.
When you're ready, click on the authentication method that makes most sense to you.
Simple authentication
Simple authentication was originally intended to make it easier to use the Particle API from a mobile app without having to maintain your own back-end server. In practice, however, this was not really possible because features like password reset require a back-end server. Additionally, maintaining access tokens and customer accounts can be tricky, especially since the device setup SDK cannot be used with Gen 3 devices, the P2, and Photon 2.
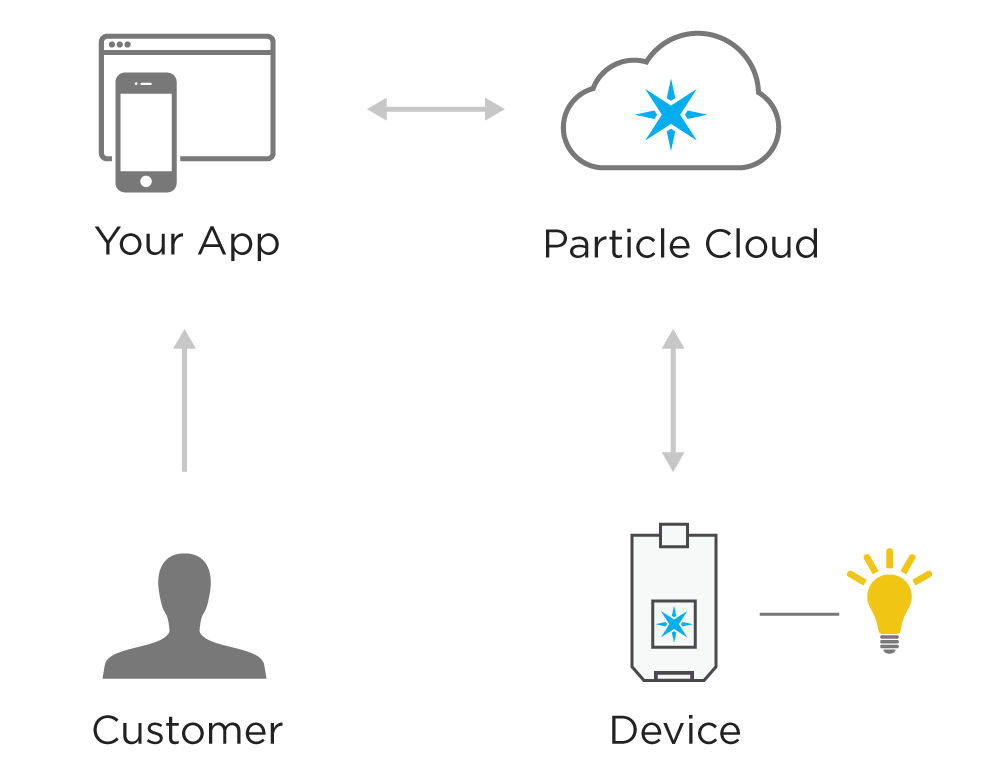
Your application interacts directly with the Particle API using Simple Authentication
Let's take a simple example. Imagine you are the creator of a smart light bulb that can be controlled via a smartphone app. The customer, or the end-user of the product, uses the mobile app to create an account. Behind the scenes, your mobile app hits the Particle API directly to create a customer. Then the customer goes through the setup process and links their device to their customer account. Again, your mobile app uses the Particle API to successfully claim the device to the customer account. After the device is setup, the customer can toggle a light on and off with the mobile app. This works as your app is able to call functions on the customer's device using the customer's access token.
All of this is able to happen without the need to have your own server. All communication flows from the mobile client to the Particle cloud, then down to the customer's device.
Simple auth implementation
If you choose to go with simple authentication for your web or mobile application, you should get to know the diagram below very well. While a majority of the steps are wrapped by the mobile and JavaScript SDKs, it is still important to grasp how customer authentication, device setup, and device interaction work.
Each one of the steps will be covered in detail below. Note that the first two steps are a one-time configuration process, whereas product setup will occur for each new customer that sets up a device.
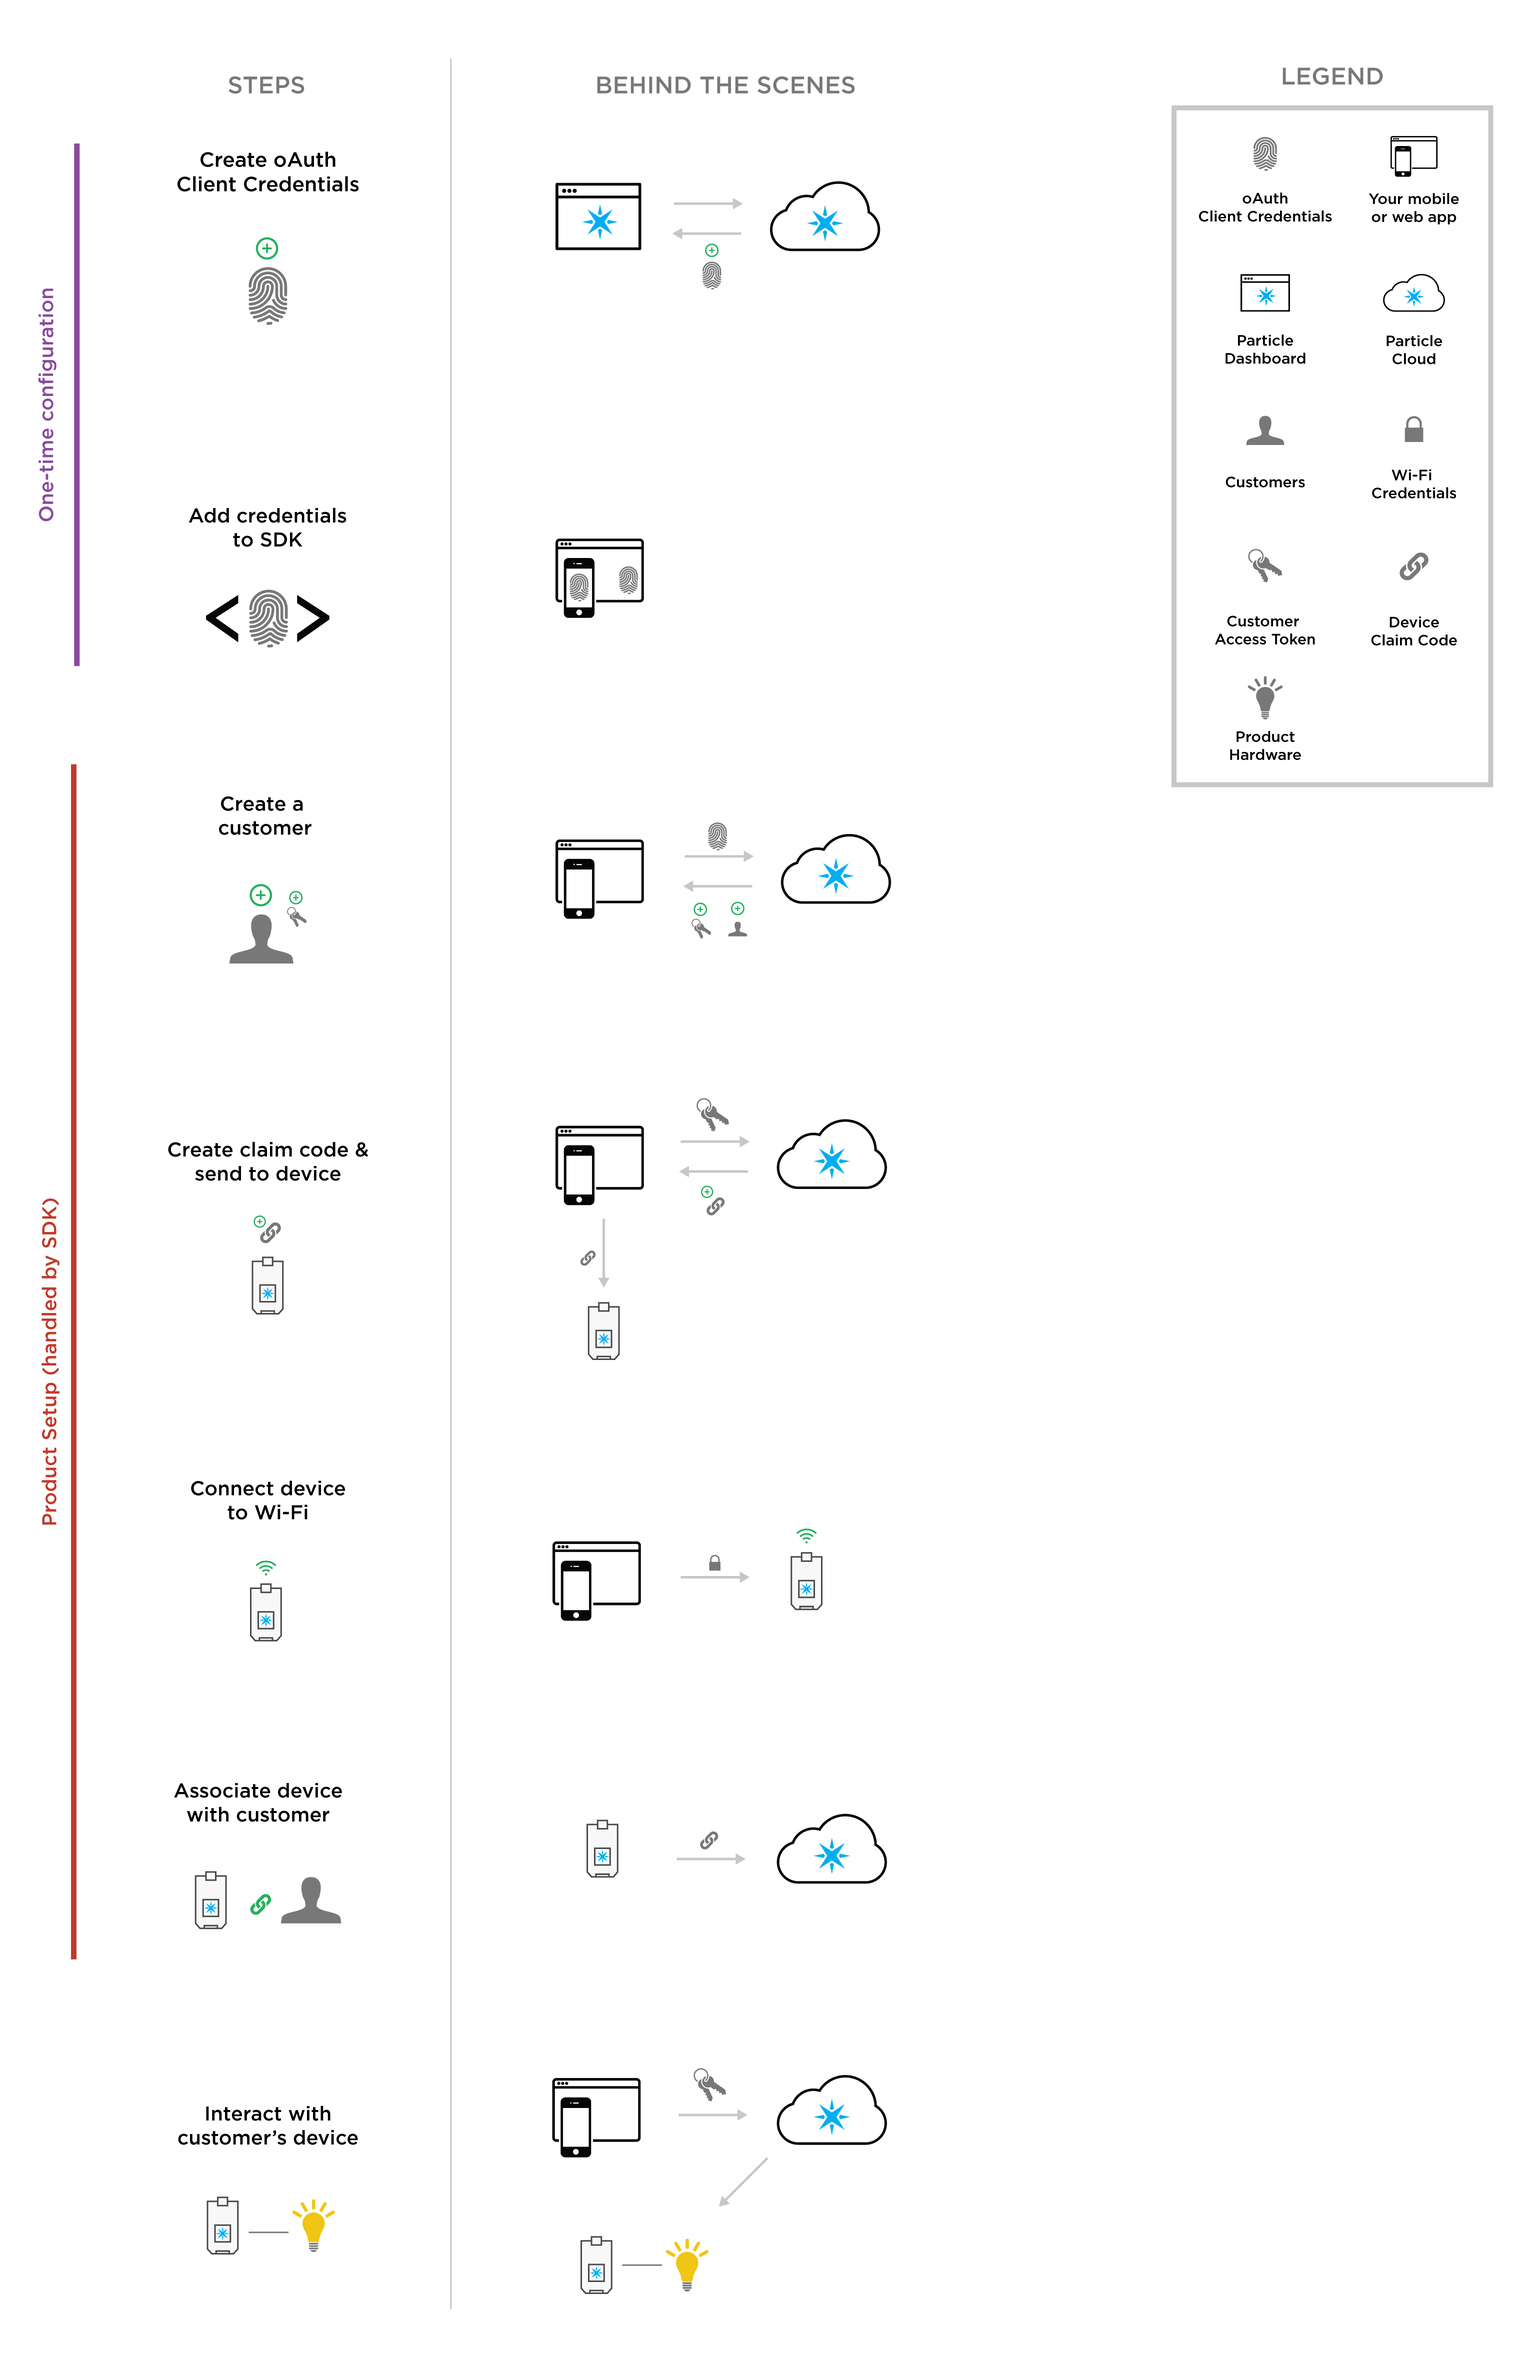
The full simple authorization flow. See here for full size diagram
1. Creating OAuth Client Credentials
The first thing you will need to do is ensure that you have created proper OAuth client credentials for your product. In simple authentication, communication will be direct from a client application (web or mobile app) to the Particle API. This is much less secure than server to server communication. As a result, you will create scoped client credentials that will be able to do one thing and one thing only: create new customers for your product.
You will create your OAuth client using the Authentication view in your product's Particle console. For info on how to find the Authentication page and create a client, check out the earlier discussion.
If you are building a mobile app for your Particle product, you should choose Simple Auth (Mobile App) from the client type options when creating a new OAuth client. This will provide the recommended client configuration, and only requires you to provide a name for your new client.
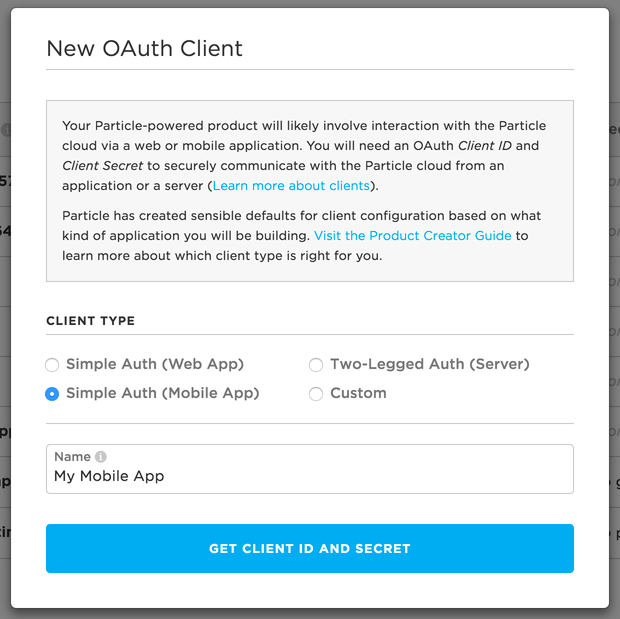
Creating an OAuth client for a mobile app using Simple Auth
If you are building a web app instead, select Simple Auth (Web App). You'll notice that you have to provide both a name and a redirect URI. A redirect URI is required for any web browser-based OAuth flows, and should be set to the URL of the first page of device setup for your product. The redirect will be triggered once a customer is created successfully, and the next step in the process is setting up their device.
Regardless of your app medium, you will receive an OAuth client ID and secret upon successful creation of a client that will look like this:
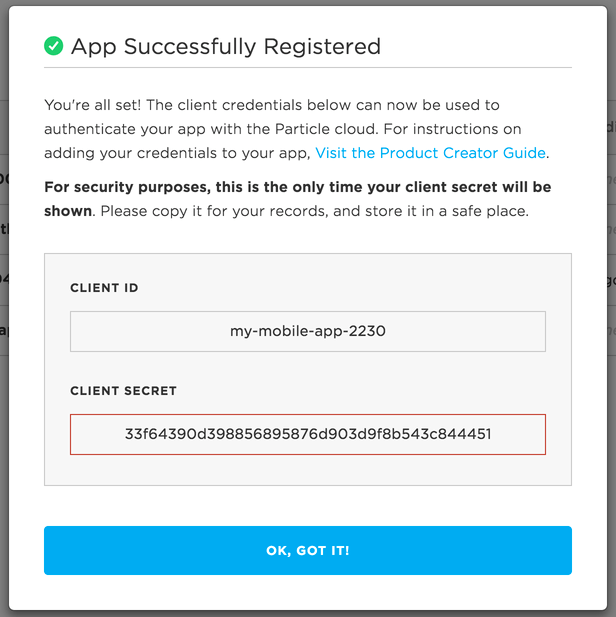
Your client secret will only be shown once, so be sure to capture it for your records
This client ID and secret will be added to your application in the next step below. Note that clients created using the default Simple Auth configurations will be scoped for customer creation only. This is for security purposes. In Simple Auth, client credentials can be uncovered relatively easily with some basic scraping techniques. Scoping the client will prevent unintended access to your product's devices or data.
Creating OAuth client can still be done directly against the Particle API. For info on this, see reference documentation on creating OAuth clients.
2. Add OAuth Credentials to SDK
For both the mobile & JavaScript SDKs, you will need to add your client credentials to a configuration file. The client application will need the client credentials that you just generated when creating new customers. Without these credentials, calls to POST /v1/products/:productIdOrSlug/customers will fail.
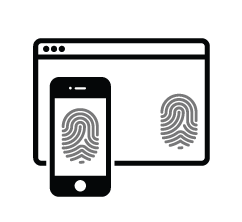
You will need to add your OAuth credentials to your web or mobile application
If you are creating a mobile application, you will need to include both the client ID and secret in your configuration file. If you are creating a web application, you only should include your client ID.
For instructions on how to add client credentials to your iOS app, please see iOS OAuth client configuration. For Android apps, please see Android OAuth client configuration
3. Create a customer
You have now moved from the one-time configuration steps to a process that will occur for each new customer that uses your web or mobile app. As mentioned earlier in this section, much of what will be discussed in the next four steps will be magically handled by the Particle SDKs, with no custom code needed from you.
After navigating to your application, one of the first things your customer will need to do is create an account. Because you are not running your own web server, the customer will be created in the Particle system. They will provide a username and password in the form, that will serve as their login credentials to the app.
Specifically, the SDK will grab the customer's username and password, and hit the POST /v1/products/:productIdOrSlug/customers API endpoint, passing along the customer's credentials as well as the OAuth client credentials you added to the config file in the previous step.
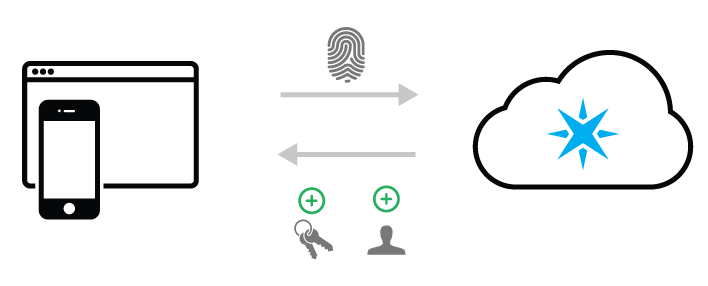
The create customer endpoint requires your OAuth client credentials,
and returns an access token for the newly created customer
For a mobile app, the SDK will require both the client ID and the secret to successfully authenticate. For a web app, the endpoint will only pass the client ID.
The POST customers endpoint both creates the customer as well as logs them in. As a result, an access token will be available to your application after successful customer creation. Remember that it is this access token that will allow the app to do things like claim the device, and interact with it.
4. Create Claim Code & Send to Device
This step actually comprises a lot of things that happen behind the scenes, but has been combined for simplicity and ease of communication. A claim code is what is used to associate a device with a person. In your case, the claim code will associate a device with a customer.
In order for a device to be setup successfully, your application must retrieve a claim code on behalf of the customer setting up their device and send that claim code to the device. When the device receives proper Wi-Fi credentials and is able to connect to the Internet, it sends the claim code to the Particle cloud. The Particle cloud then links the device to the customer, and grants the customer access over that device.
The first thing that must happen is retrieving a claim code from the Particle cloud for the customer. A special endpoint exists for products to use to generate claim codes on behalf of their customers.
This endpoint is POST /v1/products/:productIdOrSlug/device_claims. The customer's access token is required, and is used to generate a claim code that will allow for the link between the device and the customer.
Once your mobile/web app has a claim code, it then must then send it to the device.
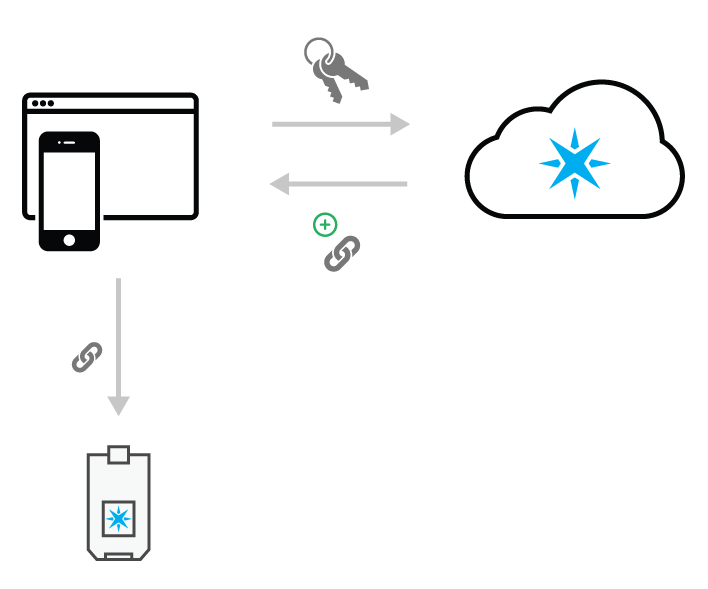
Your app will use the customer access token to generate a device claim code and send it to the device
This happens by connecting the customer's device to the device's Wi-Fi access point. When the photon is in listening mode, it is broadcasting a Wi-Fi network that the customer's computer or phone can connect to.
Note: When programmatically entering listening mode on the Photon, P1 or P0, care should be taken to conserve the memory utilized by user firmware. Listening Mode on these devices utilizes a number of threads to create short-lived HTTP server instances, a TCP server for SoftAP access, and associated resources. If the free memory available on a device at the time Listening Mode is triggered is less than 21.5K, the device will be unable to enter listening mode. In some cases, it may appear as though the device is in listening mode, but any attempt to configure access via the CLI or Particle Mobile App will time out or fail. None of the device's user firmware is lost or affected in either case, but the RAM in use will need to be optimized below 21.5k before re-attempting to enter listening mode.
Once the customer's device is connected to the Particle device's network, your mobile app then will send the claim code generated in the last step to the Particle device.
Again, this will all be part of the boilerplate code of the SDKs, meaning that you will not need to worry much about the nitty-gritty details about how this works.
5. Connect device to Wi-Fi
Now that your app is connected directly to the customer's Particle-powered device, it can provide the device with Wi-Fi credentials to allow it to connect to the Internet.
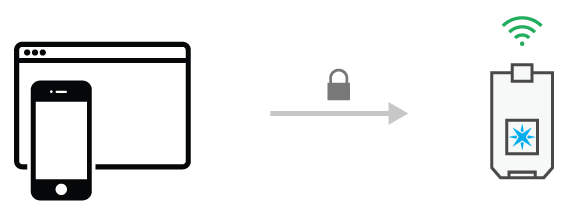
Your app will send the customer's device Wi-Fi credentials
Through your mobile or web app, your customer will choose from a list of available Wi-Fi networks, and provide a password (if necessary) to be able to connect. The app sends these credentials to the device. Once received, the device resets and uses these credentials to connect to the Internet.
6. Associate device with customer

The device sends the claim code to the cloud, which is used to link the device to the customer
The device uses the Wi-Fi credentials to connect to the Internet, and immediately sends the claim code to the Particle cloud. At that point, the device is considered "claimed" by the customer. This means that any access token generated by that customer can be used to read data from or interact with the device.
7. Interact with Customer's Device
Congratulations! You've now successfully created a customer, gotten the device online, and tied the device to the new customer. You have everything you need to make your product's magic happen.
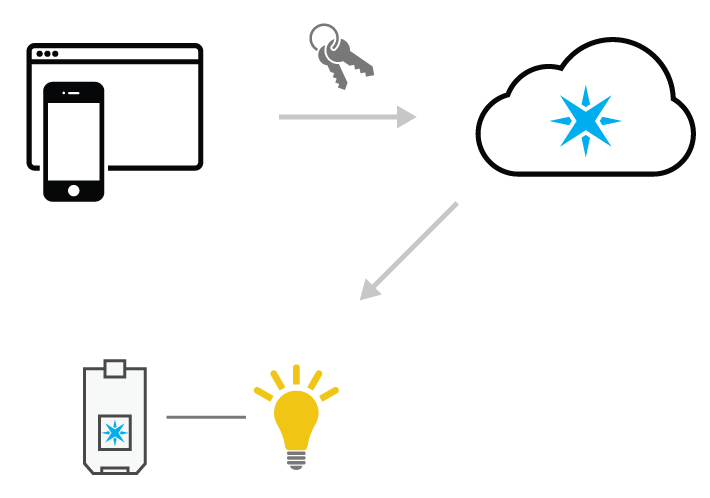
Use your customer's access token to call functions, check variables, and more!
Your application, armed with the customer's access token, can now successfully authenticate with any device-specific Particle API endpoint, giving it full access and control over the device. Some of the things you can do include:
- Call functions on the device
- Read variable values from the device
- See if the device is online or not
- Much more!
Note that now, your app will never communicate directly to the device. The customer will trigger a call to the Particle API, which then communicates with the device to carry out the desired action.
Further considerations
Signup and device claiming only will happen one time for each customer. After this has been completed, subsequent visits to your application will continue to use customer access tokens to interact with the device via the Particle API.
If a customer's access token expires, the customer will be asked to log in again, generating a fresh access token to interact with the device.
Two-Legged authentication
The main difference between two-legged and simple authentication is the presence of a back-end architecture to compliment your mobile or web application. Your application would communicate with both your server as well as the Particle cloud.
The most common reason to use two-legged authentication is the desire to store & manage customer accounts yourself in your own database.
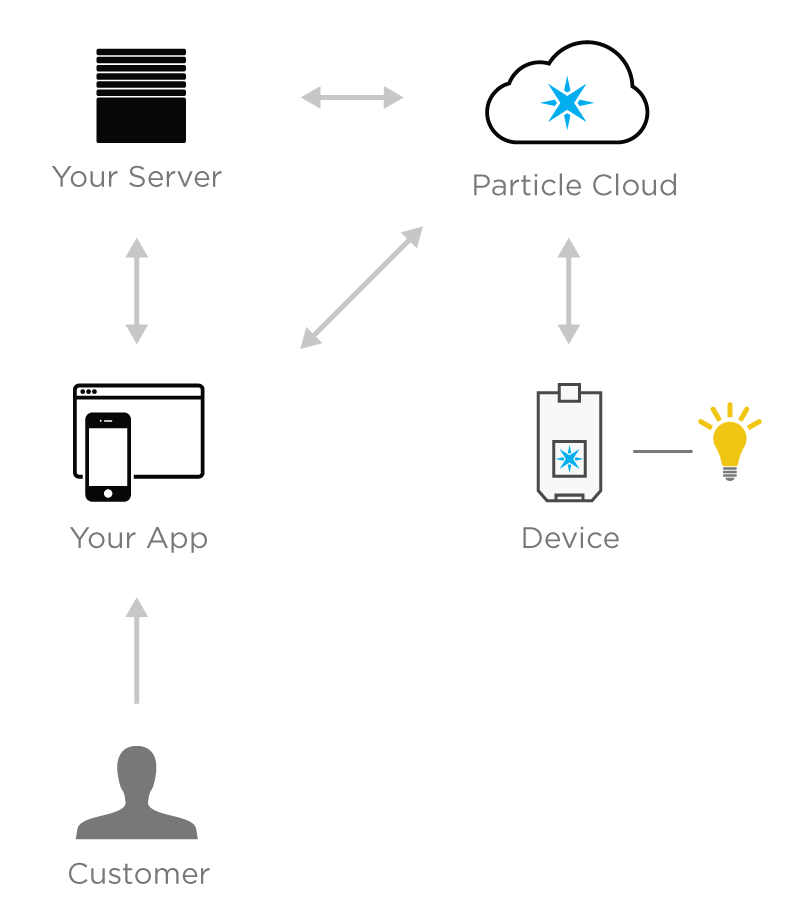
Two-legged authentication involves the presence of your own server
Advantages of two-legged
Two-legged authentication is the ideal choice for a product creator looking for maximum visibility, control, and flexibility of their web or mobile application. With two-legged, you gain the ability to implement custom logic, integrations with third-party services, and store application-specific data that are not currently part of the Particle platform.
For example, if you were building a connected hot tub, you could use your own web server and database to allow a customer to set their desired water temperature, then use that piece of data to set the temperature when the hot tub is turned on.
Another advantage of two-legged authentication is beefed-up security. Server-to-server communication (your server to the Particle API) is much more secure than client-to-server communication (your mobile/web application to the Particle API). For sensitive transactions like passing OAuth credentials to get customer access tokens, using your server to talk to the Particle API over HTTPS is safe and protected.
Disadvantages of two-legged
Because of the introduction of your own web server, implementing two-legged authentication adds complexity to the architecture of your application and the flow of data. There are simply more pieces of the puzzle that must all fit together.
This will likely result in more development time than choosing Simple Authentication, and can introduce more points of failure for your application.
Two-Legged implementation
Below is a diagram of the entire setup and authentication flow for the two-legged option. If you choose this authentication method, it is important that you understand the diagram very well. When comparing to the simple auth implementation, you'll notice that many of the steps are similar, with the exception of steps involving interaction with your web server.
Each one of the steps will be covered in detail below. Note that the first two steps are a one-time configuration process, whereas product setup will occur for each new customer that sets up a device.
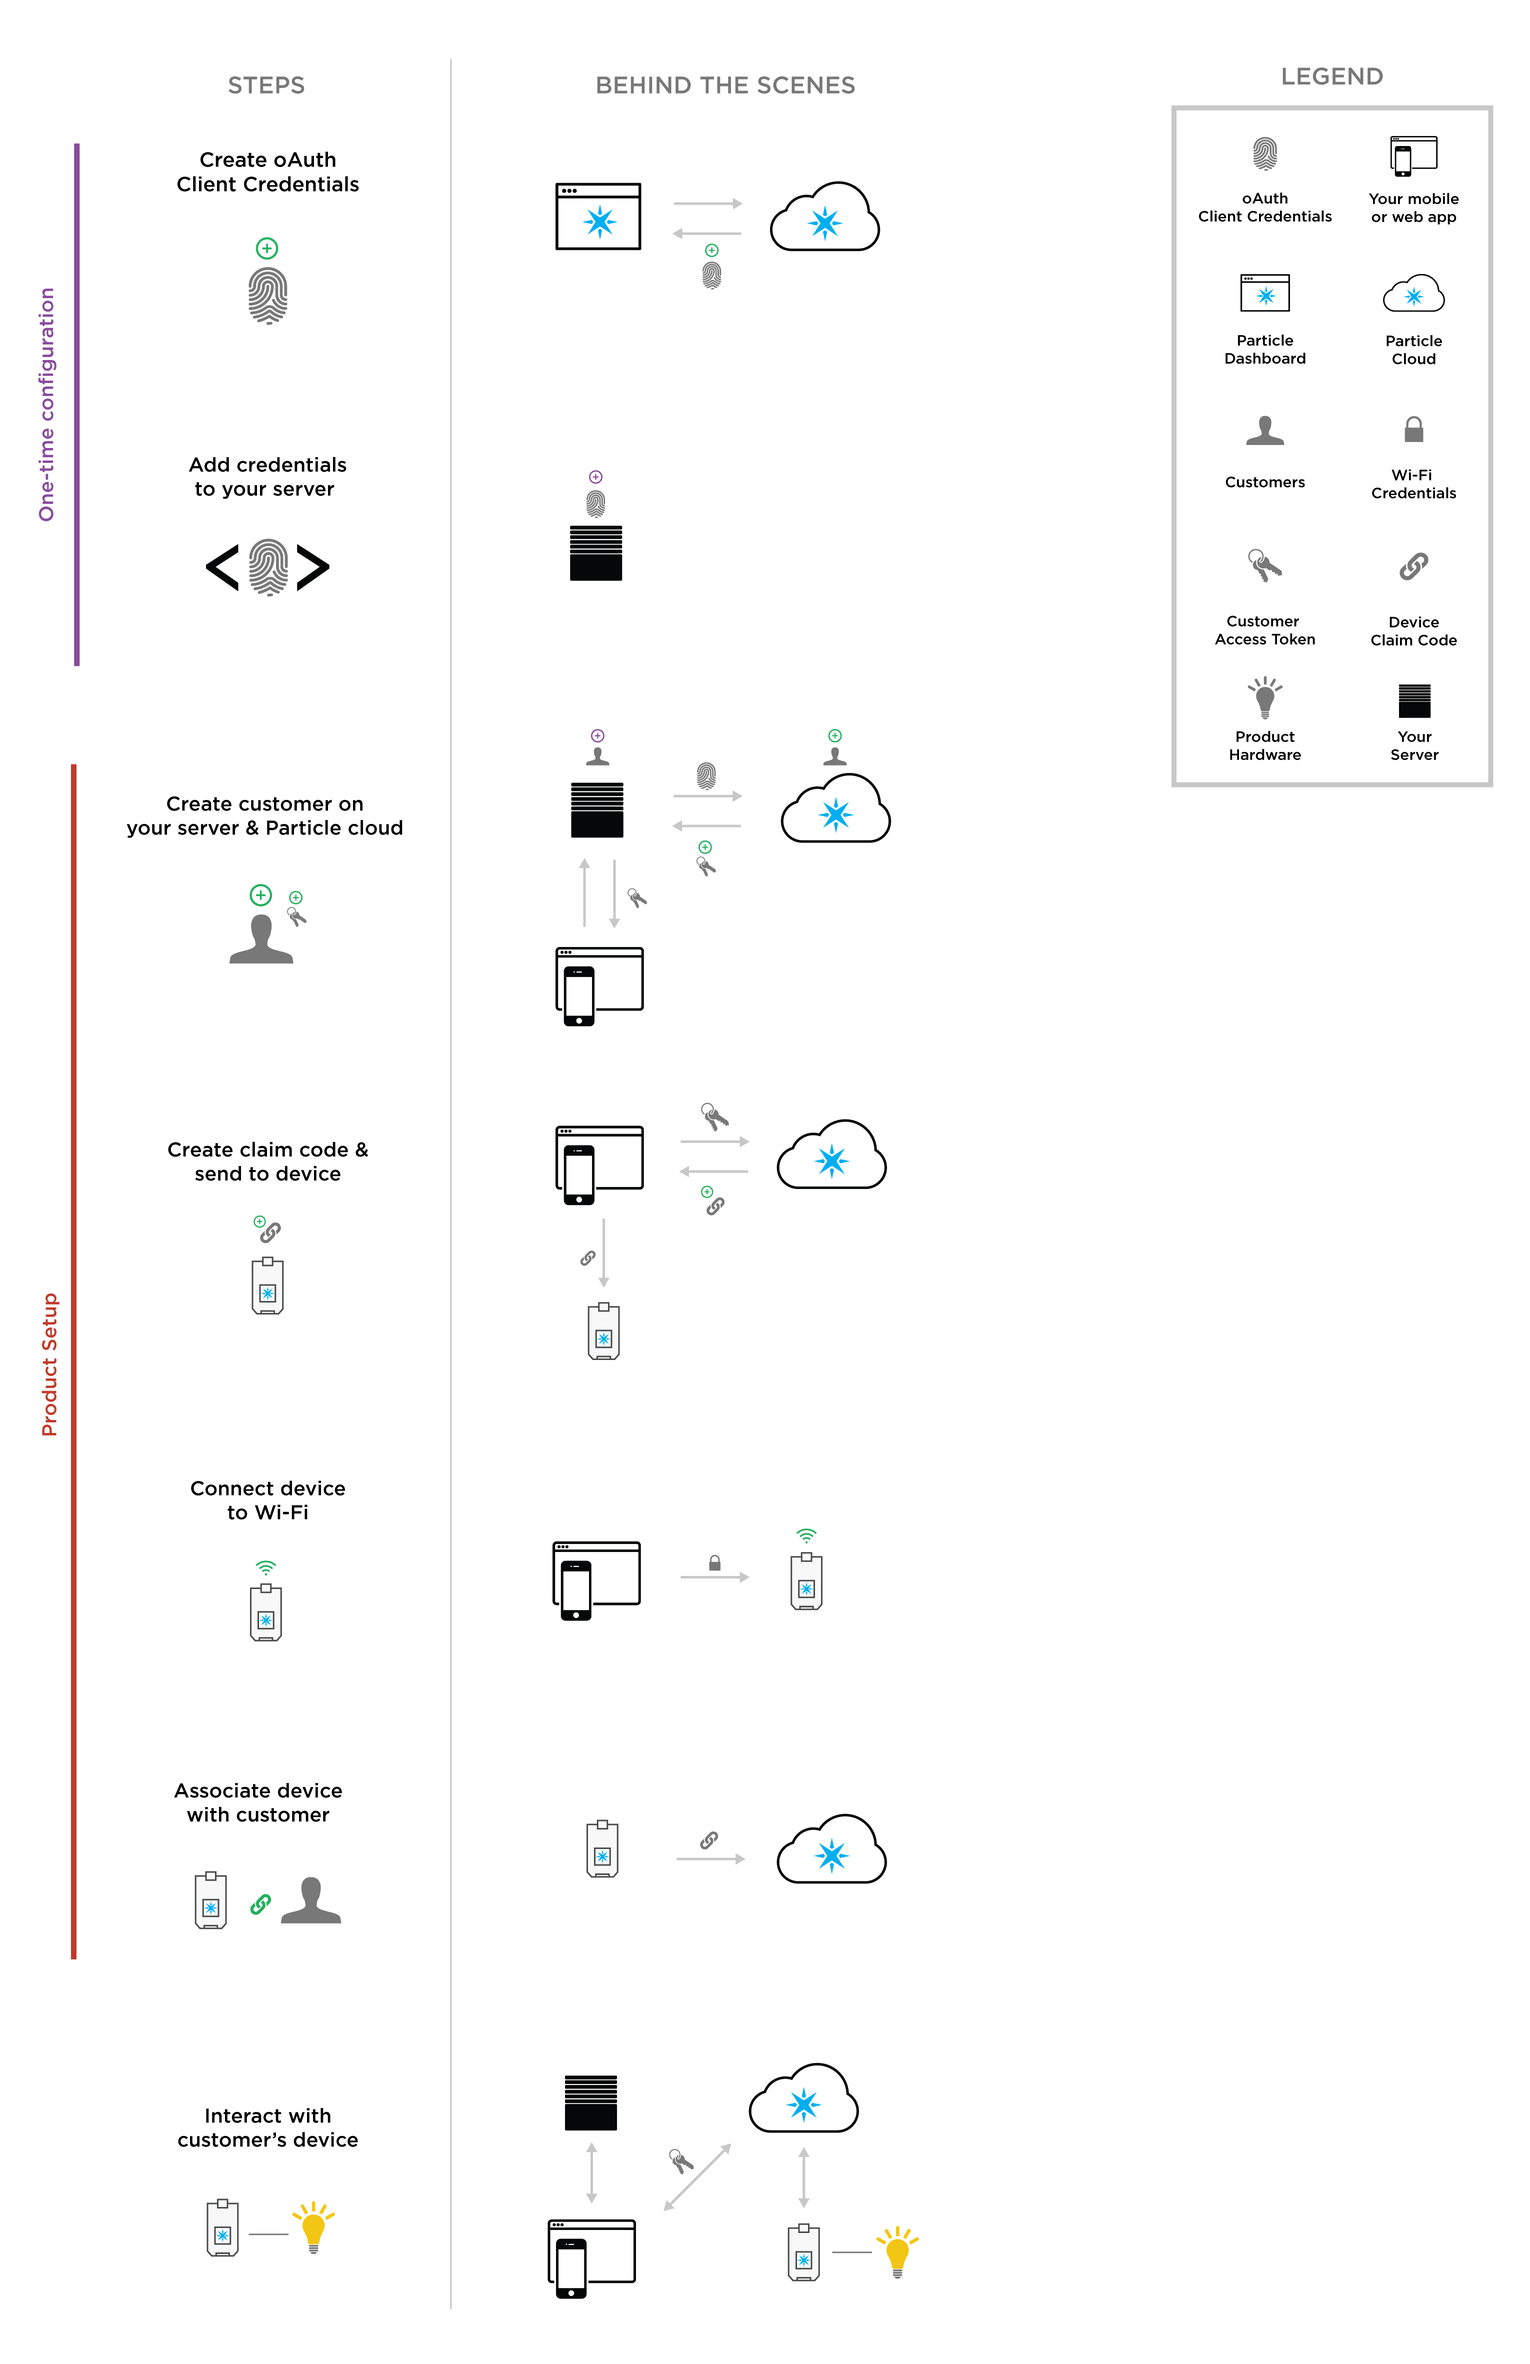
The full two-legged authorization flow. See here for full size diagram
1. Creating OAuth Client Credentials
Like Simple Authentication, you will need to create valid OAuth client credentials for your product. Unlike simple authentication, your OAuth client credentials will be sent to the Particle API from your server, not directly from your mobile/web application. The client credentials will be used for two purposes:
- Creating new customers
- Creating scoped access tokens for customers
You will create your OAuth client using the Authentication view in your product's Particle console. For info on how to find the Authentication page and create a client, check out the earlier discussion.
For two-legged authentication, you should choose Two-Legged Auth (Server) from the client type options when creating a new OAuth client. This will provide the recommended client configuration, and only requires you to provide a name for your new client.
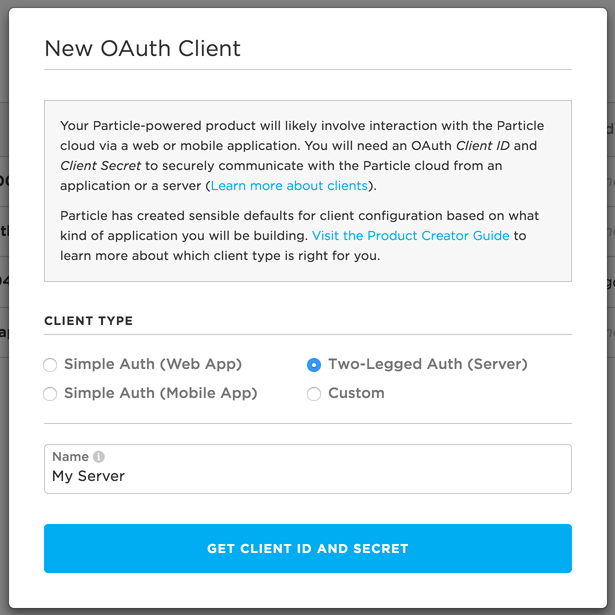
The recommended client configuration for Two-Legged Authentication
You will receive an OAuth client ID and secret upon successful creation of a client that will look like this:

Your client secret will only be shown once, so be sure to capture it for your records
This client ID and secret will be added to your server in the next step below.
Creating OAuth client can still be done directly against the Particle API. For info on this, see reference documentation on creating OAuth clients. Because the communication is server-to-server, you do not need to specify a scope. Without a scope, your client credentials can be successfully used for both of the purposes listed above.
2. Add OAuth Credentials to your server
Your server will need access to your newly created OAuth client ID and secret. Unlike simple authentication, both client ID and secret will be needed for two-legged authentication. Your server should have access to the client credentials anytime it needs to make an API call to Particle.
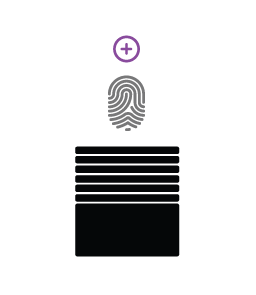
You must add your OAuth client credentials to your server
Because of the presence of your server, you should not need to add these credentials to your web or mobile application.
Do not share your client ID and secret publicly. These credentials provide the ability to fully control your product's devices, and access sensitive information about your product. We recommend never publishing the client ID and secret to a GitHub repository.
3. Create a customer
When using two-legged authentication, you will likely be managing customers on your own database (Note: We realize that you may not call end-users of your product "customers" like we do. You may simply refer to them as users internally. However, we will continue calling them customers here to avoid confusion).
An important thing to understand is that even though you will be creating customers yourself, you will also need to create a shadow customer on the Particle cloud. That is, for every customer you create on your back-end, an mirroring customer record must be created using the Particle API.
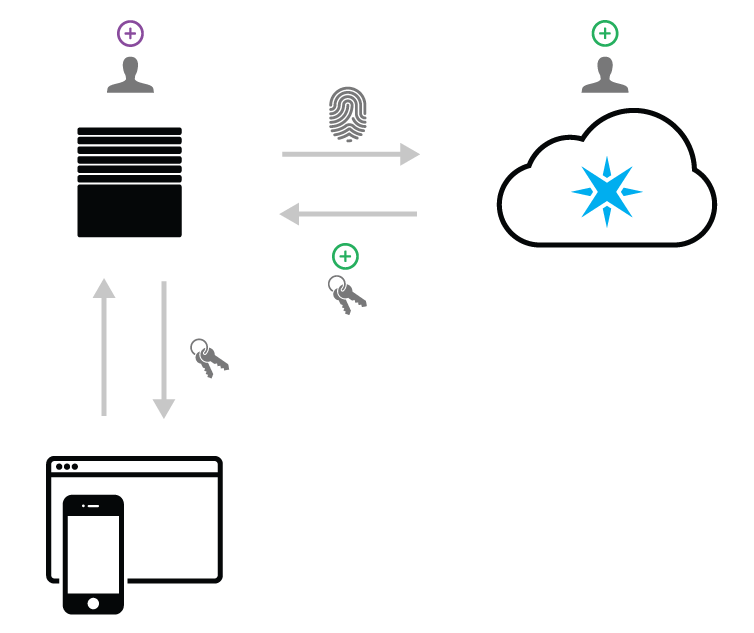
You will create a Particle shadow customer in addition to creating the customer on your own back-end.
A Particle shadow customer is required to interact with Particle devices when using two-legged auth. Specifically, the customer must exist in the Particle system so that your server can generate access tokens on behalf of the customer. This allows your mobile or web application to interact with the customer's device.
The Particle shadow customer should be created at the exact time that the customer is created in your system. As you will be managing customer credentials on your own server/database, a shadow customer should not have a password when they are created. You will still be able to generate access tokens for the customer using your OAuth client ID and secret instead of passing a username/password for that customer.
The API endpoint to create a customer is POST /v1/products/:productIdOrSlug/customers. A request to create a customer could look something like:
curl -X POST -u "client-id-goes-here:client-secret-goes-here" -d email=abu@agrabahmonkeys.com \
-d no_password=true https://api.particle.io/v1/products/widget-v1/customers
Note that there is no password for the customer. An email address is the only piece of information required to create a customer in the Particle system, and must be collected by your application during signup. As a result, you must pass the no_password=true flag to create the customer with no password. Note that in this endpoint, you should use your client ID and secret instead of an access token.
As the diagram above suggests, you will receive an access token in the response of the POST to creating of the customer. You will use this access token during the device claiming process as well as to interact with the device once it's set up.
Reference docs on creating a customer
If you are using Particle's iOS SDK, there is a hook available to inject the customer's access token into the mobile client. You can learn about this hook here.
Device setup (steps 4, 5 & 6)
Now that you have created the customer, and received a valid access token for that customer, it is now time to start the device setup process. This process will occur in exactly the same fashion as with Simple Authentication, and will not involve your server.
It is important to note that the device setup process will not involve your server. All communication will be between your web/mobile application, the customer's device, and the Particle cloud. These steps will also be handled by the mobile & JavaScript SDKs, involving extra work from you.
Because these steps are the same as for Simple Authentication, documentation will not be duplicated here. Instead, you can check out:
Step 4. Create claim code and send to device
Step 5. Connect device to Wi-Fi
Step 6. Associate device with customer
7. Interact with Customer's Device
Once the device has been setup, and the customer created, you're now ready to interact with the device! Hooray! It's important to understand that while you do have your own server, we recommend hitting the Particle API directly from your application client for any device-related actions. This includes:
- Calling functions on the device
- Reading variables on the device
- Listing devices for a customer
This should be straightforward, as using the SDKs will provide helper methods for these actions.
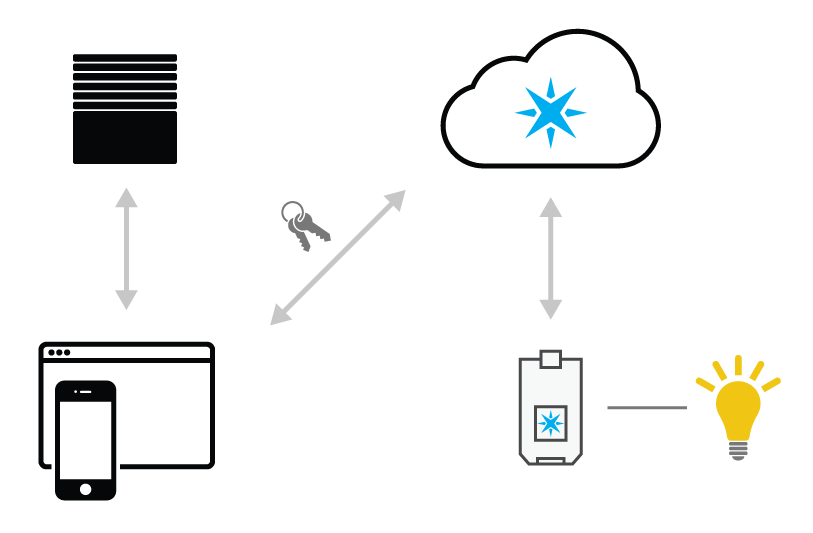
For all direct interactions with the device, hit the Particle API from your application client
The alternative would be telling your application client hit your back-end server, which would then trigger a call to the Particle API. This introduces an extra intermediary in communication, and involves needing to unnecessarily "wrap" Particle API endpoints.
The only reason for your server to hit the Particle API is to generate new scoped access tokens for your customers. You should generate a fresh access token each time the customer logs into your application.
To do this, you will use the POST /oauth/token endpoint, but in a special way. The request will look like this:
curl -u my-org-client-1234:long-secret -d grant_type=client_credentials \
-d scope=customer=jane@example.com https://api.particle.io/oauth/token
Breaking this down:
- The
-uis a HTTP Basic Auth header, where you will pass your OAuth client ID and secret. This allows you to generate access tokens for customers that belong to your product grant_typeis the OAuth grant type, which in this case isclient_credentialsscopeis set to customer, and what allows you to specify the customer you'd like an access token for. The value ofcustomershould be set to theemailyou passed when creating the customer.
The response should look like this:
{
  "access_token": "254406f79c1999af65a7df4388971354f85cfee9",
  "token_type": "bearer",
  "expires_in": 7776000,
  "refresh_token": "b5b901e8760164e134199bc2c3dd1d228acf2d90"
}
The response includes an access_token for the customer, that should be included for all subsequent API calls for the session. In addition, there's a refresh_token that you could use to generate a new access token in the event that the token expires. Here's how to use your refresh token to get a new access token:
curl -X POST -u client-id-1234:secret \
-d grant_type=refresh_token -d refresh_token=b5b901e8760164e134199bc2c3dd1d228acf2d90 \
https://api.particle.io/oauth/token
The response will be identical to the new access token creation endpoint above. Refresh tokens can only be used product oAuth tokens. They cannot be used to renew a Particle developer account access token (particle:particle).
