
AN032 Calling API from web page
This example illustrates a few techniques for calling the Particle API from a web page.
The first few examples use the Blink an LED from the cloud firmware.
You can use this firmware on most Particle devices, both Wi-Fi and Cellular, including the Argon, Boron, Photon, and Electron.
Embedding the token in the HTML
DO NOT USE THIS TECHNIQUE
Really, this is a horrible idea. It's tempting because it's so easy, but you really should not do this.
In this example we copy and paste our access token and device ID into the HTML source. The problem is that anyone can just "View Source" on the web page and get our access token. With that token, they can log into the Console, manage devices, delete source code from the Web IDE, pretty much everything.
If you are using source code management like GitHub, it's easy to accidentally share your account access token if you paste it into your code and have to remove it every time you commit a change.
Log in from page
A more secure option is to prompt the user for their username and password and use that to log into the Particle cloud.
This example:
- Uses Particle API JS to interact with the Device from Javascript.
- Uses jQuery to handle some AJAX (asynchronous HTTP requests) and web page manipulation.
- Prompt for login to a Particle developer account.
- Handles MFA (multi-factor authentication) if is is enabled on the account.
- Stores a short-lived access token in browser local storage.
Download this file and save it to disk on your computer. Then double-click to open it in your browser. The technique in this example works from file:// URLs so you don't need to host the page on an actual web server to use it.
The user interface isn't very pretty because we've left out the CSS styling, but it works.
The HTML
The HTML page is really three separate user interfaces that are either displayed or hidden as needed.
mainDivis the main user interface. If you want to play around with adding some other controls, here's where to put them.loginDivis where the user is prompted to log in.otpDivis where the user is prompted to enter their MFA token.
<body>
<div id="mainDiv" style="display: none;">
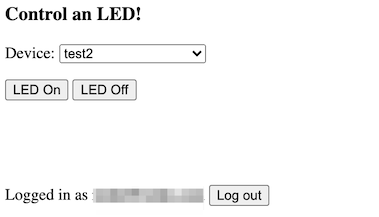
<h3>Control an LED!</h3>
<form>
<p>Device: <select id="deviceSelect"></select></p>
<p><button id="ledOnButton">LED On</button> <button id="ledOffButton">LED Off</button></p>
<p> </p>
<p><span id="statusSpan"></span></p>
<p> </p>
<p>Logged in as <span id="userSpan"></span> <button id="logoutButton">Log out</button></p>
</form>
</div>
<div id="loginDiv">
<h3>Login to Particle</h3>
<div id="loginFailedDiv" style="display: none;">
<p>Login failed, please try again.</p>
</div>
<form id="loginForm">
<p>Username (Email): <input type="text" id="userInput" /></p>
<p>Password: <input type="password" id="passwordInput" /></p>
<p><input type="submit" value="Login" /></p>
</form>
</div>
<div id="otpDiv" style="display: none;">
<form id="otpForm">
<p>One-time password from your authenticator app: <input type="text" id="otpInput" /></p>
<p><input type="submit" value="Login" /></p>
</form>
</div>
</body>
These are the external Javascript requirements for jQuery and Particle API JS.
<script src="https://ajax.googleapis.com/ajax/libs/jquery/3.5.1/jquery.min.js"></script>
<script src="https://cdn.jsdelivr.net/npm/particle-api-js@8/dist/particle.min.js"></script>
The Javascript
There's a fair amount of Javascript embedded in the top of the HTML file, but it breaks down into manageable chunks:
In jQuery, this marks the beginning of the function that is called when the HTML document and its scripts have been loaded.
$(document).ready(function () {
This is a single-page app that handles all operations using AJAX (asynchronous Javascript) and never reloads the page.
Here's how we attach a function to be called when the Login form is submitted in jQuery. This also prevents the page from changing.
$('#loginForm').submit(function (e) {
    e.preventDefault();
We hide the login page. We'll bring it back if login fails, or we'll display the OTP (MFA/one time password) page or the main page.
This application uses your browser session storage. When you close the browser window, the storage goes away, which helps keep your access token secure.
On your own computer, you could switch the locations that use sessionStorage to use localStorage which persists across closing
the browser. This would eliminate the need to log in every time. You may need to adjust the lifetime of the localStorage and your
Particle token to fit your needs.
$('#loginDiv').css('display', 'none');
$('#loginFailedDiv').css('display', 'none');
sessionStorage.particleUser = $('#userInput').val();
This chunk of code handles logging in. While the Particle API JS has a login function, it does not work with MFA. This code works for accounts with MFA enabled or disabled.
If you want to change the lifetime of the access token, change the value in expires_in. It's in seconds (3600 = 1 hour).
The code that handles the 403 error is used for MFA. It enables the otpDiv for the user to enter their one-time password.
And on success, it calls the loginSuccess() method with the access token we received.
$.ajax({
    data: {
        'client_id': 'particle',
        'client_secret': 'particle',
        'expires_in': 3600,
        'grant_type': 'password',
        'password': $('#passwordInput').val(),
        'username': $('#userInput').val()
    },
    error: function (jqXHR, textStatus, errorThrown) {
        if (jqXHR.status === 403) {
            // Got a 403 error, MFA required. Show the MFA/OTP page.
            mfa_token = jqXHR.responseJSON.mfa_token;
            $('#otpDiv').css('display', 'inline');
            return;
        }
        console.log('error ' + textStatus, errorThrown);
        $('#loginDiv').css('display', 'inline');
        $('#loginFailedDiv').css('display', 'inline');
    },
    method: 'POST',
    success: function (data) {
        loginSuccess(data.access_token);
    },
    url: 'https://api.particle.io/oauth/token',
});
In the MFA case, this code handles making the second part of the login process. It passes the mfa_token we got
in the first step (that returned the 403) and adds in the otp that the user entered in the text box.
$('#otpForm').submit(function (e) {
    // Login on the OTP/MFA form
    e.preventDefault();

    $('#otpDiv').css('display', 'none');

    $.ajax({
        data: {
            'client_id': 'particle',
            'client_secret': 'particle',
            'grant_type': 'urn:custom:mfa-otp',
            'mfa_token': mfa_token,
            'otp': $('#otpInput').val()
        },
        error: function (jqXHR, textStatus, errorThrown) {
            // Invalid MFA token
            $('#loginDiv').css('display', 'inline');
            $('#loginFailedDiv').css('display', 'inline');
        },
        method: 'POST',
        success: function (data) {
            loginSuccess(data.access_token);
        },
        url: 'https://api.particle.io/oauth/token',
    });

});
The Particle API JS does not have a function to delete the current access token but it's easy to do with AJAX.
$('#logoutButton').on('click', function (e) {
    // Logout button clicked
    e.preventDefault();

    // Delete the access token from local session storage
    const accessToken = sessionStorage.particleToken;
    delete sessionStorage.particleToken;
    delete sessionStorage.particleUser;

    // Invalidate the token on the cloud side
    $.ajax({
        data: {
            'access_token': accessToken
        },
        method: 'DELETE',
        complete: function () {
            // Show the login page
            $('#mainDiv').css('display', 'none');
            $('#loginDiv').css('display', 'inline');
            $('#loginFailedDiv').css('display', 'none');
        },
        url: 'https://api.particle.io/v1/access_tokens/current',
    });
});
This is where we handle the two user-oriented buttons. The ledControl() function is called
to do either the on or off operation.
$('#ledOnButton').on('click', function (e) {
    e.preventDefault();
    ledControl('on');
});
$('#ledOffButton').on('click', function (e) {
    e.preventDefault();
    ledControl('off');
});
And this code will attempt to use a previously saved token. This makes it possible to refresh the page and not have to reenter your password every time.
if (sessionStorage.particleToken) {
    // We have a Particle access token in the session storage. Probably
    // refreshed the page, so try to use it. You don't need to log in
    // every time, you can reuse the access token if it has not expired.
    $('#loginDiv').css('display', 'none');
    getDevices();
}
There are three cases that lead to calling getDevices():
- Already have a token (page refresh)
- Successfully logged in in one step (MFA disabled)
- Successfully logged in after the OTP entered (MFA enabled)
The getDevices() function uses Particle API JS to call the listDevices() function.
It uses the access token stored in the session storage. It's possible that this token has expired (the code currently sets the expiration to 1 hour), and if so it brings back up the login window.
If it's successful, then it shows the mainDiv and loads the device list into the popup
using loadDeviceList().
The Particle API JS is asynchronous, and uses promises. The parts in the then are called
later. The first function is called on successful completion, or the second is called on error.
function getDevices() {
    // Request the device list from the cloud
    particle.listDevices({ auth: sessionStorage.particleToken }).then(
        function (data) {
            // Success! Show the main page
            $('#mainDiv').css('display', 'inline');

            // Load the device selector popup
            loadDeviceList(data.body);
        },
        function (err) {
            // Failed to retrieve the device list. The token may have expired
            // so prompt for login again.
            $('#mainDiv').css('display', 'none');
            $('#loginDiv').css('display', 'inline');
            $('#loginFailedDiv').css('display', 'inline');
        }
    );
}
The loadDeviceList() function initializes the "logged in as" field then builds the device select popup menu.
It only includes devices that implement the led Particle.function, and also includes a label if the device is currently offline.
function loadDeviceList(deviceList) {
    let html = '';

    $('#userSpan').text(sessionStorage.particleUser);

    deviceList.forEach(function (dev) {
        if (dev.functions.includes('led')) {
            html += '<option value="' + dev.id + '">' + dev.name +
                (dev.online ? '' : ' (offline)') + '</option>';
        }
    });
    $('#deviceSelect').html(html);

    if (html == '') {
        $('#statusSpan').text('No device are running led control firmware');
    }
    else {
        $('#statusSpan').text('');
    }
}
And last but not least, the function that is called to turn on or off the LED:
This gets the selected Device ID from the select, and then calls the led particle function on it with a parameter of on or off.
function ledControl(cmd) {
    // Used to turn on or off the LED by using the Particle.function "led"
    const deviceId = $('#deviceSelect').val();

    $('#statusSpan').text('');

    particle.callFunction({ deviceId, name: 'led', argument: cmd,
        auth: sessionStorage.particleToken }).then(
        function (data) {
            $('#statusSpan').text('Call completed');
        },
        function (err) {
            $('#statusSpan').text('Error calling device: ' + err);
        }
    );
}
Simple server
These techniques work fine when the user can log into an account, but what if you want a public page where an anonymous user can make a function call without exposing your access token?
In this case, you may want to use your own server that acts as front-end for allowed calls. This allows precise control over what is allowed, and allows the access token to be stored in the back-end, safely away from prying eyes looking at the HTML source.
This example uses Express JS in node.js.
You can download the files associated with this app note as a zip file. This example is in the server directory.
This is the node server source:
This is a node app so it includes a package.json file with its dependencies. To install these dependencies, use:
cd server
npm install
Then run it. The preferred way is to use environment variables:
export AUTH_TOKEN=fe12630d2dbbd1ca6e8e28bd5a4b953dd3f1c53f
export DEVICE_ID=1d002a000547343232363230
node app.js
Or for Windows:
set AUTH_TOKEN=fe12630d2dbbd1ca6e8e28bd5a4b953dd3f1c53f
set DEVICE_ID=1d002a000547343232363230
node app.js
You can also do this using command line options, but this is less secure.
node app.js --auth-token fe12630d2dbbd1ca6e8e28bd5a4b953dd3f1c53f --device-id 1d002a000547343232363230
Then open the site in a browser: http://localhost:3000/index.html.
The source in app.js is a pretty normal express app. It serves the files in the public directory just like a regular web server.
The only special code, and the reason for having the server in the first place, is to handle the special /led URL.
What this does is translates calls to the /led URL into Particle API calls using the specified access token and Device ID.
This keeps the actual token and device ID safely in the server, while allowing it to be called from an anonymous browser.
app.post('/led', function (req, res) {
    const arg = req.body.arg;

    particle.callFunction({ deviceId: deviceId, name: 'led', argument: arg, auth: token })
        .then(function (data) {
            // console.log('call success');
            res.json({ ok: true });
        }, function (err) {
            // console.log('call failure', err);
            res.json({ ok: false, err });
        });
});
This is the HTML source. This is much simpler than even the first example because all of the API logic has been moved into the server.
The only noticeable change (other than removing a lot of stuff) is the ledControl() function.
Instead of calling the Particle API, it calls the led function on the server that it is served from. Note that this
does not have any authentication, but your token is still safe because it's stored in the server, not in your
browser.
function ledControl(cmd) {
    // Used to turn on or off the LED by using the Particle.function "led"
    $('#statusSpan').text('');
    $.ajax({
        contentType: "application/json; charset=utf-8",
        data: JSON.stringify({
            'arg': cmd
        }),
        error: function (jqXHR, textStatus, errorThrown) {
            $('#statusSpan').text('Error calling led server');
        },
        method: 'POST',
        success: function (data, textStatus, jqXJHR) {
            const respObj = jqXJHR.responseJSON;
            if (!respObj.ok) {
                $('#statusSpan').text('Error calling device: ' + respObj.err.body.error);
            }
        },
        url: '/led'
    });

}
Sensor page
What if you wanted to send data in the other direction - from the device to a web page? You can do that too!
This example demonstrates a few useful techniques:
- Smoothing data in device firmware
- Publishing values
- Subscribing to events from a web page
It's based on the login example above, so a lot of the code will already be familiar.
You can download the files associated with this app note as a zip file. This example is in the two sensorPage files (.cpp and .htm).
The circuit
For testing this, instead of using an actual sensor I used a potentiometer. One side is connected to GND (black), the other side to 3V3 (red), and the center wiper is connected to A0 (orange).
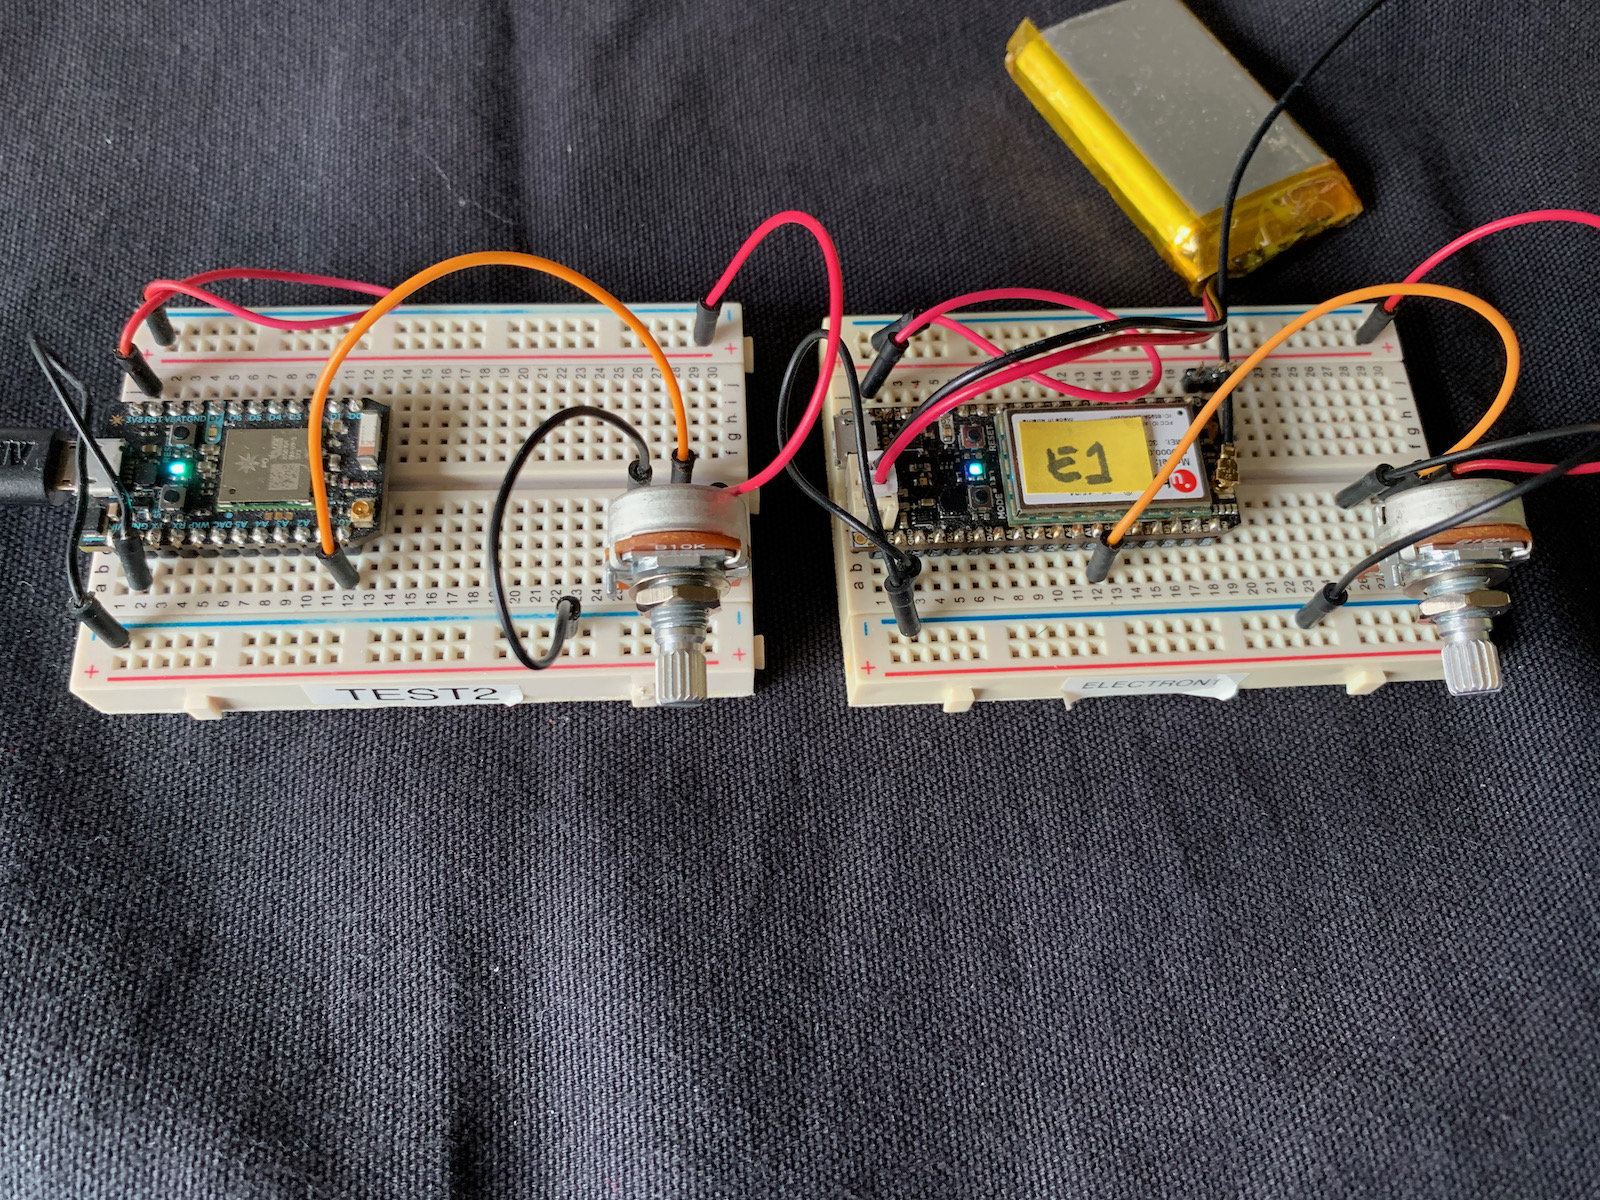
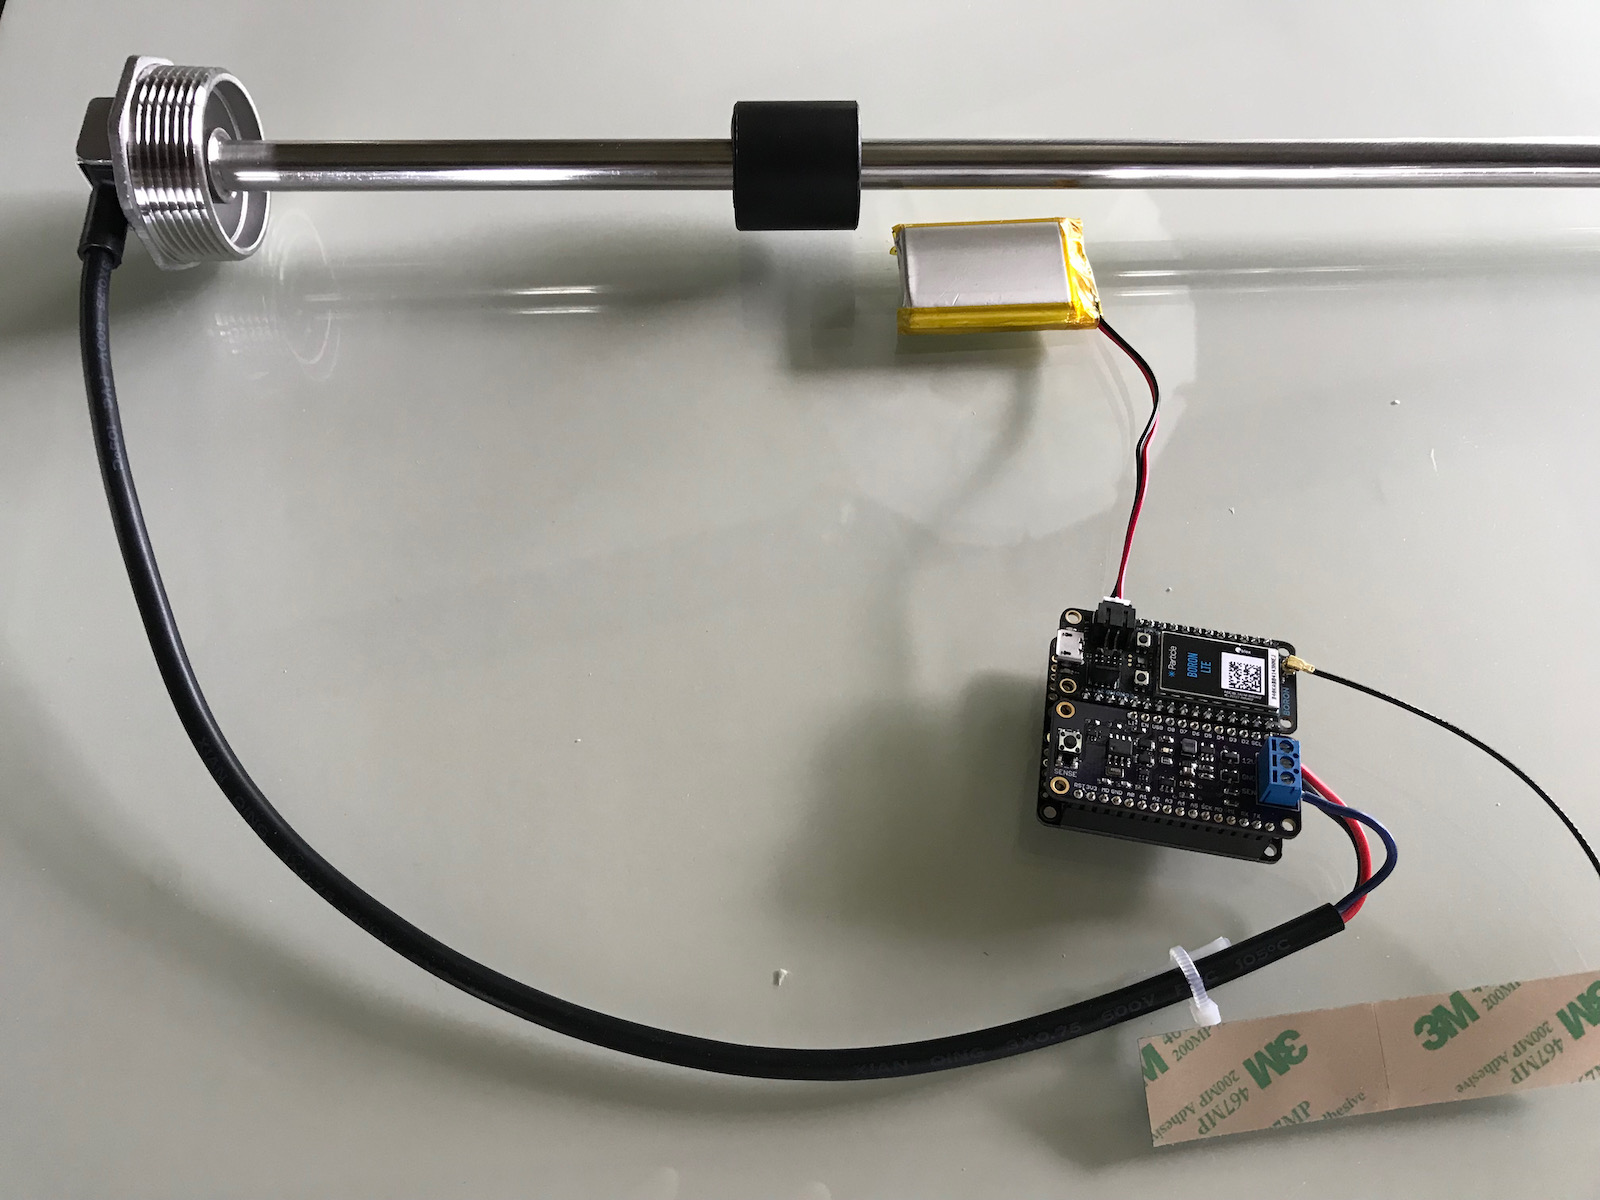
A better illustration of how you would use this would be a tank level sensor, but this particular sensor is almost 4 feet long and is incredibly unwieldy when sitting on my desk.
Device firmware
A few things to note in this firmware:
This configures which pin the analog sensor is connected to.
const pin_t SENSOR_PIN = A0;
A sensor can sometime have a little jitter to it. Averaging the samples can reduce this. This code is where you configure how many samples to average. It's being run at 1000 samples per second and this seems to be a good compromise with RAM usage.
const size_t NUM_SAMPLES_TO_AVERAGE = 50;
int16_t samples[NUM_SAMPLES_TO_AVERAGE];
size_t sampleIndex = 0;
Additionally, this code only publishes when:
- The change from the last publish exceeds
MIN_DELTA_TO_PUBLISH(on a scale of 0 - 4095). - It's been
MIN_PUBLISH_PERIODsince the last publish. It's 1 second here (1s) but you might want to make this longer. - You're connected to the Particle cloud (breathing cyan).
const int MIN_DELTA_TO_PUBLISH = 5;
const std::chrono::milliseconds MIN_PUBLISH_PERIOD = 1s;
This is the event name that is published. Make sure it doesn't conflict with any events you are using. This is also in the HTML/Javascript code.
const char *EVENT_NAME = "sensorValueEvent";
In loop() we check the sensor using analogRead().
The samples array is the samples. We write to the array in a circular fashion. sampleIndex starts out at
zero and increments for each sample added. However, we take it modulo NUM_SAMPLES_TO_AVERAGE using the %
operator, so the array index will always be in the range of 0 <= index < NUM_SAMPLES_TO_AVERAGE.
Once we have enough samples we sum the entire sample buffer and divide to get the average (mean).
void loop() {
    samples[sampleIndex++ % NUM_SAMPLES_TO_AVERAGE] =
        (int16_t) analogRead(SENSOR_PIN);
    if (sampleIndex >= NUM_SAMPLES_TO_AVERAGE) {
        // Sum the recent samples to calculate the mean
        int sum = 0;
        for(size_t ii = sampleIndex - NUM_SAMPLES_TO_AVERAGE;
            ii < sampleIndex;
            ii++) {

            sum += (int) samples[ii % NUM_SAMPLES_TO_AVERAGE];
        }
        int mean = (sum / NUM_SAMPLES_TO_AVERAGE);
The rest of the code checks to see if the delta from last publish is large enough and enough time has elapsed, and the device is connected to the cloud. If all three are true, then the value is published!
int delta = abs(mean - lastValue);
if (delta > MIN_DELTA_TO_PUBLISH &&
    millis() - lastPublish >= MIN_PUBLISH_PERIOD.count() &&
    Particle.connected())
{
    //
    lastPublish = millis();
    lastValue = mean;
    Particle.publish(EVENT_NAME, String(mean));
    Log.info("published %d", mean);
}
Web page
As in the earlier example, download the file and double-click to open in your web browser.
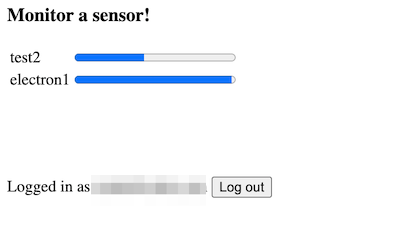
When a device running the sensor firmware above comes online, it will start publishing values and the page will automatically update.
If you refresh the page you may have to move the potentiometer as for simplicity the code does not send up values when the value does not change. That would be a good enhancement.
As you add new devices, new rows are added to the table.
As the values change, the progress bar updates. This works for both cellular and Wi-Fi. It's normally pretty fast, within a second or so, but if a cellular device has been idle for a while it may take longer for the first update (up to 10 seconds) but then subsequent updates will be much faster.
Most of the code is the same as the login page example above, however there are a few differences:
Upon retrieving the device list, we build a hash which maps the device IDs to device names for devices in the account that logged in.
deviceList = data.body;

deviceIdToName = {};
deviceList.forEach(function(dev) {
    deviceIdToName[dev.id] = dev.name;
});
Also we open up a new server-sent-events data stream to monitor this account's event stream for
events whose names begin with sensorValueEvent.
particle.getEventStream({ name: 'sensorValueEvent', auth: sessionStorage.particleToken }).then(
function (stream) {
    console.log('starting event stream');
    stream.on('event', function (eventData) {
        showSensor(eventData)
    });
});
The showSensor() function maps the Device ID (that we get from SSE) into the device name.
It also grabs the value from the eventData. The value is an ASCII representation of the numeric value, base 10.
function showSensor(eventData) {
    // eventData.coreid = Device ID
    const deviceId = eventData.coreid;

    // We retrieved the device list at startup to validate the access token
    // and also to be able to map device IDs to device names.
    const deviceName = deviceIdToName[deviceId] || deviceId;

    // eventData.data = event payload
    const sensorValue = parseInt(eventData.data);
This code checks to see if there's a progress bar for this device already. If not, it adds a row to the sensorTable for this device with the device name and a new progress bar.
if ($('#prog' + deviceId).length == 0) {
    // Add a row
    let html = '<tr><td>' + deviceName + '</td><td><progress id="prog' +
        deviceId + '" value="0" max="4095"></progress></td></tr>';
    $('#sensorTable > tbody').append(html);
}
Finally, whether the row is new or not, the progress bar is updated with the value.
$('#prog' + deviceId).val(sensorValue);