
node.js getting started
Node.js is a scripting language that can be used to write back-end servers and command line tools. It's based on Javascript, the language used in web browsers, and there are many similarities. One of the most powerful features is its extensibility using packages. There's a huge library of them at npmjs.com, the Node Package Manager. It also cross-platform, allowing easy use from Windows, Mac, and Linux operating systems.
This document is a brief introduction to node.js and using the Particle Cloud API, designed for beginners moving from using things like curl and bash or MSDOS batch scripts to a more powerful, and, ultimately easier to use, full programming language environment.
Log in
To use the interactive examples in this page, you must be logged into your Particle account:
Hello world - browser
The examples in this page can be used either locally, on your computer with node.js installed, or right from your browser.
Click the Try It! button to open a new browser tab. This allows you to edit and run node.js scripts from your browser with no software install required. Browser-based examples work on Chrome and Edge on Mac, Windows, Linux, and Chromebook.
The window looks like this:
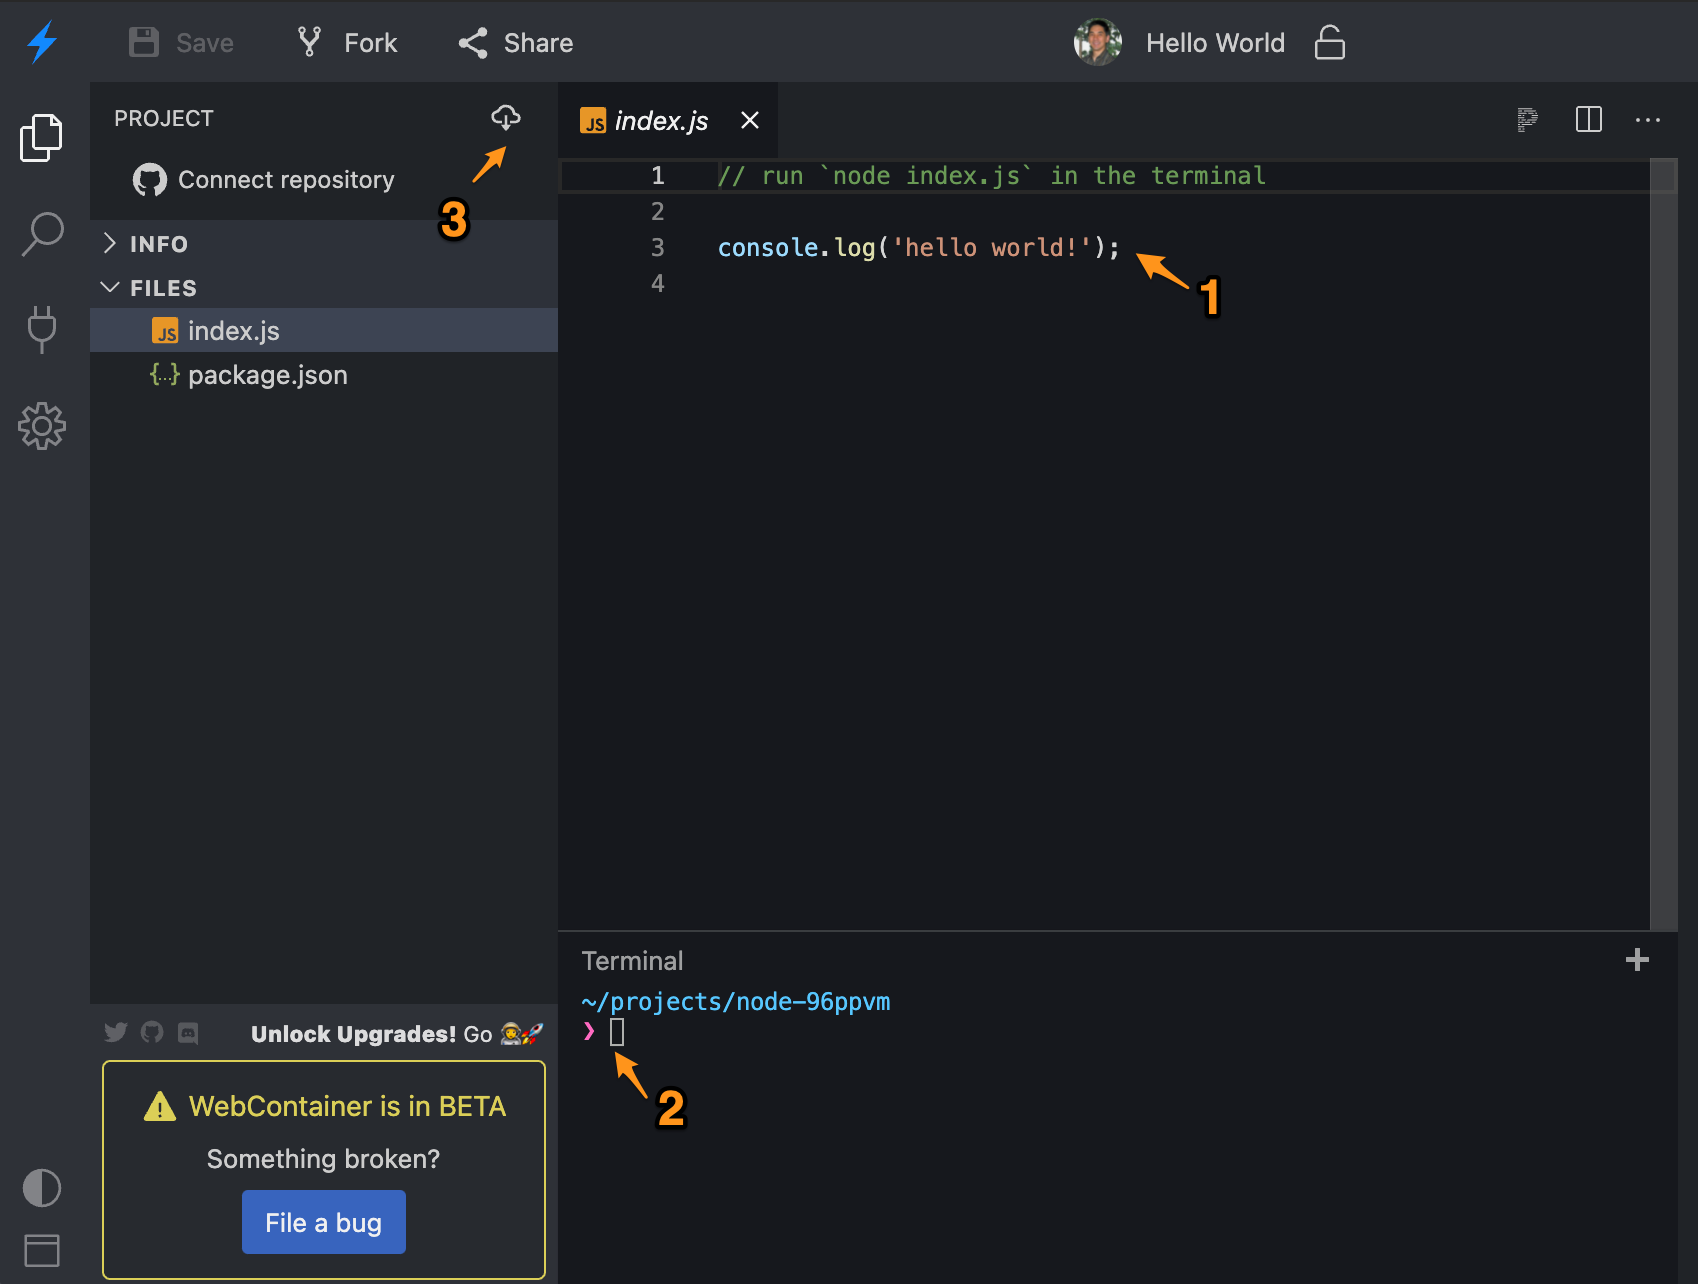
You can view the code here, as well as edit it. Syntax checking, auto-completion, etc. are all included.
The Terminal pane allow you to run the script and see the output. Type:
node index.js
to run the sample hello world app. Filename completion is available so you can type i then hit Tab to complete the rest of index.js. You can also use the Up Arrow or Ctrl-P to bring up previous commands in that you've typed in the Terminal window to repeat them.
- The Download icon allows you to download a zip copy of the project so you can run it on your computer's node.js instead of in a browser.
The node.js scripts are run securely in your browser and no have access to files on your computer or other browser tabs. There are no browser extensions; it's all browser-based Javascript.
When editing the code, don't forget to save your changes before running the script again (Command-S on the Mac and Ctrl-S on Windows and Linux). If you make changes to the file, it creates a copy ("fork") of the file and the URL changes so you don't need to worry about overwriting the public example. You can save and run the file without logging into GitHub, but changes will be lost when you close your browser window.
Installation - computer
Just go to the nodejs.org page and follow the instructions to download and install. The LTS (long-term support) version is recommended. You do not need to do this if you're going to be running the examples in your browser using the Try It buttons.
You may already have it installed; you can check from a command prompt or terminal window by entering the command:
node -v
The examples here require a minimum of version 12. The LTS version at the time of writing is 14.17.
Hello world
Not surprisingly we'll start with a Hello World example, which is really simple:
To run it, you create or download the hello.js file, then:
node hello.js
It should output:
hello world!
In Javascript, console.log() is the function that prints a debugging log message, like Log.info() or Serial.printlnf() in C++ on a Particle device.
A few other things to note:
- In Javascript, string constants can be surrounded by either single quotes or double quotes, unlike C++ which only uses double quotes. This is equally valid:
console.log("hello world!");
- The semicolon at the end of the line is optional in Javascript, but required in C++. We'll include them in the examples. This works too!
console.log("hello world!")
- The
console.logautomatically adds the end of line character so you don't need to manually add it.
Basic language features
Loops
The for loop construct looks like it does in C++, with three parts: initialization, test, and increment steps separated by semicolons:
To run it, you create or download the for-loop.js file, then:
node for-loop.js
It should output:
testing 0
testing 1
testing 2
testing 3
testing 4
testing 5
testing 6
testing 7
testing 8
testing 9
If you were writing this in C++ code on a Particle device, it might look like this, which isn't that different:
for(int ii = 0; ii < 10; ii++) {
    Log.info("testing %d", ii);
}
- Like C++, you can declare a variable within the loop construct. In C++ you need a type like
intorsize_tbut Javascript variables don't have a type. You instead declare it withletorvar. - Instead of using
sprintfformatting like in our Particle device code, we just concatenate a string and number using+in Javascript. - There are both
letvs.varbut in this example, either would work. Theletandconststatements were added in the ES6 version of Javascript, and many examples you find on the Internet will usevarfor compatibility with old versions.
Like C++, Javascript tends to use 0-based indexes in loops and in particular arrays, but making a 1-based loop is just as easy as C++:
This outputs:
testing 1
testing 2
testing 3
testing 4
testing 5
testing 6
testing 7
testing 8
testing 9
testing 10
If you're converting from the DOS command prompt for loop, that might look like this:
/Lis a incrementing loop- The first value (1) is the start
- The second value (1) is the increment
- The third value (10) is end condition (inclusive)
If you're coming from a Fortran background, the for loop is called do:
while loop (top-test)
You can do a while loop with a top test, like C++.
If you're coming from a Python background, the syntax is different, but the construct looks more or less the same:
do-while loop (bottom-test)
You can do a while loop with a bottom test, like C++, too.
Conditionals
Conditionals, if statements, work like C++:
Note that this code outputs this:
testing 0
testing 2
testing 4
testing 6
testing 8
The reason is that the if statement uses the modulus operator % in modulo 2 to check for even numbers. This works the same as C++.
if - else
Like C++, there is also an if - else:
if (a >= 10) {
    console.log('a was greater than or equal to 10');
}
else {
    console.log('a was less than 10');
}
And multiple conditions:
if (a >= 20) {
    console.log('a was greater than or equal to 20');
}
else if (a >= 10) {
    console.log('a was greater than or equal to 10');
}
else {
    console.log('a was less than 10');
}
This is different than shell/bash, which has an odd syntax:
if [$a -ge 20]
then
    echo "a was greater than or equal to 20"
elif [$a -ge 10]
then
    echo "a was greater than or equal to 20"
else
    echo "a was less than 10"
fi
Bracket placement
The placement of the curly brackets doesn't matter in Javascript or C++, but may start an argument with other programmers.
if (condition)
{
    console.log('condition was true');
}
Or omitted for single lines:
if (condition)
    console.log('condition was true');
Comparison
The comparison operators work like C++:
| Operator | Description |
|---|---|
== |
Equal to |
!= |
Not equal to |
> |
Greater than |
< |
Less than |
>= |
Greater than or equal to |
<= |
Less than or equal to |
Comparing strings
Unlike C++ native c-strings, you can compare Javascript strings for equality using == and != instead of having to use a function like strcmp().
Equal type operators
You'll see these used in many examples on the web:
| Operator | Description |
|---|---|
=== |
Equal to and same type |
!== |
Not equal to or different type |
The difference is that if you test 2 == "2" the result is true. The have the same value, but a different type. The left-hand side is a number and the right-hand side is a string.
Using 2 === "2" would return false because they have different types.
Arrays
Arrays will be familiar to C++ programmers, but there are some differences:
- You don't need to declare the size of a Javascript array, it automatically grows as needed
- Arrays don't have a data type. In fact, each element can have a different type of data (string, number, boolean, etc.)
This outputs:
1
3
5
7
9
Of note in this example:
- You can declare an array inline in your code using square brackets
- We used
constinstead oflet(orvar). This means the array cannot be changed. - The array knows its own length, which is available using
myArray.length. Note that it is a property of the array, not a function, so it's notlength(). - You access array elements using square brackets like C++.
for - of
The array style above is very C++-like, but there's a more Javascripty and less verbose way to do it, using the for - of statement:
The output is the same as above.
elemcontains the value at the next array index (not the index)- It can be declared
constbecause technically on each loop iteration a newelemvariable is created. You can usevarorletthere as well. - There's also for - in which is a little confusing and they're not at all interchangeable. Use
ofwith arrays.
Incidentally, you can declare an array almost anywhere, and the array can contain other types of data. This works too!
Output:
apple
banana
cucumber
There's another common way this is done, see array with iterator function, below.
Batch file array loop
That syntax may look familiar to DOS command prompt batch file users:
Python array loop
Or Python users:
Unix shell
Or sh (or bash) users:
Functions
Functions are declared using the function statement which can have 0 or more parameters, and optionally a return value.
This outputs:
add(3, 5) = 8
You can call the function almost anywhere, including the console.log statement, and pass parameters in between the parentheses, like in C++.
There's a lot more to functions, which we'll get into shortly.
Incidentally, Javascript numbers don't differentiate between integer and floating point types like C++. You could use floating point decimal numbers in the previous example like this:
console.log('add(3.5, 5.5) = ' + add(3.5, 5.5));
Object properties
Arrays are good when you have a sequence of values, but you'll also want to use objects and properties. These are a named key and its associated value, which can be any Javascript type (boolean, number, string, array, another object, or a function). Properties are often used to pass configuration data into functions in Javascript because named parameters are much more scalable than positional parameters as in C++.
To declare an object in Javascript:
let myObj = {
    "a":123,
    "b":"testing!"
}
If you understand JSON you'll immediately notice the similarities. However, Javascript is much more relaxed about syntax. You can use single or double quotes:
let myObj = {
    'a':123,
    'b':'testing!'
}
And you can omit the quotes on the key if there are no special characters in it:
let myObj = {
    a:123,
    b:'testing!'
}
This is a shorthand. You can explicitly declare each member if you want:
let myObj = {};
myObj.a = 123;
myObj.b = 'testing!';
One difference between Javascript and C++ is that square brackets can be used to access both arrays and objects. Note that the c is quoted here; if you didn't include the quotes the part inside the [] must be a variable, which is handy if you want to calculate which object property to read or write.
myObj['c'] = 'another element';
Objects can contain more objects and arrays, as well.
let myObj = {
    a: 123,
    b: 'testing!',
    c: [5, 6, 7, 8],
    d: {
        aa: true,
        bb: 3.333
    }
}
Even functions:
let myObj = {
    a:123,
    b:'testing!',
    callback: function(obj) {
        console.log('callback called!', obj);
    }
Another thing you see sometimes is an single item in place of a key and value:
const options = {
    auth
};
This means you create a key named auth with the value set to the value of the variable named auth. It's just shorthand for this:
const options = {
    "auth": auth
};
Asynchronous functions
Up to now things have been pretty simple syntax variations from other languages. Here's where things diverge and get more complicated.
This will output a new line every second;
testing 1
testing 2
testing 3
There's a lot to unpack in this little bit of code.
- The
var counter = 0line makes what is essentially a global variable. - The
setIntervalfunction is a built-in Javascript function for implementing a repeating timer. - It takes two parameters:
- A function to call when the timer fires
- An interval in milliseconds (1000 milliseconds = 1 second)
- The function body is executed later, when the timer fires.
- The function prints a message with an incrementing counter.
counter++is the value ofcounterwhich is then incremented after getting the value (post-increment).'testing ' + counter++takes the stringtestingand appends the number from the post-increment ofcounter.
The previous syntax is really common, however if you're coming from old-style C/C++, this declaration of function style might be confusing. It's somewhat equivalent to this, which might be more familiar:
Press Ctrl-C to stop the script from running (this works for both computer-based node.js as well as the browser-based Try It! buttons).
Also, if you're searching the web for node/Javascript examples you'll encounter arrow functions. The syntax looks like this and the code works the same:
Array with iterator function
Remember this example for iterating an array earlier?
for(const e of ['apple', 'banana', 'cucumber']) {
    console.log(e);
}
There another common way this is handled in Javascript using forEach:
- An array is declared.
- For each element in the array (
forEach) call the specified function. - The function is declared inline, and it takes one parameter
ethat's the element of the array being handled. - Prints the element
e.
Or you can do this with arrow functions:
Simple techniques
Adding a package
One of the advantages of node is the huge number of available packages or libraries. In order to use them, we'll change the structure of the projects we use in the examples.
- Each project should be in a separate directory.
- You need a
package.jsonfile at the top level of the directory. The file is mostly boilerplate for private projects like this. It will be updated as we add libraries, however, so it's still important. - Your Javascript sources go in that directory as well. In this case, it's in
app.js.
To add a package, cd into the project directory (containing the package.json file), then:
npm install particle-api-js
- This locates the
particle-api-jspackage in the node project manager (npm) database and downloads and installs it in this project. - It adds it to the
package.jsonfile;
    "dependencies": {
        "particle-api-js": "^9.1.0"
    },
- It creates a
package-lock.jsonfile. You probably won't need to mess with this, but it's used to keep track of the dependencies of the project. If you are committing a project to GitHub source control, you should add thepackage-lock.jsonfile. - It creates the
node_modulesdirectory. This contains the downloaded package, as well as all of the libraries it depends on. You should not commit this directory to source control.
List devices (Particle API)
Now lets move on to something more useful, using the Particle cloud API to list the devices in our account.
There are a bunch of new things in this code:
These two lines will likely be be in every project you create that uses the particle-api-js. The require statement loads the package that you added to your package.json and installed using npm install. The second line creates an object to access the package. Different libraries will have different initialization strategies.
var Particle = require('particle-api-js');
var particle = new Particle();
This example also uses the node-example-helper package. This makes it easy to handle authentication tokens from the example script, either by logging in interactively, from an environment variable, or from a configuration file.
const helper = require('@particle/node-example-helper');
This example uses async/await, which is a somewhat new feature of Javascript which greatly simplifies writing asynchronous code. While you do not need to use it, it makes the examples easier to read so most of the examples will use it. The run() function is where all of the important stuff in this example lives.
async function run() {
This function handles getting the auth token. When complete, the variable helper.auth will contain this access token.
// Authenticate the user and obtain the access token
await helper.authenticate();
One of the things about using async/await is that you need to catch the exceptions that can be thrown if an error occurs. This is done with a try/catch block.
try {
    // Code was here...
}
catch(e) {
    console.log('exception getting device list', e);
}
Finally, this is the code to get the list of devices. It requests a list of devices from the Particle Cloud API then prints it out.
const devices = await particle.listDevices({ auth: helper.auth });

for(const dev of devices.body) {
    console.log('name=' + dev.name + ' id=' + dev.id);
}
Finally, this allows the helper to exit. If you leave off this line, the script will keep running forever and you'll need to Ctrl-C to exit it.
helper.close();
Print devices that have not been heard from since a date
This example uses the last_heard of the device object to list devices that we have not heard from since a specific date.
The code uses Date.parse() which parses a date in various formats (including the ISO 8601 format used by the cloud) and return the time in milliseconds since January 1, 1970 UTC. This is sort of like Unix time, but Unix time is in seconds, not milliseconds.
If you are using the web-based Try It! button paste your access token in the index.js file where it says PASTE_YOUR_ACCESS_TOKEN_HERE. You can generate a temporary token using the [Create a token (browser-based))(#create-a-token-browser-based-) above, or use particle token create from the Particle CLI.
Print csv of cellular devices
This example generates csv (comma-separated value) data containing the device ID and the ICCID of the cellular devices in your account.
The code has a check for dev.iccid. If this field does not exist, then the body of the if won't be executed. That will cause it to not print Wi-Fi devices.
for(const dev of devices.body) {
    if (dev.iccid) {
        console.log(dev.id + ',' + dev.iccid);
    }
}
If you want to store it in a file, you can execute the command like this:
node app.js > devices.csv
The > redirects the output from the program to a file. This does not work with the Try It console.
Accessing files on your computer
Node.js programs running on your computer have access to your computer's file system directly, unlike Javascript programs running in your web browser. If you're automating operations across many devices, it's common to work with a file of device IDs one per line, performing some operation on each device sequentially. Fortunately, this is easy to do.
Print lines of a file
This isn't a very useful program, as your operating system can already do this (cat on Mac and Linux, type on Windows), but it shows how the file system API works.
Lines like these are how you import libraries into your node.js project. Sometimes you'll see var used instead of const.
The fs and path libraries are built into node.js so you don't need to npm install them. require is used for both built-in and 3rd-party libraries. There's also import which won't be covered in this tutorial.
const fs = require('fs');
const path = require('path');
This construct is used to make a full pathname to a file relative to the directory our script is run from (node-file1). path.join joins two or more path components into a single path. It works with .. and works with both Windows and Mac/Linux directory separators. The __dirname variable is built-in and is the directory the script runs from.
const testFilePath = path.join(__dirname, 'testfile.txt');
The node file system API is actually two similar APIs, an asynchronous one (with callbacks or promises) and a Sync API that effectively blocks during the operation. For our test tool, synchronous is fine and easier to use.
This command reads the entire file into RAM and returns it. The utf8 parameter is so the data is read as text and stored in a string variable. Otherwise it's stored as binary data in a Buffer object.
const testFile = fs.readFileSync(testFilePath, 'utf8');
The reason we need a string is we then split it into lines, using split('\n') which splits on newline characters. Then we print out each line, which isn't all that useful but is just for illustration.
for(let line of testFile.split('\n')) {
    console.log(line);
}
When using the Try It! browser-based node.js, it's using the testfile.txt in the virtual machine, not on your computer. But you can edit the file in the virtual IDE in the browser.
Processing a list of devices
A more useful thing to do is process a file of Device IDs and act on each device in the list. In this example, we'll get the full device information which isn't all that useful, but it's just a template that you can use to put other things in that block of code. For example, you might claim devices this way, name devices, or change device groups.
Sometimes instead of encoding the name of the file to process in the script, you want to pass it as command line arguments. There are multiple command line processing options, but we'll use yargs here.
The yargs package is already added to this project's package.json file but to add it to a new project you'd just:
npm install yargs
If you've downloaded the project and want to run it, you'll still need to install the pre-configured libraries when using node.js on your computer.
npm install
To run it:
node app.js deviceIds.txt
If using the Try It! button use:
node index.js deviceIds.txt
This require line is a little different because the yargs package supports multiple APIs. We're only interested in the argv API, so we get only that one API this way:
const argv = require('yargs').argv
We'll store all of the Device IDs in an array in this example. This is how you declare an empty array.
let deviceIds = [];
You must pass one or more filenames on the command. This is a little error checking. The argv._.length syntax is weird, but argv defines a property named _ so that's just how it works.
The process.exit(1) causes the script to exit with an exit code of 1. It's pretty common to return 0 on success and non-zero on error, but not required. And oddly you don't need to require process like you do fs and path.
if (argv._.length == 0) {
    console.log("file of device IDs is required");
    process.exit(1);
}
This loops through all of the files on the command line, in case there are more than 1.
for(const name of argv._) {
    // console.log('processing ' + name);
This reads the file into memory as a string like we did in the previous example, except name comes from the command line options.
const fileContents = fs.readFileSync(name, 'utf8');
This is a regular expression. There are countless entire books on regular expressions, but in this case what it does is pick out strings of 24 hexadecimal characters from a line of the file. This is the standard format for Device IDs.
const re = /([A-Fa-f0-9]{24})/;
Iterate over each line of the input file;
for(const line of fileContents.split("\n")) {
Match line line against the regular expression. If there is a match add it to the array. If the line does not contain a valid-looking Device ID, skip this line.
const m = line.match(re);
if (m) {
    deviceIds.push(m[1]);
}
And finally print out the results:
console.log('deviceIds', deviceIds);
The output should look like this:
% node app.js deviceIds.txt
deviceIds [
  'ffff8db41188ef384f6bc425',
  'ffffeb93d65d7ac6005dbe64',
  'ffff57a7aec00b13955458a5',
  'ffff3e241d61256cd4b285de',
  'ffff14031c46fa0d034800f9',
  'ffffdaf61e1ec9e8b12dca3b',
  'ffff04202004dac1dc1b52a3',
  'ffff71a58aed2acbccec6a26',
  'fffff006441bbb7fd0da24f9',
  'ffff84b3e7f2c0a6d9ad93ba'
]
The same techniques can be used to pick out other common things like ICCIDs, IMEIs, and serial numbers by adjusting the regular expression.
Reading a csv file
Sometimes you'll have a comma-separated value file (csv). Resist the temptation to parse it by hand because there are good csv parsers available for node and dealing with escaped strings yourself is tedious and error-prone.
Some of the code should be familiar from the last example.
Install the dependencies when using node.js on your computer:
npm install
This example uses the csv-parse package for node.js.
const csvParse = require('csv-parse/lib/sync');
Instead of iterating the lines of the file it's just passed off to the CSV parser package synchronous API.
const fileContents = fs.readFileSync(name, 'utf8');

const records = csvParse(fileContents, {
    columns: true,
    skip_empty_lines: true
});

allRecords = allRecords.concat(records);
Using this package makes it easy to handle CSV files with a column key, like this:
deviceId,imei
ffffb83d01d2aae50a12a0b6,89010009533675340735
ffff54e0aa399e010f5e5c25,89010004583001443088
...
The csvParse() method returns an array of records, with each element being an object with the column key and the data in the CSV. This means the data is tied to the labels and not the actual column order, in case the file format changes later.
Full output:
% node app.js ids.csv
allRecords [
  {
    deviceId: 'ffffb83d01d2aae50a12a0b6',
    imei: '89010009533675340735'
  },
  {
    deviceId: 'ffff54e0aa399e010f5e5c25',
    imei: '89010004583001443088'
  },
  {
    deviceId: 'ffff4a73a348c62c9a928361',
    imei: '89010002073644760033'
  },
  {
    deviceId: 'ffff10ab47bb9c98d42dd93b',
    imei: '89010007159791067705'
  },
  {
    deviceId: 'ffff50f908d5104debc4563f',
    imei: '89010008949712709354'
  }
]
ffffb83d01d2aae50a12a0b6
ffff54e0aa399e010f5e5c25
ffff4a73a348c62c9a928361
ffff10ab47bb9c98d42dd93b
ffff50f908d5104debc4563f
Access tokens
One common thing you'll need to do is authenticate Particle API calls from a node.js script. There are four common ways of using access tokens in scripts:
- Interactive login from the script.
- Embed the token in the script as a variable.
- Pass the token in a command line parameter.
- Store the token in a configuration file.
- Pass the token in an environment variable.
For security reasons, the first and last ones are usually the most secure.
If you use the boilerplate in the list devices examples above, interactive login and environment variable support are built in. Configuration files can also be used with a few additional lines of code.
When you want to use your access token, for example with a Particle cloud API call, you just the helper.auth variable.
To call the script, you just need to set the environment variable first.
For Mac and Linux:
export PARTICLE_AUTH=27fdffffffffffffffffffffffffffffffff4259
node app.js
For Windows:
set PARTICLE_AUTH=27fdffffffffffffffffffffffffffffffff4259
node app.js
For the browser-based examples, you can do this from the terminal box in the lower right.
To get an access token, you will often use the particle token create command in the Particle CLI. Remember that the access token grants full access to your account, so make sure you keep it secure!
Create a token (browser-based)
You can also create a token using this web-browser control. This creates a token for your account, which can access all devices in your sandbox as well as products and organizations you have access to. Be careful with this token! The username, password, and MFA OTP token (if required) are necessary to create a new token. You can't create another token from your single-sign-on login.
| User Email | ||
| Password | ||
| Expires In | ||
| MFA OTP Token | (6 digits) | |
| Access Token | ||
Copy and paste the token out of the Access Token field to use in locations where you need an access token. (The password is sent using a Particle Cloud API call using Javascript and TLS/SSL encryption.)
Changing device ownership
This is a starter script that you can tailor to your own purposes, but illustrates a bunch of techniques. It moves devices from one developer account to another account.
Install the dependencies when using node.js on your computer:
cd node-device-change-owner
npm install
You need access tokens for the old and new accounts, and then set them in the environment:
For Mac and Linux:
export PARTICLE_AUTH_OLD=fffffff344ede465db1ce541461e41eb5219749d
export PARTICLE_AUTH_NEW=ffffff988ea2e0537b40ffe7cc36906f5b36a76c
Or for Windows:
set PARTICLE_AUTH_OLD=fffffff344ede465db1ce541461e41eb5219749d
set PARTICLE_AUTH_NEW=ffffff988ea2e0537b40ffe7cc36906f5b36a76c
One handy way to get tokens is to open up the console, opening one in a separate incognito or private browsing window. Go into the Events tab and click the View in Terminal icon. The command that's printed includes an access token, and you can just copy that token for temporary use. That token is invalidated when you log out of the console.
If you are using the web-based Try It! button paste your access token in the index.js file in the two locations where it says PASTE_YOUR_ACCESS_TOKEN_HERE. You can generate a temporary token using the [Create a token (browser-based))(#create-a-token-browser-based-) above, or use particle token create from the Particle CLI.
This example shows how to filter devices by name. You can test the filtering by using a command like:
node app.js --list "test*"
This will print out all of the devices whose names begin with "test".
To set this as the list of devices to process, use the --set option:
node app.js --list "test*" --set
This updates a file called status.json that contains the list of devices to process and the status. You can do this multiple times with different names and patterns to build the full list of devices.
To run the unclaim and reclaim process:
node app.js --run
If an error occurs or devices are offline, you can repeat this as necessary until all devices are migrated.
How it works
The top of the file should be familiar from the list devices example, above, except it takes two access tokens instead of one.
This is a new technique:
First we create a path to the status.json file in the script directory.
Then we initialize
statusto be an empty object.If the status.json file exists, then we read the file (as a UTF-8 string), then parse it into a JSON object, and save it in the
statusobject.
const statusPath = path.join(__dirname, 'status.json');
let status = {};
if (fs.existsSync(statusPath)) {
    status = JSON.parse(fs.readFileSync(statusPath, 'utf8'));
}
And there is also a function to save the current status object back into the file. We call this after updating it. You'll see something like this JSON.stringify(status, null, 2) frequently. It converts an object (status) into a JSON string. The parameters null, 2 have the result of pretty-printing the output, with 2-space indentation. If you leave those out, it outputs a compact representation on a single line, which saves bytes but is hard to read.
function saveStatus() {
    fs.writeFileSync(statusPath, JSON.stringify(status, null, 2));
}
This part should be familiar; it get the list of devices in the account and iterates through them.
async function listDevices(pattern) {

    const res = await particle.listDevices({ auth: accessTokenOld });

    for(let dev of res.body) {
If the device is not named, then it is skipped (continue).
if (dev.name == null) {
    continue;
}
The next part uses the minimatch package to do filename-style matching such as * wildcards. If the device names does not match the pattern, it's skipped.
if (!minimatch(dev.name, pattern, { noglobstar: true, nocase: true })) {
    continue;
}
This block prints out the matching name, and adds the name and device ID to the status object that's saved to the status.json file.
status.devicesis an arraypush()is a built-in method of Javascript arrays to add an element at the end of the array.- In this case, the parameter is an object in
{} - It has two members:
idandname.
console.log(dev.name);
if (argv.set) {
    status.devices.push({
        id: dev.id,
        name: dev.name
    });
}
This handles the --run option. It gets the list of devices from the cloud. Note the parentheses around the await. This is necessary because you want to wait for the listDevices command to complete, then get the body out of the response.
async function run() {

    const deviceArray = (await particle.listDevices({ auth: accessTokenOld })).body;
This iterates through the devices array in the status object. If the entry has been completed (done is set), then skip it.
for(let statusDev of status.devices) {
    if (statusDev.done) {
        continue;
    }
This is a new technique:
filter()is a method of Javascript arrays. It iterates the array and calls a function. if the function returns true, then the element is added to a new array that is returned.Instead using
function(dev)this example uses an arrow function.For each element of
deviceArraywhich is an array of devices in the old account, it checks to see if that entry'sid(Device ID) matches the one we're processing in thestatusobject. If it is, it's added to the resulting array (match).
const match = deviceArray.filter(dev => (dev.id == statusDev.id));
The syntax takes some getting used to, but it is much more compact this this, which is pretty much equivalent:
let match = [];
for(const dev of deviceArray) {
    if (dev.id == statusDev.id) {
        match.push(dev);
    }
}
If there are no matches, then the device is not in the device list. This can happen if the device has already been unclaimed.
if (match.length == 0) {
    console.log('not in device list', statusDev);
    continue;
}
If the device is not online, we skip it, because you can't claim a device that is offline.
if (!match[0].online) {
    console.log('not online', statusDev);
    continue;
}
This block of code does the unclaim. The try/catch handles any errors that occur so the error is logged, but the script will continue to run.
try {
    // Unclaim
    console.log('unclaiming ' + statusDev.name + ' ' + statusDev.id);
    await particle.removeDevice({ deviceId: statusDev.id, auth: accessTokenOld });
    statusDev.unclaimed = true;
    saveStatus();
}
catch(e) {
    console.log('unclaiming failed ' + statusDev.id, e);
    continue;
}
This block of code does the claim:
try {
    // Claim
    console.log('claiming ' + statusDev.name + ' ' + statusDev.id);
    await particle.claimDevice({ deviceId: statusDev.id, auth: accessTokenNew });

    statusDev.done = true;
    saveStatus();
}
catch(e) {
    console.log('claiming failed ' + statusDev.id, e);
}