
Finding your device ID
Finding your device ID
The device ID uniquely identifies your Particle device (Photon, Electron, P1, Core, etc.) to the Particle cloud. It consists of 24 hexadecimal characters, and looks like this:
1e0032123447343149111039
That's a made-up device ID. And you should probably avoid sharing your actual device IDs in public, just to be safe.
Also note: even though the device ID is hexadecimal, many commands that take a device ID, like particle device add assume that the letters a-f will be lowercase. Using uppercase letters will not work properly.
Using the Particle CLI
For the Photon, Electron, and Core, an easy way is to use the Particle CLI.
Connect the device to your computer using USB and put the device in listening mode (blinking dark blue) by holding down the SETUP (or MODE) button until the main status LED blinks dark blue, about 3 seconds.
Then issue the command:
particle identify
This will output your device ID, Device OS version number (previously called system firmware), and, for the Electron, your ICCID. Something like:
Your device id is 1e0032123447343149111039
Your system firmware version is 0.5.3
This also works on the P1, assuming the USB port is exposed.
Using Wi-Fi (photon and P1 only)
This technique is useful if you have a device built around a P1 and you don't have ports exposed.
It's also handy because you can do it from your phone with no USB connection to the device, though you still need to access the SETUP button.
Put the device in listening mode (blinking dark blue) by holding down the SETUP button until the main status LED blinks dark blue, about 3 seconds, if it's not already in that state.
Find the device's Wi-Fi network and connect to it. It's usually called something like "Photon-57R2" where the last 4 letters and numbers are random.
(Also, those 4 characters are printed on a label on the side of the Photon packaging. That can be useful if a lot of people are setting up Photons in close proximity, like a classroom or hackathon, so you know which Wi-Fi is yours.)
Then open a web browser and navigate to:
It should return a page with something like:
{"id":"1e0032123447343149111039","c":"1"}
Using USB serial
If you don't have the Particle CLI installed, you can get the device ID using the USB serial port on the Photon, Electron, and Core.
This also works on the P1, assuming the USB port is exposed.
Serial - Windows
For Windows, you'll need a program like PuTTY or CoolTerm.
Connect the device to your computer using USB and put the device in listening mode (blinking dark blue) by holding down the SETUP (or MODE) button until the main status LED blinks dark blue, about 3 seconds.
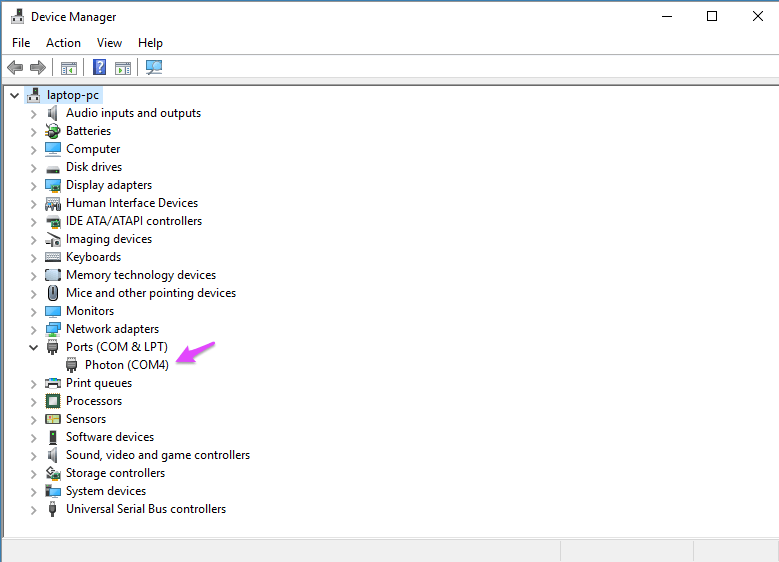
It's hard to say what COM port it will use, but if you open the Windows Device Manager and expand Ports (COM & LPT) it should show the Photon.
This is the configuration screen for PuTTY:
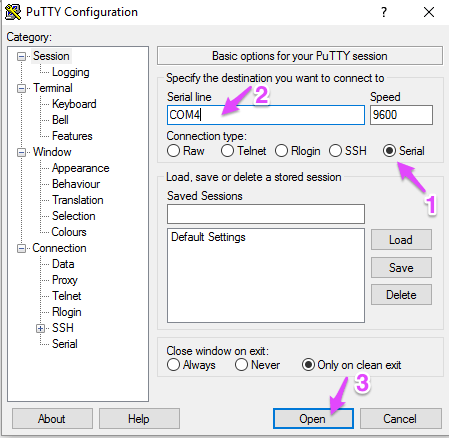
Click Serial (1) then enter the COM port number (2) then click Open (3).
Press the letter i (lowercase i, as in identify) by itself, not followed by Return. Something like this should be printed:
Your device id is 1e0032123447343149111039
Serial - Mac
Connect the device to your computer using USB and put the device in listening mode (blinking dark blue) by holding down the SETUP (or MODE) button until the main status LED blinks dark blue, about 3 seconds.
Find the serial port that is being used using the Terminal program command line:
ls /dev/cu.usb*
It should return something like /dev/cu.usbmodemFD1161.
Then issue the command:
screen /dev/cu.usbmodemFD1161
The screen will probably clear. Press the letter i (lowercase i, as in identify) by itself, not followed by Return. Something like this should be printed:
Your device id is 1e0032123447343149111039
You will probably want to issue the screen command in a new Terminal window, because it's hard to close screen once you start it and you'll probably just need to close the window afterwards.
Serial - Linux
Connect the device to your computer using USB and put the device in listening mode (blinking dark blue) by holding down the SETUP (or MODE) button until the main status LED blinks dark blue, about 3 seconds.
Find the serial port that is being used using the Terminal program command line:
ls /dev/ttyACM*
It should return something like /dev/ttyACM0.
Then issue the command:
screen /dev/ttyACM0
The screen will probably clear. Press the letter i (lowercase i, as in identify) by itself, not followed by Return.
You will probably want to issue the screen command in a new Terminal window, because it's hard to close screen once you start it and you'll probably just need to close the window afterwards.
Serial - Particle Dev (Atom IDE)
If you have the Particle Dev (Atom IDE) installed on your Windows or Mac computer, you can use that.
Connect the device to your computer using USB and put the device in listening mode (blinking dark blue) by holding down the SETUP (or MODE) button until the main status LED blinks dark blue, about 3 seconds.
Select Show Serial Monitor from the Particle menu.
Select the serial port, 9600 baud, and click the Connect button.
Type the letter i (lowercase i, as in identify) in the Enter string to send box and press Return.
Serial - Arduino IDE
If you have the Arduino IDE installed, you can use that.
Connect the device to your computer using USB and put the device in listening mode (blinking dark blue) by holding down the SETUP (or MODE) button until the main status LED blinks dark blue, about 3 seconds.
Select the serial port from the Port menu in the Tools menu.
Select Serial Monitor from the Tools menu.
Type the letter i (lowercase i, as in identify) in the box at the top of the window and click Send.
Serial - Android phone
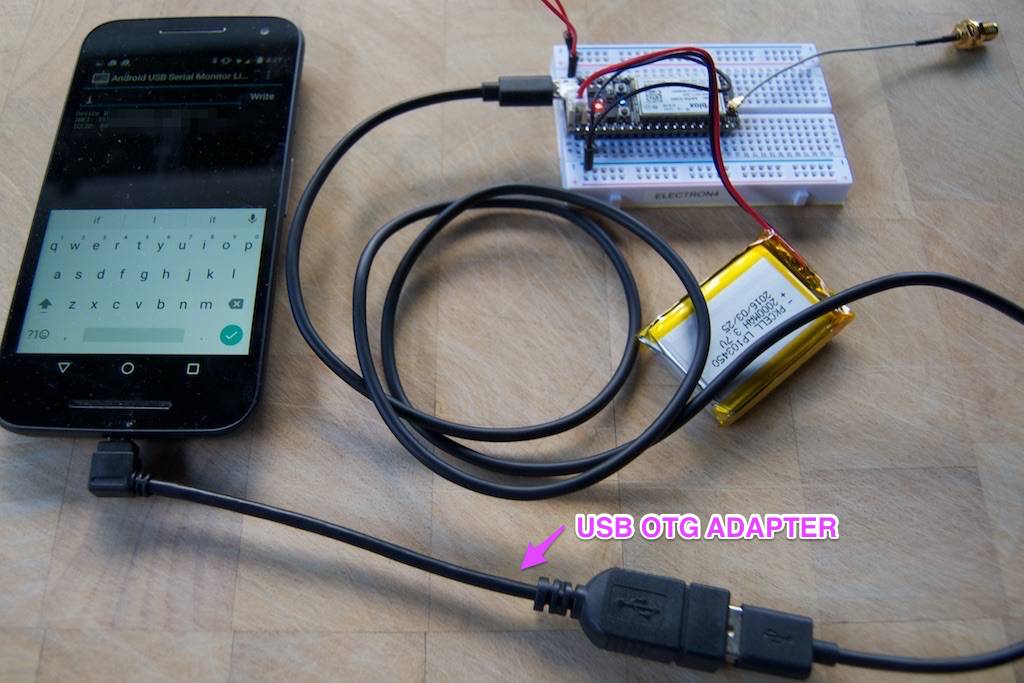
If your Android phone supports USB OTG ("on the go") and you have an OTG adapter cable, you may be able to get your device ID that way. One caveat is that your phone probably won't power up a Photon, so this will probably only work if you have an external power source, like an Electron with a battery.
Install the Android USB Serial Monitor Lite application from the Google Play store.
Connect the device to your phone using a USB cable and a USB OTG adapter and put the device in listening mode (blinking dark blue) by holding down the SETUP (or MODE) button until the main status LED blinks dark blue, about 3 seconds.
Open the serial monitor app and it should ask if you want to connect to the device. Tap yes and you should see a screen like this:
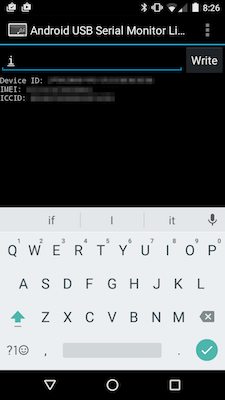
Enter "i" (lowercase i, as in identify) in the box at the top of the box at the top of the screen and tap the Write button. The device ID (and other information, for an Electron) should be displayed.
USB Serial number - 0.6.0 and later
Starting with Device OS version 0.6.0, the USB device serial number is your Device ID. This only works when your Photon or Electron is in normal operating mode or listening mode (blinking blue); it does not work in DFU mode. Also, since it only works when the device is running 0.6.0 this won't be helpful for fresh from the factory devices at this time. But it still may come in handy.
USB Serial number - Windows
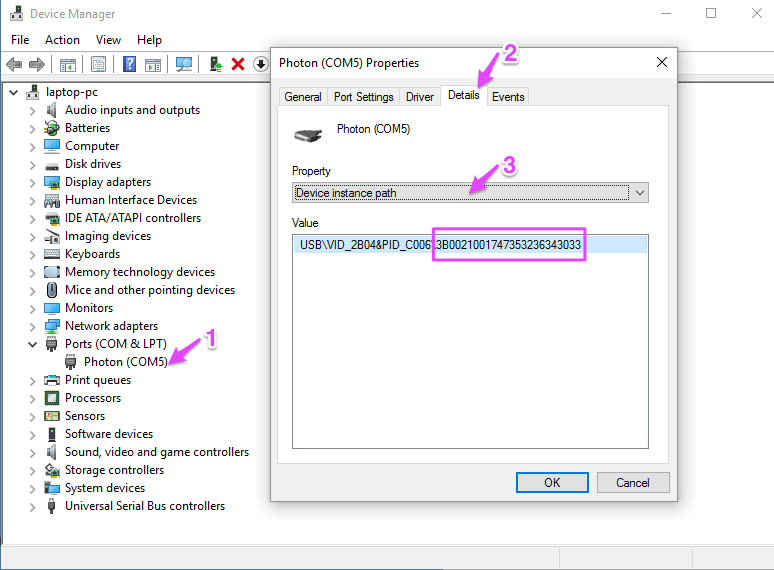
Open the Windows Device Manager, then Ports (COM & LPT) then select your Photon or Electron (1). Select the Details tab (2), and select Device instance path from the Property popup menu.
Your device ID is the last part of the value, after the last backslash \.
USB Serial number - Mac
Open the Mac System Information app. It's in the Utilities folder within Applications. Select USB (1), then your Photon or Electron (2).
Your device ID is in the Serial Number field below.

USB Serial number - Linux
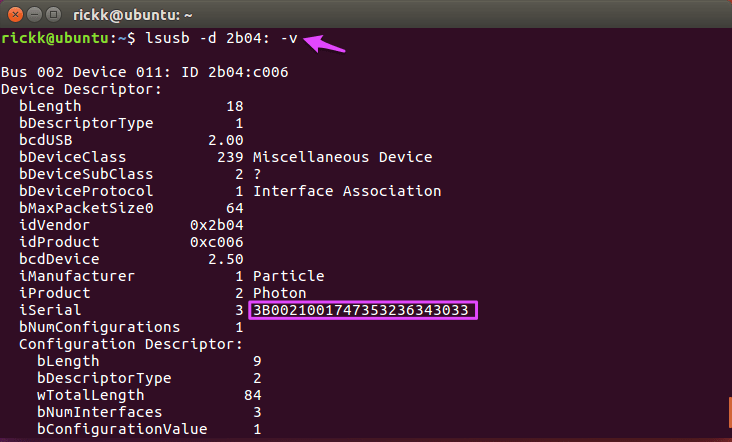
Open a command shell and enter the command:
lsusb -d 2b04: -v
Note that there is a colon after 2b04. This will display verbose information (-v) about all Particle devices (2b04).
Your Device ID is in the iSerial field of the Device Descriptor.
JTAG/SWD
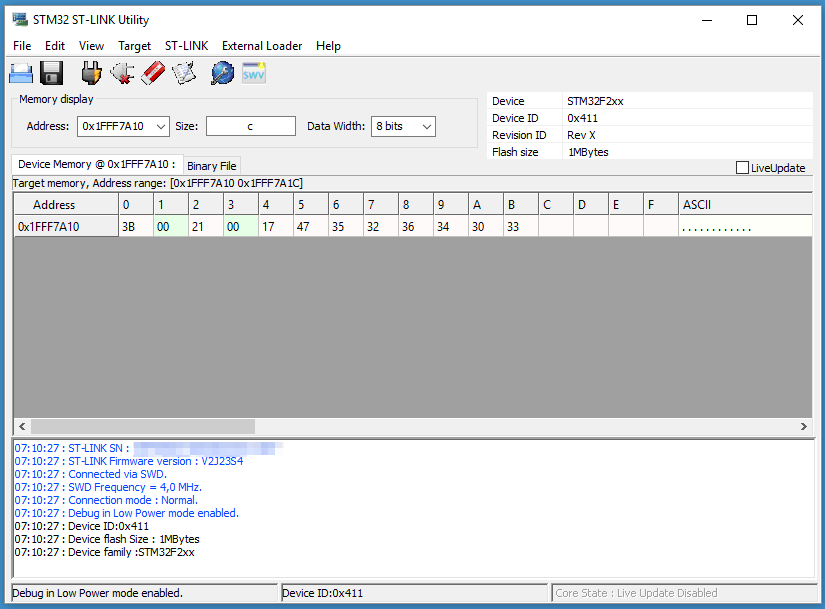
The cloud device ID is the STM32F2xx device ID, so it can be retrieved by JTAG.
I connected a ST-LINK/V2 mini to a Photon using SWD, which only requires three connections:
- SWCKD - D6
- SWDIO - D7
- GND - GND
You need to make sure your user firmware doesn't interfere with SWD; one easy way to do this is just put it in DFU mode (blinking yellow).
Then just display the memory at 0x1FFF7A10 with a size of C (0xC, 12 bytes) and a data width of 8 bits.
I also was able to use a ST-LINK/V2 mini SWD programmer on the Mac using OpenOCD in telnet mode:
openocd -f interface/stlink-v2.cfg -f target/stm32f2x.cfg -c "telnet_port 4444"
And then use the mdb command to display memory via the telnet session:
$ telnet localhost 4444
Trying 127.0.0.1...
Connected to localhost.
Escape character is '^]'.
Open On-Chip Debugger
> mdb 0x1FFF7A10 12
0x1fff7a10: 3b 00 21 00 17 47 35 32 36 34 30 33
I also tested this using the Particle Programmer shield using OpenOCD and GDB to get the data via JTAG:
$ openocd -f interface/ftdi/particle-ftdi.cfg -f target/stm32f2x.cfg -c "gdb_port 3333"
And in a separate terminal window:
$ arm-none-eabi-gdb
(gdb) target remote:3333
Remote debugging using :3333
0x00000000 in ?? ()
(gdb) monitor mdb 0x1FFF7A10 12
0x1fff7a10: 3b 00 21 00 17 47 35 32 36 34 30 33
After claiming
After you've claimed the device to your Particle account, the device ID is available in a number of locations that don't require changing the mode of the device.
In the phone apps, clicking on the device will show you the device ID in the Info panel.
In Particle Web IDE, click on the Devices icon (the circle with 4 lines, the target symbol). Select the device and then the ">" icon to view the device ID.
In the Particle Console, the My Devices icon displays the device ID.
In the Particle CLI, the command:
particle list