
Maker kit tutorials
This page is no longer maintained and is provided for historical reference only.
The Photon, Photon Maker Kit, and IFTTT integration have been discontinued.
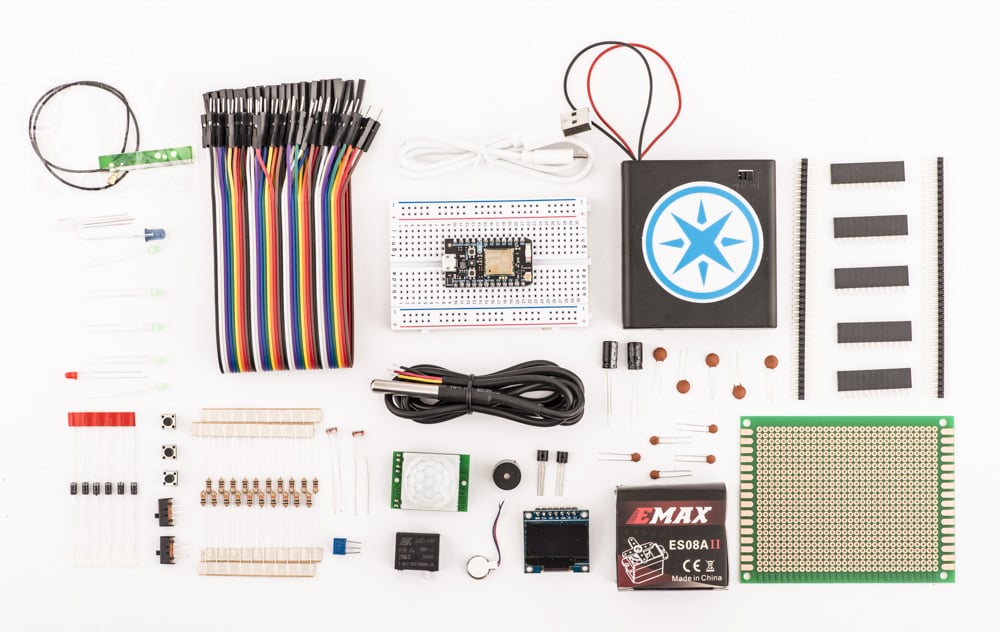
This section provides tutorials for new users of the Photon Maker Kit to get started quickly and build some projects using the contents of the kit. These tutorials assume you’ve gone through the getting started guide and have set up your Photon. You'll also need to know how to use the Particle Web IDE.
Tutorial #1: Servo Gong
In this beginner tutorial, you’ll learn how to connect the Maker Kit servo to your Photon, and how to control it via the web using the IFTTT Do Button app on your smartphone to ring a gong or other noise-making object.
What you'll need
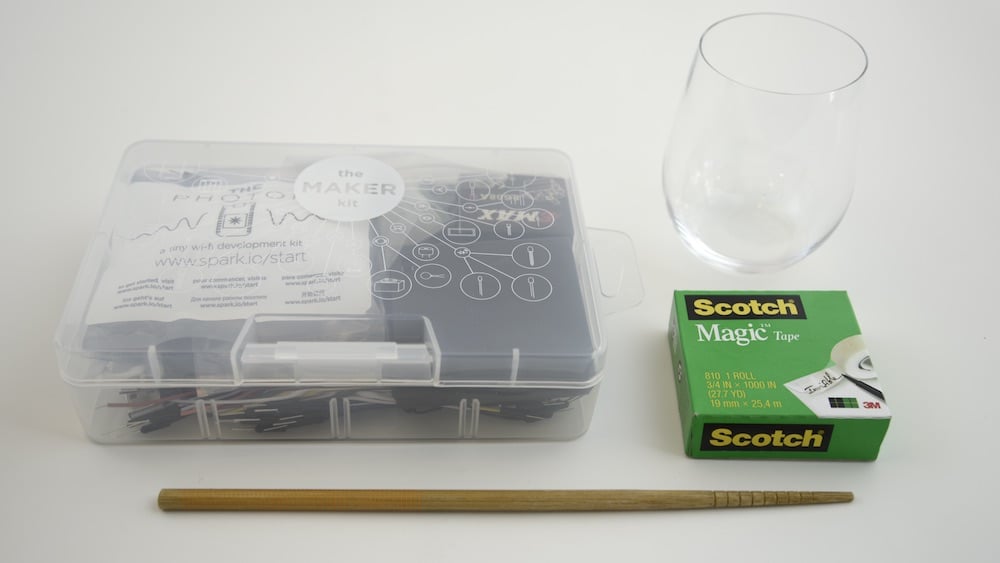
In addition to your Maker Kit, you’ll need something that makes noise, like a bell or wine glass or gong, and something to strike it with, like a chopstick or mallet if you have one. You’ll also need some tape. We're using a wine glass in this example because it's something most people have, but a real gong or singing bowl provides the best sound.
Prepare the servo
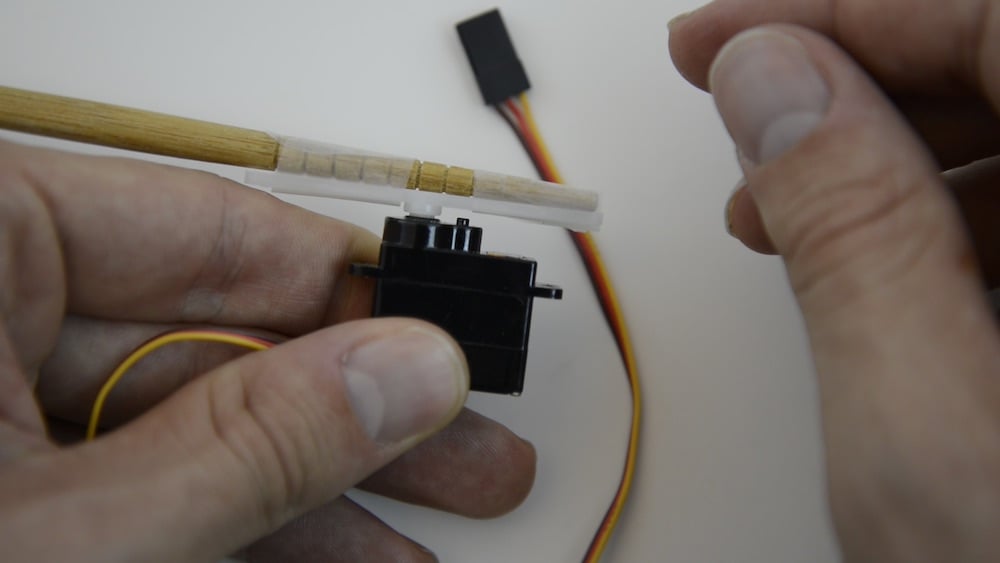
Find the servo in your Maker Kit.

Use tape to attach the chopstick to the long white servo horn, then attach the servo horn to the servo by pressing it onto the servo drive gear.
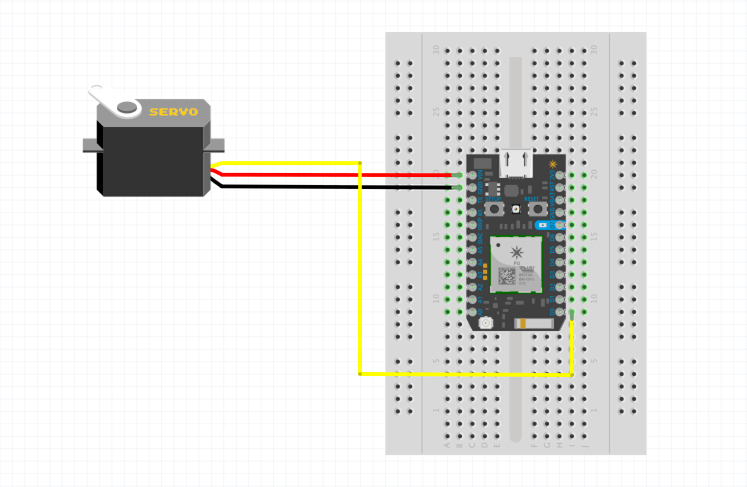
Connect the servo to the Photon
Insert jumper wires into the servo connector. It's easiest to use jumper wires whose colors match the color of the servo's wires.
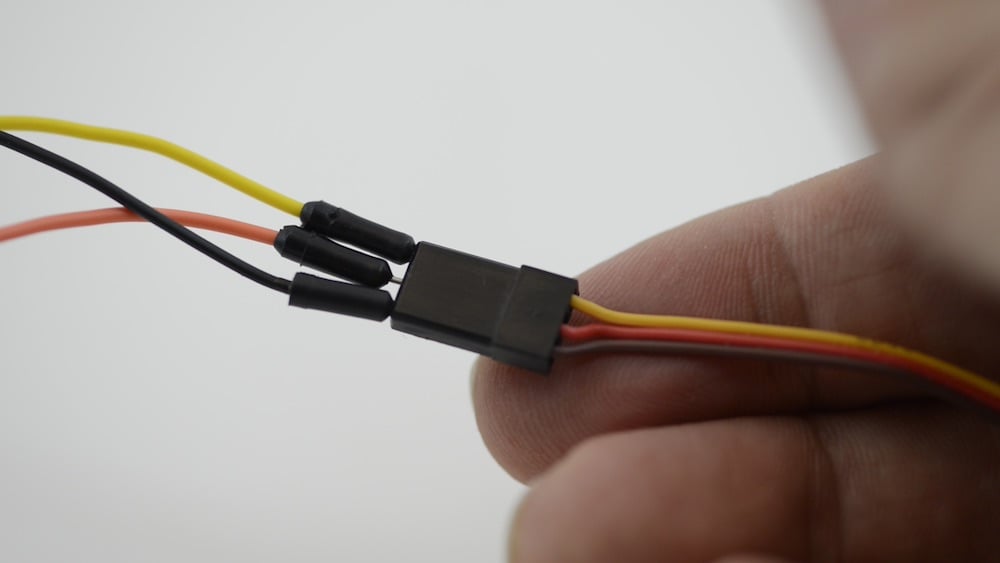
Connect the the black jumper wire to the GND pin on the Photon, the red wire to the Vin pin, and the yellow wire to D0.
Flash code to the Photon
Now that the servo is connected electrically, we’ll connect it in software. Log into the Particle Web IDE and make a new app. Copy and paste the example code below into the new file.
Servo myservo;  // create servo object to control a servo
                // a maximum of eight servo objects can be created

int pos = 0;    // variable to store the servo position

void setup()
{
    Particle.function("gong", gong);  // create a function called "gong" that
                                      // can be called from the cloud
                                      // connect it to the gong function below

    myservo.attach(D0);   // attach the servo on the D0 pin to the servo object
    myservo.write(25);    // test the servo by moving it to 25°
    pinMode(D7, OUTPUT);  // set D7 as an output so we can flash the onboard LED
}

int gong(String command)   // when "gong" is called from the cloud, it will
{                          // be accompanied by a string.
    if(command == "now")   // if the string is "now", ring the gong once.
    {
        myservo.write(0);       // move servo to 0° - ding!
        digitalWrite(D7, HIGH); // flash the LED (as an indicator)
        delay(100);             // wait 100 ms
        myservo.write(25);      // move servo to 25°
        digitalWrite(D7, LOW);  // turn off LED
        return 1;               // return a status of "1"
    }
    else if(command == "alarm")     // if the string is "alarm",
    {
        for (int i = 0; i < 3; i++) // ring the gong 3 times.
        {
            myservo.write(0);       // move servo to 0° - ding!
            digitalWrite(D7, HIGH); // flash the LED
            delay(100);             // wait 100 ms
            myservo.write(25);      // move servo to 25°
            digitalWrite(D7, LOW);  // turn off LED
            delay(1000);            // wait 1 second between gongs
        }
        return 2;                   // return a status of "2"
    }
}

void loop()
{
  // empty because we call the gong function via the cloud
}
Save the code, then flash the firmware to the Photon. (If you have multiple Photons, click the Devices icon in the sidebar and put a star next to the Photon you'd like to upload to.) The servo should move a little bit, which indicates that it's connected correctly.
Set up remote control
One of the easiest ways to control a Particle device remotely is by using the Do Button. The Do Button is a smartphone app made by IFTTT (If This Then That) that can be set to trigger events, which they call applets, when you press the button(My Applets) inside the app. In this case, we’ll make an applet that activates the servo.
First, download the Do Button app to your phone, make an account or log into your existing IFTTT account if you have one, and flip through the examples in the app. (Optionally, swipe left on the example applet to delete it and reduce clutter.)
Next, make a new applet in the Do Button app:
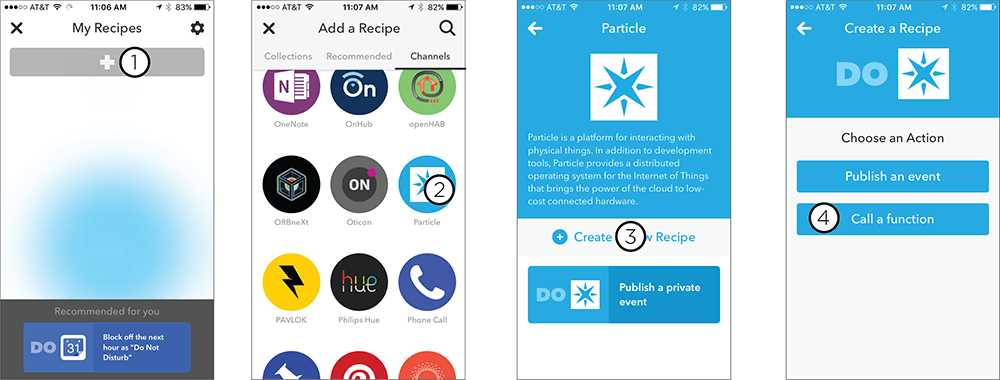
- Click the My Applets button on the bottom of the screen
- Click the + button to start a new applet
- Press the blue + this button to find an applet
- Find Particle in services
- Tap Particle
- Tap Monitor a function result
If this is your first time using IFTTT with Particle, you'll be prompted to enter your Particle username and password so that IFTTT can connect to your Particle account and all your devices. Then you'll return to the Do Button app to finish the applet.
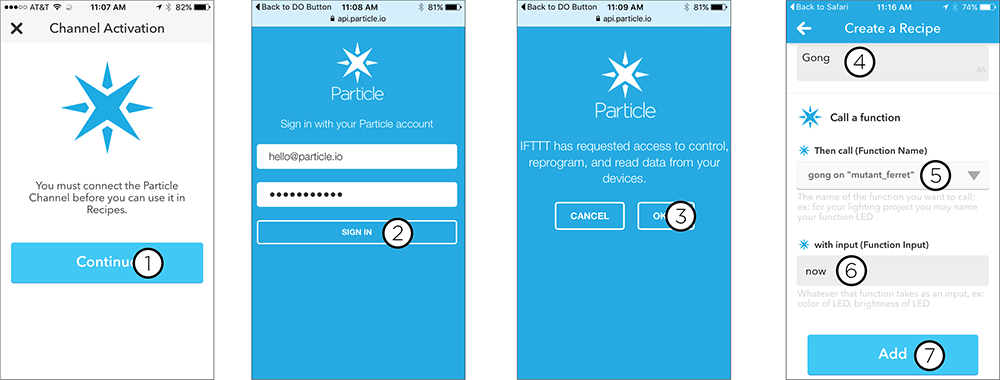
- Tap Connect to start process of connecting IFTTT to Particle
- Enter your Particle username and password, then tap Sign In
- Tap Ok to connect your accounts
- Select the gong function
- Under Input, enter “now” to match the command in our code
- Tap Next then Finish to finish creating the applet.
Test it!
Now tap the Do Button and watch what happens (sometimes it takes 5-10 seconds). The little LED next to pin D7 should blink and the servo should move. Congratulations, you just actuated a servo over the internet! If the LED blinks but the servo doesn't move, check the wiring from your servo to the Photon.
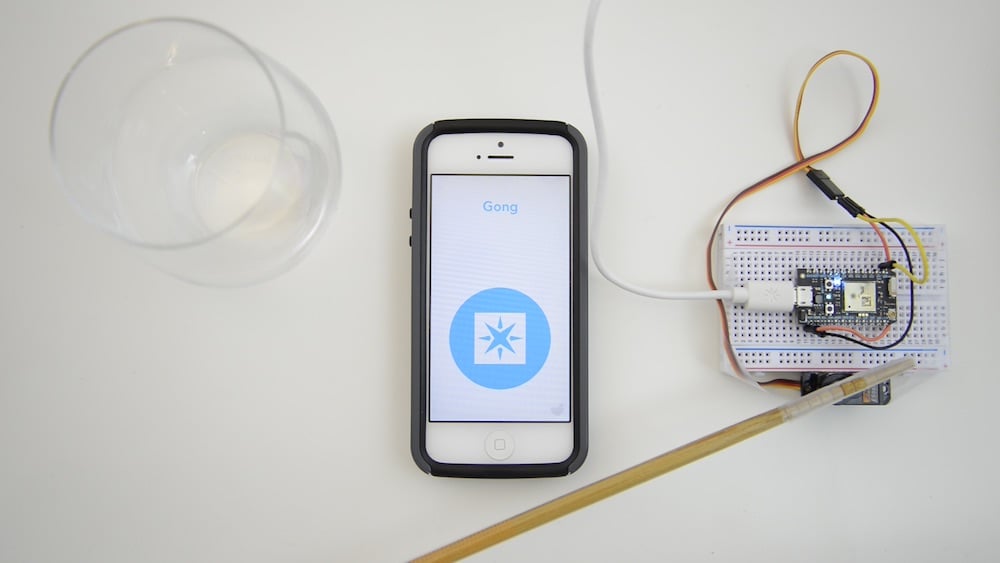
There are a few ways to secure the servo so it swings the chopstick properly. Taping it to the side of the breadboard works pretty well in a pinch, but the servo also comes with mounting screws if you have something to mount it to. If you're taping it to the breadboard, you'll also want to put a rolled-up piece of tape under the breadboard so it doesn't move.
Going further
You can also do other fun things using IFTTT without the Do Button, such as turning this gong into an alarm that goes off at 8am:
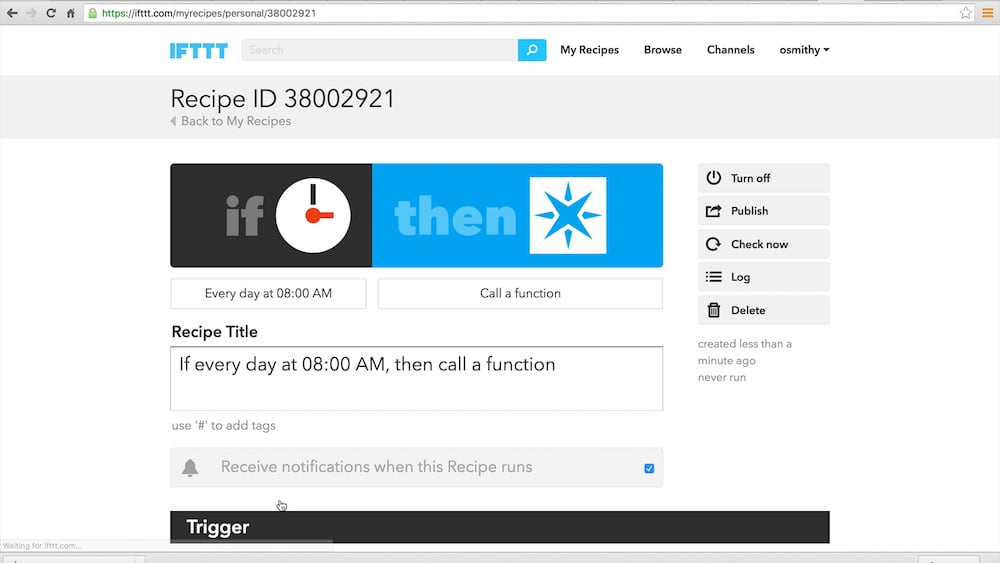
- Log into ifttt.com
- Make a new Applet
- Choose Date and Time as the first ("+ this" button)service
- Choose the trigger (every day, hour, month, etc)
- Choose Particle as the action ("+ that" button)
- Choose Call a function
- Select the gong function
- Enter "alarm" in the input field (the code makes it ring three times instead of one)
- Click Next, then click Finish to finish the process
Discover more projects at particle.hackster.io, and join our community at community.particle.io.
Troubleshooting
I don't see my function listed when making my Do Button applet. This can happen if you connect IFTTT to your Particle account before flashing code to your Photon, or if you add a new Photon to your account after connecting IFTTT. This can often be fixed by going to ifttt.com/particle and clicking the Reconnect Channel button.
When I press the Do Button, the D7 LED blinks but the servo doesn't move. IFTTT is communicating successfully with the Photon, but the Photon is not communicating with the servo. Double-check your wiring: the servo's brown or black wire should go to GND, the orange wire to Vin, and the yellow wire to D0.
When I press the Do Button, nothing happens. If you were able to successfully create an applet for your device but nothing happens when you press the Do Button, try moving your device closer to your Wi-Fi router or access point.
If you have issues that can't be solved here, post on our community forums.
Tutorial #2: Next Bus Alert
In this tutorial, you’ll learn how to to get bus prediction times from the internet and display them on the Maker Kit OLED screen, which will provide alerts for upcoming buses. You'll also learn what a webhook is, and how to use it to get the prediction data to your Photon.
Then you'll wire up the OLED screen and display the bus alerts with fancy marquee scrolling.
Here's how:
- Discover your bus prediction URL
- Set up a webhook
- Subscribe to the webhook from the Photon
- Add the library for the OLED screen
- Wire up the OLED screen and display bus times
Discover your bus prediction URL
The NextBus Public XML Feed allows anyone to get prediction times for many municipal transit agencies across the United States (many other countries also have their own public transit feeds). But in order to use it to get times for a specific bus at a specific stop, we first have to use the feed itself to figure out what information to send to it. NextBus provides a document that shows how to enter query URLs to get back the information we need. The relevant URLs have been pulled from the document and into the steps below, but feel free to reference the document if you'd like more information.
Setting up our prediction URL only requires five relatively simple steps, all of which can be done with a web browser. We'll choose a transit agency, bus route, and bus stop, then look up the agency tag, route tag, and stop tag, and finally create the full prediction URL.
Choose the agency, bus route, and bus stop that you’d like to get times for.
For this example, we'll use the Santa Clara Ave & Crescent St stop for the AC Transit #57 bus in Oakland, California.Use the following URL to locate your transit agency tag: http://webservices.nextbus.com/service/publicXMLFeed?command=agencyList.
On that page, you can see that the agency tag for AC Transit isactransit.Use the following URL to locate your route tag:
http://webservices.nextbus.com/service/publicXMLFeed?command=routeList&a=AGENCYTAG.
ReplaceAGENCYTAGwith your agency tag.
Example: For AC Transit, the URL would be:
http://webservices.nextbus.com/service/publicXMLFeed?command=routeList&a=actransit
On that page, the route tag for the #57 bus is57.Use the following URL to locate your stop tag:
http://webservices.nextbus.com/service/publicXMLFeed?command=routeConfig&a=AGENCYTAG&r=ROUTETAG.
ReplaceAGENCYTAGwith your agency tag andROUTETAGwith your route tag.
Example: For AC Transit’s #57 bus, the URL would be:
http://webservices.nextbus.com/service/publicXMLFeed?command=routeConfig&a=actransit&r=57.
On that page, the stop tag for the Santa Clara Ave & Crescent St stop is1018530.Use the following URL to create your full prediction URL:
http://webservices.nextbus.com/service/publicXMLFeed?command=predictions&a=AGENCYTAG&r=ROUTETAG&s=STOPTAG.
Substitute in your agency tag, route tag, and stop tag.
Example: For AC Transit’s #57 bus at stop 1018530, the URL would be:
http://webservices.nextbus.com/service/publicXMLFeed?command=predictions&a=actransit&r=57&s=1018530&useShortTitles=true.
The data from your prediction URL should look like this:
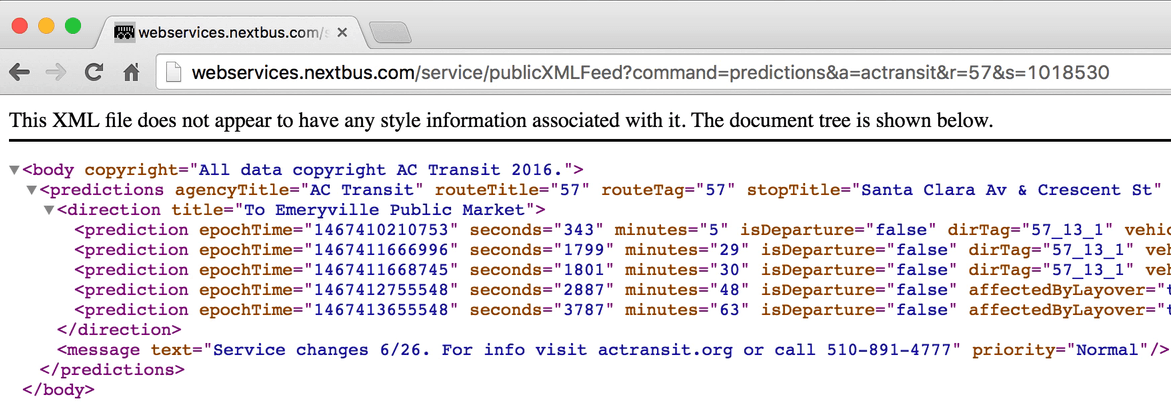
If you get an error, the feed will give you an indication of what's wrong. Check your URL to make sure you haven't deleted any of the & or = symbols, and that everything is spelled correctly.
If it works, congrats! You've created your bus prediction URL.
Create a webhook to retrieve prediction times
Great, so we’ve got our prediction URL and we can access it from a browser, but how do we access it from the Photon? The answer is to use a webhook, which you can read more about in our webhooks guide.
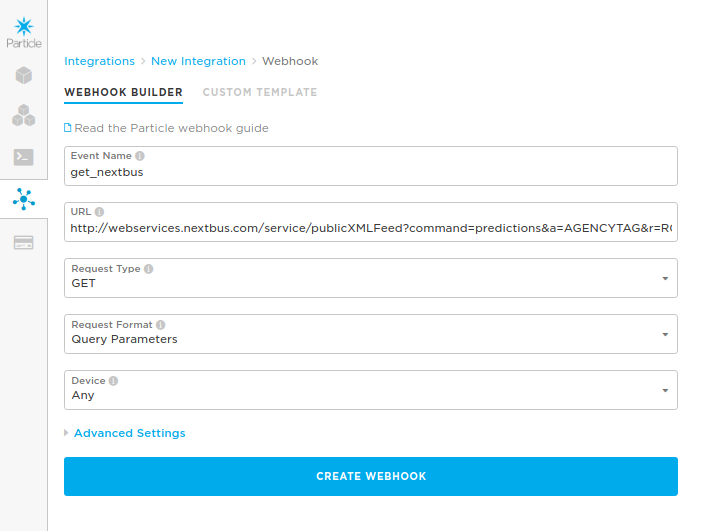
To create a webhook:
- Go to the Particle Console
- Click the Integrations tab
- Click New Integration
- Click Webhook
- Enter
get_nextbusin the Event Name field - Paste your prediction URL into the URL field
- Change Request Type to
GET - Click Create Webhook to finish the process
Great! Your webhook is created. Now let’s access it from the Photon.
Code and OLED library
Here's the code:
/*****************************************************************************
Particle Maker Kit Tutorial #2: Next Bus Alert

This tutorial uses a Particle Photon and the OLED screen from the Particle
Maker Kit. It uses a webhook to retrieve bus prediction times from the
NextBus Public XML feed, which must be set up first along with the webhook.
See https://docs.particle.io/tutorials/topics/maker-kit to learn how!

NOTE: This code example requires the Adafruit_SSD1306 library to be included,
so make sure to add it via the Libraries tab in the left sidebar.
******************************************************************************/

// use hardware SPI
#define OLED_DC     D3
#define OLED_CS     D4
#define OLED_RESET  D5
Adafruit_SSD1306 display(OLED_DC, OLED_RESET, OLED_CS);

String busName = "57"; // name of your bus -- FILL THIS IN!
int leadTime = 5; // #minutes you need to get to your bus -- FILL THIS IN!
int soonestBusTime = 99; // #minutes until next bus (99 is a placeholder)
int nextSoonestBusTime = 88; // #minutes until bus after next (88 is a placeholder)
String soonestStr, nextSoonestStr; // strings for parsing
int gaveWarning = false; // variable to make sure we don't give bus warning too often
int  x, minX; // variables for scrolling code

void getBusTimes() {
    // publish the event that will trigger our Webhook
    Particle.publish("get_nextbus");
}

// create a software timer to get new prediction times every minute
Timer timer(60000, getBusTimes);

void setup()   {
  // start the data retrieval timer
  timer.start();

  //subscribe to the get_nextbus event so we can get the data from the webhook
  Particle.subscribe("hook-response/get_nextbus/0", gotNextBusData, MY_DEVICES);

  Particle.publish("get_nextbus"); // publish the event to trigger the data
  delay(2000); // wait for data to arrive

  // by default, we'll generate the high voltage from the 3.3v line internally! (neat!)
  display.begin(SSD1306_SWITCHCAPVCC);

  display.setTextSize(7);       // text size
  display.setTextColor(WHITE); // text color
  display.setTextWrap(false); // turn off text wrapping so we can do scrolling
  x    = display.width(); // set scrolling frame to display width
  minX = -1500; // 630 = 6 pixels/character * text size 7 * 15 characters * 2x slower
}

void loop() {

  // this code displays the next bus times on the OLED screen with fancy scrolling
  display.clearDisplay();
  display.setCursor(x/2, 7);
  display.print(busName);
  display.print(" in ");
  display.print(soonestBusTime);
  display.print(", ");
  display.print(nextSoonestBusTime);
  display.print(" min   ");
  display.display();
  if(--x < minX) x = display.width()*2;

  // give a "time to leave!" beeping warning, but only once per bus
  if(soonestBusTime <= leadTime && gaveWarning == false)
  {
      for (int i=0; i<3; i++)
      {
        tone(D0, 5000, 100);
        delay(200);
      }
      gaveWarning = true;
  }

  // reset the beeping warning flag so we can warn about the next bus
  else if(soonestBusTime > leadTime && gaveWarning == true)
  {
      gaveWarning = false;
  }
}

// This function will get called when NextBus webhook data comes in.
// It turns the full NextBus XML page into numbers to be displayed on the screen
void gotNextBusData(const char *name, const char *data) {

    // put the incoming data (the XML page) into a string called "str"
    String str = String(data);

    // send str to the tryExtractString function, looking for the first instance (0) of "minutes=\""
    soonestStr = tryExtractString(0, str, "minutes=\"", "\"");
    // turn the extracted bus time into an integer and store it in soonestBusTime
    soonestBusTime = soonestStr.toInt();

    // send str to the tryExtractString function, looking for the second instance (1) of "minutes=\""
    nextSoonestStr = tryExtractString(1, str, "minutes=\"", "\"");
    // turn the extracted bus time into an integer and store it in nextSoonestBusTime
    nextSoonestBusTime = nextSoonestStr.toInt();
}

// this function gets called by gotNextBusData to extract the bus times from the NextBus XML page
String tryExtractString(int matchNum, String str, const char* start, const char* end) {
    if (str == "") {
        return "";
    }

    int count = 0;
    int lastIdx = 0;

    while (count <= matchNum) {
        int idx = str.indexOf(start, lastIdx);

        int endIdx = str.indexOf(end, lastIdx + idx + strlen(start));

        lastIdx = endIdx;

        if (count == matchNum) {
            return str.substring(idx + strlen(start), endIdx);
        }
        count++;
    }
}
In order to use the screen, you need to add the OLED screen library to your code:
- Click the Libraries icon on the left sidebar
- Search for Adafruit_SSD1306 in the search box
- Click the Adafruit_SSD1306 library
- Click the Include in App button
- Select your code to add the library to
- Click Add to This App
You'll see the following code added to the top of your file:
// This #include statement was automatically added by the Particle IDE.
#include "Adafruit_SSD1306/Adafruit_SSD1306.h"
Publish and subscribe to the webhook
In the example code for this project, you’ll see
void getBusTimes() {
    // publish the event that will trigger our Webhook
    Particle.publish("get_nextbus");
}
This function publishes an event called get_nextbus to the Particle cloud. If you remember, we used this event name when we created the webhook. Further down, you'll see
// retrieve the webhook data and send it to the gotNextBusData function
Particle.subscribe("hook-response/get_nextbus/0", gotNextBusData, MY_DEVICES);
This line subscribes your device to the get_nextbus event, which pulls in data coming from the webhook attached to it. (The /0 tells it to reference the first chunk of data, since there are a few of them.) It then sends that data to a function called gotNextBusData, which parses all the XML and pulls out the tiny bits we need, which are the number of minutes for the next two buses.
Fill in your bus name and lead time
Near the top of the code above, you'll see:
String busName = "57"; // name of your bus -- FILL THIS IN!
int leadTime = 5; // #minutes you need to get to your bus -- FILL THIS IN!
- busName: Later, once you set everything up, the name of your bus will display on the screen along with the prediction time. Using the example above, you would see something like
57 in 5, 15 min. Change it to match the name of your bus. - leadTime: This is used to alert you with beeps that it's time to leave. Change it to the number of minutes you'll need in order to get comfortably to the bus stop. Don't forget to leave time to put on your shoes!
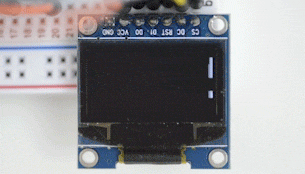
Connecting the OLED screen
Now that the webhook is ready, we can connect the OLED screen.
Press the OLED screen into the breadboard, making sure the pins go in separate numerical rows (i.e. 24-30), not all in the same row. Then connect the pins according to this diagram:
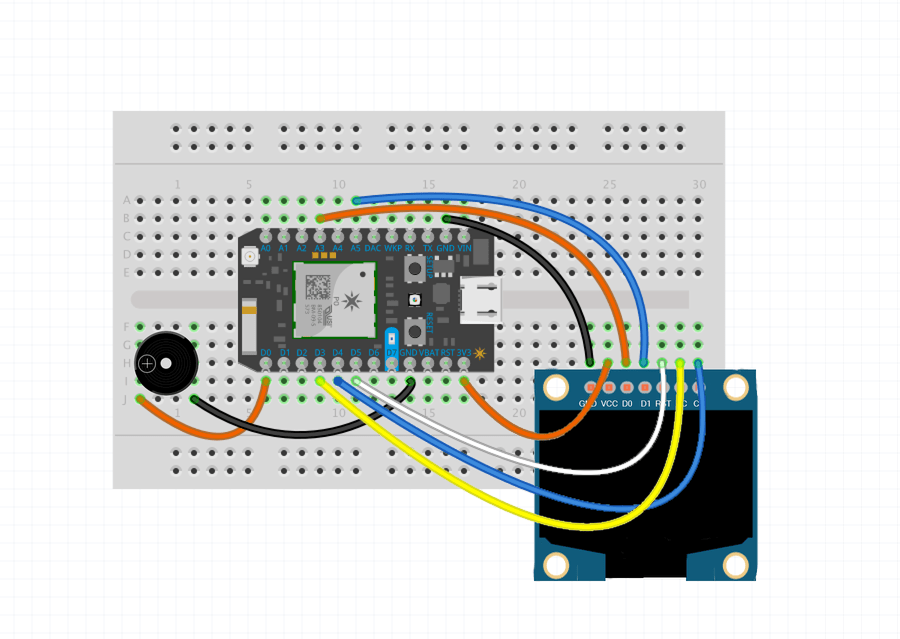
Wiring (Photon ⇒ OLED screen):
- D4 ⇒ CS
- D3 ⇒ DC
- D5 ⇒ RST
- A5 ⇒ D1
- A3 ⇒ D0
- 3V3 ⇒ VCC
- GND ⇒ GND
Then press the piezo buzzer into the breadboard and connect the long pin to D0 and the short pin to GND. The long pin has a plus sign engraved over it on the top of the buzzer.
Upload and test!
Plug in your Photon and upload the code! If all goes well, the screen will immediately start scrolling [bus number] in xx and yy min, where xx and yy are the times for the next two buses.
Additional reading: software timer
If you're interested in how we're able to have scrolling code that runs constantly in our loop() function, yet still be able to trigger the webhook every 60 seconds, the reason is that we're using a software timer. Software timers are hugely powerful because they allow functions to be triggered independently of other code. It's possible to do this without a software timer by using millis(), but a bona fide software timer makes it much neater.
If you look in the code for this project, you'll see:
// create a software timer to get new prediction times every minute
// by calling the getBusTimes() function
Timer timer(60000, getBusTimes);
Above it, you'll see:
void getBusTimes() {
    // when the timer goes off, publish the event that triggers our webhook
    Particle.publish("get_nextbus");
}
By keeping these functions separate from the main loop() function, code can be made much neater and more flexible. For more complex code, software timers are essential because they save you from having to weave timed events (which are sometimes blocking) into code that needs to run continuously. To learn more, read our software timers guide.
Troubleshooting
My OLED screen doesn't turn on.
- Re-check your wiring. "DC" and "D0" look pretty similar, so make sure you haven't swapped any pins.
- If your Photon is not breathing cyan, check the device modes guide.
My OLED screen works, but it shows 0 for both prediction times.
- First enter your prediction URL into your web browser to make sure it's working properly.
- If the URL returns good data when viewed from a browser, check your webhook and make sure the URL in the webhook matches the one you just tested in your browser.
I missed my bus because I was hypnotized by the fancy scrolling OLED screen.
- Don't worry, it happens to the best of us.
If you have issues that can't be solved here, post on our community forums.
Tutorial #3: Conference Room Monitor
Wouldn’t it be awesome to be able to know whether someone is occupying your office’s conference room, without getting up from your desk? In this tutorial, you’ll learn how to use the Maker Kit PIR motion sensor, and how to integrate it with Slack using webhooks. PIR sensors detect subtle changes in infrared light, so they're particularly good for sensing people, animals, or other warm (or bright, since many lights also produce infrared) objects -- regardless of whether it's dark or not. There are many use cases for this, but for this tutorial we’re going to make a Slack channel that gets real-time updates of whether a conference room is in use.
Set up a Slack incoming webhook
A Slack Incoming Webhook listens for data from an external source and then posts it to a Slack channel of your choosing.
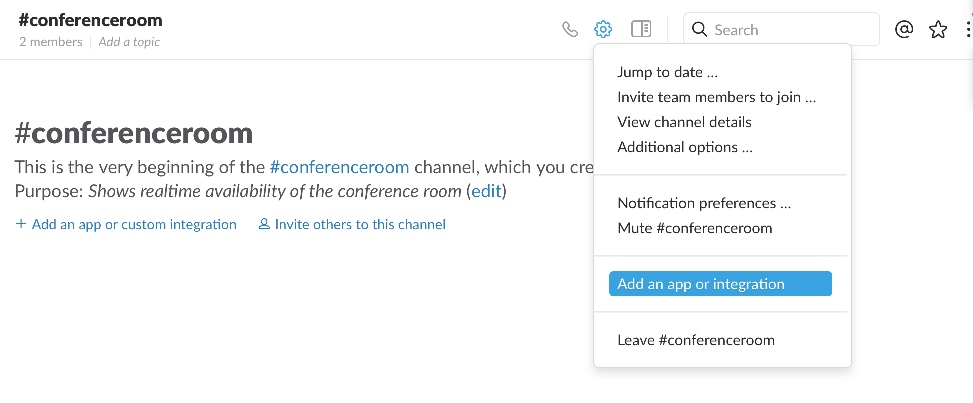
First, make a channel for the webhook to post in. This example is for conference room availability, so we’ll make a channel called #conferenceroom. Next, click the gear icon and choose “Add an app or integration”.
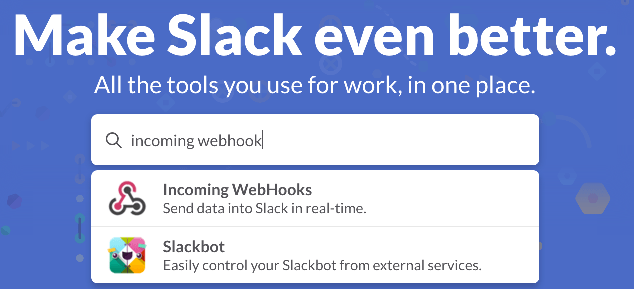
Now we'll create the webhook itself. Type incoming webhooks into the search box, then click Incoming WebHooks.
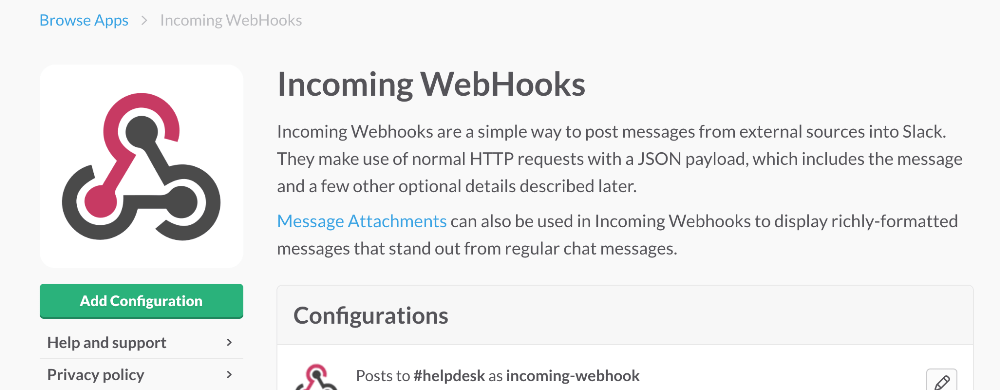
Click the Add Configuration button.
Choose a channel to post to. In this case, it’s #conferenceroom. If you’d rather keep this project to yourself, you can select Privately to @yourname which will put the updates in your Slackbot channel (not your personal private channel).

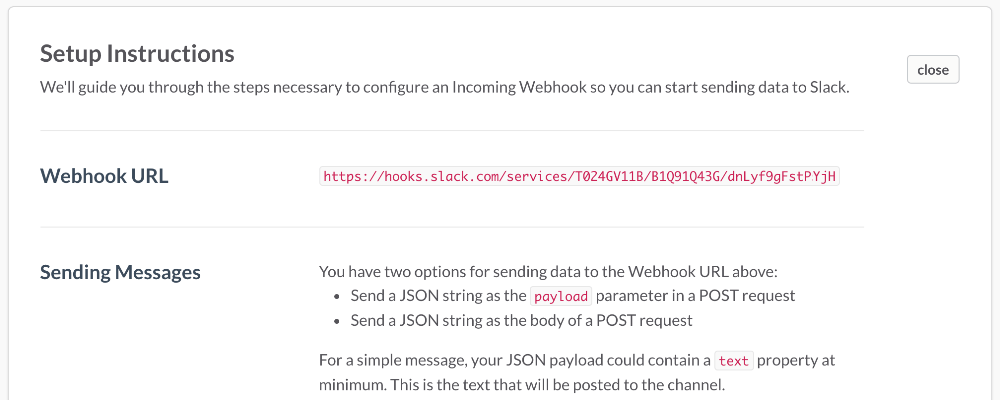
Locate your Webhook URL. This URL is what we’ll be sending data to
via the Particle Device Cloud.
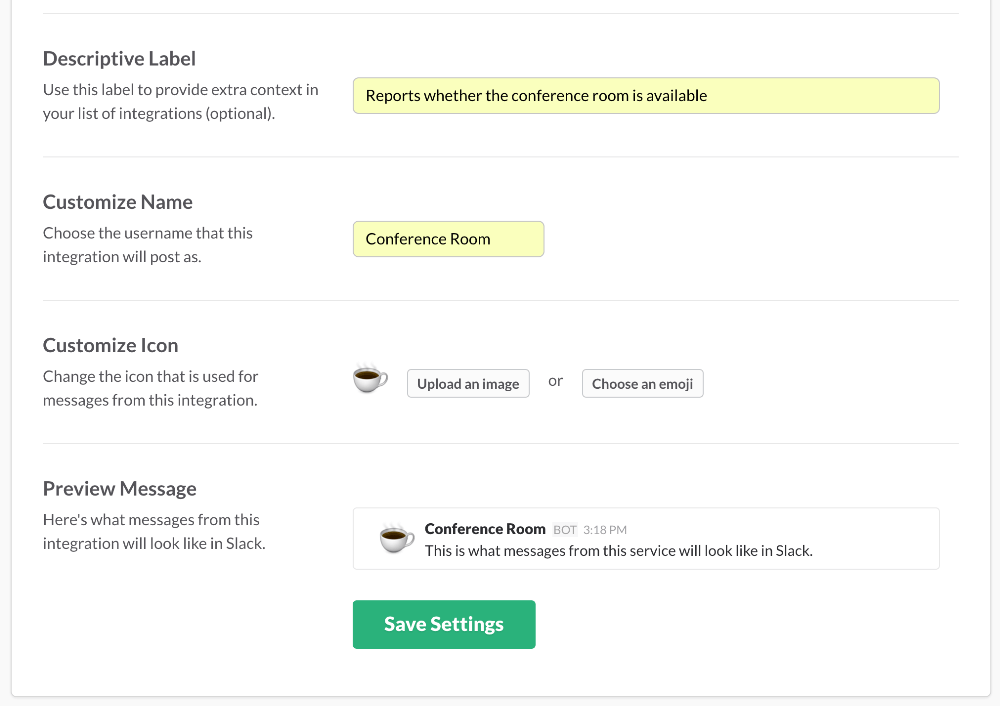
Scroll down to Integration Settings and give your webhook a descriptive label, name, and icon, then click Save Settings.
Create a Particle webhook
Many Slack integrations require dedicated web servers running PHP scripts to process information to and from Slack. However, in our case we can just use a Particle webhook to tell the Slack webhook whether the conference room is available. Easy!
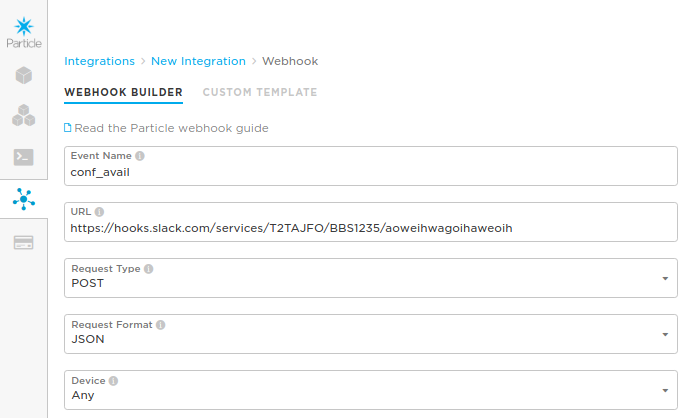
Go to the Particle Console and click the Integrations tab, then click New Integration.

Click Webhook to start the Webhook Builder.

In the Webhook Builder under Event Name, enter conf_avail. Paste your Slack webhook URL under URL. Change Request Format to JSON.
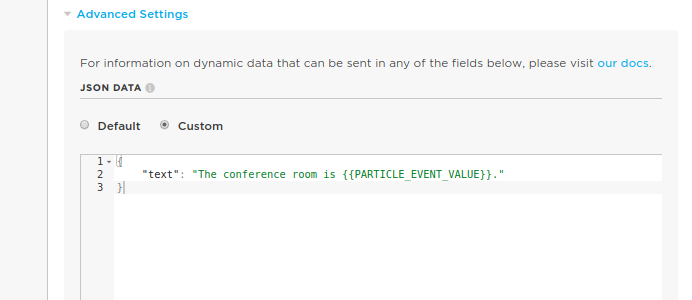
Expand Advanced Settings and choose Custom under JSON Data. Paste the following code:
{
    "text": "The conference room is {{PARTICLE_EVENT_VALUE}}."
}
The {{PARTICLE_EVENT_VALUE}} field gets filled with the data sent when the event is published by the device. In this case, the data will be the status variable, which will contain either "in use" or "available".
Scroll down to the bottom and hit Create Webhook.
Photon → Webhook code
Now we'll look at the code used to activate the webhook from a Photon. Here's all the code used in the project:
/*****************************************************************************
Particle Maker Kit Tutorial #3: PIR Motion Sensor

This tutorial uses a Photon and the PIR motion sensor from the Particle Maker
Kit to determine whether a conference room is in use (you could also use it
for many other applications) and post the status to Slack.
******************************************************************************/

int ledPin = D7;                 // choose the pin for the LED
int inputPin = D0;               // choose the PIR sensor pin
bool available;                  // status of conference room
int motionCounter = 0;           // variable to count motion events

Timer timer(30000, determineMotion); // software timer to check every 30s

void setup() {
  pinMode(ledPin, OUTPUT);       // set LED as output
  pinMode(inputPin, INPUT);      // set sensor as input

  timer.start(); // start the determineMotion timer
}

void determineMotion() {    // this function determines if there's motion
    if(motionCounter < 2) { // if very little motion was detected
        if(available == false) { // only publish if the status changed
            Particle.publish("conf_avail"); //publish to conf_avail webhook
            }
        available = true; // set the status to available
    } else if (motionCounter >= 2) {
        if(available == true) { // only publish if the status changed
            Particle.publish("conf_inuse"); //publish to conf_inuse webhook
            }
        available = false; // set the status to in use
    }
    motionCounter = 0; // reset motion counter
}

void loop() {
  if (digitalRead(inputPin) == HIGH) {  // check if the input is HIGH
    digitalWrite(ledPin, HIGH);         // turn LED ON if high
    motionCounter++;                    // increment motion counter
  } else {
    digitalWrite(ledPin, LOW);          // turn LED OFF if no input
  }
  delay(500);                           // wait 0.5s
}
The code that activates the webhooks is:
Particle.publish("conf_avail"); //publish to conf_avail webhook
The name of the event being published matches the event name parameter in the webhook we just made.
Check out the Publish, Subscribe, and Webhooks documentation for more information.
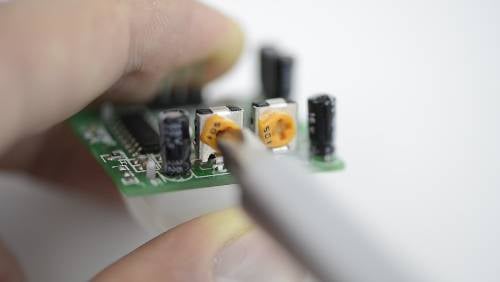
Set up the hardware
On the PIR sensor itself, with the back of the PCB facing up, find the two small potentiometers. The one on the left controls the range of the sensor (3-7 meters), and the one on the right controls how long the sensor stays triggered once tripped (1.5 - 300 seconds). Set the range potentiometer to the size of your conference room, or just turn it all the way to the right if your conference room has no windows. Set the second potentiometer all the way to the left (counterclockwise) to maximize its timing resolution.
Now we'll connect the PIR sensor to the Photon. Press the sensor into the upper-left corner of your breadboard, then connect it to the Photon as follows:

Wiring (Sensor ⇒ Photon):
- GND ⇒ GND
- OUT ⇒ D0
- +5V ⇒ VIN
Flash the code to the Photon
Plug in your Photon and flash the code to it (if you have more than one, click the Devices icon and select the desired device). If all goes well, the D7 LED on your Photon should light up when the sensor detects motion. Note that it stays tripped for a second or two, so it may appear to be sluggish. To make sure it's actually working, hold perfectly still for a few seconds, then move. You'll find that it's sensitive enough to detect very subtle motion, which is great.
Check your Slack #conferenceroom channel to see the updates! The first post you see should be The conference room is test, which is a test to make sure the webhook works without having to wait 30 seconds to determine motion. After 30 seconds, you should see The conference room is in use (assuming the sensor is pointed) The code only reports the conference room as available if it detects no motion for 30 seconds, so if you want to test it out, put a towel or piece of paper over the sensor.
Some other applications
This sensor and webhook integration are very versatile. You could use it for any number of applications, such as:
- Reporting when a pet visits its food bowl
- Reporting when someone enters your house or a building (it works in the dark!)
- Reporting when the refrigerator is opened
- Industrial applications like reporting how often vehicles frequent a particular road or when certain facilities are in use
Troubleshooting
My channel shows that the room is in use, but doesn't show that it's available (or the reverse).
- This setup is designed to only show the room as available if no motion has been detected for 30 seconds. Try putting a blanket over the sensor to completely block all motion.
- Check your Particle webhook and make sure the event name matches the event name in the code.
No motion is being detected (the D7 LED isn't turning on at all).
- Check your wiring -- with the sensor on the upper right corner of the breadboard, the pin order from left to right is
GND, OUT, +5V, whereOUTis the sensor output that is read by pinD0on the Photon. - These sensors sometimes seem to take a minute or two to start working properly, so wait and try again.
If you have issues that can't be solved here, post on our community forums.
Tutorial #4: Temperature Logger
In this tutorial, you'll learn how to use the Dallas DS18B20 temperature sensors included in the Maker Kit, and how to log the data to a Google Spreadsheet. Logging the data allows it to be graphed and analyzed, which can provide insights into temperature fluctuations in rooms, garages, reptile tanks, the outdoors, and even liquids. The Maker Kit contains two sensors, both of which are the same model, but one is waterproof and has long wires, while the other is just a bare sensor. We'll be using the bare sensor for simplicity in this tutorial, but you can substitute the waterproof sensor in its place without any modifications.
We'll wire up the sensor to the Photon, then create a Particle Function to send the temperature data to the cloud, then connect our cloud data to Google Sheets using IFTTT, and start logging!
Wire up the sensor
Slightly spread the pins of the sensor and insert them into separate numerical rows in your breadboard. Then connect them to the Photon as follows:
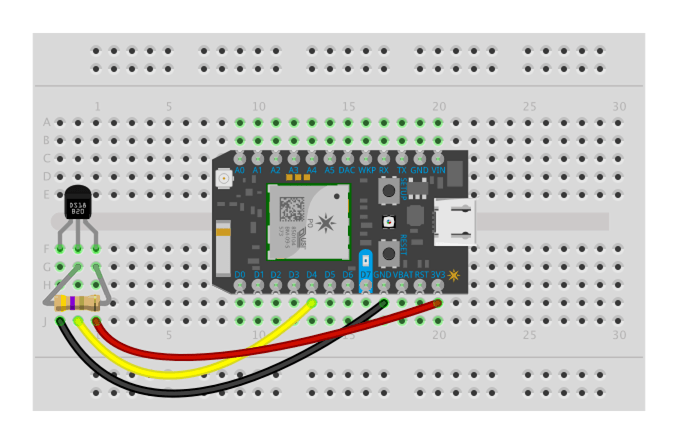
Wiring (Sensor ⇒ Photon):
- Pin 1 (GND) ⇒ GND
- Pin 2 (DQ) ⇒ D4
- Pin 3 (VDD) ⇒ 3V3
- Also put a 4.7k resistor between pins 2 and 3 on the sensor. If you don't have 4.7k, a 10k resistor will also work.
If you want to use the waterproof sensor instead of the bare sensor:
- Black (Pin 1) ⇒ GND
- Yellow (Pin 2) ⇒ D4
- Red (Pin 3) ⇒ 3V3
- Also put a 4.7k resistor between pins 2 and 3 on the sensor
Plug in your Photon before proceeding to the next step.
Code
For this project, you'll need to add the Dallas 1-Wire library:
- Click the Libraries icon on the left sidebar
- Search for OneWire in the search box
- Click the OneWire library
- Click the Include in App button
- Select your code to add the library to
- Click Add to This App
Here's the code below, all of which except the last three lines is devoted to reading the sensor. The advantage of OneWire devices is that you can have a huge number of them all on the same pin, whereas most other sensors require one dedicated pin per sensor, which limits the number of sensors to the number of pins on your device. The disadvantage of OneWire devices is that reading them is more complicated, which is why the code in this example is rather long.
/************************************************************************
This sketch reads the temperature from a 1-Wire device and then publishes
to the Particle cloud. From there, IFTTT can be used to log the date,
time, and temperature to a Google Spreadsheet. Read more in our tutorial
here: https://docs.particle.io/tutorials/topics/maker-kit

This sketch is the same as the example from the OneWire library, but
with the addition of three lines at the end to publish the data to the
cloud.

Use this sketch to read the temperature from 1-Wire devices
you have attached to your Particle device (core, p0, p1, photon, electron)

Temperature is read from: DS18S20, DS18B20, DS1822, DS2438

Expanding on the enumeration process in the address scanner, this example
reads the temperature and outputs it from known device types as it scans.

I/O setup:
These made it easy to just 'plug in' my 18B20 (note that a bare TO-92
sensor may read higher than it should if it's right next to the Photon)

D3 - 1-wire ground, or just use regular pin and comment out below.
D4 - 1-wire signal, 2K-10K resistor to D5 (3v3)
D5 - 1-wire power, ditto ground comment.

A pull-up resistor is required on the signal line. The spec calls for a 4.7K.
I have used 1K-10K depending on the bus configuration and what I had out on the
bench. If you are powering the device, they all work. If you are using parisidic
power it gets more picky about the value.
************************************************************************/

OneWire ds = OneWire(D4);  // 1-wire signal on pin D4

unsigned long lastUpdate = 0;

float lastTemp;

void setup() {
  Serial.begin(9600);
  // Set up 'power' pins, comment out if not used!
  pinMode(D3, OUTPUT);
  pinMode(D5, OUTPUT);
  digitalWrite(D3, LOW);
  digitalWrite(D5, HIGH);
}

// up to here, it is the same as the address acanner
// we need a few more variables for this example

void loop(void) {
  byte i;
  byte present = 0;
  byte type_s;
  byte data[12];
  byte addr[8];
  float celsius, fahrenheit;

  if ( !ds.search(addr)) {
    Serial.println("No more addresses.");
    Serial.println();
    ds.reset_search();
    delay(250);
    return;
  }

  // The order is changed a bit in this example
  // first the returned address is printed

  Serial.print("ROM =");
  for( i = 0; i < 8; i++) {
    Serial.write(' ');
    Serial.print(addr[i], HEX);
  }

  // second the CRC is checked, on fail,
  // print error and just return to try again

  if (OneWire::crc8(addr, 7) != addr[7]) {
      Serial.println("CRC is not valid!");
      return;
  }
  Serial.println();

  // we have a good address at this point
  // what kind of chip do we have?
  // we will set a type_s value for known types or just return

  // the first ROM byte indicates which chip
  switch (addr[0]) {
    case 0x10:
      Serial.println("  Chip = DS1820/DS18S20");
      type_s = 1;
      break;
    case 0x28:
      Serial.println("  Chip = DS18B20");
      type_s = 0;
      break;
    case 0x22:
      Serial.println("  Chip = DS1822");
      type_s = 0;
      break;
    case 0x26:
      Serial.println("  Chip = DS2438");
      type_s = 2;
      break;
    default:
      Serial.println("Unknown device type.");
      return;
  }

  // this device has temp so let's read it

  ds.reset();               // first clear the 1-wire bus
  ds.select(addr);          // now select the device we just found
  // ds.write(0x44, 1);     // tell it to start a conversion, with parasite power on at the end
  ds.write(0x44, 0);        // or start conversion in powered mode (bus finishes low)

  // just wait a second while the conversion takes place
  // different chips have different conversion times, check the specs, 1 sec is worse case + 250ms
  // you could also communicate with other devices if you like but you would need
  // to already know their address to select them.

  delay(1000);     // maybe 750ms is enough, maybe not, wait 1 sec for conversion

  // we might do a ds.depower() (parasite) here, but the reset will take care of it.

  // first make sure current values are in the scratch pad

  present = ds.reset();
  ds.select(addr);
  ds.write(0xB8,0);         // Recall Memory 0
  ds.write(0x00,0);         // Recall Memory 0

  // now read the scratch pad

  present = ds.reset();
  ds.select(addr);
  ds.write(0xBE,0);         // Read Scratchpad
  if (type_s == 2) {
    ds.write(0x00,0);       // The DS2438 needs a page# to read
  }

  // transfer and print the values

  Serial.print("  Data = ");
  Serial.print(present, HEX);
  Serial.print(" ");
  for ( i = 0; i < 9; i++) {           // we need 9 bytes
    data[i] = ds.read();
    Serial.print(data[i], HEX);
    Serial.print(" ");
  }
  Serial.print(" CRC=");
  Serial.print(OneWire::crc8(data, 8), HEX);
  Serial.println();

  // Convert the data to actual temperature
  // because the result is a 16 bit signed integer, it should
  // be stored to an "int16_t" type, which is always 16 bits
  // even when compiled on a 32 bit processor.
  int16_t raw = (data[1] << 8) | data[0];
  if (type_s == 2) raw = (data[2] << 8) | data[1];
  byte cfg = (data[4] & 0x60);

  switch (type_s) {
    case 1:
      raw = raw << 3; // 9 bit resolution default
      if (data[7] == 0x10) {
        // "count remain" gives full 12 bit resolution
        raw = (raw & 0xFFF0) + 12 - data[6];
      }
      celsius = (float)raw * 0.0625;
      break;
    case 0:
      // at lower res, the low bits are undefined, so let's zero them
      if (cfg == 0x00) raw = raw & ~7;  // 9 bit resolution, 93.75 ms
      if (cfg == 0x20) raw = raw & ~3; // 10 bit res, 187.5 ms
      if (cfg == 0x40) raw = raw & ~1; // 11 bit res, 375 ms
      // default is 12 bit resolution, 750 ms conversion time
      celsius = (float)raw * 0.0625;
      break;

    case 2:
      data[1] = (data[1] >> 3) & 0x1f;
      if (data[2] > 127) {
        celsius = (float)data[2] - ((float)data[1] * .03125);
      }else{
        celsius = (float)data[2] + ((float)data[1] * .03125);
      }
  }

  // remove random errors
  if((((celsius <= 0 && celsius > -1) && lastTemp > 5)) || celsius > 125) {
      celsius = lastTemp;
  }

  fahrenheit = celsius * 1.8 + 32.0;
  lastTemp = celsius;
  Serial.print("  Temperature = ");
  Serial.print(celsius);
  Serial.print(" Celsius, ");
  Serial.print(fahrenheit);
  Serial.println(" Fahrenheit");

  // now that we have the readings, we can publish them to the cloud
  String temperature = String(fahrenheit); // store temp in "temperature" string
  Particle.publish("temperature", temperature, PRIVATE); // publish to cloud
  delay(5000); // 5 second delay
}
The second-to-last line publishes the data to the cloud:
Particle.publish("temperature", temperature, PRIVATE); // publish to cloud
This line publishes an event named "temperature" to the Particle cloud, which brings with it the data stored in the temperature variable. You can read more about publishing events here.
The default is to take a reading every five seconds, which is great for for short-term projects and for testing this setup to make sure it works. If you want a longer interval once you get it working, change delay(5000) to something larger. Google spreadsheets can hold a maximum of 2000 rows, so the following line will take a reading every five minutes, which fits about a week's worth of readings into one sheet:
delay(300000); // 5 minute delay
Now let's upload the code. Click Devices in the left sidebar, and select your device as the device to upload to. Click the Flash button to upload the code!
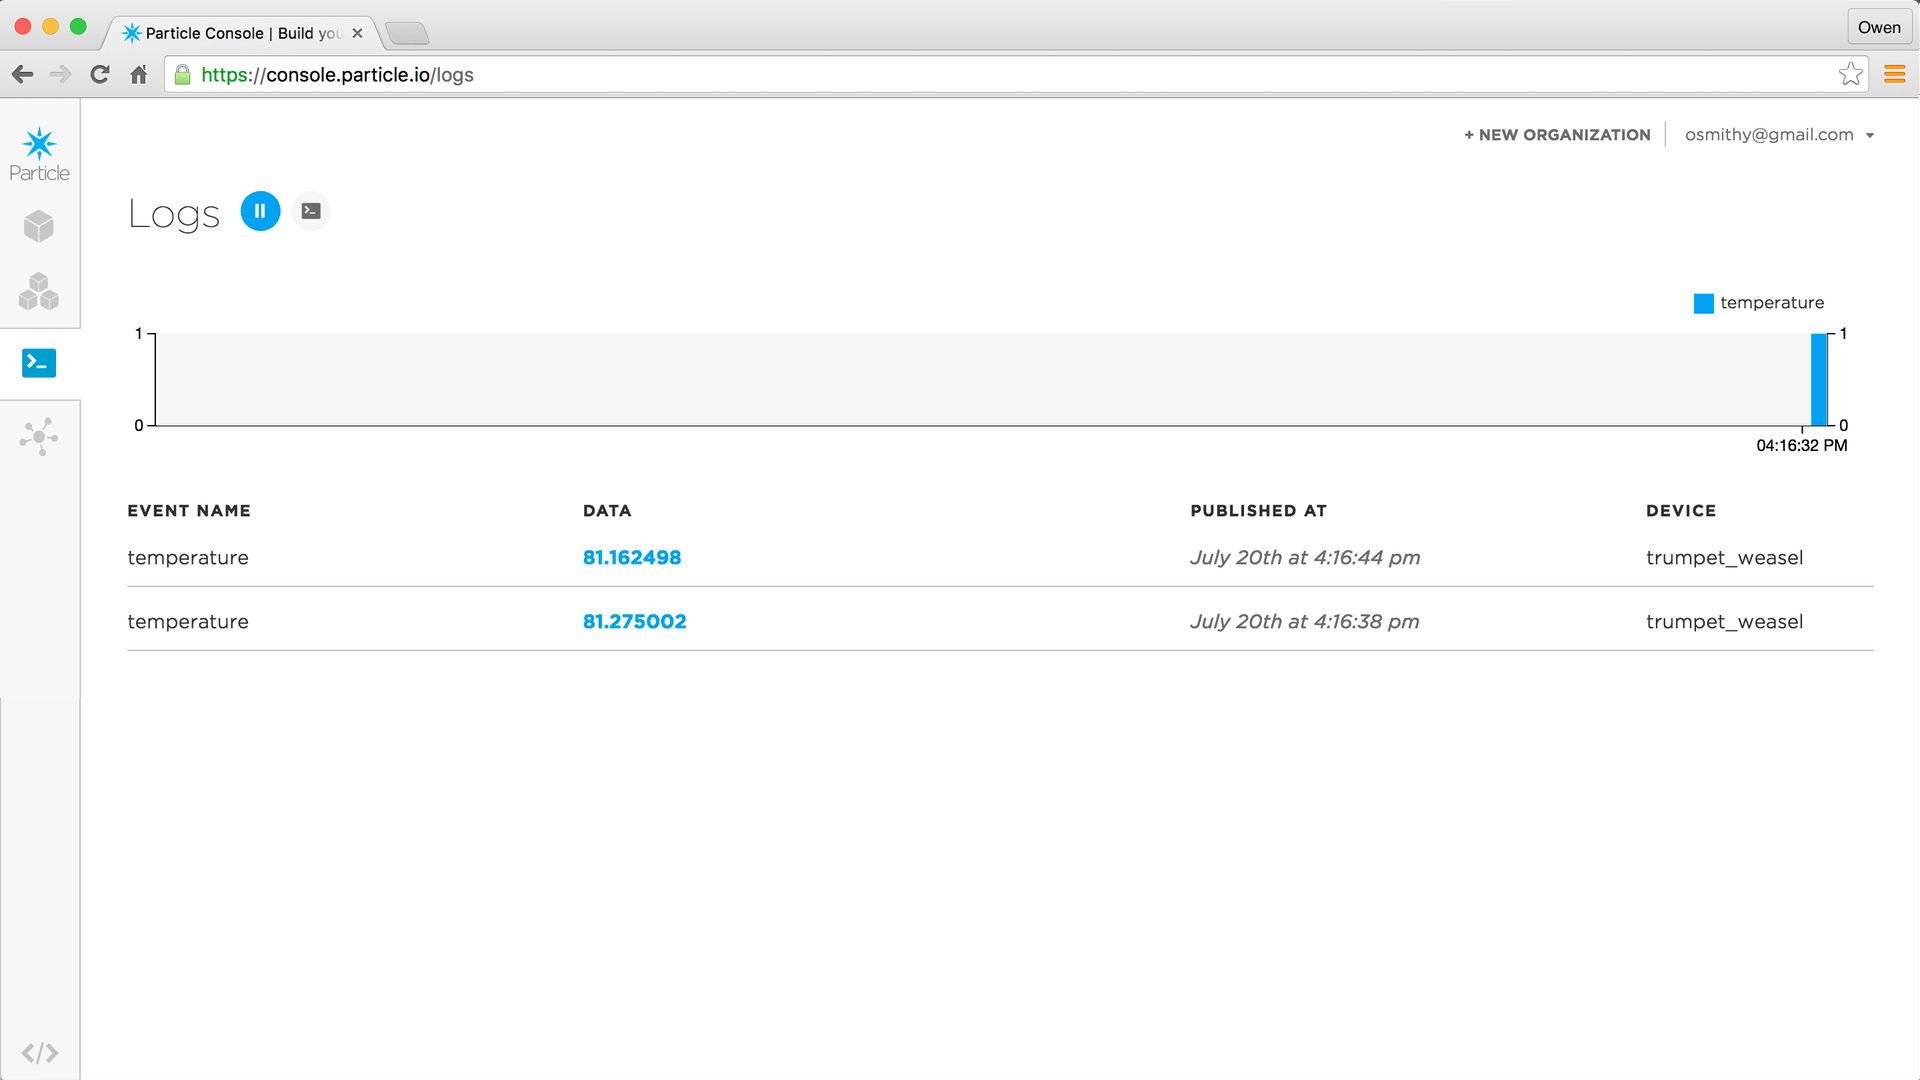
Your device should start publishing temperature readings to the Particle Console immediately, so go there and make sure they're showing up. If you get nothing, the sensor is probably not connected properly. Make sure your wiring matches the diagram, and make sure your resistor and sensor are fully inserted into the breadboard. If the resistor seems loose in the breadboard holes, try inserting it into the same holes as the sensor. Once you get readings, continue on!
For more information about the Console, read our Console guide.
IFTTT
IFTTT (which stands for "IF This Then That" and is pronounced "ift") is an incredibly flexible service that allows you to select a trigger and perform actions based on that trigger. In this case, the trigger will be our Photon publishing an event called temperature, and the action will be to add a row to a Google Spreadsheet containing the temperature and the current date and time. This will allow us to graph the temperature later on.
Sign in to your IFTTT account or sign up for a new one if you don't already have an account.

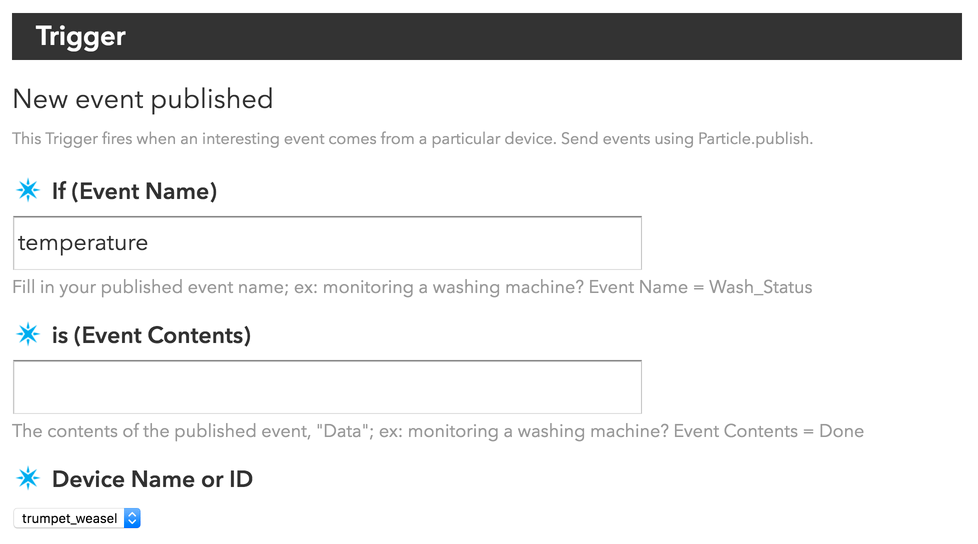
Click on My Applets at the bottom of the page to start the creation of your temperature-logging applet. Select the following parameters in each of the New Applet steps:
- Step 1: Select Particle from the services list. You'll be prompted to connect your Particle account to IFTTT if you have not done so already.
- Step 2: Select New event published
- Step 3: Enter
temperaturein the If (Event Name) field, and select your device in the Device Name or ID field. - Step 4: Select Google Drive from the integrations list. You'll be prompted to connect your Google Drive account to IFTTT if you have not done so already.
- Step 5: Select Add row to spreadsheet
- Step 6: Paste the following line into the Formatted Row box:
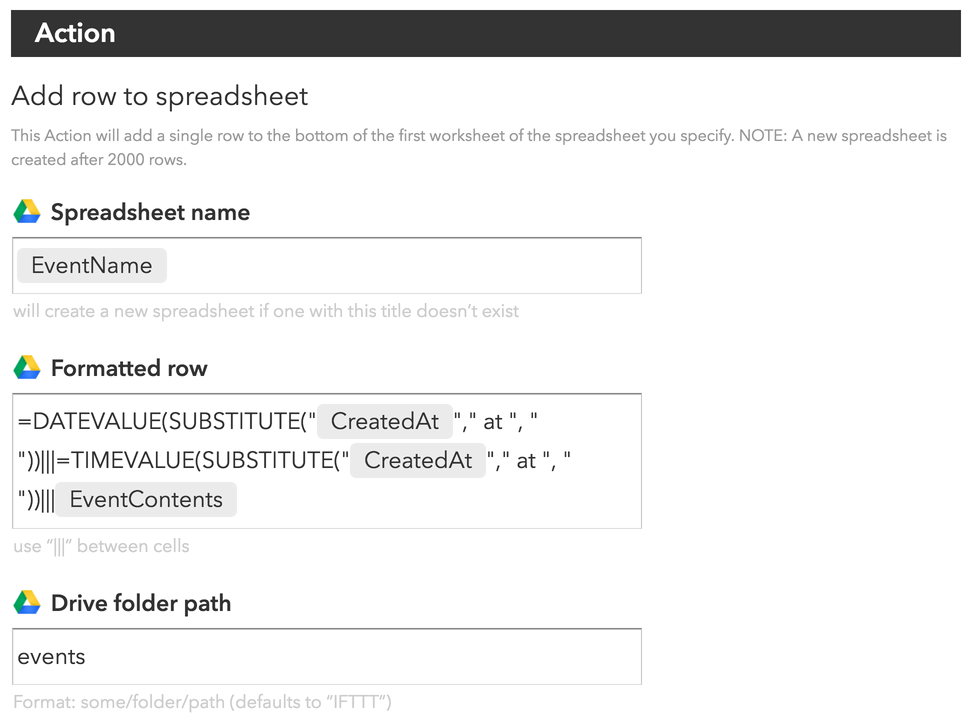
=DATEVALUE(SUBSTITUTE("{{CreatedAt}}"," at ", " "))|||=TIMEVALUE(SUBSTITUTE("{{CreatedAt}}"," at ", " "))|||{{EventContents}}. This line makes separate columns for the date, time, and temperature. - Step 7: Click Next and then Finish!
Your configuration settings should look like this:

Your Photon is already plugged in and taking readings, so check your Google Spreadsheet and watch the readings come in!
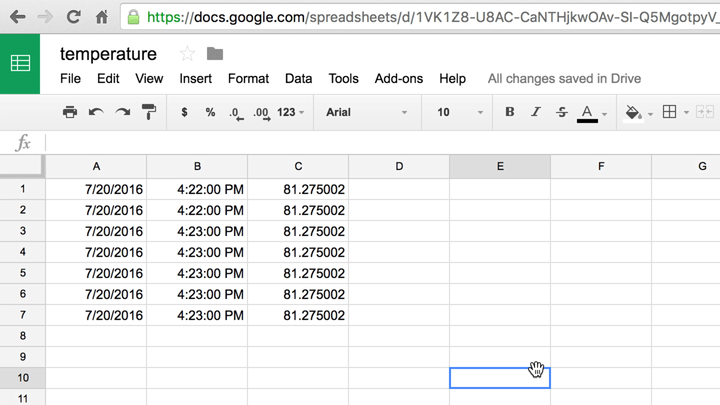
To make the date and time columns appear properly do the following:
- Select Column A
- From the Format menu, open Number and choose Date
- Select Column B
- From the Format menu, open Number and choose Time
Once you get enough readings, you can make a graph:

This setup has a wide range of applications, so enjoy!
Troubleshooting
No events are appearing in the Console.
- Check the sensor wiring against the diagram.
- In some cases breadboard holes can be a little loose. Try wiggling the resistor and sensor and see if readings come in. If you're using a resistor with very thin leads, sticking them into the same holes as the sensor pins often provides better contact.
- Make sure you're logged into the Console with the same account that owns the device.
- Make sure the Photon LED is "breathing cyan", which means it's connected to the cloud.
I see events in the Console, but not in the spreadsheet.
- Check your IFTTT Applet. Is everything spelled correctly and in the correct boxes?
I can't find the spreadsheet.
- The default folder for the spreadsheet is
My Drive/events, so check there first. - Check if events are showing up in the Console.
If you have issues that can't be solved here, post on our community forums.