
JSON (JavaScript Object Notation)
Introduction
JSON is a text-based format for exchanging data. It's useful because while it's mainly used for machine-to-machine data transfer, it's easy for humans to read and generate as well.
It's a well-defined standard (ECMA 404) and is implemented compatibly across operating systems, web services, and IoT devices. On Particle devices, you can use it with the cloud primitives including publish, subscribe, functions, and variables. Webhooks and SSE (server-sent-events) also can take advantage of JSON.
It's the native format for Tracker configuration, and you can use it in many other places like device notes, NFC data, the possibilities are endless!
Commonly used data types include:
- Number (integer or floating point)
- String (UTF-16)
- Boolean (
trueorfalse) null(less commonly used)
You can group together data types in an object, which consist of key/value pairs, or an array of just values.
Objects and arrays can contain both simple types (number, string) as well as more objects or arrays. Nested objects are allowed, but you cannot represent circular data objects.
The use of key/value pairs is helpful for client-server and similar situations because you can easily add new data (more key/value pairs) later without breaking things as long as both sides ignore keys they don't understand.
JSON Examples
Here's a JSON object containing a key a and a value 123:
{
  "a":123
}
Multiple values are separated by commas:
{
  "a": 123,
  "b": 456
}
The whitespace and multiple lines are optional, and this is equivalent:
{"a":123,"b":456}
The keys are always surrounded by double quotes. If you're familiar with Javascript JSON will look familiar, however Javascript is more lax and allows, for example, single quotes surrounding keys and strings. That is not allowed in JSON!
It's also worth nothing that you cannot have comments in JSON data.
Numbers can be decimal as well as integer:
{
  "value":33.333
}
The JSON format does not specify a maximum precision, however when converted the destination may impose limits. For example, your Particle device may save the value in a float or double, which does have limits.
As you might guess, strings are also surrounded by double quotes:
{
  "value":"this is a test"
}
What happens if you need to include a double quote in a JSON value? You escape it with a backslash:
{
  "value":"Call me \"Al\""
}
But what if you want to encode a backslash? You double it.
{
  "value":"Ends with a backlash\\"
}
There are a bunch of valid backslash escapes:
| Character | Name | ASCII Code |
|---|---|---|
| \b | Backspace | 8 (0x08) |
| \n | Newline | 10 (0x0a) |
| \f | Formfeed | 12 (0x0c) |
| \r | Carriage Return | 13 (0x0d) |
| \/ | Solidus (forward slash) | 27 (0x2f) |
| \" | Double Quote | 34 (0x22) |
| \\ | Reverse Solidus (backslash) | 92 (0x5c) |
| \u | 4 hex digits, Unicode UTF-16 |
Note that you cannot continue a string across multiple lines. But you can insert a new line (\n) in a string.
Arrays are surrounded by square bracket:
[
    1,
    2,
    3
]
And you can include an array in an object:
{
  "a": [
    1,
    2,
    3
  ],
  "b": "testing!"
}
Note that arrays and objects can't end in a trailing comma in JSON, but can in Javascript.
You can nest objects and arrays as deeply as you want:
{
  "a": {
    "inner1": 123,
    "inner2": 456,
    "innerArray": [
      555.5,
      666.6
    ]
  }
}
There is no limit to the length of keys and data elements imposed by the JSON standard. However, using extremely long key names and very nested objects will use up more space if you're trying to fit the data in a publish. The maximum data size varies depending on the Device OS version and sometimes the device; see API Field Limits.
It's also important to note that binary data cannot be stored in JSON! You must instead encode the binary data in a text-based format and store it in a string. Some formats you might want to use include:
- Hex encoding
- Base 64
- Base 85 (Ascii85)
Try it!
Enter JSON in the box below to validate it. If there is a syntax error, there will be a red x in a circle on the line with the syntax error.
- The Prettify button reformats the JSON to be one key/value pair per line, which is easier to read.
- The Compact button removes the excess whitespace and converts everything to a single line.
- The Stringify button converts JSON into a string, escaping double quotes and backslashes, and Unicode.
- The Unstringify button converts a string back into JSON, removing the escaping.
- The Escape Unicode button converts characters >= 127 to a four-digit hex Unicode escape sequence.
The five buttons only work when the JSON is valid. If there are syntax errors, the buttons will be grayed out.
Try some other experiments:
- The buttons are mostly non-destructive so try them out!
- Try copying and pasting the examples above or your own JSON file into the box.
- Try typing some diacritical marks (like jalapeño).
Try intentionally creating syntax errors:
- Try adding a trailing comma after the last array element.
- Try adding a key not in double quotes.
- Try using single quotes instead of double quotes.
Convert to code
Sometimes you will want to convert JSON data into static strings in your C++ application firmware. The tool below will convert the JSON above into code.
Generate using sprintf
A common use case is to generate JSON on your Particle device and send it to the cloud using Particle.publish().
For simple data, using the standard C library function sprintf() or String::format() are a convenient
method.
One important caveat: Once you start getting into strings that might contain a double quote, backslash, or other character that must be escaped, things start to get complicated very quickly and you are much better off using the JSON writer in a later section of this page. In fact, once you get used to using the JSON writer you'll probably want to use it for all cases, since it really makes life simpler.
If you use sprintf, you must allocate a buffer big enough to hold your output. Furthermore, you
should always use snprintf which includes a length field, which prevents buffer overruns if
your buffer is too small. A buffer overrun could cause your code to crash, or worse yet,
crash sometimes later for unknown reasons because of heap corruption.
int a = 123;
int b = 456;

char buf[256];
snprintf(buf, sizeof(buf), "{\"a\":%d,\"b\":%d}", a, b);
Particle.publish("testEvent", buf);
// {"a":123,"b":456}
Note the need to escape all of the double quotes in the formatting string using backslashes.
You can also do this using String::format, which does not require allocating a buffer:
int a = 123;
int b = 456;

Particle.publish("testEvent", String::format("{\"a\":%d,\"b\":%d}", a, b));
// {"a":123,"b":456}
If you need to include a c-string (const char *), use %s but don't forget to double
quote escape the output.
int a = 123;
const char *b = "testing!";

char buf[256];
snprintf(buf, sizeof(buf), "{\"a\":%d,\"b\":\"%s\"}", a, b);
// {"a":123,"b":"testing!"}
If the source is a String make sure you use .c_str() when using %s:
int a = 123;
String b = "testing!";

char buf[256];
snprintf(buf, sizeof(buf), "{\"a\":%d,\"b\":\"%s\"}", a, b.c_str());
// {"a":123,"b":"testing!"}
You can output floating point numbers:
float a = 12.333333;

char buf[256];
snprintf(buf, sizeof(buf), "{\"a\":%f}", a);
// {"a":12.333333}
Floating point numbers with a limited number of decimal points:
float a = 12.333333;

char buf[256];
snprintf(buf, sizeof(buf), "{\"a\":%.2f}", a);
// {"a":12.33}
For double use %lf (long float):
double a = 12.333333;

char buf[256];
snprintf(buf, sizeof(buf), "{\"a\":%lf}", a);
//{"a":12.333333}
For booleans you might do something like this. Note that the true and false are not enclosed in double
quotes in the JSON output.
 bool a = false;

char buf[256];
snprintf(buf, sizeof(buf), "{\"a\":%s}", (a ? "true" : "false"));
// {"a":false}
Putting it all together:
int a = 123;
float b = 5.5;
bool c = true;
const char *d = "testing";

char buf[256];
snprintf(buf, sizeof(buf), "{\"a\":%d,\"b\":%.1f,\"c\":%s,\"d\":\"%s\"}",
    a, b, (c ? "true" : "false"), d);
// {"a":123,"b":5.5,"c":true,"d":"testing"}
There are so many options to sprintf but fortunately there are many good references online including the one at cplusplus.com.
JSON Troubleshooting
As generating JSON that way is error-prone, some debugging techniques can help.
This is a code sample for generating some JSON publish data. You can flash right from here, though you will probably want to copy this into Particle Workbench or the Web IDE so you can edit the code to try out new things.
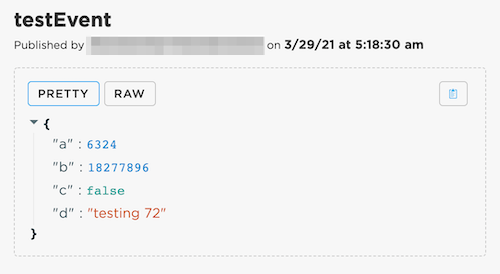
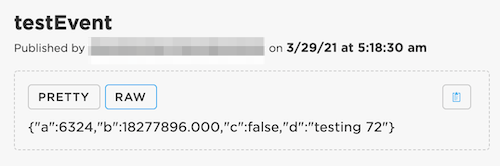
The console
The Particle Console as an Events tab that allows you to see recent events.

Clicking on a row will show the details. Important note: The Pretty view is not actually JSON! It's missing the comma-separators, for example.
The Raw view is the actual string received in the event.
The event
The Particle event payload may contain JSON, as the code above shows. However, there is no requirement that the event data be JSON, and may only be a string of data. It could be a single data element, or something like comma-separated values. While the console decodes JSON if detected, the data does not have to be JSON.
Because of this, the data is treated as a JSON string value, not a JSON object value. The double quotes, in particular, as backslash escaped in the event payload.
This applies when getting the data from most sources:
{{PARTICLE_EVENT_VALUE}}in a webhook- The
.datafield of the event in SSE (Server-Sent-Events) - The
.datafrom Particle API JS event when usinggetEvent()
If you are processing an event payload that you know is JSON, you will need to parse it. For example, when
using a browser or node.js, you will probably use JSON.parse(event.data).
Event decoder
What if you are having trouble with your event JSON? It's easy to make a mistake in encoding the
JSON by hand using sprintf. This online viewer will print the most recently received event in
the box and attempt to parse it as JSON. If there are errors, they will be flagged which will
hopefully make it easier to figure out what you did wrong.
Flash the event generating firmware above to a test device. Click the Enabled button to start monitoring events. Click on a row in the event list in the middle part to validate and display the decoded JSON in the bottom part.
| Event | Data | Device | Time |
|---|
Using JSONWriter
Instead of using sprintf you can use the JSONWriter class in the Device OS API.
In the example above we wanted to output these values:
int a = rand() % 10000;
float b = ((float)rand()) / 100.0;
bool c = (bool)(rand() % 2);
String d(String::format("testing %d", rand() % 1000));
This is the sprintf version:
char buf[256];
snprintf(buf, sizeof(buf),
    "{\"a\":%d,\"b\":%.3f,\"c\":%s,\"d\":\"%s\"}",
    a, b, (c ? "true" : "false"), d.c_str());
And the equivalent JSONWriter:
char buf[256];
JSONBufferWriter writer(buf, sizeof(buf));
writer.beginObject();
    writer.name("a").value(a);
    writer.name("b").value(b, 3);
    writer.name("c").value(c);
    writer.name("d").value(d);
writer.endObject();
writer.buffer()[std::min(writer.bufferSize(), writer.dataSize())] = 0;
It's more verbose, but it's also much more readable and less error-prone. The big
advantage is that if the String (d) may contain special characters that need to
be escaped like double quotes and backslash characters.
Also, if you have arrays, especially variable-length arrays, or nested objects, it is much easier to use the JSONWriter.
The Device OS Firmware API Reference has more information on JSONWriter.
Receiving JSON
You may want to receive JSON data on your Particle device using a Particle.function or subscribing to a Particle event.
Subscription logger
This sample device firmware just subscribes to the event testEvent and prints out JSON to
the USB serial debug log.
Sample event sender
This box allows you to enter JSON and publish it:
{"a":123,"b":"test","c":true,"d":[1,2,3]}
Combining the two, you should see a decoded event like this in the USB serial debug log:
0000010859 [app] INFO: Object
0000010859 [app] INFO:   key="a" Number: 123
0000010860 [app] INFO:   key="b" String: "test"
0000010860 [app] INFO:   key="c" Bool: true
0000010860 [app] INFO:   key="d" Array
0000010861 [app] INFO:     Number: 1
0000010861 [app] INFO:     Number: 2
0000010861 [app] INFO:     Number: 3
Looking for values
In most cases you won't just be logging your event out to the USB serial debug log, you'll actually want to extract the values you care about.
The important part of the code is here:
We initialize the values to reasonable defaults. There's no guarantee the JSON object will have every element we expect.
int a = 0;
String b;
bool c = false;
This parses the JSON and sets up an iterator:
JSONValue outerObj = JSONValue::parseCopy(data);
JSONObjectIterator iter(outerObj);
while (iter.next())
{
For each item in the outerObj we check the name (key) of the key/value. If it's one we're expecting
we decode it and store it in our local variable we defined above.
    if (iter.name() == "a")
    {
        a = iter.value().toInt();
    }
    else
    if (iter.name() == "b")
    {
        b = iter.value().toString().data();
    }
    else
    if (iter.name() == "c")
    {
        c = iter.value().toBool();
    }
}
Finally, outside of the iterator we print out all of the values we obtained.
Log.info("a=%d", a);
Log.info("b=%s", b.c_str());
Log.info("a=%s", (c ? "true" : "false"));
And the USB serial debug output should look like this:
0000007544 [app] INFO: a=123
0000007544 [app] INFO: b=test
0000007544 [app] INFO: a=true
It should be noted that you should never try to manually parse JSON, for example
using sscanf or strtok. It's very hard to get correct, and you could end up
creating a dependency on the format of the JSON, which you should never do.
For example, in JSON the keys may be reordered, and perhaps across versions
of your software keys could be added or removed.
Webhooks
The other common place where JSON is used is with webhooks, both for sending data to external servers, as well as parsing responses from servers.
In the Webhook Tutorial there's a brief mention
of {{{PARTICLE_EVENT_VALUE}}} but what is really going on there?
The answer is that the webhook server uses a template language known as Mustache. Things in double or triple curly brackets are a variable substitution.
These variables are predefined for any webhook (use triple curly brackets to avoid HTML escaping of the values):
{{{PARTICLE_DEVICE_ID}}}: The Device ID of the device that triggered the webhook{{{PARTICLE_EVENT_NAME}}}: The name of the event that triggers the webhook{{{PARTICLE_EVENT_VALUE}}}: The data associated with the event{{{PARTICLE_PUBLISHED_AT}}}: When the event was published{{{PRODUCT_ID}}}: The Product ID of the device that triggered the webhook
Product webhooks also have access to:
{{{PRODUCT_USER_ID}}}: The user id of the device owner{{{PRODUCT_VERSION}}}: The firmware version that published the event
However, there's much more than that. When you trigger a webhook and the source data is JSON, you can use the variables in your data as variables in most places, including the URL, query parameters, headers, and POST or PUT body.
And if the response from your server is JSON, you can extract elements from it and return it in the hook-response or hook-error. This is a powerful technique that can greatly reduce the size of the response if you only need a portion of the data returned by an API.
This only works with JSON responses. Some APIs return XML instead of JSON, and mustache templates do not work with XML. Some services may have an option to return different formats, so that's worth looking into as well.
Before we dive into parsing our own data, sometimes you'll see
{{{PARTICLE_EVENT_VALUE}}} and sometimes {{PARTICLE_EVENT_VALUE}}. Since
mustache was originally intended for use in HTML, the default (two curly brackets)
is to HTML escape any values where that is required. For example, angle brackets.
This is almost never what you want for a JSON API, so you will almost always use
three curly brackets, which do not HTML escape.
Mustache variables
This section has a number of examples of using mustache templates. The next section has an interactive editor that you can use with your own data!
All of the examples use this JSON data:
{"a":123,"b":"test","c":true,"d":[1,2,3],"e":{"f":444,"g":5.5}}
This could be the data sent up from your device in a JSON publish. Or it could be the data returned from a web service. It's in the compressed format above, if you prettify it, it looks like this:
{
  "a": 123,
  "b": "test",
  "c": true,
  "d": [
    1,
    2,
    3
  ],
  "e": {
    "f": 444,
    "g": 5.5
  }
}
Here are some simple templates and what is output:
| Template | Output |
|---|---|
{{{a}}} |
123 |
Testing {{{a}}} |
Testing 123 |
{{{b}}} |
test |
{{{c}}} |
true |
{{{d}}} |
1, 2, 3 |
{{{d.0}}} |
1 |
{{{d.1}}} |
2 |
{{{e}}} |
[object Object] |
{{{e.f}}} |
444 |
{{{e.g}}} |
5.5 |
{{{a}}},{{{e.f}}} |
123,444 |
{{{PARTICLE_EVENT_VALUE}}} |
{"a":123,"b":"test","c":true,"d":[1,2,3],"e":{"f":444,"g":5.5}} |
You've probably figured out the pattern:
{{{a}}}outputs the value of the top-level keya{{{b}}}does the same, but note that strings are not surrounded by double quotes{{{d}}}is an array, but it only outputs the values separated by commas{{{d.0}}}is the first element of the arrayd{{{e.f}}}is the keyfin the inner objecte
Transforming JSON with mustache
You can also take the JSON values in, and create new JSON data out. This can be helpful for connecting to internal services, because it allows you to mix in things like the Device ID that sent the event, or for expanding key names so you can communicate with a server that uses verbose key names and still stay within the publish size limit.
It can also be used in the other direction, to get a subset of larger data returned by a web service and only return a portion of it to the device, to save on data operations.
Simple substitution
This example includes two pieces of data, and the requesting Device ID.
Template:
{"a":{{{a}}},"message":"{{{b}}}","device":"{{{PARTICLE_DEVICE_ID}}}"}
Output:
{"a":123,"message":"test","device":"3f002b000000000000000000"}
Note that the does not
include the quotes, so they're included in the template. It also does not escape quotes in the string
and it is hard to work around, so it's best if you never have to deal with double quotes or backslashes.
Try it out
Enter your JSON data to be parsed here:
Mustache template:
Expanded Template:
Expanded template (JSON):
Some mustache templates to try:
{{{a}}}{{{b}}}"{{{b}}}"[{{{d}}}]{{{e.g}}}[{{{e.g}}},{{{e.f}}},{{{a}}}]
Advanced mustache
Expanding key names
Sometimes you'll be interfacing with an API that has verbose keys. Google likes to do this. The problem is that publishes are limited to 255 characters, and sometimes you can run out of room if you compose the JSON on the Particle device. Instead, you can use mustache templates to expand key names.
In this fragment of body template:
{"cellId":{{i}},"locationAreaCode":{{l}},"mobileCountryCode":{{c}},"mobileNetworkCode":{{n}} }
You'd send up in your publish data like:
{"i":1234,"l":567,"c":890,"n":765}
and the template would convert it to:
{"cellId":1234,"locationAreaCode":567,"mobileCountryCode":890,"mobileNetworkCode":765}
Passing pre-formatted arrays
Sometimes you might want to pre-encode part of your JSON webhook data. A good reason is that you have a variable-length array of data. Say you're passing the following up via publish:
{"a":[123,456,789]}
And you use this Mustache template:
{"anArray":[{{{a}}}]}
Then the output would be:
{
    "anArray": [
        123,
        456,
        789
    ]
}
The other reason you might want to do this is to mix in some pre-defined things, like:
{"anArray":[{{{a}}}], "id":"{{{PARTICLE_DEVICE_ID}}}"}
This would output:
{
    "anArray": [
        123,
        456,
        789
    ],
    "id": "12345678901234567890abcd"
}
You can also use this technique to implement a "zero or more" option. Using the same template above, this input:
{"a":123}
Generates a valid JSON array in the output:
{
    "anArray": [
        123
    ],
    "id": "12345678901234567890abcd"
}
And if there is no a property at all, then you get an empty array.
This only works for numbers and booleans. Since strings are not quoted, you can't generate an automatic array of strings using this technique.
Body with conditional blocks
Conditional blocks can be used for optional objects. This would allow you to use a single webhook for multiple functions.
If you have this published value:
{"a":123,"b":{"c":"hello","d":false}}
And this mustache template:
{ "cat":"{{b.c}}", "dog":{{b.d}}, "apple":{{a}} }
You get this JSON output:
{
    "cat": "hello",
    "dog": false,
    "apple": 123
}
Using a conditional block, you can also implement it using this mustache template:
{
    {{#b}}
        "cat":"{{c}}",
        "dog":{{d}},
    {{/b}}
    "apple":{{a}}
}
This generates the same output as above. The {{#b}} tests if b exists and if it does, includes the statements until the {{/b}}.
Also, any mustache variables within the block are relative to b. That's why cat is {{c}} in this example and {{b.c}} in the example before that.
The real difference is when you only publish this:
{"a":123}
The output won't have any references to the cat and dog at all:
{
    "apple": 123
}
Body with arrays
This technique can also be used to handle arrays of varying size, with certain caveats and some annoying complexity.
The data you pass up by publish contains a JSON object, which contains a JSON array, which contains more objects. The length of the array may vary.
{"a":[{"b":123,"c":true},{"b":456,"c":false}] }
And you have this template:
{
    "array":[
        {{#a}}
        {
            "banana":{{b}},
            "capybara":{{c}}
        },
        {{/a}}
        {}
    ]
}
Like the conditional block example above, this template uses {{#a}}. However, since it's an array, the text until {{/a}} is repeated once for every element in the array. This allows for easy expansion of objects contained in an array.
Also note that processing directives like {{# always use two curly brackets, not three.
And this is what gets generated:
{
    "array": [
        {
            "banana": 123,
            "capybara": true
        },
        {
            "banana": 456,
            "capybara": false
        },
        {
        }
    ]
}
Unfortunately, there's a problem. Because mustache was designed to generate HTML, not JSON, it doesn't really know what to do about the comma separator needed between JSON array elements.
There are three ways to deal with this:
- Leave the extra comma after the last element.
If the template had been this:
{
    "array":[
        {{#a}}
        {
            "banana":{{b}},
            "capybara":{{c}}
        },
        {{/a}}
    ]
}
You'd get this:
{
    "array": [
        {
            "banana": 123,
            "capybara": true
        },
        {
            "banana": 456,
            "capybara": false
        },
    ]
}
Note the comma before the ]. This isn't valid JSON, but the thing you're sending your webhook data to may be OK with it, and if so then you're set.
- Add an empty element
That's what's done above. Each array element ends with a comma, but then there's an element with no data at the end. Some servers may be OK with this, which is valid JSON, but weird data.
        },
        {{/a}}
        {}
- Duplicate the first element again
{
    "array":[
        {{#a}}
        {
            "banana":{{b}},
            "capybara":{{c}}
        },
        {{/a}}
        {
            "banana":{{a.0.b}},
            "capybara":{{a.0.c}}
        }
    ]
}
This outputs:
{
    "array": [
        {
            "banana": 123,
            "capybara": true
        },
        {
            "banana": 456,
            "capybara": false
        },
        {
            "banana": 123,
            "capybara": true
        }
    ]
}
If the service doesn't care about the duplicated value, and you always have at least one, you're set.
Arrays of strings
{"a":["aaa","bbb","ccc"]}
As mentioned earlier, you can't just do this:
{"a":[{{{a}}}],"d":"{{{PARTICLE_DEVICE_ID}}}"}
because it produces this, which is not JSON; note the missing double quotes around the strings. This is fine for numbers, but not for strings.
{"a":[aaa,bbb,ccc],"d":"3f002b000000000000000000"}
This template works, sort of:
{"a":[{{#a}}"{{{.}}}",{{/a}}""],"d":"{{{PARTICLE_DEVICE_ID}}}"}
It outputs this JSON, which is valid:
{"a":["aaa","bbb","ccc",""],"d":"3f002b000000000000000000"}
A few things to note:
{{#a}}Iterates each element ina, which is an array"{{{.}}}",prints out the array element at each index. We've surrounded it by double quotes, and included the comma-separator for the next element.{{/a}}ends the iteration loop onabut leaves us with a trailing comma""adds an empty string element after the last item so the JSON is valid again
Of course some services won't like the empty string element. You could also try the repeated first element technique:
{"a":[{{#a}}"{{{.}}}",{{/a}}"{{a.0}}"],"d":"{{{PARTICLE_DEVICE_ID}}}"}
Also note that this fails if any array element contains a double quote or backslash.
Google geolocation example
The Google geolocation integration really just creates a fancy webhook template on the back-end.
{ {{#c}}"considerIp":false,"radioType": "gsm","carrier": "{{o}}","cellTowers":[{{#a}}{"cellId":{{i}},"locationAreaCode":{{l}},"mobileCountryCode":{{c}},"mobileNetworkCode":{{n}} },{{/a}}{"cellId":{{a.0.i}},"locationAreaCode":{{a.0.l}},"mobileCountryCode":{{a.0.c}},"mobileNetworkCode":{{a.0.n}} }]{{/c}}{{#w}}"considerIp":false,"wifiAccessPoints":[{{#a}}{"macAddress":"{{m}}","signalStrength":{{s}},"channel":{{c}} },{{/a}}{"macAddress":"{{a.0.m}}","signalStrength":{{a.0.s}},"channel":{{a.0.c}} }]{{/w}} }
That's kind of ridiculous, it looks a bit better expanded:
{
    {{#c}}
        "considerIp":false,
        "radioType": "gsm",
        "carrier": "{{o}}",
        "cellTowers":[
        {{#a}}
            {
                "cellId":{{i}},
                "locationAreaCode":{{l}},
                "mobileCountryCode":{{c}},
                "mobileNetworkCode":{{n}}
            },
        {{/a}}
            {
                "cellId":{{a.0.i}},
                "locationAreaCode":{{a.0.l}},
                "mobileCountryCode":{{a.0.c}},
                "mobileNetworkCode":{{a.0.n}}
            }
        ]
    {{/c}}
    {{#w}}
        "considerIp":false,
        "wifiAccessPoints":[
            {{#a}}
            {
                "macAddress":"{{m}}",
                "signalStrength":{{s}},
                "channel":{{c}}
            },
            {{/a}}
            {
                "macAddress":"{{a.0.m}}",
                "signalStrength":{{a.0.s}},
                "channel":{{a.0.c}}
            }
        ]
    {{/w}}
}
This is doing a few things:
- Includes the cellular fields if the
cobject is included in the top level of the publish object. - Includes the Wi-Fi fields if the
wobject is included in the top level of the publish object. - Expands JSON field names to maximize the data that will fit in a publish. For example
stosignalStrengthorctomobileCountryCode. - Includes variable length arrays using the repeat first item in the array trick.