
Tracker Edge firmware
One difference between the Tracker One and other Particle devices is that the Tracker One firmware can be used in three different ways:
- Completely off-the-shelf. With its cloud-based configuration, you can use the firmware as-is with no modifications in some cases.
- Semi-custom. The Tracker One firmware is customizable on-device making it possible to add new sensors and customize behavior while still making it easy to upgrade the base firmware.
- Custom. The Tracker One firmware is open-source so you can duplicate and modify it ("fork") for completely custom applications. Or build your own completely from scratch.
The Tracker Edge Firmware API Reference is also available.
Note:
This page is for the Tracker One. If you are using the Monitor One, see Monitor Edge.
How to customize tracker products
This video covers the Tracker basics including Tracker Edge, adding custom data to location publishes, and adding new settings panels for your own custom settings to the Particle console using a configuration schema.
Configuration
The configuration schema specifies all of the elements that can be cloud-configured via the Particle console. The panels vary depending on whether the product is a Tracker One or Monitor One product. You can also customize the panels with options specific to your product.
For more information about the console settings, see device fleet settings.
Using off-the-shelf releases
Your Tracker device is pre-configured with Tracker Edge firmware that you can use out of the box with no flashing of firmware necessary.
When new versions are released, you generally go through several steps that can be accomplished with the tool below:
- Select the product you want to work with. Make sure you select a Tracker One product, not a Monitor One product.
- Select the Edge version from the Edge version popup menu. The default is the newest version, which is recommended.
- Download the Edge version you wish to upgrade to and upload this to your product using the Upload Edge firmware to product button.
- Update the configuration schema using the Set Configuration Schema button.
- The upload tool only adds the firmware to the product; you will still need to release the firmware to one or more devices from the console.
- To learn about the console settings, see Tracker settings.
- Upload Edge firmware to product is only available for v19 and earlier. To use a newer versions, you should build your own binary with any customizations you desire.


Development device setup
If you are going to develop firmware for the Tracker One or Tracker SoM, you have to perform a few additional steps.
- Your firmware will typically be based on Tracker Edge, as outlined below. This is not a requirement and you can build your own firmware from the ground-up, however you will not have the cloud configuration, location event support, and the libraries for the GNSS (GPS), IMU (accelerometer), CAN bus, and other Tracker-specific peripherals.
- All Tracker devices must be part of a product, as described in setup.
- By default, Tracker devices are not claimed to your account. This may affect development.
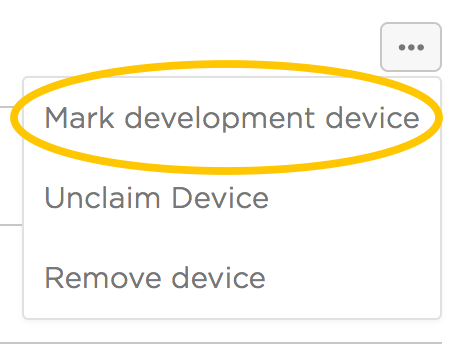
Mark as development device
- Go to the console.
- Open the product containing your Tracker device.
- In the Device List, click the ... button and then Mark development device.
For more information, see Development devices.
Claiming the device
By default, Tracker devices are not claimed to your account. This will affect the workflow in Workbench and there are two options:
Leave unclaimed
You can choose to leave your device unclaimed, however:
When prompted to select the Tracker device you want to work with, will need to specify it by Device ID (24 character hex) or hit Esc and manually put the Tracker in DFU mode (blinking yellow) using the buttons on the device.
You will not be able cloud flash (OTA) an unclaimed product device from the Particle CLI or Workbench.
Claim
Or you can claim the device to your account. You can do so with the Particle CLI.
Get the device ID of the tracker. It will be displayed in the device list where you marked the device as a development device, above.
Use the Particle CLI command:
particle device add <device-id>
Replace <device-id> with the 24-character hex device ID.
Getting the Tracker Edge firmware
Note:
This page is for the Tracker One. If you are using the Monitor One, see Monitor Edge.
You can download a complete project for use with Particle Workbench as a zip file here:
Version:
- Extract tracker-edge.zip in your Downloads directory
Open the tracker-edge directory in Workbench; it is a pre-configured project directory.
In order to use the Geofencing features, Tracker Edge v17 is required.
- In order to use Store and Forward, Tracker Edge v18 is required
After you've downloaded the source zip file:
- Extract the downloaded .zip file.
- Open Particle Workbench.
- From the command palette, Particle: Import Project.
- Run Particle: Configure Workspace for Device, select version 3.3.0 or later, Tracker, and your device.
- Run Particle: Flash application (local) or Particle: Cloud flash.
Make sure you've used the Mark As Development Device option for your Tracker device in your Tracker product. If you don't mark the device as a development device it will be flashed with the default or locked product firmware version immediately after connecting to the cloud, overwriting the application you just flashed.
It is recommended that Tracker fleets upgrade to the latest Device OS 4.x LTS (currently 4.2.0). You can also use Device OS 3.3.0.
Tracker Edge v20
This version is recommended for use with Device OS 6.2.0 and later.
It can be built back to Device OS 3.2.0, however the changes between v19 and v20 are only for Device OS 6.2.0 compatibility.
Tracker Edge v19
Note:
Tracker Edge v19 can only be used with Device OS 6.1.1 and earlier.
A compile error prevents it from working in 6.2.0 and later, however correcting this issue issue is not sufficient as a separate issue can cause a SOS+1 fault.
Tracker Edge with bare Tracker SoM
If you are using the Tracker SoM directly, not as part of the Tracker One (or Monitor One), you will need to make some minor modifications to Tracker.cpp to correspond to the hardware you have on your carrier board.
In particular, in Tracker::init() in src/Tracker.cpp, you will at minimum want to add a default: case to the switch statement:
EdgePlatform::instance().init(_model, _variant);
switch (EdgePlatform::instance().getModel()) {
    case EdgePlatform::TrackerModel::eTRACKER_ONE:
        _platformConfig = new TrackerOneConfiguration();
        _commonCfgData = _platformConfig->get_common_config_data();
        break;
    default: // <-- add this line
    case EdgePlatform::TrackerModel::eEVAL:
        _platformConfig = new TrackerEvalConfiguration();
        _commonCfgData = _platformConfig->get_common_config_data();
        break;
}
The reason is that the model will be eBARE_SOM for a bare Tracker SoM, leaving _platformConfig and _commonCfgData uninitialized,
which will cause the software to crash at boot.
This will allow you to boot, however, you should search all of the locations where TRACKER_MODEL_TRACKERONE is referenced and make sure you don't have similar changes you want to make for your custom board. This is how differences for the status LED, buttons, and other peripherals like the thermistor, are handled for the Tracker One.
Tracker Edge v18
Prior to June 2023, you could not build Tracker Edge v18 using the cloud compilers. This included Particle: Cloud compile and Particle: Cloud flash in Workbench and the particle compile and particle flash commands in the CLI.
With Particle CLI version 3.11.1 and later, you can now cloud compile, with one additional caveat. To update your CLI version if necessary, use:
particle update-cli
The other requirement is that the top level of your tracker-edge directory contain a particle.include file. The contents are:
**/*.def
If you've downloaded Tracker Edge v18 using the tool above recently, it was inserted automatically for you. If you've previously downloaded and modified the Tracker Edge v18 source, you can create the file or download and save it.
With those two changes you can cloud compile Tracker Edge v18 with Device OS 4.x LTS.
Tracker Edge v18 is not compatible with Device OS 5.x or later.
Tracker Edge v17 and Earlier
Tracker Edge v17 and earlier will not build on Device OS 4.x LTS without a modification. In main.cpp, comment out this line when using Device OS 4.x LTS:
PRODUCT_ID(TRACKER_PRODUCT_ID);
Tracker Edge v17 is not compatible with Device OS 5.x or later.
Manually
The Tracker Edge firmware can be downloaded from GitHub:
https://github.com/particle-iot/tracker-edge
You will probably want to use the command line as there are additional commands you need to run after cloning the source:
git clone https://github.com/particle-iot/tracker-edge
git submodule init
git checkout release/v18
git submodule update --recursive
- Open Particle Workbench.
- From the command palette, Particle: Import Project.
- Run Particle: Configure Workspace for Device, select version 3.3.0, Tracker, and your device.
- Run Particle: Flash application (local).
Make sure you've used the Mark As Development Device option for your Tracker device in your Tracker product. If you don't mark the device as a development device it will be flashed with the default or locked product firmware version immediately after connecting to the cloud, overwriting the application you just flashed.
If you are cloning Tracker Edge v18 and would like to be able to cloud compile, you must add a particle.include in the tracker-edge directory. Earlier tracker-edge firmware do not need it, later version already have it, and if you use the tool above it's automatically added if necessary.
Overview
A typical main source file looks like this:
#include "Particle.h"

#include "tracker_config.h"
#include "tracker.h"

SYSTEM_THREAD(ENABLED);
SYSTEM_MODE(SEMI_AUTOMATIC);

#ifndef SYSTEM_VERSION_v400ALPHA1
PRODUCT_ID(PLATFORM_ID);
#endif
PRODUCT_VERSION(1);

SerialLogHandler logHandler(115200, LOG_LEVEL_TRACE, {
    { "app.gps.nmea", LOG_LEVEL_INFO },
    { "app.gps.ubx",  LOG_LEVEL_INFO },
    { "ncp.at", LOG_LEVEL_INFO },
    { "net.ppp.client", LOG_LEVEL_INFO },
});

void setup()
{
    Tracker::instance().init();

    Particle.connect();
}

void loop()
{
    Tracker::instance().loop();
}
This doesn't look like much, but a lot of stuff happens behind the scenes and is cloud-controllable:
- Publishing location periodically, or when movement larger than a specified radius occurs
- Publishing on movement sensed by the IMU (inertial measurement unit, the accelerometer)
- Control of the RGB status LED
Digging into this:
These are some standard Tracker include files that you will likely need:
#include "Particle.h"

#include "tracker_config.h"
#include "tracker.h"
This is the recommended threading and system mode to use.
SYSTEM_THREAD(ENABLED);
SYSTEM_MODE(SEMI_AUTOMATIC);
Since all Tracker devices must belong to a product, you should set the product ID and version. You can either set the product ID to PLATFORM_ID which means use the product that the device has been added to, or you can set the product ID to your actual product ID value. The version is arbitrary, though it should be sequential and can only have value from 1 to 65535.
#ifndef SYSTEM_VERSION_v400ALPHA1
PRODUCT_ID(PLATFORM_ID);
#endif
PRODUCT_VERSION(1);
This block is optional, but sets the logging level. It's sets it to TRACE by default, but sets a lower level of INFO for Device OS and tracker internal messages.
SerialLogHandler logHandler(115200, LOG_LEVEL_TRACE, {
    { "app.gps.nmea", LOG_LEVEL_INFO },
    { "app.gps.ubx",  LOG_LEVEL_INFO },
    { "ncp.at", LOG_LEVEL_INFO },
    { "net.ppp.client", LOG_LEVEL_INFO },
});
Setup calls Tracker::instance().init(). This is required! Since the sample uses SYSTEM_MODE(SEMI_AUTOMATIC) you should call Particle.connect() at the end of setup().
You can add your own code to setup() as well.
void setup()
{
    Tracker::instance().init();

    Particle.connect();
}
The loop() function must always call Tracker::instance().loop(). You should do this on every loop.
You can add your own code to loop, however you should avoid using delay() or other functions that block. If you would like to publish your own events (separate from the location events), you can use the Tracker cloud service to publish safely without blocking the loop.
void loop()
{
    Tracker::instance().loop();
}
For more information about the reason for using Tracker::instance() and the singleton pattern, see application note AN034 singleton pattern.
Adding to the location event
It's easy to add additional data to the location event. For example, if you wanted to include the speed in the location event, along with the GNSS position information, you could modify the sample above to be like this (beginning lines omitted in the code below but are still required):
void myLocationGenerationCallback(JSONWriter &writer, LocationPoint &point, const void *context); // Forward declaration

void setup()
{
    Tracker::instance().init();
    Tracker::instance().location.regLocGenCallback(myLocationGenerationCallback);

    Particle.connect();
}

void loop()
{
    Tracker::instance().loop();
}

void myLocationGenerationCallback(JSONWriter &writer, LocationPoint &point, const void *context)
{
    writer.name("speed").value(point.speed, 2);
}
Note the additions:
- Calls
Tracker::instance().location.regLocGenCallback()to register a location generation callback insetup(). - Adds a new function
myLocationGenerationCallback(). - In the function adds a value to the loc object using the JSON Writer API.
If you look at the location event, you can see the new field for speed (in meters/second):
{
    "cmd":"loc",
    "time":1592486562,
    "loc":{
        "lck":1,
        "time":1592486563,
        "lat":42.469732,
        "lon":-75.064801,
        "alt":321.16,
        "hd":122.29,
        "h_acc":6.7,
        "v_acc":12,
        "cell":37.1,
        "batt":98.8,
        "speed":0.05
    },
    "trig":[
        "time"
    ],
    "req_id":4
}
You can add more than one value, and you can also add JSON objects and arrays.
Initially this will not be shown in the map view, but is a possible future enhancement. It is stored, even though it's not visible on the map.
To check the latest data on a device, you can query the Cloud API using the curl command. In order to do this you will need:
- Your product ID. Replace
1234in the command below with your product ID. - A product access token. Replace
903a7ab752f2dcf8ed8ffffffffffff24b467131in the command below with your access token (see below). - The device ID you want to query. Replace
e00fce68ffffffffff46f6in the command below with the device ID (24-character hex).
curl "https://api.particle.io/v1/products/1234/locations/e00fce68ffffffffff46f6?" -H "Authorization: Bearer 903a7ab752f2dcf8ed8ffffffffffff24b467131"
This should return something like this. Note the addition of the speed data from our custom location event callback.
{"location":{"device_id":"e00fce68ffffffffff46f6","geometry":{"type":"Point","coordinates":[-75.064801,42.469732,337.16]},"product_id":9754,"last_heard":"2020-06-18T14:04:43.000Z","gps_lock":true,"timestamps":["2020-06-18T14:04:43.000Z"],"properties":[{"hd":214.36,"h_acc":4.3,"v_acc":10,"speed":0.04}],"device_name":"Test-TrackerOne","groups":[]},"meta":{}}
One easy way to get a temporary access token is to:
- Open the console.
- Open your Tracker product.
- Click on Devices.
- Open your device.
- In the Events tab, click on View events from a terminal (it's a button).
- Copy and paste the access token from the end of the command that is displayed.
- This token is invalidated when your close the console.
To estimate the data usage when adding additional fields, see this page.
Multi-function pins
The Tracker One has three multi-function pins on the M8 port:
| M8 Pin | Function | Function | Function |
|---|---|---|---|
| 4 | Serial1 RX | Wire3 SDA | GPIO D9 |
| 5 | Serial1 TX | Wire3 SCL | GPIO D8 |
| 7 | Analog A3 | GPIO D3 |
If you enable Serial1 you cannot use the pins for I2C or GPIO.
Serial1.begin(9600);
If you enable Wire3 you cannot use the pins for Serial or GPIO.
Wire3.begin();
This feature is also available on the Tracker SoM, however on the Tracker SoM you have access to Wire on pins D0 an D1, so there is less of a need to use Wire3. Note that they map to the same I2C peripheral so you cannot use Wire and Wire3 at the same time!
If you do not enable Serial1 or Wire3, you can use the pins are regular GPIO, including all pin modes, INPUT, INPUT_PULLUP, INPUT_PULLDOWN, and OUTPUT.
These pins have a 3.3V maximum and are not 5V tolerant!
You must enable CAN_5V in order to use GPIO on M8 pins 3, 4, and 5 (A3, D9/RX/SDA, D8/TX/SCL) on the Tracker One. If CAN_5V is not powered, these pins are isolated from the MCU starting with version 1.1 of the Tracker One/Tracker Carrier Board (September 2020 and later). This is necessary to prevent an issue with shipping mode, see technical advisory note TAN002.
Using GitHub with Tracker Edge
GitHub is a tool for source code control, issue, and release management. It's great for managing Particle projects in Workbench. For many uses, it's free, too. There are many features, entire books, and tutorials about Git (the underlying source code control system) and GitHub (a service that allows you to store files in the cloud). This is just an overview.
Source code control allows you to have a secure record of all of the changes you've made to the source over time. You can roll back to previous versions and compare versions. It also makes sure you have a copy of all of your source separate from your computer, in case something happens to it.
Sign up for a GitHub account if you have not already done so. You will select a username at this point, which will be your primary method of identification, not your email address. Your username will be shown publicly in many instances, so keep that in mind.
Most operations are centered around a repository. In many cases, each repository will be a single project. However, in some cases you might want to store multiple Particle firmware projects in a single repository when they are related. For example, if you were writing Bluetooth LE (BLE) communication software, one firmware might be for the central role and one might be the peripheral role, but since they're both part of one project you'd store the source in a single repository.
Each repository can be public or private. If you are creating an open-source project or library, public typically used. Using GitHub teams multiple users can access private repositories. Everyone working on a project should always have their own GitHub account; you should never share an account.
While you can download code from the GitHub website, you will probably want to install a desktop GitHub client on your computer. You should install both the graphical and command line options.
There is also support for GitHub built into Visual Studio Code (Particle Workbench), but it uses your computer's GitHub desktop installation so you still need to install a desktop client.
Creating a mirror
In the example above we just use Clone to make a private copy of the source on your computer. There is another option that is more common when working with Tracker Edge projects: Mirror. A mirror allows you to make a private copy of a repository and link the two, so you can later merge any changes in the original with your changes! This is a power user feature, so you'll need to use some command-line git commands to make it work.
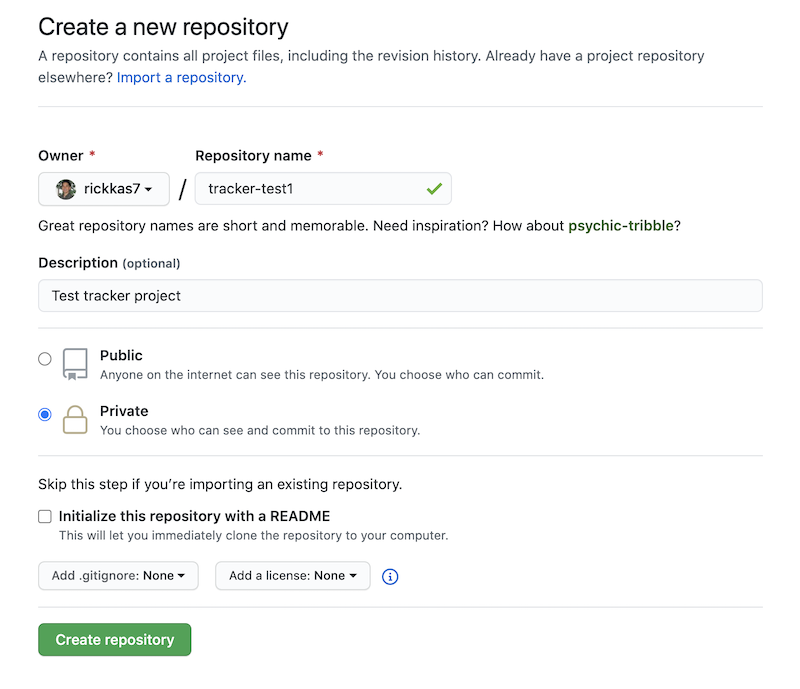
Create a new GitHub repository in your account. In this case, I created tracker-test1 and made it a private repository. Since we're going to mirror, it's not necessary to create a README or LICENSE.
git clone --bare https://github.com/particle-iot/tracker-edge.git
cd tracker-edge.git
git push --mirror https://github.com/rickkas7/tracker-test1.git
Run the commands to mirror the changes into the repository you just created. Be sure to change the last URL to match the URL for your repository!
At this point you can delete the tracker-edge.git directory as it's no longer needed.
git clone https://github.com/rickkas7/tracker-test1.git
cd tracker-test1
git submodule update --init --recursive
Make a clone of your repository and initialize the submodules.
Open your project in Workbench:
- Open Particle Workbench.
- From the command palette, Particle: Import Project. Select the project.properties file in the tracker-test1 directory.
- Run Particle: Configure Workspace for Device, select version 1.5.4-rc.1, 2.0.0-rc.3, or later, Tracker, and your device.
- Run Particle: Compile and Flash.
Now that you have a mirror, you're free to do things like update main.cpp and even edit the other Tracker source as desired. When you Stage, Commit and Push, the changes will be saved to your own GitHub private repository only.
cd tracker-test1
git remote add official https://github.com/particle-iot/tracker-edge.git
Link the two repositories. This makes it possible to merge changes from the official version later on, when new versions of Tracker Edge are released. This merge is smart, so it won't overwrite your changes if there are no conflicts, but if both you and Particle changed the same lines of source, this may be flagged as a conflict and you will need to manually figure out which to keep. You only need to run this command once.
cd tracker-test1
git pull official develop
This is how to merge updates from the official repository into yours. When a new version of Tracker Edge is released, you run a command to pull the changes from that release into your repository. You then resolve any conflicts and then push the changes to your repository. The steps are:
- Pull the changes from the official repository
- Resolve any conflicts
- Push the merged changes to your repository.
cd tracker-test1
git pull official release/v8
If you prefer, you can merge to a specific release instead of develop.
Making a source code change
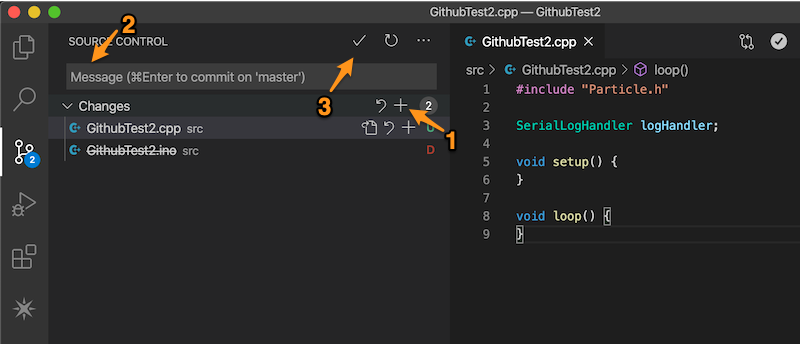
Once you've made some source changes and tested them, you might want to Commit and Push these changes.
Before you can commit you need to Stage your changes, which lets Git know you indeed want to upload all of these changes. The easiest way is to click on the Stage All Changes (1) + button. It's hidden by default but will appear if you hover over the spot.
Enter a commit message in the box (2). This can be a reminder of why you made the change.
Click the Commit icon (3) (check mark). This saves a record of the changes, but the changes still only live on your computer.
For personal projects like this you will typically just push to master. This sends the data to the GitHub servers. For more complex projects with team members, code reviews, etc. you will likely use a more complex process of Pull Requests instead.
- Click on the ... (Views and More Actions) at the top of the Source Control tab. Select Push.
Now the changes should be visible on the GitHub web site. Also if other team members Fetch and Pull the project they'll get your latest changes.
To summarize:
- Stage indicates this file should be committed
- Commit marks all of the changes are ready to go as one package of changes
- Push uploads the package of changes to GitHub
Sending commands
When viewing a device in the console, in the functions and variables area on the right, is the cmd box.
Some commands you can enter into the box:
| Command | Purpose |
|---|---|
{"cmd":"enter_shipping"} |
Enter shipping mode |
{"cmd":"get_loc"} |
Gets the location now (regardless of settings) |
{"cmd":"reset"} |
Gracefully reset the device |
{"cmd":"get_cfg"} |
Get all configuration objects in the device |
{"cmd":"reset_to_factory"} |
Perform a factory reset for configuration |
Shipping mode powers off the device by disconnecting the battery. This allows a Tracker One to be shipped in a way that the battery does not discharge without having to open the case and disconnect the battery. Note that you can only get out of shipping mode by connecting the device to USB power or power by the M8 connector. It works on the Tracker SoM evaluation board, but is less useful there since it has physical power switches.
It's also possible to create custom cmd handlers. These can be used instead of creating a custom Particle function handler and make it possible to add more than 12 handlers and automatically decode JSON arguments to the cmd handler.
On a successful cmd request, the result is 0. A result of -22 indicates the JSON is invalid.
Warning: Particle has discovered an issue with GPIO current leakage through Tracker One's M8 connector that affects Tracker One v1.0 devices manufactured prior to August 31, 2020 and can adversely affect the use of shipping mode for devices that use the M8 connection to an external peripheral device. For more information see TAN002 - Tracker One v1.0 Shipping Mode.
Software licenses
Tracker Edge and Monitor Edge software is Apache licensed, which is a permissive license.
The Apache License 2.0 explicitly grants the ability to use modified or unmodified versions of the source in open or closed source projects, in source or binary form. You can make a modified version of Tracker Edge, known as a derivative work, and not publish the changed source, or continue to make it open-source, whichever you prefer.
The exception is if you include libraries in your application that are licensed GPL (GNU public license) or LGPL. These licenses require that you open source your project that includes a GPL or LGPL library, with the same license.
This is the reason Tracker Edge and Monitor Edge do not use the more popular MCP_CAN library for CAN bus; it is GPL licensed and would have required your application to be open sourced if we had used that instead. The CAN library used in Tracker Edge is Apache 2.0 licensed. MIT and BSD licenses work similarly to Apache.
The confusing exception to the exception is LGPL code that is dynamically linked to an application. This is how parts of Device OS, some of which are LGPL licensed, can be used in closed source user firmware. Since Device OS is dynamically linked to user firmware, the LGPL exception can be used to allow the derivative work to be closed source.
Using a library from user firmware, on the other hand, uses static linking so you cannot use the LGPL library exception for firmware libraries added to user firmware applications.
For more information, see libraries and software licenses.
Learn more
- The Tracker Edge Firmware API Reference has more information on the available APIs.
- The Tracker Eval Board I2C Example shows how to add I2C sensor data to your location publishes.