
Blink an LED hardware examples
Here you will find a bunch of examples to get you started with your new Particle device!
Logging in
You can interact directly with your device from this tutorial page by logging into your Particle account in the box below. This is optional, as you can use Particle Workbench or the Web IDE and other techniques directly, if you prefer.
Blink an LED
The "Hello World" of embedded devices is blinking an LED, so here we go!
Hardware
- Your Particle device
- USB to micro USB cable
- Power source for USB cable (such as your computer, USB battery, or power brick)
To complete the later examples
- (2) Resistors between 220 Ohms and 1000 Ohms
- (1) LED, any color
- (1) Photoresistor or phototransistor (explained below)
Code
This example will blink the blue D7 LED on your Particle device.
- On the Photon and Electron it's located next to the D7 pin
- On the Argon and Boron it's located next to the USB connector (on the side with the battery connector)
- The E-Series, B-Series SoM, and Tracker SoM evaluation boards, and the Tracker One, do not have D7 LEDs.
This code has a lot of comments, but a few things to note:
This defines which pin we want to blink, in this case D7. If you wanted to use an external LED connected to D2, for example, you could change the constant in this one place at the top of the file. This is a good practice to get into.
const pin_t MY_LED = D7;
You can learn more about threading in the firmware API reference, but for now you mostly just need to know if you add this line, your code will run immediately at startup, before connecting to the cloud. If you leave this out, your code won't run (and the LED will not blink) until you've connected to the network and the Particle cloud successfully (breathing cyan).
#ifndef SYSTEM_VERSION_v620
SYSTEM_THREAD(ENABLED); // System thread defaults to on in 6.2.0 and later and this line is not required
#endif
The setup() function is called once when the device boots to, well, set up the device. In this case we define our LED
pin an an OUTPUT instead of digital input. You can learn more about pinMode()
in the firmware API reference.
void setup() {
    pinMode(MY_LED, OUTPUT);
}
The loop() function is called repeatedly while your device is running. In this case, we turn the LED on (HIGH), wait one second,
turn it off, wait one second, and repeat. You can learn more about digitalWrite()
and delay() in the firmware API reference.
void loop() {
    digitalWrite(MY_LED, HIGH);
    delay(1s);
    digitalWrite(MY_LED, LOW);
    delay(1s);
}
Note the two delay values of 1s or 1 second. If you want to make it blink faster, try changing it to milliseconds (250 milliseconds = 1/4 second)!
void loop() {
    digitalWrite(MY_LED, HIGH);
    delay(250ms);
    digitalWrite(MY_LED, LOW);
    delay(250ms);
}
Control LEDs over the 'net
Intro
Now that we know how to blink an LED, how about we control it over the Internet? This is where the fun begins.
We've heavily commented the code below so that you can see what's going on. Basically, we are going to:
- Set up the pins as outputs that have LEDs connected to them
- Create and register a Particle function (this gets called automagically when you make an API request to it)
- Parse the incoming command and take appropriate actions
Code
This code should look familiar if you've followed the previous example, but there are a few changes:
In setup() we now register a Particle.function(). This provides a way for the Particle
cloud to trigger a function on the device to do something. In this case, change the state of the blue D7 LED.
Particle.function("led", ledToggle);
The process is the same for all kinds of devices, both Wi-Fi and cellular, and also works from within network firewalls, generally without any reconfiguration. It's also secure, since the Particle device uses public key cryptography and encryption to secure the cloud connection.
The other change is the function to handle the Particle.function.
int ledToggle(String command) {
    if (command.equals("on")) {
        digitalWrite(MY_LED, HIGH);
        return 1;
    }
    else if (command.equals("off")) {
        digitalWrite(MY_LED, LOW);
        return 0;
    }
    else {
        // Unknown option
        return -1;
    }
}
There are two complementary cloud features:
- Functions request the device to do something, allowing the cloud to pass a command string to the device to specify exactly what it wants done.
- Variables get data from the device, allowing the cloud to request a value. This is often used with sensor data.
(There are also publish and subscribe, which you can learn more about in the cloud introduction.)
In the code above, if the command is "on" we turn the LED on, and if it's "off" we turn the LED off.
Testing
If you've logged in, you can interact with your devices here:
You can also test your new function is from the console. In the devices tab, click on the row for the device you just flashed your code to.
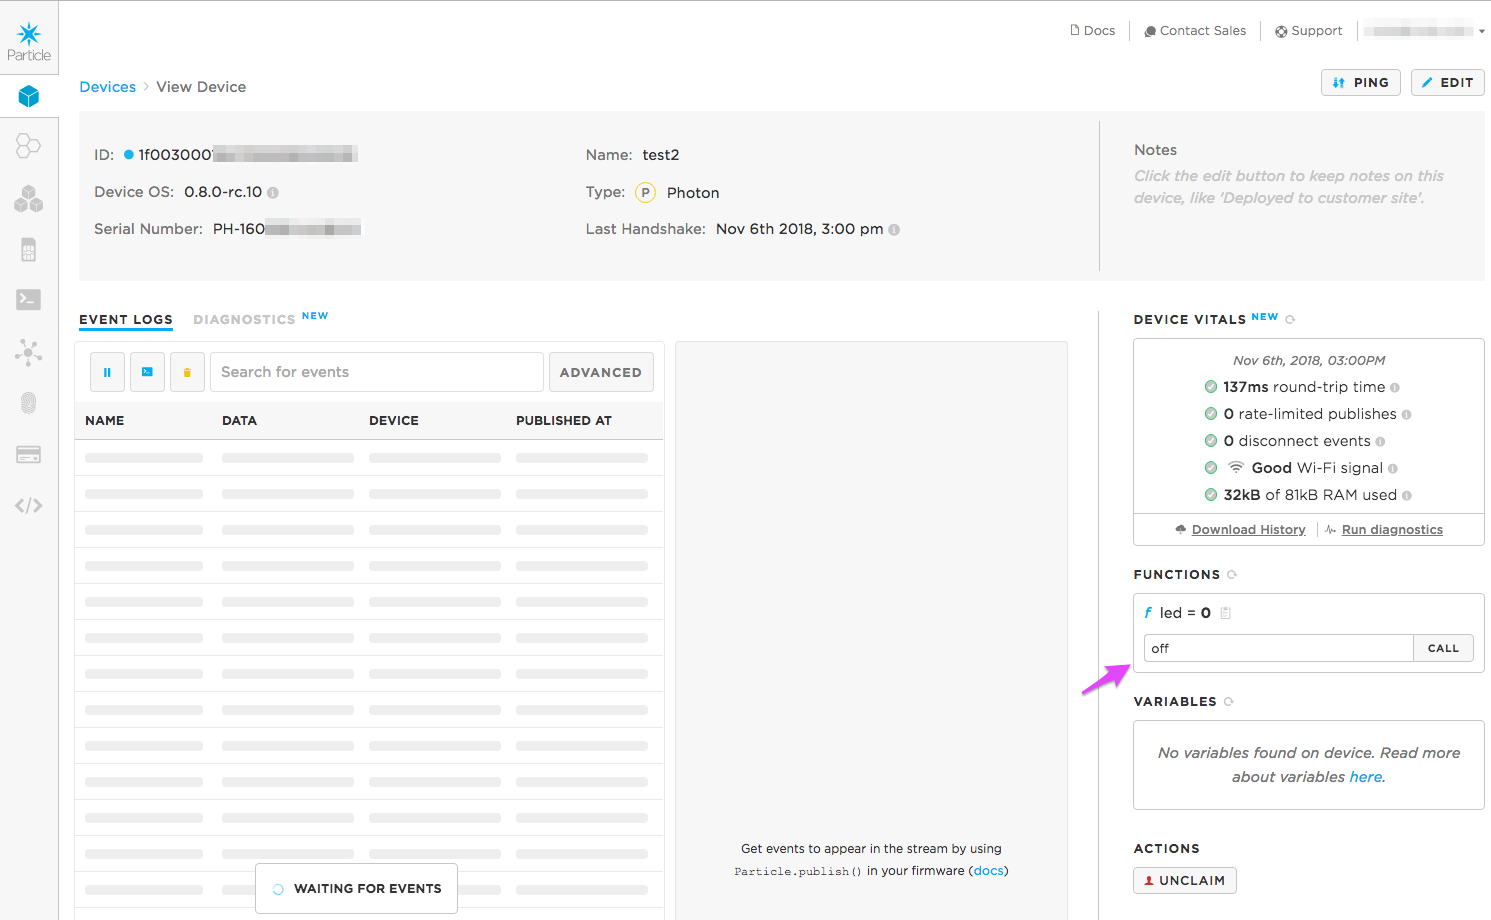
On the right-hand side of the screen is a box for functions. There should be one labeled "led". If you type on in the box and click the Call button the LED should turn on. To turn it off use off.
Or you can also do this from the Particle CLI.
particle call my-test-device led on
Replace my-test-device with the name of your device. If you get an "The access token was not found" error, use particle login to log into your Particle account first.
From HTML
It's also possible to call the function from your own HTML page. That's a more complicated scenario and there are a few options, so that's discussed in a separate application note.
Blink an external LED
Intro
Instead of using the built-in blue LED, we'll now hook up an external LED.
The development kits generally include the necessary extra parts, but the bare devices do not. If you do not have the components you can skip these examples.

Depending on the kit you have, you may have one or more of the items above. Left to right:
- IR (infrared) LED. It has a blue-ish tint. Don't use that one here, as you can't see the light with the naked eye!
- White LED. It has a rounded top. You can use this instead of the red LED in the examples below.
- Red LED.
- Photo transistor. The top of this is flat and is not an LED, it's a light sensor. You'll use that later.
There may also be smaller red or green LEDs. Those are also fine.
Setup
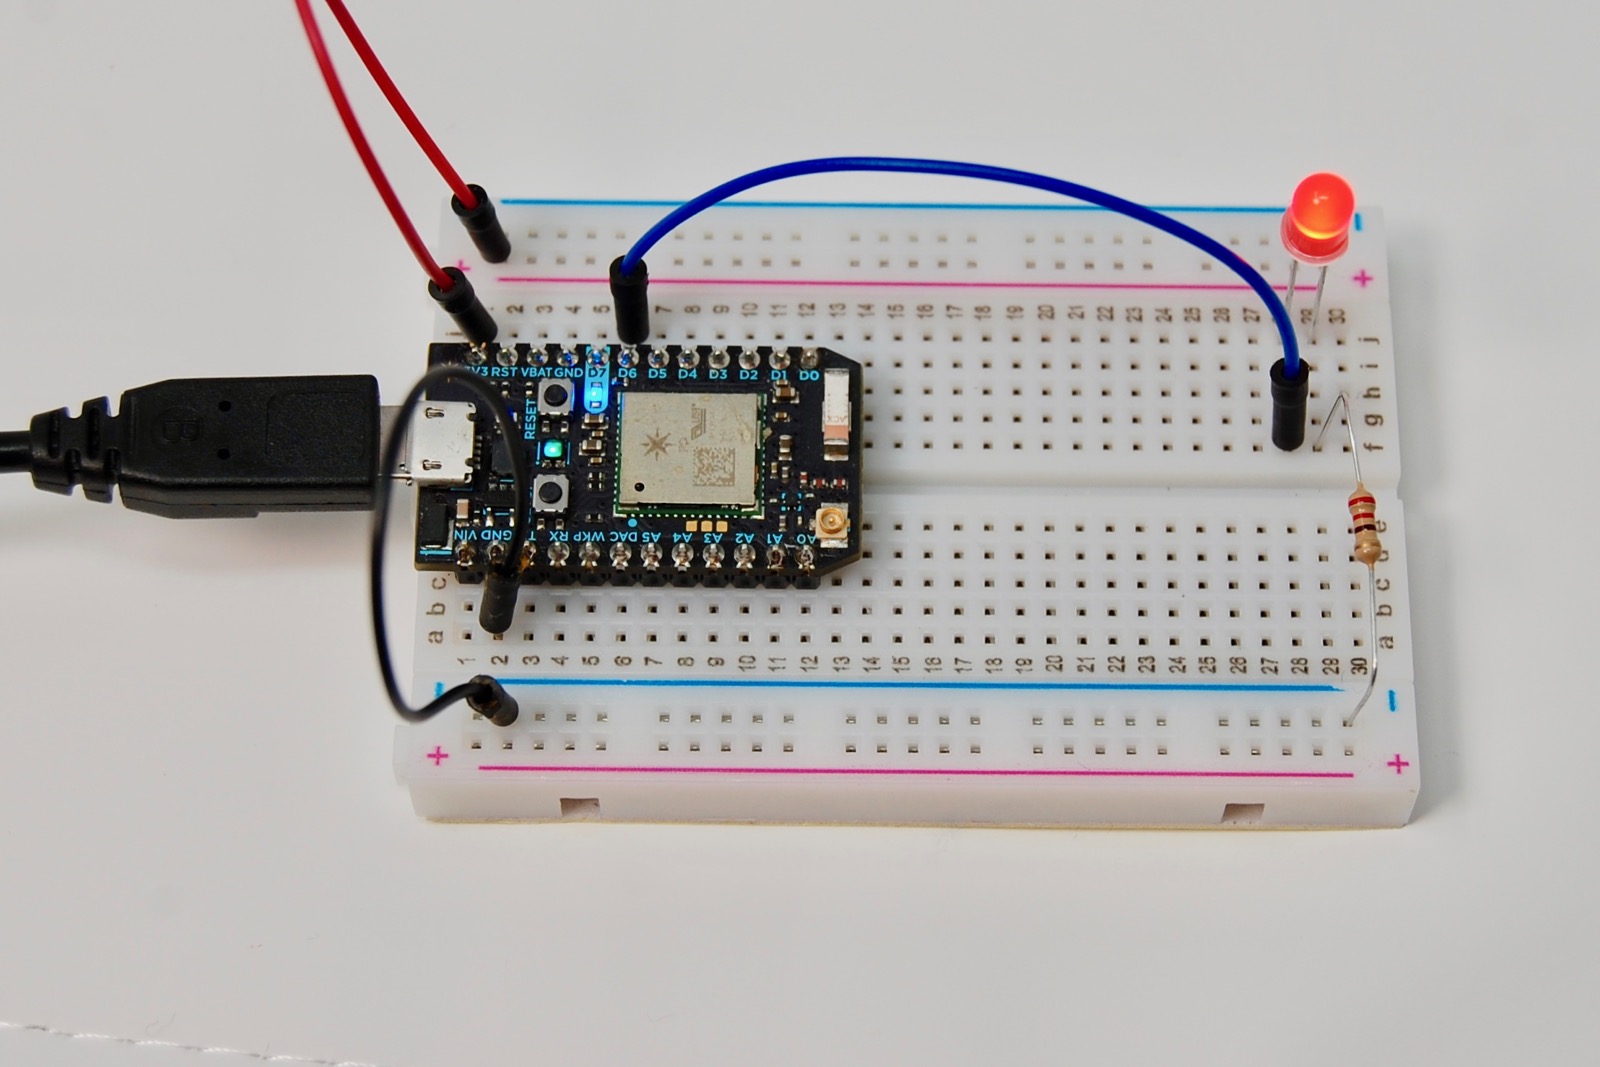
It's good practice to connect the red (+) bus bar on the top to 3V3 and the blue (-) bus bar on the bottom to ground.
Position the LED in the breadboard. The long lead (anode) goes to + (left) and the short lead (cathode) goes to - (right). When using an LED, you must always add a current liming resistor. Normally you'd use a 220 ohm resistor (red-red-brown-gold) for 3.3 volt circuits.
In the picture, the long lead of the LED connects to pin D6 using the blue wire. The short lead of the LED connects to a 220 ohm resistor that connects it to ground. That completes the circuit.
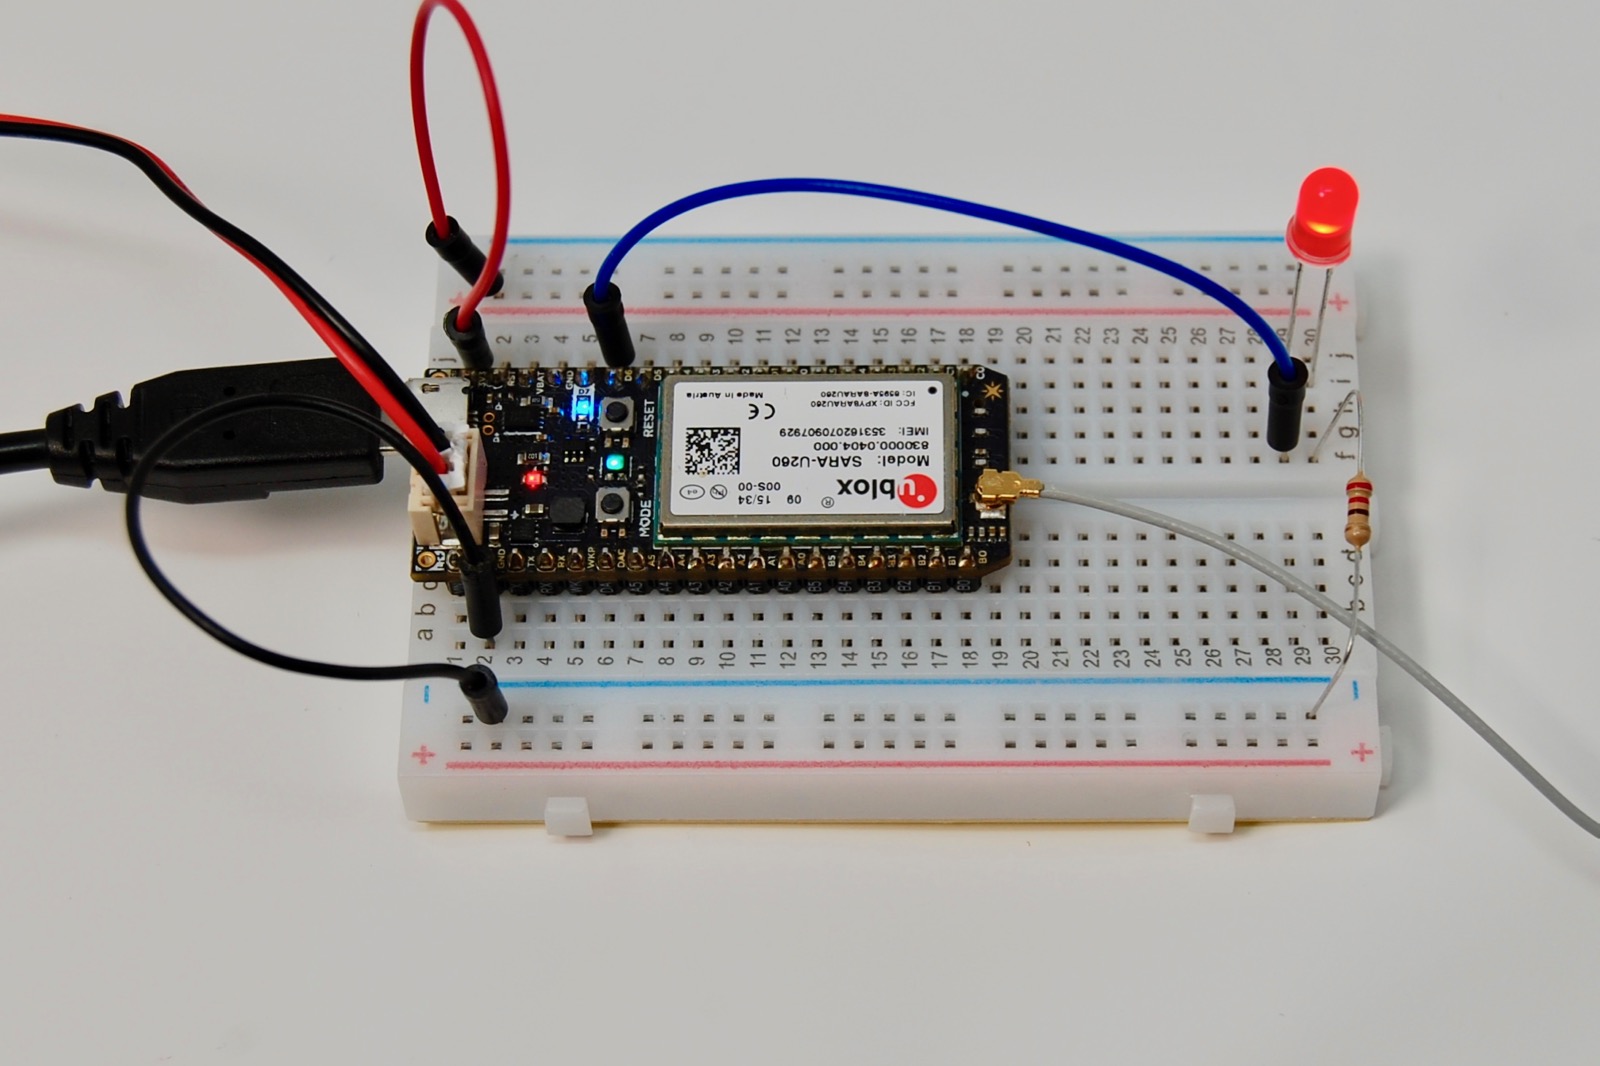
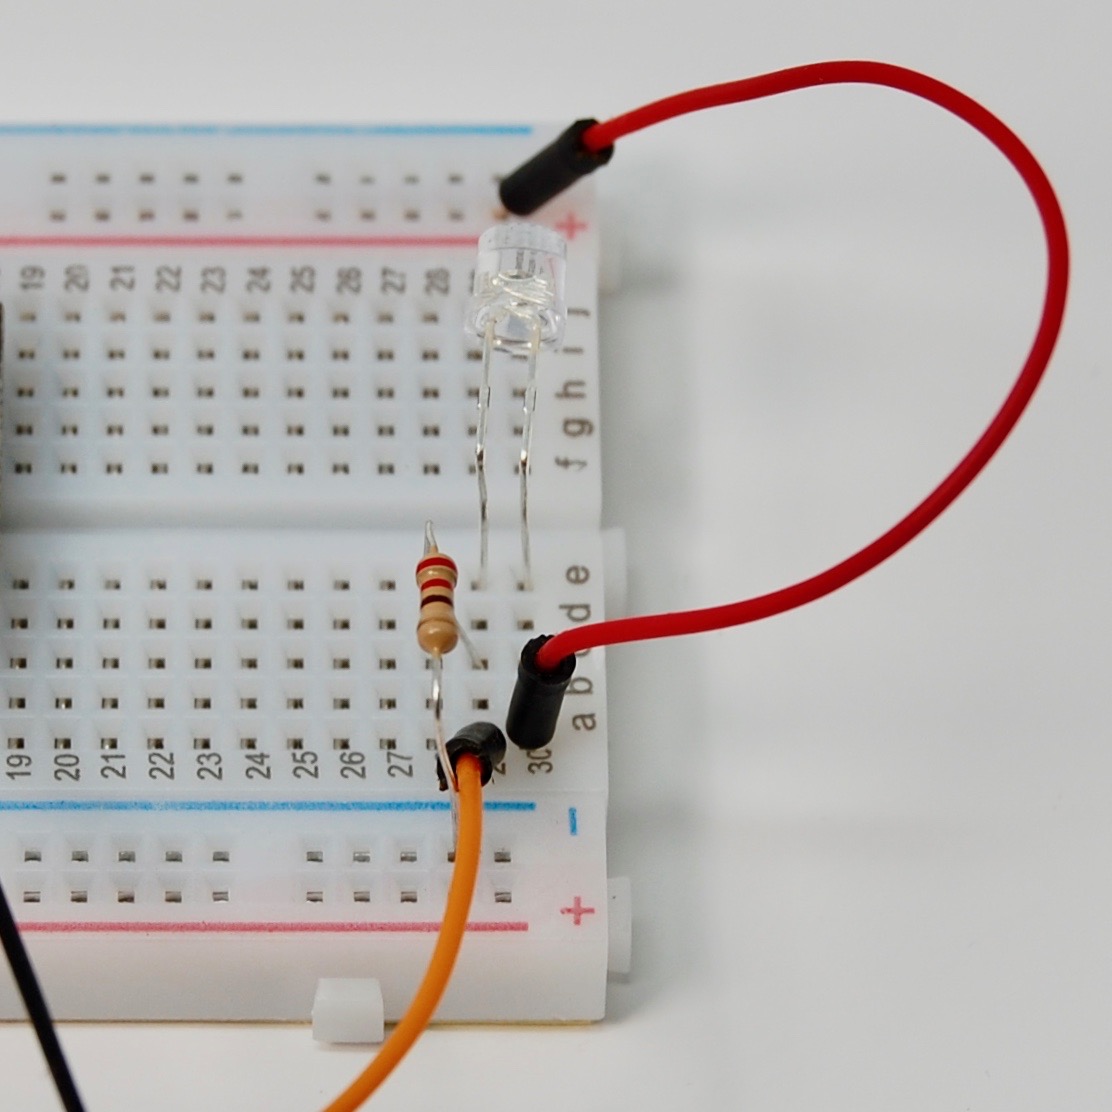
Here's a close-up of the connections
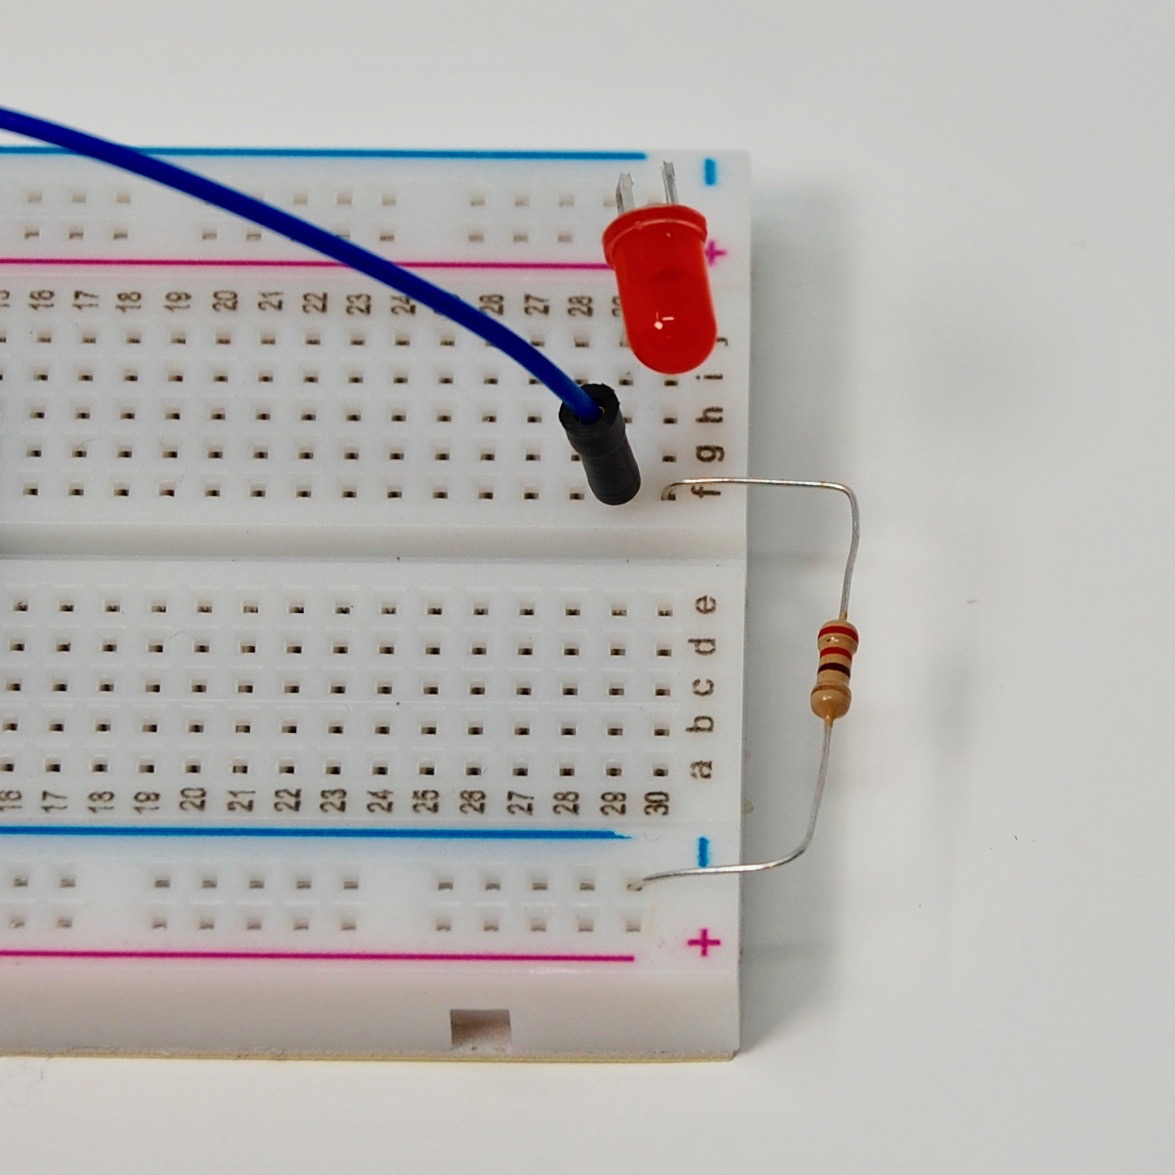
- The long lead of the LED is on the left. The blue wire connects to this lead.
- The short lead of the LED is on the right. This connects to ground with a 220 ohm resistor.
You can use the same code as in the previous example, just update the declaration of MY_LED to be the pin that you used. For example:
const pin_t MY_LED = D6;
Read your photo sensor: Function and Variable
Intro
This example uses the same setup as the LED control example to make a Particle.function. This time, though, we're going to add a sensor.
We will get a value from a photo resistor or photo transistor and store it in the cloud.
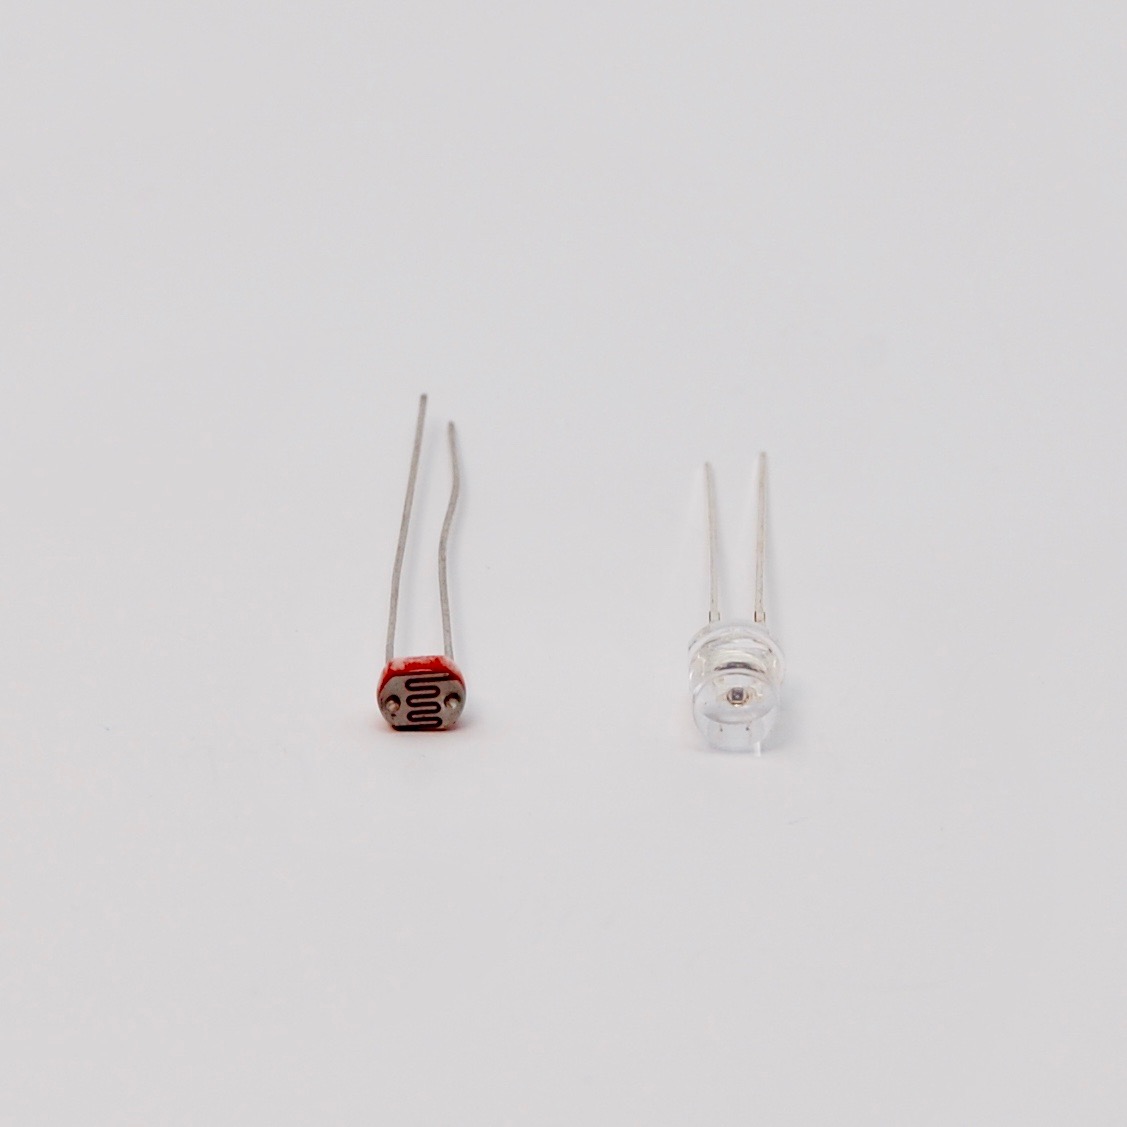
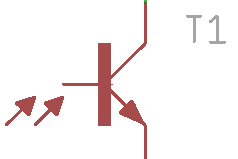
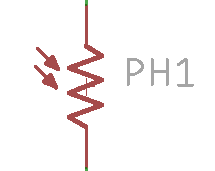
Depending on the kit you have, there may be a photo resistor (left, thin and flat with the squiggle pattern on the face) or photo transistor (right, clear and round with a flat top). The photo transistor and a clear LED look similar, but the LED has rounded top and the photo transistor has a flat top.
All Gen 3 (Argon and Boron) kits have a photo transistor.
Paste the following code into your IDE, or just access the examples on the left hand menu bar in the online IDE.
Setup
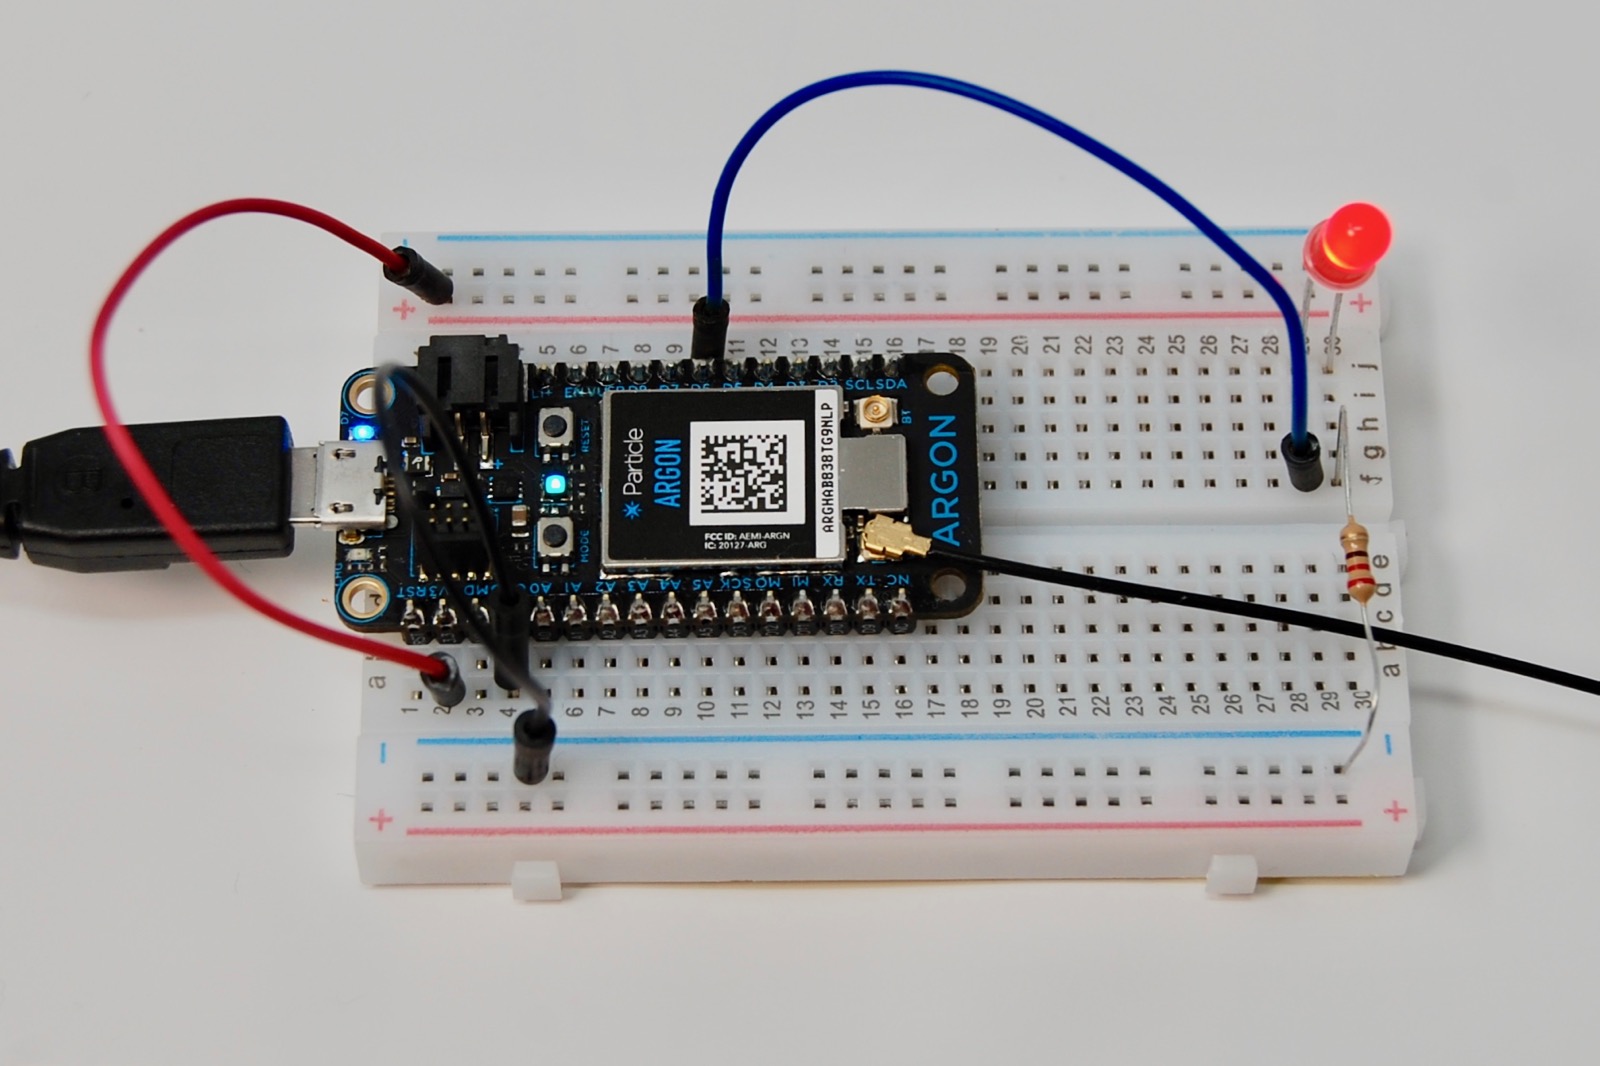
The basic wiring is the same as the previous example:
- The long lead of the LED connects to D6 using the blue wire.
- The short lead of the LED connects to a 220 ohm (red-red-brown-gold) resistor. The other side of the resistor connects to ground.
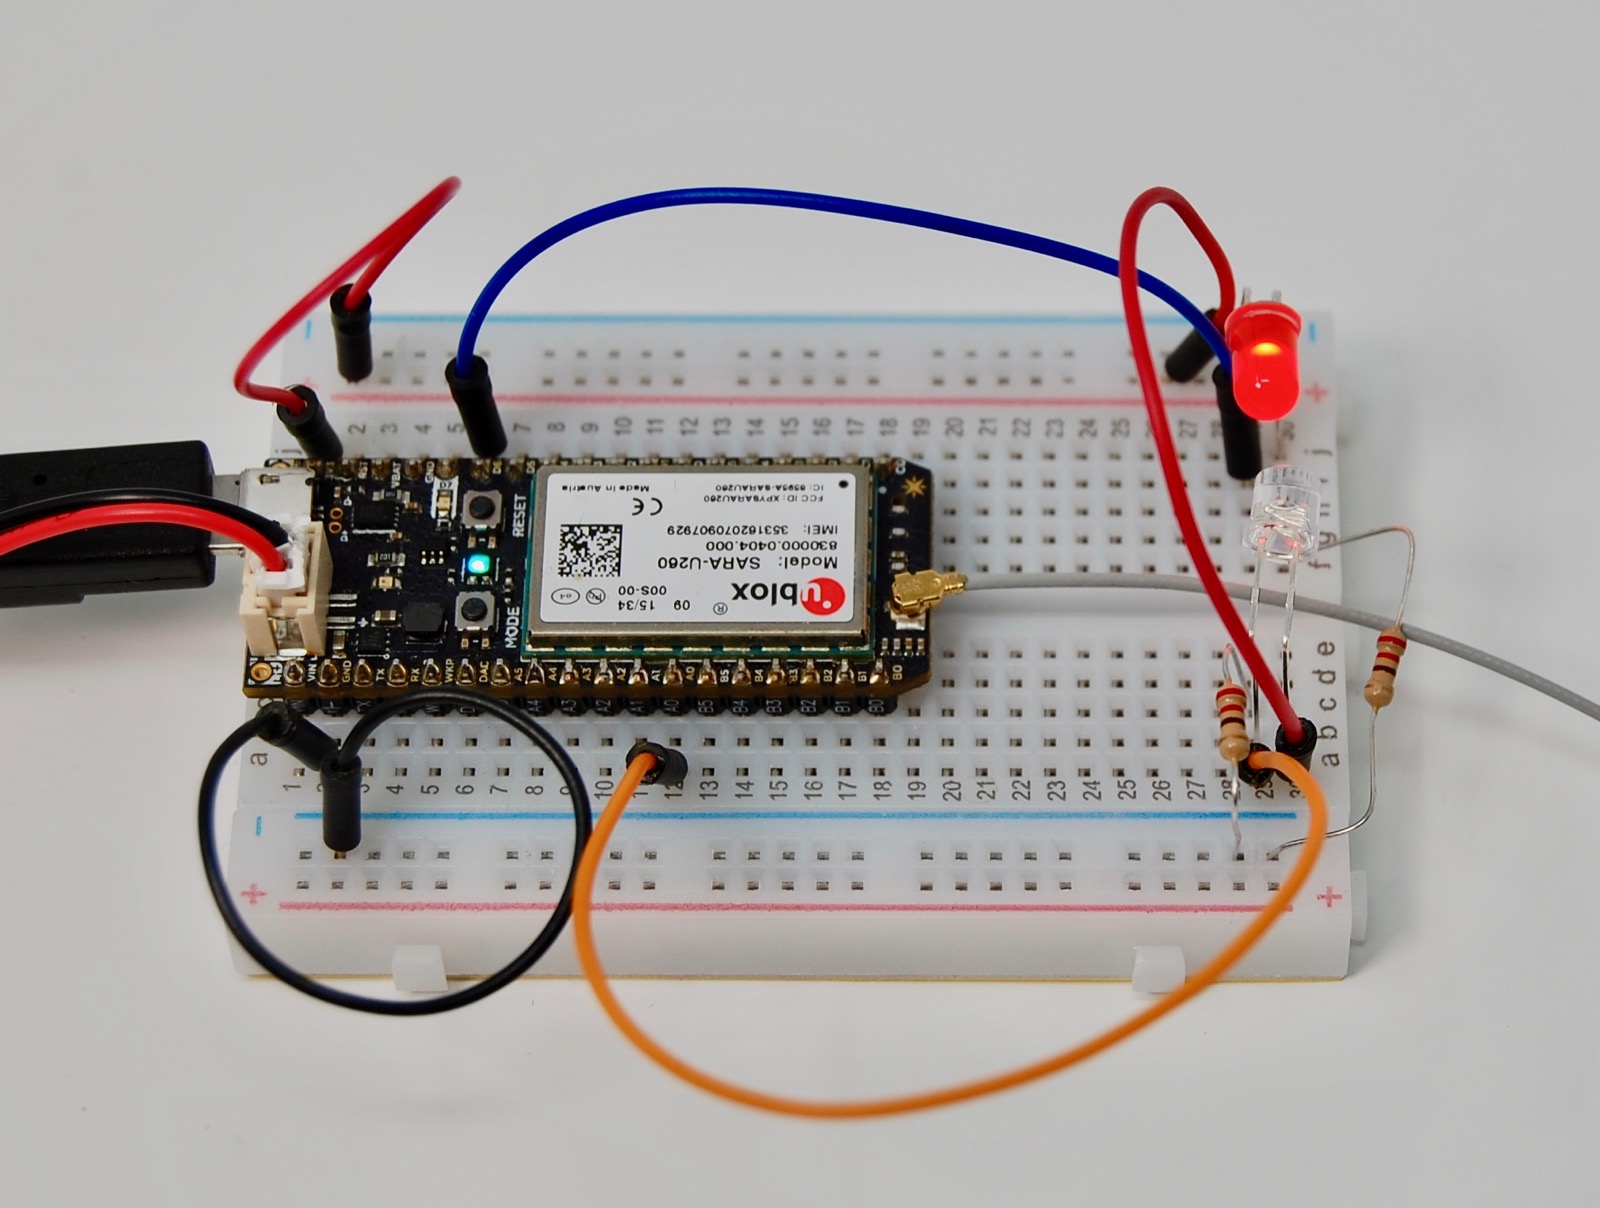
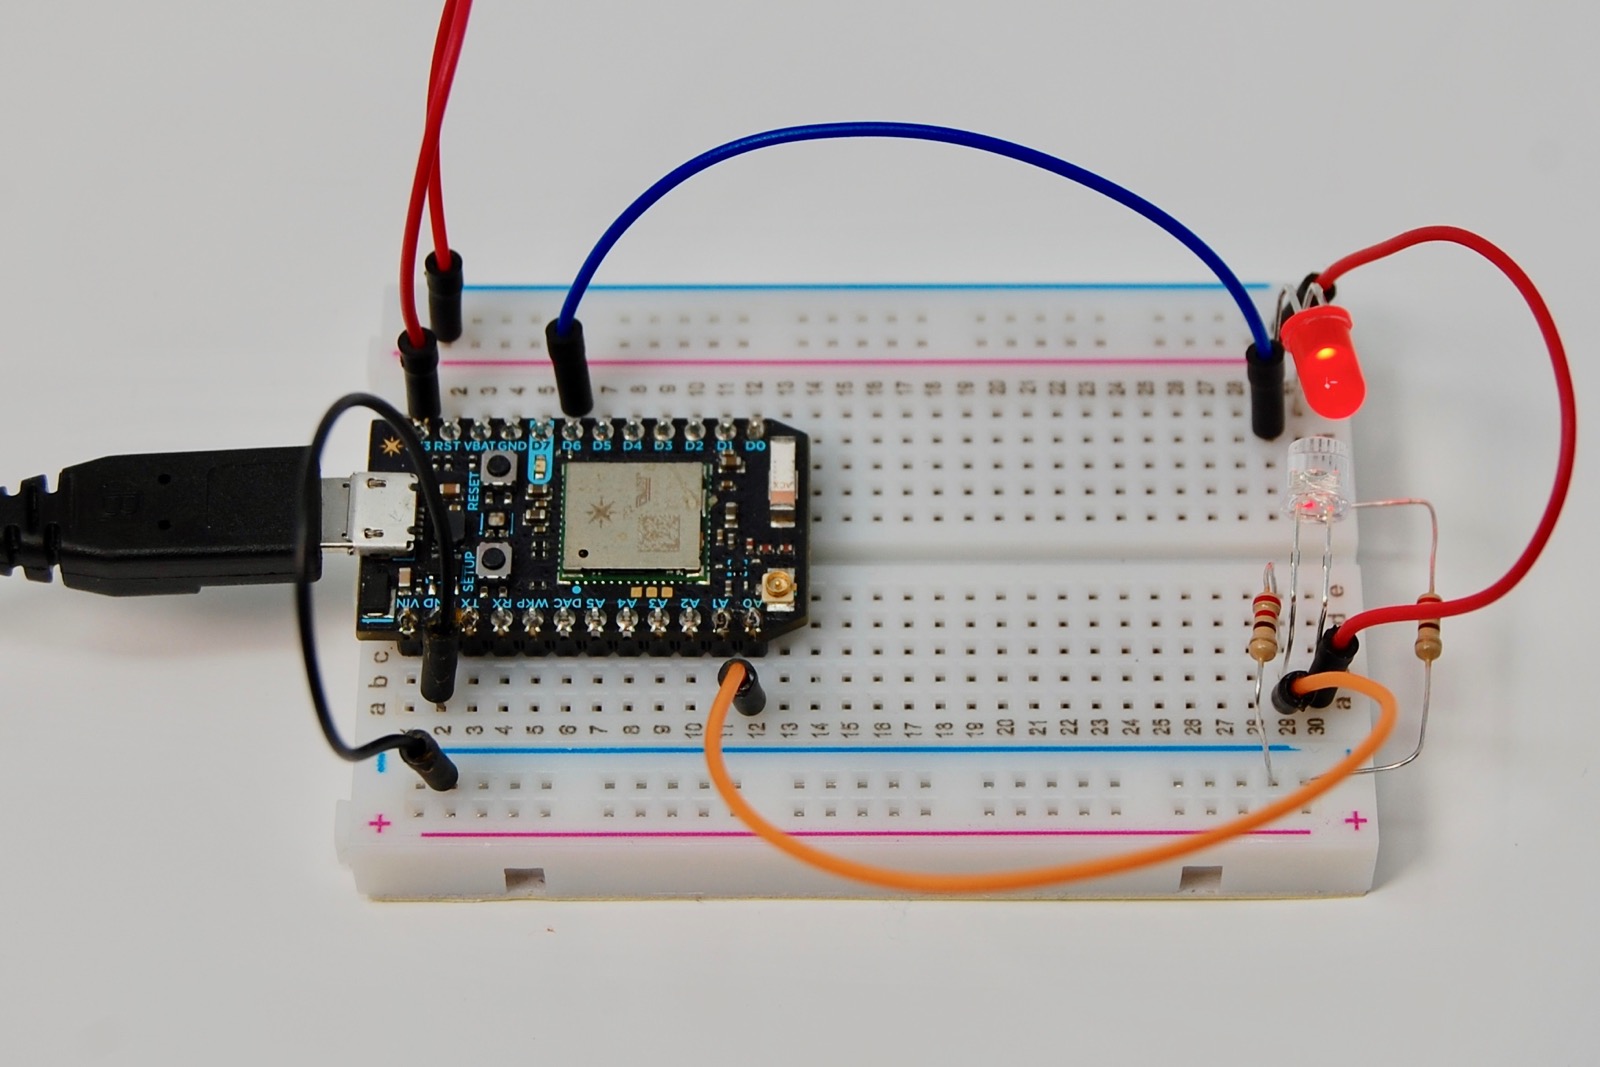
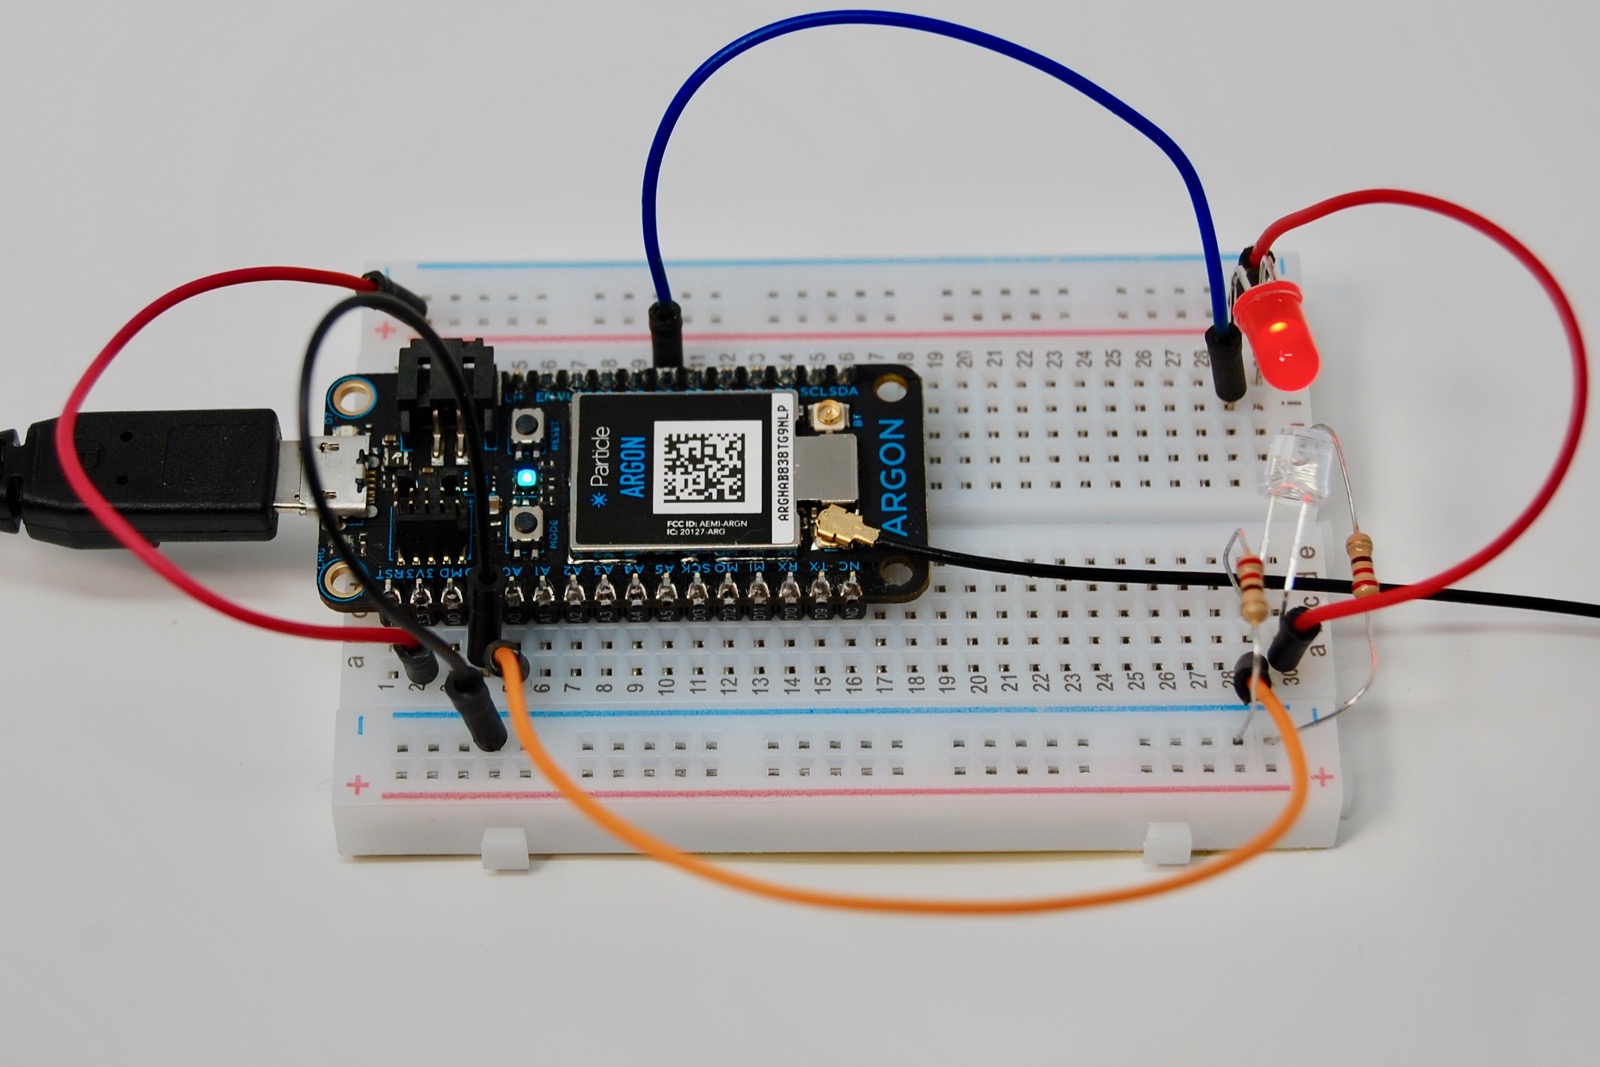
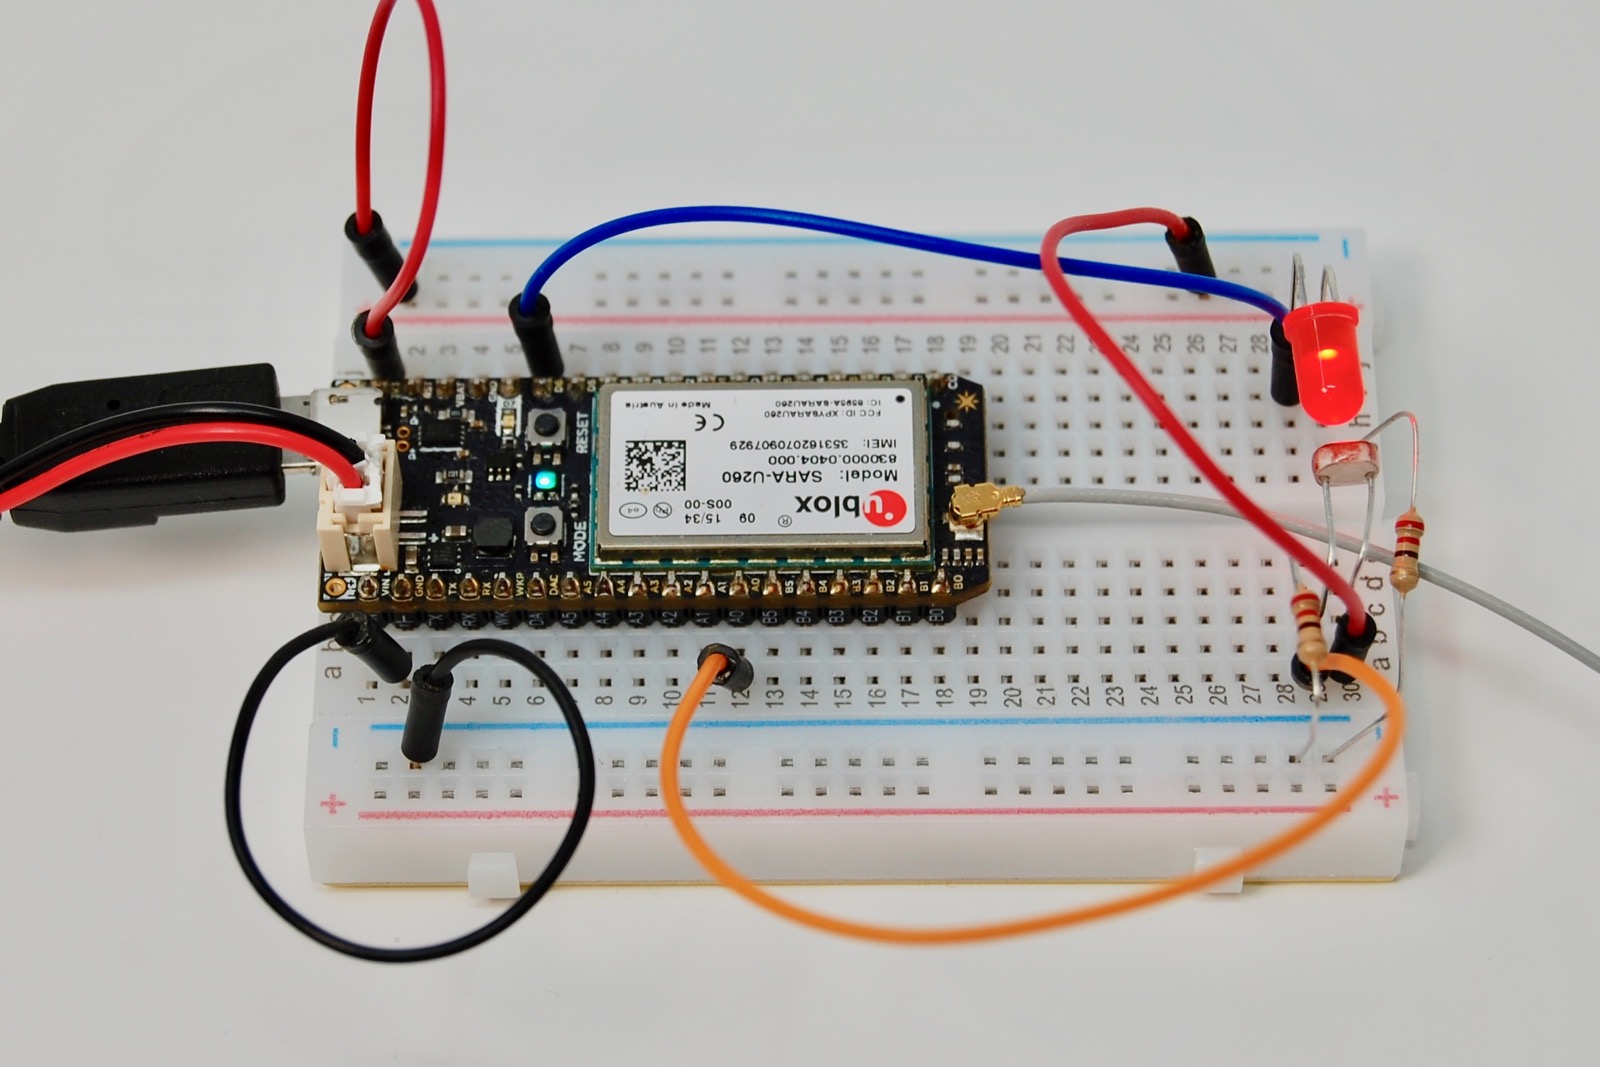
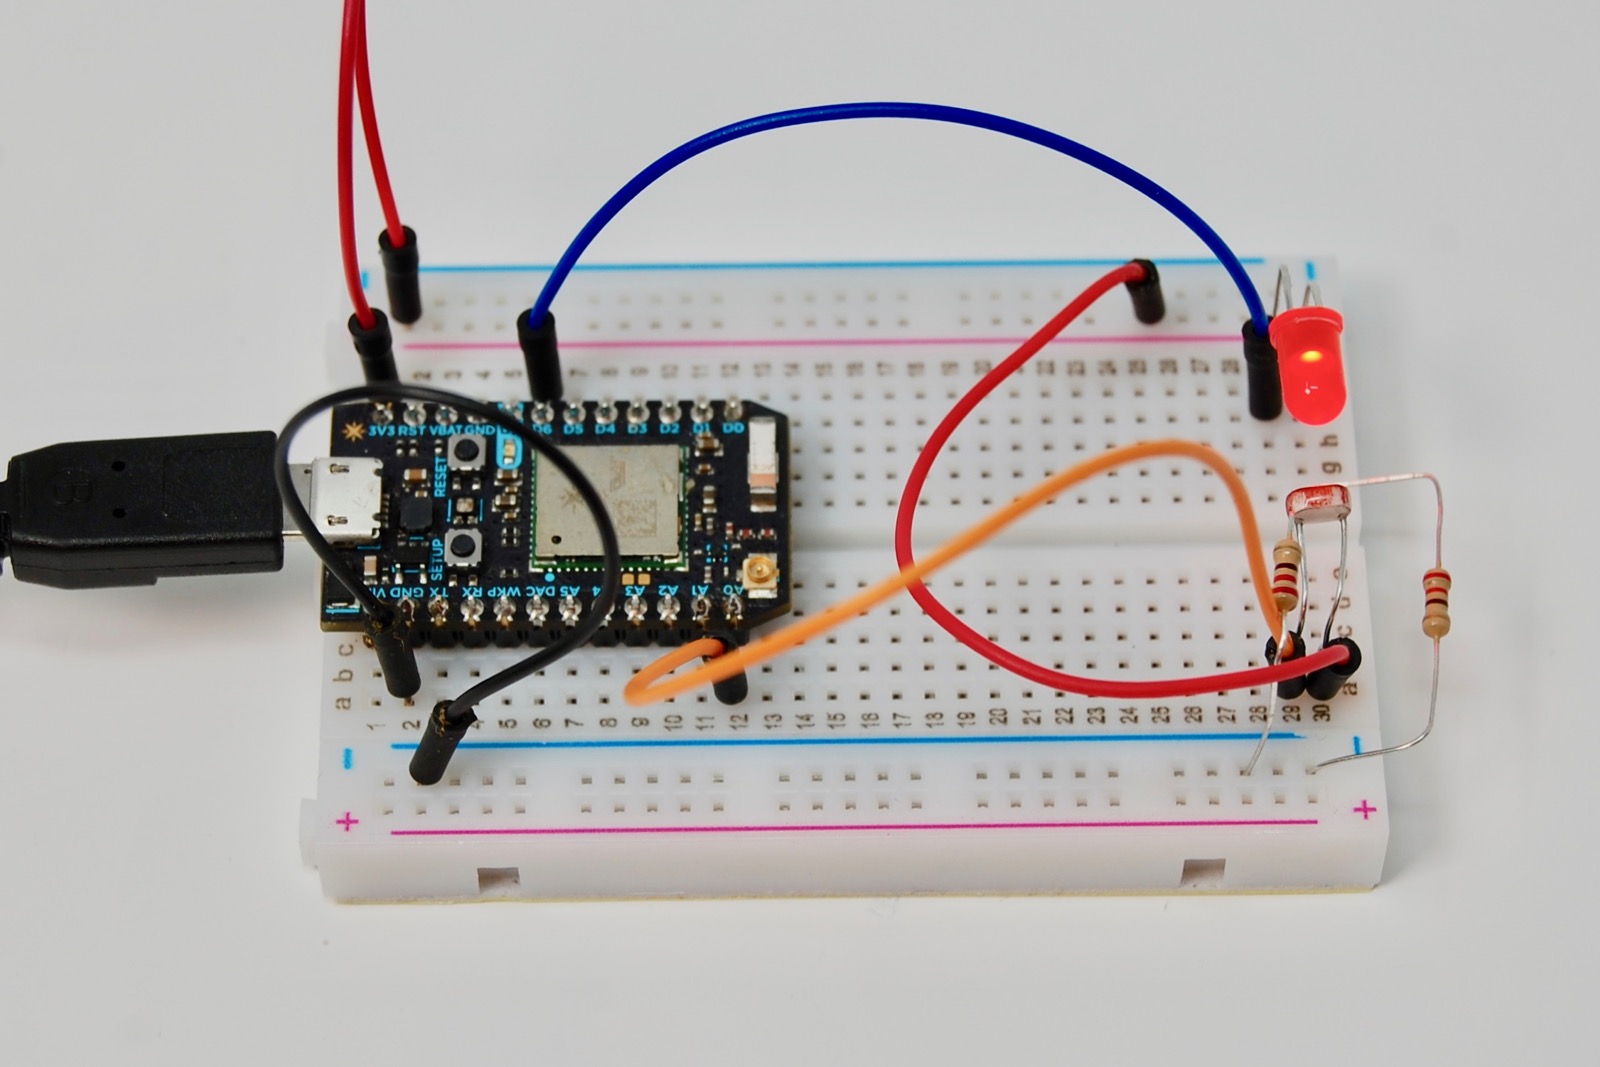
Bend the LED and the photo sensor so that they are pointing at each other. (You want the LED, when turned on, to shine its beam of light directly at the photo sensor.)
Schematics
A schematic diagram is often use to document a circuit. You don't need to understand schematic diagrams, so feel free to skip this section, but they can make it easier to understand a circuit once you know the basics.

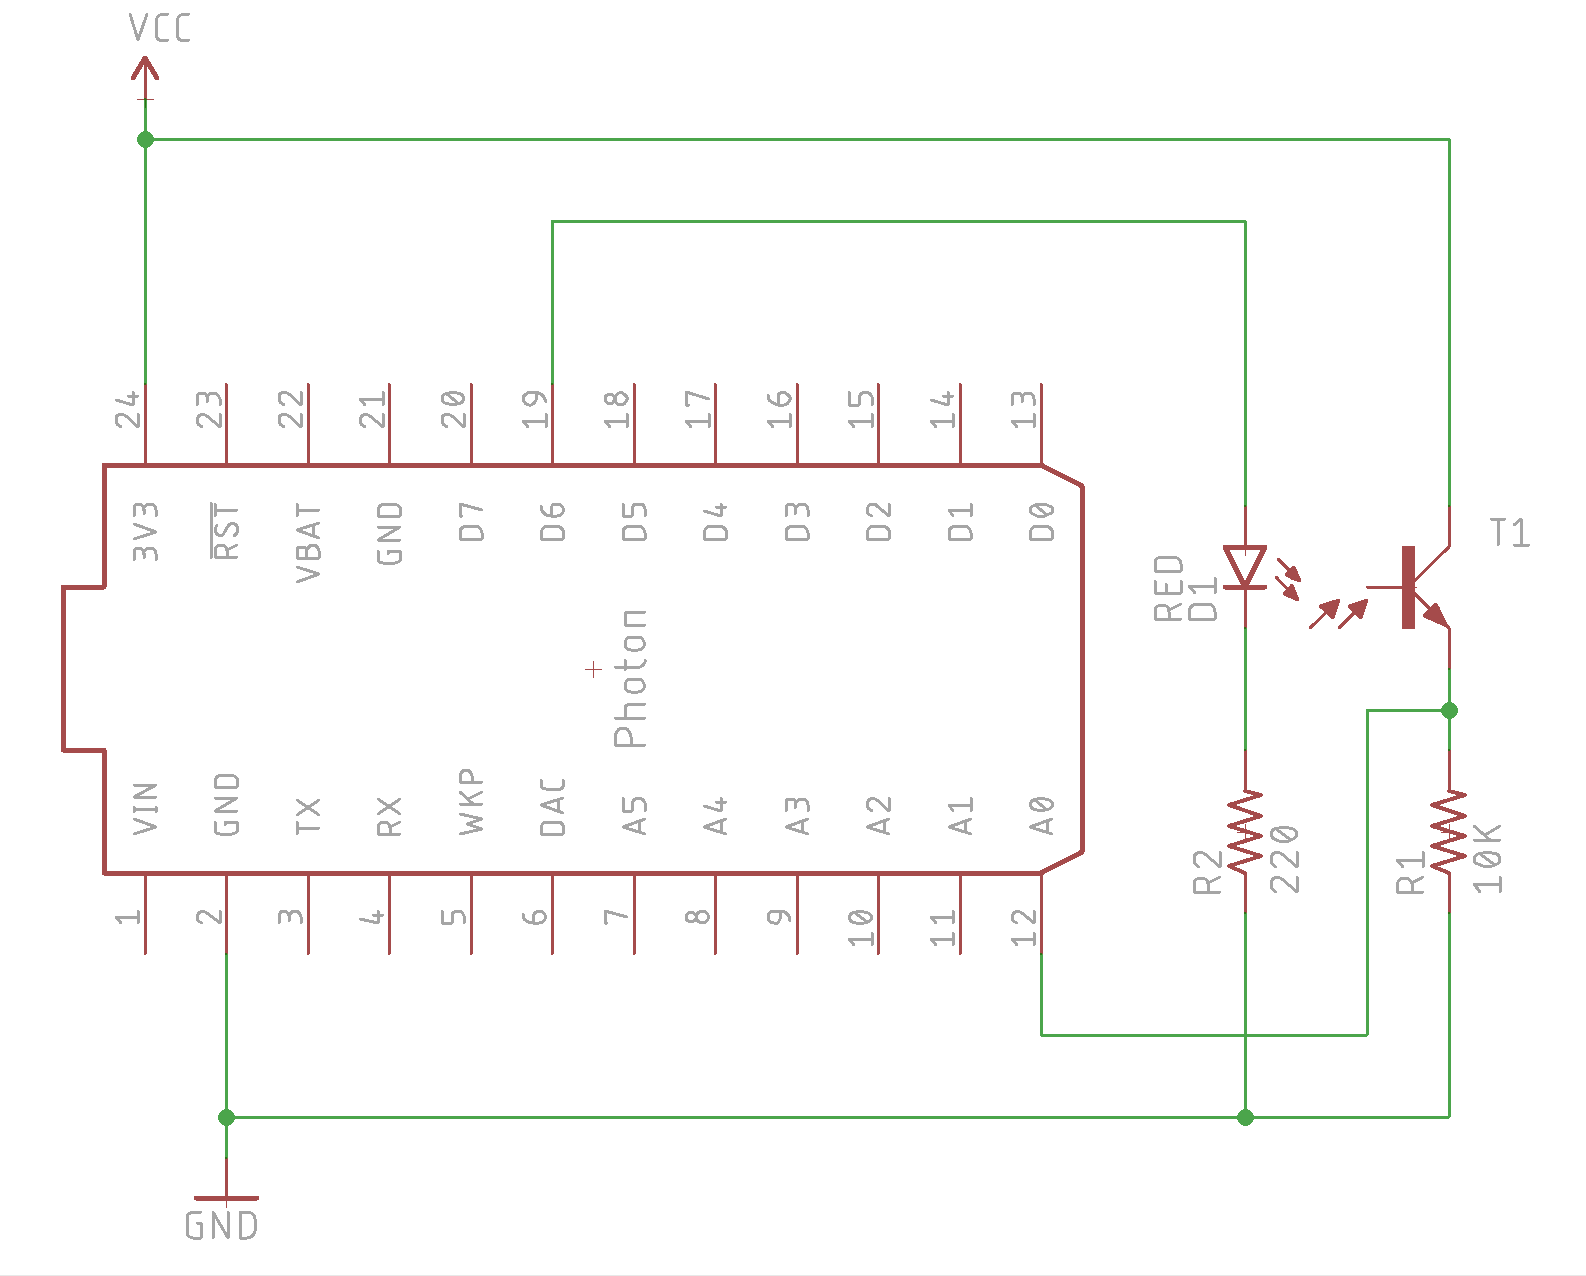
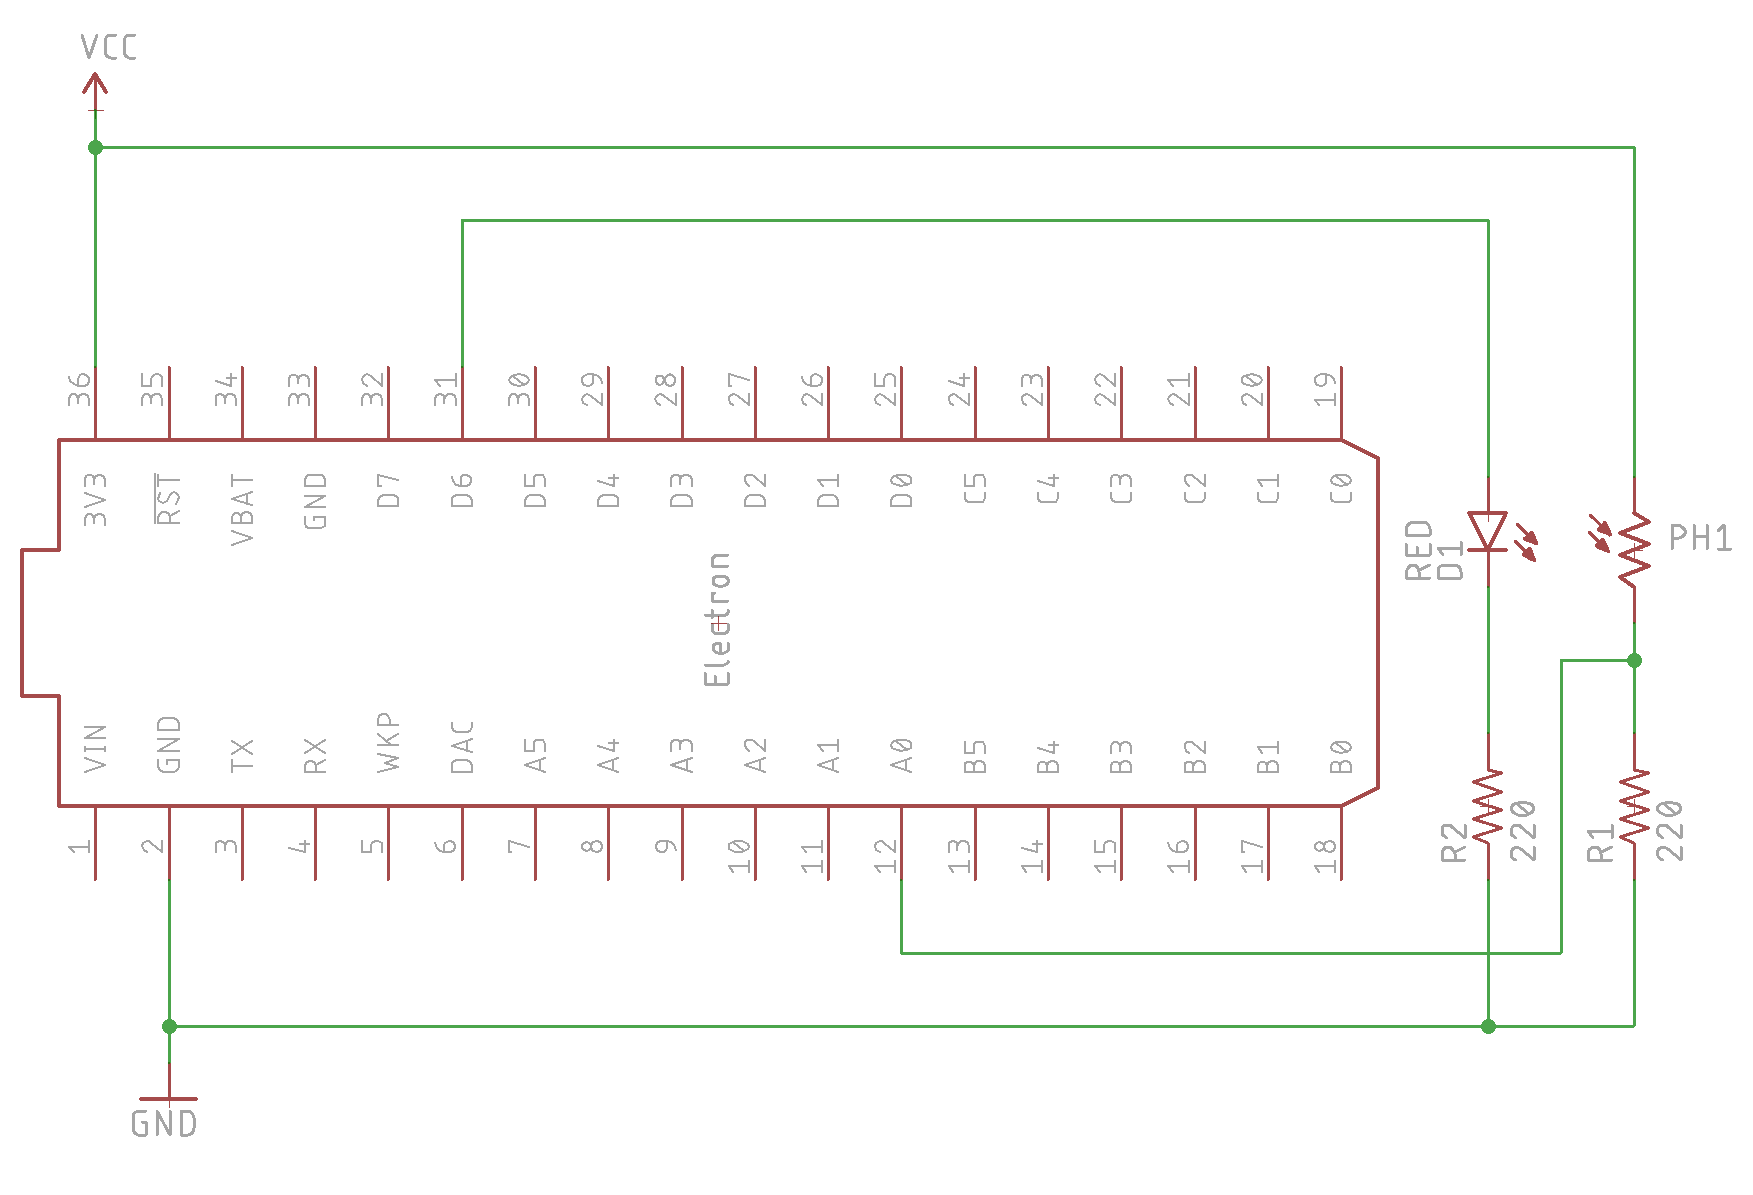
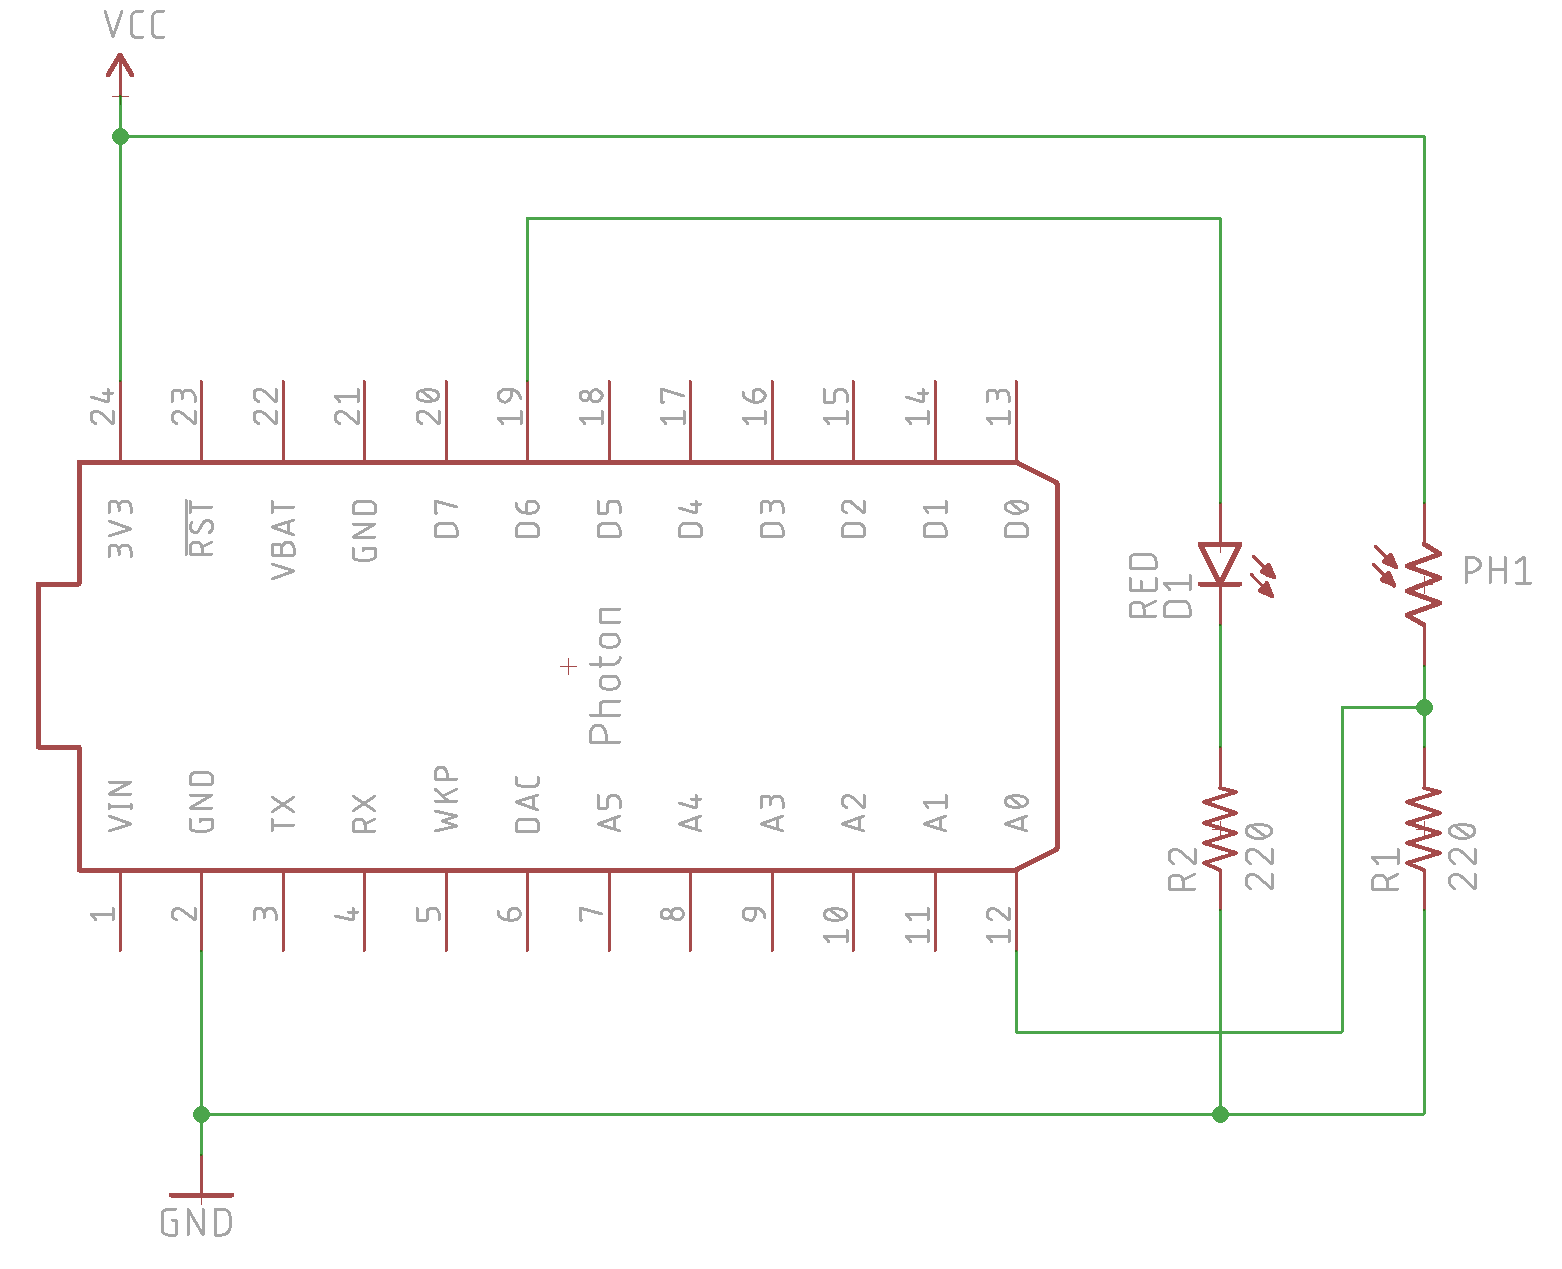
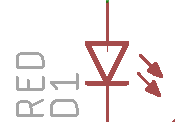
LED
A LED (light emitting diode) produces light.
- The side with bar is the cathode and connects to ground. It's the short lead.
- The side with the triangle is the anode and connects to 3V3/VCC. It's the long lead.
You must always connect an LED using a current-limiting resistor. It can be on either the + or - side.
Resistor

VCC
VCC in this diagram is 3V3 (3.3 volts DC).

GND (Ground)

Lines
The green lines are connections between two pins.
- When the line crosses and there is no dot, then the crossing lines are just passing by each other and are not connected.
- When the line crosses and there's a dot - both lines are connected.

Code
This example can optionally print debugging information (the analog output value) to the USB serial output when your Particle device is connected by USB to your computer. This line in the code enables it:
SerialLogHandler logHandler;
To view the output, the easiest way is to use the Particle CLI and use
particle serial monitor
You can also use dedicated serial terminal programs like screen on Mac and Linux, and PuTTY or CoolTerm on Windows.
In this example we register a variable in setup():
Particle.variable("analogvalue", analogvalue);
You always use Particle.variable from setup(). It registers a variable for later retrieval from the cloud. Any time the cloud
wants the value of the variable, it requests it from the device. This means the device must be online (breathing cyan) in
order to retrieve the value.
| Variable | Publish |
|---|---|
| Cloud requests value | Device publishes value |
| Device must be online to get value | Device can go offline after publishing |
| Data is used when requested | Data is used on every published change |
In loop() we read the analog pin using analogRead().
analogvalue = analogRead(SENSOR_PIN);
We also print this value to the USB serial debug log. In many examples you may see Serial.print() used instead,
but it's good to get into the habit of using Log.info() instead.
Log.info("analogvalue=%d", analogvalue);
Use
You can turn the LED on and off from the console or the CLI, same as before:
particle call device_name led on
and
particle call device_name led off
where device_name is your device ID or device name. If you get an "The access token was not found" error, use particle login to log into your Particle account first.
As for your Particle.variable, the API request will look something like this:
GET /v1/devices/{DEVICE_ID}/analogvalue

# EXAMPLE REQUEST IN TERMINAL
# Core ID is 0123456789abcdef
# Your access token is f8a4d380cb6ffffffffffffffffffaf5e496ddf0c0
curl -G https://api.particle.io/v1/devices/0123456789abcdef/analogvalue \
  -H "Authorization: Bearer f8a4d380cb6ffffffffffffffffffaf5e496ddf0c0"
Replace the access token with a valid access token, such as from particle token create.
You can also check out this value by using the command line. Type:
particle variable get device_name analogvalue
and make sure you replace device_name with either your device ID or the casual nickname you made for your device when you set it up.
Now you can turn your LED on and off and see the values at A0 change based on the phototransistor or photoresistor!
Make a motion detector: publish and the console
Intro
What if we simply want to know that something has happened, without all the information of a variable or all the action of a function? We might have a security system that tells us, "motion was detected!" or a smart washing machine that tells us "your laundry is done!" In that case, we might want to use Particle.publish.
Particle.publish sends a message to the cloud saying that some event has occurred. We're allowed to name that event, set the privacy of that event, and add a little bit of info to go along with the event.
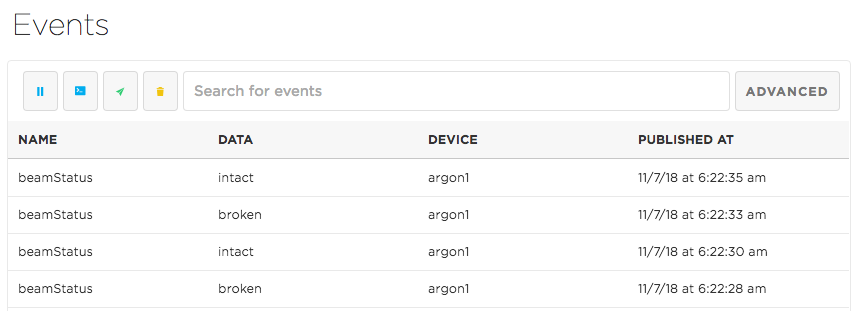
In this example, we've created a system where you turn your LED and photo sensor to face each other, making a beam of light that can be broken by the motion of your finger. Every time the beam is broken or reconnected, your device will send a Particle.publish to the cloud letting it know the state of the beam. Basically, a tripwire!
For your convenience, we've set up a little calibrate function so that your device will work no matter how bright your LED is, or how bright the ambient light may be. Put your finger in the beam when the D7 LED goes on, and hold it in the beam until you see two flashes from the D7 LED. Then take your finger out of the beam. If you mess up, don't worry-- you can just hit "reset" on your device and do it again!
You can check out the results on your console at console.particle.io. As you put your finger in front of the beam, you'll see an event appear that says the beam was broken. When you remove your finger, the event says that the beam is now intact.
Setup
The setup for your breadboard is the same as in the last example.
Code
The buddy system: publish and subscribe
Intro
This example uses two devices claimed to the same account. When the beam is broken on either device, both D7 blue LEDs will light up; when the beam is intact again, both will turn off.
Flash the firmware to your devices. Calibrate your device when it comes online (same as in the previous example).
Setup
The setup for your breadboard is the same as in the last example.
Code
Combined publish
Intro
Every message the Electron sends to or from the Cloud has a certain fixed overhead, so we try to minimize the number of messages that are sent. You can do some optimization in your code, too. If you combine many data points in a single publish message, you'll use less data. We combine the data points into a single string, with commas in between them for easy parsing later.
Setup
You can use the previous circuit, with the photoresistor or phototransistor connected to A0.
Code
If you want to subscribe to these publishes from another Particle device, you can create a handler that splits the data on receipt:
Tinker
Remember back when we were blinking lights and reading sensors with Tinker on the mobile app?
When you tap a pin on the mobile app, it sends a message up to the cloud. Your device is always listening to the cloud and waiting for instructions-- like "write D7 HIGH" or "read the voltage at A0".
Your device already knew how to communicate with the mobile app because of the firmware loaded onto your device as a default. We call this the Tinker firmware. It's just like the user firmware you've been loading onto your device in these examples. It's just that with the Tinker firmware, we've specified special Particle.functions that the mobile app knows and understands.
If your device is new, it already has the Tinker firmware on it.
To reflash Tinker from within the Particle mobile app:
- iOS Users: Tap the list button at the top left. Then tap the arrow next to your desired device and tap the "Re-flash Tinker" button in the pop out menu.
- Android Users: With your desired device selected, tap the options button in the upper right and tap the "Reflash Tinker" option in the drop down menu.
Or from the Particle CLI:
particle flash my-device-name tinker
Once you flash your own firmware to your device it will no longer have Tinker functionality. However you can easily take the Tinker source and add in your own code so it will both have your code and the original Tinker functions you can call from the mobile apps!