Data transformation with Logic
Logic is in open beta. Pricing and availability may change in the future.
One of the feature of Logic is the ability to take events published from a device and transform them before passing them to an external service using a webhook. You might want to do this to expand data to minimize cellular data usage and fit within publish size limits, as demonstrated in this page.
When using this model:
- Your Particle device publishes a product event using
Particle.publish. - Logic receives this event and runs the logic block associated with the event.
- The logic block transforms the data as desired and publishes a transformed event.
- A product webhook receives the transformed event and interacts with an external service.
In this example, a Wi-Fi device (P2, Photon 2, or Argon) queries the nearby networks and passes the information to the Google Geolocation API. This is a good use for data expansion because the Google API uses very verbose key names, and you want to maximize the number of access points for the best possible location results.
The second part of this example shows how to store the last known geolocation coordinates for the device in Ledger.
Sandbox product
In order to use Logic beta, you will need to:
- Create a product for testing in your developer sandbox. There is no additional charge for this.
- Add one or more devices to the product.
Logic can only be used with devices in products; it cannot be used with individual developer devices.
Logic beta cannot be used with organization products at this time.
Device firmware
Device-published events are limited to 1024 bytes, less on some devices and Device OS versions. Additionally, some external services use JSON key names that are very verbose. You can use Logic to change key names, unpack data, or even change the shape of data structures easily.
The device firmware uses WiFi.scan() to scan for nearby Wi-Fi access points, sorts the list (highest strength first), takes the strongest 25 and publishes them as compact JSON data.
While you can use any text-based format for sending data from the device to the cloud, a common choice is JSON. This makes it easy to add new fields later. We recommend using JSONWriter which is easy to use and built into Device OS.
The important part for packing in as much data as possible is to use short JSON key names, such as:
bfor bssid (base station MAC address in hex format)cfor channel number (decimal)rfor RSSI (signal strength, decimal, negative)
writer.beginObject();
writer.name("ap").beginArray();

for(size_t ii = 0; ii < accessPointsCount; ii++) {
    ApInfo* apInfo = accessPoints[ii];

    writer.beginObject();

    writer.name("b").value(apInfo->bssid);
    writer.name("c").value(apInfo->channel);
    writer.name("r").value(apInfo->rssi);

    writer.endObject();
}
writer.endArray();

writer.endObject();
The logic block will expand these key names into the format required by the Google geolocation API.
Logic block
Follow the instructions in Logic for creating an Event triggered function. Logic beta can only be used with your developer sandbox (not organizations) and with product devices.
The following table shows how the data published from the device is converted into the Geolocation API format. Note how much longer then API key names are, especially since the array elements keys are repeated for each access point found.
| Device JSON | Geolocation API | Description |
|---|---|---|
ap |
wifiAccessPoints |
Array of objects |
b |
macAddress |
BSSID MAC address (hex) |
c |
channel |
Channel number (positive number) |
r |
signalStrength |
Signal strength (RSSI, negative number) |
This is an example JSON from a device. The MAC addresses are not real, so you won't be able to obtain a location with this data, but this is what it would look like:
{
  "ap": [
    {
      "b": "3c:37:86:5d:75:d4",
      "r": -35,
      "c": 6
    },
    {
      "b": "94:b4:0f:fd:c1:40",
      "r": -35,
      "c": 11
    }
  ]
}
The logic block transforms the JSON so it looks like this. The considerIp is false as the Geolocation API should not consider the requesting IP address as this will be the Particle webhook server, not the public IP of the Wi-Fi network.
{
  "considerIp": "false",
  "wifiAccessPoints": [
    {
      "macAddress": "3c:37:86:5d:75:d4",
      "signalStrength": -35,
      "channel": 6
    },
    {
      "macAddress": "94:b4:0f:fd:c1:40",
      "signalStrength": -35,
      "channel": 11
    }
  ]
}
This is the code for the logic block.
- It extracts the JSON from the original event into
origData. - It expands the data into
reformattedData. - It publishes it using the new name
wifiScanExpanded.
import Particle from 'particle:core';

export default function process({ functionInfo, trigger, event }) {
  let origData;
  try {
      origData = JSON.parse(event.eventData);
  } catch (err) {
    console.error("Invalid JSON", event.eventData);
    throw err;
  }

  let reformattedData = {
    considerIp: false,
    wifiAccessPoints: [],
  };

  if (Array.isArray(origData.ap)) {
    for(const ap of origData.ap) {
      reformattedData.wifiAccessPoints.push({
        macAddress: ap.b,
        signalStrength: ap.r,
        channel: ap.c,
      });
    }
  }
  console.log('reformattedData', reformattedData);
  Particle.publish('wifiScanExpanded/' + event.deviceId, reformattedData, { productId: event.productId });
}
The published event name is 'wifiScanExpanded/' + event.deviceId because later on we'll need the original Device ID in the response. Since the integration event name is a prefix, it does not care that there are additional characters at the end.
Set the trigger to match your product and the original event name which must match your device code. Note that the trigger for Logic is an exact match, not a prefix match.
| Trigger field | Value |
|---|---|
| Product | Your test product |
| Trigger event name | wifiScan |
Webhook
Logic itself cannot interact with an external web service. It can, however publish a transformed event that triggers a webhook.
- The events published by Logic are not limited to 1024 bytes like a device-published event when not sent to a device.
- Logic can trigger zero or more events from a device-published event.
- Additional events triggered by Logic are not counted as data operations at this time.
The Google Geolocation API requires an API key that goes into the URL of the webhook.
Create a product webhook using Custom JSON. Replace YOUR_API_KEY with your actual API key. Also note that the account must have Geolocation API access enabled, and also have billing enabled, or the request will fail with an 400 error.
{
    "name": "wifiScanExpanded",
    "event": "wifiScanExpanded",
    "url": "https://www.googleapis.com/geolocation/v1/geolocate?key=YOUR_API_KEY",
    "requestType": "POST",
    "noDefaults": true,
    "rejectUnauthorized": true,
    "body": "{{{PARTICLE_EVENT_DATA}}}",
    "responseTopic": "wifiScanResponse",
    "responseTemplate": "{\"eventName\": \"{{PARTICLE_EVENT_NAME}}\",\"ts\": \"{{PARTICLE_PUBLISHED_AT}}\",\"lat\": {{location.lat}},\"lng\": {{location.lng}},\"accuracy\": {{accuracy}}}"
}
Your product event log should look something like this in the console. Make sure you view the product event log, not the sandbox event log, or you will not see the responses.

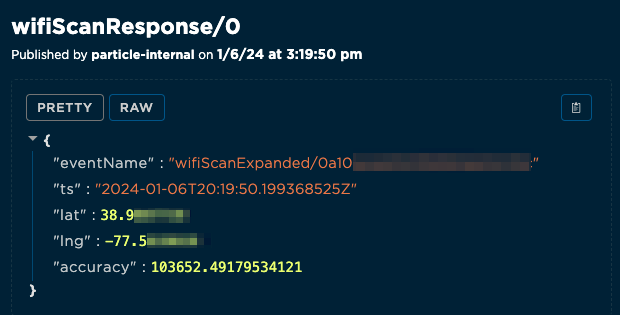
The webhook response will be wifiScanResponse/0 and should look like this:

The response template is discussed in the next sections.
Create ledger
Now we'll go one step farther and store the last known location in Ledger.
In the Ledger icon your sandbox, create a new cloud-only ledger.
| Setting | Value |
|---|---|
| Type | Cloud only |
| Ledger name | device-location |
| Scope | Device |
Make sure you create the ledger before you create the Logic block to write to it, because you won't be able to save the logic block if the ledger doesn't already exist.
The ledger name can be something else, but must match the Particle.ledger call in the logic block below.
Save data to ledger
| Setting | Value |
|---|---|
| Name | wifiScanResponse |
| Product | Your test product |
| Trigger event name | wifiScanResponse/0 |
Set the Javascript to:
import Particle from 'particle:core';

export default function process({ functionInfo, trigger, event }) {
  let origData;
  try {
      origData = JSON.parse(event.eventData);
  } catch (err) {
    console.error("Invalid JSON", event.eventData);
    throw err;
  }

  const deviceId = origData.eventName.split('/')[1];

  const deviceLedger = Particle.ledger("device-location", { deviceId });

  let ledgerValue = {
    ts: origData.ts,
    lat: origData.lat,
    lng: origData.lng,
    accuracy: origData.accuracy
  };

  deviceLedger.set(ledgerValue, Particle.REPLACE);
}
This code first extracts the JSON from the event into origData, as we did before.
When the wifiScanExpanded webhook is published, the device ID of the originating device is appended to the event name. This is necessary because Logic republishes a modified event, so when the webhook is called is Logic not the original Device ID. This code extracts the original device ID from the event name.
const deviceId = origData.eventName.split('/')[1];
It then gets the ledger for this device.
const deviceLedger = Particle.ledger("device-location", { deviceId });
And stores the data into the Ledger.
let ledgerValue = {
    ts: origData.ts,
    lat: origData.lat,
    lng: origData.lng,
    accuracy: origData.accuracy
};

deviceLedger.set(ledgerValue, Particle.REPLACE);
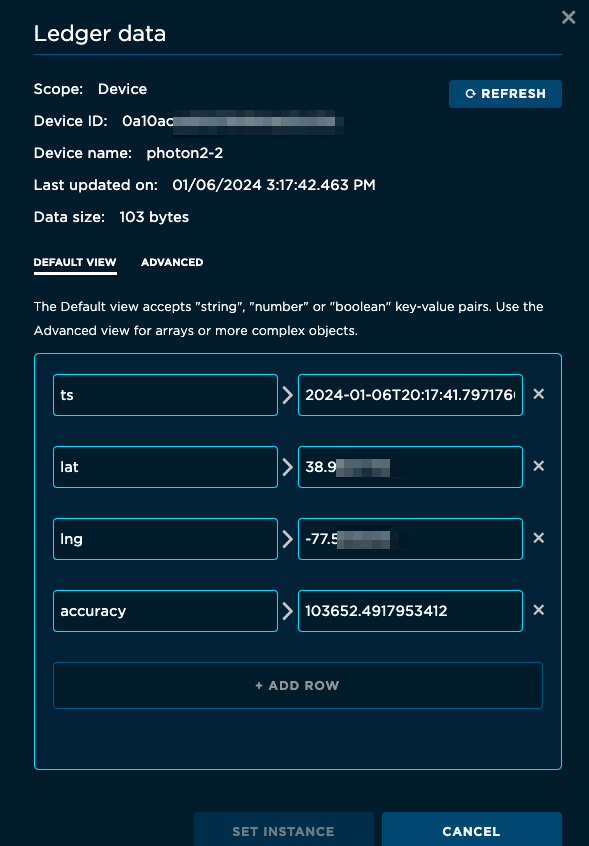
If you view the ledger, you'll be able to see the last known location of the device.

