
Logic
Logic Functions are bits of Javascript code that get called in response to a Logic Trigger, which can be:
- A Particle event, generated by a device, Particle cloud API, or webhook response
- A scheduled, periodic time event ("cron")
Logic Functions run in the cloud and are designed to perform short-running calculations such as:
- Generation of new event (which might be subscribed to by a device, or trigger an integration)
- Storing data in the Ledger database (in the future)
In particular, Logic Functions consist only of calculations, conditional logic, etc.. Logic Functions cannot directly interact with the outside world (such by REST APIs), and do not maintain state across invocations of the Logic Function.
Logic Functions can, however, trigger an integration (webhook), and also respond to the results from a webhook.
- Logic Functions are available in the both developer sandbox and the organization level
- Maximum number of Logic Functions per sandbox or organization: 20
- Maximum number of triggers per Logic Function: 5
- Run logs per function retained: 100
- Maximum logic run execution time: 30 seconds
A companion feature, Ledger, allows data to be stored in the cloud and synchronized with devices.
Common use cases
Data transformation
Events to and from devices have a limited size (typically 1024 bytes). Using Logic you can transform data that has been abbreviated or compressed, expanding it and passing it to a webhook. The communication between logic and a webhook is not limited by the 1024 byte event size limitation, making it ideal for expanding compressed data.
While a webhook hook-response cannot trigger another webhook, it can trigger a logic block. This allows much more complex processing of the data coming from a web service than is possible using mustache variables in your hook response template.
There are several use-cases for data transformation:
- Cloud protocol translation
- Moving business logic from firmware to the cloud
- Alerting on abnormal conditions (using an external service)
In addition to bypassing event size limitations, logic events do not currently count as an additional data operations, however a triggering event from a device or hook-response does still count.
Console interface
The Logic feature is typically accessed from the Particle console. It is also possible to access it from the Particle Cloud API, and there will be support for creating Logic Functions in a future version of the Particle CLI.
In the developer sandbox in the console, select the Logic icon.
Logic templates
Using a template is the easiest way to get started:
- Decode Base64: Decode an event data payload that is encoded using Base64 back into a byte array.
- Decode Base85: Decode an event data payload that is encoded using Base85 back into a byte array.
- Reformat JSON data: Reformat and add fields to a JSON event to make it compatible with an external service.
To create a Logic Function from scratch, select the template that matches the type of trigger you want:
- Event-triggered function: Start with a blank Logic Function that triggers from an event.
- Scheduled function: Start with a blank Logic Function that triggers on a schedule.
Creating a Logic Function from a template
Using a template is a three step process:
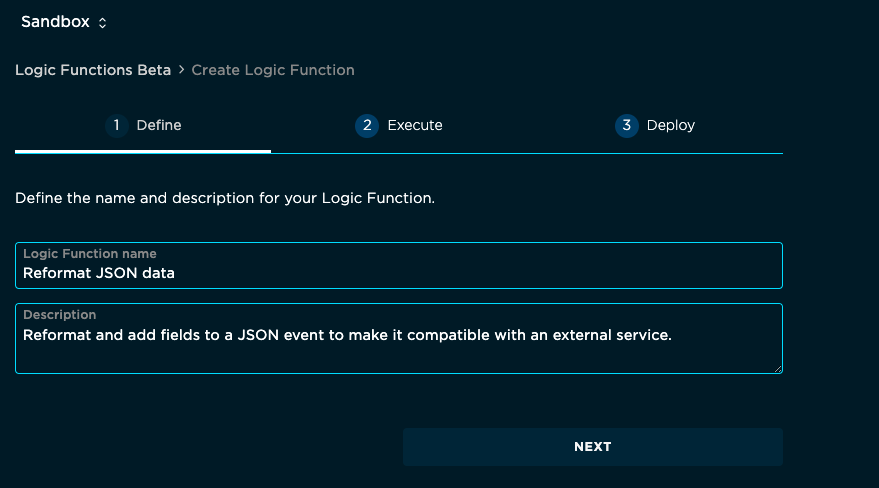
- Define: Set name and description
- Execute: Update the Javascript and test
- Deploy: Set triggers and enable to run in the cloud
Define Logic Function
The name must be unique across Logic Functions in your sandbox or organization.
The description is for your use to help remember how you are using the Logic Function.
Cloud secrets
The cloud secrets feature allows you to:
- Securely store secret data like passwords, API keys, and authorization tokens for external services.
- Share secrets across integrations and Logic.
- Prevent even authorized users from viewing the secrets once created.
- Updating a secret immediately takes effect in all things that use it.

Clicking click here to create a new secret will open a new browser tab to allow you to create a new cloud secret. Once you've created it, you can switch back to the Logic tab and it will be immediately available to use.
You can select zero or more secrets to be made available to your logic block.
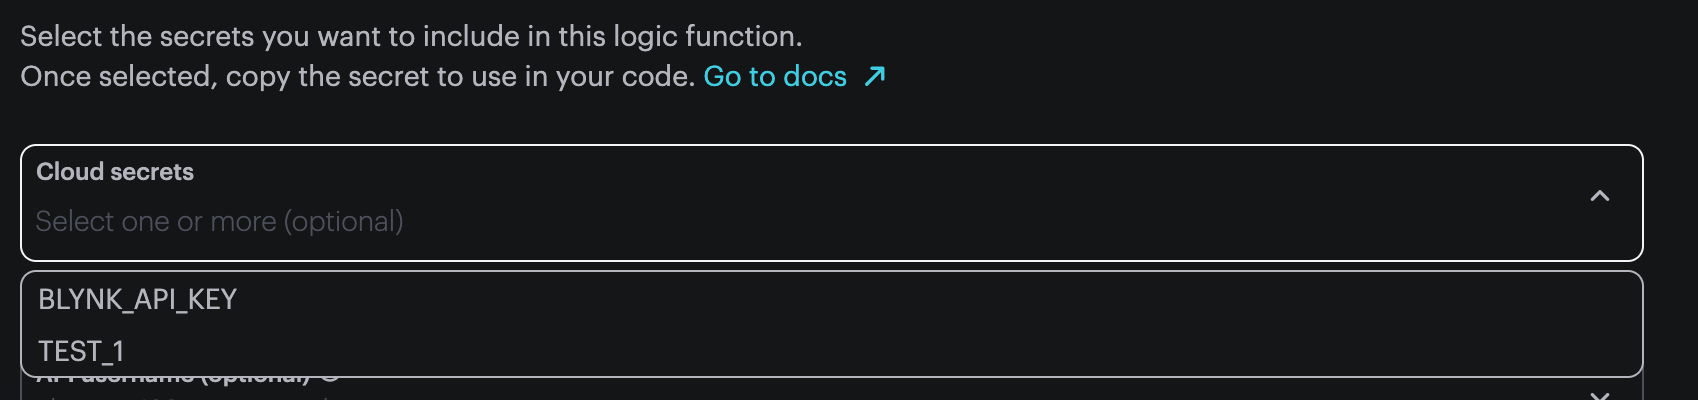
If you select TEST_1, it will be available as the Javascript variable secrets.TEST_1 in your logic block.

Make sure to include the secrets argument to your Logic Function.
export default function process({ event, secrets }) {
  // use secrets.TEST_1 here
}
The same secret can be shared by multiple logic blocks and integrations. Editing the secret value will cause the new value to be used in all locations. Since cloud secrets are scoped to your sandbox or organization, they can be shared across multiple product integrations as well.
Cloud secrets used from logic blocks will be hidden from the logs. For example, if you use console.log to attempt to print the secret, the log will instead contain [[SENSITIVE]].
For more information, see cloud secrets.
Execute Logic Function
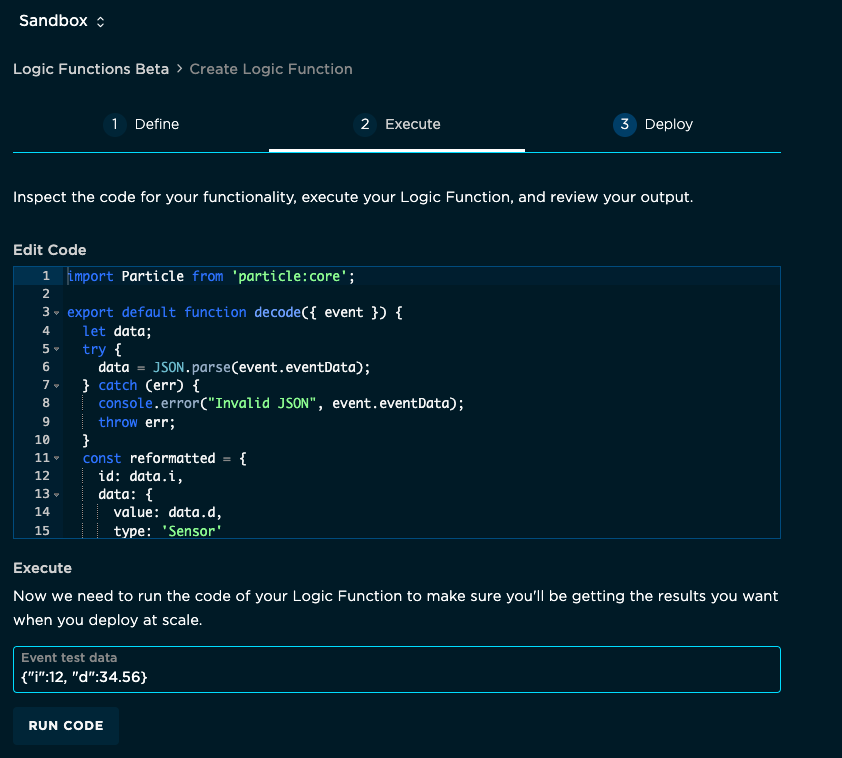
Executing a Logic Function performs operations such as publishing an event. When Ledger is available, you will be able to write to your Ledger database from your Logic Function.
This is the sample code generated in the template, it will be explained in more detail below.
import Particle from 'particle:core';

export default function reformat({ event }) {
  let data;
  try {
      data = JSON.parse(event.eventData);
  } catch (err) {
    console.error("Invalid JSON", event.eventData);
    throw err;
  }
  const reformatted = {
    id: data.i,
    data: {
      value: data.d,
      type: 'Sensor'
    }
  };
  Particle.publish("data-reformatted", reformatted, { productId: event.productId });
}
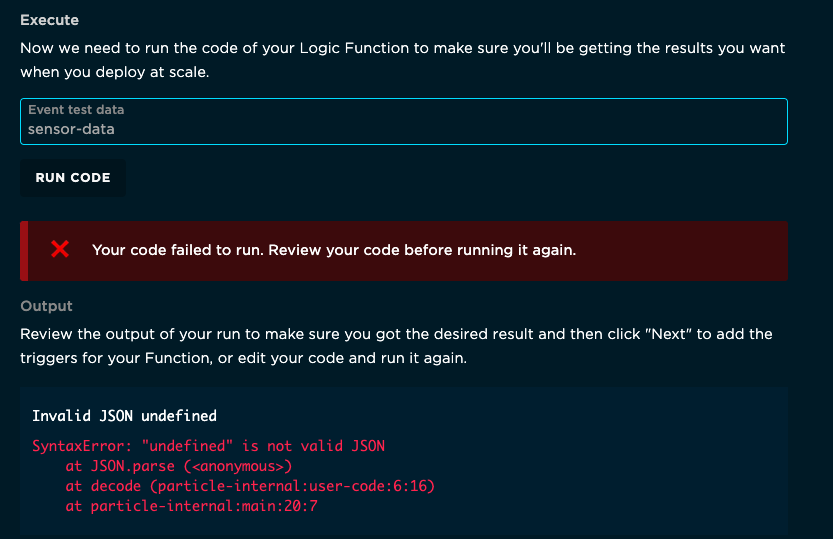
The next part of interest is the Event Test Data. The field is initially empty and says Sensor Data but if you are transforming JSON, you will typically enter sample data that your device would normally publish. For example:
{"i":12, "d":34.56}
You'll enter the event name in the next step.
Finally, click the Run Code button.
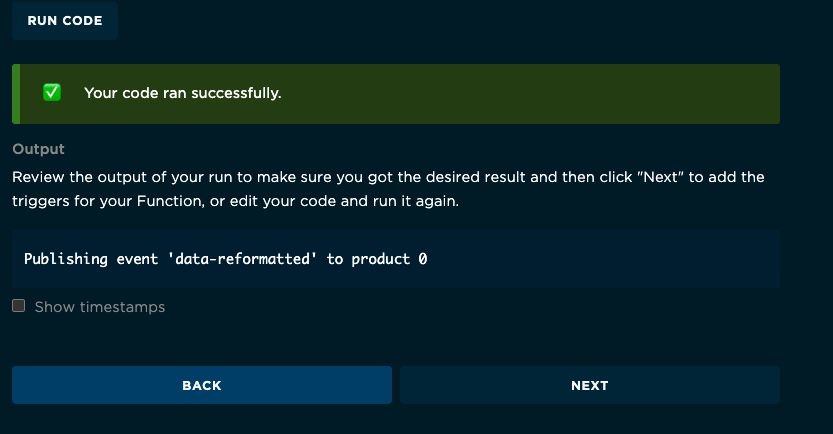
If you have an error in your Javascript code, or in the event data, you will get an error message instead.
Deploy Logic Function
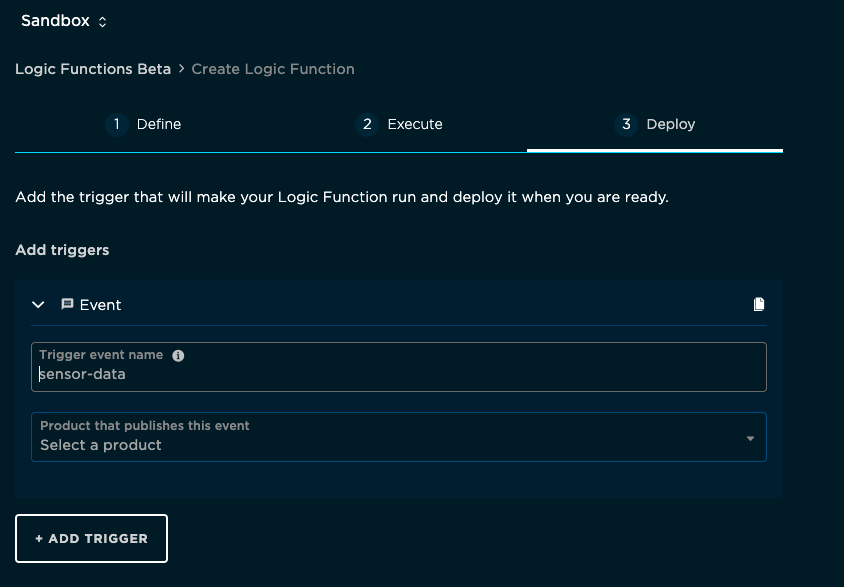
For an event triggered Logic Function, this is where you enter the Trigger event name. Unlike an integration, a Logic Function event name trigger is an exact match, not a prefix match.
You must specify a product to associate the Logic Function with! Logic Functions only work with product devices, not sandbox devices.
If you add multiple triggers, if any of the triggers occurs, the Logic Function will be called. Each function can have up to 5 triggers.
One use case of this is if you have two products, one for the bsom and one for the b5som, but you want to use the same Logic Functions
for both. If you need to figure out which product triggered the event, use event.productId which contains the numeric product ID
that triggered the event.
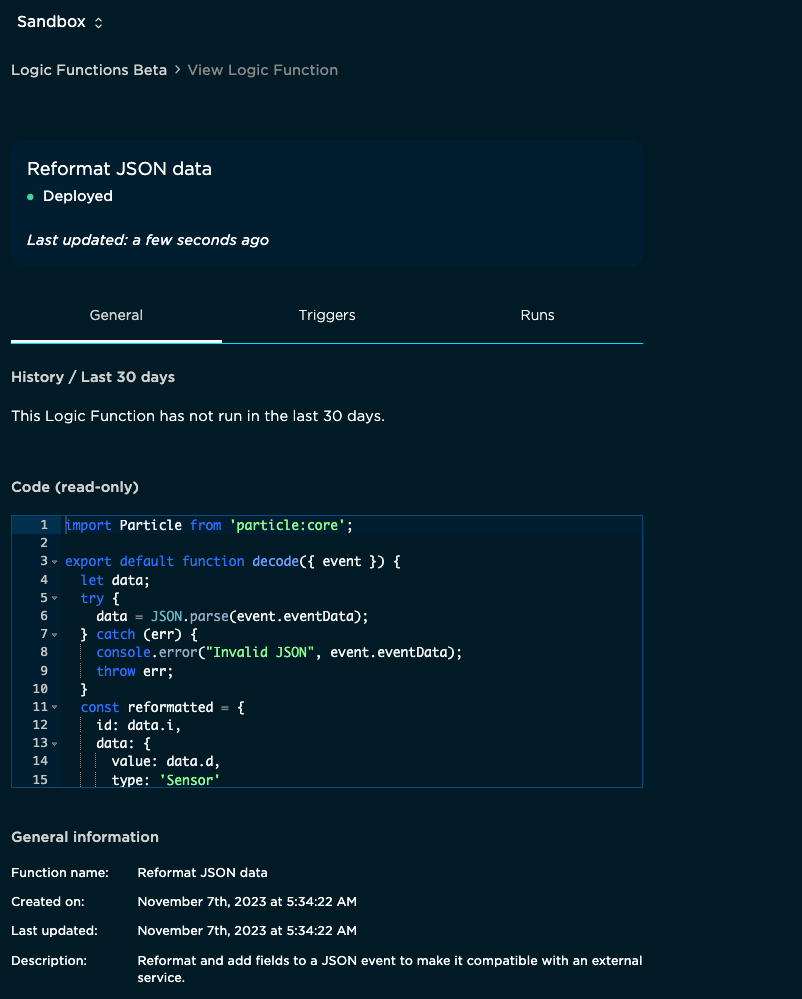
When you've successfully deployed the Logic Function:
Testing from console
Since Logic Functions only work with products:
- From the Products icon in your developer sandbox, open the product that you associated your Logic Function with.
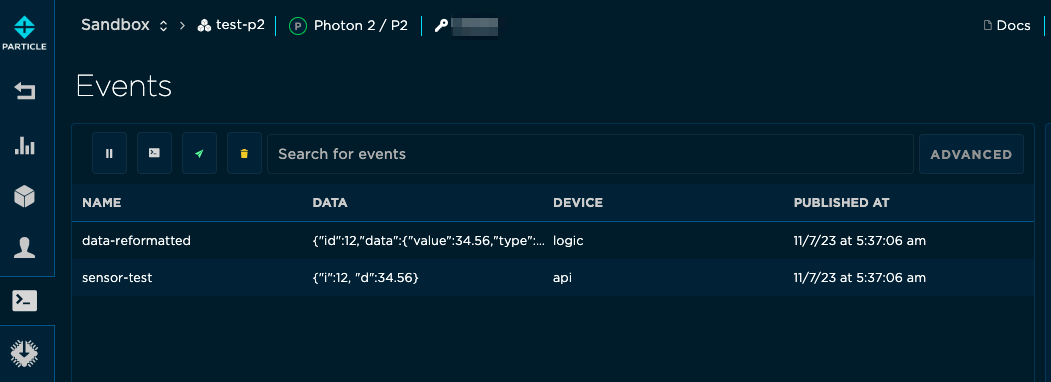
- Click on the Events icon within your product.
- Click on the Publish an event icon near the top, to the left of Search for events.
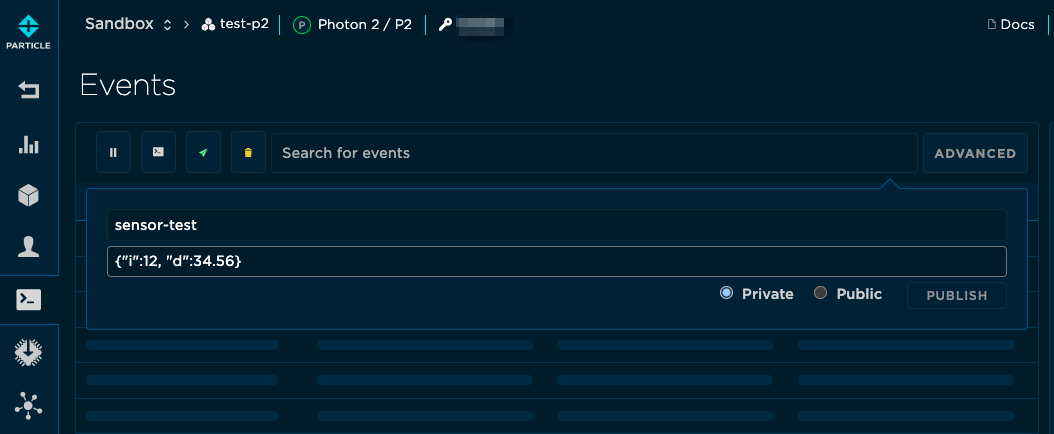
- For Event name enter the event name you entered in the Deploy step above.
- For Event data enter the test JSON data. For example:
{"i":12, "d":34.56}
Click the Publish button and you should see both the sensor-test event and the data-reformatted event!
Testing from the Particle CLI
You can publish events using the Particle CLI for testing, but remember to pass the product number, since Logic Functions only work with product devices.
% particle publish --product 1234 'sensor-test' '{"i":12, "d":34.56}'
Published private event: sensor-test to product: 1234
Testing from a device
Of course the real application for this is having a device publish the data.
- The JSON documentation is a good place for a background in JSON.
- JSONWriter is a good way to generate JSON on device.
- Particle.publish from device firmware to publish an event.
For example:
char buf[particle::protocol::MAX_EVENT_DATA_LENGTH + 1];
memset(buf, 0, sizeof(buf));
JSONBufferWriter writer(buf, sizeof(buf) - 1);

writer.beginObject();
    writer.name("d").value(sensorData);
    writer.name("i").value(sensorId);
writer.endObject();

Particle.publish("sensor-test", buf);
Remember that Logic Functions only work with product devices. The devices can be product developer devices (or not) and can be claimed or unclaimed.
Implementing webhook response handlers
There are a few options to must set to handle a webhook response from Logic.
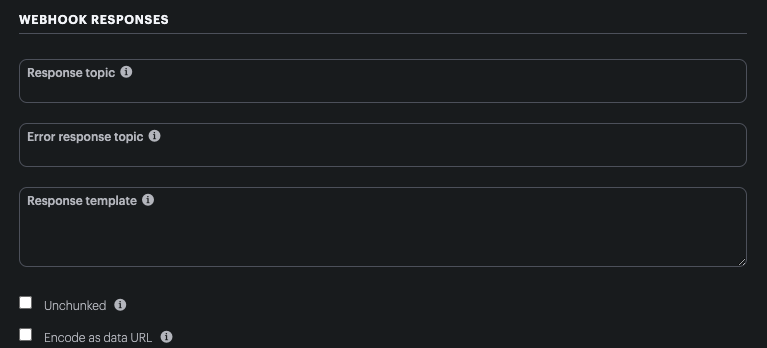
Response Topic
This setting determines the name of the event that is published containing the response from the webhook.
You will need to make sure the Response topic does not embed the publishing device Device ID in the topic as you want a single logic block to be used for all devices.
hook-response/{{PARTICLE_EVENT_NAME}}
responseTemplate
You will typically want to pass the entire response to Logic, so you can leave this field blank.
Unchunked
Webhook responses to devices are split into 512 byte chunks before sending to devices.
Logic, however, can accept large publishes up to 100 Kbytes, and you should check the Unchunked
option in the webhook as this not only prevents chucking, but prevents adding a sequence number
such as /0, /1, etc. to the end of the event name.
Since Logic requires an exact match of the event name, the sequence numbers can be problematic.
Encode as data URL
Normally webhook responses are limited to UTF-8 text data due to how events are processed by publish and subscribe.
If your response is JSON, you should leave this checkbox unchecked.
However, if your server is returning binary data, you should check the Encode as data URL checkbox.
Say you have this binary data returned from your webhook:
0000: a7 22 98 1c 40 1b 9b 80 bb 9d d9 c0 13 bb 4e d0   |  "  @         N
0010: a3 c0 ae 81 c5 93 91 2a 83 8e 69 27 b0 c6 17 26   |        *  i'   &
0020: 85 93 b7 a6 f5 69 c0 4c 9e 3d 53 49 b5 47 f0 44   |      i L =SI G D
0030: 26 9b 8a 1d e4 bc 73 f9 4d a4 e8 34 c2 56 17 c9   | &     s M  4 V
This is encoded in the Data URL format, which looks like this:
data:application/octet-stream;base64,pyKYHEAbm4C7ndnAE7tO0KPAroHFk5Eqg45pJ7DGFyaFk7em9WnATJ49U0m1R/BEJpuKHeS8c/lNpOg0wlYXyQ==
The dataUrlDecode function, below, can be used to decode the Base 64 encoding to return
an array of bytes, as well as extract the content-type, from your Logic block.
Scheduled events
When using the scheduled event template, the following code is provided to start:
import Particle from 'particle:core';

export default function job({ functionInfo, trigger, scheduled }) {
  // Add your code here
}
Cron syntax
In the Deploy step of creating a scheduled event, you enter the schedule in cron format.
When scheduling events, cron syntax is used. A chron schedule consists of 4 or 5 space-separated fields for:
| Field | Range |
|---|---|
| minute | 0 - 59 |
| hour | 0 - 23 |
| day of month | 1 - 31 |
| month | 1 - 12 |
| day of week | 0 = Sunday, 1 = Monday, ..., 6 = Saturday (optional) |
Additionally, three special characters are allowed:
| Character | Meaning |
|---|---|
* |
All (wildcard) |
, |
List of options (any of the list) |
- |
Range (inclusive) |
This most easily illustrated by examples:
| Example | Description |
|---|---|
* * * * |
Once per minute |
0 * * * * |
Every hour at minute = 0 |
0,30 * * * * |
Every half hour (at minute = 0 and minute = 30) |
0 4 * * * |
Every day at 4:00 UTC (minute = 0, hour = 4) |
0 4,8,12,16 * * * |
Every day at 4:00, 8:00, 12:00, at 16:00 UTC |
0 4 * * 1-5 |
Every weekday at 4:00 UTC (minute = 0, hour = 4, day of week = 1 - 5 or Monday - Friday |
You cannot schedule an Logic Function to execute more than one time per minute. This only applies to cron scheduled functions; event triggered functions will be called as often as necessary based on the events that are received by the cloud.
Logic Function coding
The Logic Function code is Javascript. You can use built-in language features such as:
- calculations
- if blocks
- for and while loops
- functions
- JSON features like
JSON.parse()andJSON.stringify() - Standard built-in objects like
MathandString console.log(useful for debugging, as the run logs include this log output)- Particle Logic core API (below)
- Particle encoding API (below)
- Vendor packages (below)
This list is not complete! If it's a standard Javascript function it may work and you should just try it. It only takes a few seconds to edit and test from the console.
You cannot use features such as:
- functions implemented in external packages (no package.json)
- network access (access to external APIs using things like fetch or axios)
- long running operations (limit is 20 seconds)
- asynchronous features like async/await, promises, etc.
- browser features like the DOM
- node.js features like Buffer, the file API, etc.
Deep dive into the reformat JSON template
Every template has one or more import statement to make certain features available to your Logic Function. The Particle class from particle:core contains the Particle.publish call that you will frequently use.
import Particle from 'particle:core';
You must define a function to be called to implement the Logic Function. The JSON example uses this declaration, but you may have a comma-separated list of other parameters in some cases.
The function can have any name as long as its declared with export default function.
export default function reformat({ event }) {
This bit of code transforms event.eventData, which is a string, into a JSON object. It includes some error checking, but even if you didn't handle the exception
using a try/catch block, the exception would still be caught and displayed in the run logs for your Logic Function.
  let data;
  try {
      data = JSON.parse(event.eventData);
  } catch (err) {
    console.error("Invalid JSON", event.eventData);
    throw err;
  }
Here's where a new object is created based on the original event JSON.
  const reformatted = {
    id: data.i,
    data: {
      value: data.d,
      type: 'Sensor'
    }
  };
In addition to simply changing the "shape" of the object (key names, embedded objects, etc.), you can also perform calculations. For example, this makes the reformatted
data.d value the square of the original value using the Javascript Math.pow() (power) method.
  const reformatted = {
    id: data.i,
    data: {
      value: Math.pow(data.d, 2),
      type: 'Sensor'
    }
  };
And, finally, the reformatted object is published. The options (last parameter) specify that the event goes out to the same product that the event came from.
  Particle.publish("data-reformatted", reformatted, { productId: event.productId });
}
Particle Logic core API
To use the Particle Logic core API this line is added automatically when using a template:
import Particle from 'particle:core';
Particle.publish
Publishes an event to the Particle cloud. This event can be subscribed to on-device or be used to trigger a webhook.
// PROTOTYPE
export function publish(name: string, data: any | undefined, options: { productId: number, asDeviceId: string }): null;
nameThe name of the eventdataThe particle publish data. This can be a string or an object. If an object, it will be serialized to JSON usingJSON.stringify.optionsproductIdThe event will be sent on this product event streamasDeviceId(optional) If provided, the event will be published as if it came from this device.
When triggering from an event, you will typically publish the event to the same product:
Particle.publish("data-reformatted", reformatted, { productId: event.productId });
When triggering on a schedule, you need to specify which product to send the event to.
A Logic Function can publish more than one event if desired, and is not limited to the once per second average that devices are. However if you are publishing events that devices are subscribed to, you should limit the size and number of events published to devices, as the device will drop events that it is unable to process.
When publishing to a webhook, the data can exceed the normal 1024 bytes event size limit. When sending to a device, however, you must still limit the size of the event data. Events published by Logic do not currently count against your data operations usage.
ParticleApiResponse
The calls below all return a promise for this object containing the status code (success is typically 200), and data as determined by the API.
export interface ParticleApiResponse {
    status: number;
    body: Record<string, any>;
}
listDevices - core API
This calls list devices in a product from Logic.
export interface ListDeviceOptions {
    groups?: string[];
    sortAttr?: 'deviceId' | 'firmwareVersion' | 'lastHeard' | 'deviceName';
    sortDir?: 'asc' | 'desc';
    page?: number;
    perPage?: number;
}

export function listDevices(productIdOrSlug: string | number, options?: ListDeviceOptions): Promise<ParticleApiResponse>;
getDevice - core API
This calls get device from Logic.
export function getDevice(deviceId: string): Promise<ParticleApiResponse>;
getLastDeviceVitals - core API
This calls get last known device vitals for a device from Logic.
export function getLastDeviceVitals(deviceId: string): Promise<ParticleApiResponse>;
GetDeviceLocationOptions - core API
This object specifies options for getDeviceLocation():
dateRangeStart and end date in ISO-8601 format, separated by comma, to query. Omitting date_range will return last known location. (optional)rectBlBottom left of the rectangular bounding box to query. Latitude and longitude separated by comma. (optional)rectTrTop right of the rectangular bounding box to query. Latitude and longitude separated by comma. (optional)
export interface GetDeviceLocationOptions {
    dateRange?: string,
    rectBl?: string,
    rectTr?: string,
}
getDeviceLocation - core API
This calls get location for device in a product.
export function getDeviceLocation(productIdOrSlug: string | number, deviceId: string, options?: GetDeviceLocationOptions): Promise<ParticleApiResponse>;
listIntegrations - core API
This calls list integrations from Logic.
export function listIntegrations(productIdOrSlug: string | number): Promise<ParticleApiResponse>;
getIntegration - core API
This calls get integration from Logic.
export function getIntegration(productIdOrSlug: string | number, integrationId: string): Promise<ParticleApiResponse>;
integrationsMetrics - core API
This calls get integration metrics with the specific options.
export interface IntegrationsMetricsOptions {
    startDate?: string;
    endDate?: string;
    bucketSize?: number;
    productFw?: number;
    deviceOsVersion?: string,
    deviceGroup?: string
}

export function integrationsMetrics(productIdOrSlug: string | number, options?: IntegrationsMetricsOptions): Promise<ParticleApiResponse>;
listProducts - core API
This calls list products from Logic.
export function listProducts(): Promise<ParticleApiResponse>;
listUserProducts - core API
This calls list user products from Logic.
export function listUserProducts(): Promise<ParticleApiResponse>;
listOrgProducts - core API
This calls list org products from Logic.
export function listOrgProducts(orgIdOrSlug: string): Promise<ParticleApiResponse>;
getProduct - core API
This calls get product to get information about a product from Logic.
export function getProduct(productIdOrSlug: string | number): Promise<ParticleApiResponse>;
getOrgProduct - core API
This calls get org product to get information about an organization product from Logic.
export function getOrgProduct(orgIdOrSlug: string, productIdOrSlug: string | number): Promise<ParticleApiResponse>;
Using Ledger from Logic
Particle.ledger
The Ledger is available to Logic functions in the Particle core library:
import Particle from 'particle:core';

export default function myLogicFunction() {
  const productLedger = Particle.ledger("product-settings", { productId: 1234 });
  const deviceLedger = Particle.ledger("device-settings", { deviceId: '001122...' });
  const ownerLedger = Particle.ledger("owner-settings");
}
If you are handling an event, you don't need to specify the product ID or device ID, as this is known and available in the event (event.productId and event.deviceId).
import Particle from 'particle:core';

export default function myLogicFunction({ event }) {
  const productLedger = Particle.ledger("product-settings");
  const deviceLedger = Particle.ledger("device-settings");
}
Getting a ledger value
Once you have a Ledger object, call deviceLedger.get() on it to retrieve the current data.
Ledger get() returns an object with updatedAt for when the Ledger was last updated and data containing the Ledger data.
If the Ledger name doesn’t exist, Ledger get() will throw an error.
If there is no data for this device, product, or owner, Ledger get() will return an object without updatedAt and an empty object in data.
import Particle from 'particle:core';

export default function myLogicFunction({ event }) {
  const productLedger = Particle.ledger("product-settings");
  const deviceLedger = Particle.ledger("device-settings");

  const productDefaults = productLedger.get();
  const deviceOverride = deviceLedger.get();

  // Use data from device Ledger if available, otherwise use product value.
  // In this example, the data field is called threshold
  const threshold = deviceOverride.data.threshold || productDefaults.data.threshold;
  if (!threshold) {
    throw new Error("No threshold set for this device or product");
  }
  // Do something with threshold
}
Another example of getting ledger data:
const thresholds = Particle.ledger("thresholds", { productId: 1234 });
const { data } = thresholds.get();

// check if value is available for this product
if (data) {
  // do something with data.maxiumValue
}
Setting a ledger value
There are two ways to set a Ledger: either replace the entire data of the Ledger, or merge the existing data with additional data. Merging adds new fields that were not previously in the data, and replaces existing fields. The default mode is Particle.REPLACE.
// Previous Ledger data
{
  "a": 123,
  "b": 456
}

// Data to merge
{
  "b": 789,
  "c": "ok"
}

// Merged value
{
  "a": 123,
  "b": 789,
  "c": "ok"
}
import Particle from 'particle:core';

export default function myLogicFunction() {
  const productLedger = Particle.ledger("my-product-ledger");
  const deviceLedger = Particle.ledger("my-device-ledger");
  const ownerLedger = Particle.ledger("my-owner-ledger");

  const newData = { b: 789 };

  productLedger.set(newData); // implicit Particle.REPLACE
  deviceLedger.set(newData, Particle.REPLACE);
  ownerLedger.set(newData, Particle.MERGE);
}
Ledger set() doesn’t return any value. A Logic Function can set a Cloud only Ledger and a Cloud to Device Ledger. Trying to set a Device to Cloud Ledger will throw an error.
Another example of setting data:
const thresholds = Particle.ledger("thresholds", { productId: 1234 });

thresholds.set({ maximumValue: 9000, validation: { voltage: { largerThan: 3.0 }}});
Deleting a ledger
Deleting a Ledger from a Logic Function will only clear the data for the device or product specified. The data for other devices/products will remain. Deleting an owner Ledger removes the data shared across your account.
import Particle from 'particle:core';

export default function myLogicFunction() {
  const productLedger = Particle.ledger("my-product-ledger");
  const deviceLedger = Particle.ledger("my-device-ledger");
  const ownerLedger = Particle.ledger("my-owner-ledger");

  productLedger.delete();
  deviceLedger.delete();
  ownerLedger.delete();
}
Particle encoding API
Particle publish data can consist only of UTF-8 characters and cannot contain binary data. Likewise, JSON does not allow inclusion of binary data directly.
To get around this, an encoding mechanism is typically used, such as:
- Hexadecimal (hex): Each byte creates two characters 0-9 and a-f, a 16-character alphabet, doubling the size of the data
- Base64: Every 3 bytes of binary data produces 4 safe ASCII characters out of a set of 64 (RFC 3548)
- Base85 (Ascii85): Uses an 85-character alphabet, which is even denser (RFC 1924)
While Base85 provides a more dense encoding than Base64, it is not recommended if you are publishing data to be sent to an external server by a webhook. The Base85 alphabet includes the left curly bracket, and the {{ sequence is recognized as a mustache template delimiter during webhook processing, causing the data to be corrupted. The backslash can also cause unexpected data transformation. One use case of Base85, however, is to use that to send the data from the device to the cloud, and then use a Logic Function to expand this to a different format, like Base64 or hex.
If you are interpreting binary data from your Logic Function, you will typically convert the encoded data (Base64 or Base85) to a byte array, so you can access the individual values of each byte (0 - 255) as values in an array. Logic Functions do not support node.js style Buffer objects for binary data.
Using the encoding APIs
To use the Particle encoding API, lines like this are added automatically when using a template:
import Particle from 'particle:core';
import { base85Decode } from 'particle:encoding';
You can substitute other functions like bytesToString for base85Decode in the example above.
You can include a comma-separated list of multiple imports if desired:
import Particle from 'particle:core';
import { bytesToString, stringToBytes } from 'particle:encoding';
base64Encode
Encodes a string or byte array to base64 (RFC 3548).
// PROTOTYPE
export function base64Encode(input: string | number[]): string;
In your device firmware, use the Base64RK library to encode and decode Base64.
base64Decode
Decodes a base64 (RFC 3548) string to a byte array
// PROTOTYPE
export function base64Decode(input: string): number[];
In your device firmware, use the Base64RK library to encode and decode Base64.
base85Encode
Encodes a string or byte array to base85 (RFC1924)
// PROTOTYPE
export function base85Encode(input: string | number[]): string;
In your device firmware, use the Base85 library to encode or decode Base85.
base85Decode
Decodes a base85 (RFC1924) string to a byte array.
// PROTOTYPE
export function base85Decode(input: string): number[];
In your device firmware, use the Base85 library to encode or decode Base85.
dataUrlEncode
Encodes data into a data URL
// PROTOTYPE
export function dataUrlEncode(data: string | number[] | Uint8Array, mimeType?: string, parameters?: Record<string, string>): string;
datathe actual data (string or array of numbers)mimeTypethe type of the data. Default is application/octet-stream if not providedparametersadditional parameters for the data URL, for example:filename=cat.jpg- returns the encoded data URL
dataUrlDecode
Decodes a data URL. extracting its mime type, parameters (optional), and an array of numbers for the bytes in the data.
// PROTOTYPE
export function dataUrlDecode(dataUrl: string): { mimeType: string, parameters: Record<string, string>, data: number[] }
bytesToString
Convert a byte array into a UTF-8 string. This should not be used for arbitrary binary data; use Base64 or Base85 for that.
// PROTOTYPE
export function bytesToString(input: number[]): string;
stringToBytes
Converts a string into an array of bytes.
// PROTOTYPE
export function stringToBytes(input: string): number[];
Vendor packages
Additionally, some utility packages are available by importing the following:
| Import | Package | Version | Description |
|---|---|---|---|
| vendor:lodash | lodash-es | 4.17.21 | General utility functions |
| vendor:date-fns | date-fns | 2.30.0 | Date handling |
| vendor:cbor-x | cbor-x | 1.5.4 | CBOR (Concise Binary Object Representation) |
| vendor:unishox2 | unishox2.siara.cc | 1.1.3 | Compression of short UTF8 strings |
It is not possible to import arbitrary npm or other packages in your Logic Function.
Logic Function context
When your Logic Function is called, it will always include required parameters:
functionInfo: information about the function that was calledtrigger: information about the time the event was triggeredsecrets: cloud secrets for this product and organizationenv: environment variables for this function
Additionally, one of the following parameters will be populated, based on the type of trigger:
event: information about the event that triggered the Logic Functionscheduled: information about the schedule that triggered the Logic FunctionledgerChange: information about a ledger database change the triggered the Logic Function (future)
// PROTOTYPE
export interface FunctionContext {
    functionInfo: FunctionInfo,
    trigger: TriggerInfo,
    secrets: Record<string, string | null>,
    env: Record<string, string>,
    event?: EventInfo,
    scheduled?: ScheduledInfo,
    ledgerChange?: LedgerChangeInfo
}
Accessing the context
To access just the event, specify it as is done in the event trigger template.
export default function process({ event })
You can also add other parameters in a comma-separated list if you're interested in those values.
export default function process({ functionInfo, trigger, scheduled })
functionInfo - Logic Function context
This object specifies the function that was called:
ownerId`: The user that owns this function. It contains the user or organization GUID, not the email address.logicFunctionId`: The unique identifier for the function (not the name).
// PROTOTYPE
export interface FunctionInfo {
    ownerId: string;
    logicFunctionId: string;
}
trigger - Logic Function context
Information about how the event was triggered (event or scheduled).
triggeredAt: The time the trigger occurred in ISO 8601 format (2023-11-07T14:01:57.923225531Z)triggerEventId: The event ID that triggered the event (for event triggers)
// PROTOTYPE
export interface TriggerInfo {
    triggerEventId?: string;
    triggeredAt: string;
}
event - Logic Function context
eventName: The event name.eventData: The event data as a string. If you are expecting JSON, you will need to useJSON.parse()to convertevent.eventDatato an object. This may be omitted if there is no event data.publishedAt: Time in ISO 8601 format when the event was received by the cloud.deviceId: The device ID (24 character hex) that triggered the event.productId: The numeric product ID this trigger is associated with.
// PROTOTYPE
export interface EventInfo {
    publishedAt: string;
    eventName: string;
    eventData?: string;
    deviceId: string;
    productId?: number;
    userId?: string;
}
scheduled - Logic Function context
scheduledAt: When the event was scheduled at in ISO 8601 format (2023-11-07T14:01:57.923225531Z).startAt: When the scheduler started scheduling this Logic Function.endAt: When the scheduler will stop scheduling this Logic Function.
// PROTOTYPE
export interface ScheduledInfo {
    scheduledAt: string;
    startAt: string;
    endAt?: string;
}
Particle geocoding API
The Geocoding API (particle:geo) provides a function to make coordinates to a place name.
The data is provided by GeoNames under the Creative Commons License by attribution.
Location - Logic geocoding
A geocoding location specifies a place name. This is returned from reverseGeocode(), for example.
distanceDistance from the named location (meters)lat: Latitudelon: Longitudecc: ISO 2-character country code. For example United States is US and Canada is CA.admin1: Represents the first administrative division above the place, often a state, province, region, or territory, depending on the country.- US: California (state)
- UK: England (region)
- Canada: Quebec (province)
- India: Karnataka (state)
admin2: Represents the second administrative division above the place, often a county, district, or municipality, depending on the country.- US: Los Angeles County
- UK: Cornwall
- India: Bangalore Urban
- Japan: Shinjuku City
name: Name of the location. This represents the most specific name of the location, such as a city, town, village, or other settlement name.
// PROTOTYPE
export interface Location {
    distance: number,
    lat: number,
    lon: number,
    name: string,
    admin1: string,
    admin2: string,
    cc: string
}
reverseGeocode - Logic geocoding
Converts a latitude and longitude into a place name ("reverse geocode").
// PROTOTYPE
export function reverseGeocode(lat: number, lon: number): Location