Blynk is a low-code IoT software platform for connecting devices to the cloud, building mobile apps to remotely control and monitor them, and managing users and IoT devices at any scale. To visualize data and interact with devices, Blynk offers native mobile apps for iOS and Android and a web dashboard that can be built with a drag-and-drop constructor, eliminating the need to write code for the front end. Blynk also includes built-in functionality for over-the-air firmware updates, device provisioning, advanced device and user management tools, alerts and notifications, automations, and data analytics.
This integration enables bi-directional communication between any Particle hardware and Blynk IoT. It allows visualization of the data and control of the Particle device remotely via the Blynk web and mobile dashboard.
It is a collection of configurations shared by devices of a similar type.
Consider smart home switches as an example. These devices typically perform comparable functions and often have the same data model, GPIO assignments, firmware code, etc. Instead of editing each device individually when changes are required, you can modify a Device Template, and all associated devices will be updated accordingly.
These are channels for time-stamped data transmitted between the device and the cloud. For example, sensor data should pass through a Datastream.
Pre-designed UI elements for visualizing device data and interacting with devices accessible to users.
If you don't already have one, you'll need to sign up for a Blynk account to use this integration.
To simplify the setup process, we've created a Blueprint for this integration. It includes a pre-configured template tailored for this project, a firmware, and a detailed guide on setting up webhooks in both the Particle Console and Blynk.
In this section, we provide an alternative guide on setting up integration from scratch, bypassing the Blueprint. It includes steps on how to configure a Blynk Template, offering a thorough insight into building and configuring interfaces on Blynk.
Create a Template
In the Blynk.Console, navigate to Templates > My Templates and click on the New Template button at the upper right of the page, make sure the Developer Mode is enabled. Give the template a name such as 'ParticleDeviceIntegration', set the Hardware field to Particle, and choose the appropriate Connection type of GSM for cellular devices, or WiFi and click Done.
Go to the Datastreams tab in the Template you created. Click New Datastream > Virtual Pin and configure five datastreams as shown in the Datastream Settings table that follows. It is important to configure the Pin, Data Type, Is Raw, Min, Max, and Default Value as shown. Click the Save button at the upper right of the screen when all of the datastreams have been defined.
Blynk Datastreams are bi-directional channels assigned a data type and link to data values stored on the Blynk Cloud. You reference them as virtual pins between the range of V0 and V255.
Datastream Settings
Datastream
Virtual Pin |
Data Type |
Values |
Comment |
| V6 |
String |
last_publish |
The Last date/time in UTC data was published from the Particle hardware. Updated by the Particle webhook.
|
| V14 |
integer |
millis() |
Simulated sensor data generated by the firmware (C++ millis() function). Could be adapted to represent actual sensor data.
|
| V15 |
double |
3.14159 |
Simulated sensor data generated by the firmware. A constant floating point value of 3.14159. Could be adapted to represent actual sensor data. |
| V16 |
integer |
0/1 |
Controlled by switch widget on Blynk web dashboard and mobile app. Changes in the datastream value will be received by the hardware and then the state of the built-in LED will be changed (if available), and the state of the LED widget on the Blynk web dashboard and mobile app will be updated (V17). |
| V17 |
integer |
0/1 |
LED widget on Blynk web dashboard and mobile app that echos changes received by the hardware for V16.
|
The datastreams should appear like on the image below when properly configured (fields Pin, Data Type, Is Raw, Min, Max, and Default Value must match exactly).

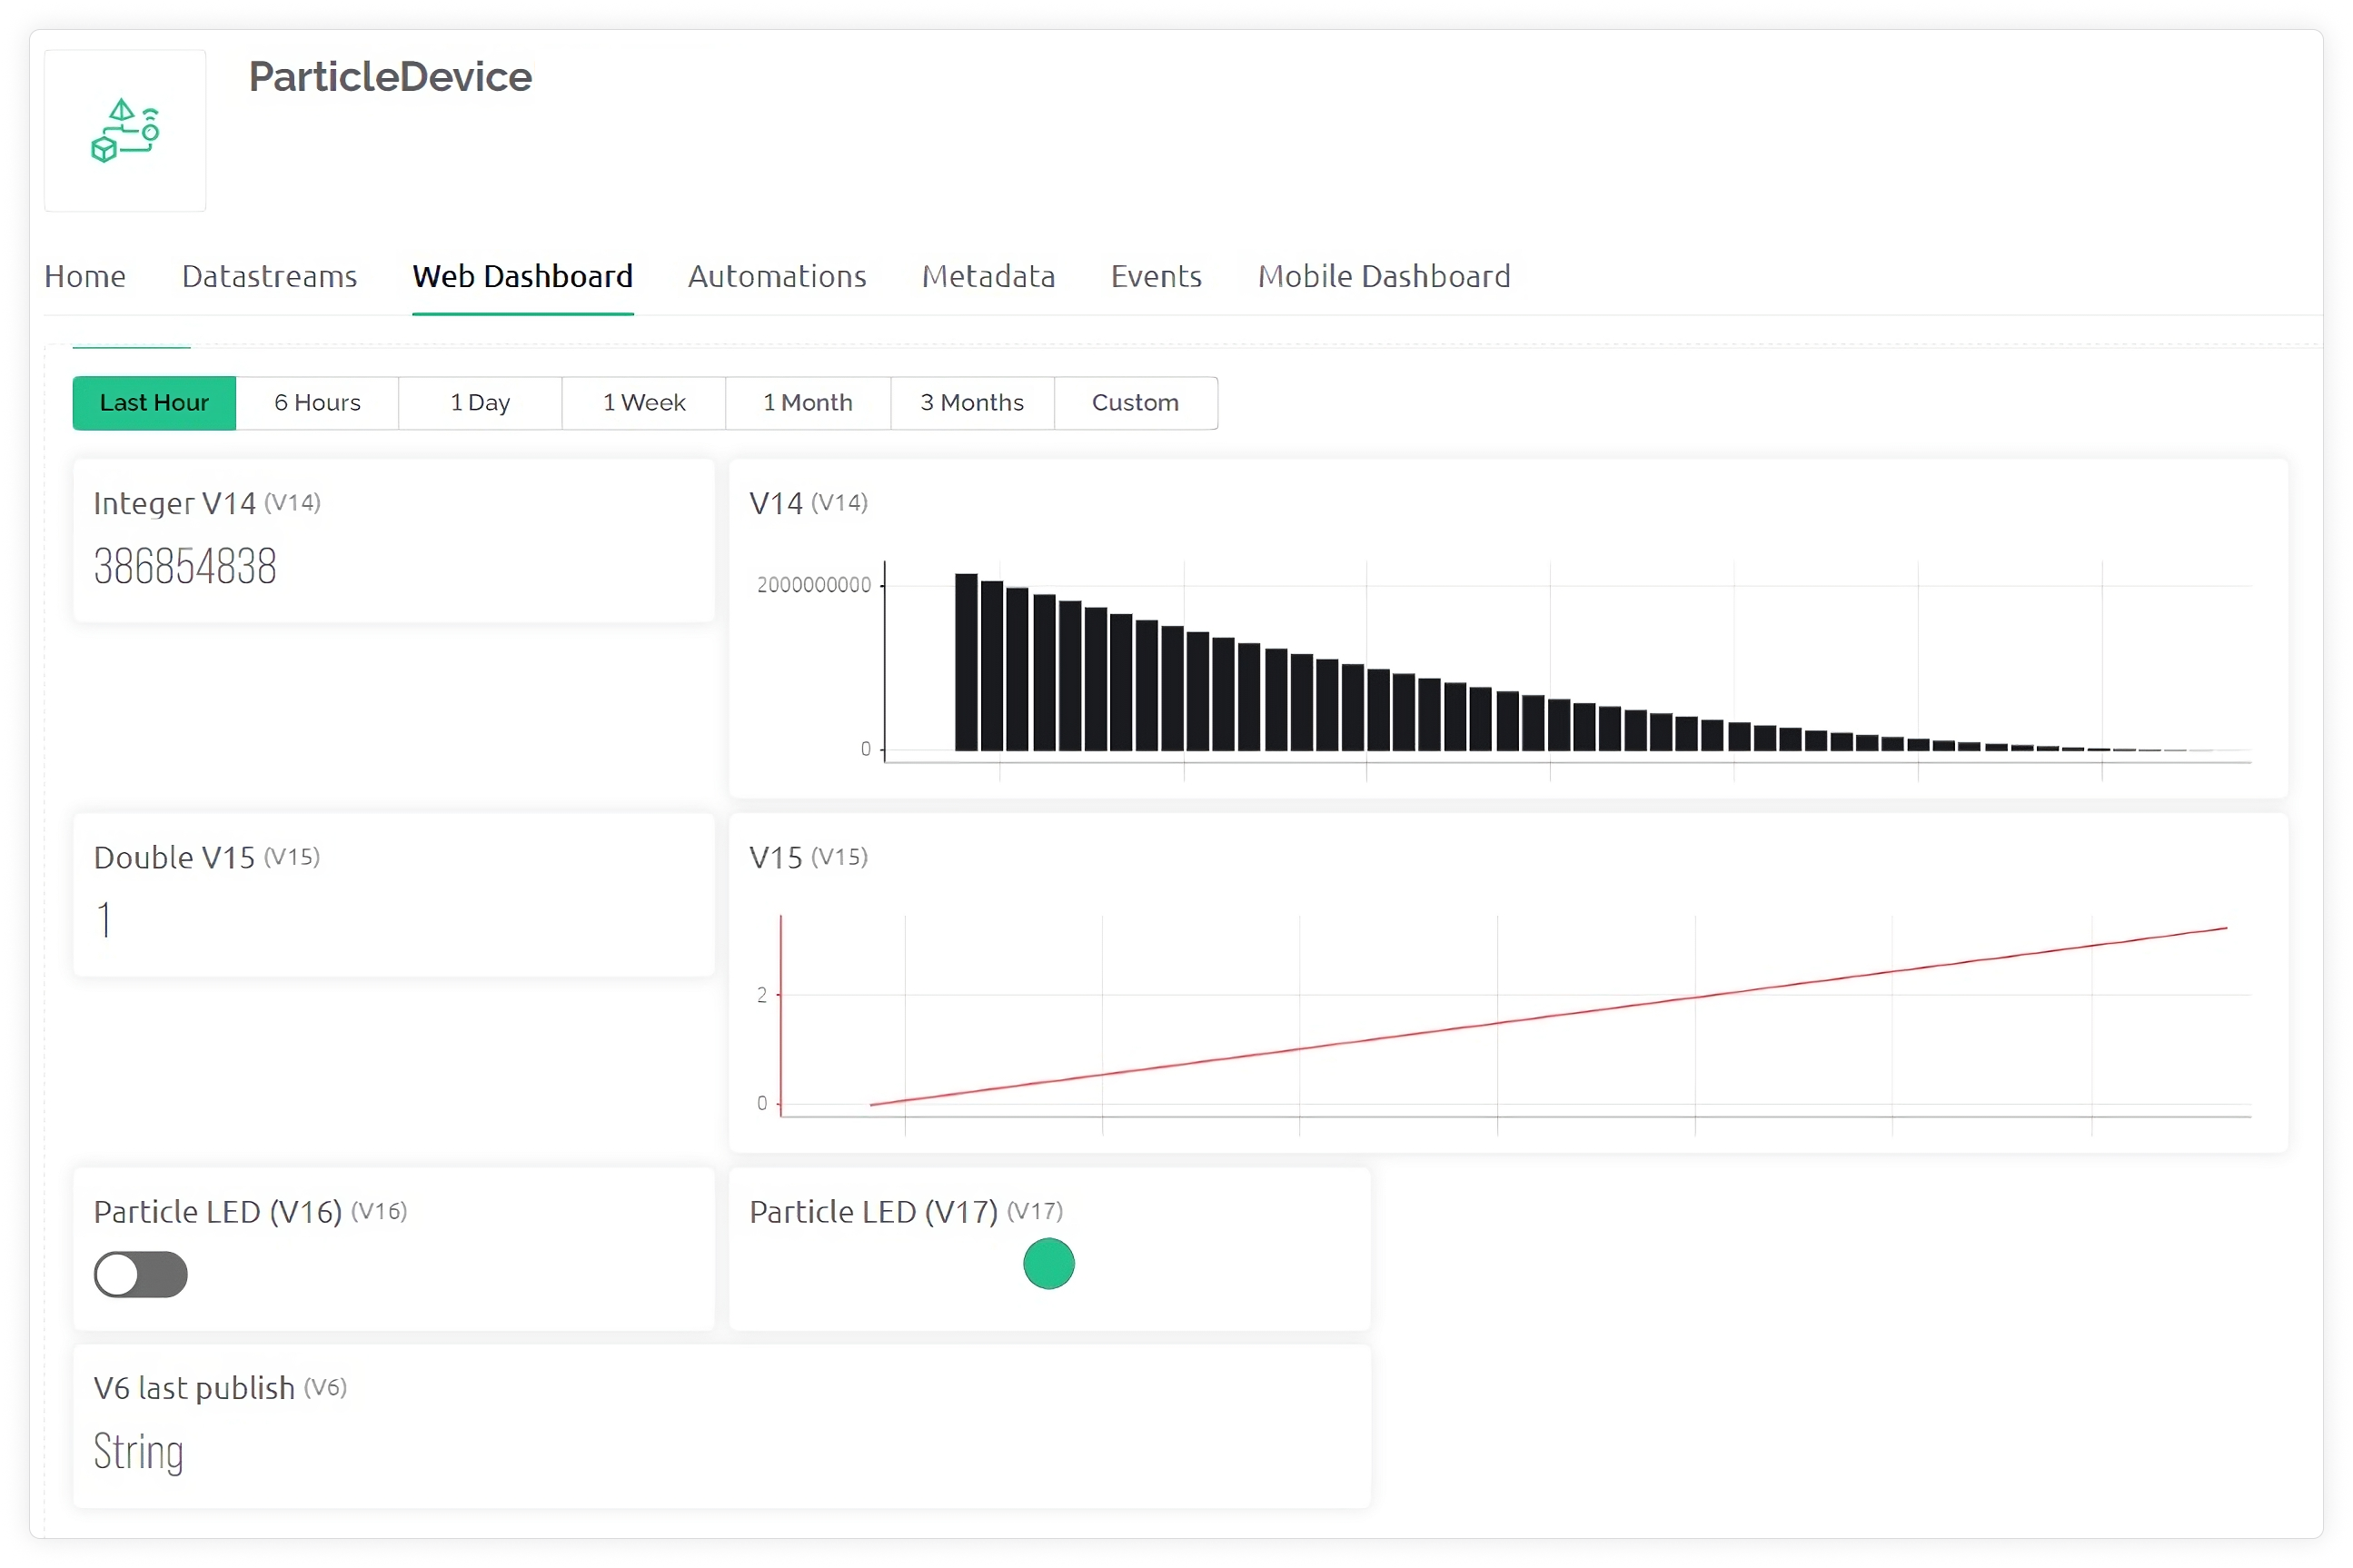
Create a Web Dashboard
The Web Dashboard allows you to visualize data from a device and control the device using Widgets (GUI elements).
- In the Web Dashboard tab click the Edit button at the upper right of the page.
- Drag and drop the following widgets to the dashboard (left to right, top to bottom) using the layout shown in the image that follows: Label, Chart, Label, Chart, Switch, LED, Label.
- Configure each widget as shown in the image that follows.
- After all widgets are configured, click Save and Apply.
Dashboard layout
Widgets settings
Create a Mobile Dashboard
The Blynk app in Developer Mode enables you to interactively build a custom app by selecting widgets and then configuring them. When the app is in the End-user Mode, it behaves like any other native app, presenting users with the widgets.
Using the Mobile Dashboard Editor, create a UI layout. The exact steps vary between iOS and Android - start by tapping on the Particle device you activated earlier, tap on the wrench icon, and then the + icon to add a widget. Add the following widgets: SuperChart (datastreams V14, V15), Labeled Value (V14), Labeled Value (V15), Button (V16), LED (V17), Labeled Value (V6).
Hold and drag a widget to place it in your desired position. Use green handles to resize the widget.
After the widgets are added to the dashboard canvas, you can tap on it to configure it. Every widget has Settings and Design options at the bottom of the screen. Configure each widget similarly to the dashboard widgets.
Firmware
Any Particle hardware such as Tracker One, Tracker SoM, Boron, B-Series SoM, Photon 2, P2, Argon, Photon, Electron, E-Series, and Core running the provided firmware will send two channels of simulated sensor data to Blynk.
One channel will send integer values, while the other will transmit a floating point value. This data will be visualized on the Blynk web dashboard and mobile app, displayed both in a chart and as a value.
Additionally, a switch widget on both the web dashboard and mobile app will relay data to the hardware for control purposes. The switch data represents an On/Off (1/0) state. This state will control a Blynk LED widget through the firmware and will also toggle the state of the built-in LED on the Particle device, if present. Lastly, a UTC-based timestamp displayed on both the web dashboard and mobile app will indicate the last time data was published from the Particle device.
#include "Particle.h"
#include <math.h> // This library is only for function simulating a sensor
const char *firmware_version = "0.0.0";

double v15 = 3.14159;
uint32_t simSensor_timer_last = 0; // This is a variable for a function that simulates a sensor
uint8_t led_state = LOW;
bool particle_fn_called = TRUE; // causes the device to publish data immediately after started/boot and connected to the Particle cloud.

// Register the Particle cloud function
int blynkLED(String on_or_off);

/////////////////////////////////////////////////////////////////////////
// Blynk

// Update below with your Blynk auth token for your device (automatically populated by Blueprint)
#define BLYNK_TEMPLATE_ID "13 char template id"
#define BLYNK_TEMPLATE_NAME "ParticleDeviceBlueprint"
#define BLYNK_AUTH_TOKEN "your Blynk 32 char auth token"

void simSensor()    //This function simulates a sensor
{
  long sim = random(millis());
  if (millis() - simSensor_timer_last >= 20000) {
    simSensor_timer_last = millis();
    float deltaSensor = cos(float(sim) / 1000) / 100;
       if (v15 <= 0 || v15 >= 3.3)
    {
      v15 = v15 - deltaSensor;
    }
    else
    {
      v15 = v15 + deltaSensor;
     }
  }
} // simSensor

/////////////////////////////////////////////////////////////////////////

bool deviceHasLedOnD7()
{
  // Returns TRUE if the device has a built-in LED on D7:
  //  Boron, Argon, Photon 2, Photon, Electron, Core
  // 8: P1
  switch (PLATFORM_ID)
  {
  case PLATFORM_BORON:
  case PLATFORM_ARGON:
  case 0:  // Core
  case 6:  // Photon  (PLATFORM_PHOTON_PRODUCTION)
  case 10: // Electron  (PLATFORM_ELECTRON_PRODUCTION)
    return TRUE;
  default:
    return FALSE;
  }
} // deviceHasLedOnD7()

/////////////////////////////////////////////////////////////////////////
// Timer

const uint32_t TIMER_INTERVAL_MS = 300000L;
uint32_t timer_last = 0;

void pubToParticleBlynk()
{
  if (Particle.connected())
  {

    char data[90]; // See serial output for the actual size in bytes and adjust accordingly.
    // Note the escaped double quotes around the ""t"" for BLYNK_AUTH_TOKEN.
    snprintf(data, sizeof(data), "{\"t\":\"%s\",\"v14\":%u,\"v15\":%f,\"v16\":%u,\"v17\":%u}", BLYNK_AUTH_TOKEN, millis(), v15, led_state, led_state);
    Serial.printlnf("Sending to Blynk: '%s' with size of %u bytes", data, strlen(data));
    bool pub_result = Particle.publish("blynk_https_get", data, PRIVATE);
    if (pub_result)
    {
      timer_last = millis();
    }
    else
    {
      Serial.println("ERROR: Particle.publish()");
    }
  }
} // pubToParticleBlynk()

void pubTimer()
{
  // A timer for publishing data to Particle Cloud, and then continuing to Blynk.
  if (timer_last > millis())
    timer_last = millis();
  if ((millis() - timer_last) > TIMER_INTERVAL_MS && Particle.connected())
  {
    pubToParticleBlynk();
    timer_last = millis();
  }
} // pubTimer()

/////////////////////////////////////////////////////////////////////////

void setup()
{


  if (deviceHasLedOnD7() == TRUE)
  {
    pinMode(D7, OUTPUT);
    digitalWrite(D7, LOW);
  }

  Serial.begin(9600);
  waitFor(Serial.isConnected, 30000);
  delay(1000);
  Serial.printlnf("Device OS v%s", System.version().c_str());
  Serial.printlnf("Free RAM %lu bytes", System.freeMemory());
  Serial.printlnf("Firmware version v%s", firmware_version);

  // register the Particle cloud function (funcKey, funcName)
  Particle.function("blynk_led", blynkLED);

  Serial.println("Setup complete");

} // setup()

void loop()
{
  simSensor(); // This is function simulates a sensor
  pubTimer();


  if (particle_fn_called == TRUE)
  {
    particle_fn_called = FALSE;
    // Publish data to Particle cloud..
    pubToParticleBlynk();
  }

  if (deviceHasLedOnD7() == TRUE)
  {
    digitalWrite(D7, led_state);
  }

} // loop()

int blynkLED(String on_off)
{
  // Custom Particle cloud function that changes the state of the built-in LED
  // on D7 in response to an instruction from Blynk calling this
  // custom cloud function.
  // Returns the value 1 if the LED has been turned on, and 0 if turned off,
  // -1 if an unexpected on_off value is received.
  // Cloud functions must return int and take one String argument
  // curl https://api.particle.io/v1/devices/{your 25 char device id}/blynk_led
  // -H "Authorization: Bearer {your 40 char access token}"
  // -d "arg=on/off"

  if (on_off == "on" || on_off == "1")
  {
    particle_fn_called = TRUE;
    led_state = HIGH;
    return 1;
  }
  else if (on_off == "off" || on_off == "0")
  {
    particle_fn_called = TRUE;
    led_state = LOW;
    return 0;
  }
  else
  {
    Serial.print("Unexpected on_off value of: '");
    Serial.print(on_off);
    Serial.println("'");
  }
  return -1;

} // blynkLED()
Hardware authentication on Blynk
Static AuthToken will be used for device authentication. A unique Template ID, Template Name, and AuthToken should be included in the firmware.
- In the Blynk.Console, navigate to Search > Devices and click + New Device.
- Choose the From template option.
- Select your template from the Template drop-down list, fill out the Device name field, and click Create.
- In the upper right the BLYNK_TEMPLATE_ID, BLYNK_TEMPLATE_NAME and BLYNK_AUTH_TOKEN will be displayed. Copy and update the firmware sketch with your parameters. Each device in Blynk will have a unique set of these 3 parameters. They are always available under the Device Info tab.
// Update below with your Blynk auth token for your device (automatically populated by Blueprint)
#define BLYNK_TEMPLATE_ID "13 char template id"
#define BLYNK_TEMPLATE_NAME "ParticleDeviceBlueprint"
#define BLYNK_AUTH_TOKEN "your Blynk 32 char auth token"
Webhook on the Particle Cloud
A Particle integration webhook running on the Particle cloud will accept the data from the Particle.publish() function executing on the device, and transform it into a HTTPs GET that will post data to the Blynk cloud, updating the corresponding Blynk datastream values.
- Create an account or log in to the Particle Console
- Go to Products > New Product to create a new Product, and then add your device
- After the device is added, click on the Integrations on the left > Add New Integration and select the Webhook option
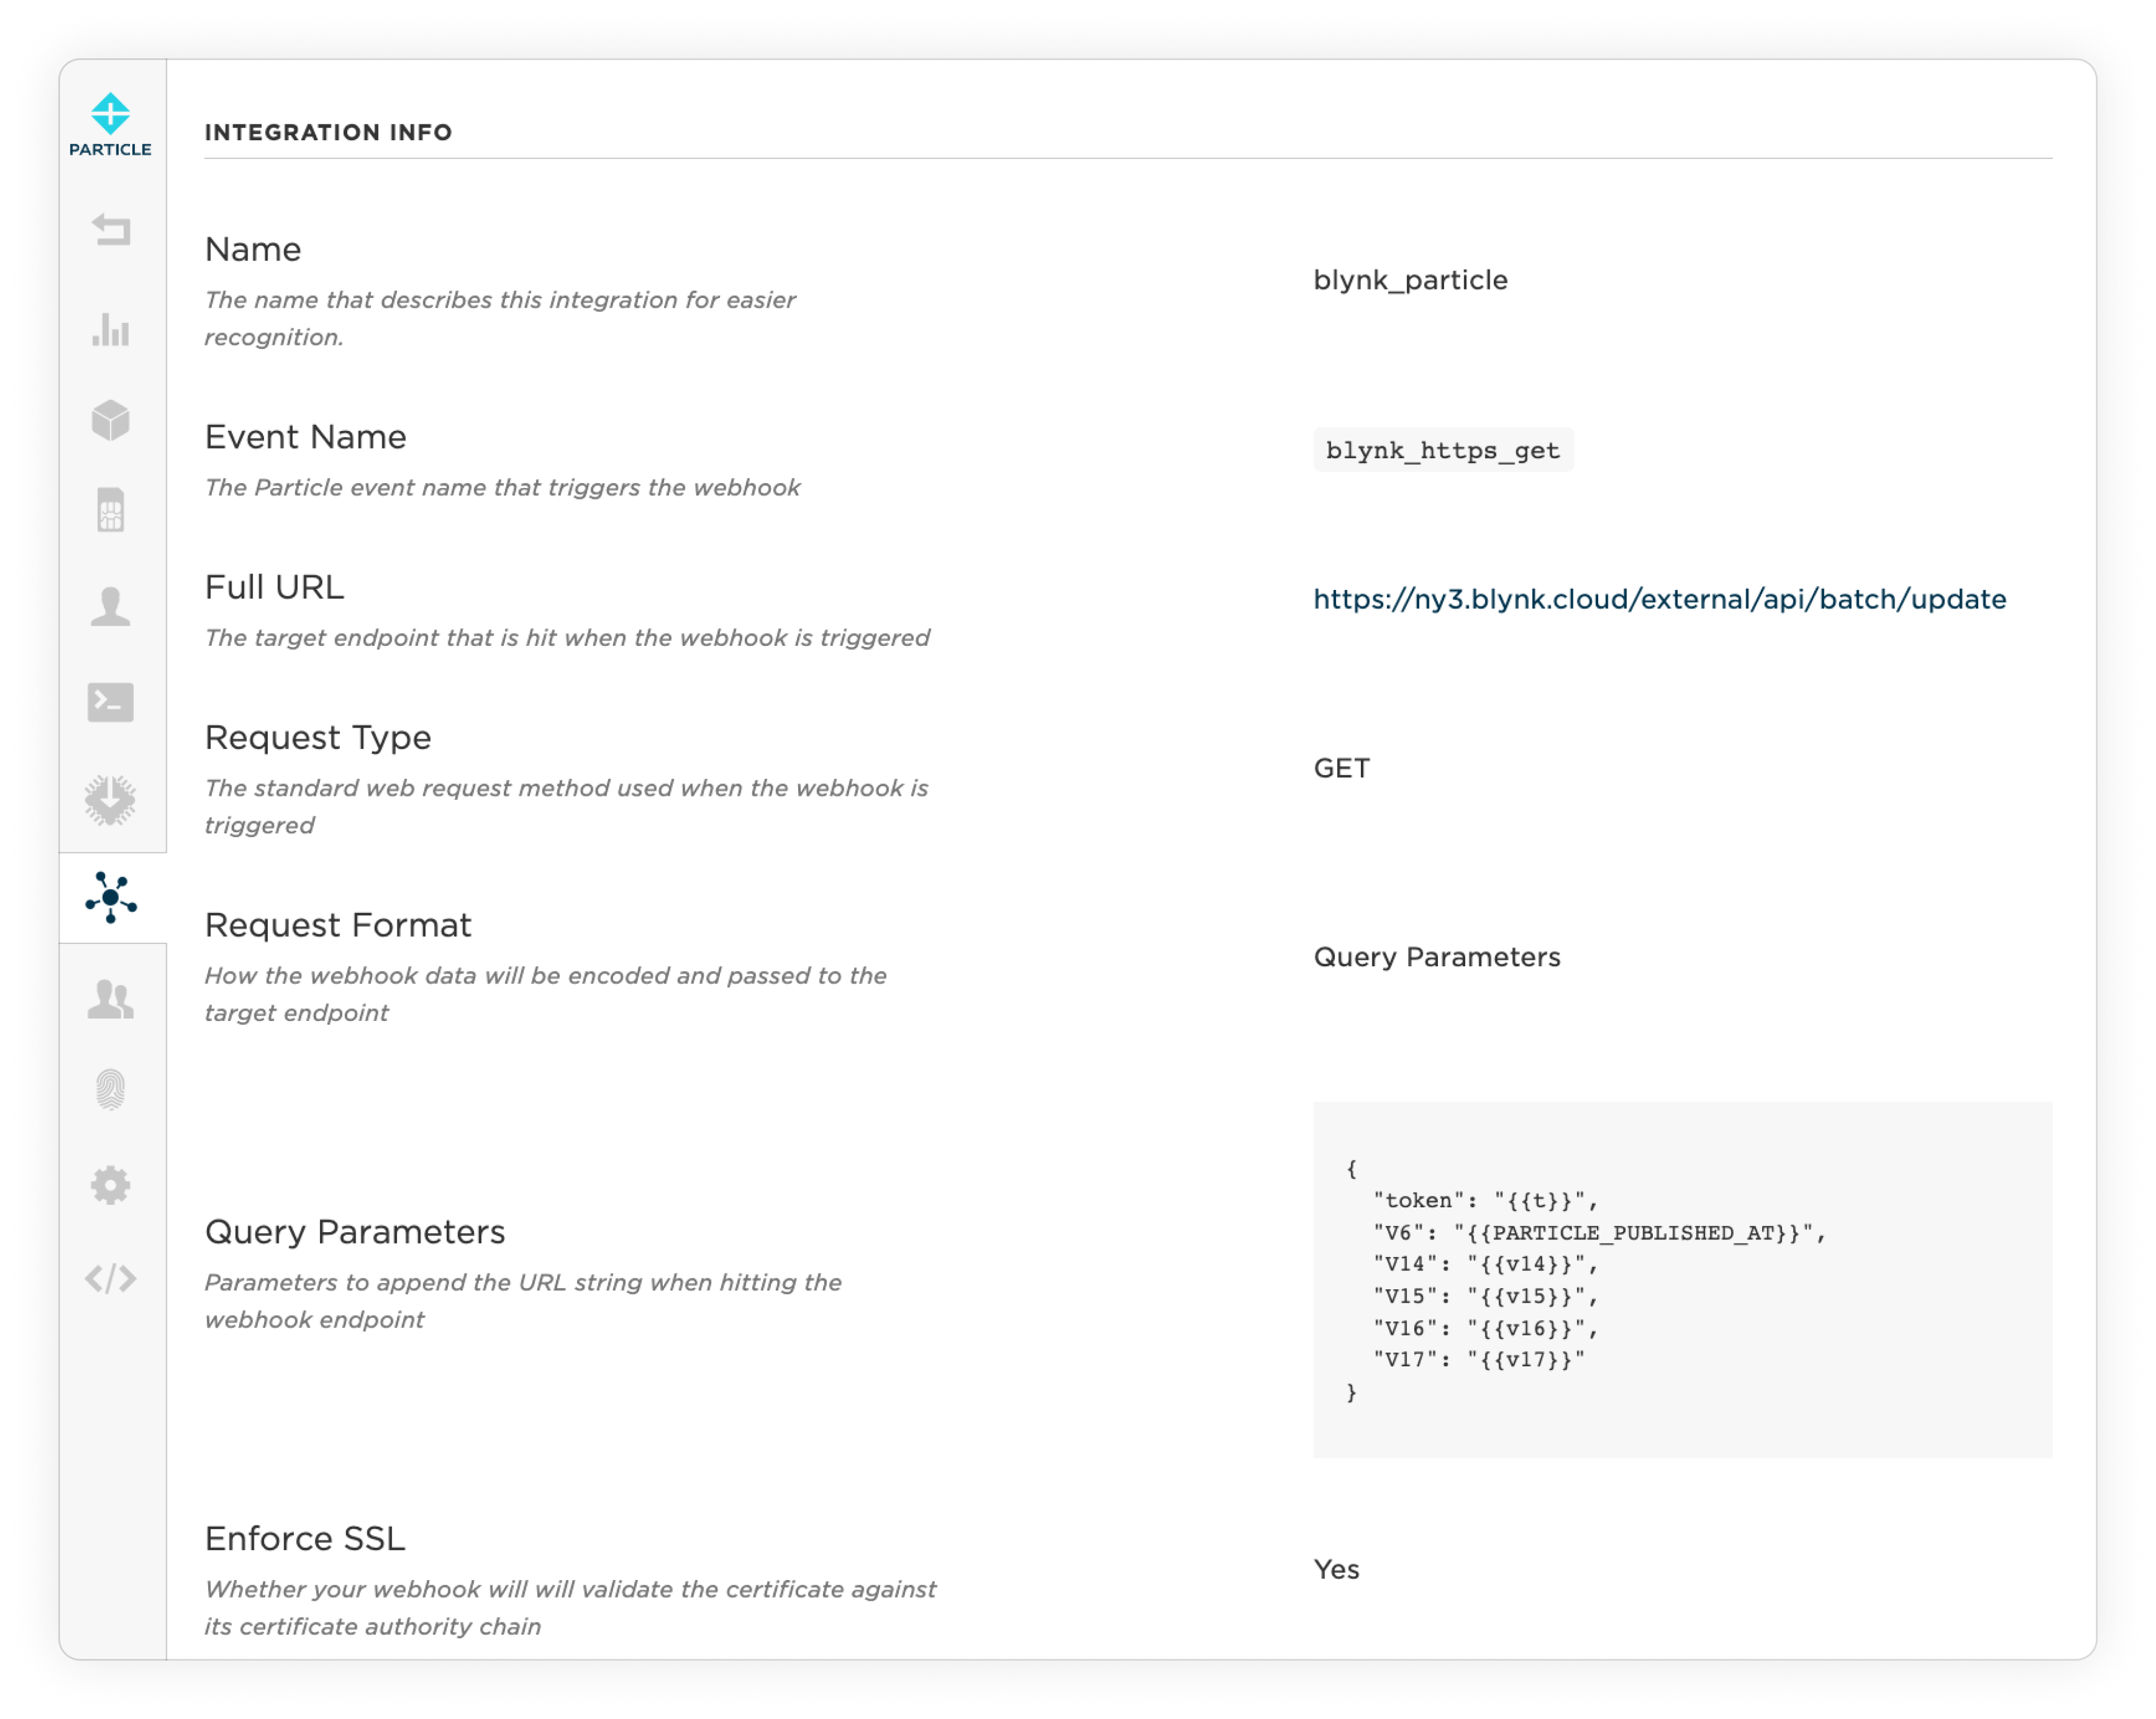
- Switch to Custom template and fill it with the following lines:
{
    "name": "blynk_particle",
    "event": "blynk_https_get",
    "url": "https://ny3.blynk.cloud/external/api/batch/update",
    "requestType": "GET",
    "noDefaults": true,
    "rejectUnauthorized": true,
    "query":
    {
        "token": "",
        "V6": "",
        "V14": "",
        "V15": "",
        "V16": "",
        "V17": ""
     }
}
The keys on the left (token, V6, V14, V15, V16, V17) refer to Blynk datastreams (virtual pins), and the values on the right reference variables from the firmware that will be passed from the Particle.publish() function. The value ‘PARTICLE_PUBLISHED_AT’ for virtual pin V6 is a Particle pre-defined variable that provides a timestamp for when the webhook is executed.
Update ny3.blynk.cloud with your server shown in the Blynk.Console lower right. Find the list of valid server addresses here
Click on Create Webhook
The Webhook should look like this:
Particle.publish() call in the firmware:
char data[90];
// Note the escaped double quotes around the ""t"" for BLYNK_AUTH_TOKEN.
snprintf(data, sizeof(data), "{\"t\":\"%s\",\"v14\":%u,\"v15\":%f,\"v16\":%u,\"v17\":%u}", BLYNK_AUTH_TOKEN, millis(), v15, led_state, led_state);
bool pub_result = Particle.publish("blynk_https_get", data, PRIVATE);
Note that the firmware will pass the unique BLYNK_AUTH_TOKEN defined for each device to the Particle webhook as the variable 't'. This allows each device to call the same webhook, at the expense of increasing the cellular payload for each transmission by 32 bytes.
You can learn more about Particle webhooks by visiting this documentation link.
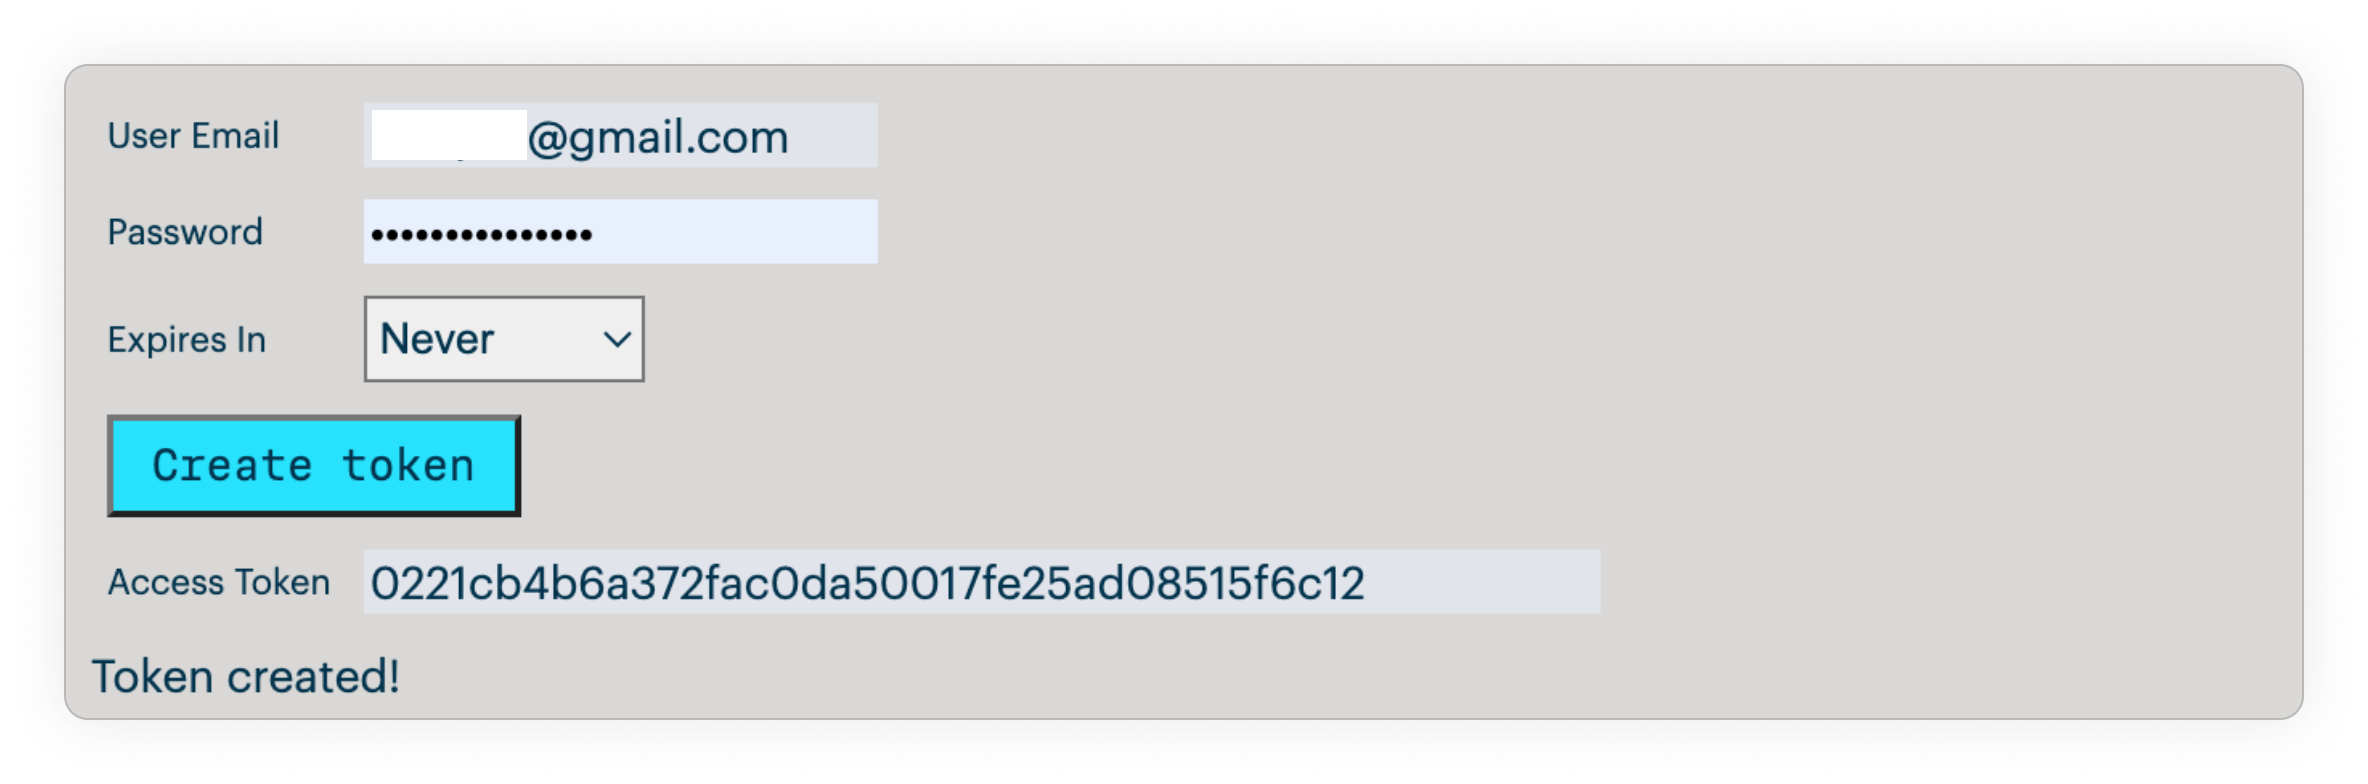
Generate Particle Access Token
The Blynk webhook will need a Particle access token to make a Particle HTTP API call to the Particle cloud function.
- Browse to the Particle documentation section Create a token (browser based).
- Enter your Particle login email and password into the form. If you have MFA (multi-factor authentication) enabled on your account, you will need your MFA code to generate the access token.
- Click the Create token button to generate a token. Keep this token confidential.
Blynk webhook setup
Control of the Particle hardware remotely from the Blynk web dashboard or mobile app is accomplished using a Blynk webhook and the Particle HTTP API. When the state of the switch widget on the Blynk web dashboard or mobile app is changed, a Blynk webhook assigned to the same datastream is called. The webhook makes a Particle HTTP API call to a Particle cloud function with a device-unique token that sends data to the Particle hardware.
- In the Blynk.Console, navigate to Settings > Webhooks and create a new webhook for datastream V16 based on the information shown in the next image.
- After you are finished configuring the webhook, click Test webhook to verify it doesn’t throw an error (it won’t send the datastream value here, so don’t expect to see the LED on your Particle device change).
- Click Create Webhook to save it and close the dialog.
Note that the Blynk webhook request quota is 1 per minute* so any datastream value changes sooner than 60 seconds will not execute the webhook.
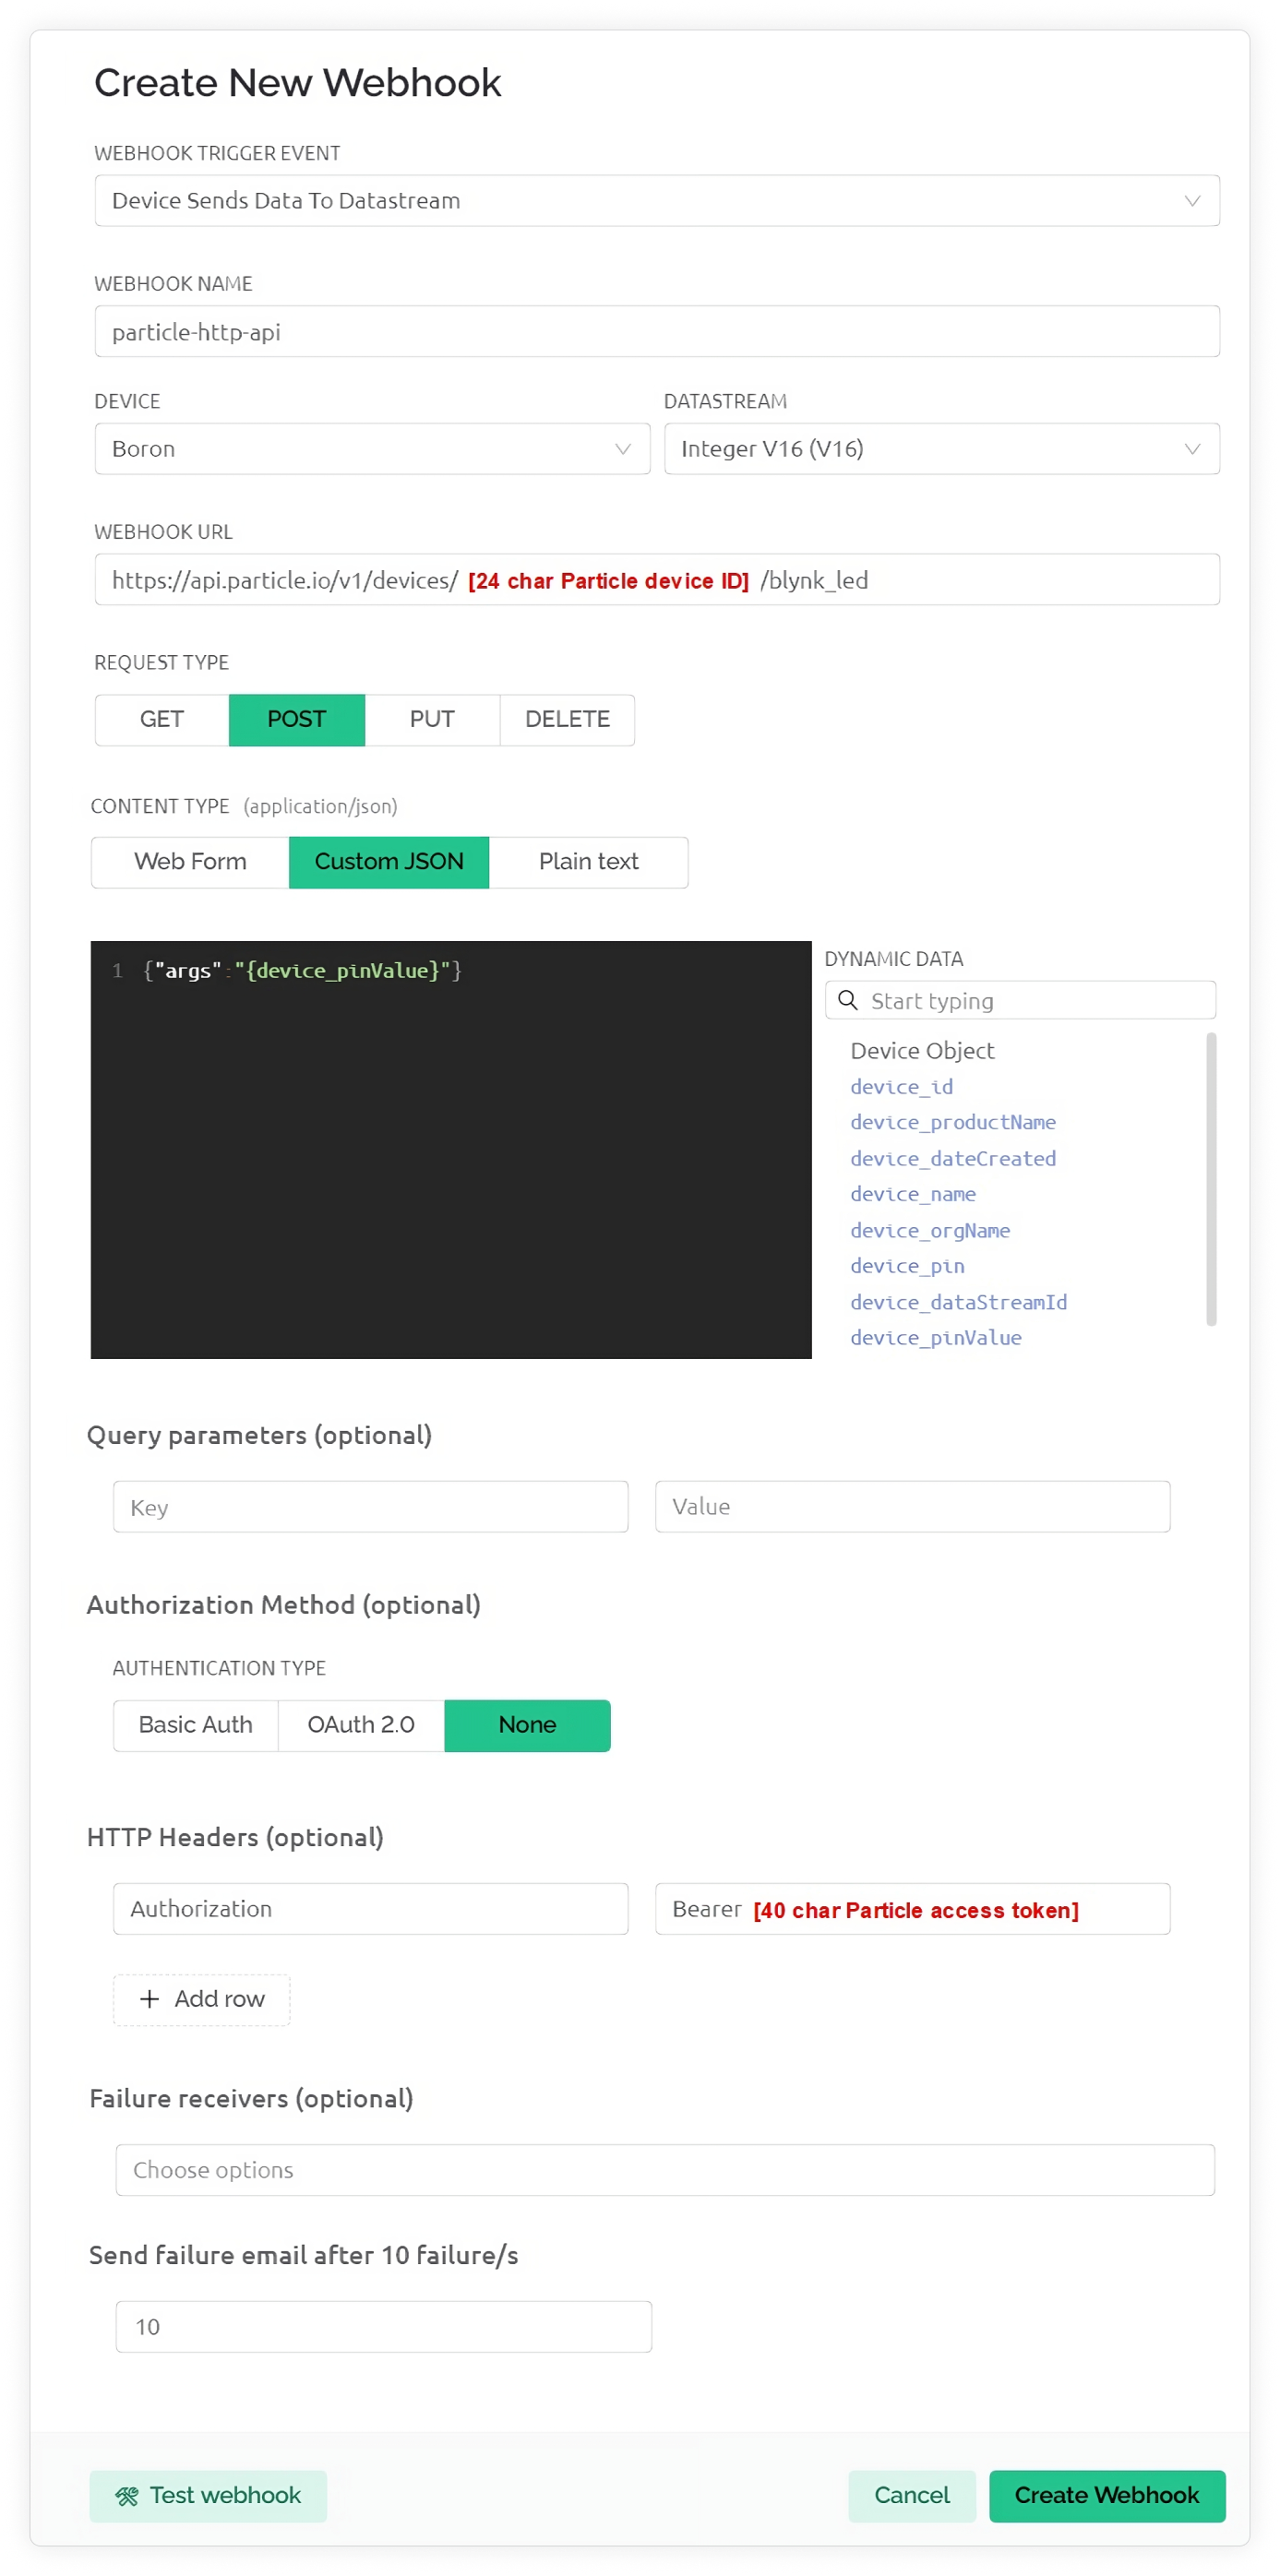
Webhook URL
The format is:
https://api.particle.io/v1/devices/[your 24 character Particle device ID]/blynk_led
Replace your Particle device ID and the 40-character access token you generated earlier in the corresponding form fields. Your 24-character Particle device ID is available in the [Particle console[(https://console.particle.io/).
The "blynk_led" at the end of the WEBHOOK URL is the Particle cloud function key that is referenced in the firmware as:
void setup()
{
  ...
  Particle.function("blynk_led", blynkLED);
  ...
}
HTTP Headers (optional)
The 'HTTP Headers' with the key "Authorization" has a value consisting of the string "Bearer " (with a space after it), and then followed by the 40-character Particle access token.
Bearer 40_character_Particle_access_token
Testing
- Test the Particle cloud function running in the firmware by calling it from the Particle console. With your Particle hardware running, visit here for detailed instructions on how to call 'blynk_led'. Go to your Particle console, select the Particle device, and then under the Functions section on the right side of the screen you will see the function key of ‘blynk_led’ listed. Enter ‘on’ in the Argument input area and click the CALL button. Observe the Particle device to confirm that the built-in blue LED on D7 turns on. Repeat with the ‘off’ argument to turn off the LED.

- Verify that your Particle access token is correct by using the Particle API to test it. Detailed instructions on how to do this using Postman can be found here.
- Test the Blynk webhook by installing the firmware on your Particle hardware, and then click Test webhook to verify it doesn’t throw an error (it won’t send the datastream value here, so don’t expect to see the LED on your Particle device change). Then from the Blynk web dashboard or mobile app, toggle the switch assigned to datastream V16 and observe the built-in LED on the hardware if it exists, or the Blynk LED widget if no built-in LED exists. Wait 60 seconds between each toggle of the switch widget.
- Don't be concerned about the "Offline" network indicator status in the web console and app. It occurs because the Particle device is not connected to the Blynk Cloud directly, but to the Particle Cloud. However, you can always check the "Last Update" data in the web console or mobile application. If the difference between the current time and this timestamp is more than the update interval set in your sketch (for this project, it's 5 minutes), then most likely your Particle device has gone offline.
- Review the Particle device log to confirm the device is connected and to see what data has been published from the hardware to the Particle cloud.
- Review the Particle integration log to see if it was triggered successfully and the data that was pushed to it from the Particle device.
Troubleshooting
- Make sure the BLYNK_AUTH_TOKEN in your firmware matches what is shown in the Blynk console Search > Device > Device Info.
- If your Particle device has a built-in RGB then it should be breathing cyan if it is connected to the Particle cloud.
- Perform all of the tests under Testing to be sure that each communication step from the Particle hardware to Blynk and back works properly.
After your device is connected to Blynk, this basic integration can be easily modified to include more functionality.


