M1 Enclosure datasheet
The M1 Enclosure makes it easy to deploy Particle Tachyon and Muon, or Raspberry Pi, projects in a IP67-rated weatherproof enclosure similar to the Monitor One.
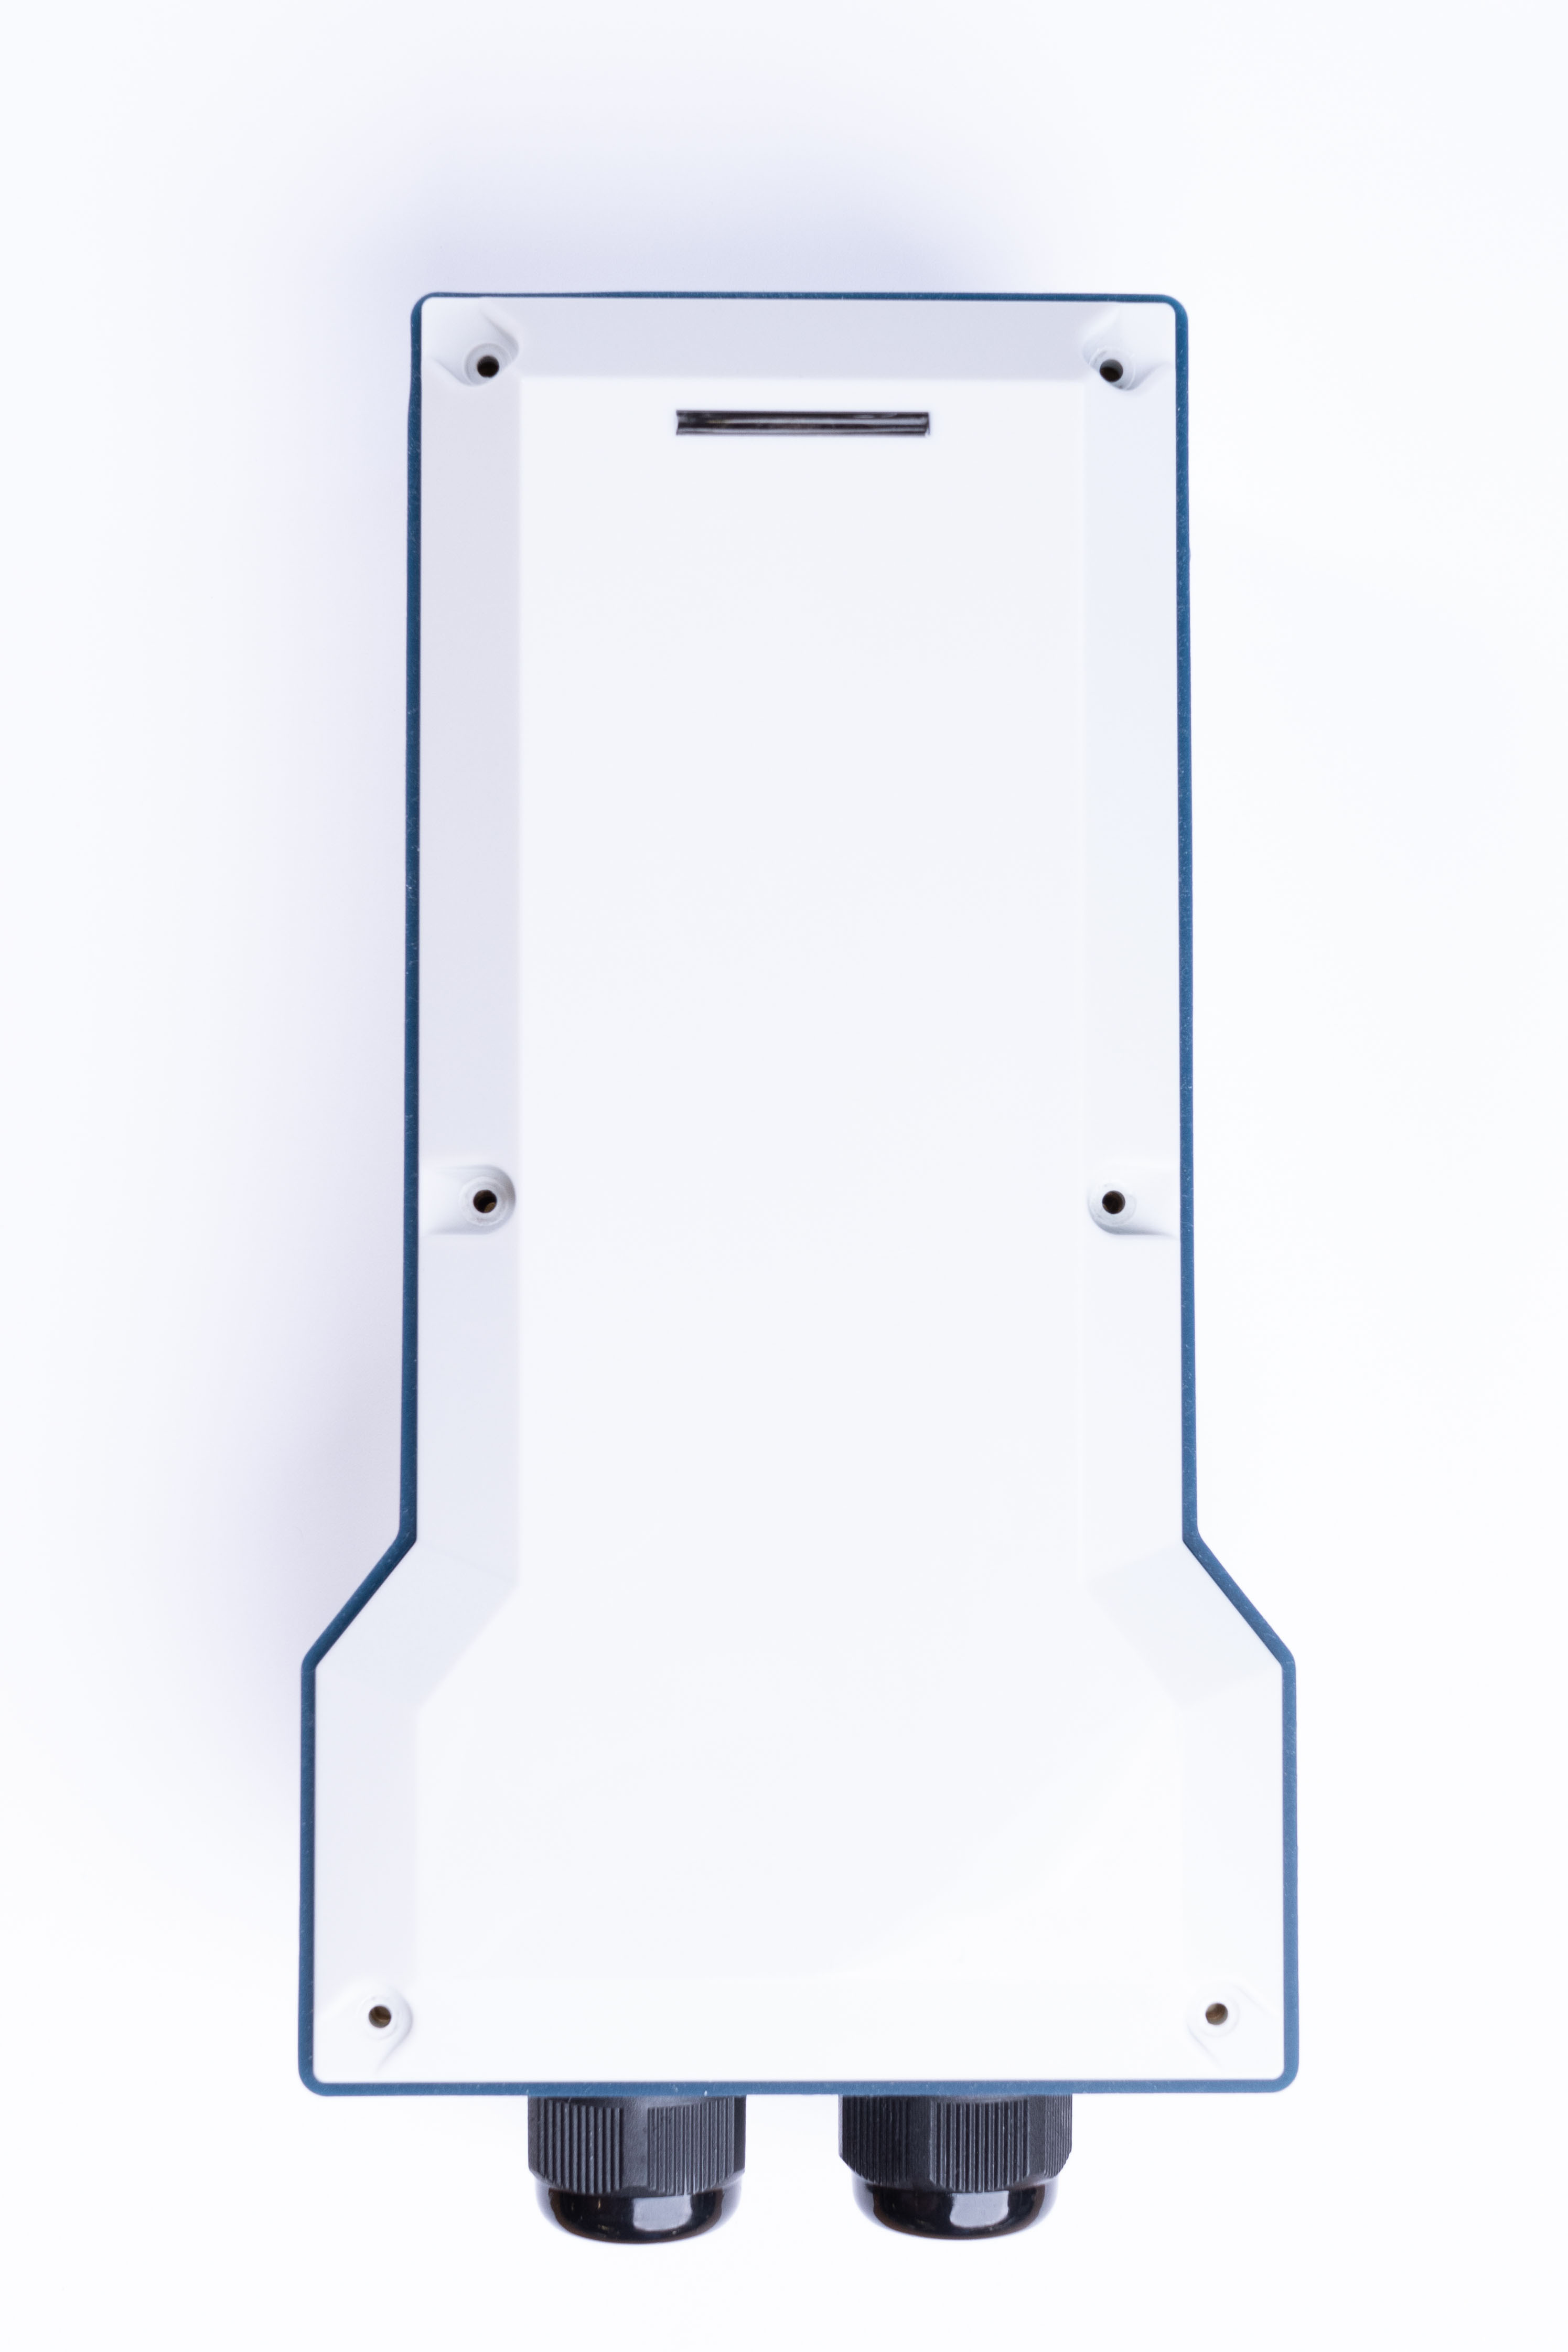
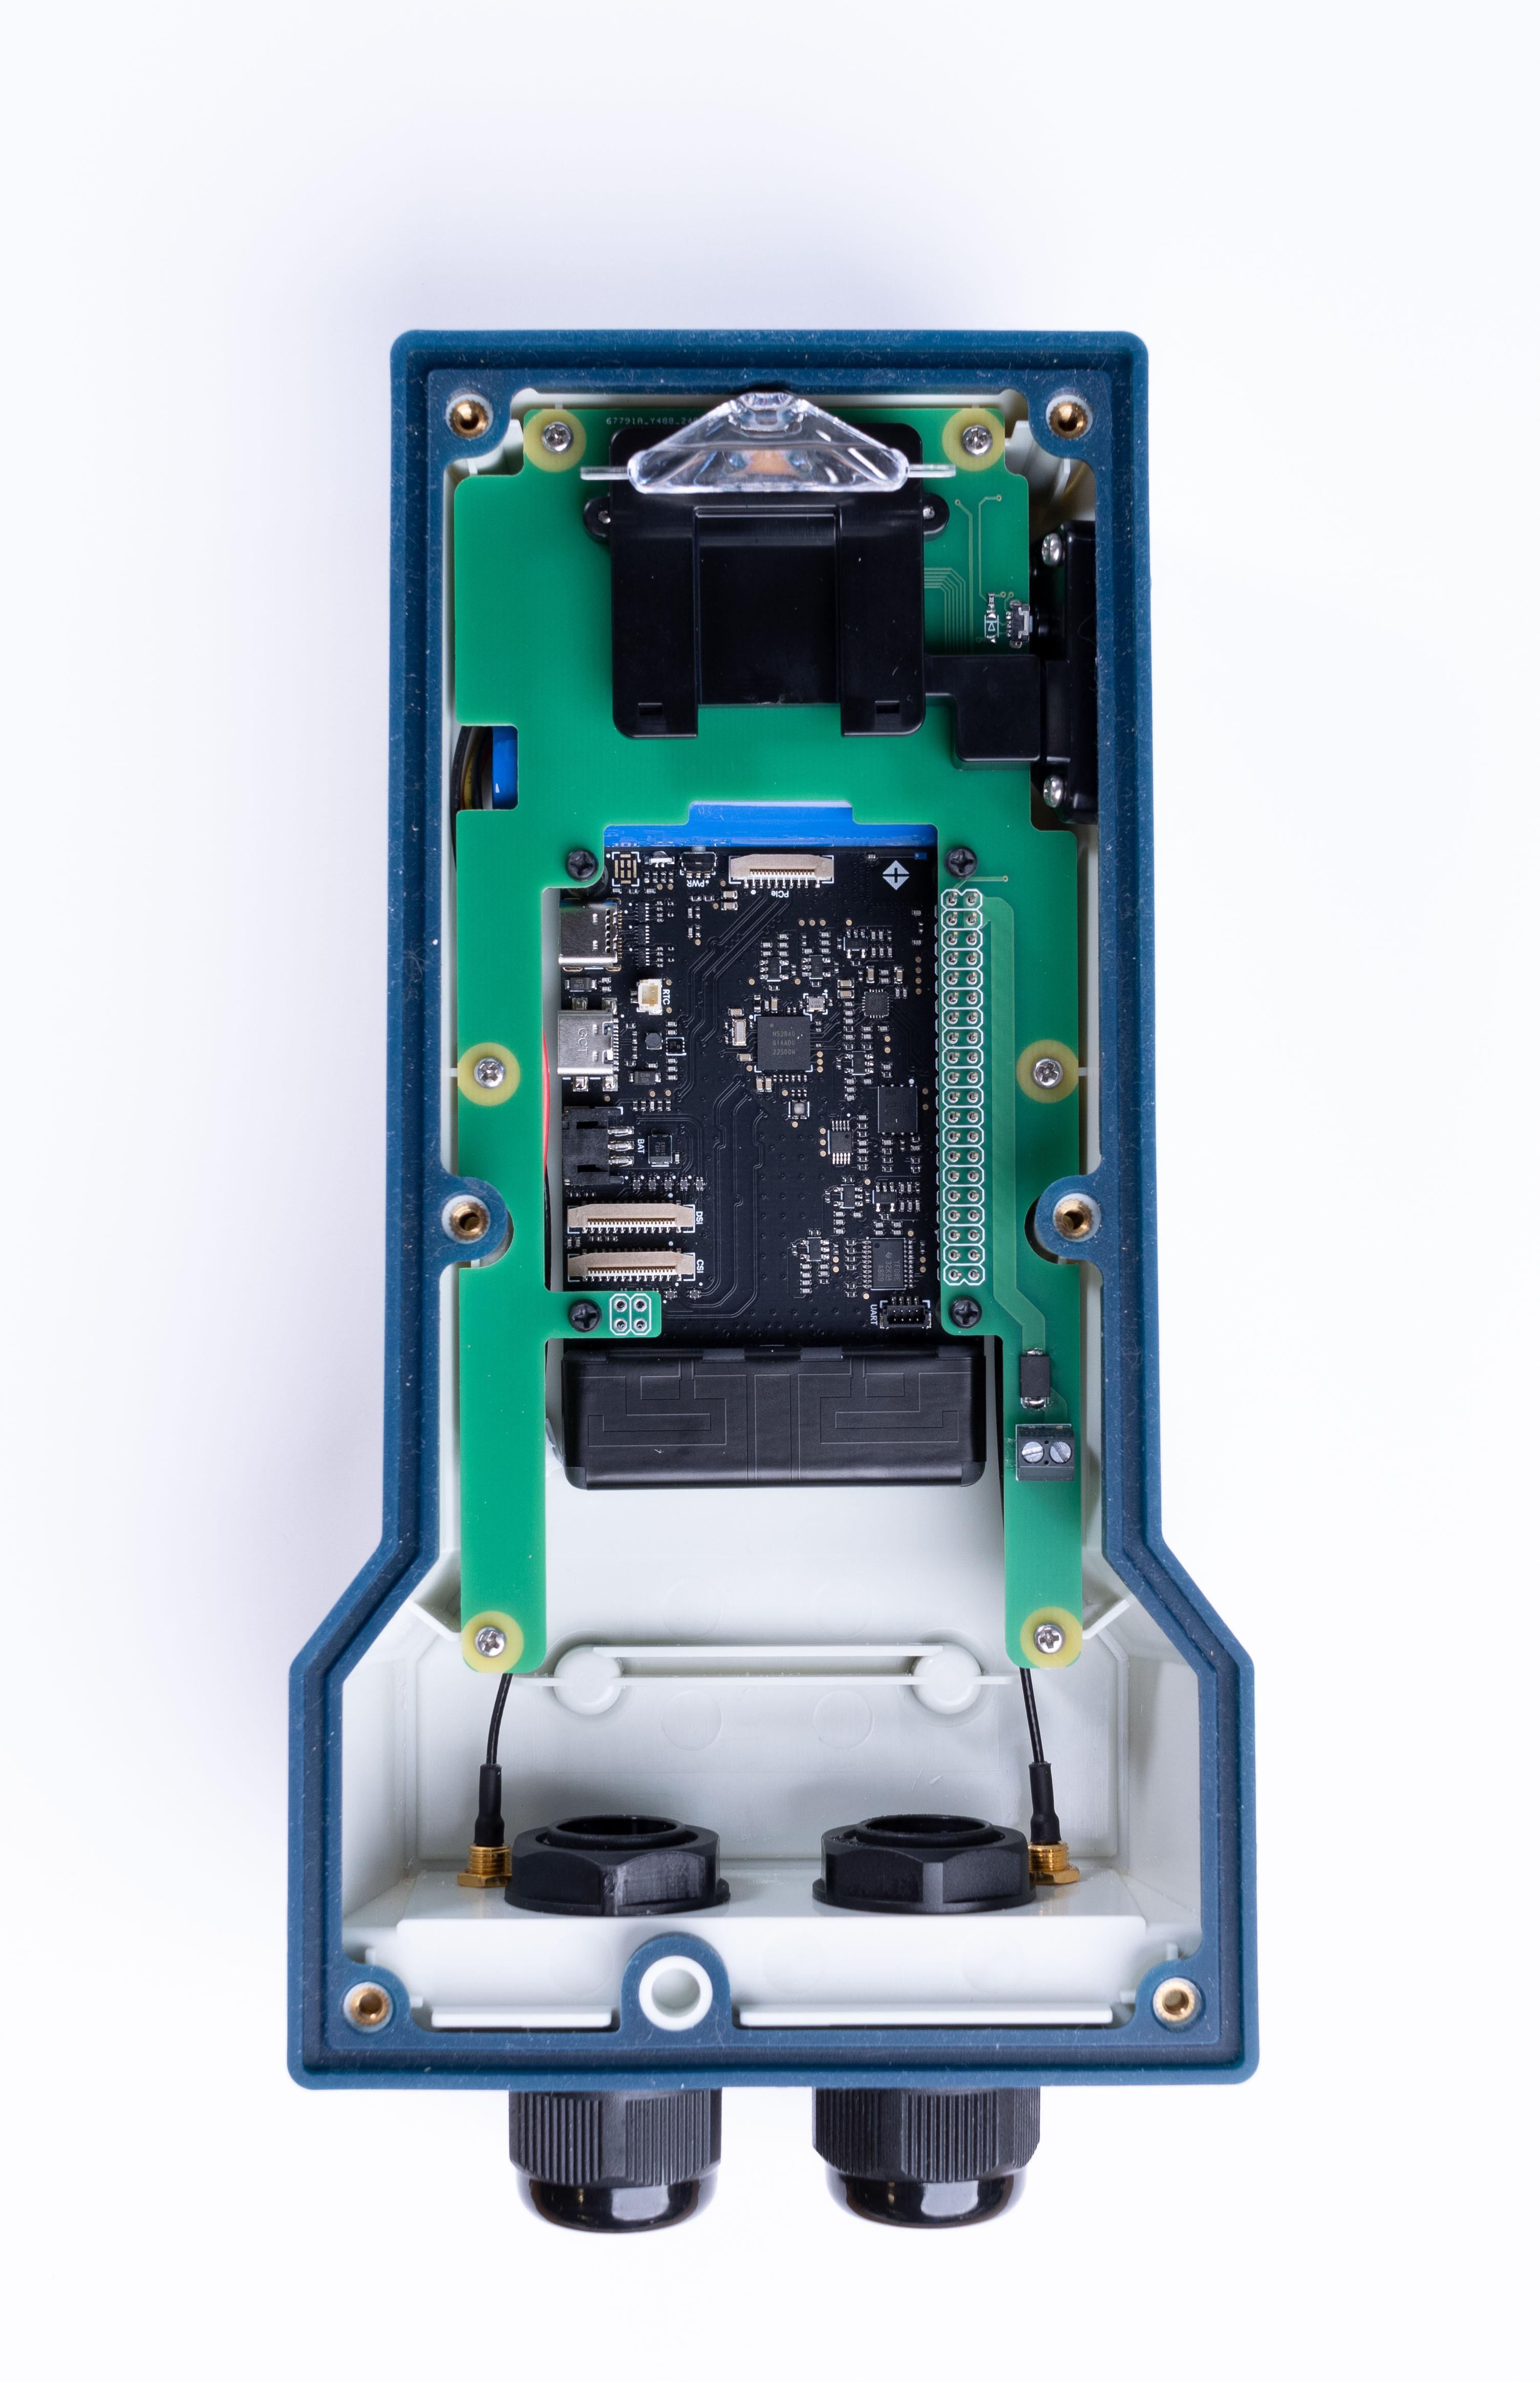
The carrier board securely installs your Raspberry Pi compatible board through use of pin headers and screws. It connects your Muon or Tachyon to the external button and internal LEDs on the carrier board, as well as allowing for expansion HATs on the top side. Cutouts in the board accommodate USB-C, PCIe, DSI, and CSI flex cables, ensuring easy access throughout the enclosure. Extra space is available within the enclosure for a GNSS antenna or a battery, depending on your specific use case.
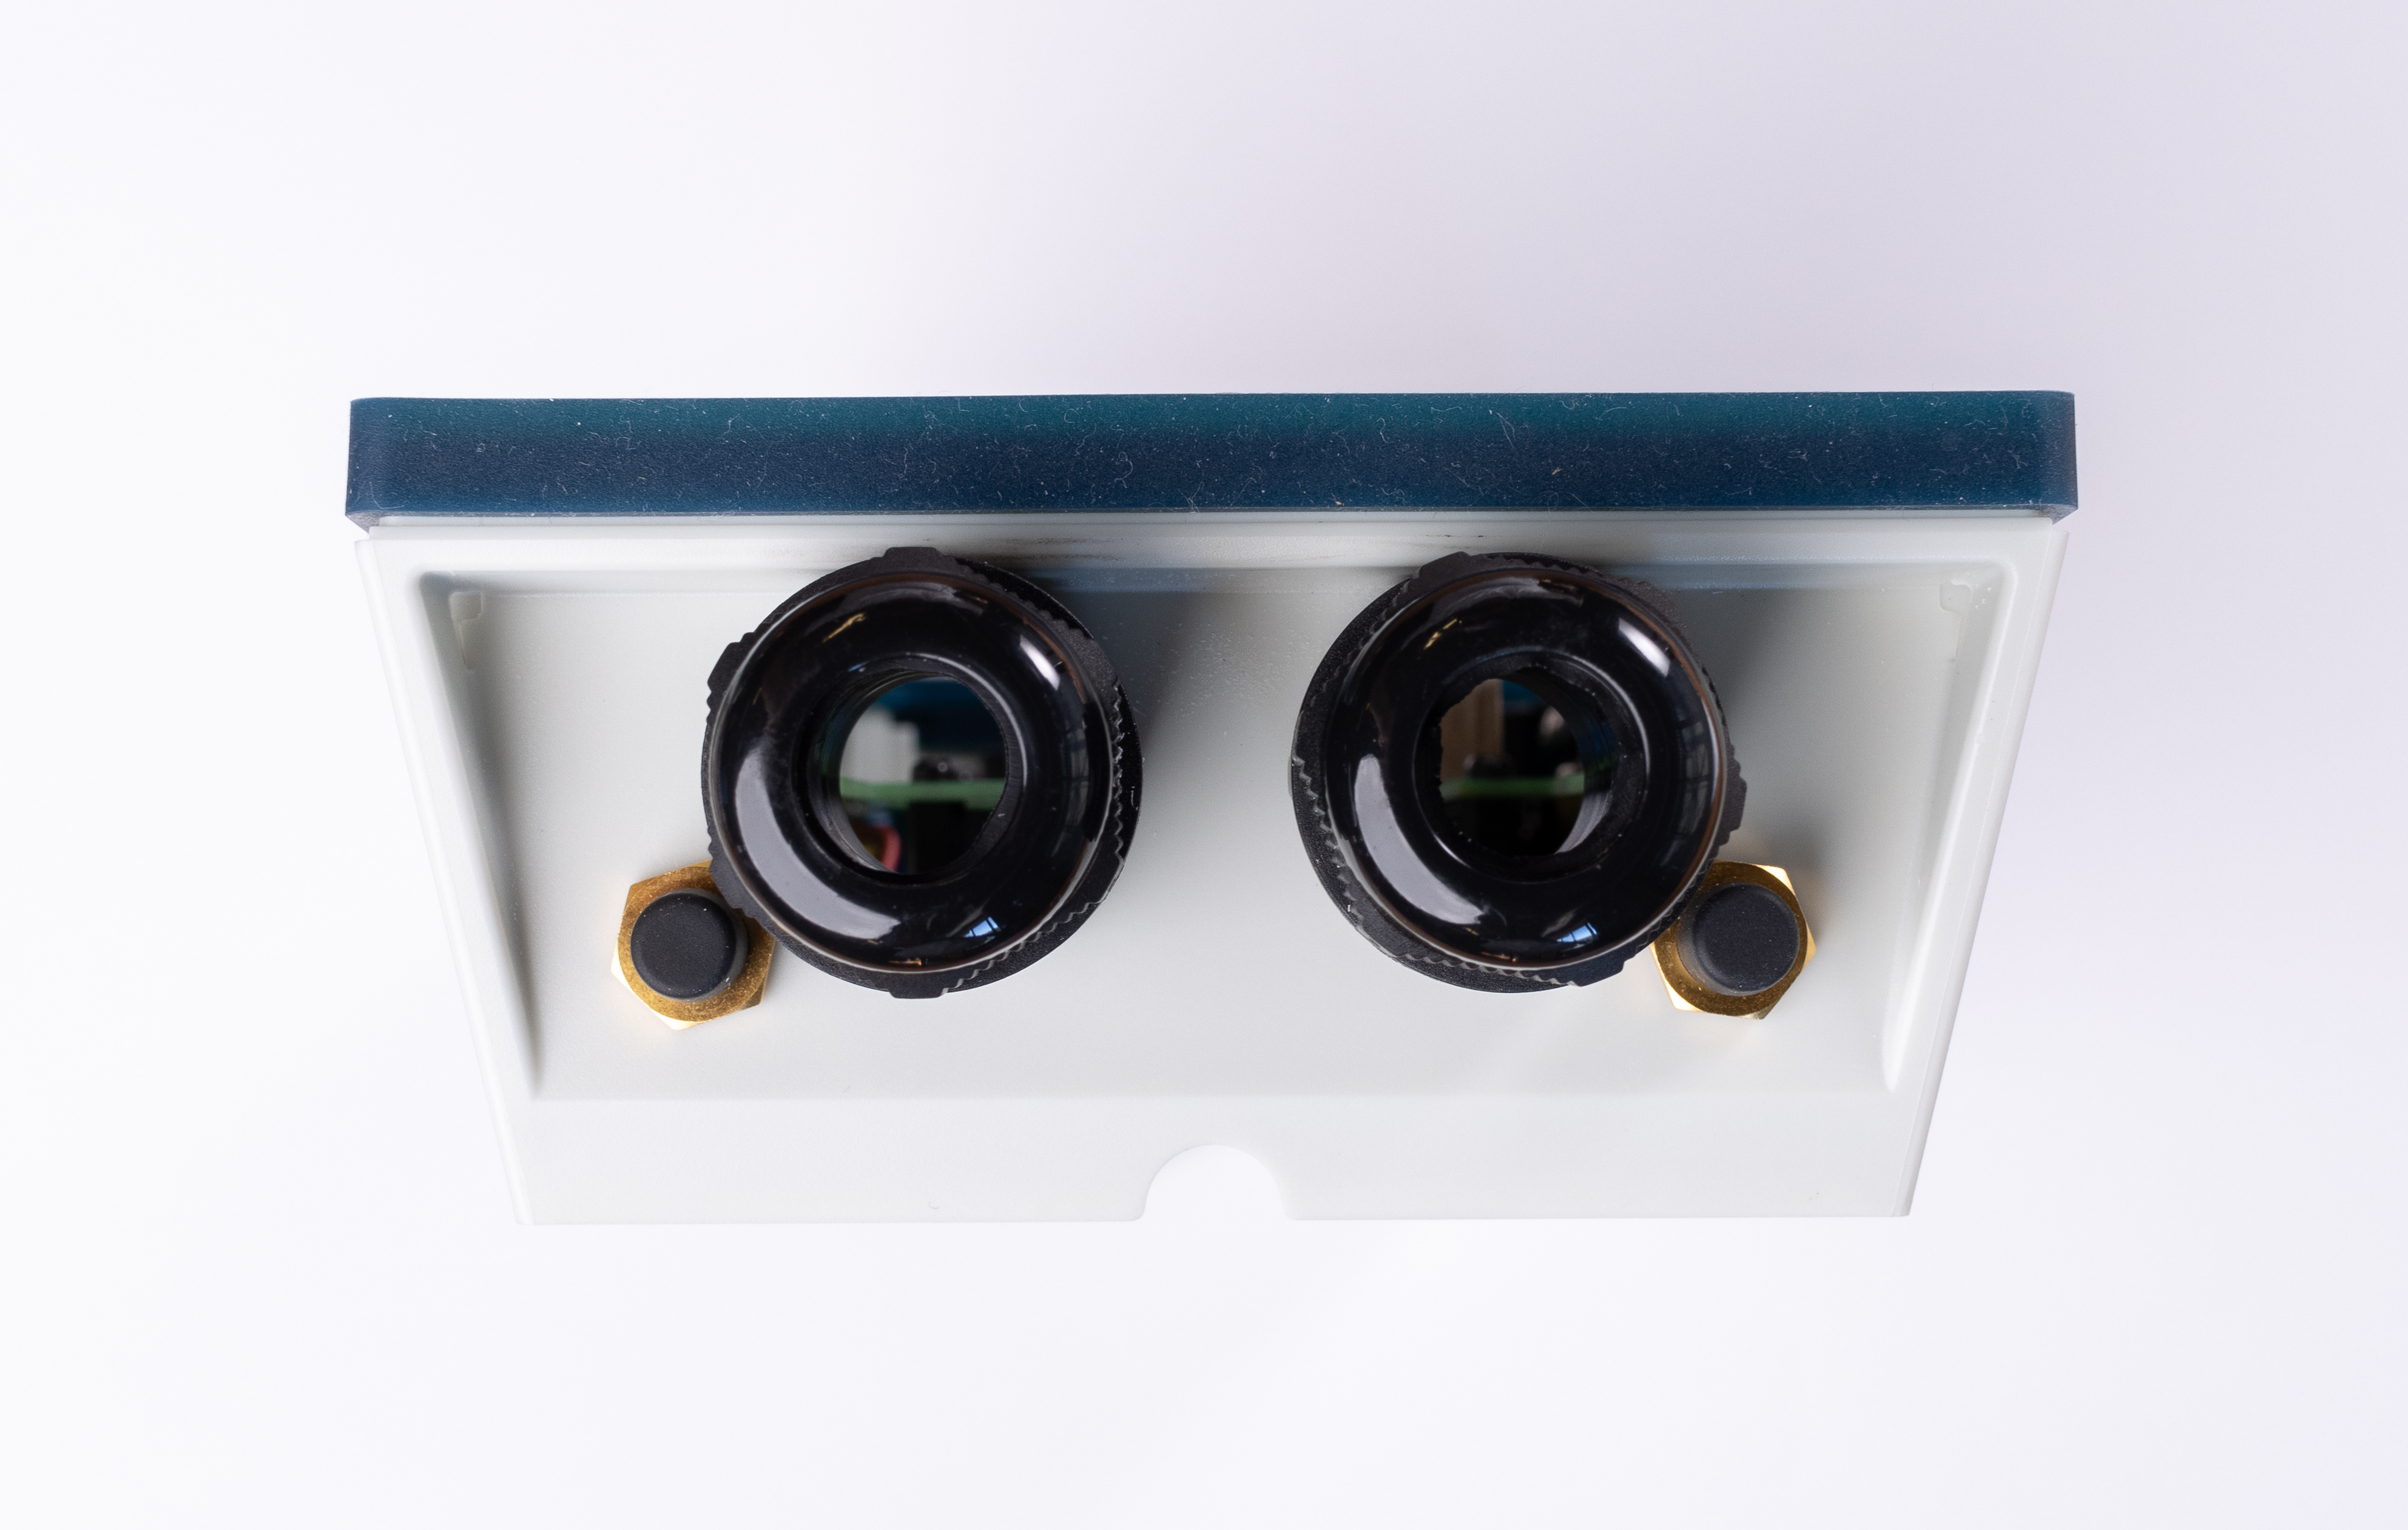
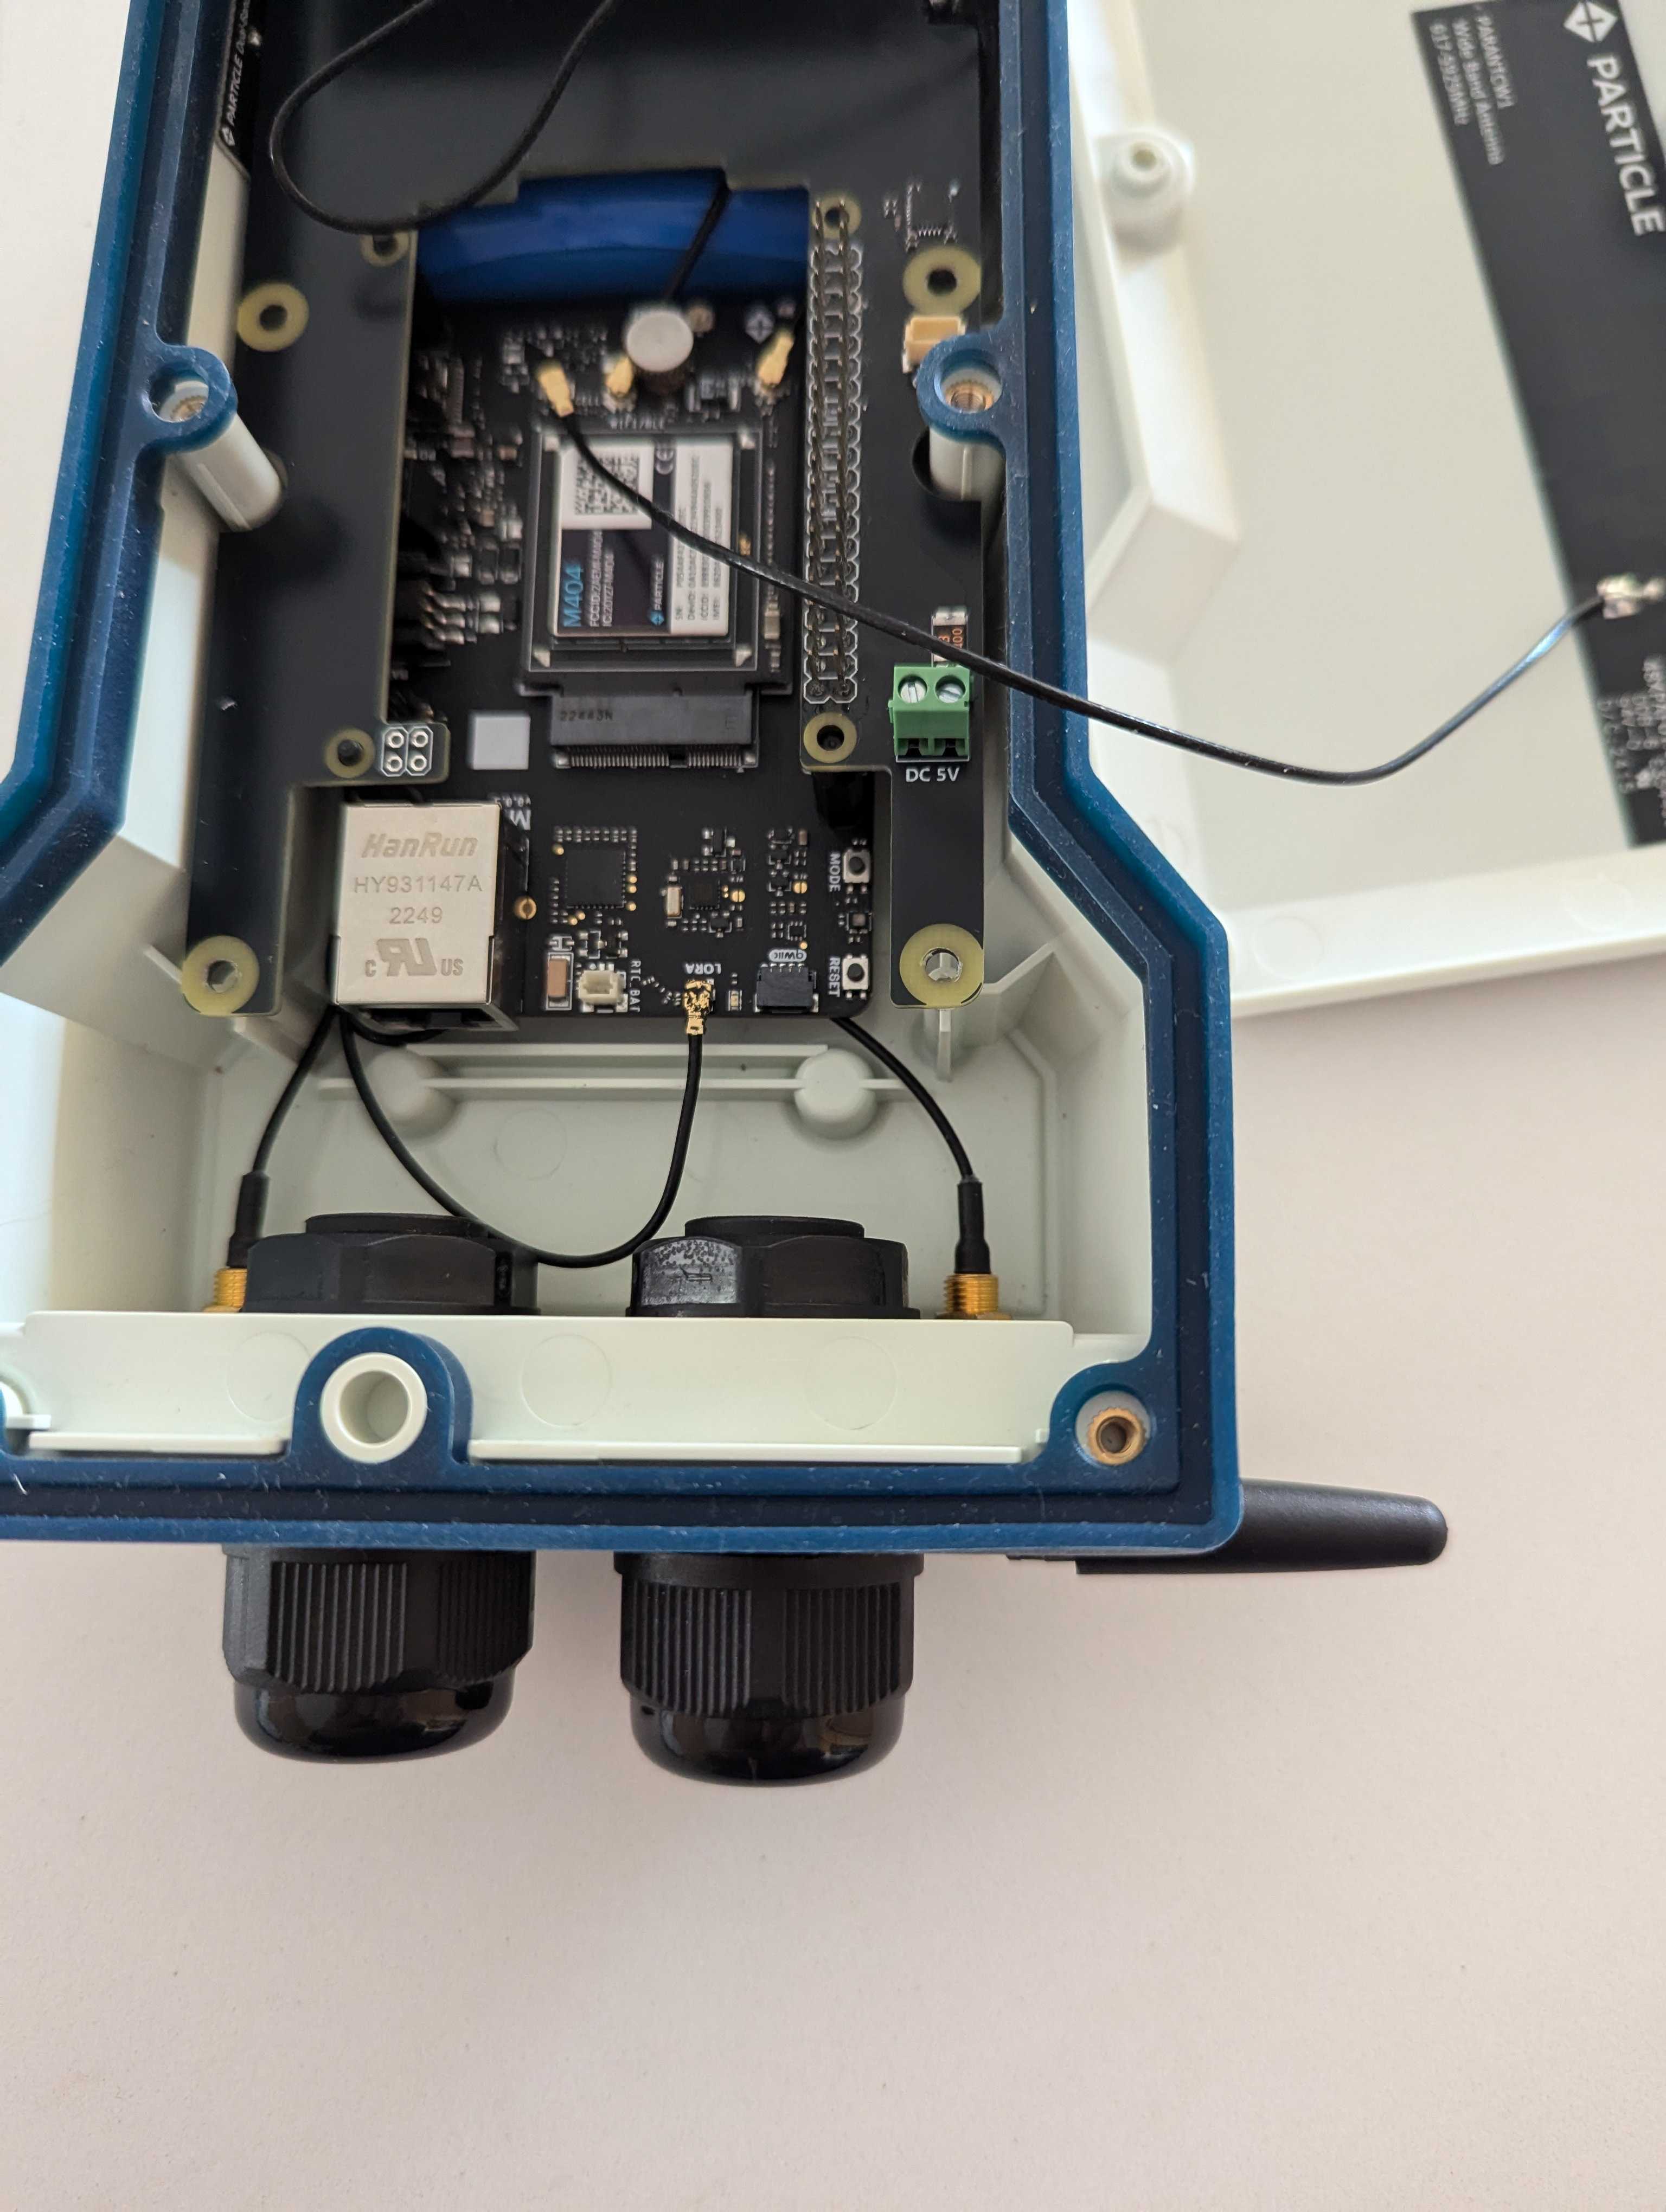
The bulkhead includes two M20 holes that can be used with round hole plugs or cable glands (included) or can fit other compatible connectors. It also includes two holes that can be used for SMA connectors that can be used for external antennas. The specifications for this cable are in the SMA to JST cable datasheet (pdf).
This enclosure is designed to secure your gateway in various challenging environments, offering flexible mounting options for walls, rails, poles, magnetic surfaces, and more. Ideal for both indoor and outdoor use, this enclosure ensures your devices are safe from dust, water, and other environmental hazards.
Includes:
- Enclosure in white with dark blue accents
- Carrier board for Raspberry Pi compatible boards
- 2x M20 cable glands with TE RJ45 feed-through
- 2x M20 hole plugs
- Back mounting plate
- M3 & M2 hex tools
- Mounting hardware for plates (screws, bolts, etc)
- USB-C cable
The Muon, Tachyon, or Raspberry Pi is not included. Antennas and batteries are sold separately as they may vary depending on the device used.
Internal features
- ADP8866 LED driver for the 3 RGB LEDs connected by I2C
- Front RGB status LED
- Side RGB LEDs (2)
- Externally accessible button for use by user applications
- 2-pin connector for 5V power (internal)
Mounting
The mounting plate on the M1 Enclosure is the same as the Monitor One. The Monitor One is shown in the picture, which has different bulkhead connectors, but the mounting plate is the same.
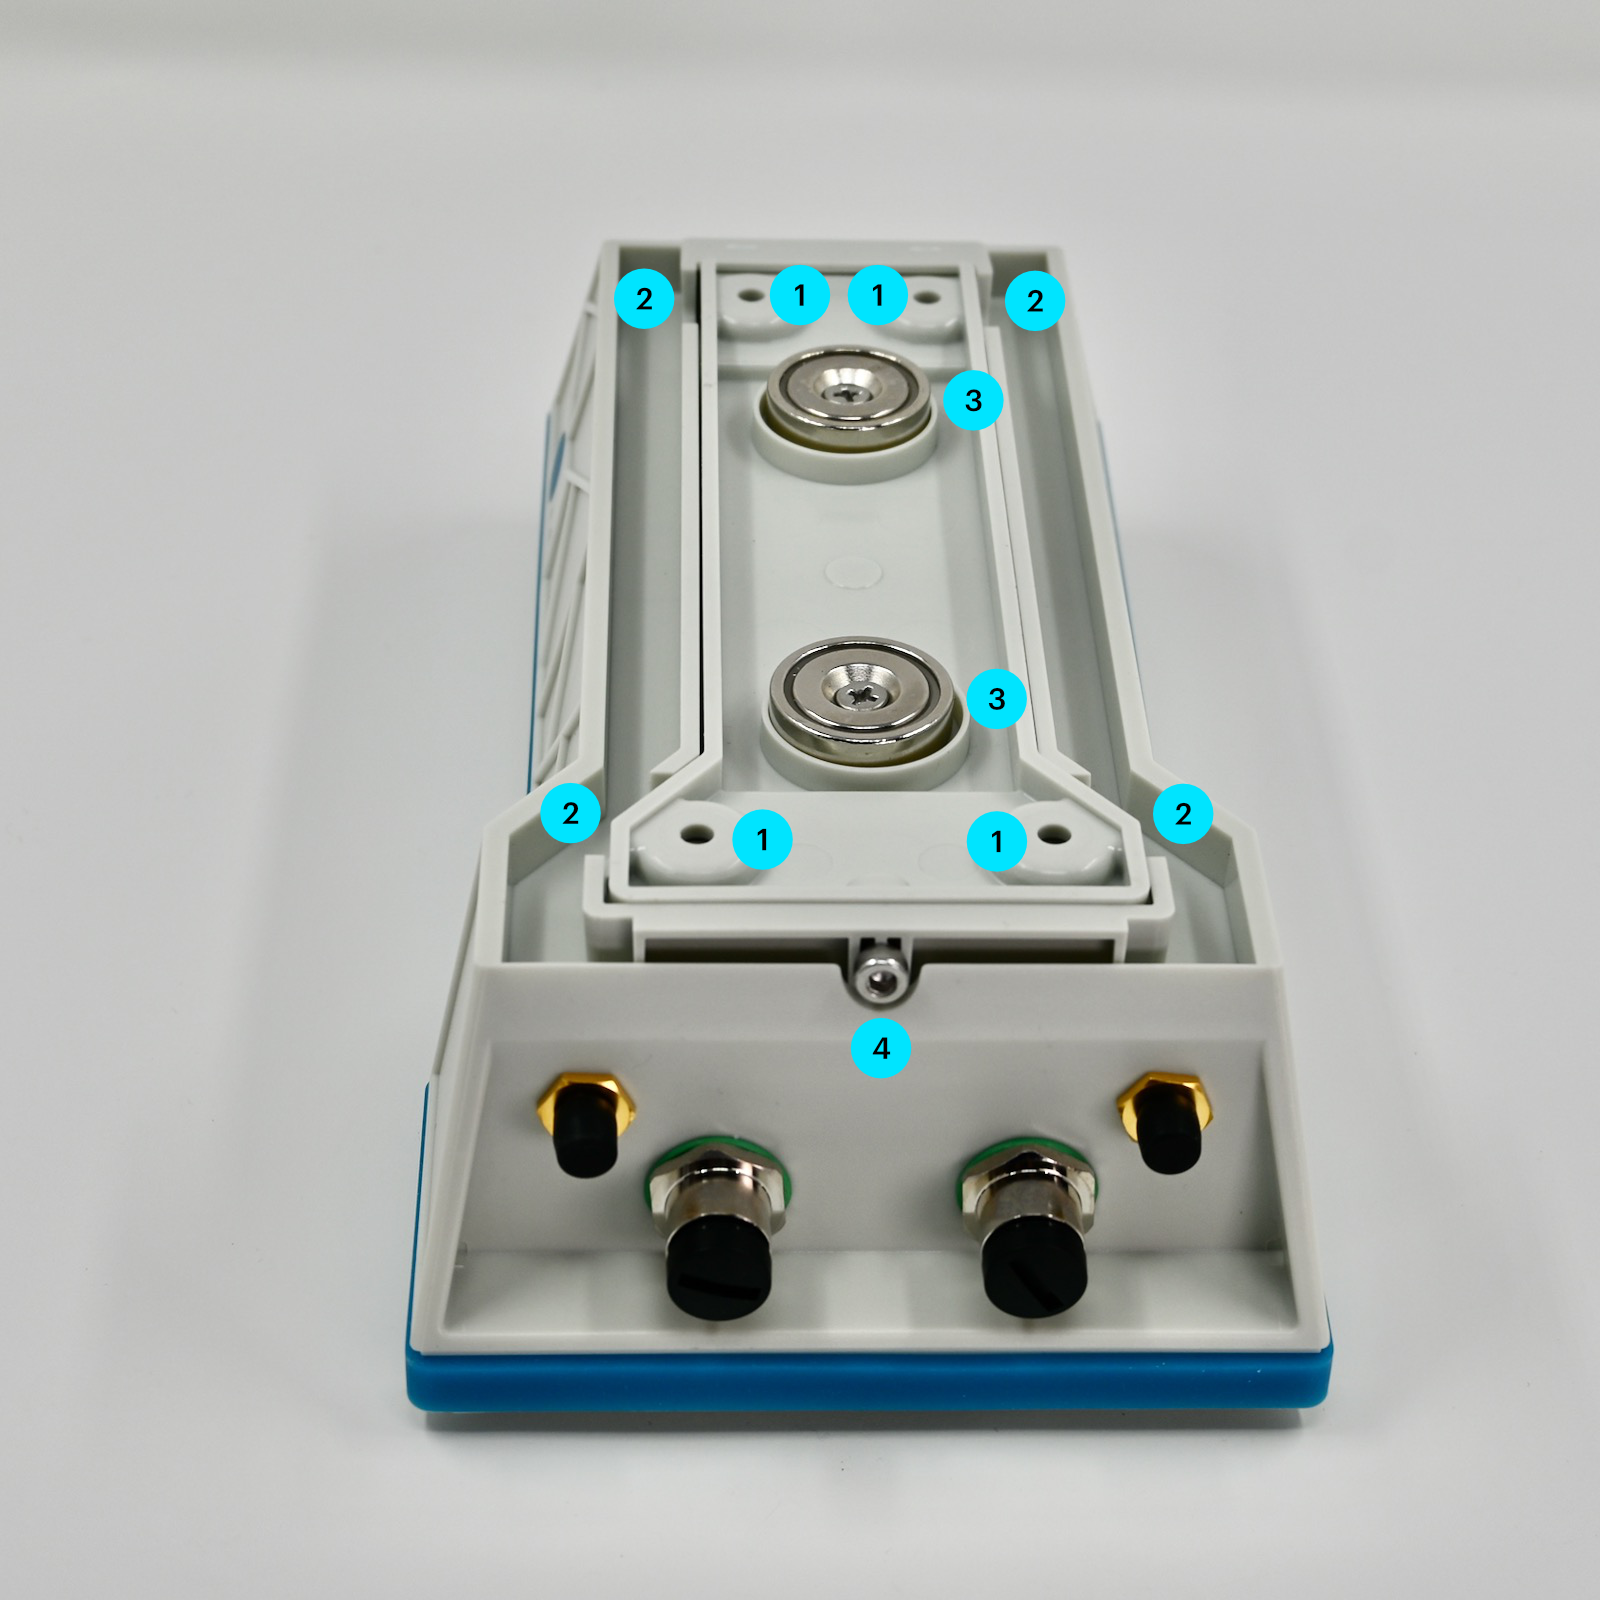
Monitor One pictured
| Label | Details |
|---|---|
| 1 | Mounting screw or bolt holes |
| 2 | Slots for strap mounting |
| 3 | Magnets |
| 4 | Mounting plate removal screw (M3 hex, 3mm) |
The mounting plate contains two magnets (3) that allow it to be easily mounted on a metal surface.
The mounting plate is removable from the back of the unit after removing the screw on the bottom (4), near the expansion connectors.
Once removed, you can screw or bolt the mounting plate through the four holes (1) and reattach the Monitor One. This is good for rough conditions and for mounting on non-metal surfaces.
The mounting plate can be strap mounted through the two slots (2).
The magnets do not need to removed to use screw, bolt, or strap mounting.
| Dimensions | Metric | SAE |
|---|---|---|
| Top, width between mounting holes | 28 mm | 1 3/32" |
| Bottom, width between mounting holes | 46 mm | 1 13/16" |
| Height between mounting holes | 140 mm | 5 1/2" |
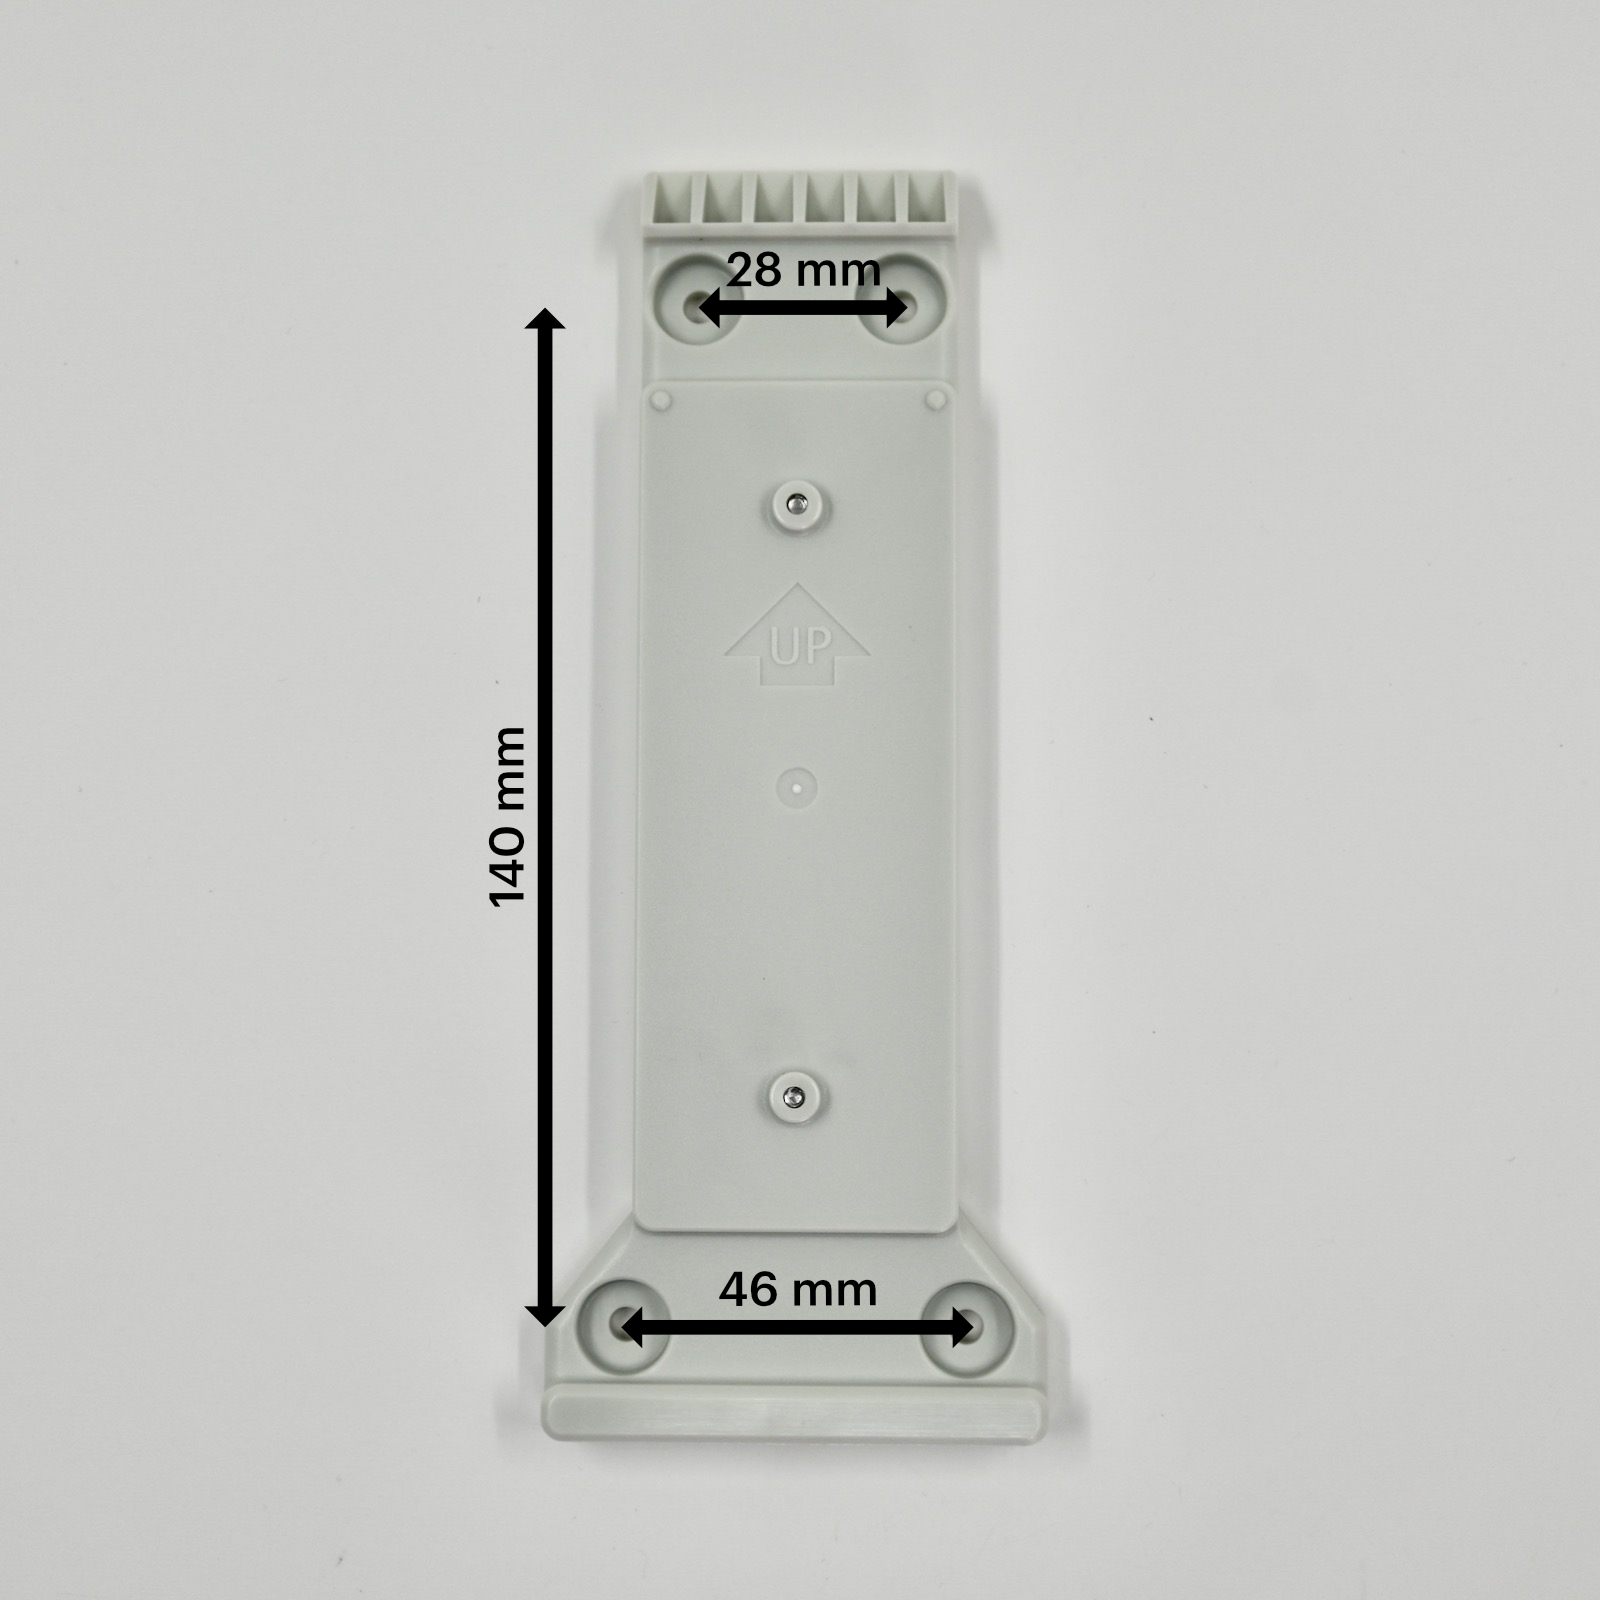
| Dimensions | Metric | SAE |
|---|---|---|
| Bolt/screw head hole diameter (maximum) | 12.46 mm | 31/64" |
| Bolt/screw head maximum height (maximum) | 4.0 mm | 5/32" |
| Bolt/screw hole diameter (maximum) | 4.33 mm | 11/64" |
| Bolt/screw shaft to surface (maximum) | 3.65 mm | 9/64" |
| Recommended bolt or screw | M4 | #8 |
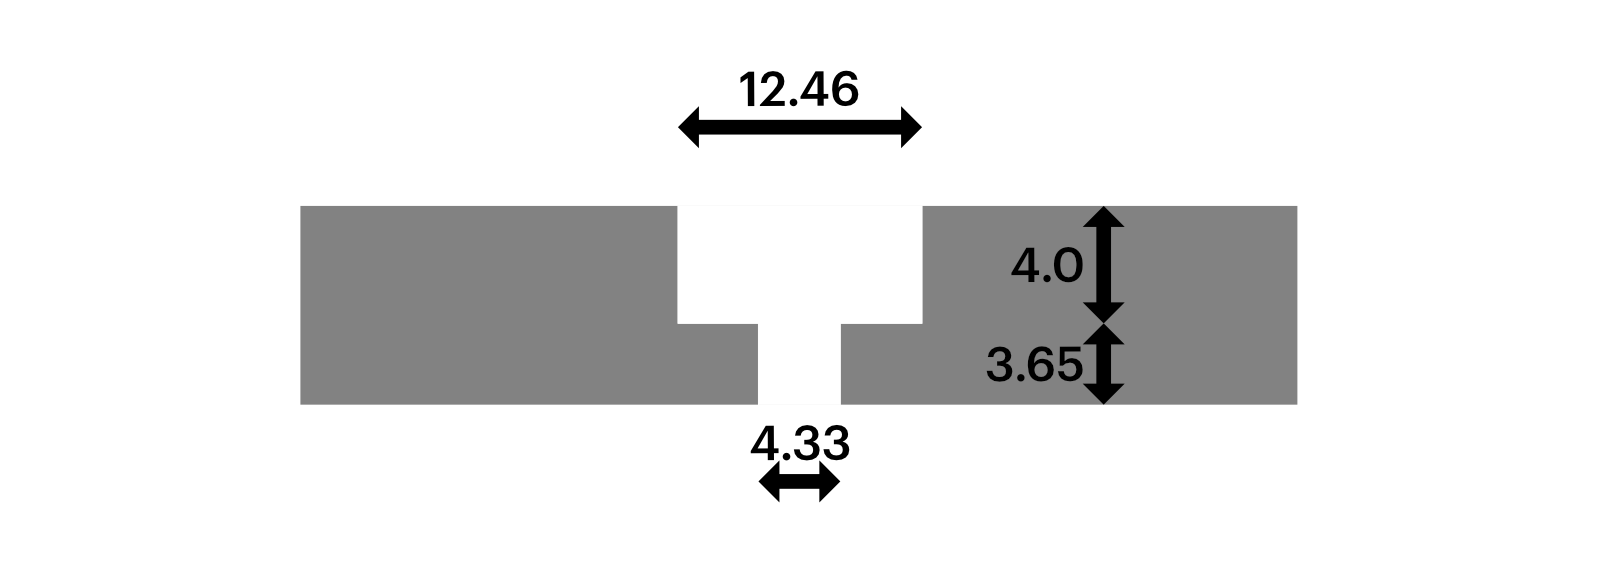
When mounting using a strap, the strap will hold the mounting bracket against a surface and is sandwiched between the mounting bracket and the Monitor One enclosure.
| Dimensions | Metric | SAE |
|---|---|---|
| Maximum strap width | 15 mm | 19/32" |
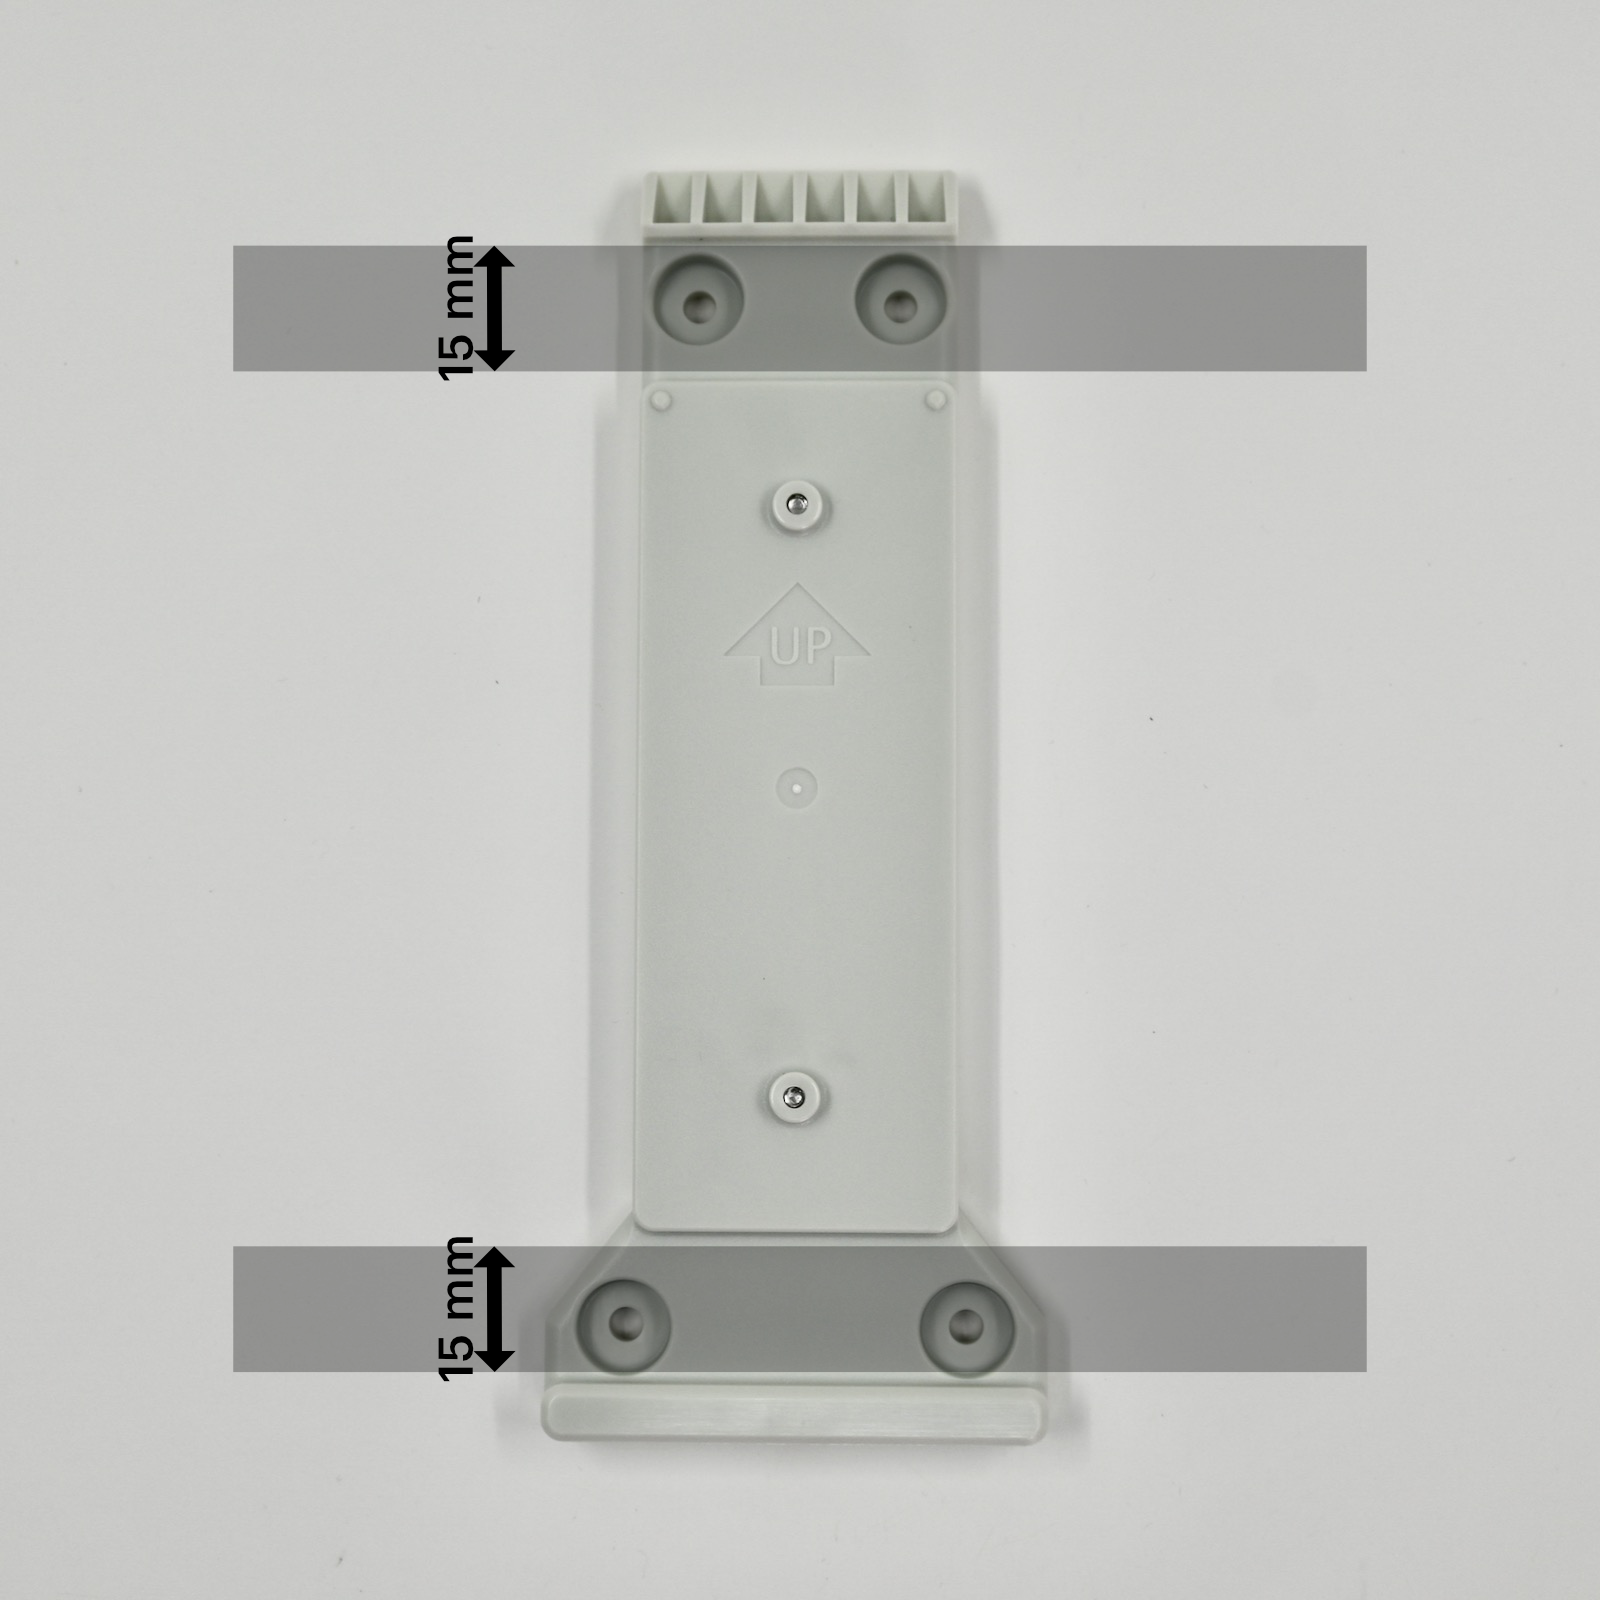
If you wish to fabricate your own compatible mounting bracket, the STEP file can found in the Monitor One Github repository.
User LEDs
There are three LEDs controlled by an ADP8866 I2C PWM controller. It is connected to the I2C bus (address 0x27).
M1 carrier board
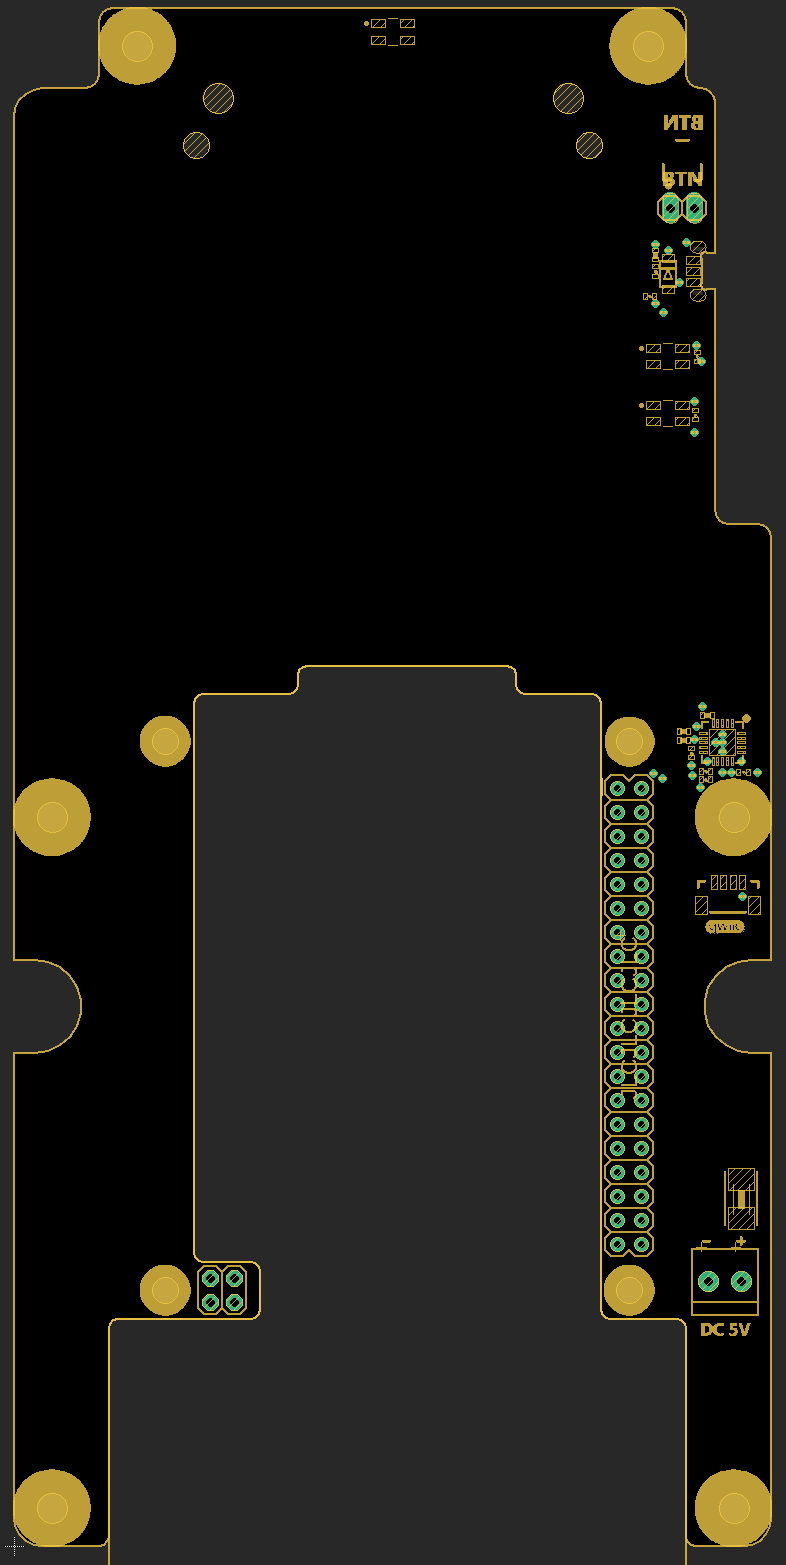
The M1 carrier board fits in the M1 Enclosure. The Raspberry Pi-compatible board including the Muon or Tachyon mounts under the carrier board and the expansion header pins passes through the carrier board.
Muon Antenna placement
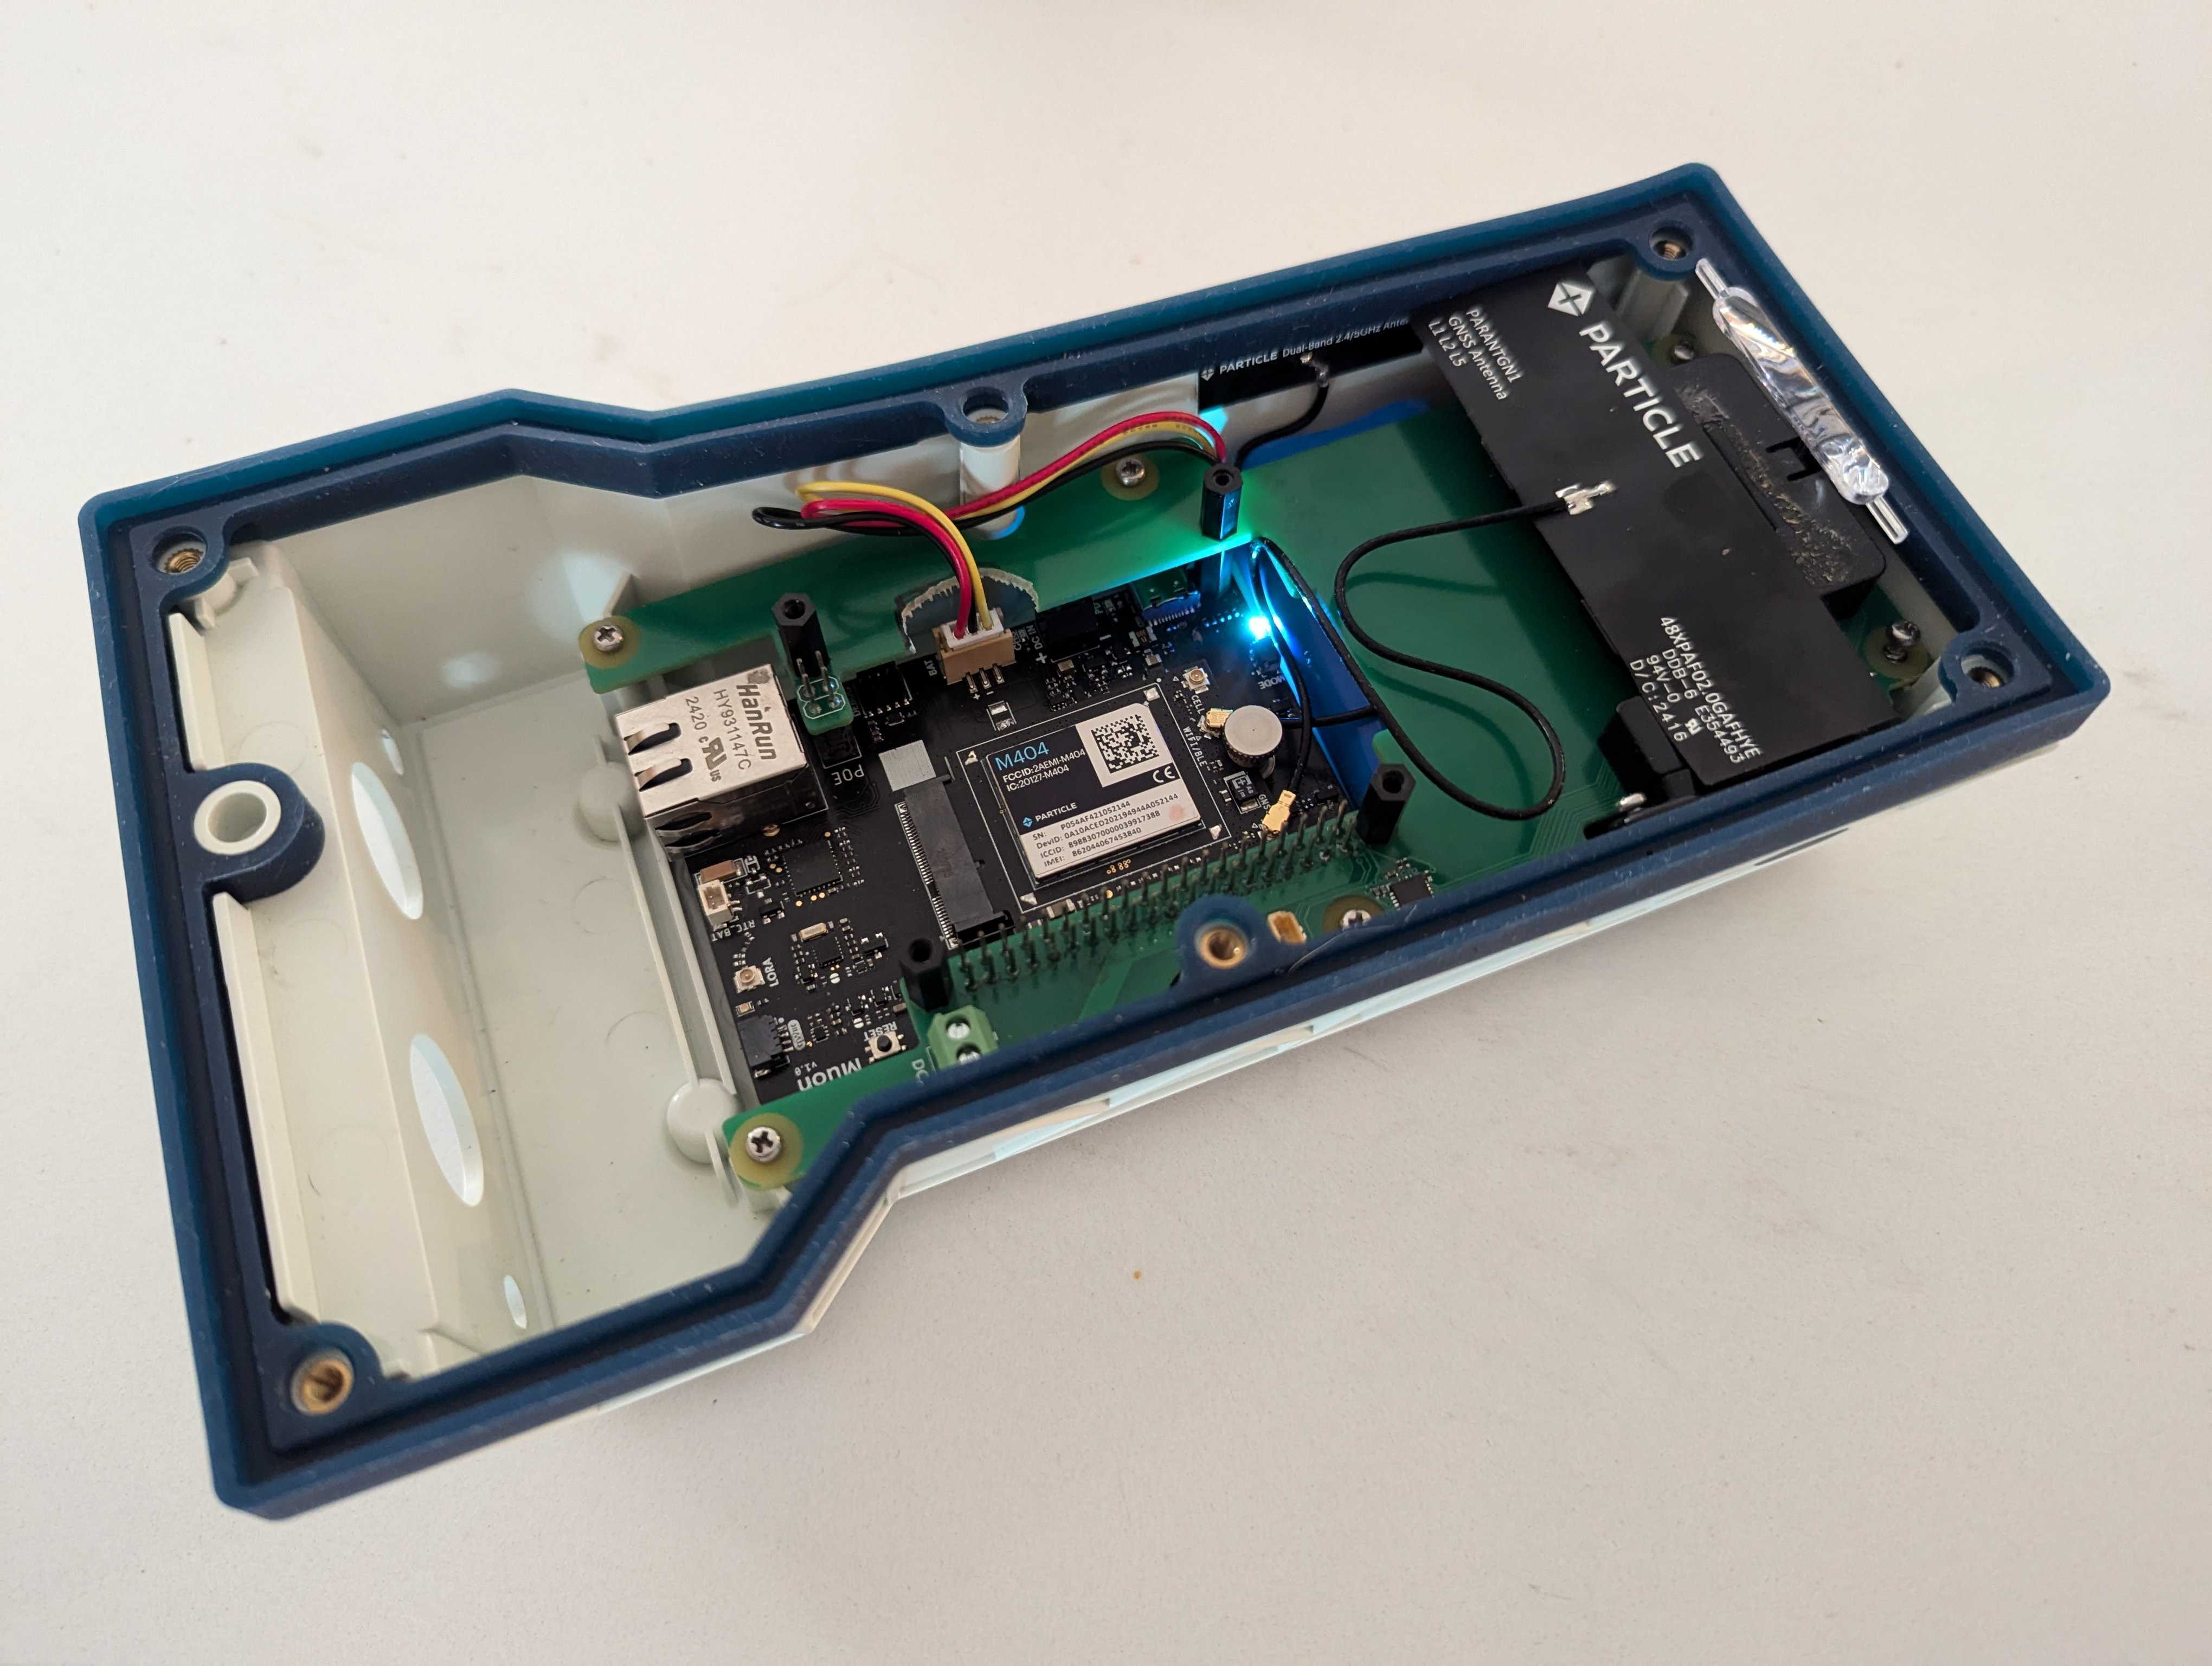
The following antenna placement is recommended when using the Muon in the M1 Enclosure.
Cellular antennas - Muon
The cellular antenna should be mounted on the lid and connected to the U.FL connector on the M-SoM.
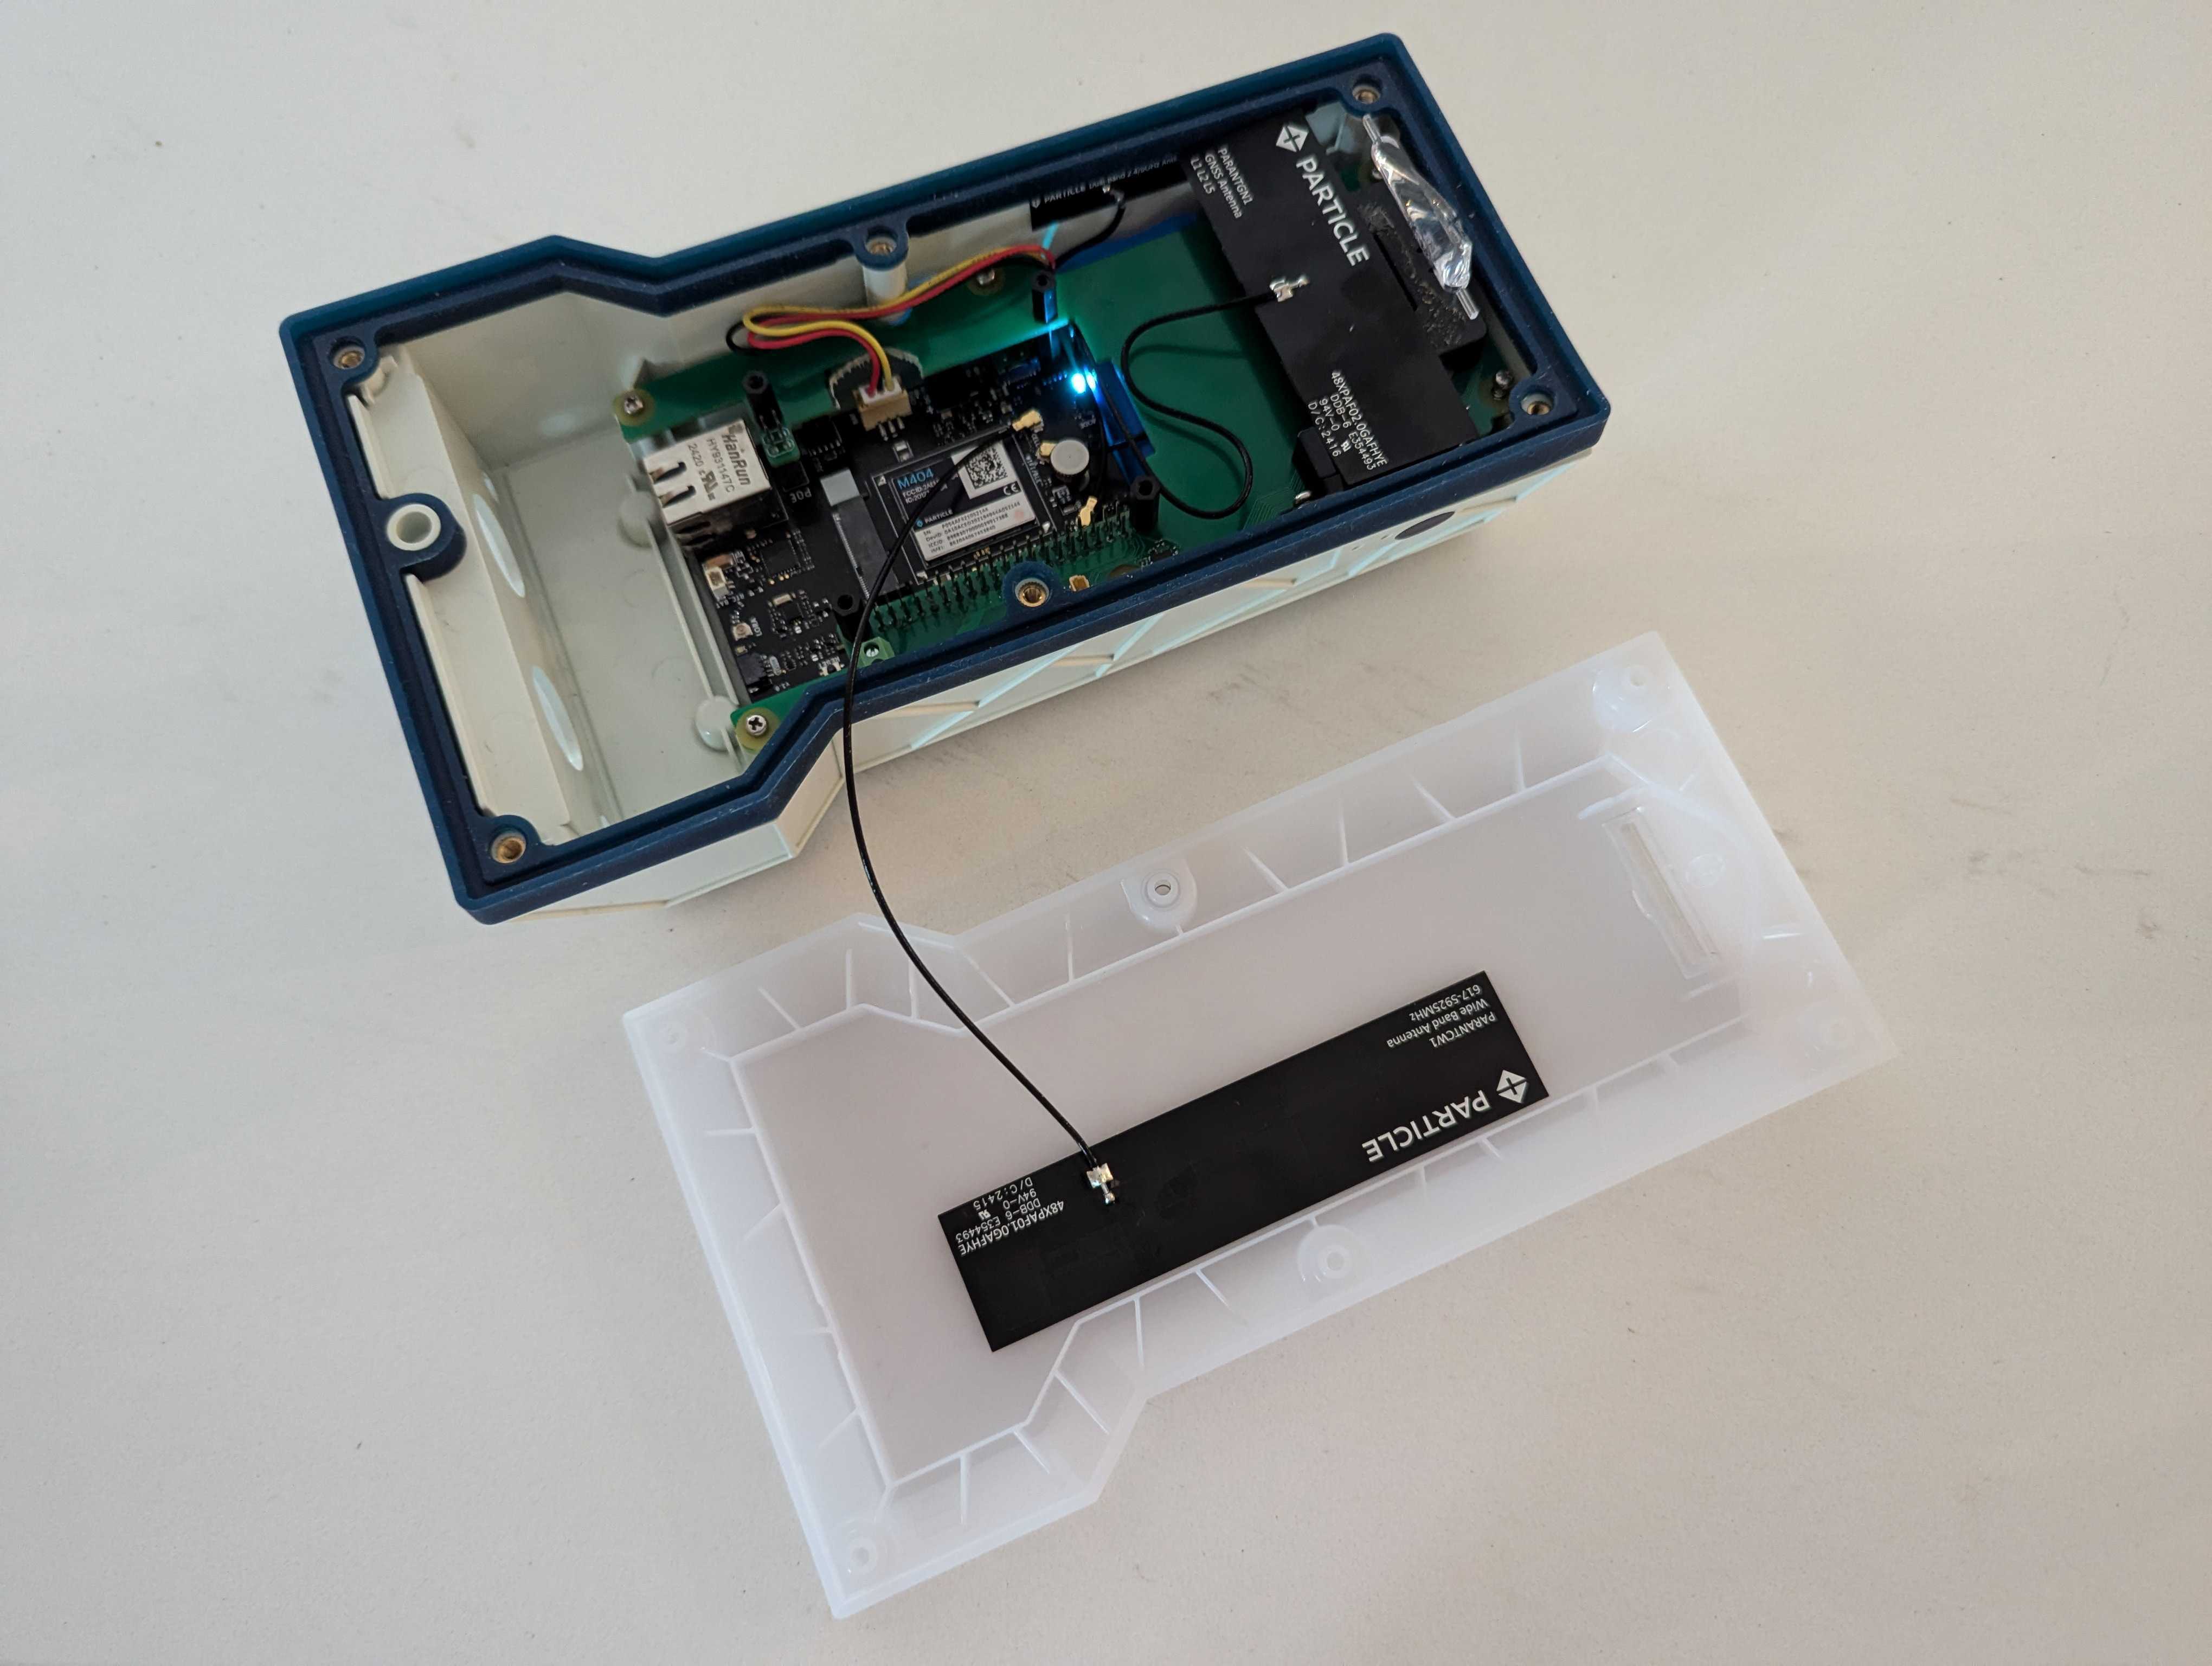
The M-SoM is certified with the following cellular antenna:
| Antenna | SKU | Details | Links |
|---|---|---|---|
| Wide band LTE cell antenna [x1] | PARANTCW1EA | B504e and M-SoM | Datasheet |
| Wide band LTE cell antenna [x50] | PARANTCW1TY | B504e and M-SoM | Datasheet |
Single quantity units and developer kits include a PARANTCW1EA antenna. Tray quantities of the do not include antennas.
| Dimension | Value | Unit |
|---|---|---|
| Length | 116.0 | mm |
| Width | 27.0 | mm |
| Thickness | 0.2 | mm |
| Cable Length | 189.5 | mm |
| Parameter | 700/850/900 | 1700/1800/1900 | 2100 | 2400 | 2600 | Unit | |
|---|---|---|---|---|---|---|---|
| Peak gain | |||||||
| PARANTCW1EA | 2.8 | 5.3 | 5.3 | 5.3 | 5.3 | dBi |
GNSS antenna - Muon
The GNSS antenna should be mounted just below the front status LED and connected to the U.FL connector on the M-SoM.
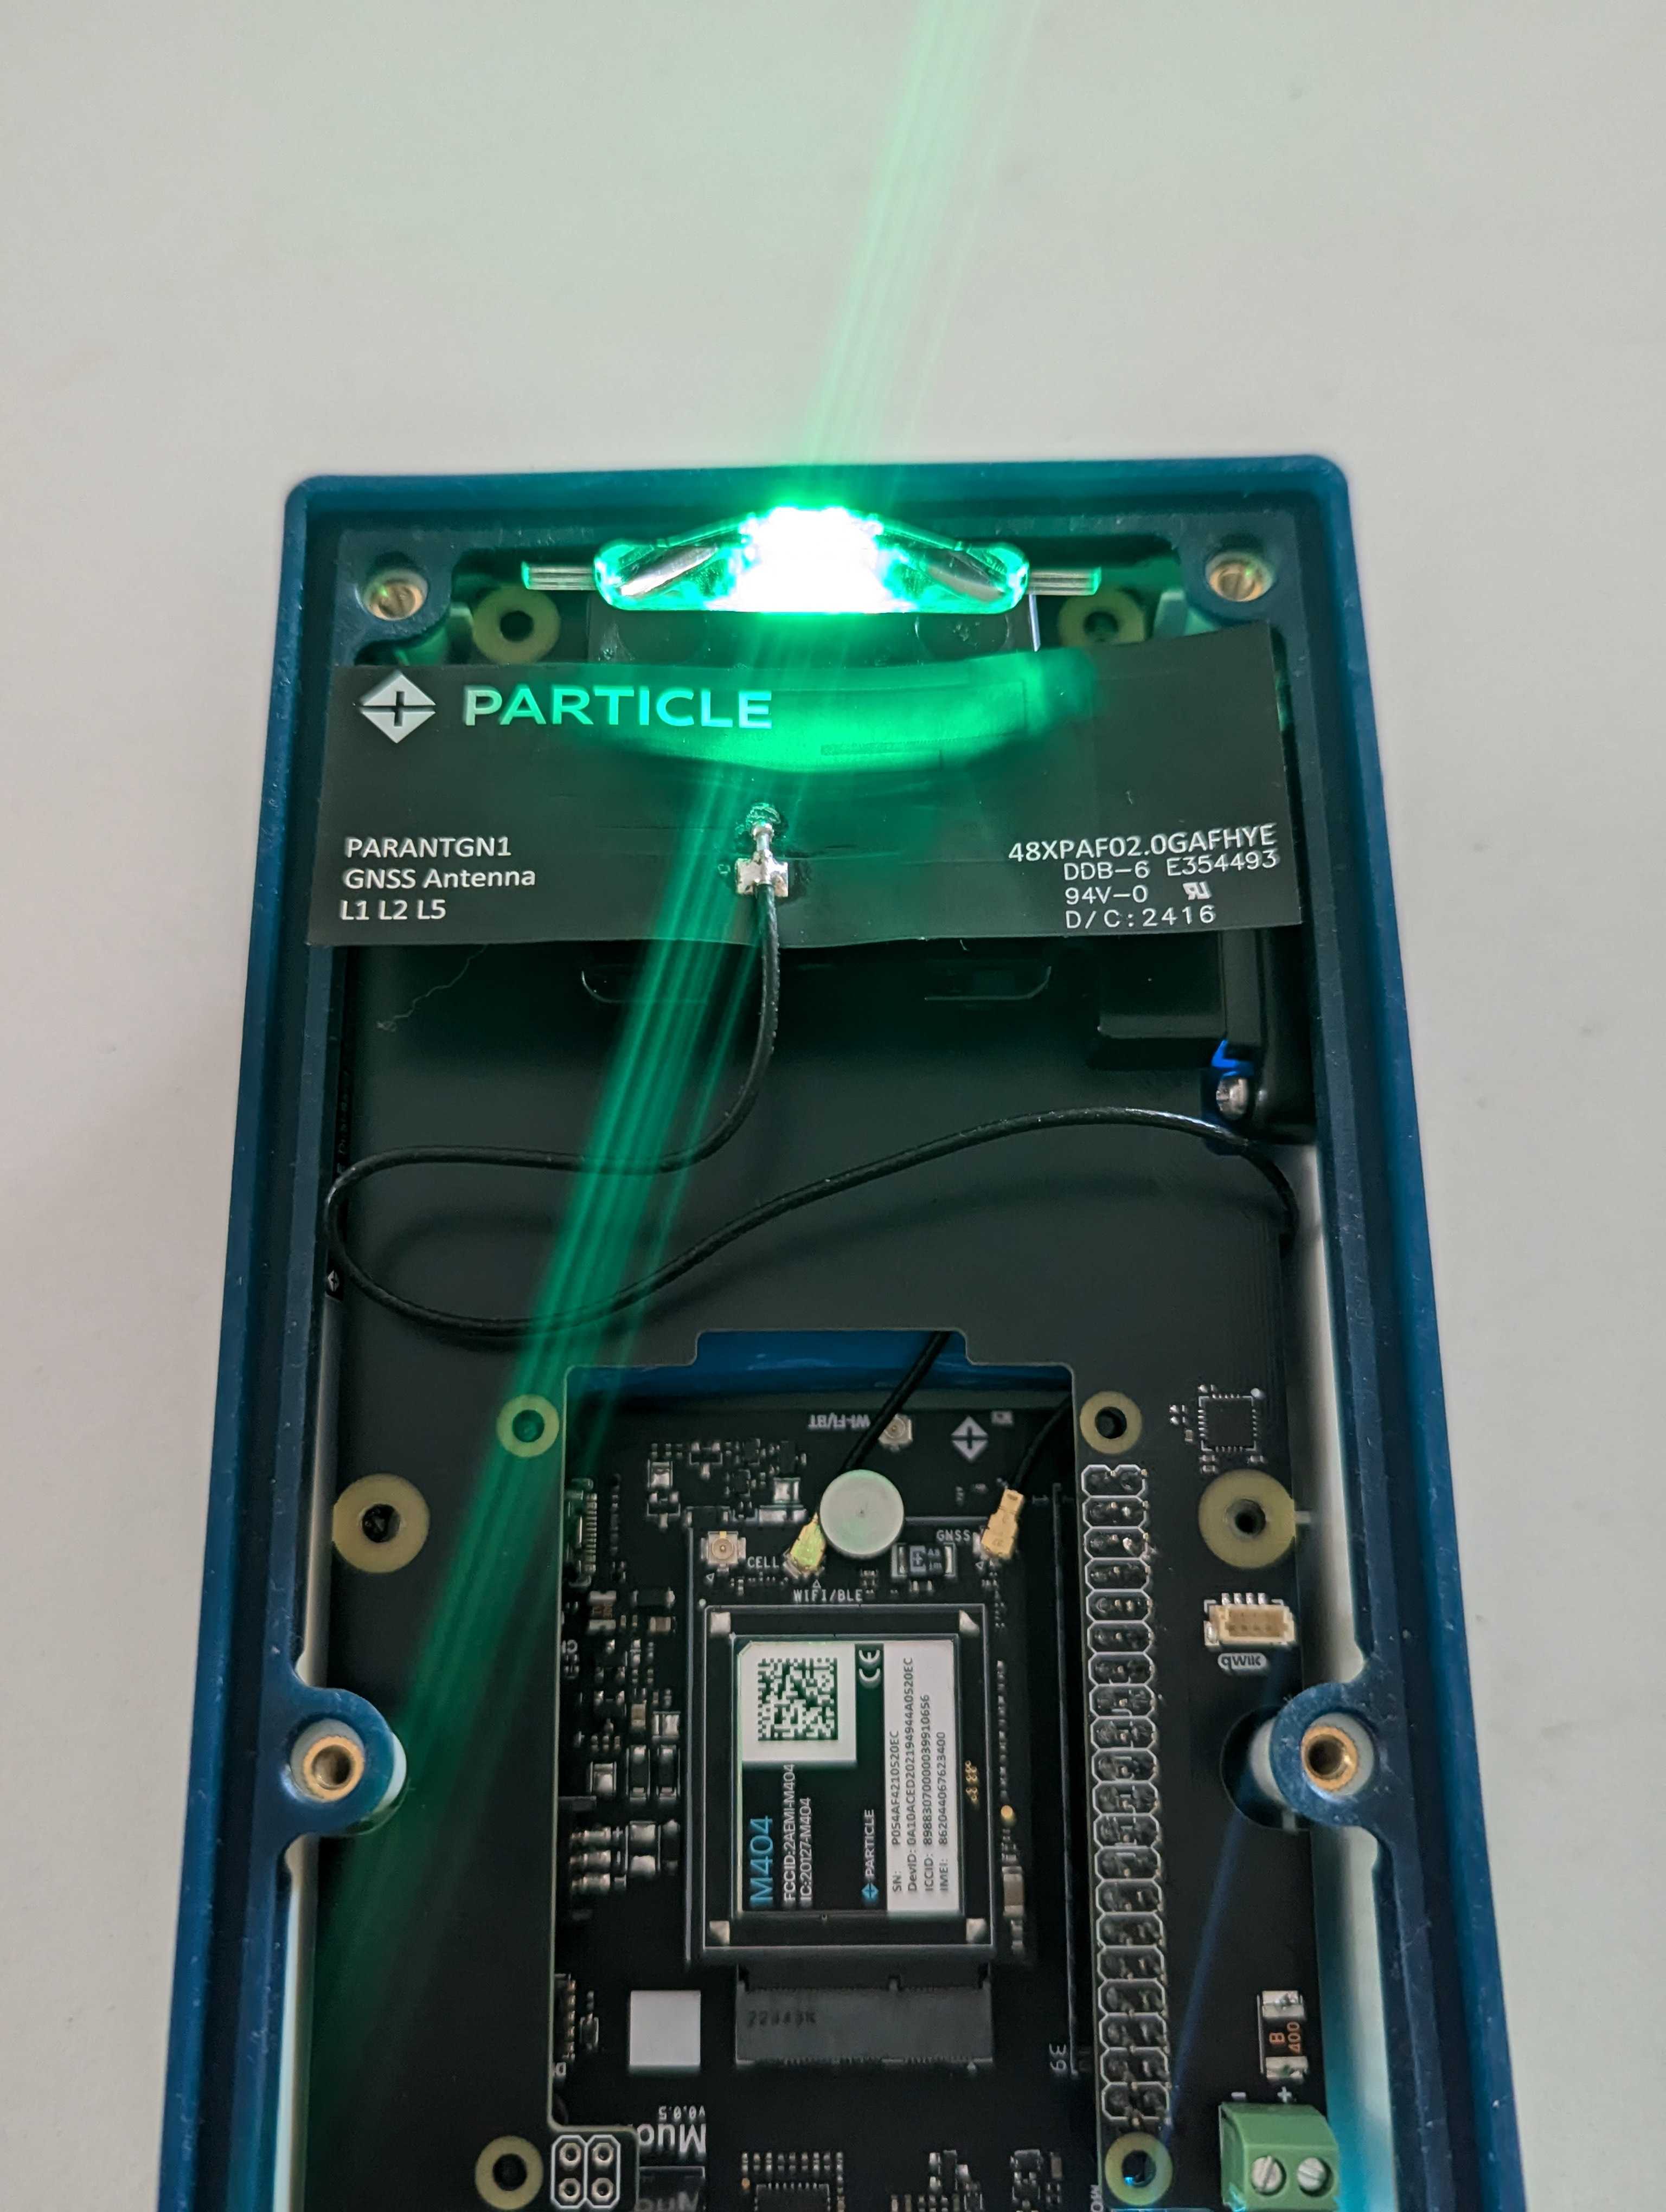
| SKU | Description | |
|---|---|---|
| PARANTGN1EA | Particle GNSS FPC Antenna, [x1] | Datasheet |
| PARANTGN1TY | Particle GNSS FPC Antenna, [x50] | Datasheet |
Single quantity M-SoM units and developer kits include a PARANTGN1EA antenna. Tray quantities of the M-SoM do not include antennas. If not using the GNSS feature, the antenna can be omitted from your design.
- A firmware library is available now for the M404. A future update will add support for the M524.
- Another option is the QuectelGnssRK library that can be used with LocationFusionRK to provide Tracker-like location services on the M-SoM.
- Features such of high-precision, dead-reckoning, and high updates rates will require an external GNSS chip.
- On the M404 (BG95 cellular modem), radio hardware is shared between the cellular modem and built-in GNSS which limits concurrent use.
Wi-Fi/BLE antenna - Muon
The Wi-Fi and BLE antenna mounts on the left side, next the carrier board, next to the battery. It must be installed before the carrier board is installed.
Install the wifi antenna sufficiently below the silicone gasket to avoid interference.
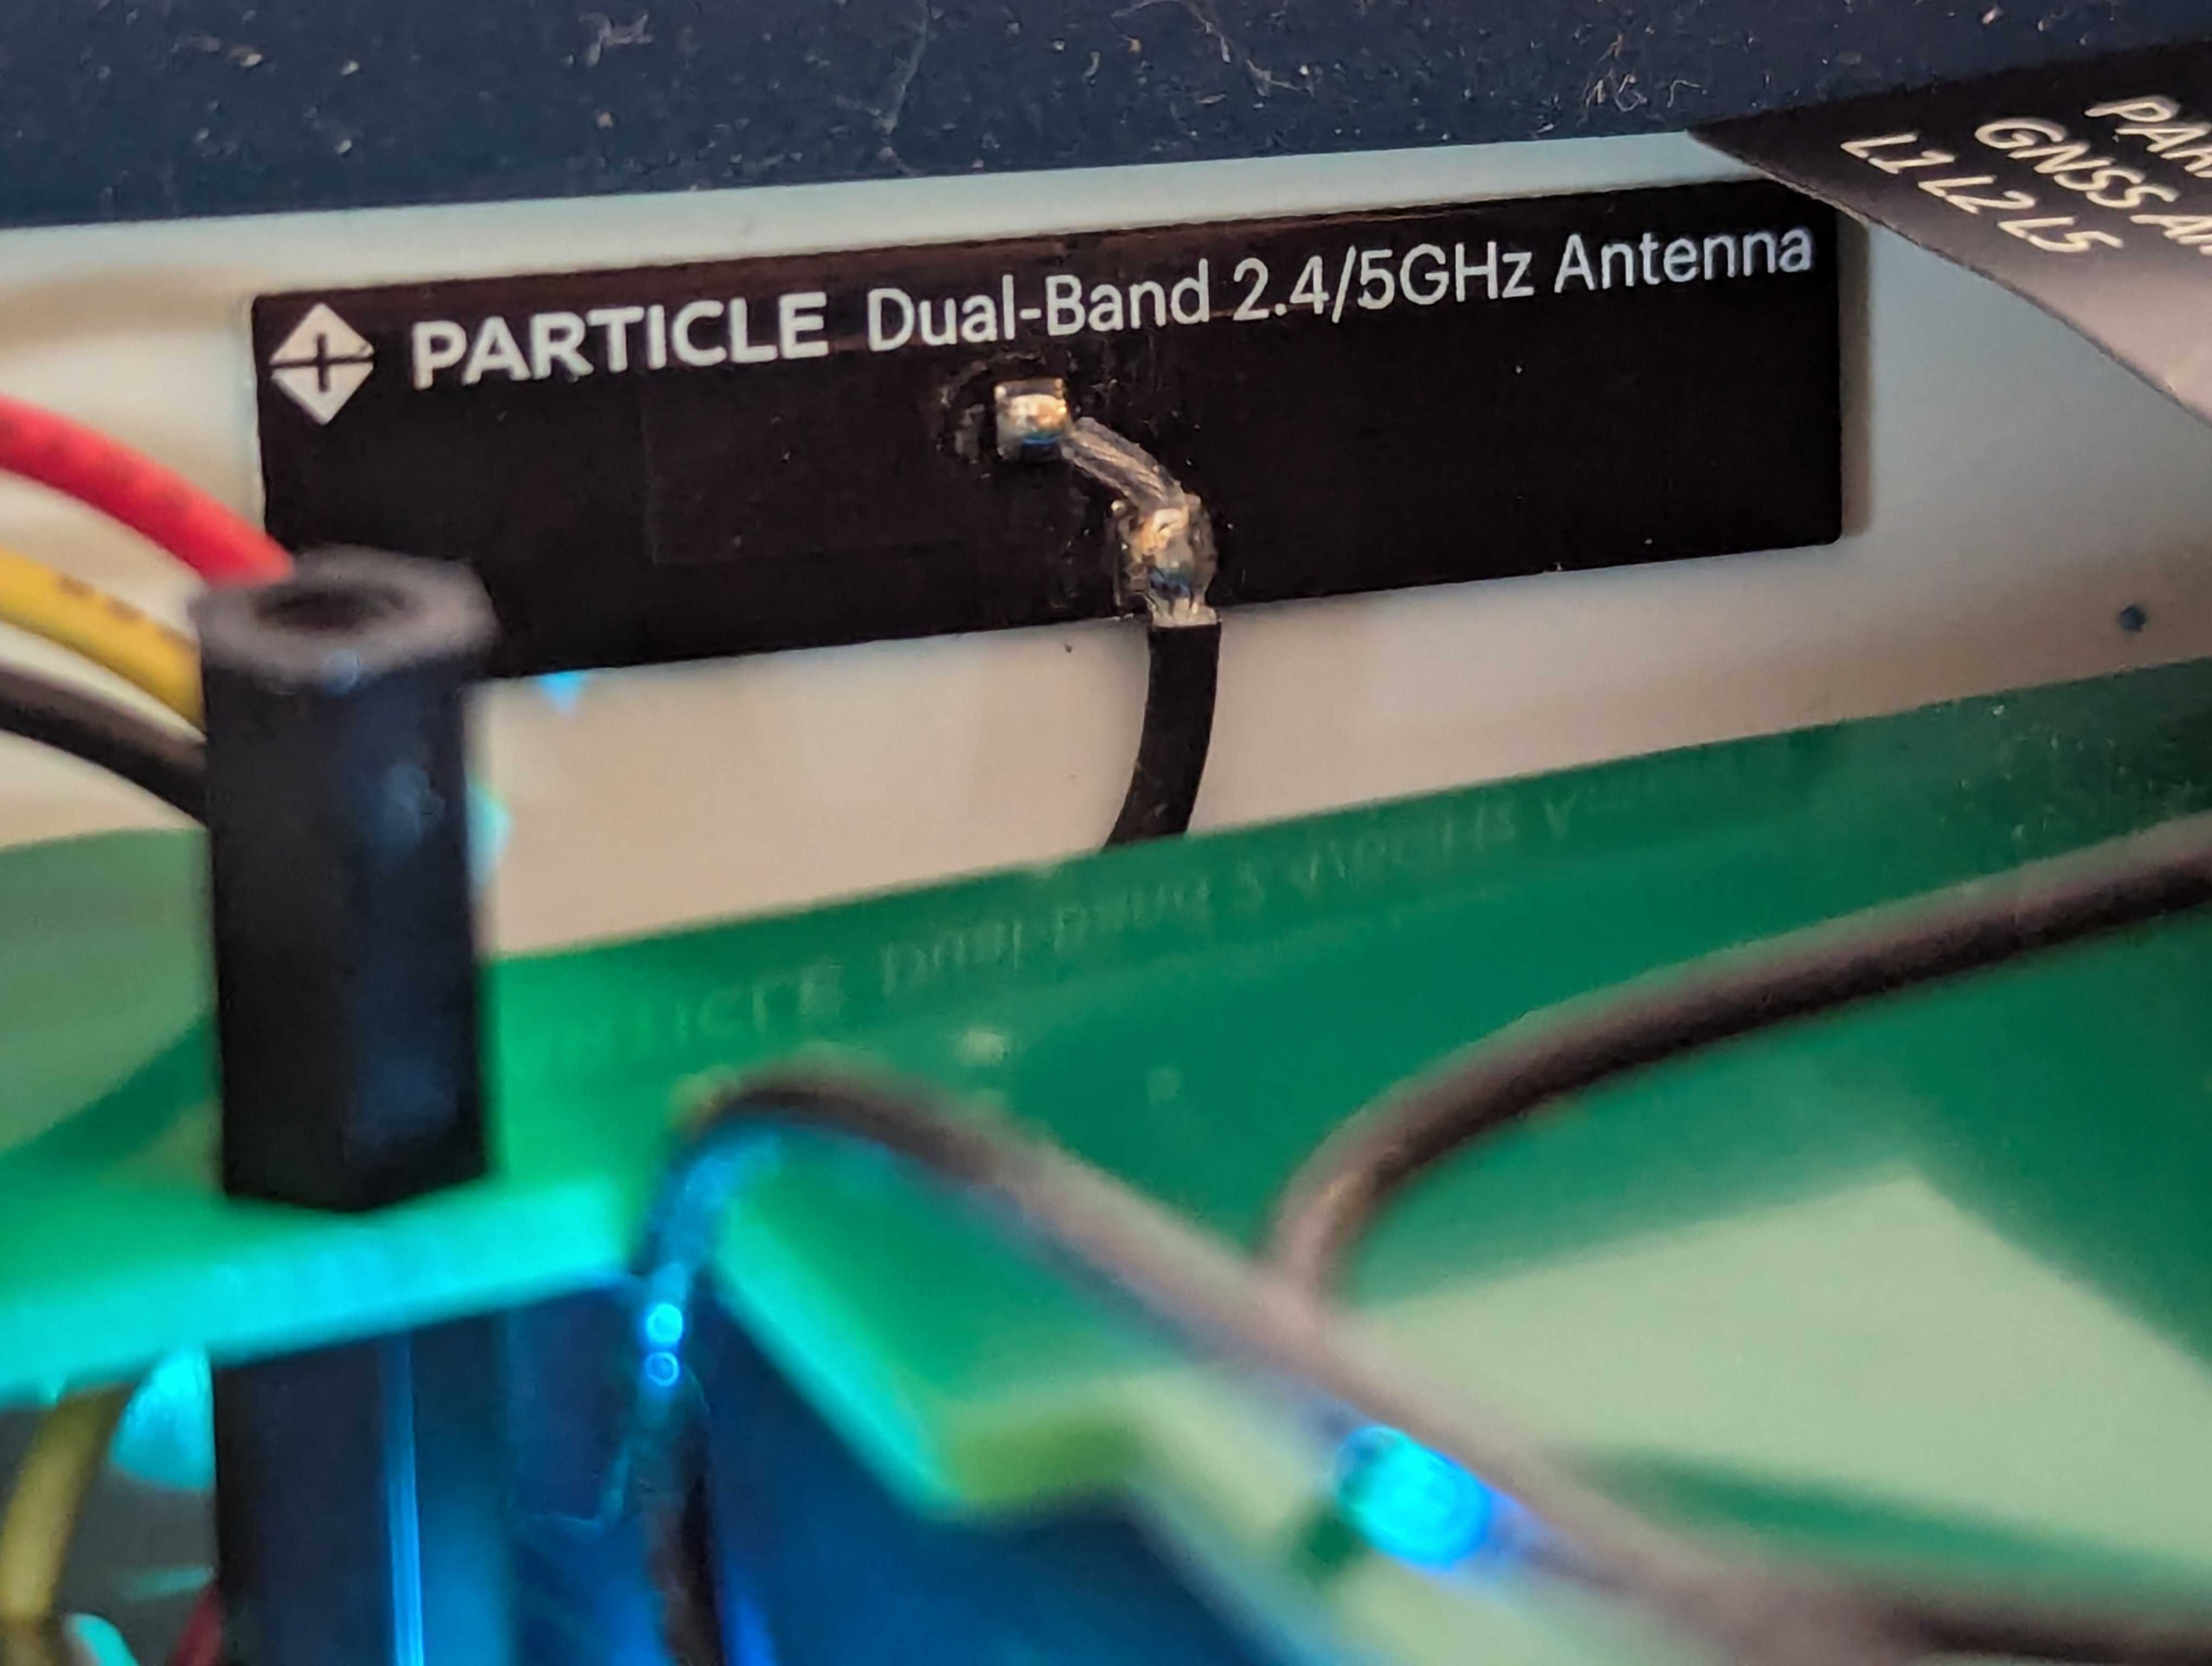
Make sure the wifi antenna cable is routed as such to avoid difficulty in assembly.
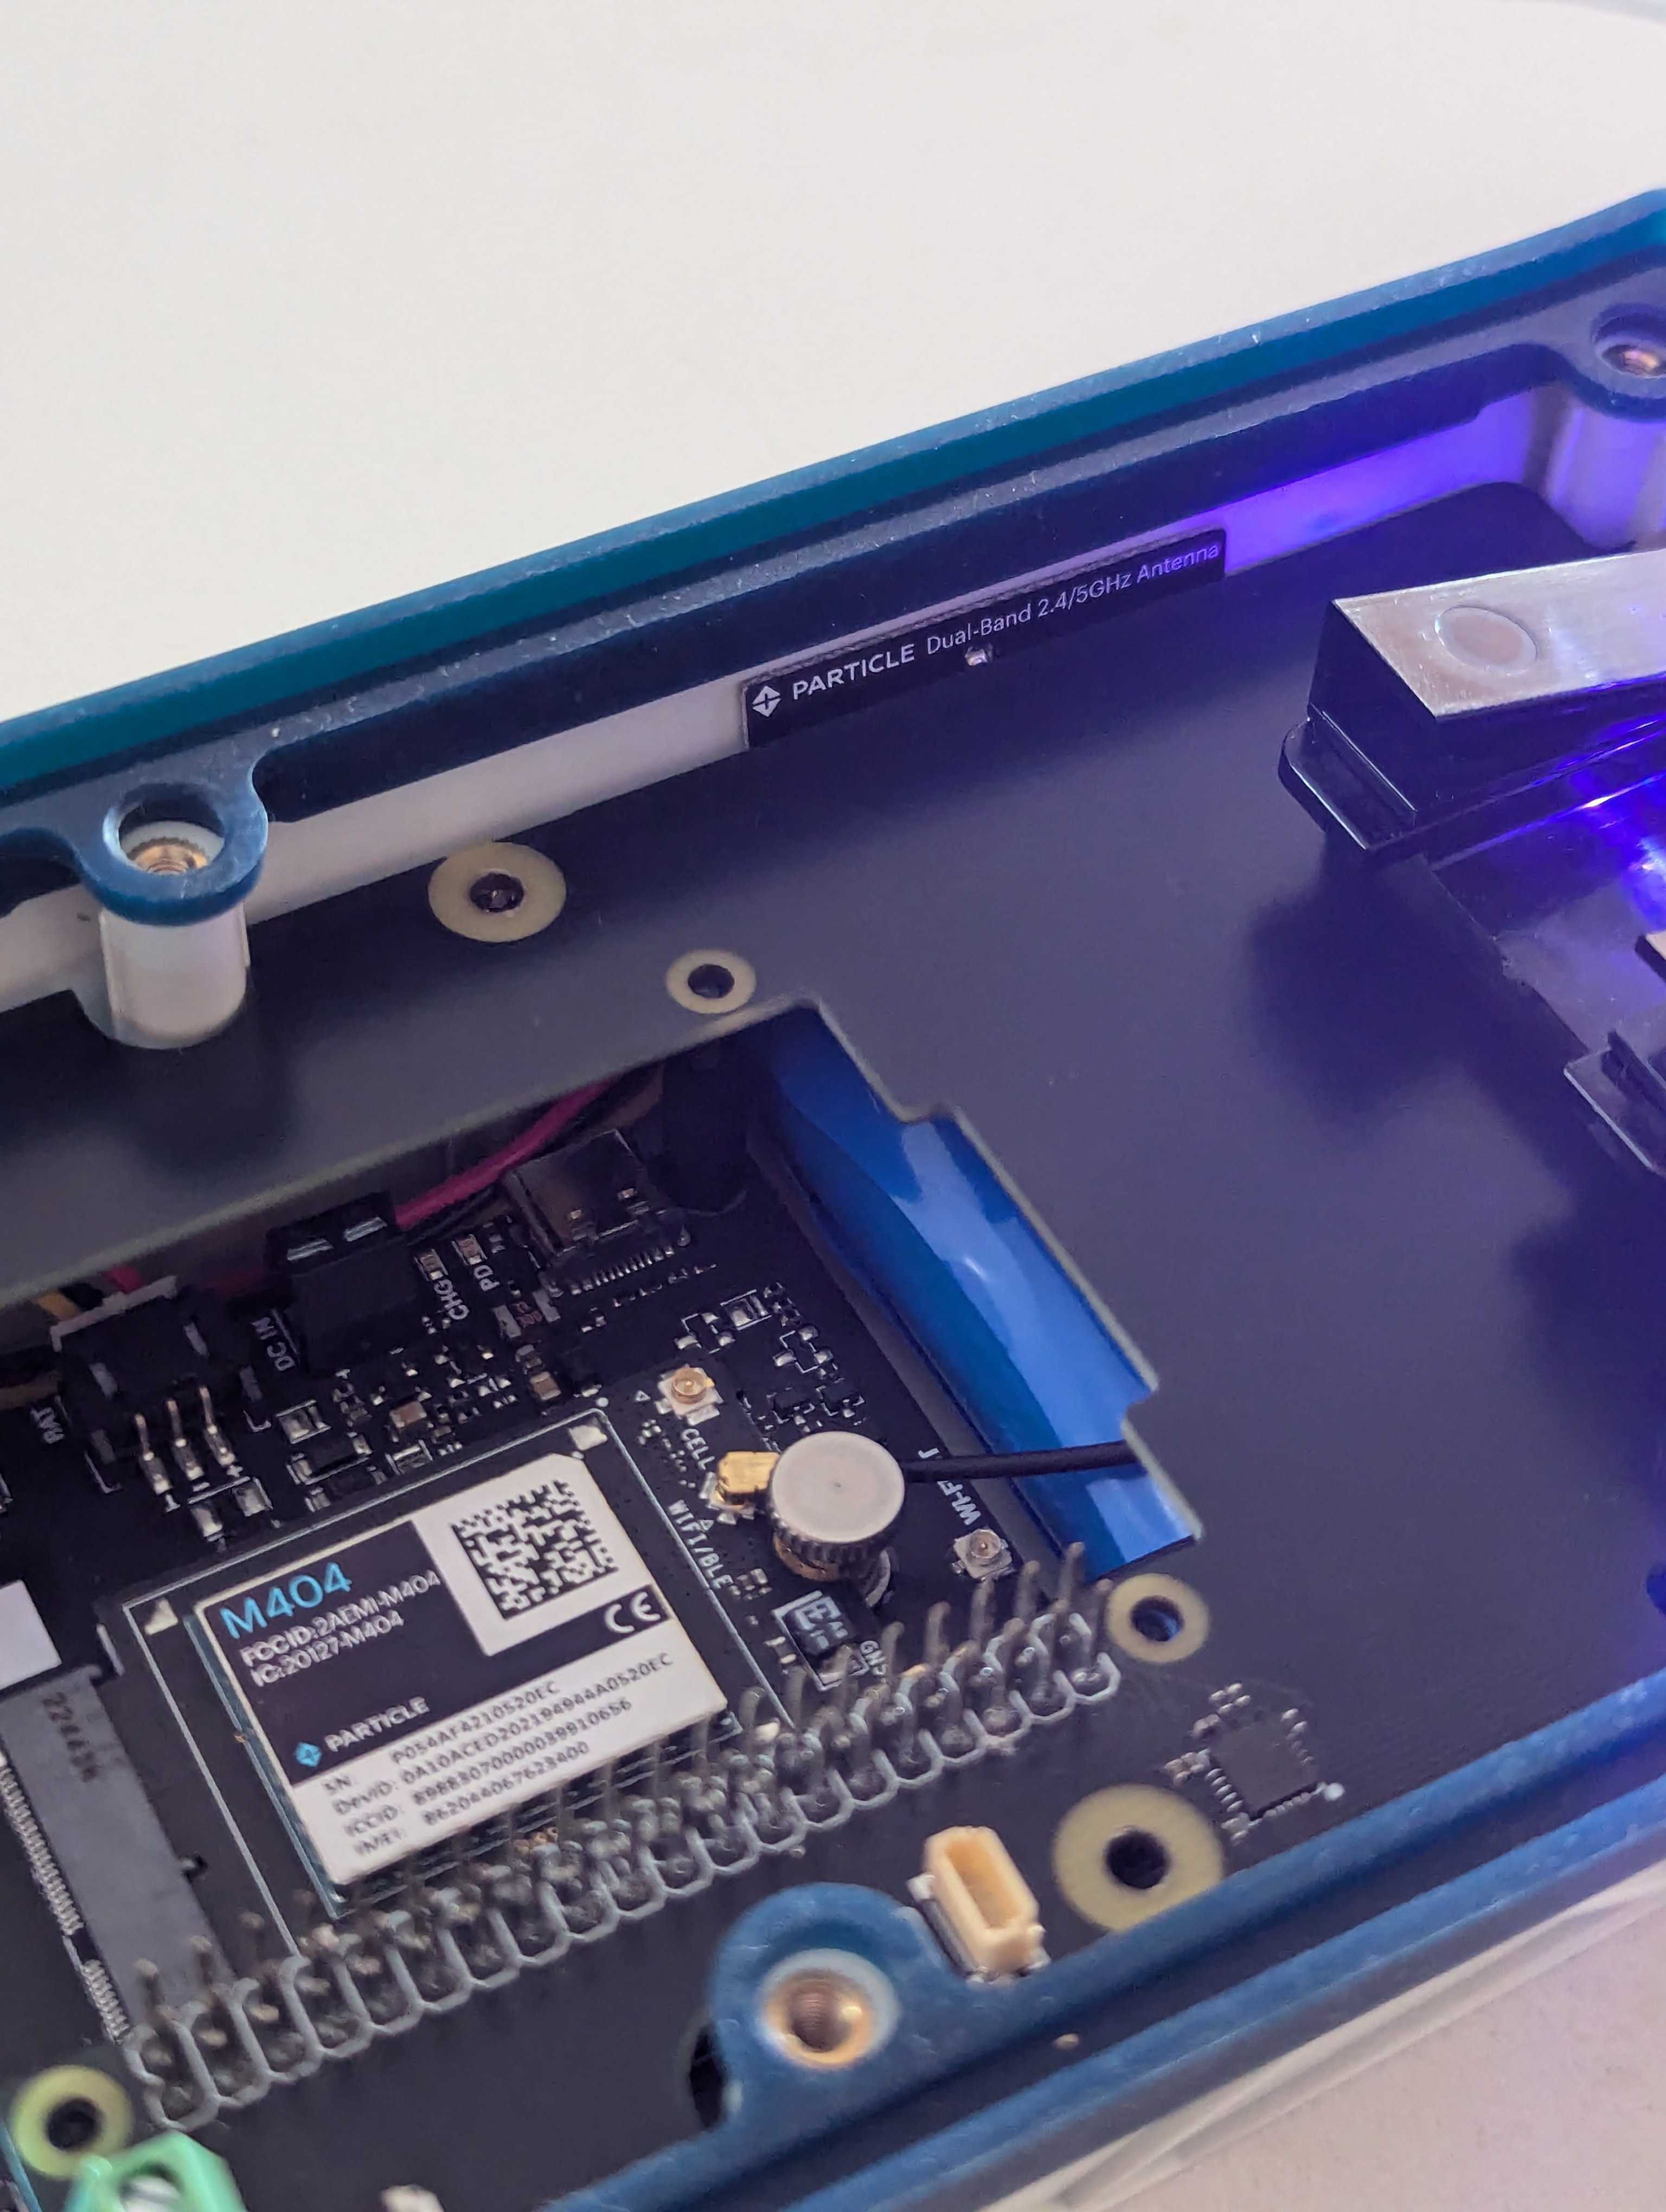
The M-SoM is certified for use with the same antennas as the P2/Photon 2. The same antenna is shared for Wi-Fi and BLE. Unlike the P2/Photon 2, the external antenna is required for Wi-Fi and BLE and the M-SoM does not include a built-in trace antenna on the module.
| Antenna | SKU | Links |
|---|---|---|
| Particle P2/Photon2 Wi-Fi Antenna 2.4/5GHz, [x1] | PARANTWM1EA | Datasheet | Retail Store |
| Particle P2/Photon2 Wi-Fi Antenna 2.4/5GHz, [x50] | PARANTWM1TY | Datasheet |
Single quantity M-SoM units and developer kits include a PARANTWM1EA antenna. Tray quantities of the M-SoM do not include antennas.
LoRa antenna - Muon
It's expected that the LoRA antenna would connect using SMA connectors on the bulkhead.
Expansion card power
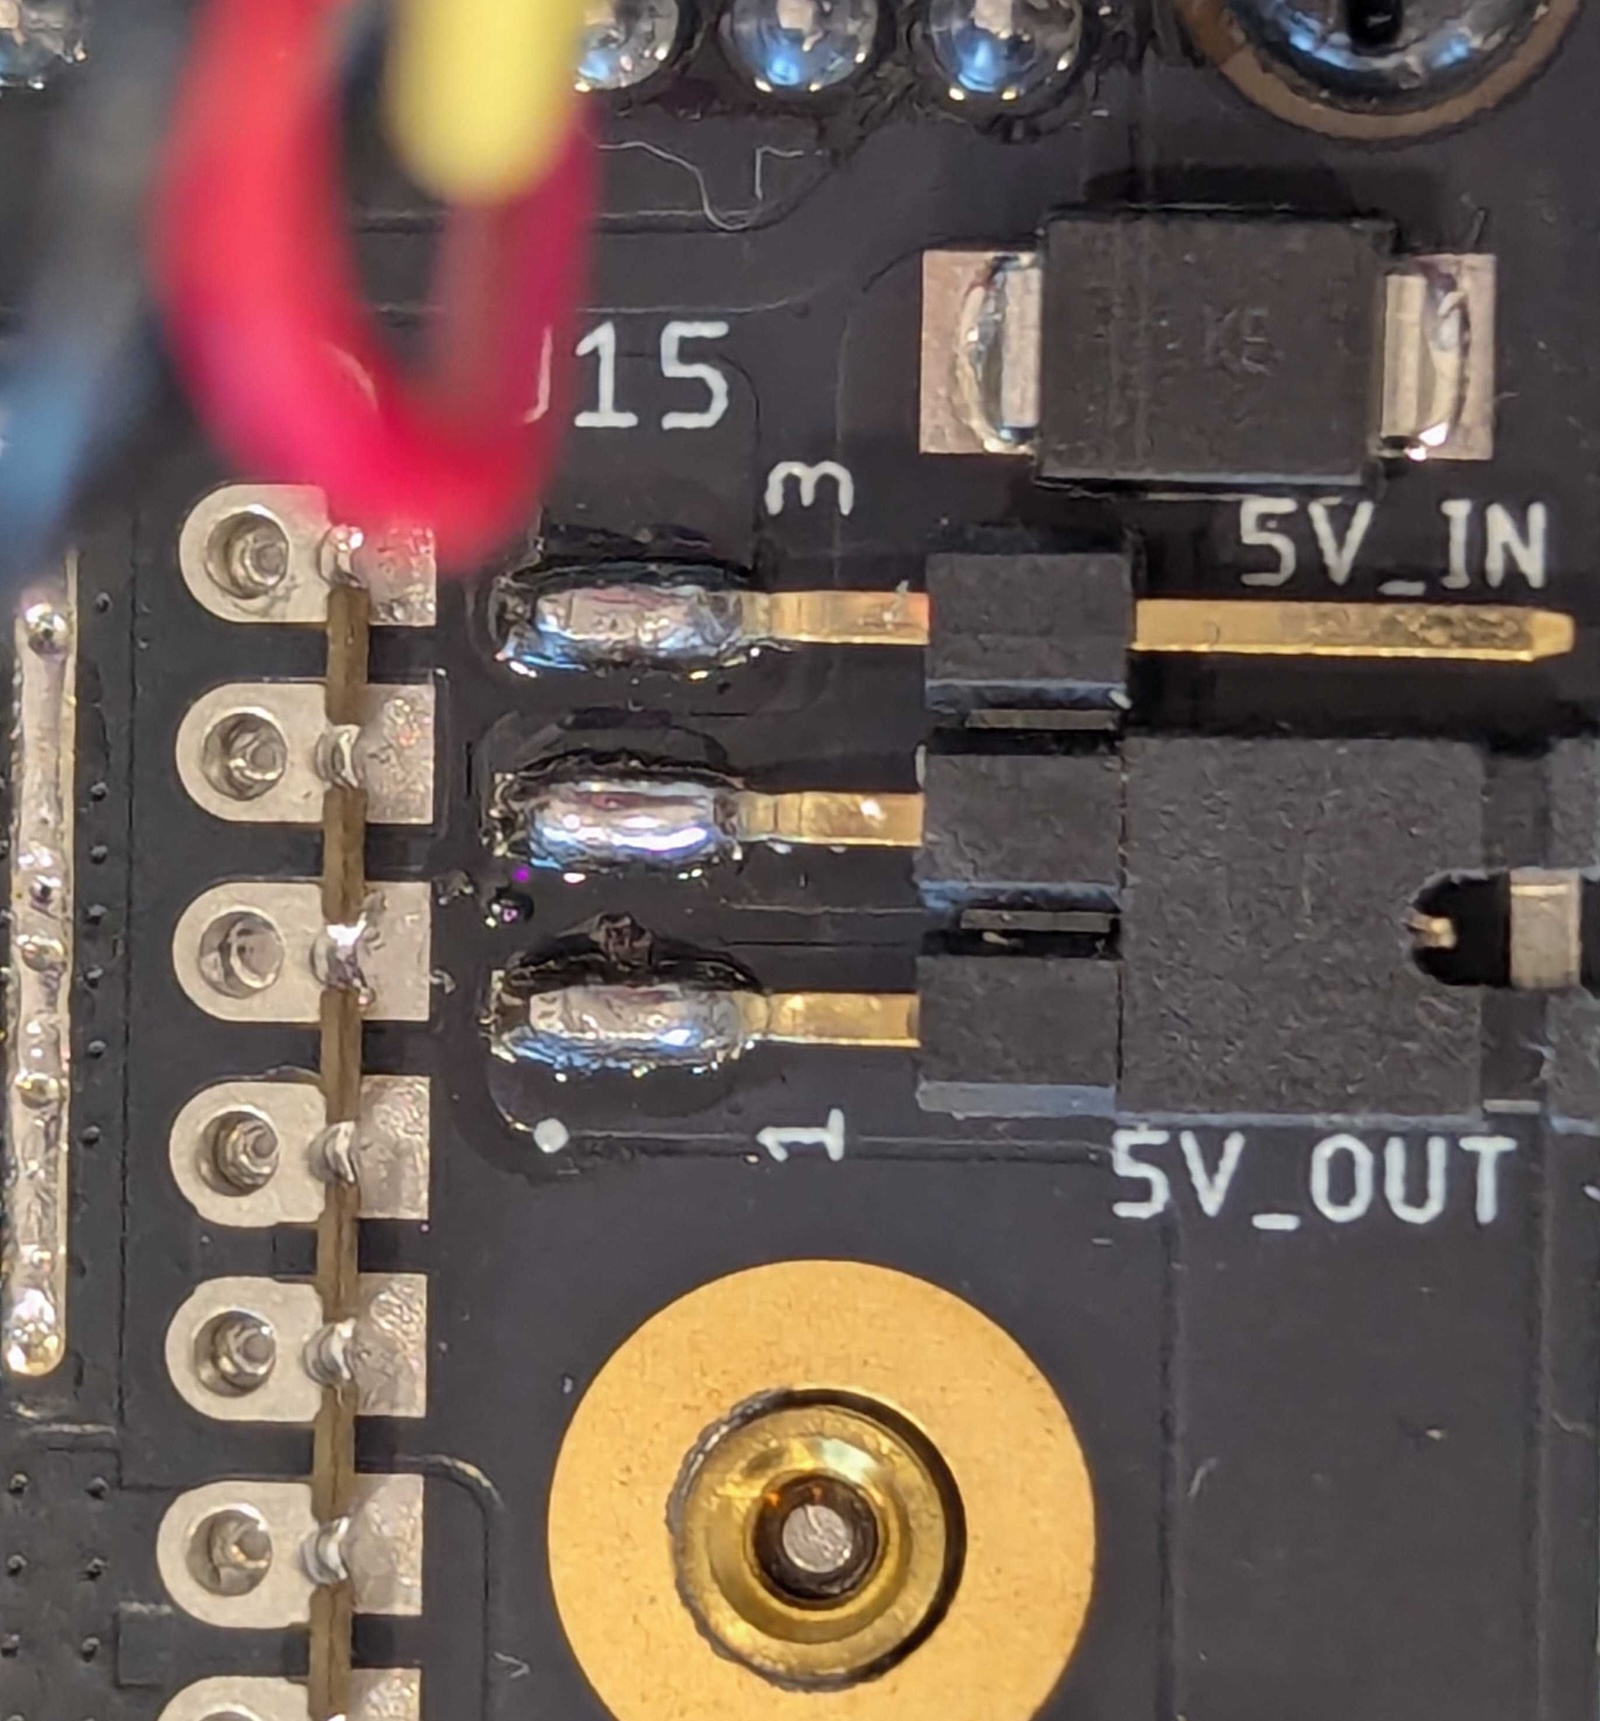
A jumper located on the bottom side of the Muon selects the direction of expansion card (HAT) 5V power.
Be sure to set this jumper before installing the Muon in the carrier board
- Connecting
5V_INand center pin: Expansion card powers the Muon (typically from PoE) - Connecting
5V_OUTand center pin: The Muon powers expansion card (from USB-C, USB, or LiPo)
Schematic
This is the schematic for the v0.5 of the M1 Enclosure carrier board. Changes are possible before general availability.

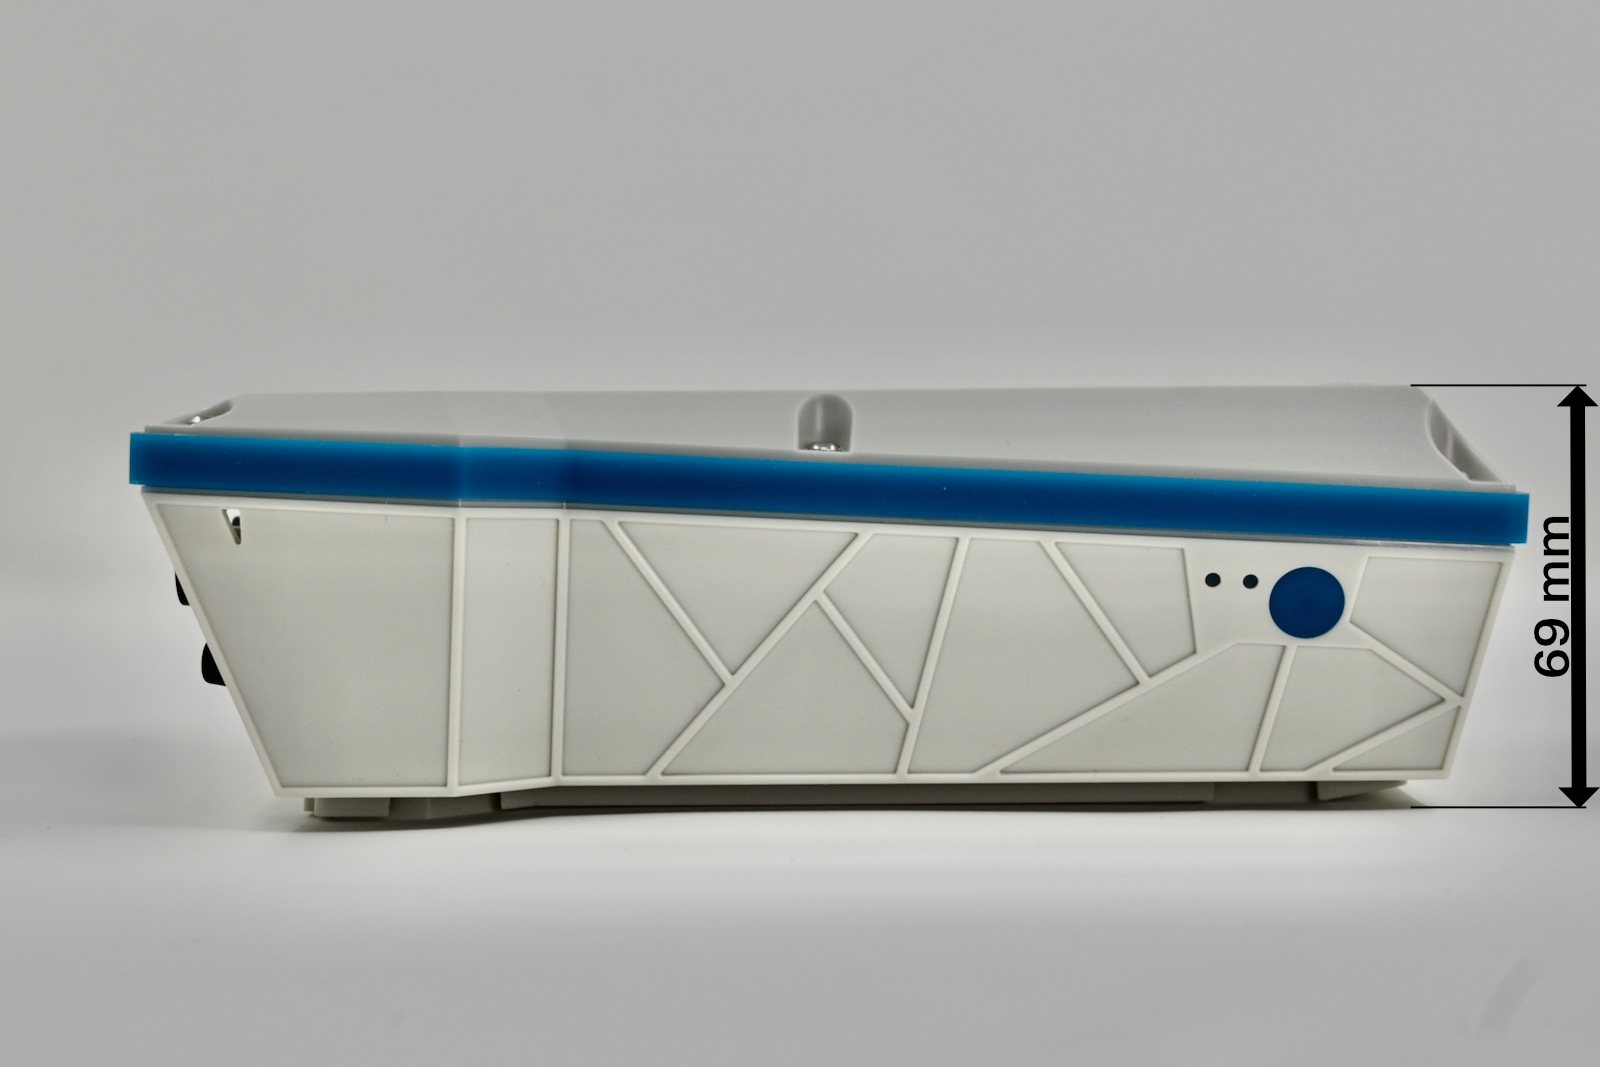
Dimensions and weight
| Dimensions | Metric | SAE |
|---|---|---|
| Width | 121 mm | 4 3/4" |
| Height | 220 mm | 8 5/8" |
| Depth | 69 mm | 2 11/16" |
| Weight |
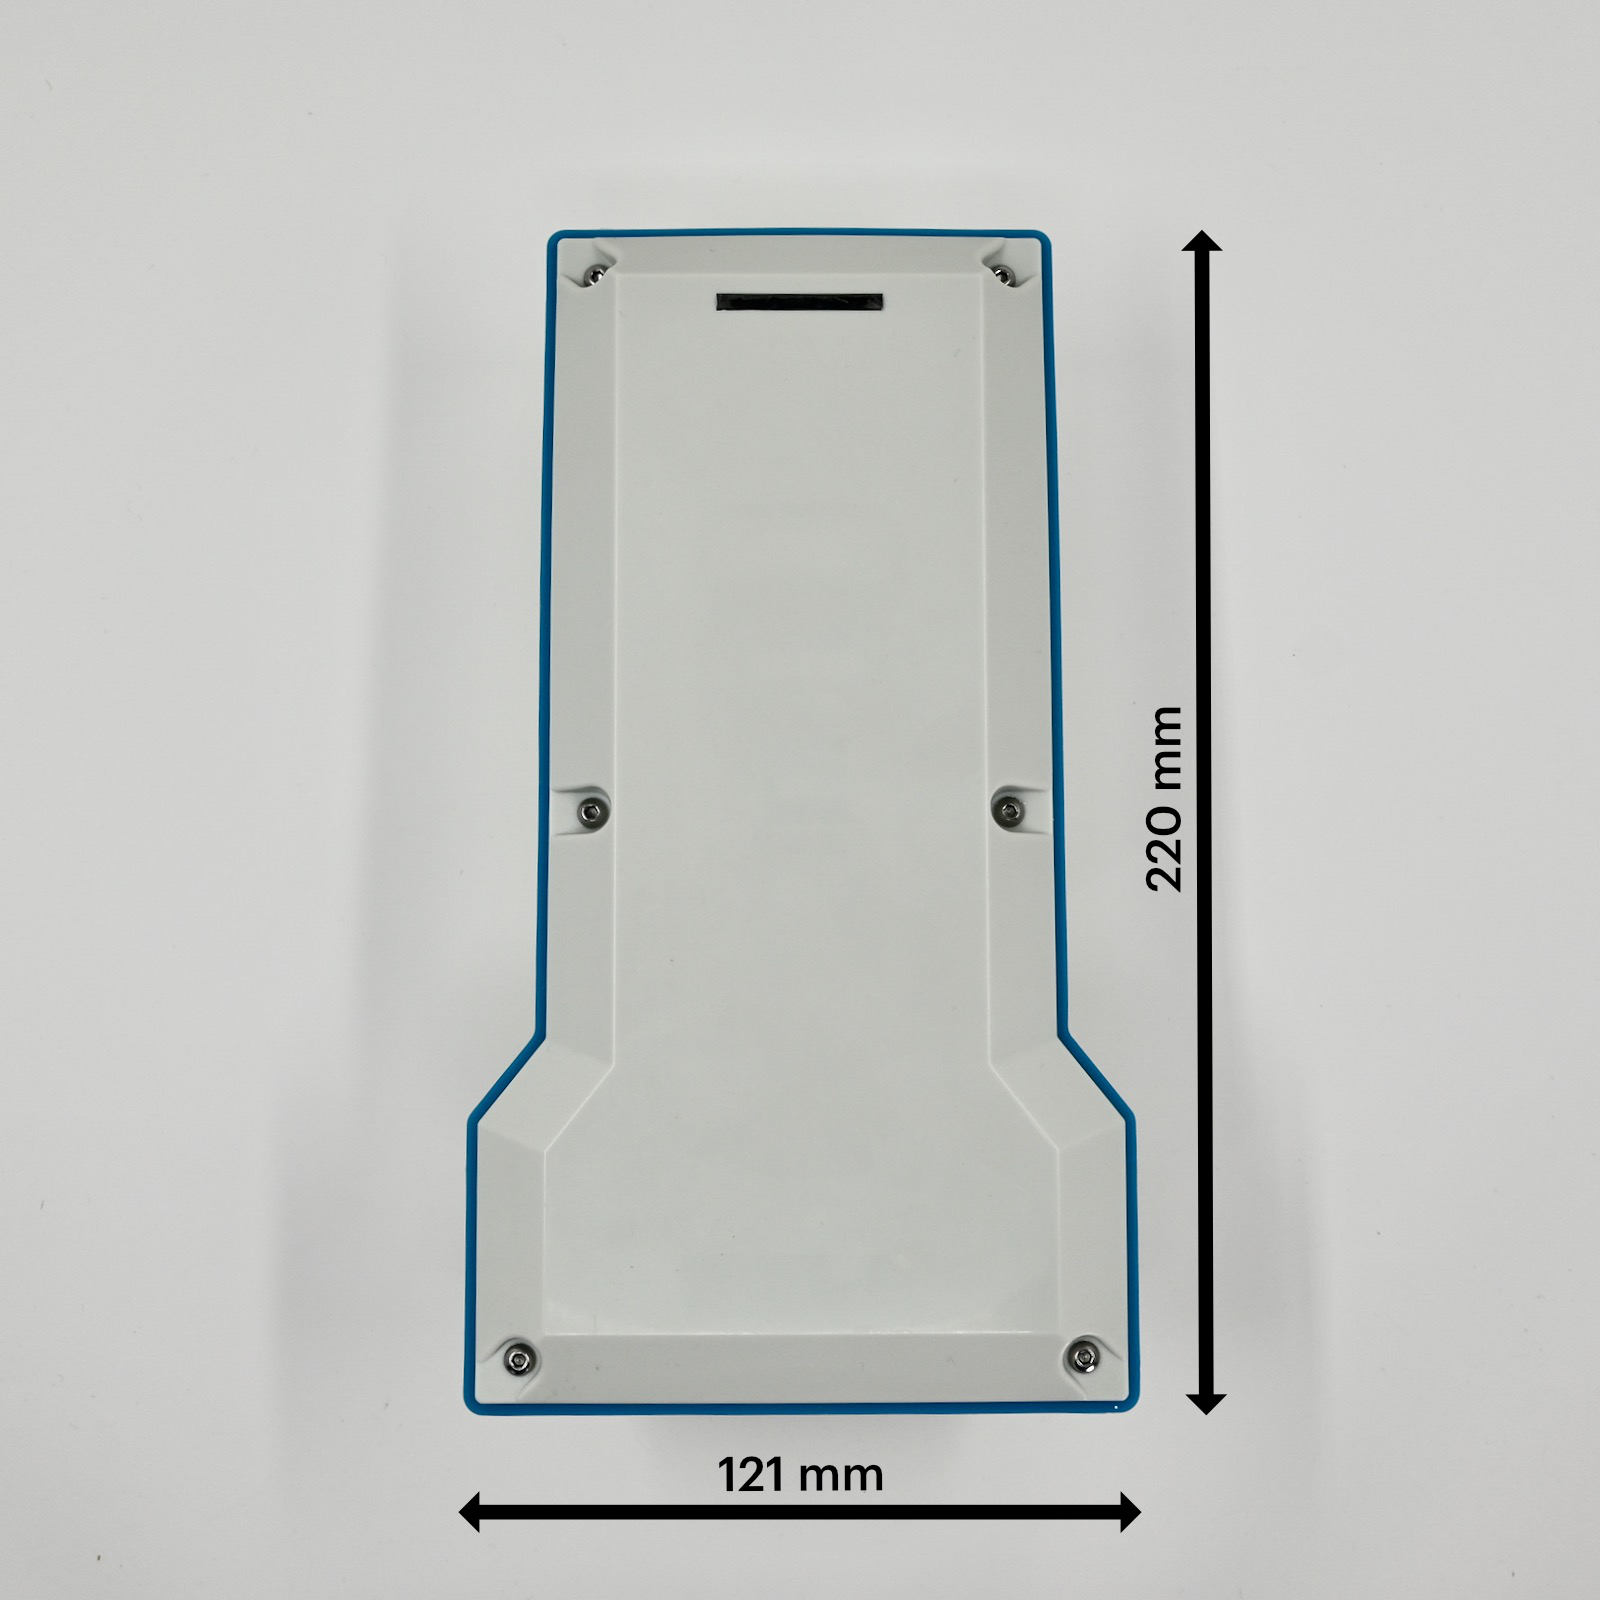
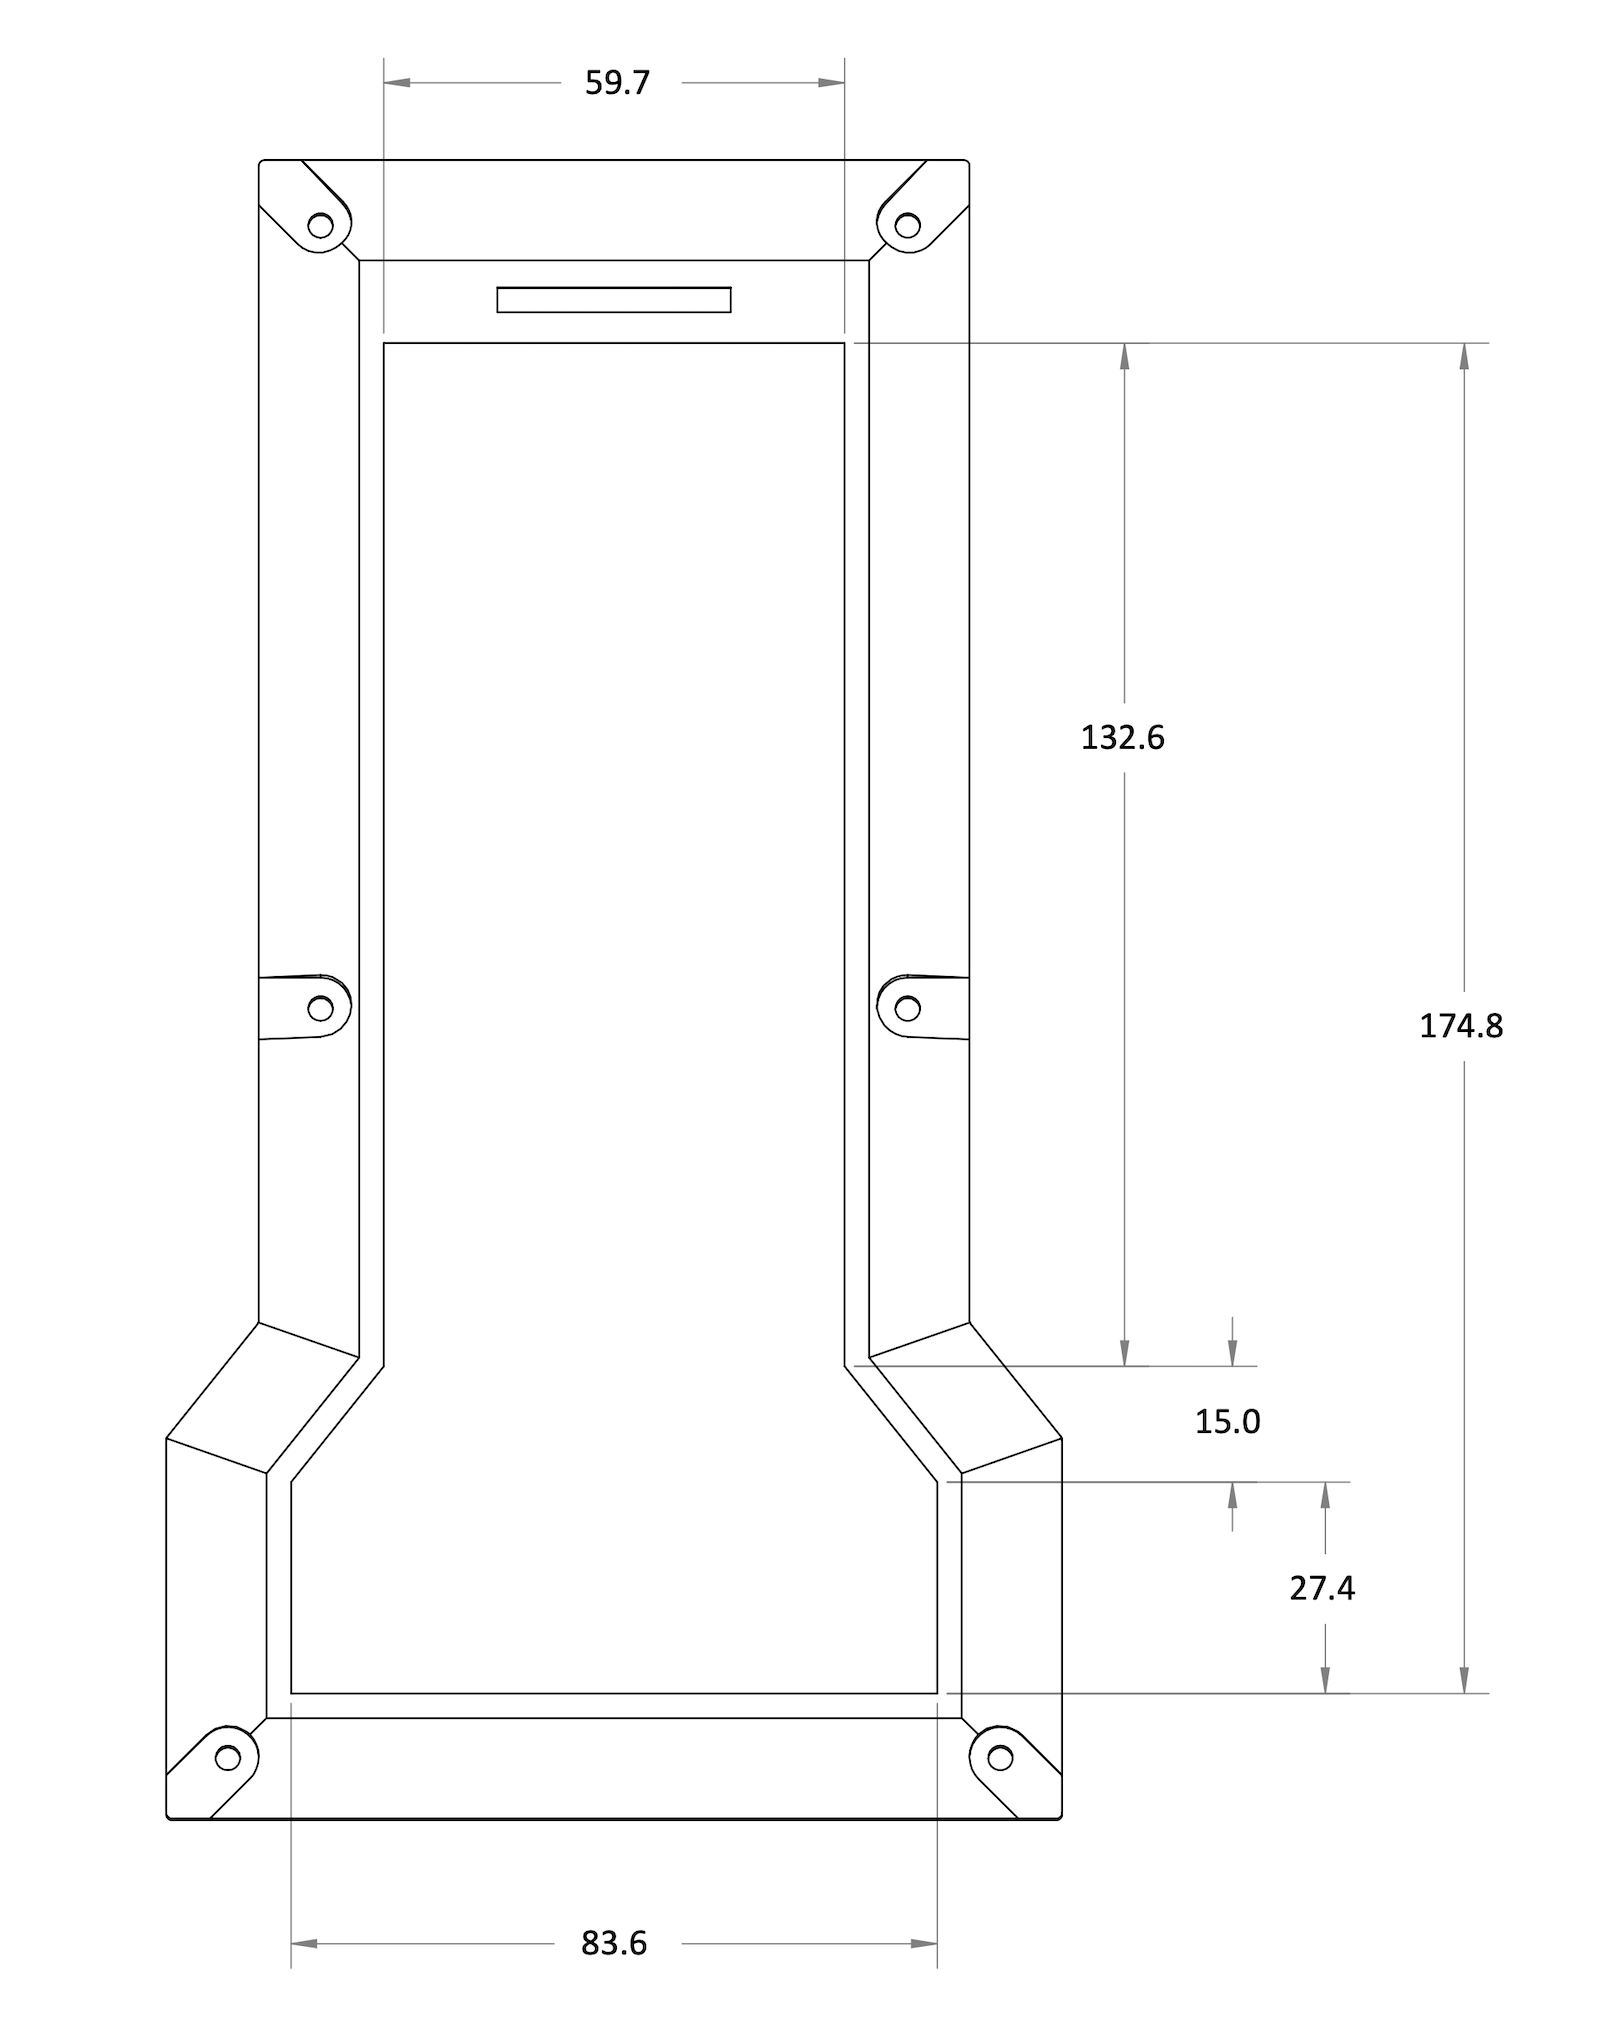
Dimensions for top cover artwork
3D models
- Bottom cover 3D model (.step)
Certification documents
Ordering information
| SKU | Description | Lifecycle |
|---|---|---|
| M1ENCLEA | M1 Enclosure | In development |
Disposal

This device must be treated as Waste Electrical & Electronic Equipment (WEEE) when disposed of.
Any WEEE marked waste products must not be mixed with general household waste, but kept separate for the treatment, recovery and recycling of the materials used. For proper treatment, recovery and recycling; please take all WEEE marked waste to your Local Authority Civic waste site, where it will be accepted free of charge. If all consumers dispose of Waste Electrical & Electronic Equipment correctly, they will be helping to save valuable resources and preventing any potential negative effects upon human health and the environment of any hazardous materials that the waste may contain.
Revision history
| Revision | Date | Author | Comments |
|---|---|---|---|
| pre | 2024-10-22 | RK | Preliminary version |
| 2024-12-02 | RK | Updated pictures and added note about positioning of Wi-Fi antenna | |
| 2025-09-02 | RK | Added SMA connector details | |
| 2025-09-24 | RK | Added certification documents |
