
Bluetooth LE (BLE)
Introduction
Gen 3 devices (Argon, Boron, Xenon) support Bluetooth. Bluetooth is used to configure your device from the Particle mobile apps for iOS and Android, and Bluetooth LE (BLE) can be used in your firmware to communicate with other devices that support BLE.
Particle devices support both the peripheral and central roles:
- Peripheral devices are typically low-power devices like heart rate sensors, body weight scales, thermometers, proximity tags, etc.. When your Particle device is configured as a peripheral, it might be attached to a sensor and provide that information to a mobile app. It can also be programmed to be an iBeacon, to allow iOS apps know they are near a specific beacon.
- Central devices are things like mobile phones and tablets that communicate with peripheral devices. Computers with BLE support can also be central devices. When your Particle device is configured as a central device, it might gather data from a sensor like a heart rate sensor and upload it to the cloud over Wi-Fi or cellular, taking the place of a mobile phone app.
BLE is intended for low data rate sensor applications. Particle devices do not support Bluetooth A2DP and can't be used with Bluetooth headsets, speakers, and other audio devices. Particle devices do not support Bluetooth 5 mesh.
The BLE protocol can use the built-in chip or trace antenna, or an external antenna if you have installed and configured one.
The B-Series SoM (system-on-a-module) requires the external BLE/Mesh antenna connected to the BT connector. The SoMs do not have built-in antennas.
A good introduction to BLE can be found in the Adafruit tutorial.
BLE is supported in Device OS 1.3.1 and later. BLE support was in beta test in Device OS 1.3.0. It is not available in earlier Device OS versions. Additional features were added in Device OS 3.0 and 3.1.
BLE Central Mode on the P2 and Photon 2 is only supported in Device OS 5.1.0 and later. Earlier versions only supported BLE Peripheral Mode.
Logging in
You can interact directly with your device from this tutorial page by logging into your Particle account in the box below. This is optional, as you can use Particle Workbench or the Web IDE and other techniques directly, if you prefer.
Major concepts
Advertising
Advertising is the process by which a BLE peripheral device broadcasts periodically. This serves two purposes:
- It allows a BLE central device (like a mobile app) to be able to discover the peripheral device.
- A peripheral device can broadcast continuously as a beacon.
A BLE advertiser doesn't require any authentication between the peripheral device and the mobile app - the advertiser just continuously outputs data over a short range, typically around 10 meters. A mobile app can look for this data and respond to it.
For example, a beacon embedded in a store display might allow a store app to provide additional information about the item, provide a coupon, or customize a store map.
The interval for advertising ranges from 20 milliseconds to 10.24 seconds, though there is a random 0 to 10 millisecond additional delay added. This prevents two devices with the same advertising interval from being stuck transmitting at exactly the same time forever and possibly interfering with each other.
The normal fast advertising interval is 100 to 500 milliseconds. For devices where latency is not important and want to reduce power consumption, it could be 1 to 2 seconds. Because of radio congestion and random packet loss, it might take more than one advertising broadcast before the message is received.
The advertising data is small (31 bytes, BLE_MAX_ADV_DATA_LEN). There are some standard types, or you can use a vendor defined type (0xff) to send any arbitrary data in your advertising payload.
Standard advertising payload data options include:
- Type: Basic features supported by the peripheral device
- Local Name: a descriptive name for your peripheral device
- Service UUID: UUIDs supported by your peripheral device
- Custom data: beacon data for iBeacon, for example
While central devices do not advertise, they may scan for devices in range and use their advertising data to determine what to connect to. For example, the heart rate central example finds the first heart rate sensor in range and connects to it automatically.
Scan response
In addition to the 31 bytes of advertising data, the device doing the scanning can request the scan response data. This does not require authentication, and does not require making a connection. The scan response data is an additional 31 bytes of data the peripheral can return to the scanning device, though it takes an extra set of packets to and from the peripheral to request and receive it.
Services
Services are collections of characteristics (roughly, values). There are defined services listed here. For example, the Heart Rate service includes the Heart Rate Measurement characteristic, below.
The Heart Rate service only has one characteristic (set of values), but some services include multiple characteristics.
A device may support multiple services. For example, most heart rate monitors include both the Heart Rate Measurement Service and Battery Service.
BLE central devices like mobile phones can find known services and characteristics and display the data, without having manufacturer-specific knowledge since the data is standardized.
It's also possible to create custom services for your own proprietary app.
Characteristics
Characteristics store a value or set of values in a service. In some cases, a service supports multiple characteristics.
In other cases, like the Heart Rate Measurement Characteristic, the characteristic contains flags, a value, and in some cases additional values. The difference is because a heart rate sensor will always want to send out beats per minute, but if it also calculates energy expended, it will want to publish all of the values at the same time in one transaction.
For assigned characteristics, the data will be in a defined format as defined by the Bluetooth SIG. They are listed here. You can also make custom characteristics, which you self-assign an identifier (long UUID).
A characteristic is also assigned a short name. This can also be used to retrieve it, however the names are not standardized so it's usually better to retrieve a characteristic by UUID.
The maximum size of the characteristic will depend on both devices. For example, different phones may have different limits.
When sending between two Particle Gen 3 devices with the default settings, the maximum characteristic that can be sent is 244 bytes. If you attempt to send a larger characteristic, only the first 244 bytes will be sent.
| Characteristic Size | Maximum Data Transfer Rate |
|---|---|
| 20 bytes | 222 bytes/sec. |
| 100 bytes | 1100 bytes/sec. |
| 200 bytes | 2210 bytes/sec. |
| 236 bytes | 2186 bytes/sec. |
| 237 bytes | 1753 bytes/sec. |
| 244 bytes | 1793 bytes/sec. |
Note, however, the most efficient size is a maximum 236 bytes. Above that size, fragmentation occurs which lowers the transfer rate. The maximum efficient size could vary slightly based on other factors.
You can improve performance by adjusting the PPCP settings to reduce the interval setting. It may be possible to transmit as fast as 52 Kbits/sec. with adjusted settings.
Peripheral characteristics
In a BLE peripheral role, each service has one or more characteristics. Each characteristic may have one of more values.
For example, implementing a Health Thermometer peripheral you could use these services and characteristics:
// The "Health Thermometer" service is 0x1809.
// See https://www.bluetooth.com/specifications/gatt/services/
BleUuid healthThermometerService(0x1809);

// We're using a well-known characteristics UUID. They're defined here:
// https://www.bluetooth.com/specifications/gatt/characteristics/
// The temperature-measurement is 16-bit UUID 0x2A1C
BleCharacteristic temperatureMeasurementCharacteristic("temp", BleCharacteristicProperty::NOTIFY, BleUuid(0x2A1C), healthThermometerService);

// The battery level service allows the battery level to be monitored
BleUuid batteryLevelService(0x180f);

// The battery_level characteristic shows the battery level of
BleCharacteristic batteryLevelCharacteristic("bat", BleCharacteristicProperty::NOTIFY, BleUuid(0x2A19), batteryLevelService);
In this case, there are two services, health thermometer (0x1809) and battery level (0x180f). Each service has one characteristic.
For the health thermometer service, only one characteristic is advertised, the temperature measurement characteristic (0x2a1c). A few things about this characteristic:
- Its short name is "temp" (temperature)
- It is a NOTIFY characteristic - the peripheral periodically sends out the value
- It has the UUID 0x2A1C
- It is part of the health thermometer service.
Another use case is like the UART peripheral example:
const char* serviceUuid = "6E400001-B5A3-F393-E0A9-E50E24DCCA9E";
const char* rxUuid = "6E400002-B5A3-F393-E0A9-E50E24DCCA9E";
const char* txUuid = "6E400003-B5A3-F393-E0A9-E50E24DCCA9E";

BleCharacteristic txCharacteristic("tx", BleCharacteristicProperty::NOTIFY, txUuid, serviceUuid);
BleCharacteristic rxCharacteristic("rx", BleCharacteristicProperty::WRITE_WO_RSP, rxUuid, serviceUuid, onDataReceived, NULL);
In this case, all of the UUIDs are proprietary. However these were generated by the Nordic Semiconductor team for the UART example, and now they're widely used for UART-like services. The Adafruit Bluefruit hardware and mobile apps support this, for example.
The txCharacteristic looks much like the health monitor example, except the UUIDs are just const char * variables, not BleUuid values. This is an option, however you need to pick one style as both the characteristic and service UUIDs must be the same type.
The rxCharacteristic has some more parameters. This is because data is received by the peripheral with this characteristic.
BleCharacteristicProperty::WRITE_WO_RSPmeans the peripheral value is written to, without acknowledgement.onDataReceivedThe function that is called when data is received.NULLContext pointer. If your data received handler is part of a C++ class, this is a good place to put the class instance pointer (this).
The data received handler has this prototype:
void onDataReceived(const uint8_t* data, size_t len, const BlePeerDevice& peer, void* context)
The 128-bit UUIDs are used for your own custom services and characteristics. These are not assigned by any group. You can use any UUID generator, such as the online UUID generator or tools that you run on your computer. There is no central registry; they are statistically unlikely to ever conflict.
A 128-bit (16 byte) UUID is often written like this: 240d5183-819a-4627-9ca9-1aa24df29f18. It's a series of 32 hexadecimal digits (0-9, a-f) written in a 8-4-4-4-12 pattern. The A-F can be uppercase or lowercase, they are not case-sensitive.
Central characteristics
In a BLE central role (behaving like a phone), you typically have a receive handler to be notified when the peripheral updates each characteristic value that you care about.
Declaring variables for central characteristics is usually just assigning a global variable to hold the value.
BleCharacteristic heartRateMeasurementCharacteristic;
In setup, you hook up a data received handler to your characteristic to be notified when that characteristic is received from the BLE peer:
    // In setup()
    heartRateMeasurementCharacteristic.onDataReceived(onDataReceived, NULL);
The NULL parameter here is the context, an optional pointer value. If you implement your onDataReceive handler in a C++ class, the context is a good place to put the "this" (class instance pointer).
Finally, the onDataReceived handler looks like this:
void onDataReceived(const uint8_t* data, size_t len, const BlePeerDevice& peer, void* context) {
    uint8_t flags = data[0];

    uint16_t rate;
    if (flags & 0x01) {
        // Rate is 16 bits
        memcpy(&rate, &data[1], sizeof(uint16_t));
    }
    else {
        // Rate is 8 bits (normal case)
        rate = data[1];
    }
    if (rate != lastRate) {
        lastRate = rate;
        updateDisplay = true;
    }

    Log.info("heart rate=%u", rate);
}
In the heart rate measurement characteristic:
- The first byte is a flag byte. The only bit we care about is bit 0, LSB, mask 0x01. If that bit is 1, then the BPM value is 16-bits wide. If it's 0, then the BPM value is 8-bits wide.
- Right after the flag is the BPM value. It's either 8-bit or 16-bit depending on the flag
- The onDataReceived handler updates the global variables lastRate and updateDisplay as necessary.
The other scenario is where you're sending data from the central node to the peripheral. In this example, the central can connect to multiple peripherals, so it needs to store a separate characteristic for each peripheral device:
BlePeerDevice peer = BLE.connect(scanResults[ii].address());
if (peer.connected()) {
    Log.info("successfully connected %02X:%02X:%02X:%02X:%02X:%02X!",
            scanResults[ii].address()[5], scanResults[ii].address()[4], scanResults[ii].address()[3],
            scanResults[ii].address()[2], scanResults[ii].address()[1], scanResults[ii].address()[0]);

    // Get the button characteristic
    peer.getCharacteristicByUUID(buttonCharacteristic[availableButtonIndex], buttonCharacteristicUuid);
    peers[availableButtonIndex] = peer;
}
else {
    Log.info("connection failed");
}
For more information about characteristics, the Nordic Semiconductor BLE characteristics tutorial is good.
Characteristic definitions
If you're not interested in decoding arbitrary characteristics, you can skip this section.
In the characteristics table, clicking on a name brings up the definition for the characteristic. It's a little hard to read (it's XML), but from this example you can find some useful facts about the Heart Rate Measurement Characteristic:
- The UUID is
uuid="2A37". That's hexadecimal, so you'd usually useBleUuid(0x2A37)as the characteristics UUID.
<Characteristic xsi:noNamespaceSchemaLocation="http://schemas.bluetooth.org/Documents/characteristic.xsd" xmlns:xsi="http://www.w3.org/2001/XMLSchema-instance" type="org.bluetooth.characteristic.heart_rate_measurement" uuid="2A37" name="Heart Rate Measurement">
- The first field is the flags, which is an 8-bit value (uint8_t) and is required.
        <Field name="Flags">
            <Requirement>Mandatory</Requirement>
            <Format>8bit</Format>
- The first flag bit is bit index="0" which corresponds to the LSB, a mask value of 0x01 or 0b00000001. In this case, if the bit is 0, the BPM is 8-bits wide. If the bit is 1, the BPM is 16-bits wide.
                <Bit index="0" size="1" name="Heart Rate Value Format bit">
                    <Enumerations>
                        <Enumeration key="0" value="Heart Rate Value Format is set to UINT8. Units: beats per minute (bpm)" requires="C1" />
                        <Enumeration key="1" value="Heart Rate Value Format is set to UINT16. Units: beats per minute (bpm)" requires="C2" />
                    </Enumerations>
                </Bit>
There are some other flag bits that we won't worry about right now.
After the flag bits, is the 8-bit BPM value, if using an 8-bit BPM value. This is a uint8_t value (0-255) for the number of beats per minute.
        <Field name="Heart Rate Measurement Value (uint8)">
              <InformativeText>
                Note: The format of the Heart Rate Measurement Value field is dependent upon bit 0 of the Flags field.
              </InformativeText>
            <Requirement>C1</Requirement>
            <Format>uint8</Format>
            <Unit>org.bluetooth.unit.period.beats_per_minute</Unit>
        </Field>
- If the BPM is 16-bits, then this is used instead:
         <Field name="Heart Rate Measurement Value (uint16)">
              <InformativeText>
                Note: The format of the Heart Rate Measurement Value field is dependent upon bit 0 of the Flags field.
              </InformativeText>
            <Requirement>C2</Requirement>
            <Format>uint16</Format>
            <Unit>org.bluetooth.unit.period.beats_per_minute</Unit>
        </Field>
- Putting this into code, receiving the heart rate data from a BLE heart rate sensor:
void onDataReceived(const uint8_t* data, size_t len, const BlePeerDevice& peer, void* context) {
    uint8_t flags = data[0];

    uint16_t rate;
    if (flags & 0x01) {
        // Rate is 16 bits
        memcpy(&rate, &data[1], sizeof(uint16_t));
    }
    else {
        // Rate is 8 bits (normal case)
        rate = data[1];
    }

    Log.info("heart rate=%u", rate);
}
Peripheral role
Using your Particle device in a peripheral role allows you to do things like:
- Be a beacon that can be located by mobile app
- Be a sensor whose value can be read by a mobile app
- Communicate with a mobile app
There's also a special case of the peripheral role: A broadcaster only advertises, and does not accept any connections.
Gen 4 Devices (RTL872x) (P2, Photon 2, and M-SoM):
On Gen 4 devices, you can have a maximum of 4 BLE links open at the same time. This includes both central and peripheral connections.
Gen 3 Devices (nRF52) (B-Series SoM, Tracker SoM, Tracker One, Boron, Argon, and E404X):
When in peripheral role the peripheral can advertise to any number of devices, but can only accept a connection from one at a time. A device can also only be a peripheral or central, not both at the same time.
Advertising (peripheral)
Advertising is the process by which a BLE peripheral device broadcasts periodically. This serves two purposes:
The minimum you typically need to include is the service UUIDs so your device can be discoverable. For example, in the UART peripheral example, this code is used:
const BleUuid serviceUuid("6E400001-B5A3-F393-E0A9-E50E24DCCA9E");

BleAdvertisingData data;
data.appendServiceUUID(serviceUuid);
BLE.advertise(&data);
When not connected to a central device, the peripheral device will continuously advertise that it supports the UART service.
Another more complicated example is the Health Thermometer peripheral example:
BleUuid healthThermometerService(0x1809);

BleCharacteristic temperatureMeasurementCharacteristic("temp", BleCharacteristicProperty::NOTIFY, BleUuid(0x2A1C), healthThermometerService);

BleUuid batteryLevelService(0x180f);

BleCharacteristic batteryLevelCharacteristic("bat", BleCharacteristicProperty::NOTIFY, BleUuid(0x2A19), batteryLevelService);

void setup() {
    BLE.addCharacteristic(temperatureMeasurementCharacteristic);
    BLE.addCharacteristic(batteryLevelCharacteristic);

    BleAdvertisingData advData;

    // While we support both the health thermometer service and the battery service, we
    // only advertise the health thermometer. The battery service will be found after
    // connecting.
    advData.appendServiceUUID(healthThermometerService);

    // Continuously advertise when not connected
    BLE.advertise(&advData);
}
While you don't generate advertising data when in central mode, you often use it during scanning, as described in the section below
For more information about Advertising and beacons, the Argenox BLE advertising primer is good.
iBeacon
One special type of beacon is the Apple iOS iBeacon.
There are three parameters of interest:
| Field | Size | Description |
|---|---|---|
| UUID | 16 bytes | Application developers should define a UUID specific to their app and deployment use case. |
| Major | 2 bytes | Further specifies a specific iBeacon and use case. For example, this could define a sub-region within a larger region defined by the UUID. |
| Minor | 2 bytes | Allows further subdivision of region or use case, specified by the application developer. |
(From the Getting Started with iBeacon guide.)
In other words, you'll assign a single UUID to all of the beacons in your fleet of beacons and figure out which one you're at using the major and minor values. When searching for an iBeacon, you need to know the UUID of the beacon you're looking for, so you don't want to assign too many.
Flash this code to a Gen 3 device:
Enabling iBeacon mode is easy, just a few lines in setup().
The parameters for the beacon are:
- Major version (1)
- Minor version (2)
- Application UUID ("9c1b8bdc-5548-4e32-8a78-b9f524131206")
- Power measurement in dBm (-55)
You define the major and minor for your particular application, and generate any random UUID.
There are a number of iBeacon finding applications for iOS. I've used Locate Beacon successfully. Note: You must enter the Application UUID you want to search for; it can't arbitrarily find any iBeacon in range.
Central role
Using your Particle device in a central role allows you to do things like:
- Detect when BLE beacons are nearby
- Read data from BLE sensors
There's also a special case of the central role: An observer only looks for advertisers, and does not make any connections.
Gen 4 Devices (RTL872x) (P2, Photon 2, and M-SoM):
On Gen 4 devices, you can have a maximum of 4 BLE links open at the same time. This includes both central and peripheral connections.
BLE Central Mode on the P2 and Photon 2 is only supported in Device OS 5.1.0 and later. Earlier versions only supported BLE Peripheral Mode.
Gen 3 Devices (nRF52) (B-Series SoM, Tracker SoM, Tracker One, Boron, Argon, and E404X):
On Gen 3 devices, a central device can connect to up to 3 peripheral devices at a time. It's limited to 1 in Device OS 1.3.0.
Additionally, one peripheral connection can be open at the same time.
Pairing
- Device OS 3.1.0 and later: Support for Bluetooth LE Secure Connection Pairing ("LESC Pairing"). This uses numeric comparison mode and Elliptic curve Diffie–Hellman (ECDH) encryption.
- Device OS 3.0.0 and later: Support for "Legacy Pairing" passkey display or input modes (both central and peripheral).
- Prior to Device OS 3.0.0: No support for secure pairing.
- Out-of-band authentication (such as by NFC) is not built-in.
- The P2 and Photon 2 do not support secure pairing (legacy or LESC) at this time.
When pairing, there are two different things going on:
- Encryption assures that the central and peripheral devices can exchange data securely.
- Authentication assures that both sides are who they say they are. This typically requires a display and a keyboard or keypad so a 6-digit passkey that you would only be able to obtain from the devices sitting in front of you. It prevents man-in-the middle ("MITM") attacks where a rogue device pretends to another so you'll connect to the wrong device. Authentication is optional.
Encryption without authentication is allowed, and is referred to as "just works" mode. The encryption still works.
When using Legacy Pairing, both the initiator (typically the central device) and receptor (peripheral) have five different possibilities:
- No input, no output: This side has no display and no keyboard. This will always result in an unauthenticated connection if true for either side, as there is no way to confirm the passkey, however encryption still works.
- Display Only: This side has a display that can show a 6-digit passkey.
- Display Yes-No: This side has a display that can show a 6-digit passkey, and has button(s) to confirm a yes-no selection.
- Keyboard Only: This side has a keyboard (numeric keypad, touchscreen, etc.) to enter a passkey, but no display.
- Keyboard Display: This side has both a keyboard and a display.
For example, if one side has a display and the other side has a keyboard, the connection can be authenticated since the passkey can be read off the display on one side and typed in on the keyboard on the other. The display and keypad could be on either side (central vs. peripheral).
The Display Yes-No option is mostly useful with LESC Pairing, which is supported in Device OS 3.1 and later only. With LESC Pairing Yes-No mode, both sides need a display and one side needs a Yes-No button selection to confirm that both displays are showing the same number. No keyboard is necessary.
You normally use BLE.setPairingIoCaps so specify which features you have on your device (display, keyboard, etc.).
If you are the initiator (typically the central device, but does not have to be), you start the pairing process by using BLE.startPairing() after connecting to the BLE peer.
Many BLE operations are asynchronous and you will probably need to implement a pairing event handler whether you're a central or peripheral device. This is done using the BLE.onPairingEvent() method.
The pairing events occur after you have connected to the other device (from central mode) or been connected to (if you are a peripheral).
If you have a display, and the other side has a keyboard, your pairing event callback may get a BlePairingEventType::PASSKEY_DISPLAY event with the passkey to put on your display. The passkey is determined by the other side.
If you have a keyboard and the other side has a display, you may be requested to prompt the user to enter the passkey via the BlePairingEventType::PASSKEY_INPUT event. After the passkey is entered, you call BLE.setPairingPasskey() to tell the other side what passkey was entered.
Finally, you can use either pairing status messages or functions such as BLE.isPaired() to see if the pairing has been completed.
Examples
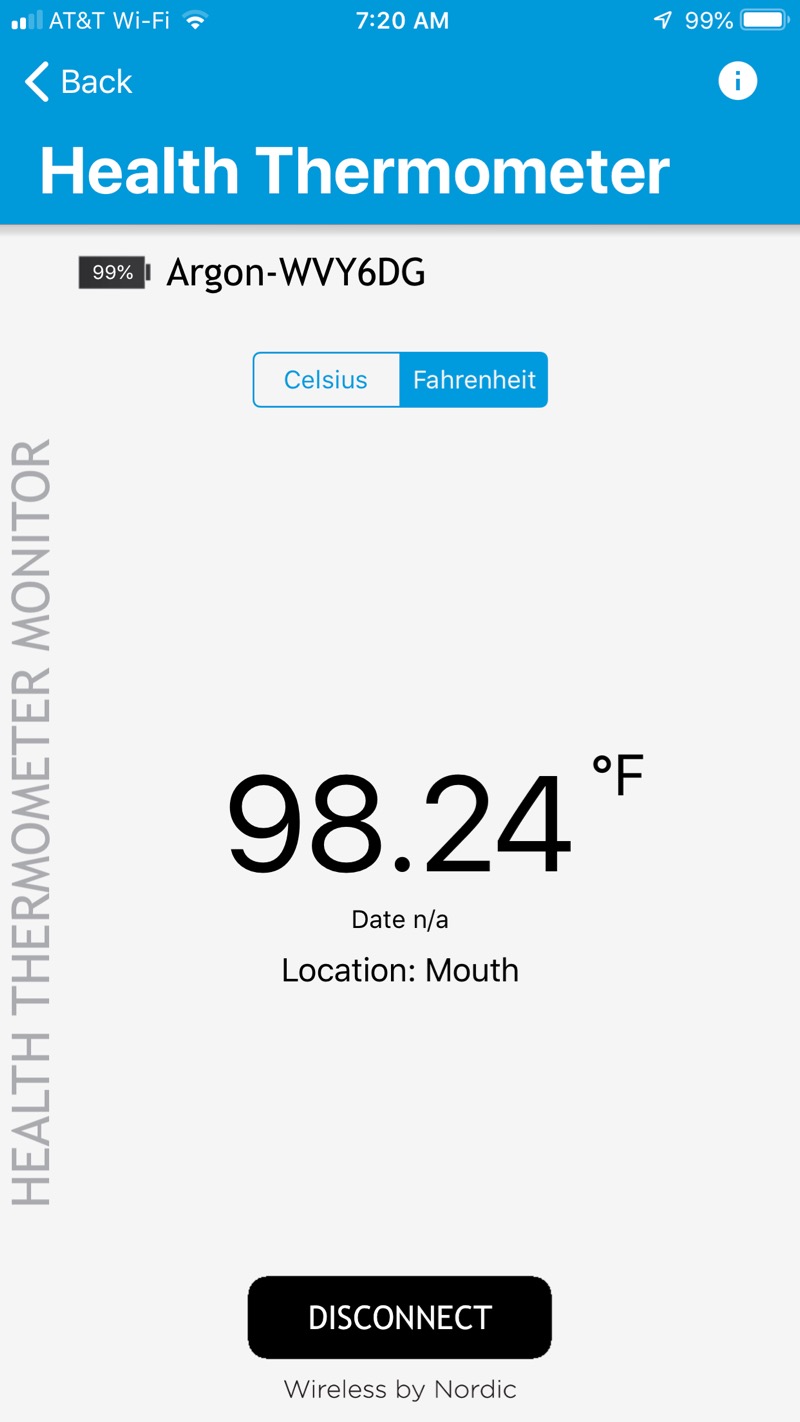
Body temperature thermometer
For this tutorial I'm using the nRF Toolbox mobile app from Nordic Semiconductor. It's free and available for iOS and Android. It has the ability to work with a number of standard BLE sensors which makes it perfect for this tutorial.
Flash this code to a Gen 3 device:
- Run the NRF Toolbox app on your mobile phone.
- Tap HTM (Health Thermometer)
- Tap CONNECT.
- Select your Particle device. For example, mine is Argon-WVY6DG.
Heart rate central
This example reads a BLE heart rate sensor (chest band). The model I tested with is no longer available, however it's similar to this one from Amazon, which typically sells for US$30 to $50.
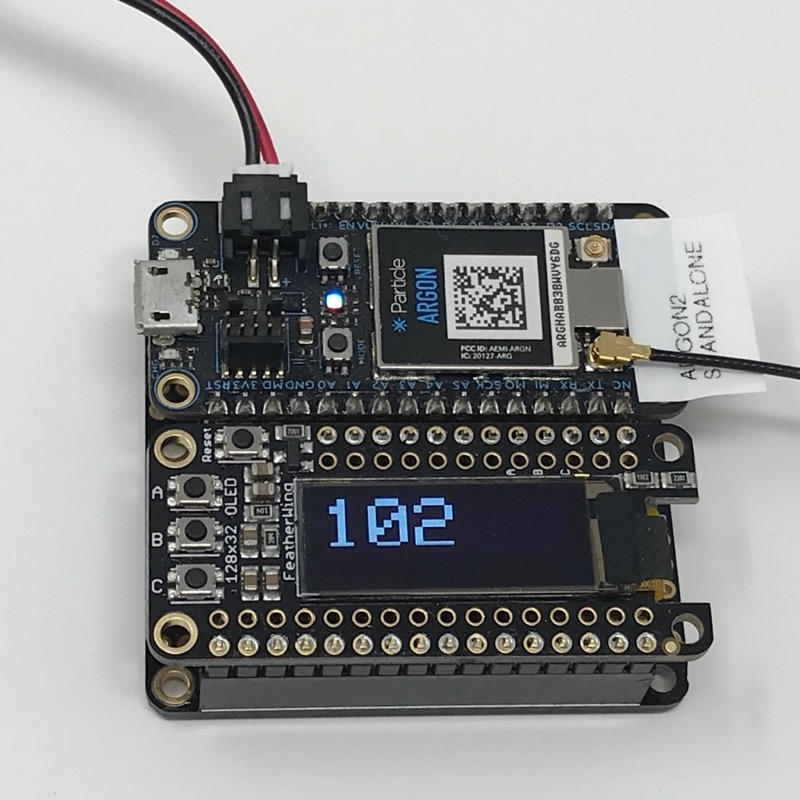
I also used and Adafruit FeatherWing OLED Display 128x32. You can purchase one from the Particle Store or from Adafruit. You can find more technical information at Adafruit.
Both the Argon (in my case, though it works with all Particle Gen 3 devices) and the display are plugged into an Adafruit FeatherWing Doubler. The Doubler is available from Adafruit.
For Device OS 3.0 and later:
- Put on your heart rate monitor.
- Flash the code to your Particle device.
- It should automatically detect the heart rate monitor and display your BPM on the display.
For earlier DeviceOS including 2.x LTS:
There is additional debugging information provided by USB serial debugging, for example using particle serial monitor.
BLE Central Mode on the P2 and Photon 2 is only supported in Device OS 5.1.0 and later. Earlier versions only supported BLE Peripheral Mode.
Device nearby
In this demo you have an central device and two or more peripheral devices. Each peripheral is assigned a color (red, green, blue, yellow, or magenta). As you wander closer and farther away from the central device, the peripheral with the strongest signal will show that color on the central status LED.
Device nearby central
For Device OS 3.0 and later:
For earlier DeviceOS including 2.x LTS
BLE Central Mode on the P2 and Photon 2 is only supported in Device OS 5.1.0 and later. Earlier versions only supported BLE Peripheral Mode.
Device nearby beacon
UART peripheral
The UART peripheral example shows how your Particle device can appear to be a BLE serial data stream. You can view this using apps such as:
- Adafruit Bluefruit app
- Nordic BLE UART app
These are available for both iOS and Android.
BLE log handler
The BLE log handler provides a way to see the Log Handler output over BLE, similar to the way you can get it over USB. You may not want to do this on a production device because there is no authentication - anyone can connect to over BLE.
You configure a buffer size, which makes it possible to see some amount of logging information in the past when you first connect. Also, BLE UART is kind of slow, so you need a buffer.
To see the logs, you use a BLE UART compatible app. Two are:
- Adafruit Bluefruit app
- Nordic BLE UART app
There is also a web-based option, below.
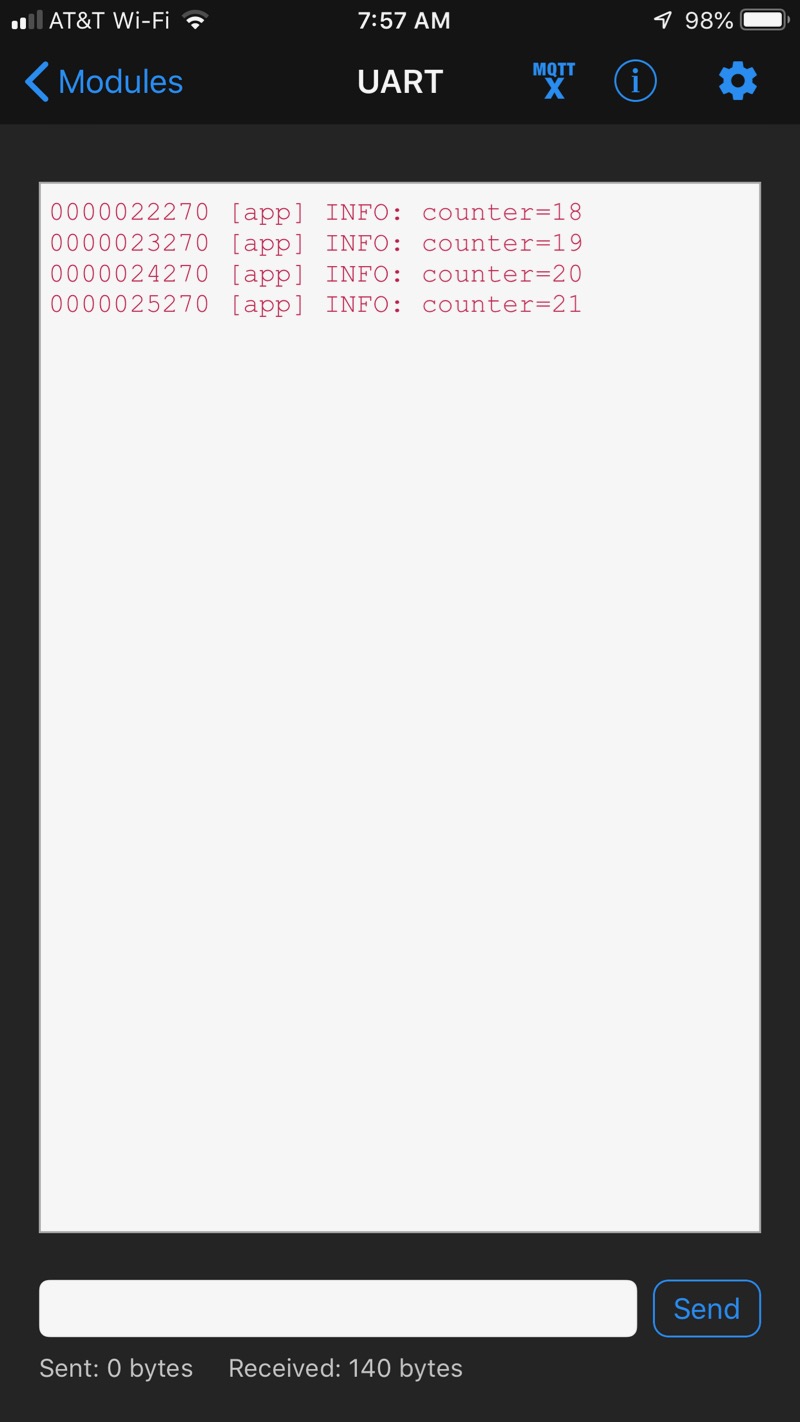
This code consists of the main application program and what is essentially a library to implement BLE log handling.
To try it:
- Flash the code below to your Particle Argon, Boron, or Xenon.
- Run the Adafruit Bluefruit app for iOS or Android.
- Select your Particle device in the Central Mode tab.
- Tap UART.
Web-based BLE serial monitor
In addition to the mobile apps above, if you are using the Chrome web browser on Mac, Windows 10, Linux, Chromebook, or Android, you can also view the logs over BLE from your web browser. (This is not available on Chrome on iPhone or iPad, or most other browsers.)
UART central
It's less common, however the Particle device can also be the central device. You might want to use this as a data stream between two Particle devices, one central and one peripheral, for example.
For Device OS 3.0 and later:
For earlier DeviceOS including 2.x LTS:
BLE Central Mode on the P2 and Photon 2 is only supported in Device OS 5.1.0 and later. Earlier versions only supported BLE Peripheral Mode.
RSSI Meter
This is a simple pair of applications that allow for simple testing of signal strength.
The fixed point is the transmitter, and you'll be measuring the strength of the signal that it is transmitting. It's the BLE peripheral and it is constantly advertising a private service.
The measuring device is the BLE central, and it looks for the peripheral every 500 milliseconds (twice per second) and measures the signal strength (RSSI). It displays this via the USB serial and also on an Adafruit OLED display FeatherWing (SSD1306).
RSSI meter (long range)
This is the previous RSSI Meter example with BLE long-range (coded phy) enabled. This requires Device OS 3.1 or later. The P2 and Photon 2 do not support long-range (coded PHY).
LESC pairing - simple
This example shows how to do encrypted BLE communication using LESC Pairing in "just works" mode. This encrypts the data between the two devices, but does not authenticate, which requires some combination of displays and keypads or buttons. This requires Device OS 3.1 or later. The P2 and Photon 2 require Device OS 5.1 or later for LESC pairing.
Chrome Web BLE
The Google Chrome browser supports BLE from web pages! There is a very good Google web BLE tutorial that explains the details and provides a number of code samples.
It only works in the Chrome browser; it does not work on Firefox, Safari, Edge, or Internet Explorer. Support for Web BLE is planned for Opera, however.
You can use it:
- In the Android web browser (with Android 7.0 or newer)
- On Chromebooks
- In the Chrome web browser on Mac OS X (sometimes)
- In the Chrome web browser on Windows (sometimes)
- On iOS devices with the Web BLE app ($1.99). Does not work on iOS with Chrome or Safari.
Here are some Web BLE examples. The project links include the device source, as well as the HTML and Javascript. Just View Source on the page to view the Javascript code.
Level meter
BLE level meter is an example that uses potentiometer connected to a Gen 3 devices to send the data directly to a compatible web browser, which displays the data on a web-based level meter.
Live graph
BLE live graph is an example that uses potentiometer connected to a Gen 3 devices to send the data directly to a compatible web browser, which displays the data on a live scrolling graph.
IMU (Accelerometer)
BLE IMU connects the Adafruit BNO055 9-DOF IMU to a Gen 3 device and sends the data over BLE to WebBLE. A compatible browser connects directly to the Gen 3 device and streams the orientation information, then uses WebGL to do a 3D animation of the orientation. No server or browser plug-ins required!
Power source display
BLE power source uses Device Diagnostics on the device to get the battery level, charging status, and power status (USB, VIN, etc.) and sends it over BLE. Using Web BLE, you can display this data on a compatible web browser. The display updates in real time!
Libraries
As the previous tutorial showed, you can use Gen 3 devices to address a number of BLE use cases. To simplify the development of some common use cases, Particle has created libraries that allow you to more quickly add BLE functionality to your device.
BLE Gateway library
For Device OS 3.0 and later
This library turns a Particle Gen3 device (Tracker, Boron, Argon) into a Bluetooth Low Energy (BLE) Central device. In this mode, it is able to detect and connect to BLE Peripherals, and expose APIs so that your application can get and/or send data to the peripherals, depending on their capabilities.
The following video shows an example of using it to connect to a Cycling Speed sensor and a heart rate monitor:
If the peripheral that you’d like to connect to is already supported by the library, you can use this without any modifications. Here's a list of peripherals currently supported:
- Heart Rate Monitor
- Cycling Speed and Cadence Sensor
- Glucose Meter
- Veepeak brand OBDII dongle
- Jumper brand Pulse Oximeter
- Masterbuilt brand smoker
If the peripheral is not currently supported, the library is written in a modular format so that it is easy to add your peripheral.
Installation
You can install the library through the Particle library system. The name is ble-gateway. You can also clone the library from GitHub to include in your project or to modify it.
BLE Central Mode on the P2 and Photon 2 is only supported in Device OS 5.1.0 and later. Earlier versions only supported BLE Peripheral Mode.
Usage
For basic usage, you will need to:
- Include the header files for the peripherals you want to use
- Enable the type of devices you want to connect to
- Register a callback to be notified when a connection happens
#include "ble-device-gateway.h"
#include "peripherals/pulse-oximeter.h"
#include "peripherals/cycling-sensor.h"
#include "peripherals/heart-rate-monitor.h"
#include "peripherals/masterbuilt-smoker.h"

void setup() {
  BleDeviceGateway::instance().setup();
  BleDeviceGateway::instance().onConnectCallback(onConnect);
  BleDeviceGateway::instance().enableServiceCustom(PulseOx::bleDevicePtr, JUMPER_PULSEOX_SERVICE);
  BleDeviceGateway::instance().enableService(HeartRateMonitor::bleDevicePtr, BLE_SIG_UUID_HEART_RATE_SVC);
  BleDeviceGateway::instance().enableService(CyclingSpeedAndCadence::bleDevicePtr ,BLE_SIG_UUID_CYCLING_SPEED_CADENCE_SVC);
  BleDeviceGateway::instance().enableServiceByName(MasterbuiltSmoker::bleDevicePtr ,"Masterbuilt Smoker");
}

void loop() {
  BleDeviceGateway::instance().loop();
}
The callback function for when a device is connected has the device class as the parameter. You can find out what type of device it is by checking the getType() function, like this:
void onConnect(BleDevice& device)
{
  if (device.getType() == BleUuid(JUMPER_PULSEOX_SERVICE))  {
    Log.info("Connected to Jumper Pulse Oximeter");
  } else if (device.getType() == BleUuid(BLE_SIG_UUID_HEART_RATE_SVC))
  {
    HeartRateMonitor& dev = (HeartRateMonitor&)device;
    dev.setNewValueCallback(onNewHrValue, NULL);
    uint8_t buf[20];
    if (dev.getManufacturerName(buf, 20) > -1) {
      Log.info("Connected to Heart Rate Monitor named: %s", buf);
    }
    Log.info("Battery Level: %d", dev.getBatteryLevel());
  }
}
Here is where you also would add the capabilities that your application needs. For example, a Heart Rate Monitor typically notifies once per second of the heart rate, so the Heart Rate Monitor type in the library has an API to register a callback to receive the notifications. The battery level is usually notified only when it changes. The NOTIFY property is Optional for the Battery Service, while READ is mandatory. If you know the heart rate monitor that you're using implements NOTIFY, then you can also get the battery level in the same callback as the heart rate measurement. For example:
void onNewHrValue(HeartRateMonitor& monitor, BleUuid uuid, void* context) {
  if (uuid == BLE_SIG_HEART_RATE_MEASUREMENT_CHAR) {
    //Log.info("Heart Rate: %u", monitor.getHeartRate() );
  } else if (uuid == BLE_SIG_BATTERY_LEVEL_CHAR) {
    Log.info("Battery callback level: %d", monitor.getBatteryLevel() );
  }
}
Beacon scanner library
This library works with Particle Gen3 devices to scan for BLE advertisements and parses them for common beacon standards. Currently supported:
- iBeacon
- Eddystone UID, URL, and unencrypted TLM
- Kontakt.io beacons (tested with Asset Tag S18-3)
The custom cold chain tutorial shows how the library can be used to monitor temperature using BLE beacons.
Installation
You can install the library through the Particle library system. The name is BeaconScanner. You can also clone the library from GitHub to include in your project or to modify it.
Usage
The following code will scan all iBeacons, Eddystones, and Kontakt.io tags nearby and automatically publish their information to the Particle Cloud.
#include "Particle.h"
#include "BeaconScanner.h"

#ifndef SYSTEM_VERSION_v620
SYSTEM_THREAD(ENABLED); // System thread defaults to on in 6.2.0 and later and this line is not required
#endif

Beaconscanner scanner;

void setup() {
}

unsigned long scannedTime = 0;

void loop() {
  if (Particle.connected() && (millis() - scannedTime) > 10000) {
    scannedTime = millis();
    scanner.scanAndPublish(5, SCAN_KONTAKT | SCAN_IBEACON | SCAN_EDDYSTONE, "test", PRIVATE);
  }
}
There are other functions that allow you to collect a Vector of the nearby tags to do some local processing prior to publishing. You can see the full documentation in the GitHub repository.
BLE Central Mode on the P2 and Photon 2 is only supported in Device OS 5.1.0 and later. Earlier versions only supported BLE Peripheral Mode.