
Debugging with Eclipse
Particle Debugging with Eclipse
Debugging Particle Photon/P1/Electron code using JTAG/SWD and Eclipse
This FAQ describes how to use Eclipse, a free IDE for Windows, Mac, and Linux, along with OpenOCD, to do source-level debugging of code running on a Particle Photon, P1, or Electron.
Some of the things you can do:
- Set breakpoints in code and view source.
- See the call stack.
- View variables.
- Single-step through code.
While you can still use these instructions, a much easier way to install Particle Workbench. It provides an automated way to install local development tools and do source-level debugging without the extreme hassle of the method described below.
Install local gcc-arm toolchain
- Install a gcc-arm toolchain for local building for Windows, Mac or Linux
The instructions are in the local build FAQ. This is necessary because the cloud compilers are not configured to generate debugging builds.
Connect the debugger device
In this tutorial, we'll use three different debugger devices, but they all work in the same way so you can choose whatever device you prefer.
Some debuggers support SWD (Single Wire Debug) mode, JTAG mode or both to talk to the STM32 microcontroller.
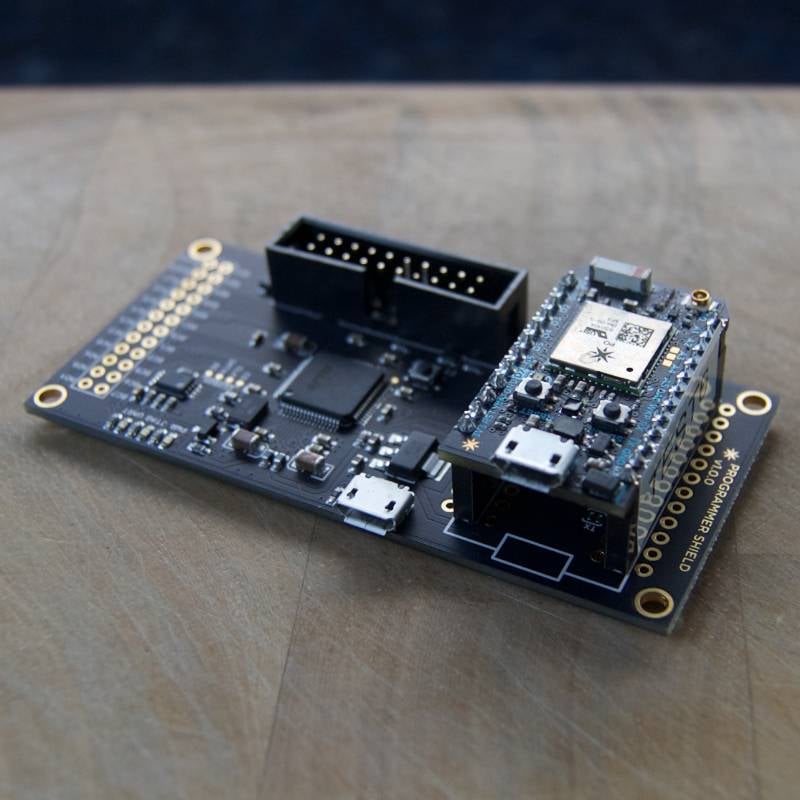
Particle Programmer Shield
The Particle Programmer Shield is designed to fit the Photon. You can also use it with an Electron, with the extra pins hanging over the edge.
If you need your device to be in a breadboard while you debug you can look at using one of the other interfaces.
You will need to use two separate micro USB cables. One connects to the Programmer Shield to access the JTAG features, and the other connects directly to the Photon.
The Photon USB cable isn't entirely necessary because the shield can power the Photon, but since the Eclipse debug process below by default uses DFU to load the debugging code onto the Photon, it's easier if you use a direct USB connection to the Photon for that.
Particle Programmer Shield - Windows
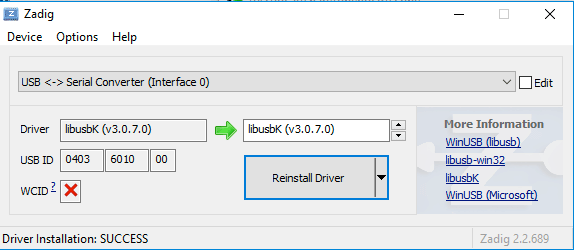
In order to use a Particle Programmer Shield with OpenOCD under Windows you'll need to assign the STM32 STLink device using Zadig.
You may need to select List All Devices from the Options menu to see the device.
Select USB <-> Serial Converter (Interface 0) (USB ID 0403 6010 00). Then set the driver to libusbK. Make sure you select Interface 0, not Interface 1.
Particle Programmer Shield - Mac
This doesn't seem to be a problem with El Capitan and Sierra versions of Mac OS (OS X), but you may encounter a driver conflict that makes it difficult to use the Programmer Shield on the Mac. The detailed instructions for the workaround are in the instructions for the Programmer Shield.
In some cases, you may need to unload and reload the driver to get the Programmer Shield to work. This will need to be done after each reboot. Try it first without running this, as sometimes it works without it. It may be sufficient to only do this and not the more elaborate steps listed above, as well.
sudo kextunload -bundle com.apple.driver.AppleUSBFTDI
sudo kextload -bundle com.apple.driver.AppleUSBFTDI
Inexpensive mini SWD device
You can find inexpensive USB stick that support SWD (Serial Wire Debug) at places like Amazon and eBay for US$12 or less. They work great with the Photon, P1, and Electron, requiring only two data lines and ground.
They are compatible with the official ST-LINK/V2, however these devices generally only support SWD.
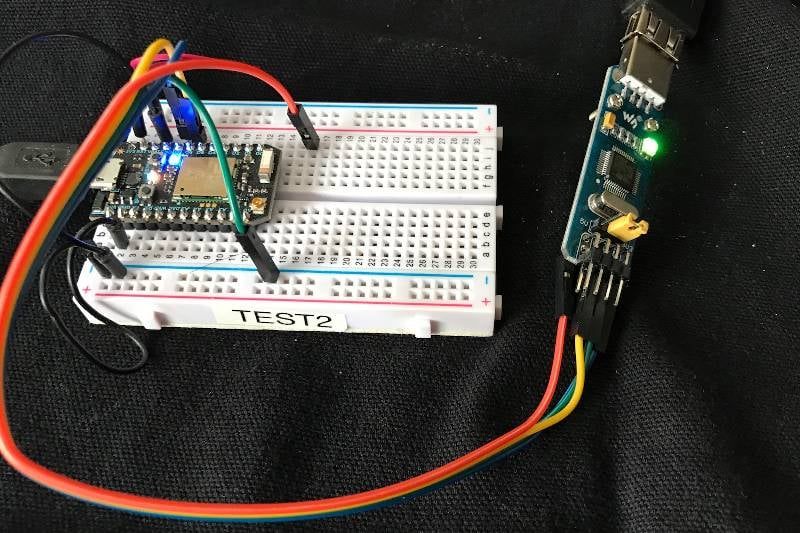
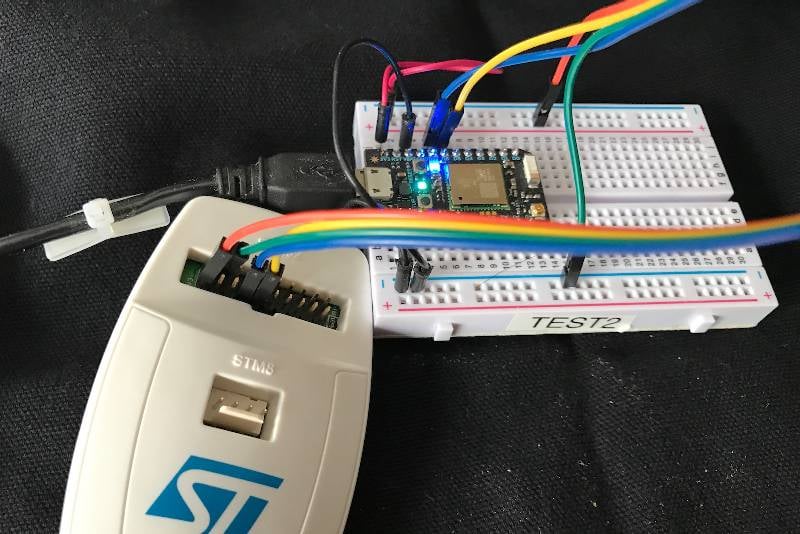
Here's an example on how to connect one brand of such an interface; verify that yours is the same before wiring.
- USB connector side away from you
- Debug header facing you
- Chips on top
| VCC | SWIM | GND | RESET | Top Row (SWIM) | |
| VCC | SWCKD | GND | SWDIO | Bottom Row (SWD) |
You will only use the bottom row (SWD). The SWIM connections are for the STM8 processors, not the STM32 processors used in the Particle devices.
In this picture, it's wired as follows. Note that the color code is not official, it's just what it happened to be with the female-to-male jumper wires that I used.
| SWD | Color | Photon Pin |
|---|---|---|
| VCC | Orange | No Connection |
| SWCKD | Yellow | D6 |
| GND | Green | GND |
| SWDIO | Blue | D7 |
It's a little unclear whether the VCC pin (orange) should be connected for the mini devices. I generally leave it unconnected for the mini devices but connected for the actual ST-LINK/V2 real device.
Mini SWD device - Windows
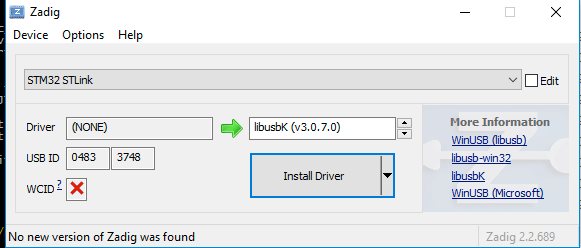
In order to use a mini SWD device with OpenOCD under Windows you'll need to assign the STM32 STLink device using Zadig.
You may need to select List All Devices from the Options menu to see the STLink device.
Select STM32 STLink (USB ID 0483 3748). Then set the driver to libusbK.
ST-LINK/V2 USB JTAG device
You can also use an official ST-LINK/V2 device. It supports both JTAG and SWD mode.
If you have a full 20-pin JTAG connector (0.1"x0.1" pitch, in 2x10 layout) on your board, that's the easiest way to connect the device. The connector is keyed so you can usually only insert it one way.
You can also connect the ST-LINK/V2 using jumper wires; this is more practical for SWD as it only requires 3 or 4 pins.
| Pin | Function | JTAG | JTAG Pin | SWD | SWD Pin |
|---|---|---|---|---|---|
| 1 | VAPP | MCU VDD | 3V3 | MCU VDD | 3V3 |
| 2 | VAPP | MCU VDD | - | MCU VDD | - |
| 3 | TRST | TRSTN | D3 | GND | - |
| 4 | GND | GND | GND | GND | GND |
| 5 | TDU | JTDI | D5 | GND | - |
| 6 | GND | GND | - | GND | - |
| 7 | TMS_SWDIO | JTMS | D7 | SWDIO | D7 |
| 8 | GND | GND | - | GND | - |
| 9 | TCK_SWCLK | JTCK | D6 | SWCLK | D6 |
| 10 | GND | GND | - | GND | - |
| 11 | NC | NC | - | NC | - |
| 12 | GND | GND | - | GND | - |
| 13 | TDO_SWO | JTDO | D4 | TRACESWO | - |
| 14 | GND | GND | - | GND | - |
| 15 | NRST | NRST | - | NRST | - |
| 16 | GND | GND | - | GND | - |
| 17 | NC | NC | - | NC | - |
| 18 | GND | GND | - | GND | - |
| 19 | VDD | NC | - | NC | - |
| 20 | GND | GND | - | GND | - |
You only need to connect one GND line, though it's best to connect all of them if possible to reduce noise on the ribbon cable if you are making a board with a 20-pin JTAG connector.
If you're just using SWD like you would with the mini SWD device, you should connect it as follows:
The pins on the connector are numbered this way when you have the programmer positioned so the logo is upright and the notch is on the bottom of the 20-pin connector.
| 2 | 4 | 6 | 8 | 10 | 12 | 14 | 16 | 18 | 20 | |
| 1 | 3 | 5 | 7 | 9 | 11 | 13 | 15 | 17 | 19 | |
| notch |
As above, the color code is not official, it's just what I happened to have on the female-to-male jumper wires that I used.
| ST-LINK | SWD | Color | Pin |
|---|---|---|---|
| 1 | VCC | Orange | 3V3 |
| 4 | GND | Green | GND |
| 7 | SWDIO | Blue | D7 |
| 9 | SWSCK | Yellow | D6 |
Building debug builds
Important: Make sure your software doesn't use the debugger pins: D6 and D7 for SWD, or D4, D5, D6, and D7 for JTAG. This means you can't use the D7 user LED while using the debugger.
The firmware compiled through the Web IDE, Desktop IDE or CLI are don't contain debug information. You'll need a local gcc-arm toolchain to make builds that are compatible with the debugger.
For debugging using JTAG/SWD you create special monolithic debug builds. They're monolithic in that they are a single file that contains the system and user firmware instead of the usual modular binaries (system parts and user part). The disadvantage of the monolithic binaries is that they are large, maybe 480 Kbytes for a simple program that might only be 6 Kbytes normally!
Whenever you switch between debug and non-debug builds, or monolithic to non-monolithic, you must add the clean option to make.
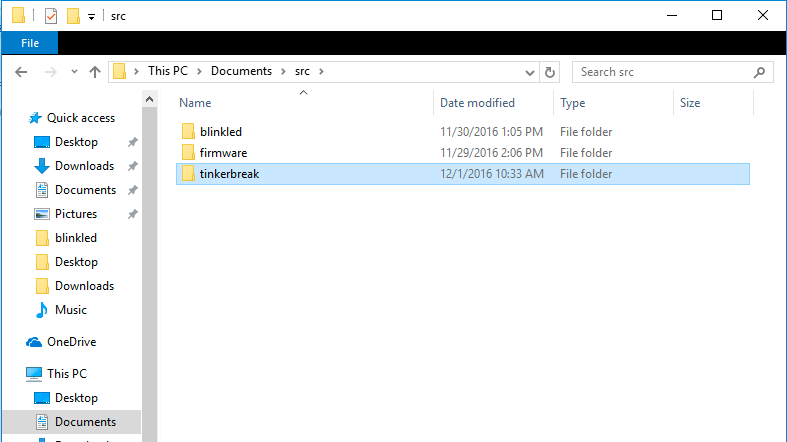
In this example I created a new directory in src called "tinkerbreak" that contains tinkerbreak.cpp, a modified version of tinker that responds to the Particle function "break" to break into the debugger under software control.
To build manually (not using Eclipse), you'd use a command line like this, based on the directory layout in the gcc-arm installation instructions linked to above.
cd firmware/main
make clean all program-dfu PLATFORM=photon MODULAR=n DEBUG_BUILD=y USE_SWD_JTAG=y APPDIR=../../tinkerbreak
In the tinkerbreak/target directory are a few files that you may need:
- tinkerbreak.bin - monolithic firmware build (can flash with the Particle CLI or dfu-util)
- tinkerbreak.elf - The debugging binary needed by gdb
Restoring modular firmware
To restore normal modular firmware, to allow for user flashing independent of Device OS firmware and normal OTA flashing, put the device in DFU mode and:
particle flash --usb tinker
After it reboots, immediately put it back in DFU mode, then:
particle update
Eclipse install
This is the abbreviated method that will allow you to use the source debugger in Eclipse. Setting up a project that has full code analysis and auto-completion is much more complicated, and will be the topic of a separate FAQ. For this version, we just turn off displaying some errors.
Eclipse base install - Windows
- Install Java 8 JDK (if necessary)
You may need to install a modern Java 8 JDK (not just the JRE) in order to use Eclipse. The JDK install page has a link to download the JDK, which is what you need.
Select a download from the first group, Java SE Development Kit 8u_some number_. It was 8u111 when I wrote this, but select the current version.
I used the 64-bit Windows version, jdk-8u111-windows-x64.exe. You should use the latest version of JDK 8 for your operating system, not specifically build 111.
For this example, I selected Eclipse IDE for C/C++ Developers but you can choose a different one if desired. If you already have Eclipse installed, you can also just add in the packages to your existing install. The examples here use Eclipse Neon (4.6).
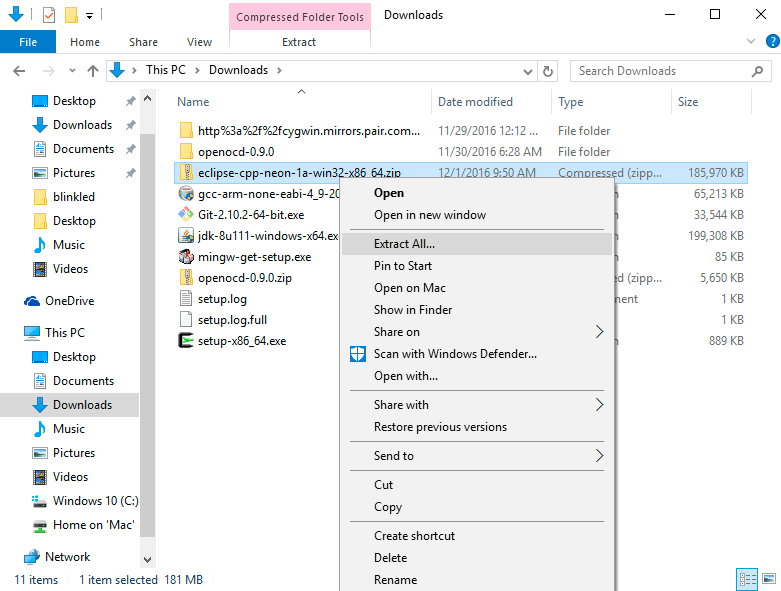
- Install Eclipse
The download is a zip file, not an installer. Select the file in your Downloads folder and right-click. Select Extract All. You will probably want to change the destination directory. I put mine in C:\Program Files. It will create the eclipse directory in that for you.
- Create desktop shortcut (optional)
For convenience, I created a desktop shortcut icon as well. Right click on eclipse.exe and select Create Shortcut and select Yes to create it on the desktop (or drag and drop it there).
Now you should be able to launch Eclipse and complete the next step of the instructions, Eclipse Install GNU ARM C/C++, which is common for all operating systems.
Eclipse base install - Mac
For this example, I selected Eclipse IDE for C/C++ Developers but you can choose a different one if desired. If you already have Eclipse installed, you can also just add in the packages to your existing install. The examples here use Eclipse Neon (4.6).
- Drag the Eclipse file to your Applications folder.
Eclipse doesn't have an installer or dmg file.
Also, you may be prompted to install the Legacy Java SE 6 for Mac OS when you first run Eclipse. If this happens, just follow the instructions for doing so.
- Upgrade to Java JDK 8 if necessary
However, if you install the Legacy Java SE 6, you will also need to install a more modern version of Java as well. You need to install the JDK, not the JRE, in order to use Eclipse. The JDK install page has a link to download the JDK, which is what you need.
- Select a download from the first group, Java SE Development Kit 8u_some number_.
It was 8u111 when I wrote this, but select the current version.
I used the 64-bit Mac version, jdk-8u111-Mac OSx-x64.dmg. You should use the latest version of JDK 8 for your operating system, not specifically build 111.
- Swap the default Mac OS JVM
Then you need to swap version 8 for the version 6 of the Mac system JVM. Open a Terminal window:
os-x-10:~ rickk$ cd /Library/Java
os-x-10:Java rickk$ ls JavaVirtualMachines/
1.6.0.jdk        jdk1.8.0_111.jdk
os-x-10:Java rickk$ sudo mv Home Home6
os-x-10:Java rickk$ sudo ln -s JavaVirtualMachines/jdk1.8.0_111.jdk Home
os-x-10:Java rickk$ ls -l
total 16
drwxrwxr-x  2 root  wheel   68 Dec  1 08:06 Extensions
lrwxr-xr-x  1 root  wheel   36 Dec  1 08:19 Home -> JavaVirtualMachines/jdk1.8.0_111.jdk
lrwxr-xr-x  1 root  wheel   48 Dec  1 08:06 Home6 -> /System/Library/Frameworks/JavaVM.framework/Home
drwxr-xr-x  4 root  wheel  136 Dec  1 08:18 JavaVirtualMachines
Make sure you link to the version of the JDK you installed, which might not be build 111.
Now you should be able to launch Eclipse and complete the next step of the instructions, Eclipse Install GNU ARM C/C++, which is common for all operating systems.
Eclipse base install - Linux
While you can install Eclipse using apt-get, at the time of writing it was an old version, and all of the other platforms I'm using Eclipse Neon, so I opted for a manual install.
- You may need to install a modern Java 8 JDK (not just the JRE) in order to use Eclipse.
The JDK install page has a link to download the JDK, which is what you need. You can also use OpenJDK if you prefer.
- Select a download from the first group, Java SE Development Kit 8u_some number_.
It was 8u111 when I wrote this, but select the current version.
I selected the Linux x64 tar.gz version, jdk-8u111-linux-x64.tar.gz. You should use the latest version of JDK 8 for your operating system, not specifically build 111.
- Extract the archive and move it to a suitable location.
I selected /usr/local/jdk1.8.0_111.
rickk@ubuntu:~/Downloads$ tar xzf jdk-8u111-linux-x64.tar.gz
rickk@ubuntu:~/Downloads$ sudo mv jdk1.8.0_111 /usr/local/jdk8
- Add this to ~/.profile:
export JAVA_HOME=/usr/local/jdk8
export PATH=$PATH:$JAVA_HOME/bin
You'll probably have to log out and log back in after that.
- Check the Java version:
rickk@ubuntu:~$ java -version
java version "1.8.0_111"
Java(TM) SE Runtime Environment (build 1.8.0_111-b14)
Java HotSpot(TM) 64-Bit Server VM (build 25.111-b14, mixed mode)
For this example, I selected Eclipse IDE for C/C++ Developers but you can choose a different one if desired. If you already have Eclipse installed, you can also just add in the packages to your existing install. The examples here use Eclipse Neon (4.6).
I downloaded the Linux 64-bit version.
- Install Eclipse
Extract the archive and move it to a suitable location:
rickk@ubuntu:~/Downloads$ tar xzf eclipse-cpp-neon-1a-linux-gtk-x86_64.tar.gz
rickk@ubuntu:~/Downloads$ sudo mv eclipse /usr/local/bin
- Create a desktop shortcut (optional):
rickk@ubuntu:~/Downloads$ cd ../Desktop/
rickk@ubuntu:~/Desktop$ ln -s /usr/local/bin/eclipse/eclipse .
Now you should be able to launch Eclipse and complete the next step of the instructions, Eclipse Install GNU ARM C/C++, which is common for all operating systems.
Eclipse Install GNU ARM C/C++
These steps are required for Windows, Mac and Linux to use the gcc-arm compiler and GDB with the Photon and Electron.
- Download the latest release of the GNU ARM Eclipse plugin.
- Run Eclipse
- From the Help menu select Install New Software...
- Click Add then Archive and select the zip file of GNU ARM Eclipse.
- Select the packages
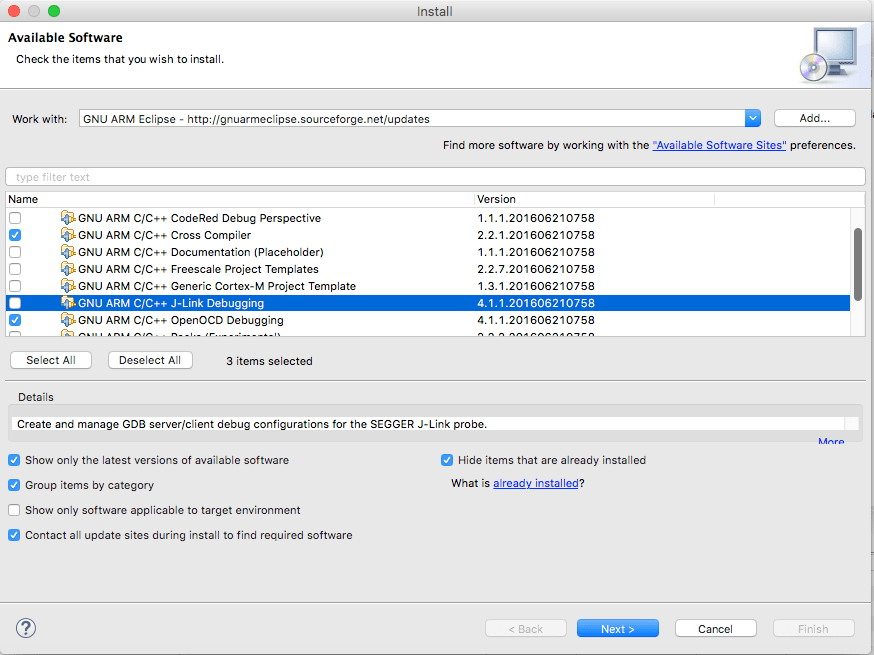
You will need the following:
- GNU ARM C/C++ Cross Compiler
- GNU ARM C/C++ OpenOCD Debugging
- GNU ARM C/C++ STM32Fx Project Templates
If you're using a different debugging hardware like the Segger J-Link, be sure to select that as well. There are additional instructions at the official download site.
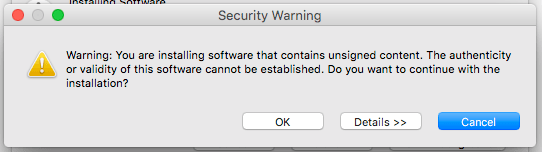
- Proceed through the rest of the installation steps
You may get a warning for unsigned content. You should select OK and proceed with the installation.
Install GNU ARM Eclipse OpenOCD - Windows
There is a separate install for the operating system-specific GNU ARM Eclipse OpenOCD bits.
https://github.com/gnuarmeclipse/openocd/releases
There are further installation instructions in the GNU ARM Eclipse OpenOCD installation instructions.
For Windows, just run the appropriate installer and accept all of the default options. The default install location is a little unwieldy but you can run the openocd --version command to test the new installation with a command something like this:
"C:\Program Files\GNU ARM Eclipse\OpenOCD\0.10.0-201610281609-dev\bin\openocd" --version
GNU ARM Eclipse 64-bits Open On-Chip Debugger 0.10.0-dev-00498-gbbfb673 (2016-10-28-16:31)
Licensed under GNU GPL v2
For bug reports, read
        http://openocd.org/doc/doxygen/bugs.html
Or better yet, the more involved example, using a ST-LINK/V2 mini SWD USB stick connected to a Photon in DFU mode (DFU has debugger support regardless of what firmware is flashed):
C:\Program Files\GNU ARM Eclipse\OpenOCD\0.10.0-201610281609-dev\scripts>..\bin\openocd.exe -f interface/stlink-v2.cfg -f target/stm32f2x.cfg
GNU ARM Eclipse 64-bits Open On-Chip Debugger 0.10.0-dev-00498-gbbfb673 (2016-10-28-16:31)
Licensed under GNU GPL v2
For bug reports, read
        http://openocd.org/doc/doxygen/bugs.html
Info : auto-selecting first available session transport "hla_swd". To override use 'transport select <transport>'.
adapter speed: 1000 kHz
adapter_nsrst_delay: 100
Info : The selected transport took over low-level target control. The results might differ compared to plain JTAG/SWD
none separate
Info : Unable to match requested speed 1000 kHz, using 950 kHz
Info : Unable to match requested speed 1000 kHz, using 950 kHz
Info : clock speed 950 kHz
Info : STLINK v2 JTAG v23 API v2 SWIM v4 VID 0x0483 PID 0x3748
Info : using stlink api v2
Info : Target voltage: 3.253510
Info : stm32f2x.cpu: hardware has 6 breakpoints, 4 watchpoints
If you are using the Particle Programmer Shield, you will need to copy the configuration file. Download particle-ftdi.cfg and copy it into your OpenOCD installation directory, into scripts/interface/ftdi/particle-ftdi.cfg.
For Gen 3 devices, also download nrf52-particle.cfg and copy it to the scripts/target directory.
Install gnu arm eclipse OpenOCD - Mac
There is a separate install for the operating-specific GNU ARM Eclipse OpenOCD bits.
https://github.com/gnuarmeclipse/openocd/releases
There are further installation instructions in the GNU ARM Eclipse OpenOCD installation instructions.
For Mac, download the pkg installer and run it. You may need to go into Control Panel then Security & Privacy and use the Open Anyway button because of the unsigned content.
The installation directory will be something like: /Applications/GNU ARM Eclipse/OpenOCD/0.10.0-201610281609-dev.
You can test it by connecting the debugging device to a Photon in DFU mode (DFU has debugger support regardless of what firmware is flashed). In this case, I connected a ST-LINK/V2 mini device to a Photon with SWD:
os-x-10:~ rickk$ cd "/Applications/GNU ARM Eclipse/OpenOCD/0.10.0-201510281129-dev/scripts"
os-x-10:scripts rickk$ ../bin/openocd -f interface/stlink-v2.cfg -f target/stm32f2x.cfg
GNU ARM Eclipse 64-bits Open On-Chip Debugger 0.10.0-dev-00141-g09aeb96 (2015-10-28-13:32)
Licensed under GNU GPL v2
For bug reports, read
    http://openocd.org/doc/doxygen/bugs.html
Info : auto-selecting first available session transport "hla_swd". To override use 'transport select <transport>'.
adapter speed: 1000 kHz
adapter_nsrst_delay: 100
Info : The selected transport took over low-level target control. The results might differ compared to plain JTAG/SWD
none separate
Info : Unable to match requested speed 1000 kHz, using 950 kHz
Info : Unable to match requested speed 1000 kHz, using 950 kHz
Info : clock speed 950 kHz
Info : STLINK v2 JTAG v23 API v2 SWIM v4 VID 0x0483 PID 0x3748
Info : using stlink api v2
Info : Target voltage: 3.250331
Info : stm32f2x.cpu: hardware has 6 breakpoints, 4 watchpoints
If you are using the Particle Programmer Shield, you will need to copy the configuration file. Download particle-ftdi.cfg and copy it into your OpenOCD installation directory, into scripts/interface/ftdi/particle-ftdi.cfg.
For Gen 3 devices, also download nrf52-particle.cfg and copy it to the scripts/target directory.
Install GNU ARM Eclipse OpenOCD - Linux
There is a separate install for the operating-specific GNU ARM Eclipse OpenOCD bits.
https://github.com/gnuarmeclipse/openocd/releases
There are further installation instructions in the GNU ARM Eclipse OpenOCD installation instructions.
I downloaded the Debian 64-bit version, gnuarmeclipse-openocd-debian64-0.10.0-201610281609-dev.tgz but you should download whatever the current version is, along with 32-bit or 64-bit as appropriate.
Extract the archive and move it to a suitable location.
rickk@ubuntu:~$ sudo mkdir /opt/gnuarmeclipse
rickk@ubuntu:~$ cd /opt/gnuarmeclipse/
rickk@ubuntu:/opt/gnuarmeclipse$ sudo tar xzf ~/Downloads/gnuarmeclipse-openocd-debian64-0.10.0-201610281609-dev.tgz
You can test it by connecting the debugging device to a Photon in DFU mode (DFU has debugger support regardless of what firmware is flashed). In this case, I connected a ST-LINK/V2 mini device to a Photon with SWD:
rickk@ubuntu:~$ /opt/gnuarmeclipse/openocd/0.10.0-201610281609-dev/scripts
rickk@ubuntu:/opt/gnuarmeclipse/openocd/0.10.0-201610281609-dev/scripts$ ../bin/openocd -f interface/stlink-v2.cfg -f target/stm32f2x.cfg
GNU ARM Eclipse 64-bits Open On-Chip Debugger 0.10.0-dev-00498-gbbfb673 (2016-10-28-17:01)
Licensed under GNU GPL v2
For bug reports, read
    http://openocd.org/doc/doxygen/bugs.html
Info : auto-selecting first available session transport "hla_swd". To override use 'transport select <transport>'.
adapter speed: 1000 kHz
adapter_nsrst_delay: 100
Info : The selected transport took over low-level target control. The results might differ compared to plain JTAG/SWD
none separate
Info : Unable to match requested speed 1000 kHz, using 950 kHz
Info : Unable to match requested speed 1000 kHz, using 950 kHz
Info : clock speed 950 kHz
Info : STLINK v2 JTAG v23 API v2 SWIM v4 VID 0x0483 PID 0x3748
Info : using stlink api v2
Info : Target voltage: 3.251357
Info : stm32f2x.cpu: hardware has 6 breakpoints, 4 watchpoints
If you are using the Particle Programmer Shield, you will need to copy the configuration file. Download particle-ftdi.cfg and copy it into your OpenOCD installation directory, into scripts/interface/ftdi/particle-ftdi.cfg.
For Gen 3 devices, also download nrf52-particle.cfg and copy it to the scripts/target directory.
Create an eclipse project - all operating systems
- From the File menu select New then Makefile Project with Existing Code.
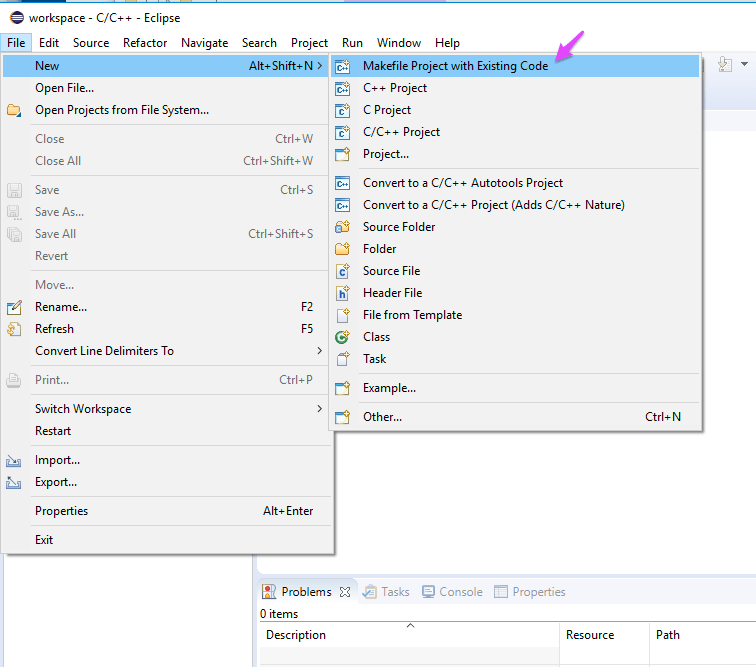
In this example, we'll create a project for the tinkerbreak code we used in the command line example. Select that and make sure Cross ARM GCC is selected.
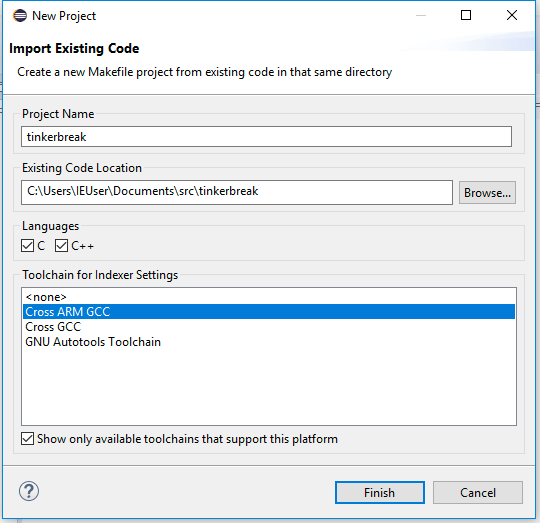
- Download Makefile and save it into your project directory.
It will be the same for all projects. You will need to right click on the project name (tinkerbreak) in the Project Explorer and select Refresh for it to display in Eclipse.
## Assumption: These variables will be set in the environment
## $(APPDIR)
## $(FIRMWARE)
## $(PATH)
## $(PLATFORM)
## $(TARGETBIN)
## Optionally set $(MAKEOPTS) for things like MODULAR=n DEBUG_BUILD=y USE_SWD_JTAG=y

all : $(TARGETBIN)

## Use the wildcard function explicitly, because just using a dependency on .h files will
## fail if the project doesn't contain any .h files. This will work either way.
source := $(wildcard *.cpp) $(wildcard *.h)

$(TARGETBIN) : $(source)
    cd "$(FIRMWARE)/main" && make all PLATFORM=$(PLATFORM) APPDIR="$(APPDIR)" $(MAKEOPTS)

clean :
    cd "$(FIRMWARE)/modules" && make clean all PLATFORM=$(PLATFORM) APPDIR="$(APPDIR)" $(MAKEOPTS)


.PHONY: all clean
There must be a single tab before each of the two indented cd commands. The make will fail if there are spaces, which may happen if you copy and paste from the web page.
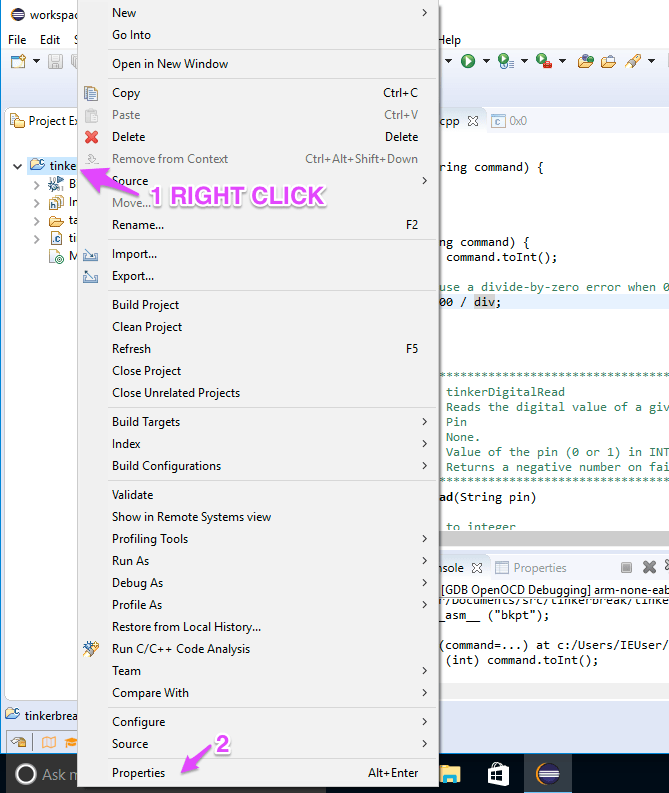
- Right click on tinkerbreak in the Project Explorer and select Properties. Most of the settings that you need to modify are located here.
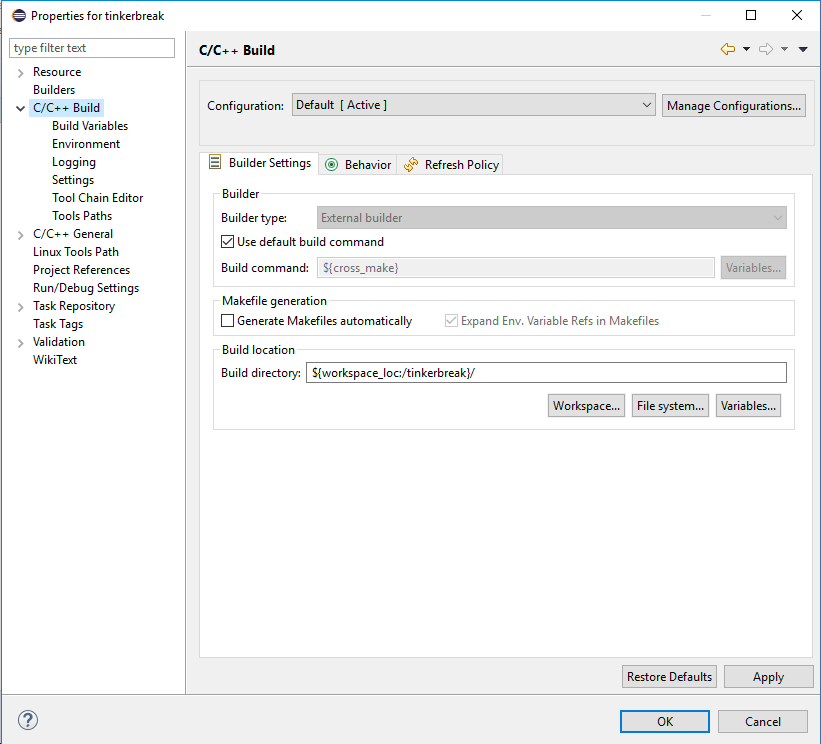
- Select C/C++ Build.
You should not need to change any setting on this page, but here's what it should look like:
- Select Build Variables (1) in the C/C++ Build preferences.
- Use the Add button (2) to add two new build variables:
| Name | Type | Value |
|---|---|---|
| cross_make | String | make |
| cross_prefix | String | arm-none-eabi- |
It should look like this when done:
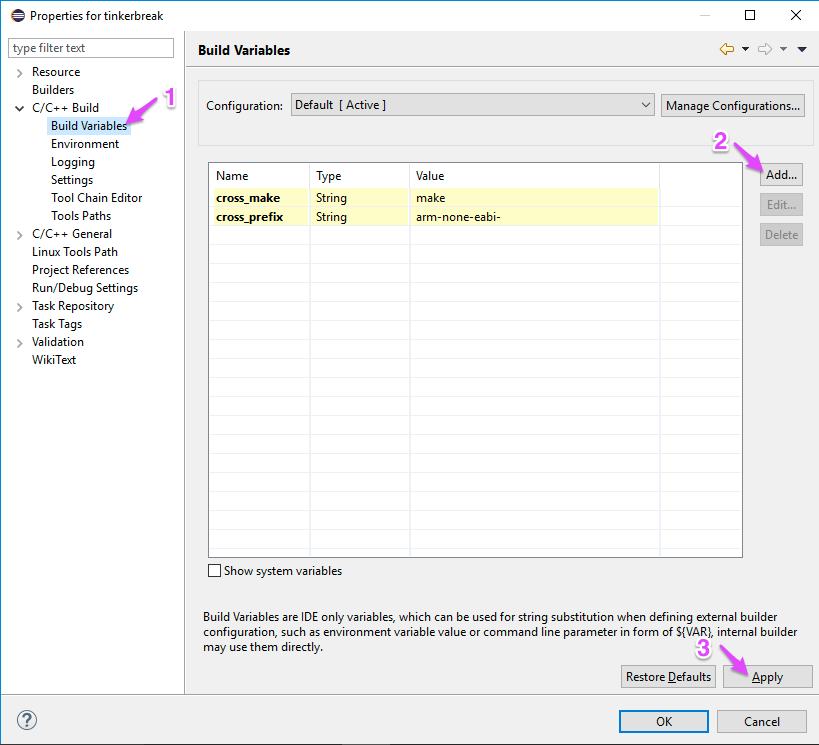
After making a change in the preferences, it's a good idea to click Apply (3) to make sure the changes are saved.
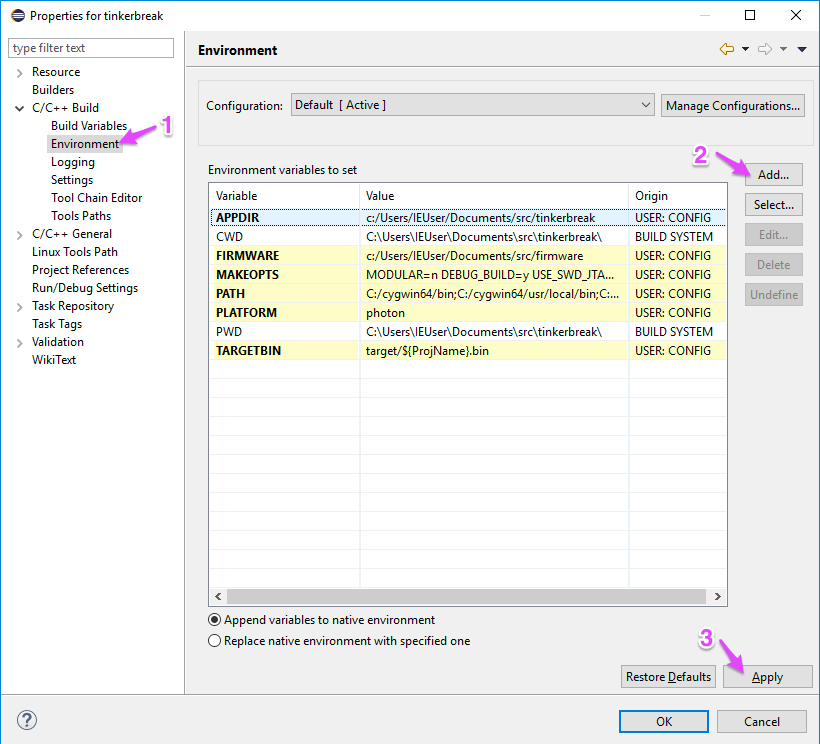
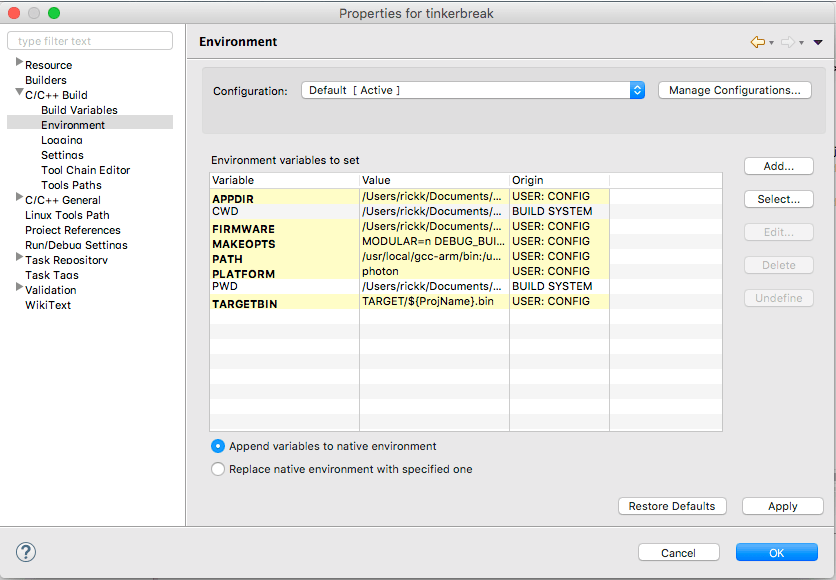
- Select Environment (1) in the C/C++ Build preferences.
- For Windows: Use the Add button (2) to add new environment variables:
| Name | Type | Value |
|---|---|---|
| APPDIR | String | c:/Users/IEUser/Documents/src/tinkerbreak |
| FIRMWARE | String | c:/Users/IEUser/Documents/src/firmware |
| MAKEOPTS | String | MODULAR=n DEBUG_BUILD=y USE_SWD_JTAG=y program-dfu |
| PATH | String | C:/cygwin64/bin;C:/cygwin64/usr/local/bin; (plus what was there before) |
| PLATFORM | String | photon |
| TARGETBIN | String | target/${ProjName}.bin |
- For Mac OS: Use the Add button (2) to add new environment variables:
| Name | Type | Value |
|---|---|---|
| APPDIR | String | /Users/rickk/Documents/src/tinkerbreak |
| FIRMWARE | String | /Users/rickk/Documents/src/firmware |
| MAKEOPTS | String | MODULAR=n DEBUG_BUILD=y USE_SWD_JTAG=y program-dfu |
| PATH | String | /usr/local/bin/gcc-arm/bin:/usr/local/bin:/usr/bin:/bin:/usr/sbin:/sbin |
| PLATFORM | String | photon |
| TARGETBIN | String | target/${ProjName}.bin |
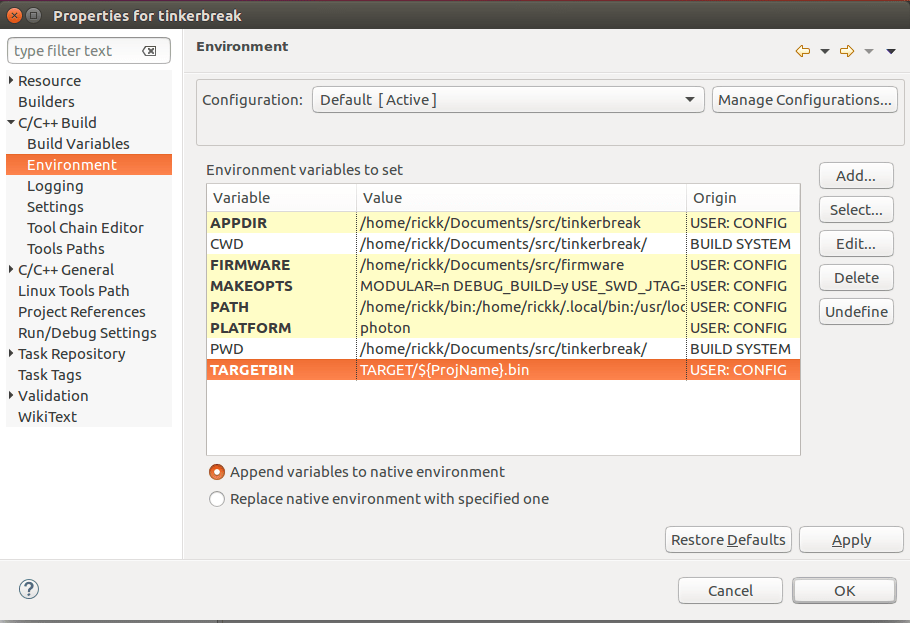
- For Linux: Use the Add button (2) to add new environment variables:
| Name | Type | Value |
|---|---|---|
| APPDIR | String | /home/rickk/Documents/src/tinkerbreak |
| FIRMWARE | String | /home/rickk/Documents/src/firmware |
| MAKEOPTS | String | MODULAR=n DEBUG_BUILD=y USE_SWD_JTAG=y program-dfu |
| PATH | String | /home/rickk/bin:/home/rickk/.local/bin:/usr/local/sbin:/usr/games:/usr/local/games:/snap/bin:/usr/local/jdk8/bin:/usr/local/gcc-arm/bin:/usr/local/bin:/usr/bin:/bin:/usr/sbin:/sbin |
| PLATFORM | String | photon |
| TARGETBIN | String | target/${ProjName}.bin |
APPDIR is the path to your source directory, the one you previously created a Makefile in. For Windows, make sure you use forward slashes (/) as the directory separator, not backward slashes commonly used in Windows. The reason is that the path is passed to GNU make, which handles the directory separators in a more Unix-like manner.
FIRMWARE is the path to the firmware release you downloaded earlier as part of the installation of the local gcc-arm build chain. For Windows, make sure you use forward slashes (/) as the directory separator.
MAKEOPTS are the options passed to make. When using the debugger with a monolithic debugging build, you typically use:
MODULAR=n DEBUG_BUILD=y USE_SWD_JTAG=y program-dfu
For the simplest non-debug modular build, the MAKEOPTS can be an empty string.
PATH specifies the PATH to pass to the shell running the Make. This may vary from computer to computer and operating system.
For Windows, insert at the beginning, C:/cygwin64/bin;C:/cygwin64/usr/local/bin or where you have your Cygwin directory. This is necessary because Cygwin tools are not added to the Windows System PATH because they can cause odd problems when Linux-style tools conflict with DOS-style tools (like find), but Eclipse needs to be able to call tools like make.
For Linux and Mac, you should make sure that the gcc-arm local build chain is in the path. For example, /usr/local/bin/gcc-arm/bin:/usr/local/bin:/usr/bin:/bin:/usr/sbin:/sbin.
PLATFORM is the platform you're building for, typically photon, p1, or electron.
TARGETBIN is the relative path to the built firmware binary. Setting it to:
target/${ProjName}.bin
will automatically change it to match your project name. In this example, it would be target/tinkerbreak.bin.
- Click Apply (3) when done.
- Change error settings
This is necessary because the Device OS firmware is not fully integrated into Eclipse in this FAQ, so the lack of definitions causes many lines to be flagged as errors.
Select C/C++ General then Code Analysis (1). Select Use project settings (2). Scroll down and uncheck the box for Syntax and Semantic Errors (3).
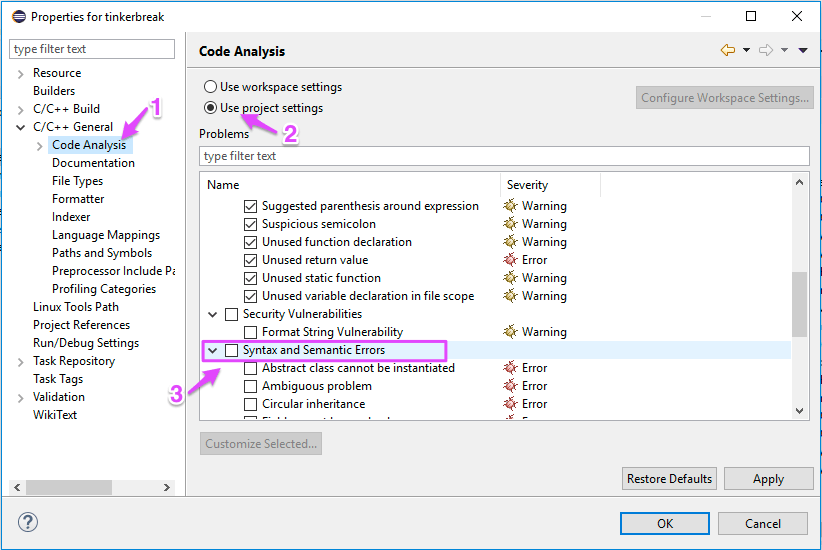
Click Apply then OK to close the Properties window.
- Put the Photon in DFU mode (blinking yellow)
- Try a build. Right click on the project name (1) and select Build Project (2).
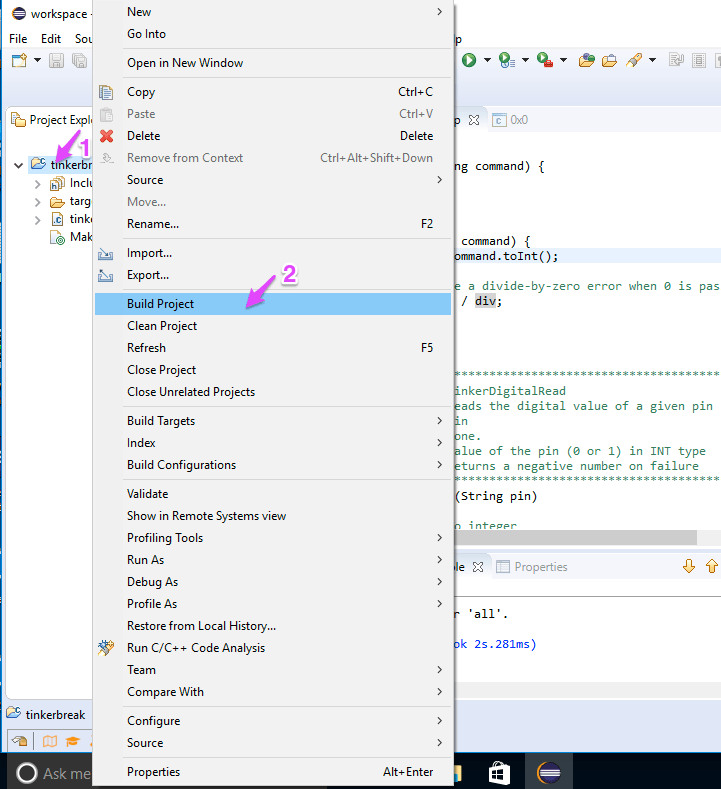
After successfully building and flashing, you'll see a message in the CDT Build Console pane at the bottom of the window.
Some errors are pretty self-explanatory:
No DFU capable USB device available
make[1]: *** [../build/module.mk:113: program-dfu] Error 74
make: *** [Makefile:16: target/tinkerbreak.bin] Error 2
make[1]: Leaving directory '/cygdrive/c/Users/IEUser/Documents/src/firmware/main'
The firmware binary (target/tinkerbreak.bin) in this case will still be fine, but the Photon won't have that firmware automatically loaded on it, of course. If you don't want to flash the device automatically, remove the program-dfu option from C/C++ Build then Environment in the variable MAKEOPTS.
Set up OpenOCD debugging
From the Run menu select Debug Configurations.
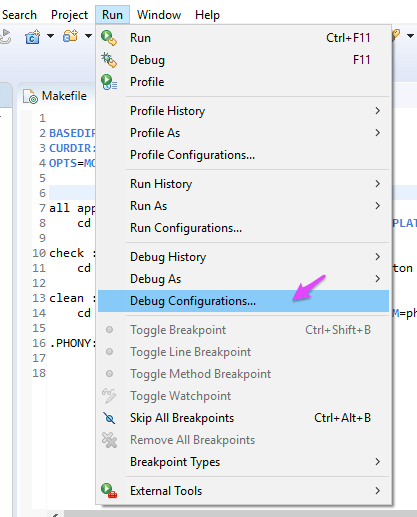
If the Run menu is nearly empty, from the Window menu select Perspective then Open Perspective then C/C++ and the Debug Configurations menu should appear.
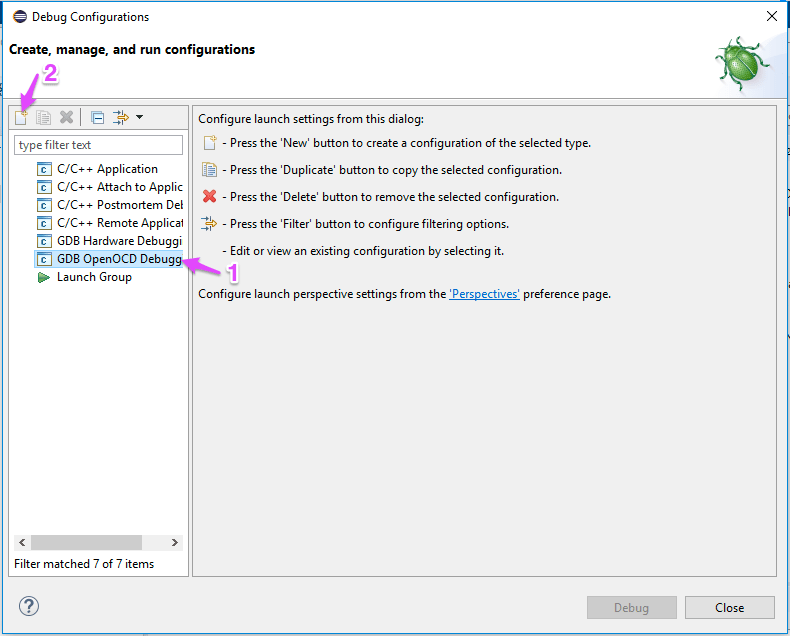
Select GDB OpenOCD Debugging and click the New button.
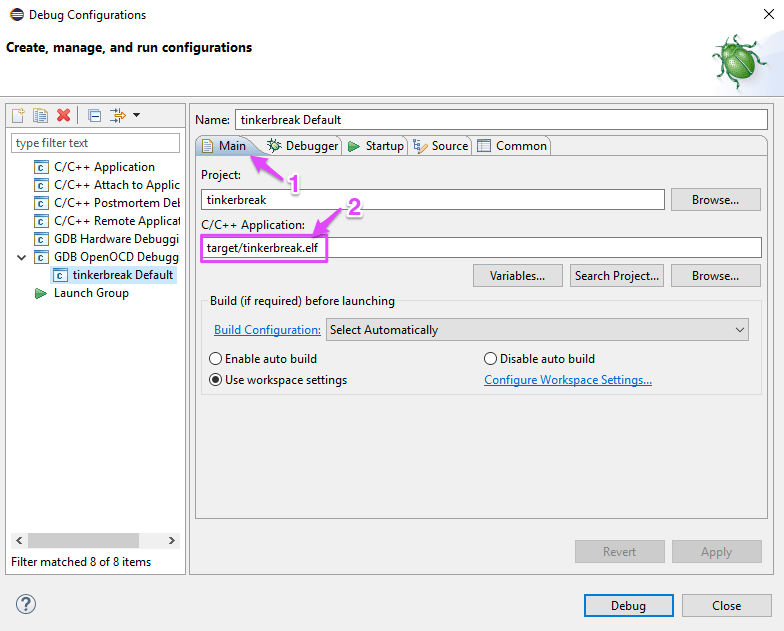
In the Main tab, in the C/C++ Application: box, enter:
target/tinkerbreak.elf
If you've named your project differently, the pattern is still target/_project_name_.elf.
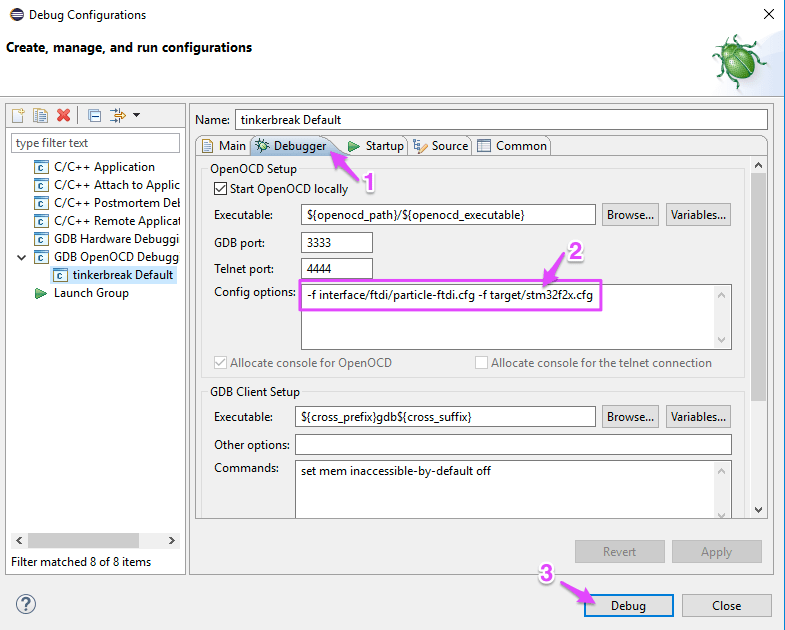
In the Debugger tab, in the Config options enter:
-f interface/stlink-v2.cfg -f target/stm32f2x.cfg
If you're using a different debugger, specify that interface instead. For the Particle Programmer Shield, enter:
-f interface/ftdi/particle-ftdi.cfg -f target/stm32f2x.cfg
Then click Debug.
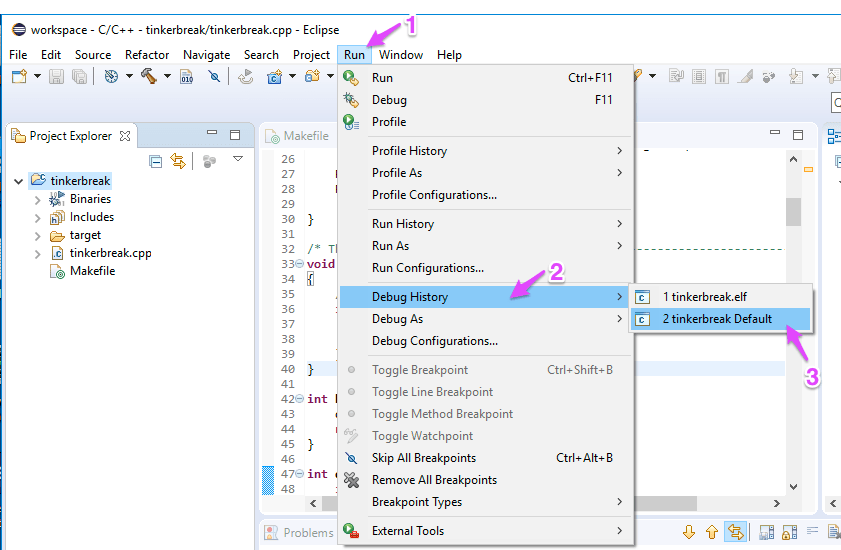
You only need to set the Debug configuration once; the next time you want to run using the debugger, from the Run menu select Debug History then tinkerbreak Default.
Make sure you select the project name Default option; selecting project name.elf will try (and fail) to launch the local debugger, not the SWD debugger. Likewise, clicking on the debug toolbar icon may try to launch the local debugger, as well.
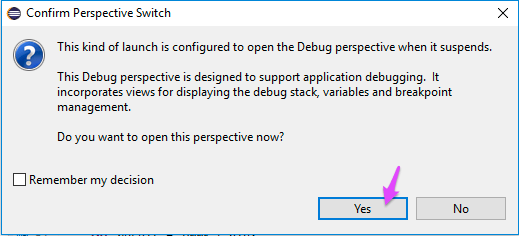
- Click Yes to switch to a Debug perspective.
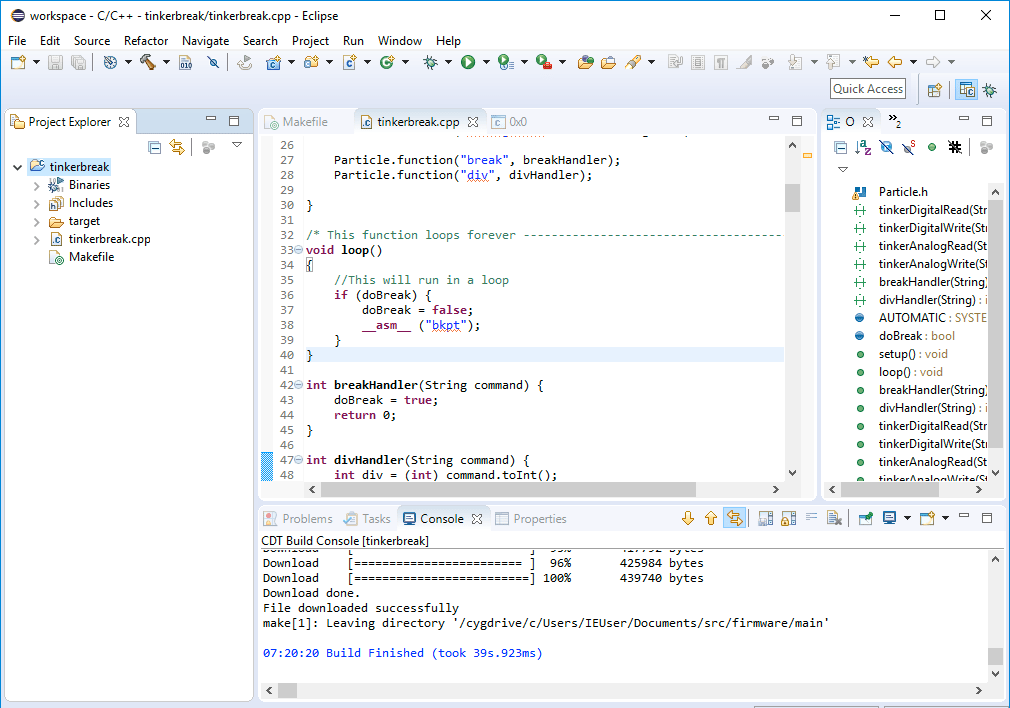
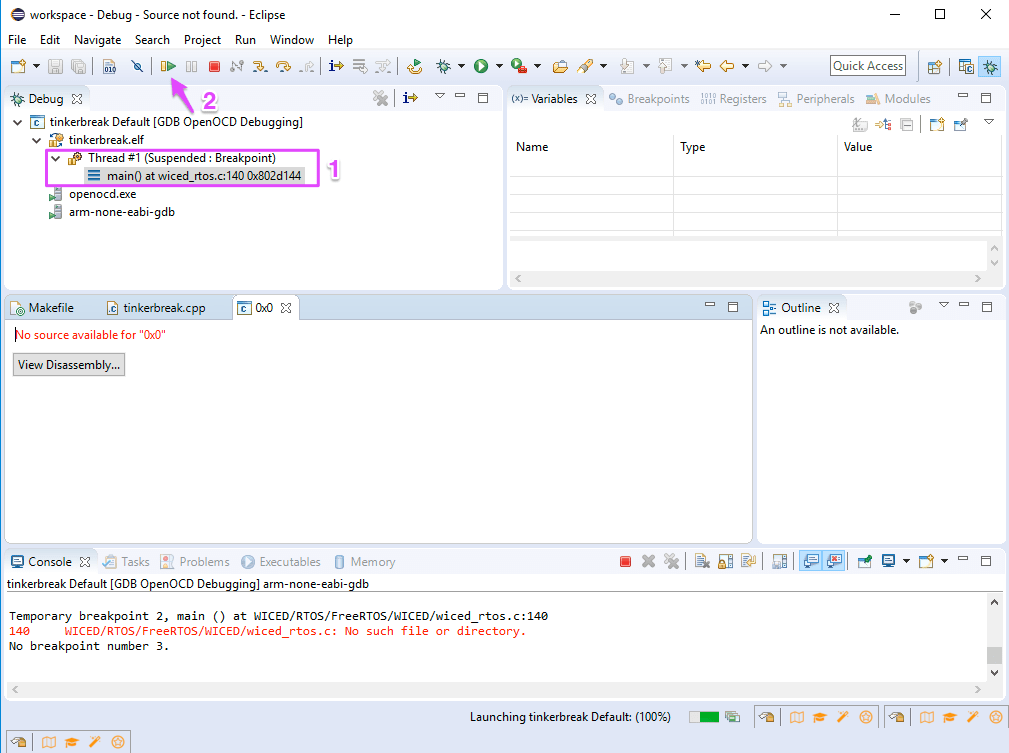
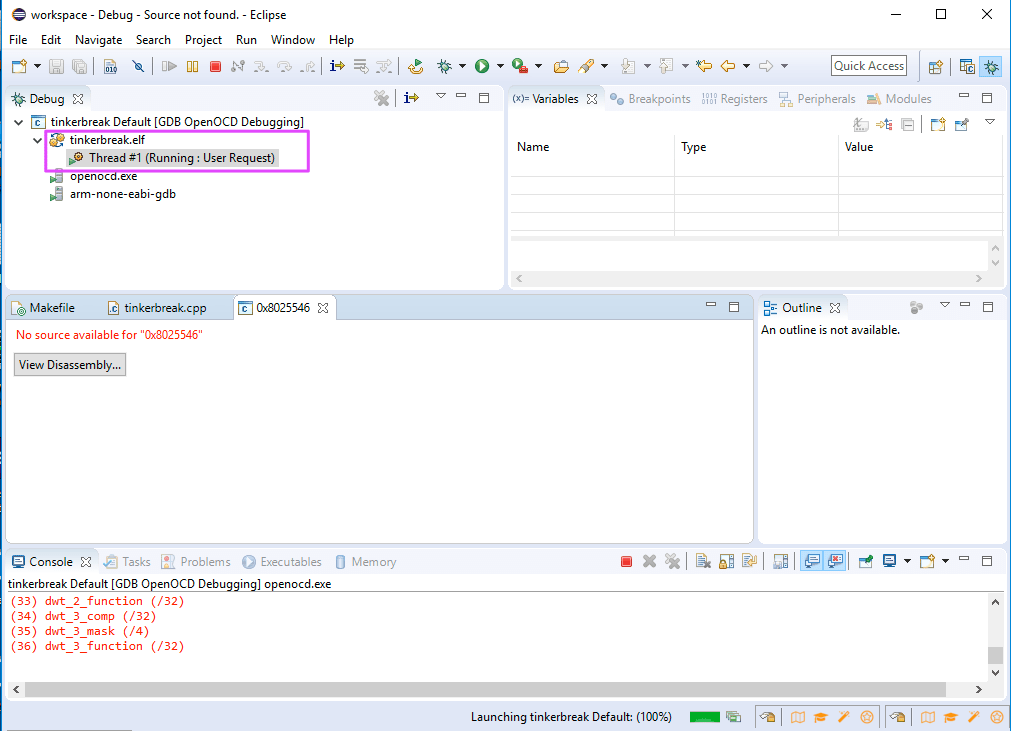
You should see a screen similar to the one below after a few seconds. A ST-LINK/V2 Mini SWD stick should be alternating red and green, and the Photon will probably have a solid white status LED.
Of importance is that the execution is stopped at 0x0 (1) and you need to click the Resume button (2) to continue.
This is what the screen looks like when firmware is running. The Photon should be breathing cyan and the a ST-LINK/V2 Mini SWD stick should be still be alternating red and green.
If you see errors in the debugging console like these make sure your code is not using pins D6 and D7 (SWD), or D4, D5, D6 and D7 (JTAG).
Examination failed, GDB will be halted. Polling again in 1500ms
Warn : Invalid ACK 0x7 in JTAG-DP transaction
Polling target stm32f2x.cpu failed, trying to reexamine
Warn : Invalid ACK 0x7 in JTAG-DP transaction
Warn : Invalid ACK 0x7 in JTAG-DP transaction
Warn : Invalid ACK 0x7 in JTAG-DP transaction
Warn : Invalid ACK 0x7 in JTAG-DP transaction
Warn : Invalid ACK 0x7 in JTAG-DP transaction
Warn : Invalid ACK 0x7 in JTAG-DP transaction
Warn : Invalid ACK 0x7 in JTAG-DP transaction
Warn : Invalid ACK 0x7 in JTAG-DP transaction
Warn : Invalid ACK 0x7 in JTAG-DP transaction
Warn : Invalid ACK 0x7 in JTAG-DP transaction
Examination failed, GDB will be halted. Polling again in 3100m
Some more techniques are described below in the Debugging Examples section.
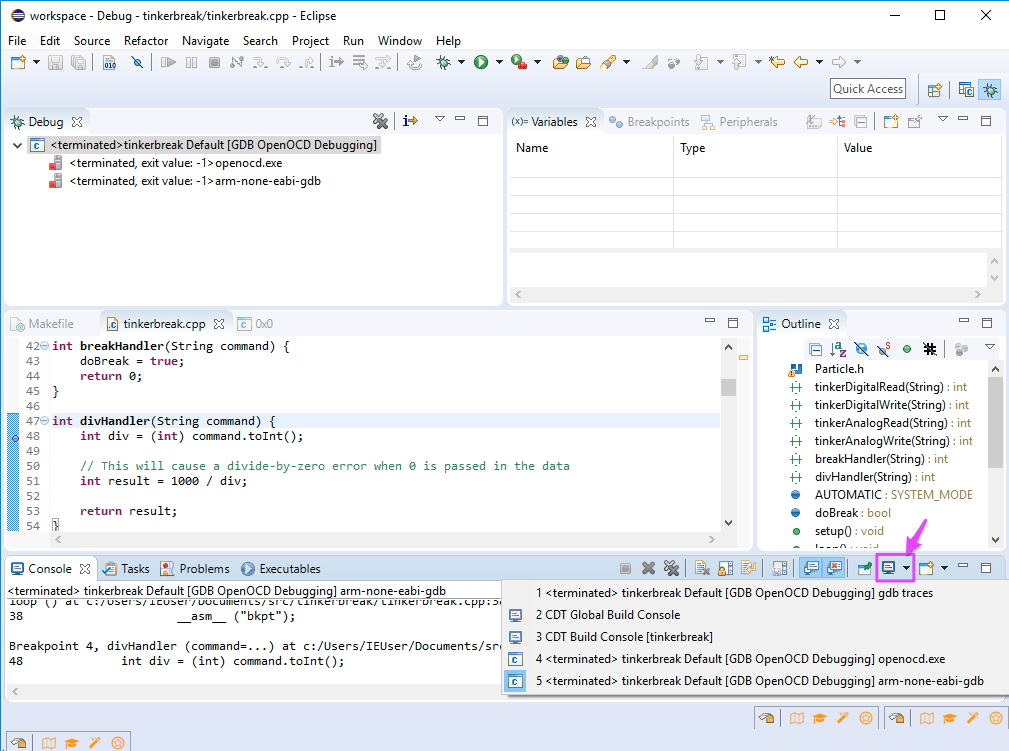
Viewing the various consoles
Eclipse keeps multiple console views, one for each process. So there's one for the build, one for running openocd, one for running gdb, and so on.
Changing the gcc optimization level
By default, the standard Makefile optimizes for size, which makes complete sense. When debugging code, however, this can be annoying because it will make it impossible to set breakpoints at certain locations in the code, you won't be able to step some individual lines of code, and some variables won't be able to be inspected by the debugger.
- Edit firmware/build/arm-tools.mk
The file typically will have something like this near the top:
CFLAGS += -g3 -gdwarf-2 -Os -mcpu=cortex-m3 -mthumb
Simply remove the -Os (optimize for size). This is probably best done only for monolithic debug builds, since you may run out of space for some system parts in a modular build without optimization.
Debugging examples
Assuming you've set things up as described above, the tinkerbreak application will respond to a Particle function break. In a separate command prompt window, run a command like this, replacing test4 with the name or device ID of your Photon.
particle call test4 break
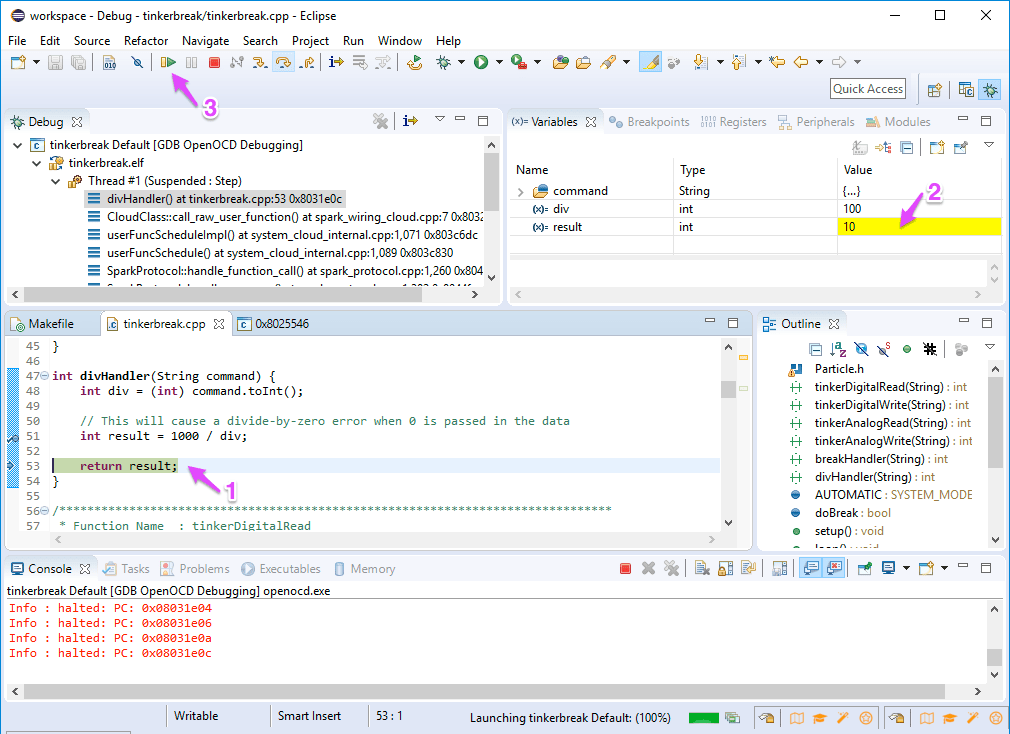
The screen will change to show the call stack (1) and the line where the breakpoint occurred (2).
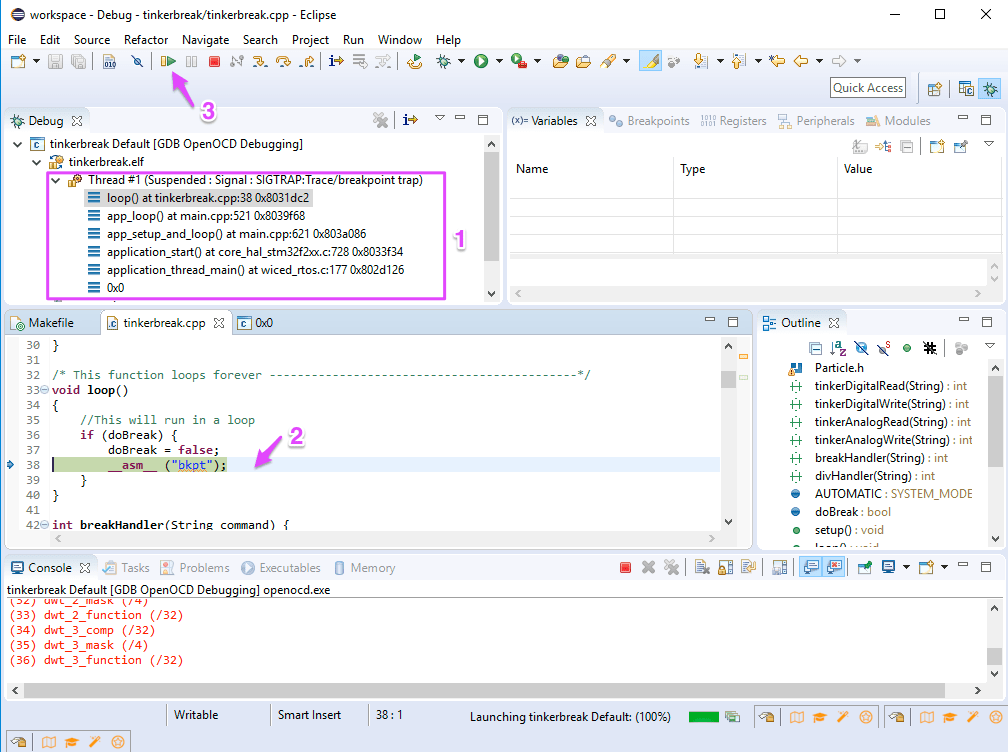
You can click the Resume button (3) to continue executing code on the Photon. It should reconnect to the cloud and resume breathing cyan.
Setting breakpoints
To set a breakpoint in the code, double-click in the blue bar to the left of the line number. A small icon with a check mark and a tiny blue circle will appear.
- The P2 and Photon 2 (RTL872x) support up to 2 hardware breakpoints
- Gen 3 devices (nrf52840) support up to 4 hardware breakpoints
In this example, I set a breakpoint on line 51.

Then, in a separate command prompt window, issue a command like:
particle call test4 div 100
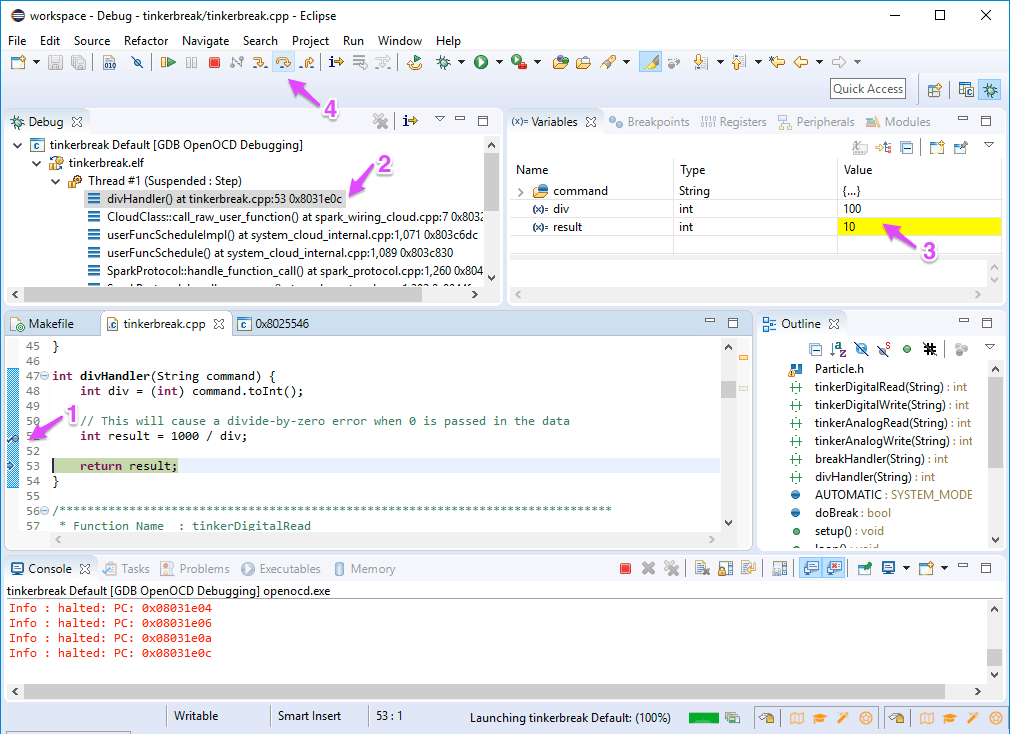
The Eclipse window should change to something like the following.
Execution is suspended because of a breakpoint at line 51 (1).
The code at that line is highlighted (2).
The value of div is 100. The value of result is random because it hasn't been set yet.
Finally, click the Step Over toolbar icon (4) to proceed to to the next line of code.
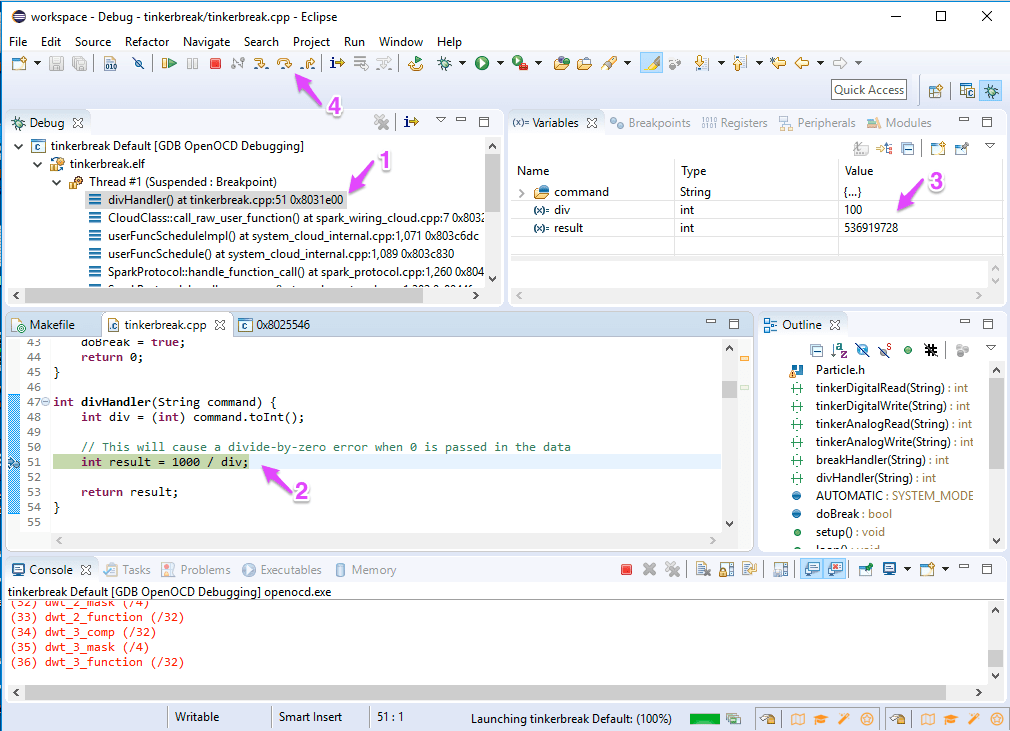
Now you can see that that the next line of code is selected (1) and the value of result has been set appropriately (2).
Click the Resume button (3) to continue execution.
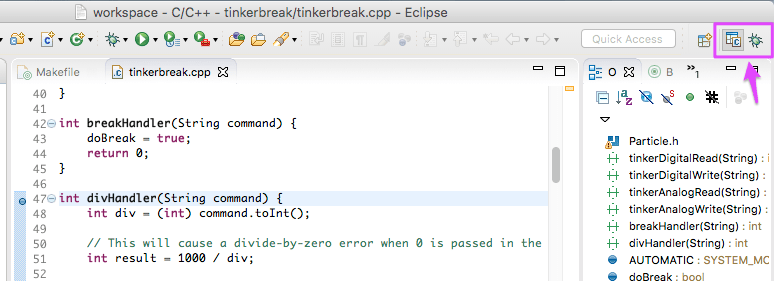
Returning to C/C++ Perspective
To switch between the Debug and C/C++ Perspective, use the perspective icons in the toolbar in the upper right corner of the screen.
Switching between platforms
To switch between Photon and Electron, for example, right click on the project name, select Properties then C/C++ Build then Environment and edit the PLATFORM setting. In this case, I changed it to electron.
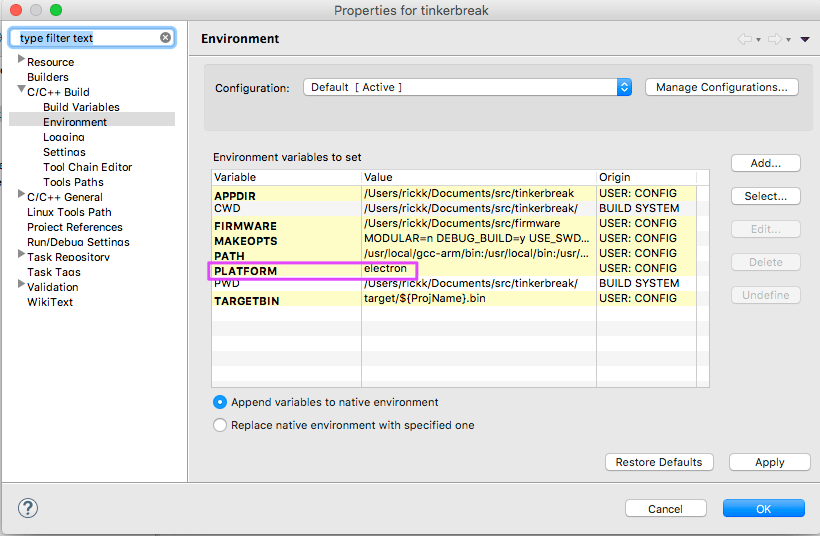
You should always delete the target directory as well to make sure all of the necessary files are rebuilt. It's not necessary to do a Clean, which takes a very long time to run, as long as you delete the target directory.
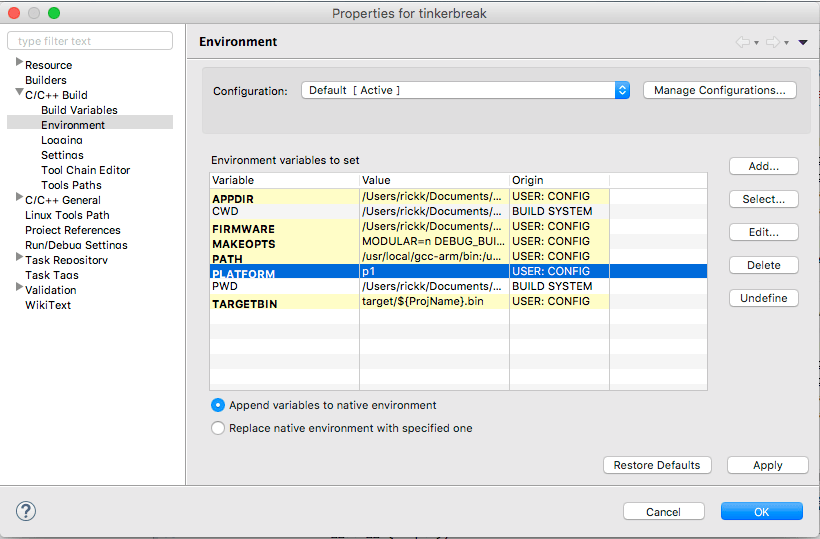
Debugging a P1 using SWD
If you've built a board with a P1, it's highly recommended that you include as many debugging ports as possible. However, as long as you include D6, D7, and GND for SWD, you can use OpenOCD and Eclipse for debugging.
- Right click on the project name, select Properties then C/C++ Build then Environment and edit the PLATFORM variable, setting it to p1 (lowercase). Also remove program-dfu from the MAKEOPTS variable, as you can't use the program-dfu option if you don't have USB.
- Delete the target directory if you've changed the platform setting.
- Right click on the project name and select Build Project.
- Open two command prompt windows. In one, run the OpenOCD server in telnet mode. The directory may vary depending on version and operating system; other examples are shown above.
cd "/Applications/GNU ARM Eclipse/OpenOCD/0.10.0-201510281129-dev/scripts"
../bin/openocd -f interface/stlink-v2.cfg -f target/stm32f2x.cfg -c "telnet_port 4444"
- In the other, telnet to the OpenOCD server and issue command such as these to program the binary.
telnet localhost 4444
> reset halt
> flash protect 0 5 8 off
> program /Users/rickk/Documents/src/tinkerbreak/target/tinkerbreak.bin verify 0x08020000
- Close both windows to stop this instance of OpenOCD.
- From the Run menu in Eclipse, select Debug History then tinkerbreak Default. You should have a working debug session as above.