
Local build using gcc-arm
Local build using gcc-arm
It is possible to build both application firmware and Device OS locally using the gcc-arm toolchain on Windows, Mac and Linux. There are a few reasons you might be interested in doing this:
- To make a custom modification to Device OS
- To test out Device OS changes that haven't been released yet
- To work entirely offline, with no Internet access
- To use the GDB debugger
While you can still use these instructions, a much easier way to use gcc-arm is to install Particle Workbench. It provides an automated way to install local development tools.
This note explains how to do a fully native installation. It's also possible to do a Docker installation. And, of course, you can use the cloud compilers Particle Build, Particle Dev, or Particle CLI which are much easier to install and use.
Installation - Windows
Install Cygwin - Windows
You should use Cygwin or MinGW, depending on what you already have or prefer. It is not necessary to install using both. If you prefer MinGW, skip to the next section.
This step uses Cygwin to provide command-line build support. You should install Cygwin first:
- You will typically download setup-x86_64.exe (for 64-bit Windows) or setup-x86.exe (for 32-bit Windows).
- Run the setup program, click Next >.
- You will typically use the default settings in chose installation type page, Install from Internet then click Next >>.
- Use the default settings in choose installation directory page (root directory of c:\cygwin64 or c:\cygwin and All Users), then click Next >.
- Use the default settings in the select local package directory page, then click Next >.
- Use the default settings in the connection page (Direct Connection), then click Next >.
- Select a mirror from the following page (it usually doesn't matter which one), then click Next > and you'll get a list of packages to choose from.
- Expand Devel by clicking on the + in a box (pointed to by the purple arrow).
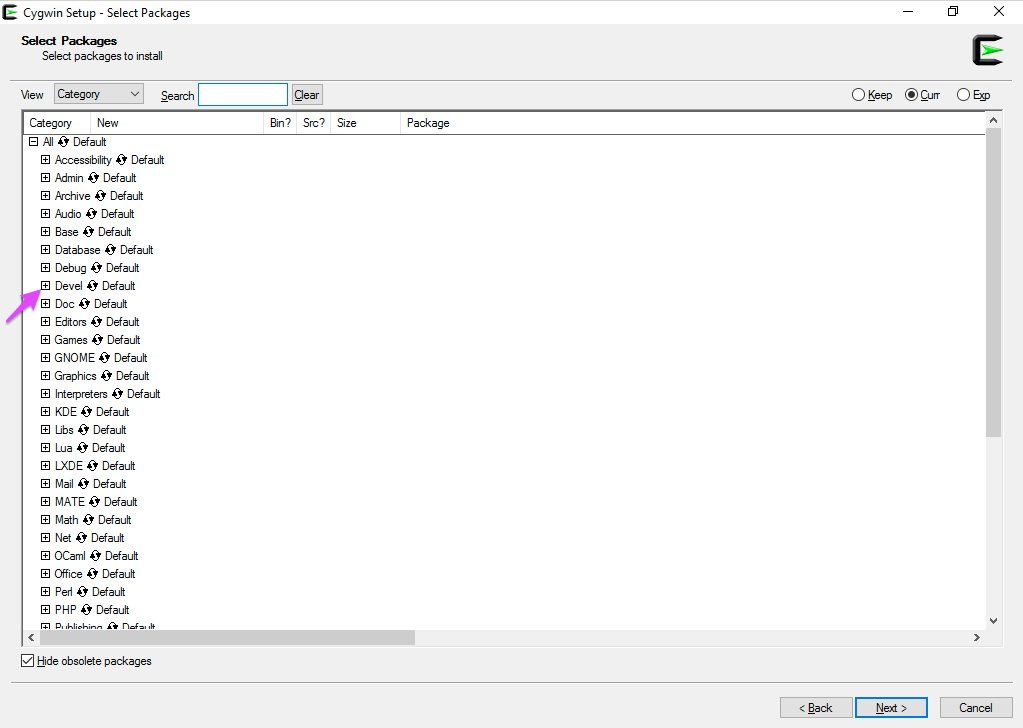
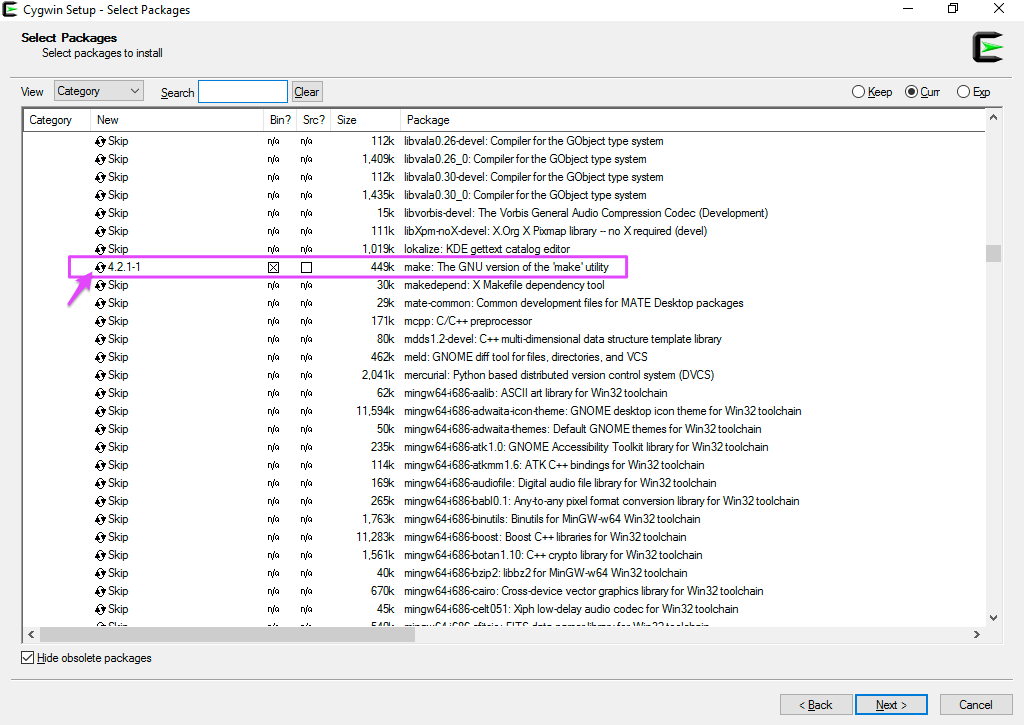
- Select make: The GNU version of the 'make' utility. Click on arrows to enable downloading of the binary. Only the Bin? checkbox needs to be checked. Click Next >.
- Accept the default settings on the resolving dependencies page and click Next >.
The download will take a few minutes. Then click Finish.
You'll need to use the Cygwin Terminal for entering your build commands, not the standard Windows Command Prompt. The installer puts a shortcut on your desktop for it.
Install MinGW - Windows
You should install using Cygwin or MinGW, depending on what you already have or prefer. It is not necessary to install using both. If using Cygwin, skip to the next section.
The official web site for MinGW is http://mingw.org/.
- Use the Download Installer link in the upper right corner of the window to download the installer, then run it.
- In the MinGW Installation Manager screen, select mingw-developer-toolkit and then click on the checkbox and select Mark for Installation.
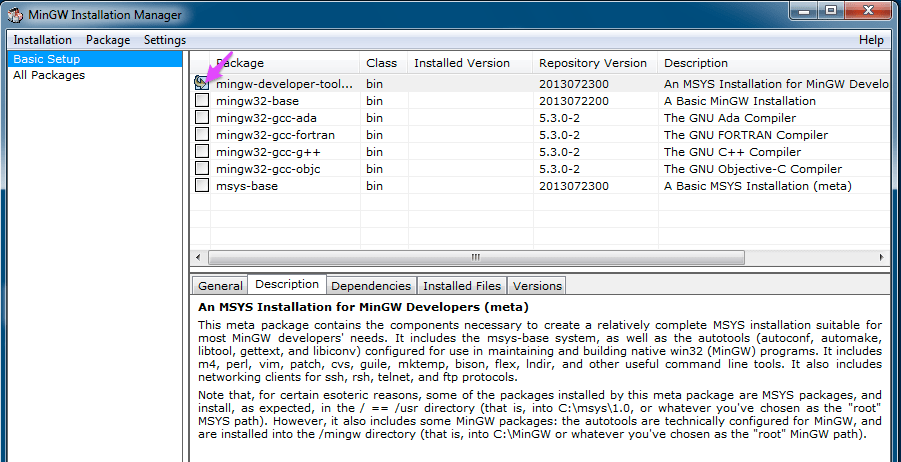
- Then, from the Installation menu select Apply Changes. And click Apply in the confirmation window.
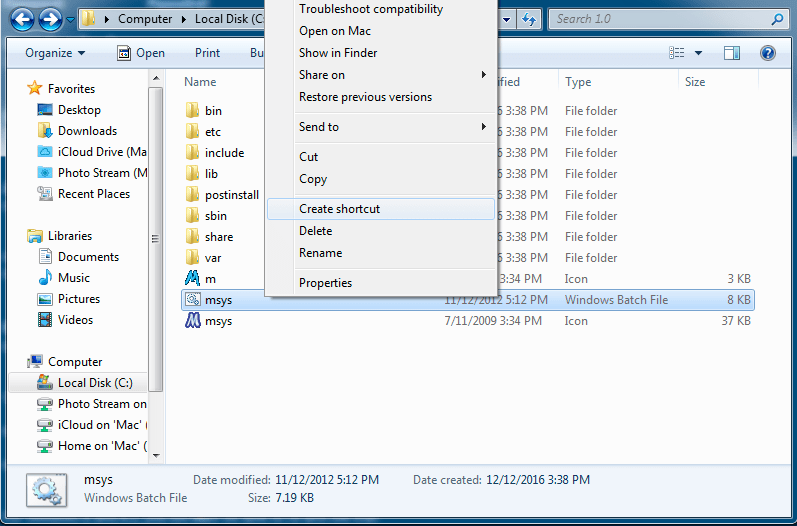
- If you did not get a MinGW Shell icon on your desktop or Startup menu, you may want to create one. Go into Computer > Local Disk (C:) > MinGW > msys > 1.0 in the Windows File Explorer. Select msys.bat (the msys file of type Windows Batch File), right click and select Create Shortcut. I like to rename this to MinGW Shell and drag it to the desktop.
You'll need to use the MinGW Shell for entering your build commands, not the standard Windows Command Prompt, so you'll probably want a handy shortcut to it.
Download the gcc-arm toolchain - Windows
The gcc-arm toolchains are here
For Device OS 2.0.0 and later, the 9-2019-q4-major (9.2.1) version is required
For Device OS 0.7.0 to 1.5.4 the 5_3-2016-q1-update (5.3.1) version is required.
Prior to Device OS version 0.6.3 you can also use the 4.9-2015-q3-update.
The 5.4.x and 6.x versions are not recommended at this time.
- For Windows, download the installer gcc-arm-none-eabi-5_3-2016q1-20160330-win32.exe.
- Run the installer. Select Next > and I Agree for the terms and conditions of the license.
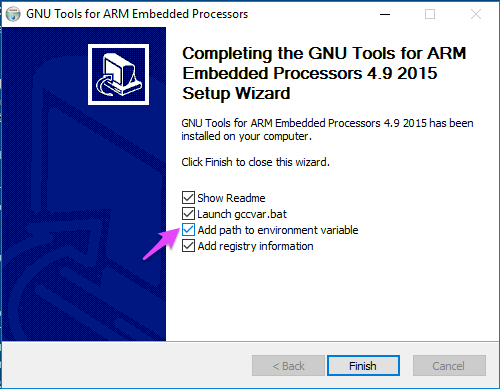
- You can use the default install location, or select another. The default location may vary, but on 64-bit Windows is typically: C:\Program Files (x86)\GNU Tools ARM Embedded\5.3 2016q1
- On the final page, be sure to select Add path to environment variable before clicking Finish. This is not the default and it is required for the builds to work properly.
To test your installation open a new Command Prompt window and enter the command:
arm-none-eabi-gcc --version
It should report back something like this (your version may be different):
c:\>arm-none-eabi-gcc --version
arm-none-eabi-gcc (GNU Tools for ARM Embedded Processors) 5.3.1 20160307 (release) [ARM/embedded-5-branch revision 234589]
Copyright (C) 2015 Free Software Foundation, Inc.
This is free software; see the source for copying conditions.  There is NO
warranty; not even for MERCHANTABILITY or FITNESS FOR A PARTICULAR PURPOSE.
This should also work from the Cygwin Terminal or MinGW Shell.
Install git - Windows
- Go to https://git-scm.com/ and download the latest Windows version for your type of Windows. In my case, I downloaded 2.10.2 for 64-bit Windows.
- Run the installer and select Next > to accept the license terms.
- You will typically install in the default location (C:\Program Files\Git) and click Next >.
- The default components should be fine and click Next >. The startup menu default is usually fine, click Next >.
- You generally will want to use the Use Git from the Windows Command Prompt option, which should be the default, click Next >.
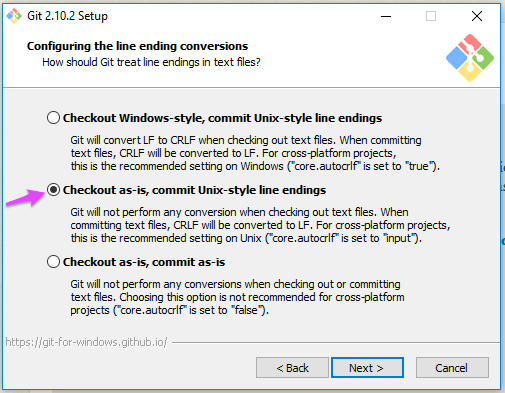
- In the next screen, it's usually best to change the setting to Checkout as-is, commit Unix-style line endings. Make sure you change that before clicking Next >.
- Either option can be selected in the next screen, Use MinTTY (the default terminal of MSYS2) is the default and is usually fine. Click Next >.
- The default options on the last screen are generally fine. Click Install.
- After installation, open a new Command Prompt window and enter the command:
git --help
- If it returns help, then your installation was probably successful. (Note that you will need to open a new command prompt window, windows that were open before won't have the PATH updated, and won't be able to use git yet.)
Install dfu-util - Windows
If you have not already done so, you should install dfu-util and the necessary drivers. If you have used the Particle Windows CLI installer, this will have been already.
There are also additional instructions in the FAQ for installing dfu-util.
Install other build tools - Windows
There are two tools needed by the standard Makefiles: xxd and crc32.
- Download the buildtools_win.zip file and extract the contents. Then copy the crc32.exe and xxd.exe application to a suitable location. I like to use /usr/local/bin because it's automatically added to your Cygwin or MinGW path so it will be found by the build tools.
(Incidentally, crc32 is named this because it generates 32-bit cyclic redundancy checks, and has nothing to do with the difference between Windows 32-bit and Windows 64-bit.)
Cygwin64 (replace IEUser with your Windows username):
cd /cygdrive/c/Users/IEUser/Downloads/buildtools_win/buildtools_win/cygwin64
cp *.exe /usr/local/bin
Cygwin32 (replace IEUser with your Windows username):
cd /cygdrive/c/Users/IEUser/Downloads/buildtools_win/buildtools_win/cygwin32
cp *.exe /usr/local/bin
MinGW32 (replace IEUser with your Windows username):
mkdir -p /usr/local/bin
cd /c/Users/IEUser/Downloads/buildtools_win/buildtools_win/mingw32
cp *.exe /usr/local/bin
There are additional instructions in the README.md file if necessary, including how to rebuild the tools from the included source code.
Installation - Mac
Download the gcc-arm toolchain - Mac
Some of the other instructions use Homebrew, but they update their current compiler more frequently than Particle does, and it can cause build problems. It's easy to just download a specific version from Canonical, instead:
- The gcc-arm toolchains are here.
For Device OS 2.0.0 and later, the 9-2019-q4-major (9.2.1) version is required
For Device OS 0.7.0 to 1.5.4 the 5_3-2016-q1-update (5.3.1) version is required.
Prior to Device OS version 0.6.3 you can also use the 4.9-2015-q3-update.
The 5.4.x and 6.x versions are not recommended at this time.
- Download the gcc-arm-none-eabi-5_3-2016q1-20160330-mac.tar.bz2 release.
- Extract the archive file, then move the directory into a permanent location. I like /usr/local/gcc-arm.
os-x-10:~ rickk$ sudo mv Downloads/gcc-arm-none-eabi-5_3-2016q1 /usr/local/gcc-arm
- Edit ~/.profile and add this:
## gcc-arm toolchain
export PATH=$PATH:/usr/local/gcc-arm/bin
- Close the Terminal window and reopen it. Then you can check that ARM gcc is in your path:
os-x-10:~ rickk$ arm-none-eabi-gcc --version
arm-none-eabi-gcc (GNU Tools for ARM Embedded Processors) 4.9.3 20150529 (release) [ARM/embedded-4_9-branch revision 227977]
Copyright (C) 2014 Free Software Foundation, Inc.
This is free software; see the source for copying conditions.  There is NO
warranty; not even for MERCHANTABILITY or FITNESS FOR A PARTICULAR PURPOSE.
Install git - Mac
- Go to https://git-scm.com/ and download the latest Mac installer. I used 2.10.1.
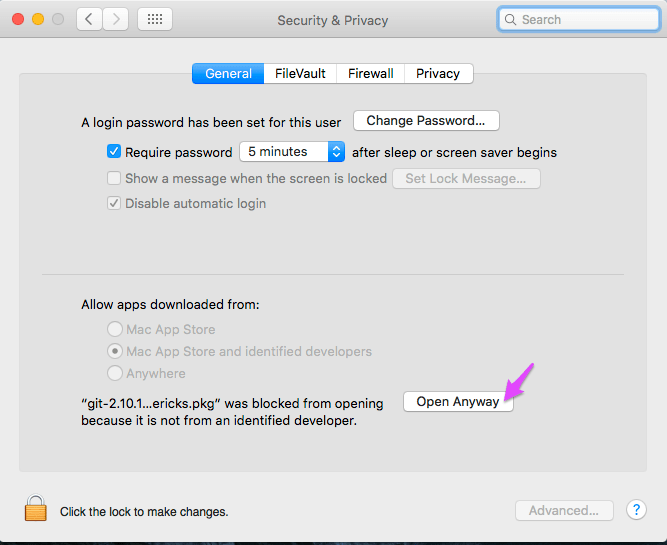
- Run the installer. Depending on your security settings, you may get an error that it is from an unidentified developer. Go into Apple Menu - System Preferences - Security and Privacy and click the Open Anyway button.
- When complete you should be able to open a Terminal window and use git -- version to check the version.
os-x-10:~ rickk$ git --version
git version 2.10.1
Install dfu-util - Mac
If you have not already done so, you should install dfu-util.
brew install dfu-util
There are additional instructions in the FAQ for installing dfu-util including installing Homebrew if necessary or using MacPorts if you use that instead of Homebrew.
Installation - Linux
I ran these tests on Ubuntu 16.04 LTS 64-bit; you will need to adjust some of the commands for other distributions that use other package managers.
Also note that the pre-built gcc-arm toolchains are for x86 architecture only. They cannot be used on other CPU architectures such as the ARM used in the Raspberry Pi, even though it's also running Linux.
Download the gcc-arm toolchain - Linux
The gcc-arm toolchains are here
For Device OS 2.0.0 and later, the 9-2019-q4-major (9.2.1) version is required
For Device OS 0.7.0 to 1.5.4 the 5_3-2016-q1-update (5.3.1) version is required.
Prior to Device OS version 0.6.3 you can also use the 4.9-2015-q3-update.
The 5.4.x and 6.x versions are not recommended at this time.
- Download the gcc-arm-none-eabi-5_3-2016q1-20160330-linux.tar.bz2 file.
- Extract it and move it to the permanent location. I like /usr/local/gcc-arm.
rickk@ubuntu:~$ cd Downloads
rickk@ubuntu:~/Downloads$ bzip2 -d gcc-arm-none-eabi-5_3-2016q1-20160330-linux.tar.bz2
rickk@ubuntu:~/Downloads$ tar xf gcc-arm-none-eabi-5_3-2016q1-20160330-linux.tar
rickk@ubuntu$ sudo mv gcc-arm-none-eabi-5_3-2016q1 /usr/local/gcc-arm
- Edit ~/.profile and add this:
## gcc-arm toolchain
export PATH=$PATH:/usr/local/gcc-arm/bin
- Log out and log back in again.
- Try to run the gcc ARM cross-compiler:
rickk@ubuntu:~$ arm-none-eabi-gcc --version
arm-none-eabi-gcc (GNU Tools for ARM Embedded Processors) 4.9.3 20150529 (release) [ARM/embedded-4_9-branch revision 227977]
Copyright (C) 2014 Free Software Foundation, Inc.
This is free software; see the source for copying conditions.  There is NO
warranty; not even for MERCHANTABILITY or FITNESS FOR A PARTICULAR PURPOSE.
If you get a "No such file or directory" on a 64-bit Linux installation even if you can see the file in the directory:
rickk@ubuntu:/usr/local/gcc-arm/bin$ ./arm-none-eabi-gcc
bash: ./arm-none-eabi-gcc: No such file or directory
it is likely that you need to install the 32-bit libraries:
sudo dpkg --add-architecture i386
sudo apt-get update
sudo apt-get install libc6:i386 libncurses5:i386 libstdc++6:i386
Install git - Linux
Installing git on Linux is easy:
sudo apt-get install git
Install dfu-util - Linux
Installing dfu-util on Linux is easy:
sudo apt-get install dfu-util
By default, dfu-util requires sudo (root access) to run. This will cause a problem using the program-dfu option in make, and many other locations.
The easiest solution is to install the Particle CLI, however you can also manually install a udev rule:
- Download the 50-particle.rules file, then:
sudo cp 50-particle.rules /etc/udev/rules.d/
- You need to unplug and replug your device after this.
Building
Selecting a source directory
One of the things you need to do is decide where to store your source. For the examples here, I've used the following.
Source directory - Windows
For Windows, I used: Documents\src
In other words, the src directory in the user's documents directory. This is easy to get to. The full path depends on your username, but in the examples here, you might see: c:\Users\IEUser\Documents\src.
Making this slightly more confusing is that when you use Cygwin Terminal the Windows paths are mapped into Unix-style paths, so that same directory is /cygdrive/c/Users/IEUser/Documents/src. Also beware that the ~ directory in Cygwin is a Unix-style home directory in /home/IEUser, not your Windows home directory!
If you are using MinGW instead of Cygwin under Windows, the path would be /c/Users/IEUser/Documents/src.
Source directory - Mac
For the Mac, I used: Documents/src
In other words, the src directory in the user's documents directory, for example, /Users/rickk/Documents/src.
Source directory - Linux
For Linux, I used: Documents/src
In other words, the src directory in the user's documents directory, for example, /home/rickk/Documents/src. Remember that Linux paths are case-sensitive.
Check out the source
- Use cd to position yourself into the src directory, as described above.
- Once you have Git installed, getting the source is easy:
git clone https://github.com/particle-iot/device-os.git
cd device-os
git checkout release/stable
- The checkout command used to specify "latest" instead of "release/stable" but you should now use "release/stable" instead.
You may prefer to check out a specific version instead:
git checkout release/v0.7.0
- Then do a build. This will build all of the Device OS firmware, plus Tinker, for the Photon.
For Gen3 devices (Argon, Boron, Xenon)
For Gen3 (mesh) devices, you should checkout either:
- A specific release such as release/v0.9.0
- The branch mesh-develop
The develop and stable branches do not support mesh devices at this time.
You must also update the submodules after checkout of the device-os tree:
cd device-os
git submodule update --init
Building
cd modules
make all PLATFORM=photon
These commands work for Windows, Linux and Mac. For Windows, remember to use the Cygwin Terminal or MinGW Shell, not the regular Windows Command Prompt.
- If you update the source, make sure you add the clean option:
cd modules
make clean all PLATFORM=photon
- If you're building for the Electron:
cd modules
make all PLATFORM=electron
- If you're building for the P1:
cd modules
make all PLATFORM=P1
These commands build the Device OS firmware and Tinker. You can find the built binaries in the following locations after a successful build.
Photon:
- firmware/build/target/system-part1/platform-6-m/system-part1.bin
- firmware/build/target/system-part2/platform-6-m/system-part2.bin
- firmware/build/target/user-part/platform-6-m/user-part.bin
Electron:
- firmware/build/target/system-part1/platform-10-m/system-part1.bin
- firmware/build/target/system-part2/platform-10-m/system-part2.bin
- firmware/build/target/system-part3/platform-10-m/system-part3.bin
- firmware/build/target/user-part/platform-10-m/user-part.bin
Building using APPDIR
I like to use the APPDIR feature to keep my code separate from the firmware repository.
- For this example I created a new directory in my src directory, as described above.
cd src
mkdir blinkled
- And I created the file blinkled.cpp.
cd firmware/modules
make all PLATFORM=photon APPDIR=../../blinkled
- This builds everything, including Device OS firmware. You will probably want to do this once, but for subsequent builds, you can save a lot of time by using the command:
cd firmware/main
make all PLATFORM=photon APPDIR=../../blinkled
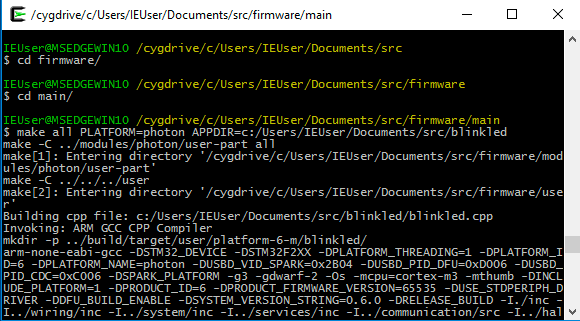
Here's what a build window might look like in the Cygwin Terminal:
If you look in the target directory in the blinkled directory you'll find a blinkled.bin. This is the user firmware binary that you can flash using the Particle CLI:
particle flash YOUR_DEVICE_NAME target/blinkled.bin
Or, with the device in DFU mode (blinking yellow). DFU mode is the recommended method of flashing over USB.
particle flash --usb target/blinkled.bin
Or, with the device in listening mode (blinking dark blue):
particle flash --serial target/blinkled.bin
Building with libraries
To use libraries with local build you should use the extended project structure within the APPDIR.
It looks like this:
myappdir
  project.properties
  src
    myapp.cpp
  lib
You can start out with an empty file for project.properties.
To add a library you typically cd into myappdir then use a CLI library copy command for example:
particle library copy neopixel
This copies the source to the neopixel library to lib/neopixel.
If you have a project in the extended format, building with APPDIR automatically builds all of the libraries in lib as well, and all of the src directories in the libraries are added to the include search path, so for example you can just:
#include "neopixel.h"
Including additional header directories
Sometimes you want to include other directories as locations for header files. For example, say you are using the extended project structure within the APPDIR with the following layout:
myappdir
  project.properties
  inc
    testinc.h
  src
    main.cpp
    build.mk
The project.properties can be an empty file; it just signifies that you are using the extended project layout.
This is my main.cpp. Of note is that it just includes testinc.h, not inc/testinc.h.
#include "Particle.h"

#include "testinc.h"

void setup() {
    Serial.begin(9600);
}

void loop() {
}
Adding additional include directories requires adding a build.mk file in your src directory. The first part should be the standard boilerplate.
But after that, you can add other things, such as adding additional include directories.
## Standard behavior must be included here
INCLUDE_DIRS += $(SOURCE_PATH)/$(USRSRC)  # add user sources to include path
CPPSRC += $(call target_files,$(USRSRC_SLASH),*.cpp)
CSRC += $(call target_files,$(USRSRC_SLASH),*.c)

APPSOURCES=$(call target_files,$(USRSRC_SLASH),*.cpp)
APPSOURCES+=$(call target_files,$(USRSRC_SLASH),*.c)

## Custom stuff can be added here
INCLUDE_DIRS += $(SOURCE_PATH)/inc
Defining custom symbols
If you want to pass custom symbols from your build script to your application source code, define them in the EXTRA_CFLAG make parameter or the EXTRA_CFLAG environment variable. Put -D in front of each symbol to define. Use a macro to convert a define into a string in your application.
cd firmware/modules
make all PLATFORM=photon APPDIR=../../blinkled EXTRA_CFLAG="-DGIT_COMMIT=abc123 -DTEMPERATURE_SENSOR_AVAILABLE -DEEPROM_VERSION=3"
Using the symbols in your application
#define STRINGIFY(x) #x
String git_hash = STRINGIFY(GIT_COMMIT);

void setup() {
  Particle.variable("git_hash", git_hash);

  setupEEPROM(EEPROM_VERSION);

#if TEMPERATURE_SENSOR_AVAILABLE
  setupTemperatureSensor();
#endif
}
Flashing using DFU during build
This technique is handy with an Electron where you want to flash over USB, though it also works with the Photon:
cd firmware/main
make all PLATFORM=electron program-dfu APPDIR=../../blinkled
If you used firmware/modules instead, it would DFU the system and the user firmware, which is handy because it will load both system and user firmware at once with a single command.