
Particle Workbench
If you are interested in using Particle Workbench with the Tracker One or Tracker SoM, see Tracker Edge Firmware for additional information.
Workbench features
Welcome screen
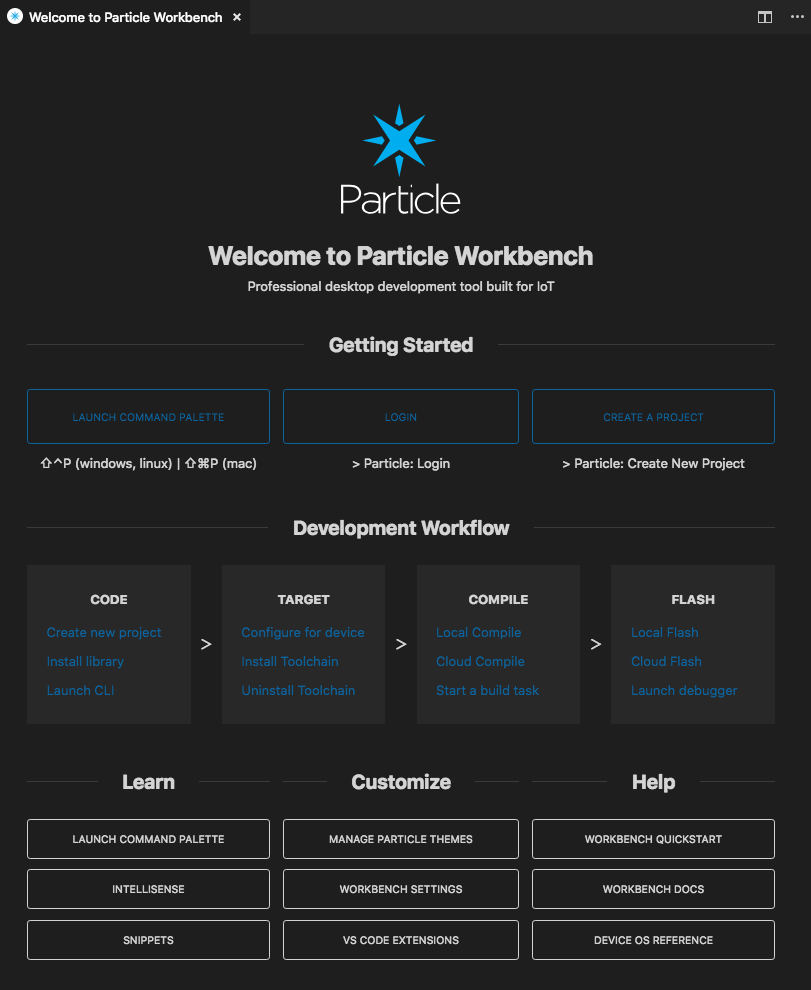
The Welcome Screen has handy tips for using Workbench. If you close it, you can get it back by clicking on the Particle icon in the left toolbar.
Left toolbar
Typically, there is a toolbar on the left with frequently used features.
| Button | Purpose |
|---|---|
 |
File Explorer |
 |
Search and Replace |
 |
Source code control (like Git) |
 |
Source level debugger |
 |
Add or modify VS Code Extensions |
 |
Particle Welcome Screen |
Particle Commands
If you’re new to Visual Studio Code, the Command Palette will become a familiar part of the user interface. As the name implies, the Command Palette provides access to many commands such as open files, search for symbols, and see a quick outline of a file, all using the same interactive window. It can be invoked via cmd+shift+p on Mac OS or ctrl+shift+p on Linux and Windows.
Workbench adds custom Particle commands to the palette. Start typing Particle to see all the currently available commands.
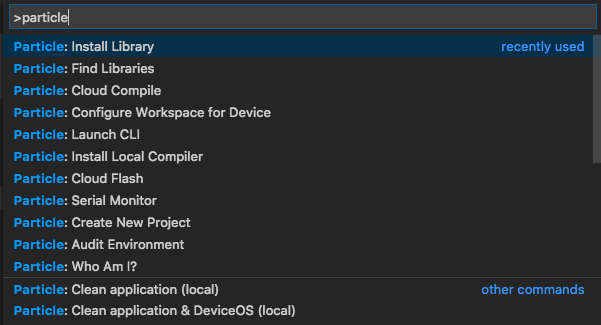
There is also a command palette reference below.
Dependency manager
Downloading and maintaining a local toolchain can be a full-time job so Workbench introduces a new dependency manager. It downloads the Device OS, build system, compiler, and anything else needed to develop and debug Device OS apps, and places them in a local, private location in user space as to not mess with your current configuration.
You can install and uninstall different versions of Device OS (and dependencies) with Particle: Install Local Compiler. You can uninstall unneeded versions just as easily.

Working with Particle projects
You can initialize a new project with the command, Particle: Create New Project. Doing so will open a new a Visual Studio Code folder preconfigured with everything needed to begin developing your Particle project, like Tasks, C++ IntelliSense, Commands, files and folders. Note that these are designed to only work when editing Particle projects as to not muddy up the rest of your editing experience.
A project contains a number of files. Here's what's in a small sample project:
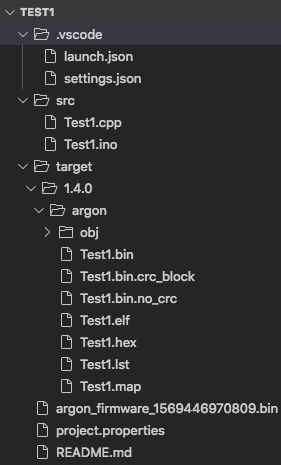
- The
.vscodedirectory contains your project-specific settings. Thesettings.jsonfile allows you to override any setting on a per-project basis. It's also where your build firmware version, target platform, and target device are saved. - The
srcdirectory contains your source file. If you created a.inofile for your main project file, after building you may see a.cppfile of the same name. This is because the.inofile is transformed into a.cppbefore compiling. You can create multiple source files and header files in this directory. - Not pictured here is the
libdirectory, at the same level assrc. This contains the source to libraries that you have included. If you are cloud compiling, and if you have the library listed in yourproject.propertiesfile, the cloud version of the library is used instead of the downloaded one inlib. - The
targetdirectory contains local build output organized into subfolders based on the Device OS version and Particle platform your project uses. In particular, the.binfile (Test1.bin) is the same binary you get from downloading from the Web IDE or CLI. - The
*.binfile (your filename will be different) at the top level is the result of a cloud compile for this project. - The
project.propertiesfile specifies all of the libraries that this project uses. README.mdis where you could put documentation for your project.
If you already have an existing Particle project (with a project.properties file), you can import it to create the necessary VS Code files by using the command Particle: Import Project from the command palette.
You can also have particle.include and particle.ignore files for controlling which files are uploaded when cloud compiling. See particle.include and particle.ignore.
Configure project
From the Command Palette select Particle: Configure Workspace for Device.

Then the device OS version you'd like to build for:
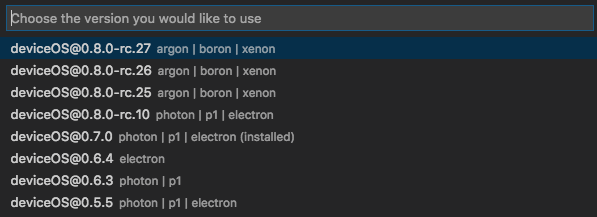
Then the type of device to you'd like to build for:

And finally the name or device ID of the device you want to flash to. You can leave this blank if you're going to flash by USB, or just want to test building.

Enabling pre-release versions
Certain Device OS releases are preview releases, intended for early testing of an upcoming release, to add new features, or fix specific issues.
Click the settings (gear) icon in the lower left, Settings, Extensions, Particle, then enable pre-release Device OS builds.
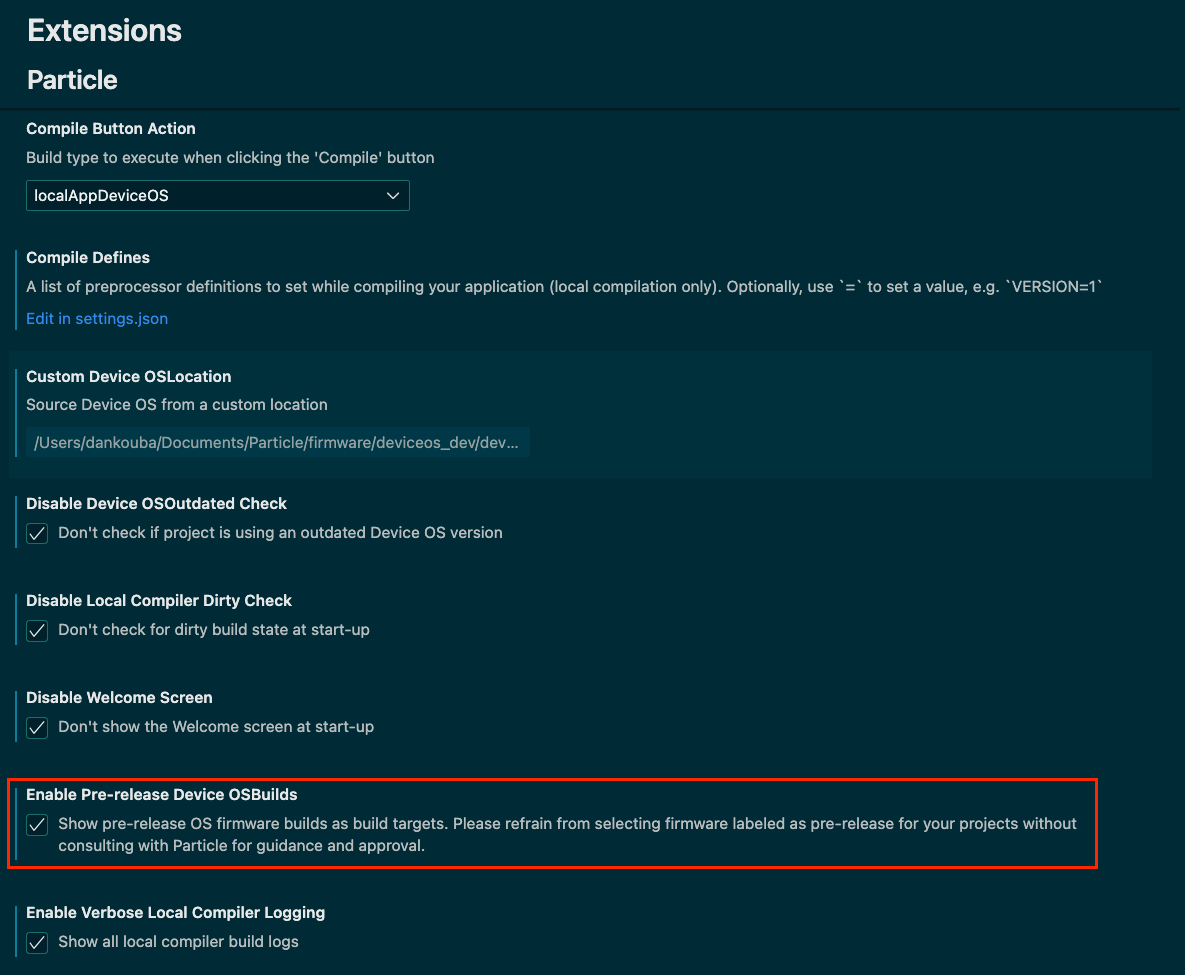
Once you complete this step, Particle: Configure Workspace for Device will include additional versions.
Cloud build and flash
Before you can build in the cloud (the way Particle Web IDE and Particle CLI normally build), you need to select the device you wish to build for. See configure project, above.
To compile your program and download the binary, open the Command Palette and select Particle: Cloud Compile. To compile your program in the cloud and flash it to the selected device over-the-air, select Particle: Cloud Flash.

It's also possible to compile in the cloud and flash over USB, as described in the section Cloud build and flash locally, below.
Local build and flash
Local build does all of the compiling locally on your computer, and, once installed, can be used even without an Internet connection.
Before you can build locally, you need to select the device and Device OS version you wish to build for. See configure project, above.
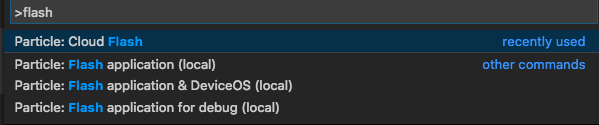
To compile and flash locally, use the Command Palette and select one of the local flash options:
- Particle: Flash application (local)
- Particle: Flash application & Device OS (local)
- Particle: Flash application & Device OS for debug (local)
As of September 2023, these commands behave slightly differently:
Particle: Flash application (local) is the command you will want to use most of the time with local compilation and a USB connection. It will now put your device in DFU mode only after successful compilation, and it will flash device OS only if an upgrade is necessary. It will not build Device OS. And it will correctly flash required parts like the bootloader and SoftDevice.
Particle: Flash application & Device OS (local) will always flash the targeted version of Device OS. It will not build Device OS. This is the best option if you don't know what version of Device OS is on the device and you want it in a known state.
Particle: Flash application & Device OS for debug (local) still needs to build Device OS in order to generate debug symbols.
It is now safe to upgrade or downgrade Device OS using these commands.
These commands will also flash Asset OTA bundles if the assetOtaDir is specified in project.properties.
256K binary edge case
On Gen 3 devices including the Argon, Boron, B-Series SoM, and Tracker, when upgrading from 3.0 or earlier to 3.1 or later, there is an edge case that can cause your old code to run. This will only occur when flashing over USB from Workbench, or using particle flash --local or particle flash --serial from the Particle CLI. This problem does not occur with OTA flashing or Device Restore.
When binaries were expanded from 128K to 256K maximum, this was accomplished by moving the start address 128K earlier in flash memory. The logic in the Device OS 3.1.0 and later bootloader is to check the 128K slot first, if there is a valid binary it will be used. This is necessary to make sure you can successfully using particle flash <device> tinker, particle flash --local tinker.
The problem is that if your 256K binary is less than 128K in size, the particle flash --local command and Workbench Particle: Flash application commands do not invalidate the old 128K binary slot, which causes the old 128K binary to continue to run.
The best workaround is to upgrade the device using Device Restore USB first, as it will clear the 128K binary slot during upgrade. This is only necessary once, when upgrading from before 3.1.0, to 3.1.0 or later.
For devices that are in a product make sure you've used the Mark As Development Device option for your device in your product. If you don't mark the device as a development device it will be flashed with the default or locked product firmware version immediately after connecting to the cloud, overwriting the application you just flashed. All Tracker (Tracker SoM, evaluation board, and Tracker One) devices are in a product, even single devices.
In order to use the Flash options, the device must be connected by USB. The device will be placed into DFU mode (blinking yellow) automatically. If for some reason you need to enter DFU manually, you can do so by holding down the MODE (or SETUP) button while tapping RESET. Continue to hold down MODE (or SETUP) while the status LED blinks magenta (red and blue at the same time), until it blinks yellow, then release.
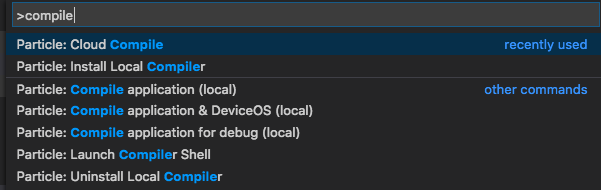
There are also compile options, which compile the code and download a binary:
- Particle: Compile application (local)
- Particle: Compile application & Device OS for debug (local) (local)
- Particle: Compile application & Device OS (local)
Normally, Device OS (system firmware) is built by Particle and downloaded to your device if an upgrade is needed. User applications are generally small and fast to update because the Device OS is not normally downloaded.
With Workbench local builds, you can optionally flash both Device OS and your binary using the Flash application & Device OS option in Build Tasks. This will upgrade or downgrade the Device OS. It also allows you to make a modified Device OS and flash it to your device by USB.
There is also a monolithic build. It contains both the Device OS and your user application in a single binary. Using the for debug options creates a monolithic debug build. These binaries are large, but are better suited for use with the debugger. Also, because the boundary between Device OS and the user application is removed, it's possible to call more low-level system functions from monolithic builds.
The local compile and flash options are also available in the Build Tasks palette (cmd+shift+b or ctrl+shift+b).
If you are getting mysterious errors, sometimes it's helpful to do a clean to remove old objects that might be causing difficulties:
- Particle: Clean application (local)
- Particle: Clean application & Device OS (local)
- Particle: Clean application & Device OS for debug (local)

When switching from a debug build back to a non-debug build, be sure to use the Particle: Flash application & Device OS (local) option once. This will put the correct modular Device OS build back onto the device.
To increase the verbosity of the local compiler, set Enable Verbose Local Compiler Logging in the Settings.
NOTE: due to limitations with the local compiler's build system, usernames (or paths) with spaces will be converted to short paths like C:\Users\EXAMPL~1 on Windows, and cannot be supported on Mac and Linux at this time
The first local compile after switching the target Device OS version, platform, or Clean application & Device OS will take many minutes. Subsequent builds are generally faster. Builds on Mac and Linux are also significantly faster than Windows.
Compile and flash buttons
When you are viewing a .cpp or .ino file, there will be two new icons in the upper right corner:
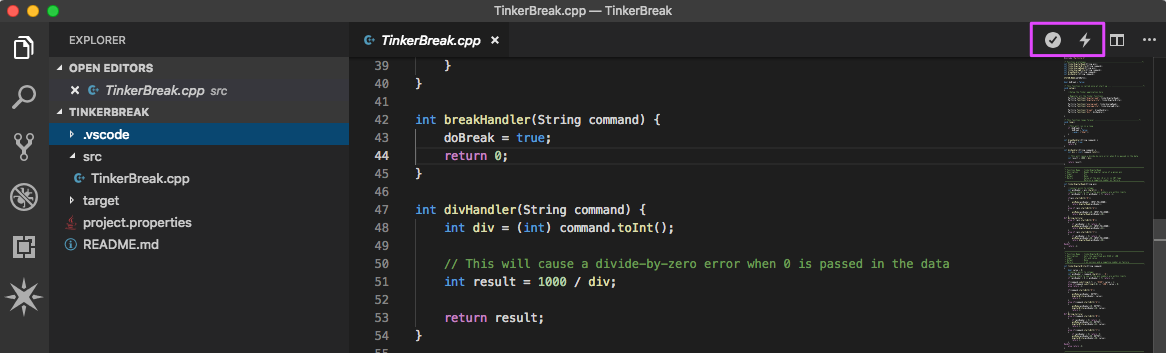
| Button | Purpose |
|---|---|
 |
Compile |
 |
Compile and Flash |
By default, the Compile button invokes Particle: Compile application & Device OS (local). Flash works similarly. To change to cloud compile and flash, see the Settings section.
Integrated CLI
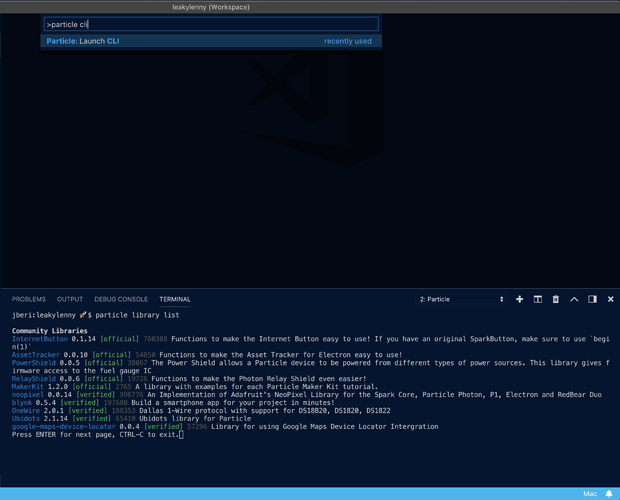
Workbench ships with a local copy of the Particle CLI (Command-Line Interface). The CLI powers many of the commands behind the scenes. It can also be accessed via the Integrated Terminal, which can be handy for features not yet exposed natively in Workbench. To open a CLI window, from the Command Palette enter Particle: Launch CLI.
In the Integrated Terminal window you can enter any Particle CLI commands, for example:
particle help
particle --version
particle libraries list
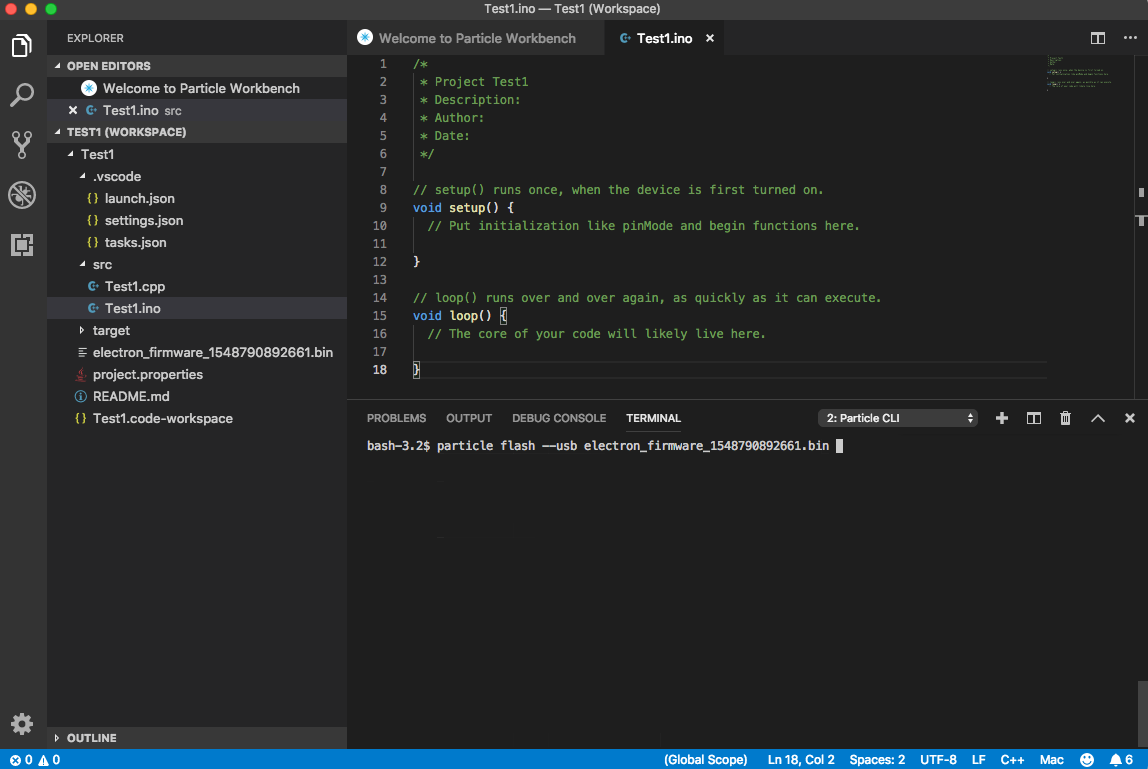
Cloud build and flash locally
Combining the cloud compile and integrated CLI, you can, for example, compile in the cloud and then flash to an Boron or Electron over USB to save on cellular data usage.
After you've done Particle: Cloud Compile you'll notice a new .bin file created in your workspace. In this example, it's electron_firmware_1548790892661.bin.
From the Command Palette enter Particle: Launch CLI.
The device must be connected by USB and in DFU mode (blinking yellow). Hold down the MODE (or SETUP) button while tapping RESET. Continue to hold down MODE (or SETUP) while the status LED blinks magenta (red and blue at the same time), until it blinks yellow, then release.
Then type in a command like:
particle flash --local electron_firmware_1548790892661.bin
You can just type the first few letters of the filename then hit Tab to auto-complete the rest.
Integrated serial monitor
One handy debugging technique is to use the USB debug serial port. Open the Command Palette and select Particle: Serial Monitor.
Normally, when the device restarts (such as after flashing new code) the serial port is disconnected, but you are presented with an option to automatically reconnect or not.
IntelliSense
Workbench leans heavily on the built-in IntelliSense features of Visual Studio Code and the C++ language support provided by the official C/C++ extension. Workbench works behind the scenes to automatically configures the C/C++ extension work with Device OS.
You can see IntelliSense in action by starting to type Particle. and see suggestions for public functions.
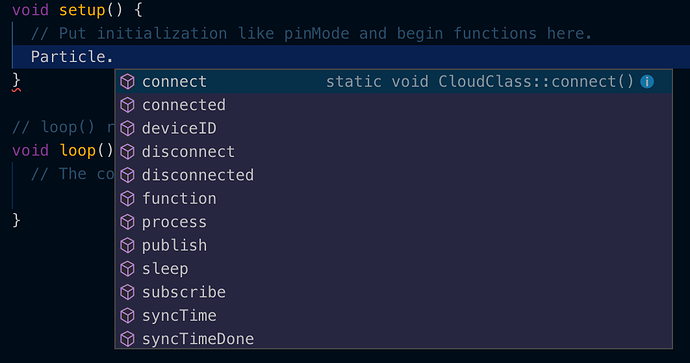
Or possible arguments.

IntelliSense for C++ includes a slew of advanced features for you to explore. For example, you can “peek” to the definition of a function.
Particle Themes
Workbench includes two Particle-inspired theme to add a little pizazz to Workbench, Matter (by Particle) and Dark Matter (by Particle).
To change the color theme, open the Command Palette and select Preferences - Color Theme.
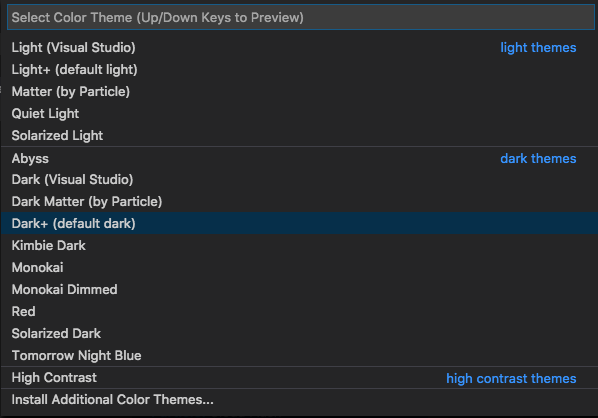
You can scroll through the list to try out the available themes, or select Install Additional Color Themes to select one from the Marketplace. There are a lot of them!
Keymaps
If you are used to a different development environment, you can use keymaps to switch the keyboard shortcuts to be similar to the other environment.
To change the keymap, open the Command Palette and select Preferences: Keymaps.
Some popular options include:
- Vim
- Sublime
- Atom (Particle Dev is based on Atom)
- IntelliJ
- Visual Studio
- Eclipse
- Emacs
and many more!
Particle Libraries
Add one of the 3,000+ Device OS libraries with the Particle: Install Library command. Workbench will download the requested library, all its dependencies and even example projects.
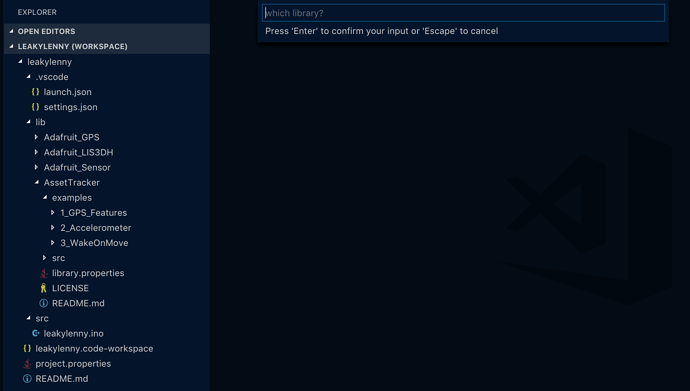
You can search for libraries using the library search page. You can also use Particle: Find Libraries in the command palette.
For example, I used the Particle: Install Library to install the AssetTrackerRK library. In the file navigation, you can see the two libraries that it included automatically, AssetTrackerRK and LIS3DH.
Navigating into AssetTrackerRK you can see the source and examples, and also the README.md file. That contains the documentation in most libraries.

Installing a specific version
You can also install a specific version of a library by using a syntax like dotstar@0.0.4. You can also change the version by editing the project.properties file at the top of your project.
Removing a library
To remove a library, you should:
- Remove the entry for it in your
project.propertiesfile in the top level of your project. - If there's a folder for it in the
libdirectory at the top level of your project, remove that too.
Using a locally modified library
You'll notice a copy of the libraries you've added in the lib directory in the top level of your project. This is handy for viewing the source and examples.
Libraries work slightly differently for local vs. cloud compiles, which can cause some confusion.
For cloud compiles, libraries in project.properties are used even if there is a local copy downloaded in your project. This also applies to using the Particle CLI particle compile command.
For local compiles, you must have a local copy of the library in the lib directory. This is done automatically by Particle: Install Library in the command palette, or by using particle library copy from the CLI.
If you want use a modified version of a community library that builds consistently for both cloud and local compiles, edit the project.properties file:
Before example:
name=discombobulator
dependencies.CellularHelper=0.2.5
After editing:
name=discombobulator
disabled_dependencies.CellularHelper=0.2.5
You could also just delete the dependencies line, but marking it with disabled_ is a good reminder of the version you started with.
Snippets
Code snippets are templates that make it easier to enter repeating code patterns, such as loops or conditional-statements. We’ve included snippets for the bits of code we use most often for your Device OS apps. For example, start typing dw and hit tab to expand the snippet. You can tab between input entries, which includes suggestions.

Debugging (3rd-generation)
There are two types of firmware:
- Modular builds have a separate user firmware binary and a Device OS build. This is standard on all platforms during normal operation.
- Monolithic builds combine the user firmware and Device OS into a single binary. This is used only for debugging on most platforms.
Prior to Device OS 4.0, monolithic builds were used mainly for source level debugging using Particle Workbench. This had the advantage of being able to easily step between the system and user firmware, but also introduced a difference that could make problems behave differently while debugging.
Starting with Device OS 4.0 (and also 5.0):
- Debugging in Workbench now works with modular builds, and you can still step between user firmware and system parts.
- This provides more consistent behavior between debugging and non-debugging builds.
- Flashing only the user binary is significantly faster.
| Platform | Gen | Debug Modular | Debug Monolithic |
|---|---|---|---|
| P2 / Photon 2 | 3 | >= 5.0 | n/a |
| Tracker M | 3 | >= 5.0 | n/a |
| Tracker | 3 | >= 4.0 | < 4.0 |
| B-SoM (B404X, B404, B402) | 3 | >= 4.0 | < 4.0 |
| B5 SoM (B524, B523) | 3 | >= 4.0 | < 4.0 |
| E-SoM X (E404X) | 3 | >= 4.0 | n/a |
| Boron | 3 | >= 4.0 | < 4.0 |
| Argon | 3 | >= 4.0 | < 4.0 |
| E-Series / Electron | 2 | ✓ | |
| P1 | 2 | ✓ | |
| Photon | 2 | ✓ |
For Gen 2 devices, E-Series (except E404X), Electron, P1, and Photon, debugging is still monolithic and unchanged as these devices cannot use Device OS 4.0 or later.
Note: There are a handful of limitations around debugging 3rd-generation hardware. Please see below for details.
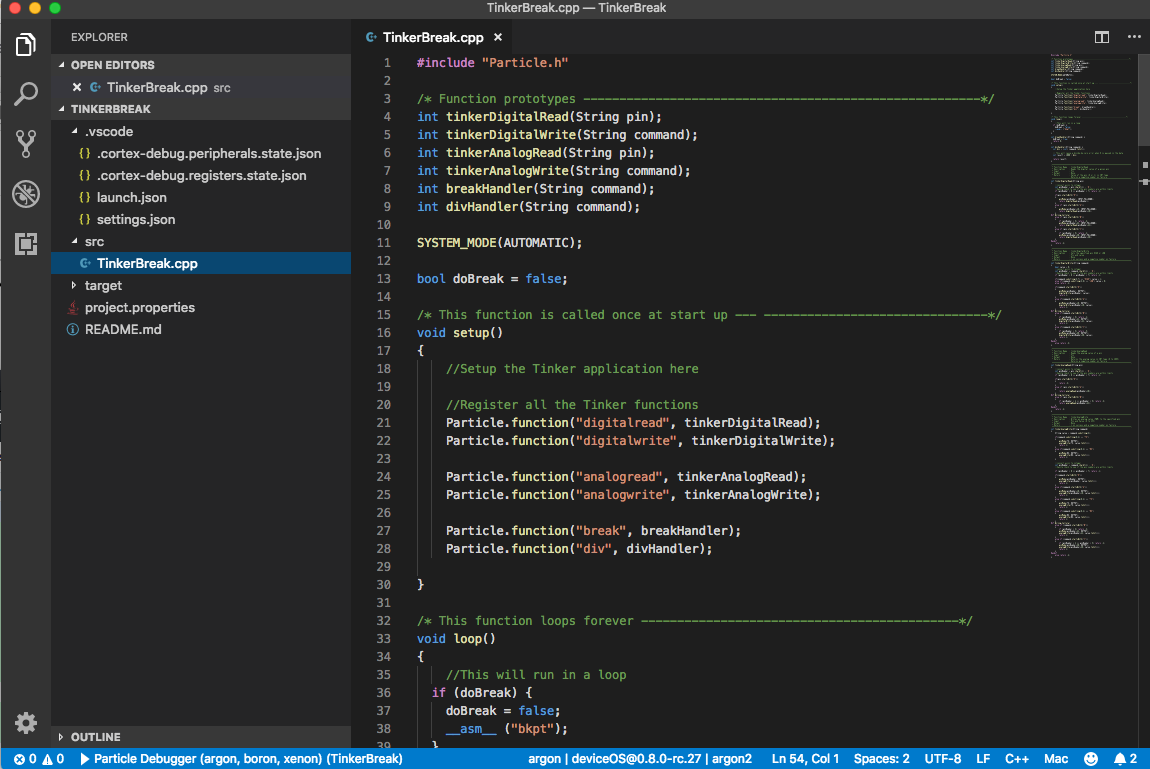
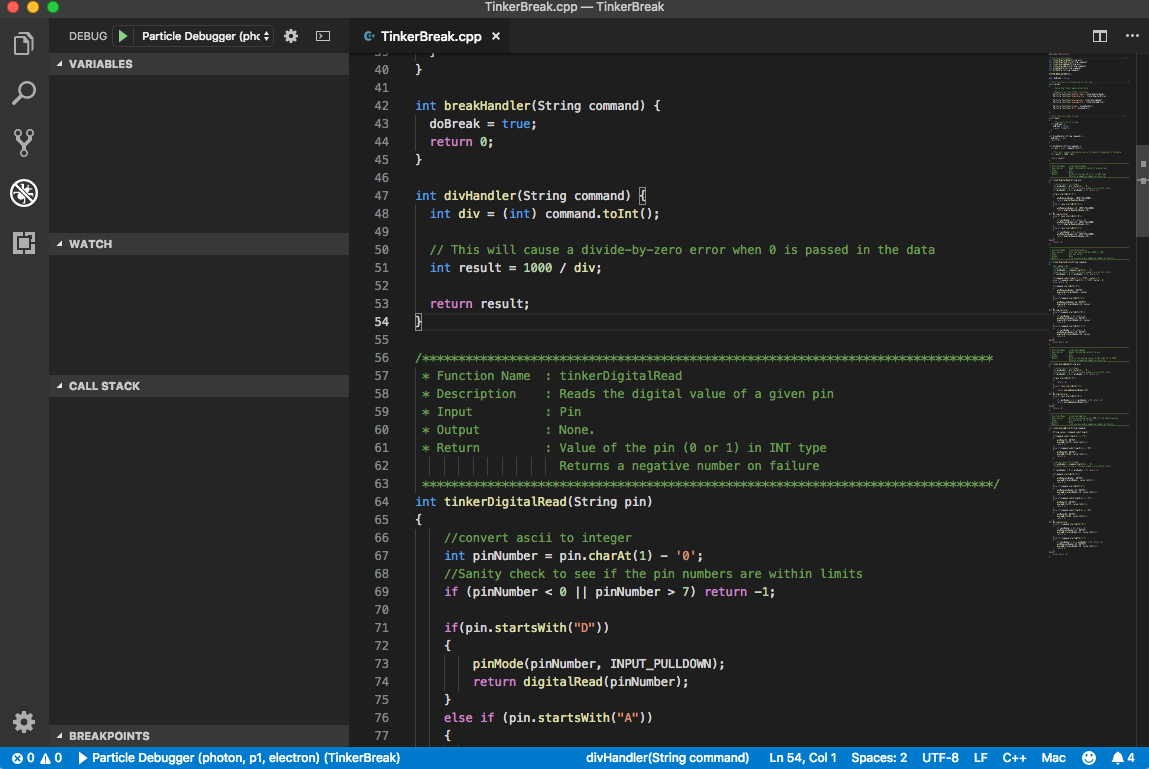
For this tutorial, you'll use the TinkerBreak source.
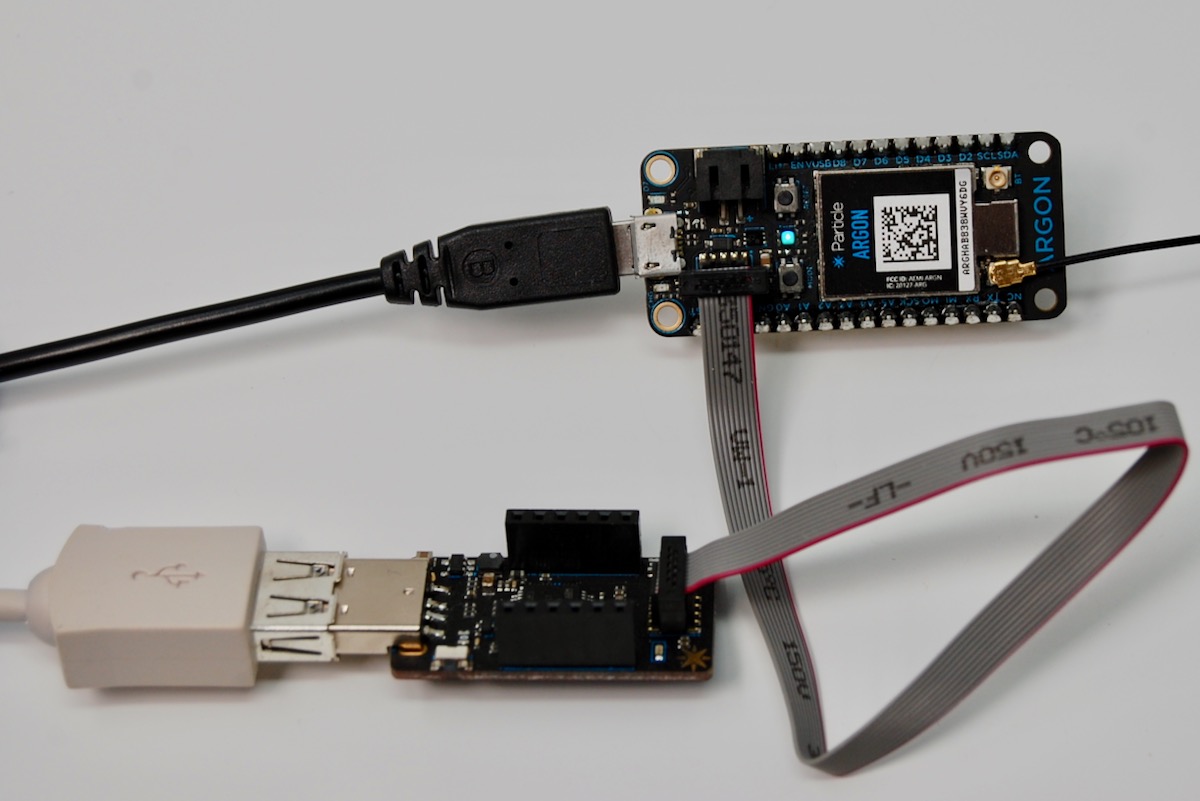
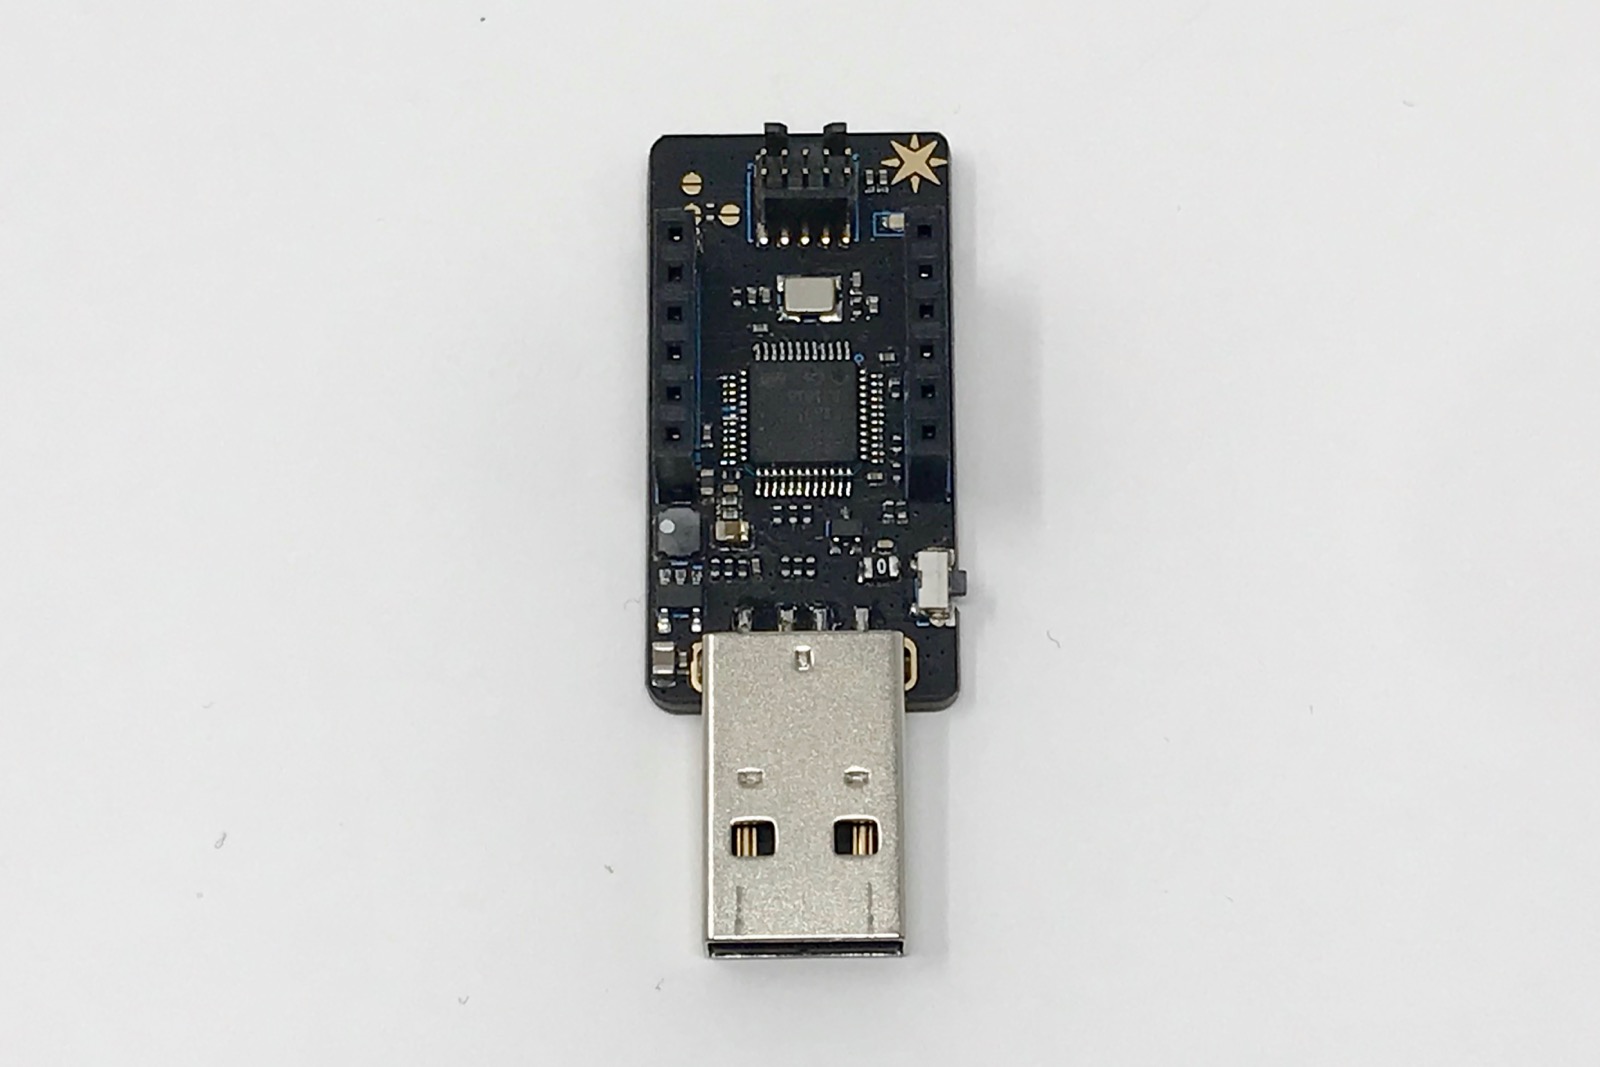
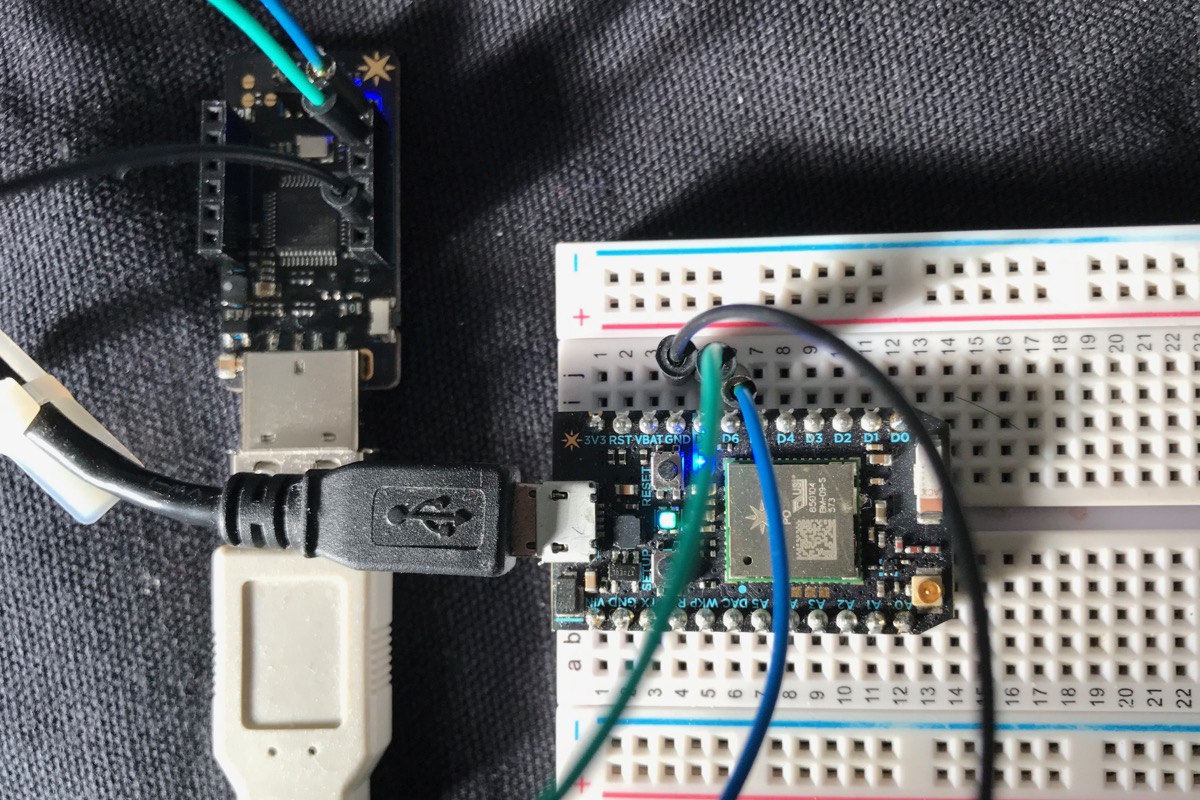
- You'll need two USB connections to your computer: Your device, connected by a micro USB cable, and the Particle debugger (or generic CMSIS/DAP debugger), either directly plugged into a USB A port, or into a USB A extension cable. The Particle Debugger also needs to connect to your device using the included ribbon cable as described in the Particle Debugger documentation.
- Create a new project using the Command Palette and Particle: Create New Project.
- Paste in the TinkerBreak source into TinkerBreak.cpp.
- From the Command Palette select Particle: Configure Workspace for Device and choose the Device OS and type of device you want to use.
- Connect the Particle Debugger using the ribbon cable to your device.
- Connect the device to your computer by USB.
- Use the Particle: Flash application & Device OS for debug (local) command to compile and flash the device over USB.
- Click the Debug icon (1), then select the correct Debugger (2). In this case, it's Particle Debugger. Note that you need to select the type of device in both places!
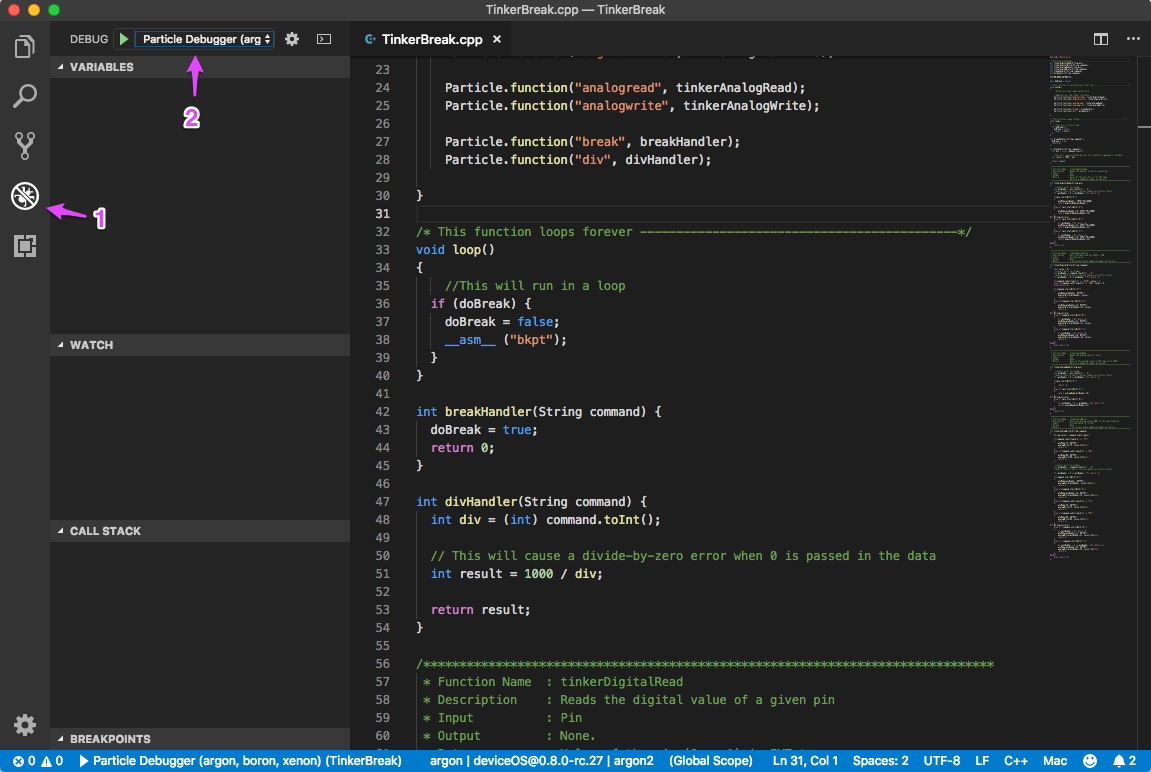
Click the green arrow next to DEBUG in the upper left to build, flash, and begin debugging.
When the debugger starts, the application will typically halt. You can tell because the device status LED will go off.
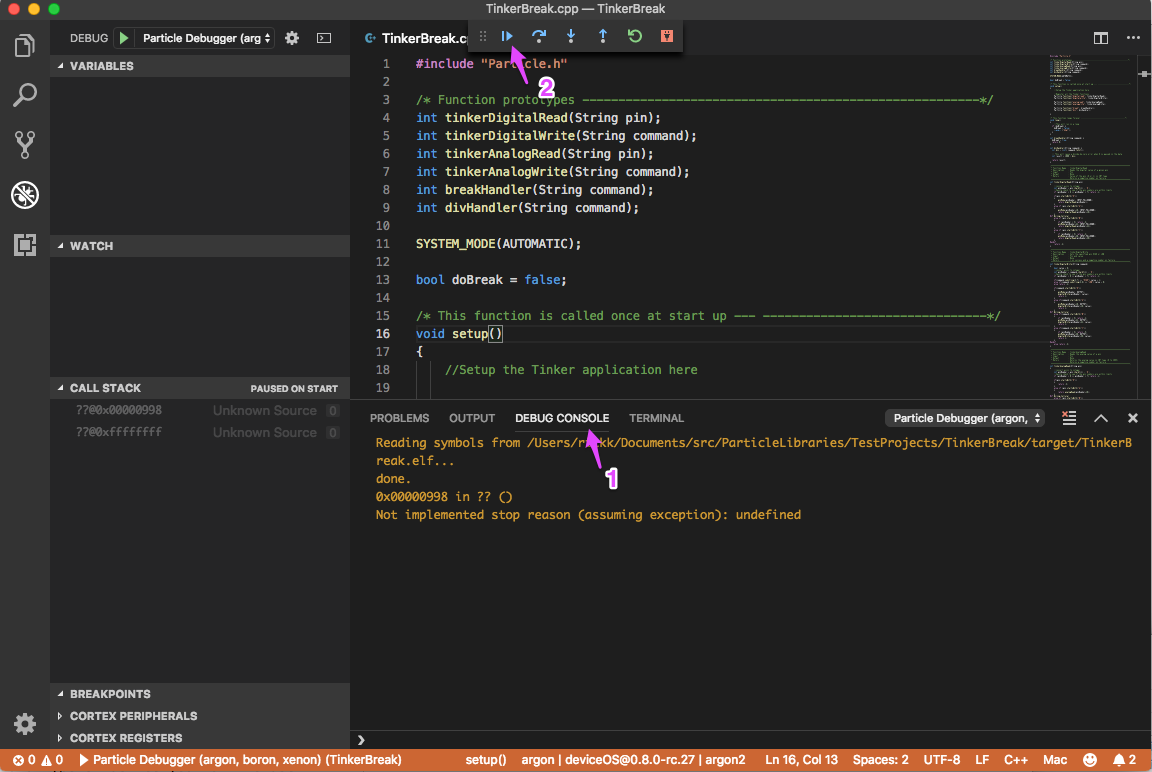
- Click Debug Console (1). The error shown is normal.
- Click Continue (2). The device should boot up normally and get to breathing cyan.
You're now debugging the application!
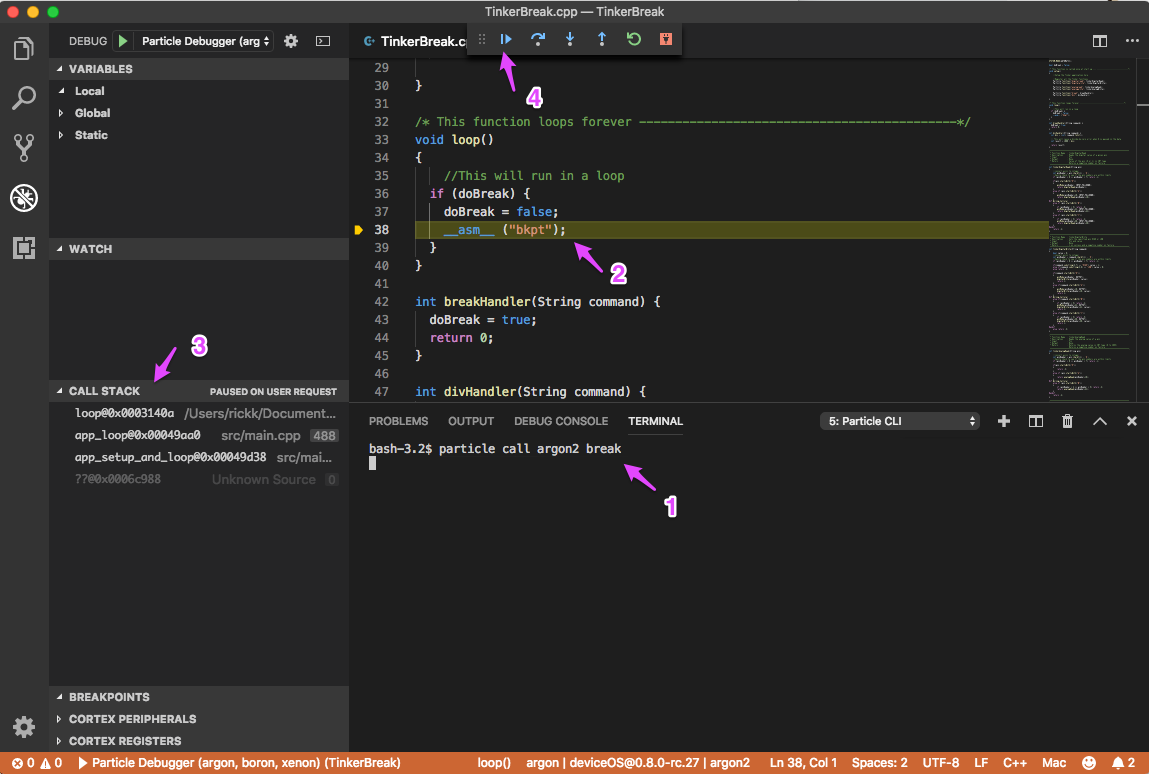
- From the Command Palette select Particle: Launch CLI. In the CLI window, enter a command like:
particle call argon2 break
Replace argon2 with the name of the device you're testing with. This should call a function via the cloud.
- The command is entered in the Terminal tab (1).
- Execution has stopped at the code breakpoint (2).
- You can see the call stack (3).
- You can continue execution using Continue (4).
You can also set your own breakpoints.
- Scroll down to line 51. Click to the left of the line number so a red dot appears (1)
- You'll also see it listed in the breakpoints tab (2).
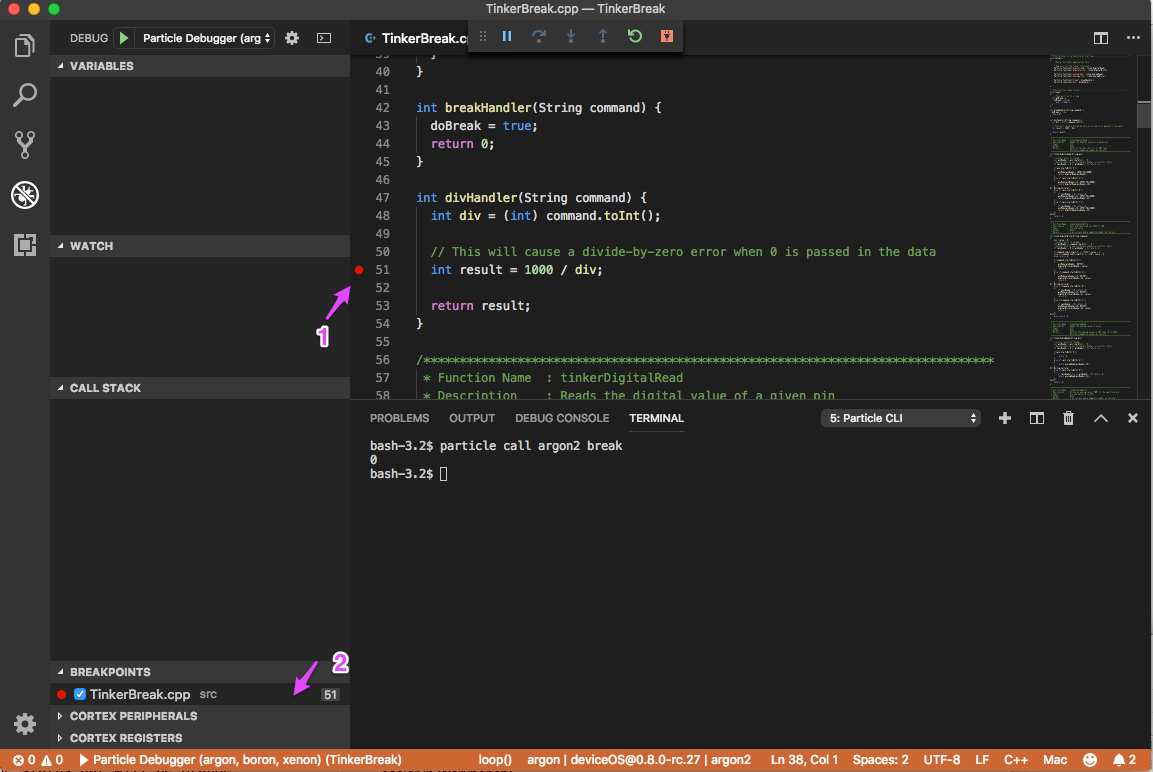
- From the Terminal window, enter a command like:
particle call argon2 div 10
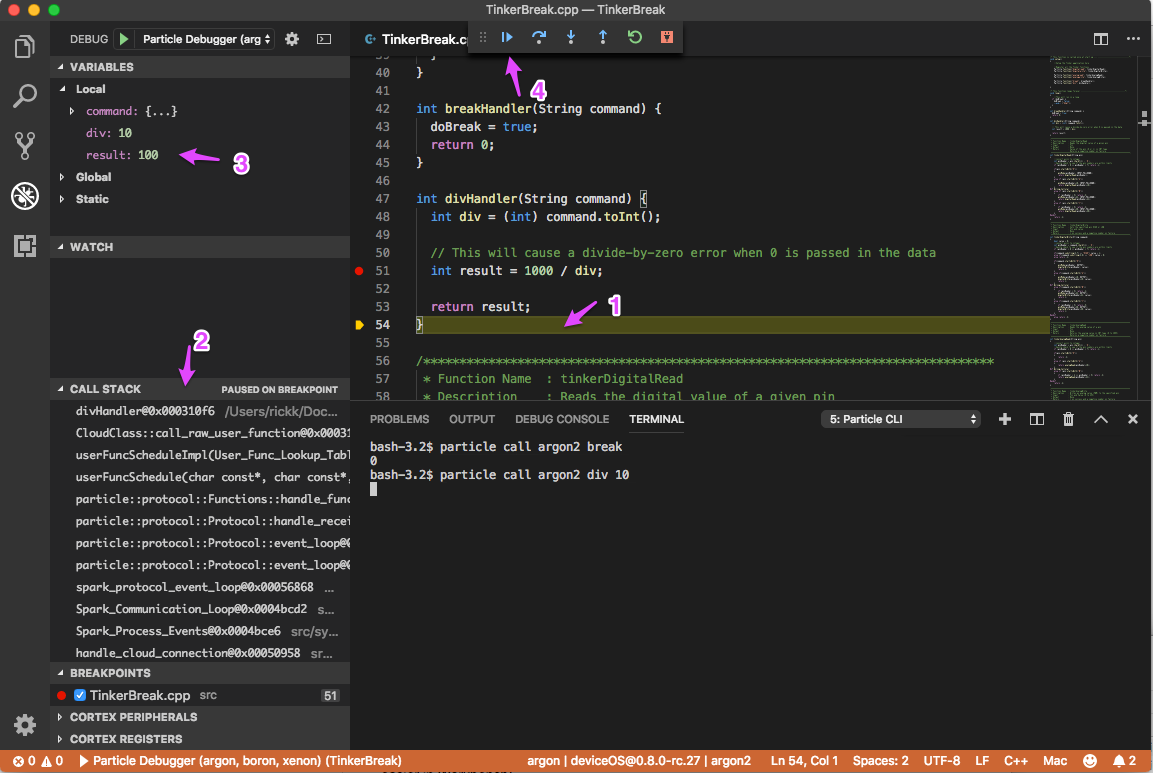
- Now you can see the execution has stopped (1). Sometimes it won't stop exactly on the line you put the breakpoint on.
- The call stack (2) is much more interesting this time.
- You can see the variables (3)!
- When done, Continue (4).
- The P2 and Photon 2 (RTL872x) support up to 2 hardware breakpoints
- Gen 3 devices (nrf52840) support up to 4 hardware breakpoints
Disabling Bluetooth
In some cases you may need to disable Bluetooth on your device in order to safely pause at break-points and step. If your device signals SOS red blinks while debugging, try adding BLE.off(); to the top of the setup() function in the TinkerBreak.cpp source file like this:
void setup()
{
    // Disable bluetooth - note: Gen3 Hardware (argon, boron, xenon, bsom, etc) only!
    BLE.off();

    // ... rest of setup
}
This is only necessary on Gen 3 devices with an nRF52 processor including the Boron, B-Series SoM, Argon, and Tracker SoM.
Disabling optimization
In the TinkerBreak.cpp source file, you'll notice this at the top of the file. This is helpful to add to your source files to turn off compiler optimization, making it easier to debug. Otherwise you can't break on some lines, and some local variables won't be available.
#pragma GCC optimize ("O0")
You can also save and restore the optimization level around certain code:
#pragma GCC push_options
#pragma GCC optimize ("O0")

// Code to compile with optimization disabled goes here

#pragma GCC pop_options
Debugging panics
Using the debugger is the best way to debug panics, especially hard fault (SOS+1), so you can examine the call stack to see where the error might be occurring. In some cases, such as memory corruption, the proximate location won't be helpful because it won't tell you where the memory corruption occurred, just where it caused a failure, but it still can be a helpful technique.
This sample firmware generates a hard fault when the function "test" is called. This can be used to test the feature described here.
#include "Particle.h"

#pragma GCC optimize ("O0")

SYSTEM_MODE(AUTOMATIC);

#ifndef SYSTEM_VERSION_v620
SYSTEM_THREAD(ENABLED); // System thread defaults to on in 6.2.0 and later and this line is not required
#endif

SerialLogHandler logHandler(LOG_LEVEL_INFO);

int testFn(String cmd);

void setup()
{
    Particle.function("test", testFn);
}

void loop()
{
}

int testFn(String cmd) {
    Log.info("test %s", cmd.c_str());

    uint32_t *p = (uint32_t *)0x7fffffff;
    *p = 0xffffffff; // This will hard fault

    Log.info("after fault");

    return 0;
}
- Connect the device and debugger to your computer. Both USB connections must be made.
- Use Particle: Configure project for device.
- Use Particle: Flash application & Device OS for debug (local).
In order to set a breakpoint in the panic handler you will need to find the appropriate location in the version of Device OS you have selected. This is a little tricky because it's in a hidden directory, and not in your workspace.
Use the Quick Open function in VSCode, Ctrl-P or Command-P, depending on platform. This is different than the Command Palette. Unlike the File-Open window, Quick Open allows you to enter a path in a hidden (dot) directory by typing the path in.
Change 6.3.3 to be the version of Device OS you have configured for.
| Platform | Quick Open | Path |
|---|---|---|
| Mac | Command-P | ~/.particle/toolchains/deviceOS/6.3.3/services/src/panic.c |
| Linux | Ctrl-P | ~/.particle/toolchains/deviceOS/6.3.3/services/src/panic.c |
| Windows | Ctrl-P | /Users/<your username>/.particle/toolchains/deviceOS/6.3.3/services/src/panic.c |
Scroll down to the panic_ext function and set a breakpoint, for example on the memset call.
Use Run: Start Debugging.
The firmware will start halted, so use Continue to have the device boot and connect to the cloud.
Calling the function test on the device will cause a hard fault, which should halt at the breakpoint.
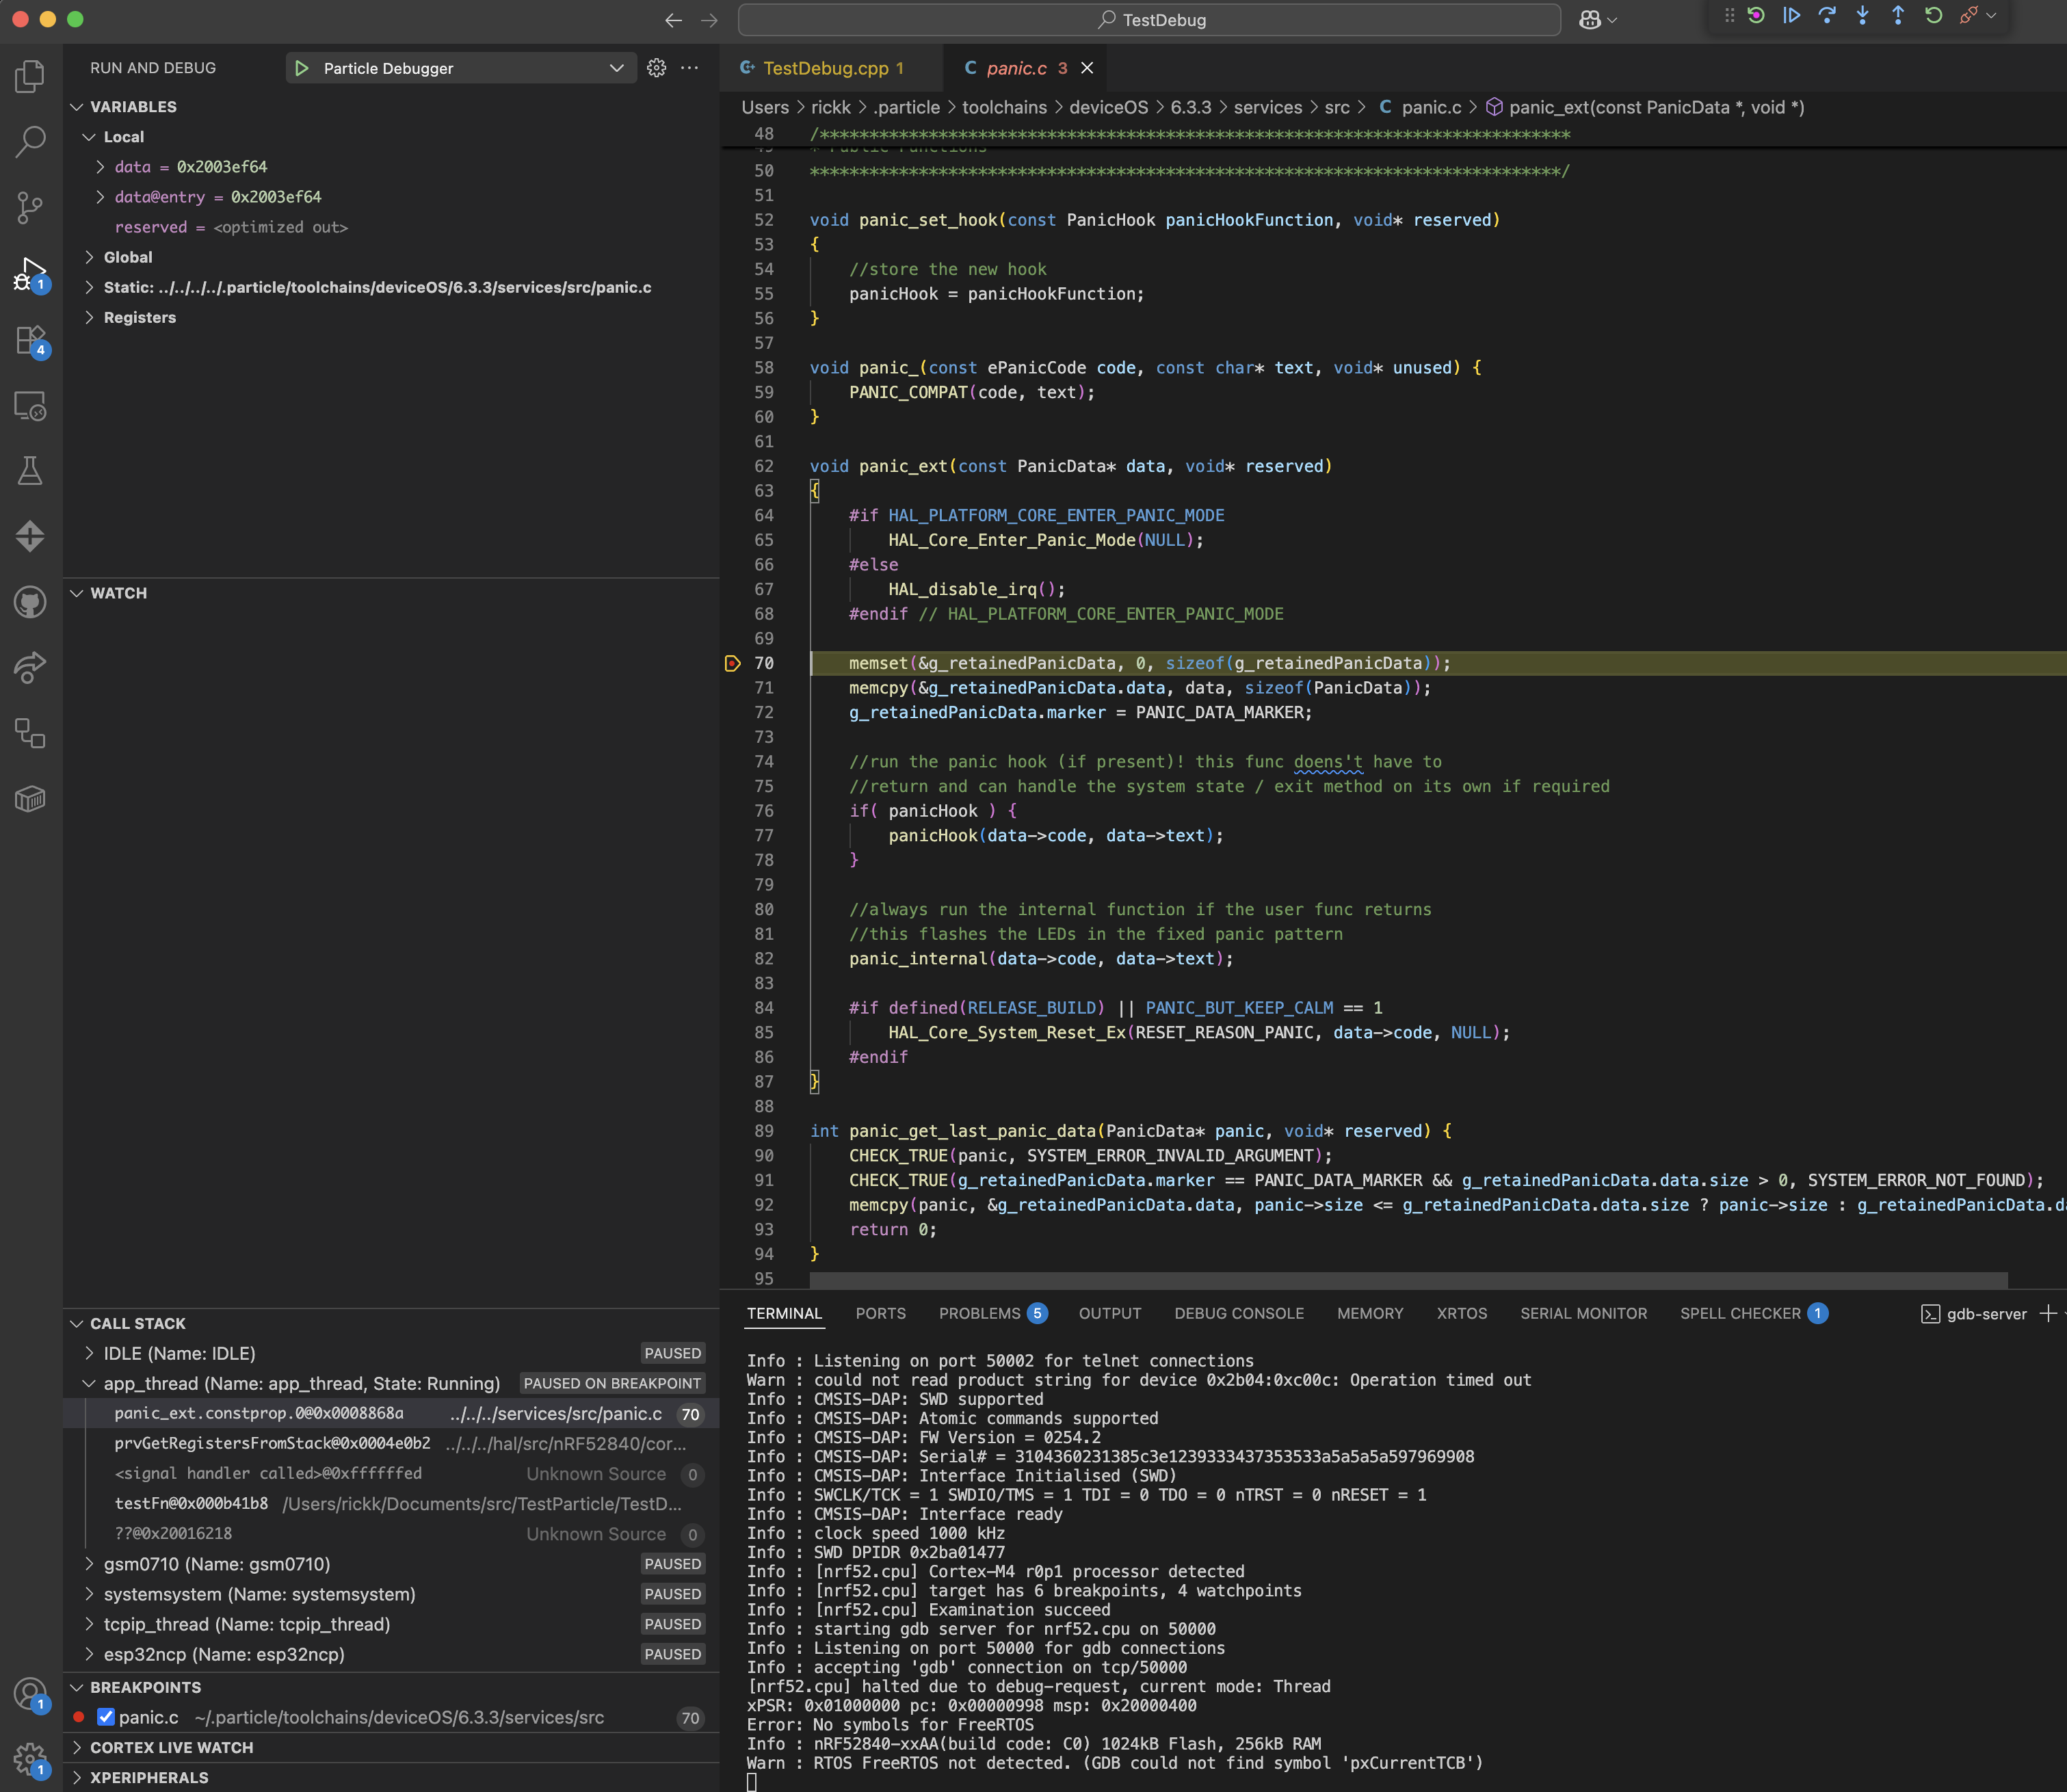
Of note:
- The call stack pane will show the current breakpoint at
panic_ext, but also show the location where the fault occurred (testFn) below it on the stack. - Clicking on
testFnin the call stack will show the source near where there fault occurred. It maybe a few lines after it. - Continue will cause the device to SOS, then reboot.
This technique can be used to open and and set a breakpoint at any Device OS function.
Debugging FreeRTOS
By default, you cannot step into the underlying FreeRTOS (real-time operating system code). You can enable it by adding:
"rtos":"FreeRTOS"
to your launch.json file. This is experimental and may cause the GDB server to crash or malfunction, so it's best to only enable this if necessary.
That is just a brief introduction to debugging. For more information, see the VS Code Debugging Documentation.
Debugging (Gen 2 with Particle debugger)
You'll need two USB connections to your computer: Your device, connected by a micro USB cable, and the Particle debugger, either directly plugged into a USB A port, or into a USB A extension cable. The Particle Debugger also needs to connect to your device's D6 and D7 pins as described in the Particle Debugger documentation.
Create a new project using the Command Palette and Particle: Create New Project. If you already created a project for the 3rd-generation device, you can just reuse that one.
- Rename TinkerBreak.ino to TinkerBreak.cpp. Paste in the TinkerBreak source into TinkerBreak.cpp.
- From the Command Palette select Particle: Configure Workspace for Device and choose the Device OS and type of device you want to use. In this example, a Photon is used.
- Connect the Particle Debugger to your device.
With the Particle Debugger positioned like this, USB connector toward you and the headers facing up:
| Left Header | Right Header |
|---|---|
| VDD | SWCLK |
| RTS | SWDIO |
| RX | NC |
| TX | NC |
| CTS | GND |
| GND | VUSB |
You need to connect:
| Pin | Function | Color |
|---|---|---|
| GND | GND | Black |
| D7 | SWDIO | Green |
| D6 | SWCLK | Blue |
- Connect the device to your computer by USB.
- Click the Debug icon (1), then select the correct Debugger (2). In this case, it's Particle Debugger (photon, p1, electron). Note that you need to select the type of device in both places!
The rest of the instructions are the same as for 3rd-generation.
Settings
There are a number of settings available to customize the experience of using Workbench. The Settings window are available through the menus Code > Preferences > Settings (Mac) or File > Preferences > Settings. Expand Extensions and select Particle.
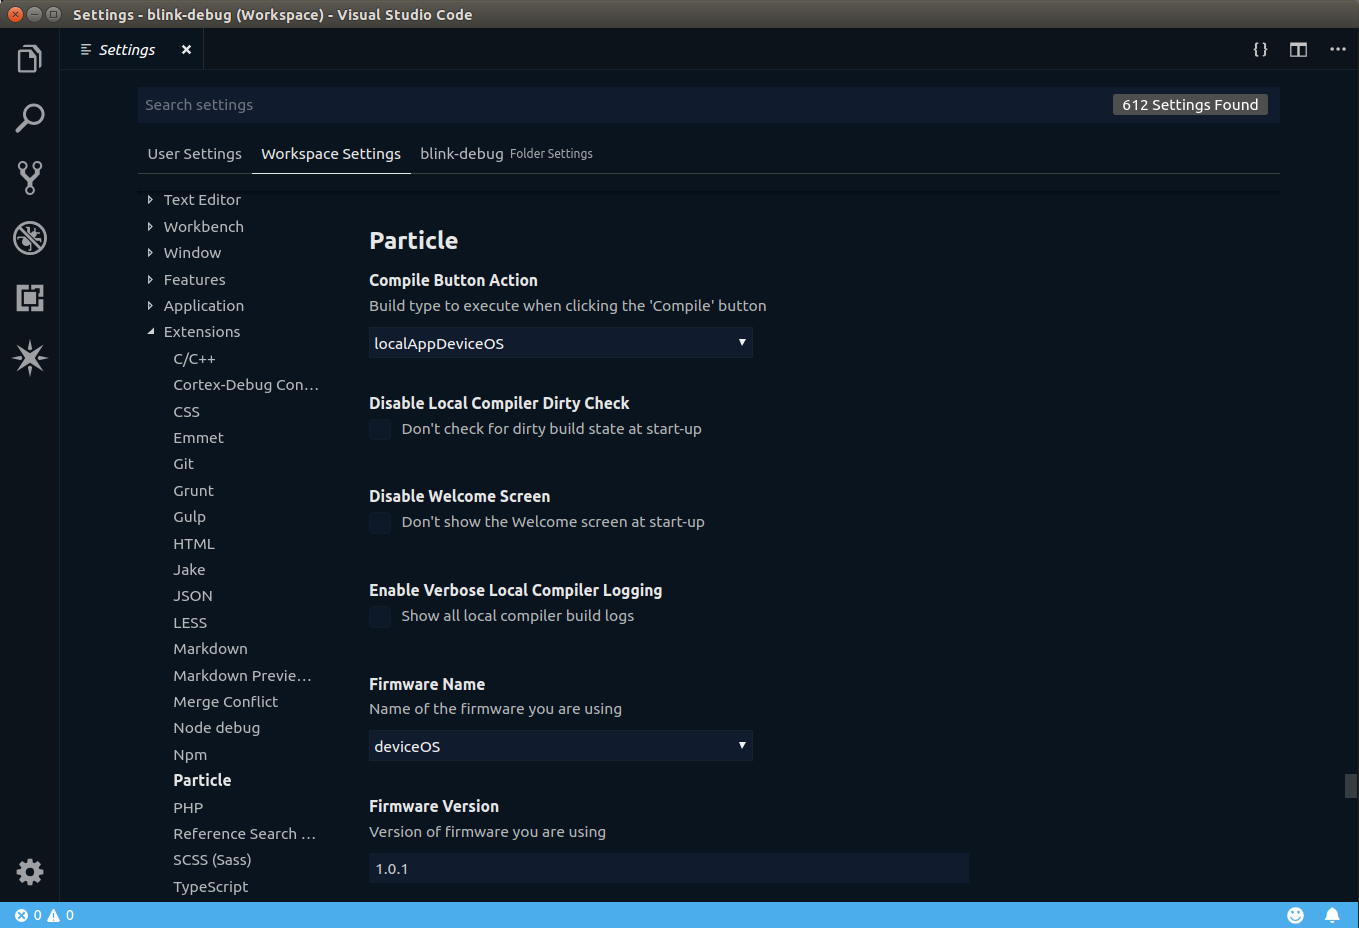
Some of the available settings are:
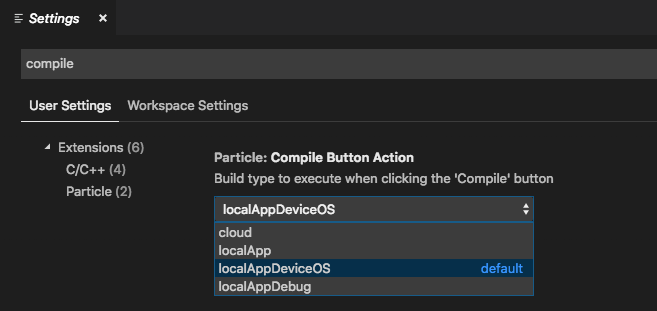
- Compile Button Action and Flash Button Action: toggles the Compile and Flash buttons between local compile/flash and cloud compile/flash.
Disable Welcome Screen: don't show the Welcome screen at start-up.
Disable Local Compiler Dirty Check: don't recommend running the clean task when the target Device OS version has been previously built.
Enable Verbose Local Compiler Logging: print log messages for each Device OS file being compiled. The default is to print only warnings, errors and completion messages.
Compile Defines: Specify a list of preprocessor definitions to set while compiling your application (local compilation only).
Custom Device OS Location: Source Device OS from a custom location - see FAQ.
Source code management
Visual Studio Code provides support for a number of source code management providers. Source code management makes it easy for team members to share code, track changes over time, and provide a cloud-based repository for storing a copy of your code.
The VS Code Instructions are a great place to start.
Particle open source projects and many community libraries are stored in GitHub, and there is good support for Git in VS Code, so that's often a good choice. You can get started at the Git SCM website.
Command palette reference
Particle: Audit Environment
Prints information about the VS Code environment and settings to the Output window.
If you are sharing the information in a public place like the community forums be sure there isn't sensitive information you do not want to share in the data.
Particle: Call Function
Call a function on a device. The device is selected with Particle: Configure Workspace For Device and you are prompted for the name of the function to call and the optional parameter. The device must be online and breathing cyan and have registered that function in order to call it.
Particle: Add / Remove particle Command in PATH
The Particle CLI (command line interface) is used for many operations within Particle Workbench. This option can be used to add or remove it from the command line tool search path.
Particle: Clean application (local)
The Clean options remove the intermediate object files and built binaries. This option removes only the application intermediate files, leaving the Device OS binaries unchanged. You might want to do this if you are getting unexpected compile errors in your application.
These are kept separate for each Device OS version, platform (Photon, P1, Electron/E-Series, Argon, Boron, Xenon, etc.), as well as debug (monolithic) and non-debug (modular).
Particle: Clean application & DeviceOS (local)
The Clean options remove the intermediate object files and built binaries. This option removes both the application and Device OS intermediate files.
These are kept separate for each Device OS version, platform (Photon, P1, Electron/E-Series, Argon, Boron, Xenon, etc.), as well as debug (monolithic) and non-debug (modular).
Particle: Clean application for debug (local)
The Clean options remove the intermediate object files and built binaries. For debug (monolithic) builds this option removes all of the intermediate files for both your application and Device OS.
These are kept separate for each Device OS version, platform (Photon, P1, Electron/E-Series, Argon, Boron, Xenon, etc.), as well as debug (monolithic) and non-debug (modular).
Particle: Cloud Compile
This option compiles in the cloud and downloads the binary to the top level of your project. This can be useful for verifying that your source compiles and also for getting binaries to upload and product firmware.
This is handy for quickly checking the syntax of your program, and also if you want to compile in the cloud and flash by USB to save on data for cellular devices like the Electron and Boron.
The device type and Device OS version are selected with Particle: Configure Workspace For Device.
The filename will be of the form platform_firmware_number.bin. For example: boron_firmware_1598526579205.bin in the top level of your project directory.
While compiling source code using the cloud compiler, or flashing a device with source code, there are limits:
- Maximum time to compile: 120 seconds
- Maximum source code size: 50 MB
Particle: Cloud Flash
This option compiles in the cloud and flashes the code to the device OTA.
The device type, Device OS version, and device name are selected with Particle: Configure Workspace For Device.
Particle: Compile application (local)
This option compiles your user firmware using the local compiler toolchain. It will create a firmware binary, but does not flash to the device. You may want to use this option to create a binary to upload as product firmware.
When you first install a new compiler version, you should use the Particle: Flash application & DeviceOS (local) option at least once to make sure your device has the correct Device OS version installed.
The device type and Device OS version are selected using Particle: Install Local Compiler.
The resulting binary will be in the target directory. For example, if you are building the project MyProject for boron version 1.5.2, the resulting binary will be target/1.5.2/boron/MyProject.bin.
There is no time or size limit for local compiles.
Particle: Compile application & DeviceOS (local)
This option compiles both Device OS and your user firmware using the local compiler toolchain. It will create a set of binaries, but does not flash to the device. The Particle: Flash application & DeviceOS (local) can be used to both compile and flash.
The device type and Device OS version are selected using Particle: Install Local Compiler.
Particle: Compile application for debug (local)
This option compiles both Device OS and your user firmware using the local compiler toolchain as a monolithic debug build. It will create a single monolithic binary containing both Device OS and user firmware, but does not flash to the device. The Particle: Flash application for debug (local) can be used to both compile and flash.
The device type and Device OS version are selected using Particle: Install Local Compiler.
Particle: Configure Workspace For Device
Selects the version of Device OS, device type (Photon, P1, Electron, Argon, Boron, Xenon, etc.) and optionally a specific device name to work with.
This is used by the Particle: Cloud Compile. When using Particle: Cloud Flash, Particle: Call Function or Particle: Read Variable you must include the device name to work with.
Particle: Create New Project
Create a new project. Typically each firmware binary or user application is a single project, and you only open one project at a time.
It is possible to have a multi-root workspace, where there are multiple projects visible at once. The downside is that for many operations like Particle: Flash application (local) you then need to select which of the available projects you want to build.
Particle: Find Libraries
Find a Particle library. You can enter a portion of a name and it will return matching libraries. For example, searching for DS18 results in:
$ particle library search DS18
> Found 2 libraries matching DS18
DS18B20 0.1.12 101761 DSB18XX Lib for Particle devices
ds18x20 0.0.4 6487 DS18B20/DS18S20 library with support for multiple sensors
You can then use Particle: Install Library to install it.
Particle: Flash application (local)
This option compiles your user firmware using the local compiler toolchain. It will create a firmware binary and also flash it to the device over USB. The device will be placed into DFU mode (blinking yellow) automatically.
When you first install a new compiler version, you should use the Particle: Flash application & DeviceOS (local) option at least once to make sure your device has the correct Device OS version installed.
The device type and Device OS version are selected using Particle: Install Local Compiler.
Particle: Flash application & DeviceOS (local)
This option compiles both Device OS and your user firmware using the local compiler toolchain. It will create a set of binaries also flash them to the device over USB. The device will be placed into DFU mode (blinking yellow) automatically.
The device type and Device OS version are selected using Particle: Install Local Compiler.
Particle: Flash application for debug (local)
This option compiles both Device OS and your user firmware using the local compiler toolchain as a monolithic debug build. It will create a single monolithic binary containing both Device OS and user firmware and also flash it to the device over USB. The device will be placed into DFU mode (blinking yellow) automatically.
The device type and Device OS version are selected using Particle: Install Local Compiler.
Particle: Get Help
Provides links to various useful resources for Workbench.
Particle: Import Project
For an existing Particle project containing a project.properties file, creates the additional directories and files needed to use it with VS Code.
Particle: Install Library
Add a library to the current project. You can search for library using Particle: Find Libraries if you are not sure of the exact name. You can specify a specific version, for example DS18B20@0.1.11.
This adds the library to the project.properties file at the top level of your project and downloads the source to the lib directory.
Particle: Install Local Compiler
Install a local compiler toolchain and Device OS source. You need to do this for any specific version of Device OS that you want to target. You can remove unneeded compilers by using Particle: Uninstall Local Compiler.
Particle: Launch CLI
Opens a Terminal window pane to use Particle CLI commands directly. Note that you still need to enter the particle command, as in:
particle help
Particle: Launch Compiler Shell
Opens a Terminal window pane to issue make commands directly with more options. A help screen is displayed when you open the compiler shell with the available options.
Normally you'll just use options like Particle: Flash application (local) instead of using the compiler shell.
Particle: Login
Log in to a Particle account. This is necessary to cloud compile and flash. The Particle: Who Am I? command can be used to determine who you are logged in as.
You'll be prompted to enter your email, password, and optionally a 6-digit login code (aka otp) if two-step authentication (aka 2FA) is enabled for the account.
Upon signing-in if you see an error notification, click the "view log" button and review the error details. If you see Could not validate OTP, that means 2FA is enabled and the login code is required. If instead you see User credentials are invalid, that means you entered the wrong email or password.
Particle: Logout
Log out from a Particle account so a different user can log in.
If you are on a shared computer you should always logout before exiting Workbench as you'll be automatically logged in when restarting if you don't log out first.
Particle: Read Variable
Read a Particle variable from a device. The device is selected with Particle: Configure Workspace For Device and you are prompted for the name of the variable to read. The device must be online and breathing cyan and have registered that variable to read it.
Particle: Reset Environment
This will uninstall and reinstall your local compilers. This takes a while to execute, but can clear up problems caused by a corrupted install.
Particle: Serial Monitor
Opens a Serial Port window to a device connected by USB. You can optionally have the connection reopened when the device restarts (such as when flashing new code), or just disconnect. If there are multiple devices connected by USB, you may be prompted to choose which one.
The serial monitor is often used for debugging to view the output from commands like Log.info and Serial.print in your firmware.
Particle: Show Welcome Screen
Shows the Welcome Screen. The Particle icon in the left toolbar also does this.
Particle: Uninstall Local Compiler
Uninstall a version of the local compiler. Use this to remove versions you no longer need to save disk space. You'll be prompted to select what version you want to remove.
Particle: Update CLI
Update the included Particle CLI (command line interface) to the latest version.
Particle: Who Am I?
Shows who you are logged in as. A small popup window will display in the lower right with the account email address.
Migration guide
From the Particle Web IDE
If you are currently using the Web IDE and want to migrate to using Workbench, you can use the Web IDE Export Tool to export your projects for use with Workbench.
One big change from the Web IDE is the lack of the icon bar on the left. Most replacements are available from the Command Palette (cmd+shift+p on Mac OS or ctrl+shift+p on Linux and Windows).
| Button | Label | Replacement |
|---|---|---|
 |
Flash | Command Palette Particle: Cloud Flash |
 |
Verify | Command Palette Particle: Cloud Compile |
 |
Code | You create a new app from the Command Palette Particle: Create New Project. If you use Particle: Cloud Compile the binary will be downloaded to the top level of your project so there isn't a separate download button. Since the files are already on your hard drive there is no project download button. Share this Revision is not supported in Workbench. |
 |
Libraries | Command Palette Particle: Find Library and Particle: Install Library |
 |
Docs | Go to https://docs.particle.io |
 |
Devices | Command Palette Particle: Configure Workspace for Device |
 |
Console | Go to https://console.particle.io |
From Particle Dev (Atom IDE)
One big change from Particle Dev is the lack of the icon bar on the left. Most replacements are available from the Command Palette (cmd+shift+p on Mac OS or ctrl+shift+p on Linux and Windows).
| Button | Label | Replacement |
|---|---|---|
 |
Compile in cloud and upload using cloud | Command Palette Particle: Cloud Flash |
 |
Compile in cloud and show errors if any | Command Palette Particle: Cloud Compile |
 |
Start a New Project | Command Palette Particle: Create New Project |
 |
Browse and manage Particle libraries | Command Palette Particle: Find Library and Particle: Install Library |
 |
Manage current library | No replacement at this time. |
 |
Docs | Go to https://docs.particle.io |
 |
Devices | Command Palette Particle: Configure Workspace for Device |
 |
Console | Go to https://console.particle.io |
 |
Show Serial Monitor | Command Palette Particle: Serial Monitor. |

- The Log out menu item is replaced by the Command Palette Particle: Logout (and Particle: Login).
- The Select device... meny item is replaced by the Command Palette Particle: Configure Workspace for Device.
- The Claim device... menu item can be replaced by using the Command Palette Particle: Launch CLI and using the
particle device add DEVICE_IDCLI command. - The Identify device... menu item done replaced by the Command Palette Particle: Launch CLI and using the
particle nyan DEVICE_NAMECLI command. - The Compile in Cloud menu item is replaced by Command Palette Particle: Cloud Compile.
- The Show serial monitor menu item is replaced by Command Palette Particle: Serial Monitor.
- The Show cloud variables and Show cloud functions menu items do not have a direct replacement but the Command Palette Particle: Launch CLI and using the
particle listCLI command does return the same information (for all of your devices).

In the bottom status bar:
- The device selector is replaced by the Command Palette Particle: Configure Workspace for Device.
- The other status bar information is displayed on the VS Code status bar. If the status bar is not visible, you can change that using Command Palette View: Toggle Status Bar Visibility.
If you are used to the editing keyboard shortcuts, you can install the Atom keymap. Open the Command Palette and select Preferences: Keymaps.
Working with products
When you are working on a product there are any number of possible scenarios, but this one is common and works well:
- Each developer has their own Particle account and device on their desk for use with the product. This makes it easy to access the USB debug serial port, buttons, etc..
- These developers are team members for the product, so they can access the product test fleet.
- The developer's desktop device is claimed to the developer's account.
- This device uses the Mark As Development Device feature. This allows it to be part of the product, but combined with being claimed to the developer's account, allows it to be flashed directly from Particle Workbench.
The normal workflow is to use Particle Workbench to develop firmware. You can use any of the local or cloud compile options, and flash over USB or OTA as desired.
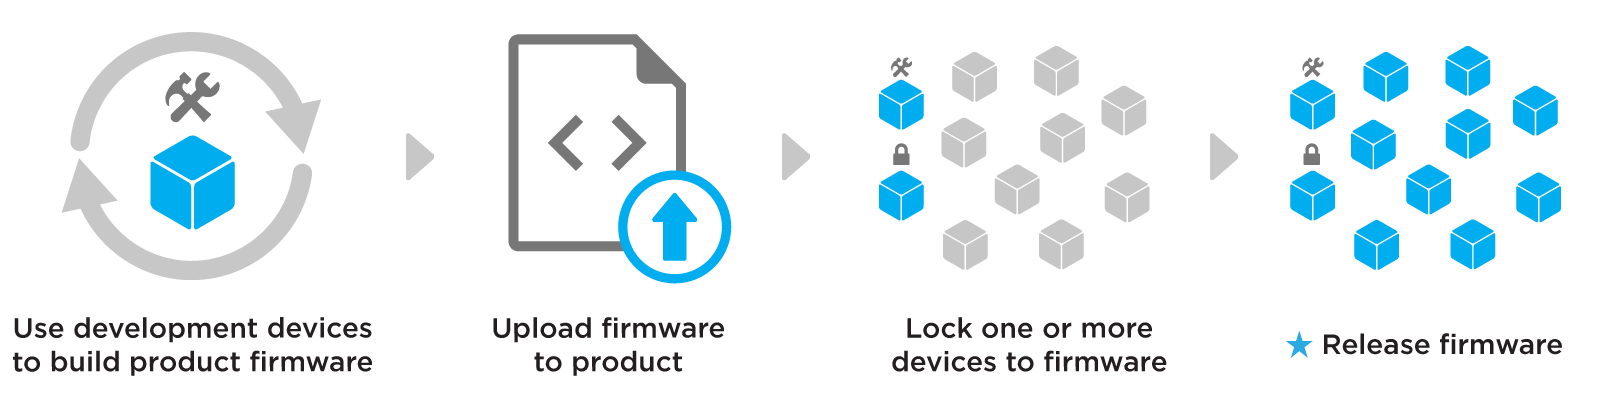
Once the firmware is ready for larger testing:
- The
PRODUCT_VERSIONis updated, if it has not already been updated. - A version of the firmware is built and downloaded, using the Particle: Cloud Compile or Particle: Compile application (local) option to create a firmware binary. The Particle CLI cloud compiler is another option.
- This version is uploaded to the console as product firmware.
You can then:
- Lock and flash a single device in your product test fleet for further testing
- Release the firmware to a device group, such as a beta test group.
- Release the firmware to all devices.
Working with github
GitHub is a tool for source code control, issue, and release management. It's great for managing Particle projects in Workbench. For many uses, it's free, too. There are many features, entire books, and tutorials about Git (the underlying source code control system) and GitHub (a service that allows you to store files in the cloud). This is just an overview.
Source code control allows you to have a secure record of all of the changes you've made to the source over time. You can roll back to previous versions and compare versions. It also makes sure you have a copy of all of your source separate from your computer, in case something happens to it.
Sign up for a GitHub account if you have not already done so. You will select a username at this point, which will be your primary method of identification, not your email address. Your username will be shown publicly in many instances, so keep that in mind.
Most operations are centered around a repository. In many cases, each repository will be a single project. However, in some cases you might want to store multiple Particle firmware projects in a single repository when they are related. For example, if you were writing Bluetooth LE (BLE) communication software, one firmware might be for the central role and one might be the peripheral role, but since they're both part of one project you'd store the source in a single repository.
Each repository can be public or private. If you are creating an open-source project or library, public typically used. Using GitHub teams multiple users can access private repositories. Everyone working on a project should always have their own GitHub account; you should never share an account.
While you can download code from the GitHub website, you will probably want to install a desktop GitHub client on your computer. You should install both the graphical and command line options.
There is also support for GitHub built into Visual Studio Code (Particle Workbench), but it uses your computer's GitHub desktop installation so you still need to install a desktop client.
Creating a new project
If you are creating a new project, from the Command Palette in Workbench, you select Particle: Create New Project. Select the location and name for the project.
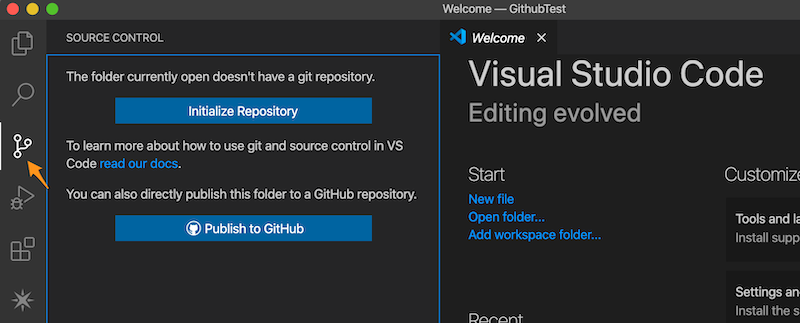
Click the Source Control icon in the left toolbar. Then click Publish to GitHub. This will create a private repository for the currently logged in user.
- Select the name (the default is the name of the project folder, which is usually a good choice)
- Select the files you want to commit (the default is probably fine for personal projects)
Now if you go to GitHub you should see your project! It's currently private, but you can make it public later, if you want to.
Making a source code change
Once you've made some source changes and tested them, you might want to Commit and Push these changes.
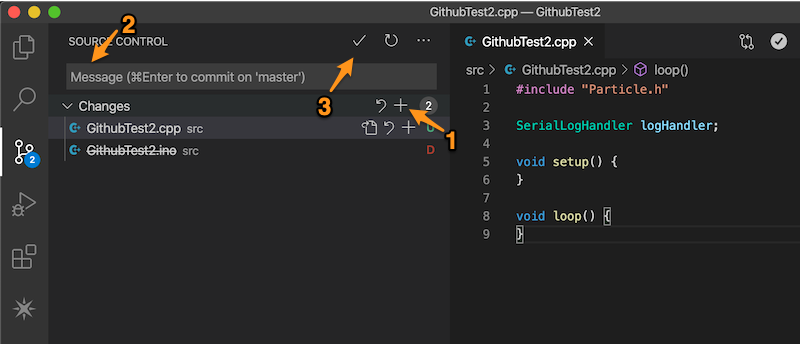
Before you can commit you need to Stage your changes, which lets Git know you indeed want to upload all of these changes. The easiest way is to click on the Stage All Changes (1) + button. It's hidden by default but will appear if you hover over the spot.
Enter a commit message in the box (2). This can be a reminder of why you made the change.
Click the Commit icon (3) (check mark). This saves a record of the changes, but the changes still only live on your computer.
For personal projects like this you will typically just push to master. This sends the data to the GitHub servers. For more complex projects with team members, code reviews, etc. you will likely use a more complex process of Pull Requests instead.
- Click on the ... (Views and More Actions) at the top of the Source Control tab. Select Push.
Now the changes should be visible on the GitHub web site. Also if other team members Fetch and Pull the project they'll get your latest changes.
To summarize:
- Stage indicates this file should be committed
- Commit marks all of the changes are ready to go as one package of changes
- Push uploads the package of changes to GitHub
Making a copy of a project (clone repository)
Often you will want to work on a project that has already been created on GitHub. The process of creating a working copy of a project is to Clone it. Cloning only makes a copy of it on your computer and doesn't affect the project that you are cloning at this stage. Feel free to clone all you want!
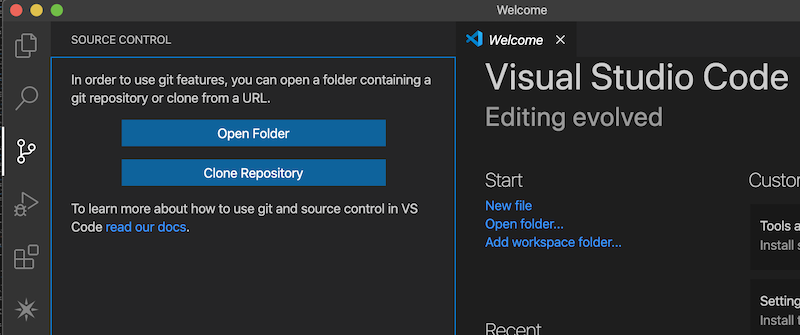
Open a new Workbench Windows or otherwise have a window with no project selected. Click on the Source Controll icon on the left side. Click the Clone Repository button.
Enter the GitHub Repository URL in the box. For example: https://github.com/particle-iot/tracker-edge
Select the parent directory of where you want the repository to be cloned to and click Select Repository Location.
Now you have a clone of the repository. You can make all of the changes you want in your clone as long as you don't use things like Commit or Push. However you won't have the benefits of source control for your changes. To do that, you may want to fork or mirror.
Creating a fork
The process of taking an existing project and duplicating it into your own GitHub where you can make changes with full source control is known as creating a fork. You might want to do this if you want to make changes to an existing library. Once caveat of fork: the visibility of a fork is always the same as the original. If the original was a public repository, your fork will be too.
You can do this by going to the original repository in GitHub and clicking on the Fork button in the upper left.
Creating a mirror
There is another option that is more common when working with Tracker Edge projects: Mirror. A mirror allows you to make a private copy of a repository and link the two, so you can later merge any changes in the original with your changes! This is a power user feature, so you'll need to use some command-line git commands to make it work.
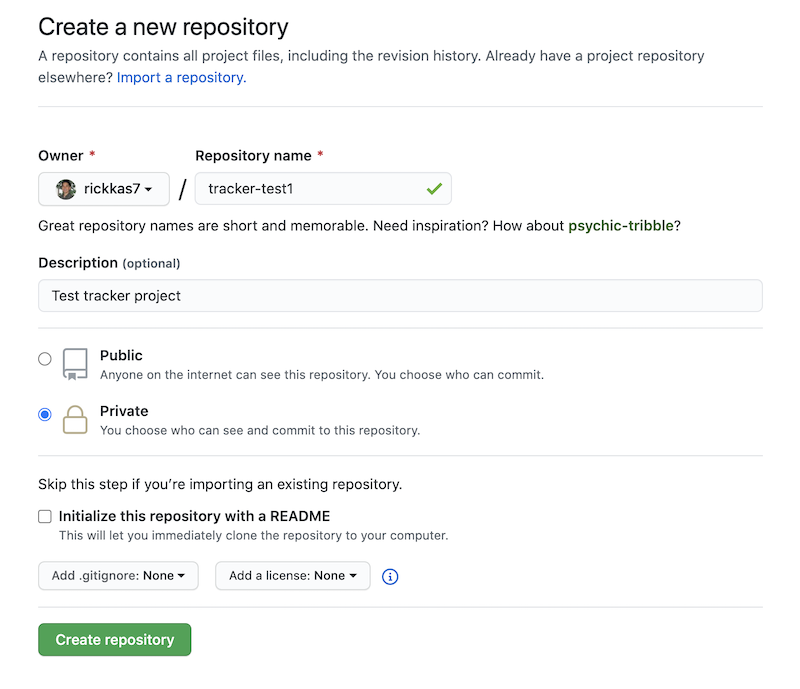
Create a new GitHub repository in your account. In this case, I created tracker-test1 and made it a private repository. Since we're going to mirror, it's not necessary to create a README or LICENSE.
git clone --bare https://github.com/particle-iot/tracker-edge.git
cd tracker-edge.git
git push --mirror https://github.com/rickkas7/tracker-test1.git
Run the commands to mirror the changes into the repository you just created. Be sure to change the last URL to match the URL for your repository!
At this point you can delete the tracker-edge.git directory as it's no longer needed.
git clone https://github.com/rickkas7/tracker-test1.git
cd tracker-test1
git submodule update --init --recursive
Make a clone of your repository and initialize the submodules.
Open your project in Workbench:
- Open Particle Workbench.
- From the command palette, Particle: Import Project. Select the project.properties file in the tracker-test1 directory.
- Run Particle: Configure Workspace for Device, select version 1.5.4-rc.1, 2.0.0-rc.3, or later, Tracker, and your device.
- Run Particle: Compile and Flash.
Now that you have a mirror, you're free to do things like update main.cpp and even edit the other Tracker source as desired. When you Stage, Commit and Push, the changes will be saved to your own GitHub private repository only.
cd tracker-test1
git remote add official https://github.com/particle-iot/tracker-edge.git
Link the two repositories. This makes it possible to merge changes from the official version later on, when new versions of Tracker Edge are released. This merge is smart, so it won't overwrite your changes if there are no conflicts, but if both you and Particle changed the same lines of source, this may be flagged as a conflict and you will need to manually figure out which to keep. You only need to run this command once.
cd tracker-test1
git pull official develop
This is how to merge updates from the official repository into yours. When a new version of Tracker Edge is released, you run a command to pull the changes from that release into your repository. You then resolve any conflicts and then push the changes to your repository. The steps are:
- Pull the changes from the official repository
- Resolve any conflicts
- Push the merged changes to your repository.
cd tracker-test1
git pull official release/v8
If you prefer, you can merge to a specific release instead of develop.
Developing Particle libraries
There is limited support for developing Particle Libraries in Workbench.
Create a project.properties file
You will need to create a project.properties file in the top of your library source directory. The easiest way is to duplicate your library.properties file. You should have both files.
The project.properties file must contain a name and the name of the library, such as:
name=AMCLCD-RK
If you duplicated your library.properties it should have a name already. The reason is that Workbench will not open a project directory that does not have a project.properties file.
Import project
From the Command Palette, select Particle: Import Project. Now that the directory contains a project.properties file, you will be able to import it.
Now the library will appears in your Workbench window and have IntelliSense highlighting.
Building examples - using CLI
The main caveat is that there is no built-in support for building library examples using local build. The easiest solution is to the Particle CLI cloud compiler manually.
From the Command Palette, select Particle: Launch CLI to open a shell panel.
Use the particle compile to build the binary. For example:
particle compile boron examples/1-simple --saveTo firmware.bin
This compiles the example 1-simple and saves the binary.
particle flash test2 examples/1-simple
This compiles and flashes the device named test2 OTA with the example firmware.
Building examples - local build
If you really do need to do a local build, for example, if you need to use the debugger, the only solution is to temporarily copy the files from the example you want to build into the src directory. Don't forget to remove them before publishing the library!
Uploading and publishing
The easiest way to upload or publish your library is to select Particle: Launch CLI to open a shell panel. This will also set it up with the correct directory so you can:
particle library upload
This uploads the library as a private library so you can test it.
particle library publish
This publishes the library, making it public and visible to all other users.
Starting from scratch
If you are making a brand new library from scratch, you may want to use Particle: Create New Project. This will create the project.properties and src directories. Then you will want to:
- Create the library.properties file.
- In the src directory, remove the YourLibraryName.ino file and instead create YourLibraryName.cpp and YourLibraryName.h.
- Create the examples directory.
- Create subdirectories in examples for each of your examples, with a main source file in each.
Learn more
Additional questions and answers are in the FAQ.