
Cloud API getting started
This document shows the basics of using the Particle Cloud API in several different ways.
In order to take full advantage of this tutorial, you should log into your Particle account. This will allow the examples to show actual commands, authentication tokens, and devices in your account.
The Particle Cloud API is a REST API that allows a computer or mobile device to make requests to the Particle Cloud and get responses back. It can also affect a change, such as a configuration change, control a real-world device, or get sensor data from a device.
In many cases you'll use a library such as Particle API JS to make using the API easier, however the API is available to all languages that support REST APIs, which is basically all of them. For example, you might instead use Python, Ruby, or Java on the server-side, or you might use Kotlin, Swift, or Objective C++ in mobile apps.
You can also use the API directly from a terminal or command prompt window using a tool like curl, or from a web-based tool like Postman.
Getting started
List devices
The first API we'll use is the list devices API. It is easy to use as it's a GET operation (get data from the API) with no parameters. There's also an authentication token used behind the scenes, which will cover shortly.
The Particle Cloud API mostly returns JSON, which is text-based structured data that is both machine-readable and human-readable. The link is to a tutorial if you need to come up to speed on the basics of JSON.
Assuming the call completes successfully and you have devices in your account you'll notice a few things:
- The response is an array, surrounded by square brackets []
- Each element in the array is an object, one for each device in your account, surrounded by curly brackets {}
There are a bunch of useful fields, for example:
- "id" is the Device ID
- "name" is the name of the device
- "online" is true if the device is probably currently online
- "platform_id" is the kind of device
The JSON output has been pretty-printed, adding line breaks, indenting, and colorization in the box above. The actual response from the API is compact JSON format, with no extra whitespace. Note that the order of the fields may change, and fields may be added or removed at any time.
What the Get Device List button does is made a GET request to the API https://api.particle.io/v1/devices/.
- The calls are encrypted (https)
- There's an access token required. It's in the
Authorizationrequest header.
If you do try to just open that URL in a browser it will not work, because it's missing the Authorization.
There are other ways you can pass the access token, which will be discussed a little later.
Get variable
Another common task is to get the value of a Particle.variable using the get variable API.
To fully take advantage of this example you'll need firmware on one of your devices that returns a variable. This firmware combines the function and variable examples from the cloud communication tutorial. You don't need to fully understand how the firmware works right now.
You can select a device and flash it right here. Note that this will replace any existing user firmware on the device and there is no way to undo this operation. You'd need to locate and flash the old firmware back to the device to restore the old code, so make sure you select the correct device.
Once you've flashed the firmware above to a device, you can test it out:
| Device | ||
| Variable Name | ||
- Device is the device you flashed the firmware to
- Variable Name must match the name used in the
Particle.variablecall in the firmware. - Note how the URL starts out the same as List Devices, but also includes the device ID and the variable to retrieve.
The response JSON contains a number of things, but the most important is result which is the value returned by the variable. In this example, it's a random integer, but it might also be a string or a boolean value (true or false).
Device offline
If you try to get a variable from a device that is offline, it will fail with a 408 timed out error and a JSON response of:
{"ok":false,"error":"timed out"}
The timeout can take two different forms:
If the device is known by the cloud to be offline, the call may fail with a 408 immediately, or at least quickly.
If the device is believed to be online, but is not responding, it can take 30 seconds for the timeout to occur.
If you are calling the cloud API from your server, be sure to take into account that both can occur. In particular, don't retry a timeout from the failure reply, because you may end up making an excessive number of API calls and getting rate limited. Be sure to have a back-off period before retrying.
Invalid variable name
If you request an invalid variable name, you'll also get a 404 error, but the JSON response will be something like:
{"ok":false,"error":"Unknown Variable: sensor2"}
Call a function
Another common thing is to do is call a function that has been registered on a device using Particle.function.
To fully take advantage of this tutorial, you should flash the code from the get a variable example, above to a test device. It supports testing function calls, too.
| Device | ||
| Function Name | ||
| Parameter | ||
With the default values, if the function call worked, the status LED on your test device should turn solid red for 10 seconds.
You'll notice that the URL for calling a function is the same as for getting a variable. That works because calling a function uses POST and getting a variable uses GET, so the cloud knows which operation you want to do.
The other difference is that the body of the POST contains the function parameter, encoded one of a few different ways.
Using the setColor example, the parameter is an RGB value. 255,0,0 is red. 0,255,0 is green. 0,0,255 is blue. Try mixing some colors!
Like the get variable example, if the device is offline, you'll get a 408 timed out error. If you specify an invalid function name, you'll also get a 404, with a different JSON body.
The JSON response for calling a function looks like this:
{"id":"1f0030001647353236343033","connected":true,"return_value":1}
The return_value is the integer returned by the Particle.function handler. The code above returns 1 if the value is a valid-looking RGB value. If you just pass, say xxx in the function parameter, the function still returns a 200 success, however you'll notice the return_value is 0 instead. This is dependent on how the user firmware is written, however. Some firmware may work the opposite way and return 0 on success and non-zero on error for a function call.
The timeout can take two different forms:
If the device is known by the cloud to be offline, the call may fail with a 408 immediately, or at least quickly.
If the device is believed to be online, but is not responding, it can take 30 seconds for the timeout to occur.
If you are calling the cloud API from your server, be sure to take into account that both can occur. In particular, don't retry a timeout from the failure reply, because you may end up making an excessive number of API calls and getting rate limited. Be sure to have a back-off period before retrying.
POST body - JSON
The example above uses JSON encoding, which makes things symmetrical as the response is always JSON.
The request Content-Type is set to application/json and the data is a JSON encoded object:
{"arg":"255,255,0"}
POST body - form URL encoded
The other way is form URL encoded method is the default for how web forms are encoded. It's also the format used when using curl with the -d option.
The request Content-Type is set to application/x-www-form-urlencoded and the data is a series of key=value pairs, separate by &. For example:
arg=255,255,0
This uses form encoding for the POST body:
| Device | ||
| Function Name | ||
| Parameter | ||
Access tokens
To this point we've glossed over the access token requirement, but we can't avoid it any longer.
In order to make any API call, you need an access token. This represent both your identity (Particle username, which is your email address) and a secure authentication. It's not actually your password, and given the access token there's no way to work backwards to your password, but it does grant access to your account. Also, if you have MFA (multi-factor authentication) enabled on your account, you will need your MFA code to generate the access token, but the access token at that point no longer requires the MFA. This is another good reason to keep your access tokens secure!
Access tokens have an expiration date. It could be from seconds, to months, to never expiring. It's also possible to revoke an access token so it no longer has access to your account.
One way to create an access token is to use the Particle CLI particle token create command. There are others, and more types of access tokens, discussed below.
Using an access token
Authorization header
One option for including the access token is including it in the Authorization header of the HTTP request. How you do this will depend both on the language and the method you are using for making the REST request.
For example, this is an example for browser-based Javascript using jQuery AJAX:
$.ajax({
    dataType: 'json',
    error: function(jqXHR) {
        // Error handing code here
    },
    headers: {
        'Authorization': 'Bearer ' + accessToken,
        'Accept': 'application/json'
    },
    method: 'GET',
    success: function(resp, textStatus, jqXHR) {
        // Success handling code here
    },
    url: 'https://api.particle.io/v1/devices/' + deviceId + '/' + variableName,
});
Note that the content of the Authorization header is the string Bearer followed by a space, then the access token.
This is the calling a function example using the Authorization header:
| Device | ||
| Function Name | ||
| Parameter | ||
This is the get variable example using the Authorization header:
| Device | ||
| Variable Name | ||
Form body
It is recommended that you use the Authorization header for passing an access token, as this works for all request types.


Query parameter
It is recommended that you use the Authorization header for passing an access token.
If you are using a URL like this, with an access_token in the URL, you are using a query parameter.
https://api.particle.io/v1/devices/?access_token=f8a4d380cb6ffffffffffffffffffaf5e496ddf0c0
For accounts created after December 4, 2024, passing an access token by query parameter will no longer be available for security reasons. There is currently no schedule to disable query parameter authentication for existing accounts, but we do recommend changing to an Authorization header.
The reason for the change is that passing authentication information in the URL can often make it easier to leak account credentials unintentionally.
- It may appear in your browser history
- Often URLs are logged which would cause authentication tokens to be leaked via logging
Access token safety
Never embed the access token in client-side HTML or Javascript
It should be obvious, but a reminder, just in case.
Don't commit access tokens to source control
If you have a public GitHub repository you definitely don't want to check access tokens into your account!
If your repository is private it's not as bad, but still it's best to use other techniques.
Avoid passing the access token on the command line
It's best to use environment variables instead of passing the access token as a command line argument in many cases.
The reason is that on some systems, it's possible to see the processes created by other users, including their options. Also, the previous commands may be stored in unencrypted history files. These could expose your access token.
Authenticating product APIs
There are several common ways to authenticate product APIs. These include the URLs of the form:
https://api.particle.io/v1/products/:productId
The productId is typically the numeric product ID, but it could also be a product slug.
User token authentication (products)
You can use your own account user token to authenticate product APIs. This token will have access to all products you have access to, including organization products, so you may want to use a more restrictive token for authenticating from back-end servers.
Owner token authentication (products)
For cellular products in particular, claiming all devices to a single account may be appropriate. If you use this technique, you will sometimes use this token for authenticating product APIs. However you can also use product bearer tokens.
As of March 2023, claiming product devices is no longer necessary to subscribe to events on-device. This can simplify the process of device onboarding.
- Prior to March 2023, claiming was required if the device firmware subscribed to events on-device. This is no longer necessary.
- You still need to claim a device is if you are using a webhook in the sandbox of the user who claimed the device. It is recommended that you use product webhooks instead, which do not require claiming.
- If you are using a device with Mark as Development device, you may want to claim the device to your account so you can easily OTA flash it from Particle Workbench or other development environments.
- If you previously had firmware that subscribed to events but was the device was unclaimed, the events previously disappeared. This is no longer the case and the device will now start receiving those events, and each event will count as a data operation.
- Claiming is still allowed, if you prefer to continue to use claiming, but not recommended.
Restricted access user token authentication (products)
With Team Access Controls you can create a user account with specific restrictions. Using the Read-Only view, for example, provides a way to create a token that can view, but not modify, product devices.
API user
The API user feature makes it possible to create a non-expiring access token that only allows access to certain Particle cloud APIs. If you have a back-end that only uses a small number of APIs, using an API user can be more secure than using a user token.
It's only available for products (not developer devices).
Product bearer token authentication (products)
While there is an API for creating an oAuth client you'll likely need to do this only once, or at least rarely, so you'll probably do it manually.
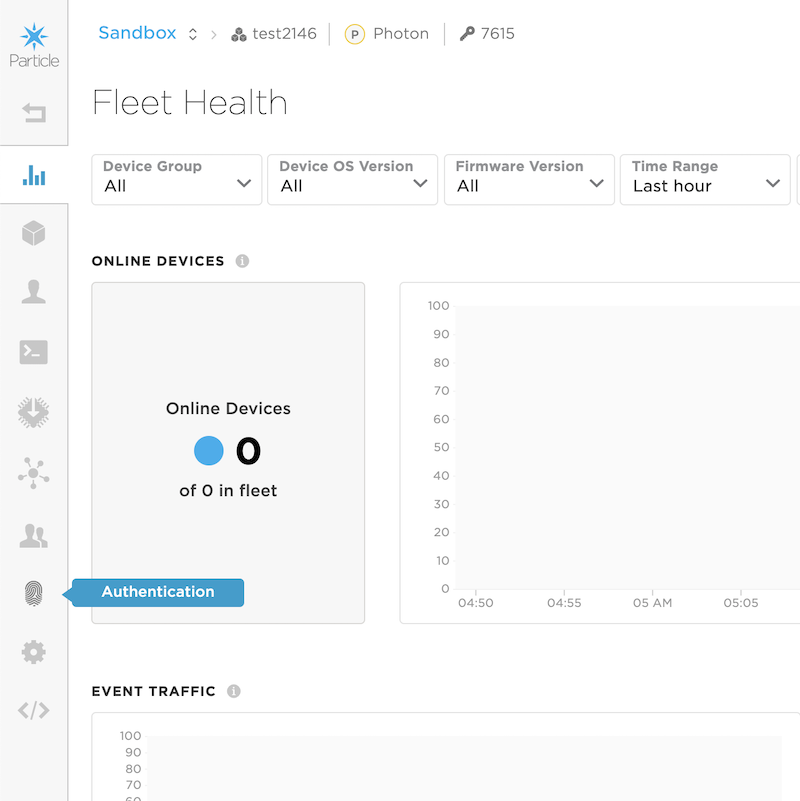
- If you're not in the products grid, click on the Products icon in the left icon bar
- Click on the product you want to use for testing
- Click on the Authentication icon in the left icon bar
- Note that there are two Authentication icons, one in your top-level of your account sandbox, and one inside your product. Make sure you use the one inside your product!
Then, create an oAuth client:
- Click New Client in the upper right corner of the window
- Select Two-Legged Auth (Server)
- Enter a name
- Click Get Client ID and Secret
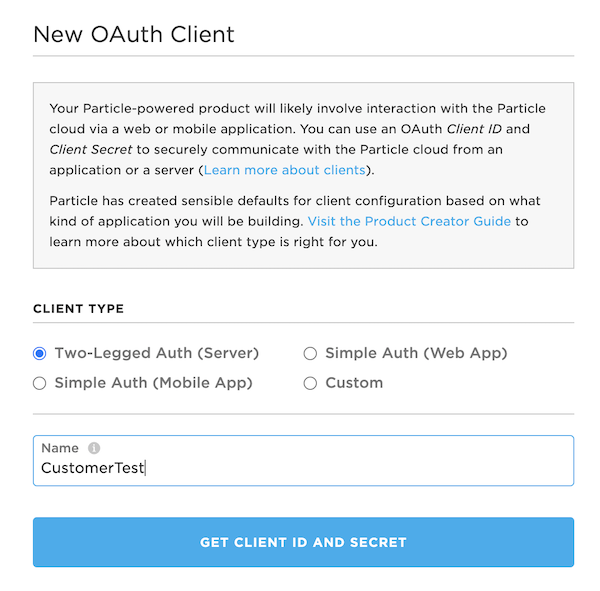
The Client ID will always be in the Authentication tab, but the secret is only shown once in the dialog and it's impossible to get it back. If you lose it, you will need to delete the oAuth client and create a new one.
Normally you would not enter your client secret into a web page, but in order to make the API calls using this secret using the controls in the documentation you will want to do that here:
| Product | ||
| Client ID | ||
| Client Secret |
The secret is only stored in your browser for this session; when you close this browser tab it is no longer saved.
Create a product bearer token
The client secret is not an access token! In order to use most product APIs, you will either need to use your own account token, or a product-specific token.
| Client ID | ||
| Client Secret | ||
| Grant Type | ||
| Expires In | seconds, 0 = never expires | |
You don't need to specify the Product ID when creating a product bearer token because it's implicit in the Client ID. Each Client ID is associated with a single product, which is why you can't use a Client ID created in the top level of your account sandbox.
The main advantage of this token is that it's restricted to the specific product it was created for.
Product APIs
List products
The list products API is a simple GET request that returns all products available in the sandbox for this user.
Retrieve product info
The retrieve product info API gets information about a single product that you have access to. This can be a sandbox product or an organization product.
| Product ID or Slug | ||
List product devices
The list product devices API lists the devices in the sandbox for this user.
| Product | ||
| Device ID | (partial match, optional) | |
| Device Name | (partial match, optional) | |
| Groups | (device group names, comma-separated, optional) | |
| Sort by Attribute | (optional) | |
| Sort Direction | (optional) | |
| Quarantine Status | (optional) | |
| Page | (starts at 1, optional) | |
| Per Page | (25 if not set, optional) | |
The API also works for organization products, however the popup menu for selecting the product in this page does not support that.
Function (products)
If you're calling a function from a back-end server, you'll probably want to use a product bearer token and the product endpoint.
| Product Access Token | ||
| Product ID | ||
| Device ID | ||
| Function Name | ||
| Parameter | ||
Variables (product)
If you're getting a variable from a back-end server, you'll probably want to use a product bearer token and the product endpoint.
| Product Access Token | ||
| Product ID | ||
| Device ID | ||
| Variable Name | ||
Publish (products)
The same thing applies for publish, with a few additional constraints.
If you're publishing events from a back-end server, you'll probably want to use a product bearer token and the product endpoint.
| Product Access Token | ||
| Product ID | ||
| Event Name | ||
| Event Data | ||
Organization APIs
If you are in the basic or enterprise plans, you will have access to organizations. Your account will have two or more spaces:
- Sandbox, for your personal development, in the free plan (up to 100 devices)
- An organization
- There might be more than one organization, for example if a software contractor worked for more than one company
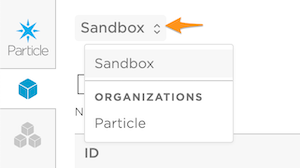
If your account is a member of an organization, the Sandbox popup in the upper left corner of the Particle console lists the organizations you can select:
While there are organization APIs for team members and billing, ones that are particularly handy are:
- List organizations (for the user associated with this access token)
- List products in organization
Once you have the product ID of the product, you can then use the regular product APIs. It doesn't matter that if it's part of an organization or not; the product APIs for product devices, customers, etc. work the same.
List organizations
If you do not have access to any organizations, an empty array [] is returned in the result object:
{
  "organizations": []
}
List organization products
List organization team members
More APIs
Get device info
The get device information API gets information about a device.
This API also returns information about devices that are not in your developer sandbox, but you have access to, including those in
products, and organization products. This is useful because the the product_id field is populated with the product ID,
which you can use to find which product it is in, so you can use product-specific APIs with it.
| Device ID | ||
Set SIM info
The get SIM information API gets information about a SIM ICCID.
This API also returns information about devices that are not in your developer sandbox, but you have access to, including those in
products, and organization products. Note, however, that the product_id field contains a string identifier, not the numeric
product ID, and there is no way to get the actual product ID or slug from it, unfortunately.
| SIM ICCID | ||
Rename a device
The rename a device API sets the device name.
| Product Access Token | ||
| Product ID | ||
| Device ID | ||
| Device | ||
| Name | ||
Ping a device
You can use the ping API to send a request to a device to see if it's online. This uses a CoAP request and response, not an ICMP ping.
| Product Access Token | ||
| Product ID | ||
| Device ID | ||
| Device | ||
Device notes
You can retrieve device notes using the get device information and set using the add device notes API.
| Product Access Token | ||
| Product ID | ||
| Device ID | ||
| Device | ||
Device vitals
These examples show how to use the Device Vitals (Diagnostics) APIs. The Last Vitals just returns the single most recent record as JSON:
| Product Access Token | ||
| Product ID | ||
| Device ID | ||
| Device | ||
The historical API returns all historical data for a date range (up to 1 month in the past), either as JSON or as CSV data.
| Product Access Token | ||
| Product ID | ||
| Device ID | ||
| Device | ||
| Output Format | ||
| Start Date | yyyy-mm-ddThh:mm:ssZ | |
| End Date | yyyy-mm-ddThh:mm:ssZ | |
Service agreements
If you want to know information about your usage or billing period information, you can use the service_agreements API. There are two versions, one for your developer sandbox, and another for basic or enterprise organizations. Only organization administrators can see the service agreement information for an organization.
The API just returns a big block of JSON which can easily be parsed to find the information you want.
API Users
An API User Account is a specific type of user account in the Particle platform that is designed to replace using 'human' accounts for programmatic tasks. You can configure them in the console.
Customer claiming
Customer claiming is common for the Photon and P1 (Gen 2 Wi-Fi devices). While it can be used with cellular devices, it's more common to claim the devices to a single account, or leave them unclaimed. Most of the work is handled by the Photon Setup SDK, however if you want to understand what is going on, you may want to follow the tutorial this section.
Setup (customers)
This tutorial is rather complicated and will require a few special things:
- Photon (it will not work with other devices)
- Chrome web browser (it will not work with Firefox, Safari, Edge, etc.)
- You'll be creating a test product in your account during this tutorial
- The process is similar for other devices, however the tutorial tools only work with the Photon because the way you set a claim code varies by device.
Set up Wi-Fi
If you have not configured your Photon Wi-Fi, you should do that now. The Photon should be breathing cyan before you start.
If the Photon is currently blinking dark blue (listening mode) without Wi-Fi configured, you can use the normal tools like particle serial wifi, or try the Photon Wi-Fi setup control.
SSID: Password:
Find your Device ID
You'll need the Device ID of your Photon.
Connect the Photon by USB to your computer
If the Photon is not in listening mode (blinking dark blue), and hold down the SETUP button until it is.
You can use tools like
particle identifyParticle CLI command to find the Device ID.Or use the Identify button in this control:
Not a product device and unclaimed
- The Photon must not already be a device product. If it is, go into your product, then devices, then unclaim device and then remove device from product.
- If your Photon was previously a developer device in your account, you must unclaim it first.
- Or you can look up the claiming for your device using this control:
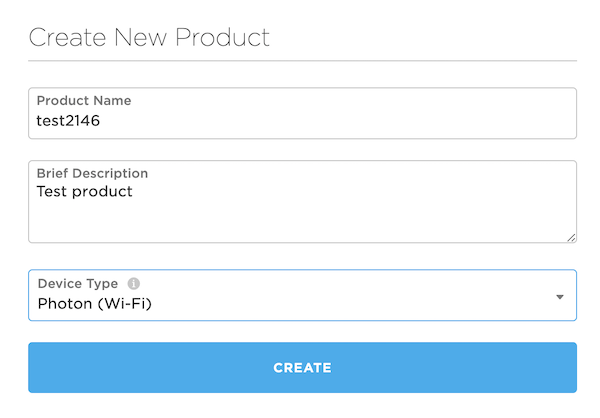
Create a product (customers)
Because you'll be adding and removing customers, devices, and using access tokens, you probably do not want to complete these steps in a production product. If you already have a test Photon project you can reuse that, or create one. You can easily delete it when you're done.
- Open the console
- Click on the Products icon in the left icon bar
- Click the New Product button in the upper left corner of the window
- Enter a product name, description, and set the product type to Photon.
Create an oAuth client (customers)
While there is an API for creating an oAuth client you'll likely need to do this only once, or at least rarely, so you'll probably do it manually.
- If you're not in the products grid, click on the Products icon in the left icon bar
- Click on the Photon product you want to use for testing
- Click on the Authentication icon in the left icon bar
- Note that there are two Authentication icons, one in your top-level of your account sandbox, and one inside your product. Make sure you use the one inside your product!
Then, create an oAuth client:
- Click New Client in the upper right corner of the window
- Select Two-Legged Auth (Server)
- Enter a name
- Click Get Client ID and Secret
The Client ID will always be in the Authentication tab, but the secret is only shown once in the dialog and it's impossible to get it back. If you lose it, you will need to delete the oAuth client and create a new one.
Normally you would not enter your client secret into a web page, but in order to make the API calls using this secret using the controls in the documentation you will want to do that here:
| Product | ||
| Client ID | ||
| Client Secret |
The secret is only stored in your browser for this session; when you close this browser tab it is no longer saved.
Create a product bearer token
The client secret is not an access token! In order to use most product APIs, you will either need to use your own account token, or a product-specific token.
| Client ID | ||
| Client Secret | ||
| Grant Type | ||
| Expires In | seconds, 0 = never expires | |
You don't need to specify the Product ID when creating a product bearer token because it's implicit in the Client ID. Each Client ID is associated with a single product, which is why you can't use a Client ID created in the top level of your account sandbox.
Add the device to your product
Normally you'll add devices in bulk from the console. When you order devices in tray or reel quantities you'll be emailed a file of Device IDs in your order and you can add these in bulk.
For this tutorial, however, we'll import the single device we're setting up.
| Product Access Token | ||
| Product ID | ||
| Device ID | ||
If you don't know the device ID, see Find your Device ID, above. If the access token field is blank, see Create a product bearer token, above.
Create a customer
This control uses the create customer API for two-legged shadow customers. The difference is that you control the identities and login mechanism for these users. In fact, you don't need to use real emails for these customers, so you don't have to expose any information about your users to Particle. The users do need to be unique, however. This control has a button Use UUID for using a UUID instead of an email to identify your customers securely.
You can use real email addresses, your own customer ID numbers, etc. if you prefer.
| Product ID | ||
| Client ID | ||
| Client Secret | ||
| Customer Email | ||
| no_password | ||
Create an access token for an existing customer
The previous API only works for new customers. If you know your customer identifier (email, UUID, etc.) you can generate a new access token using this API.
| Client ID | ||
| Client Secret | ||
| Customer Email | ||
| Expires In | seconds, 0 = never expires | |
Create a claim code (customers)
The next step is creating a claim code. The claim code associates a device that uses the claim code when connecting to the cloud with a two-legged shadow customer and product. This is one step that will require some custom code when you are implementing it on your infrastructure. This is also what links your server's customer authentication system with Particle, without exposing any personal information about your customer.
A claim code can also be used with simple auth customers and developer accounts, but this example does not demonstrate that. The Photon setup SDK takes care of that for you when you are using those modes.
Note that a claim code it only good for one hour, and if the device does not successfully get online (breathing cyan) within one hour you'll need to generate a new claim code.
| Customer Access Token | ||
| Product ID | ||
| IMEI | Leave blank | |
| ICCID | Leave blank | |
Set the claim code on the device (customers)
With the Photon there are two ways you can set the claim code:
- Over USB serial
- Over Wi-Fi using SoftAP
In both cases the device must be in listening mode (blinking dark blue). If it is not, hold down the SETUP button until the status LED blinks dark blue.
Set claim code - Wi-Fi (customers)
In order to set the claim code by Wi-Fi you need to connect your computer to the Photon Wi-Fi (SoftAP). With the Photon in listening mode (blinking dark blue), connect to the Photon-XXXXXX Wi-Fi network. XXXXXX will be a 4 or 6-character alphanumeric code that matches a part of the serial number. This is how the Photon setup SDK does it from a mobile app.
| Claim code | ||
Because the connection needs to be made to the Photon by http (unencrypted), you'll get a security warning from your browser when using this control. This is normal.
Set claim code - USB serial (customers)
In order to set the claim code by USB serial you need to connect the Photon to your computer. It also must be in listening mode (blinking dark blue).
| Claim code | ||
Get device info (customers)
The get device info is a good way to determine if the claiming succeeded.
| Product Access Token | ||
| Product ID | ||
| Device ID | ||
If the claiming succeeded, you should note:
- The "product_id" should match your Product ID
- The "owner" should match your customer
The information will not be updated until the device successfully connects to the cloud (breathing cyan) using the claim code.
If you get a "The access token provided is invalid" error, the token may have timed out. Scroll up to Create a product bearer token to create a new one.
More about customer claiming
If the device is already online and breathing cyan you can do claim it to a customer account using the API, instead of a claim code. This may be helpful is some circumstances and does not require getting the claim code to the device. There are a bunch of options, actually:
- You can use an unclaimed product device. This is the recommended method.
- You can claim devices to a single account. This was previously common for cellular products, before unclaimed device support was a viable solution.
- You can claim devices to your account. This is common for Development Devices to make it easier to flash code from standard tools like Particle Workbench and the Web IDE.
- Development devices control their own firmware updates and do not get product fleet firmware flashes.
- You can claim devices to a customer account using the API as well as using claim codes.
This control allows you easily try out several of those things.
| Product Access Token | ||
| Product ID | ||
| Customer Access Token | ||
| Device ID |
List customers
This API lists the customers in your product. This is what the Customers icon in the console uses.
| Product Access Token | ||
| Product ID | ||
| Page | (starts at 1, optional) | |
| Per Page | (25 if not set, optional) | |
Access tokens for publish, function, etc. (customers)
This section describes which access tokens you should use for things like publish, functions, variables, etc..
Customer test firmware
To following along with this tutorial, this firmware should be flashed to a Photon in your product. You could do this OTA with a developer device, but since the device has already been set up as a customer device, it's easiest to just do this by USB. You could also do this as a product firmware release.
Monitor USB serial debug (customers)
This firmware output helpful logging messages to the USB debugging serial port. You should connect the Photon to your computer by USB and monitor the serial debug log using
particle serial monitor
Monitor the product event stream (customers)
You'll probably also want to monitor the product event stream in the console. Select Products in the left icon bar, then the Photon product you created, then Events.
Function (customers)
When calling a Particle.function on the device, there are two ways:
If you're doing it from a back-end server, you'll probably want to use a product bearer token and the product endpoint.
| Product Access Token | ||
| Product ID | ||
| Device ID | ||
| Function Name | ||
| Parameter | ||
However, from a mobile app, you'll probably want to use a customer access token, and the user endpoint. Note that the customer token cannot call the product APIs, but they can call the user endpoint, even though the device is a product device.
| Customer Access Token | ||
| Device ID | ||
| Function Name | ||
| Parameter | ||
Variables (customers)
Variables work the same way.
| Product Access Token | ||
| Product ID | ||
| Device ID | ||
| Variable Name | ||
From a mobile app or using a customer token:
| Customer Access Token | ||
| Device ID | ||
| Variable Name | ||
Publish (customers)
The same thing applies for publish, with a few additional constraints.
If you're publishing events from a back-end server, you'll probably want to use a product bearer token and the product endpoint.
| Product Access Token | ||
| Product ID | ||
| Event Name | ||
| Event Data | ||
If you're publishing from a back-end server to customer claimed devices you need to create and use customer access tokens in order to publish events that can be received by devices that subscribe to them.
If you're publishing from a mobile app, it can publish events using the device endpoint that also show up on the product event stream.
| Customer Access Token | ||
| Event Name | ||
| Event Data | ||