
The Internet Button
Note: The internet button is only compatible with the Photon. It cannot be used with the Electron, Argon or Boron.
It is discontinued and is no longer available for sale, but previously purchased Internet Buttons will continue to work at this time.
Congratulations on receiving your brand new Internet Button! This part of the guide will help you start working with your Internet Button so that you can connect to the Internet in an entirely new way.
Unboxing
Your Internet Button comes in a helpful carrying tin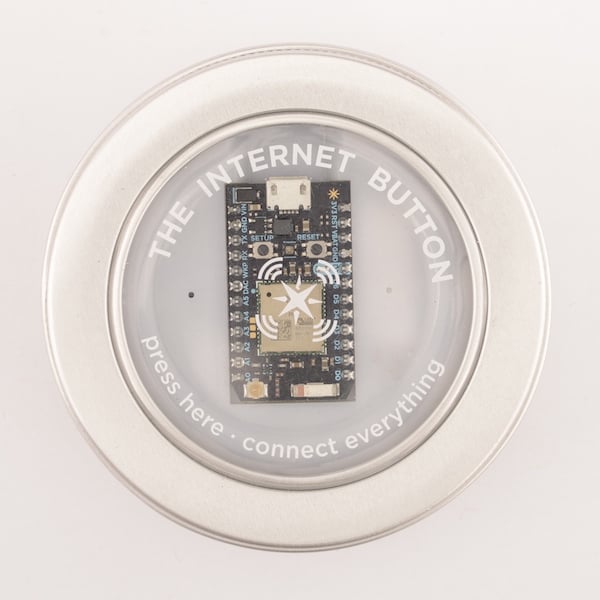 .
.
Inside the tin, you will find:
- (1) USB cable

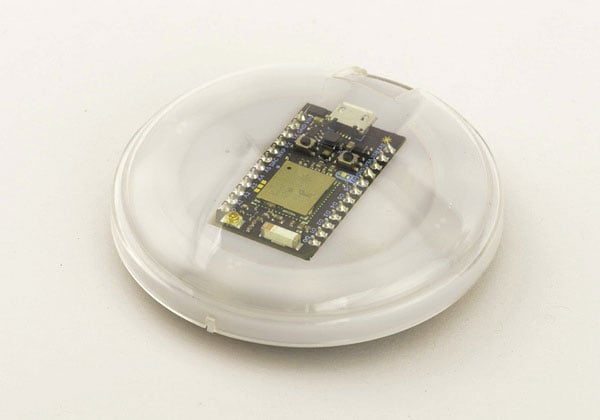
- (1) clear plastic module cover to prevent damage to your Photon
- (1) opaque plastic shield cover
 to help diffuse the light from the LEDs
 - (1) Photon
 resting between the two removeable covers
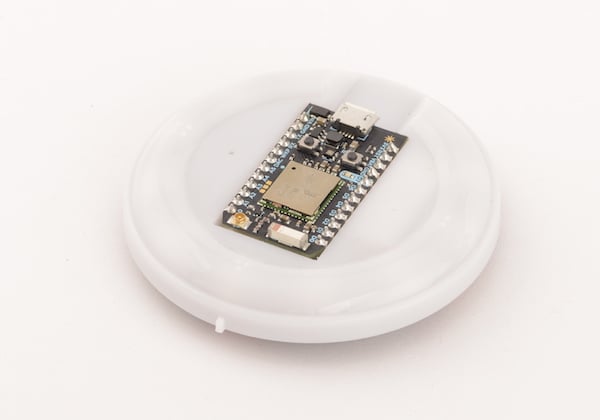
If you turn your internet button over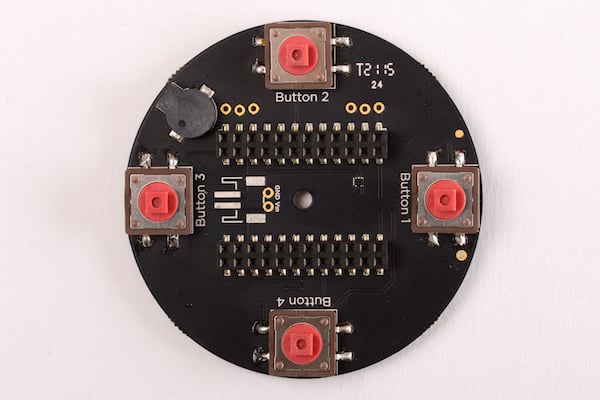 , you can see some of the components. There are four buttons, a buzzer, and a space for a JST connector if you prefer battery power to USB power.
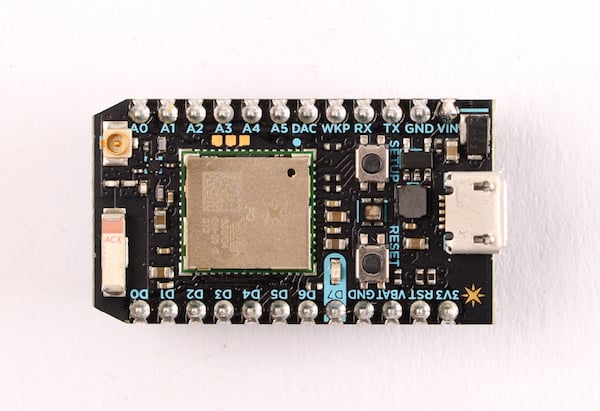
You can also remove the module cover and Photon, then the shield cover, to expose the top of the shield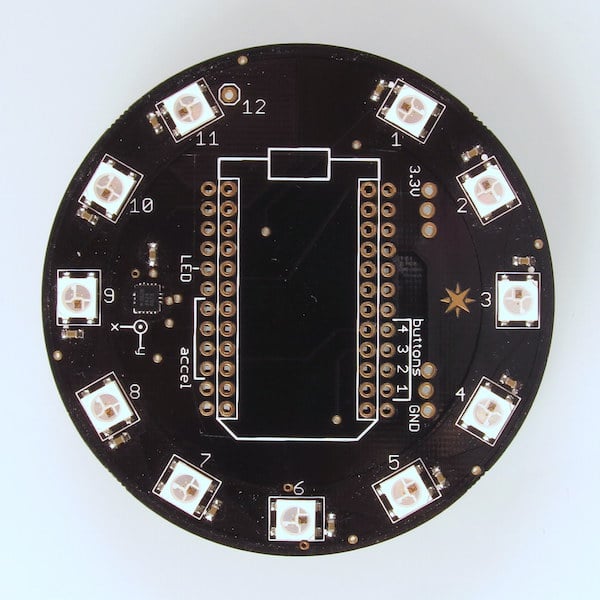 . Here, you can see the exposed LEDs and and the accelerometer.
For more information, check out the Internet Button datasheet.
Connecting
Plug in your Photon and go through the setup process.
Examples
You can find examples on how to use your Internet Button in the official Internet Button library under the Libraries tab on the Particle Web IDE. You can also access them via this GitHub repo, or by checking out the text below.
You should be able to fork the examples from the Particle Web IDE or copy and paste the code from the GitHub repo or from this page. We recommend going through these examples in order for the best understanding of how the Internet Button works. If you haven't used Particle Build before, read the Particle Web IDE guide.
If you copy and paste these examples, make sure that you include the official Internet Button library before flashing the code. Instructions on how to include a library can be found here.
Blink an LED
#include "InternetButton/InternetButton.h"

// Create a Button named b. It will be your friend, and you two will spend lots of time together.
// You may be wondering about those two slashes and this gray text- they're called comments, and
// don't affect the code. Think of this as the voice of the narrator.
InternetButton b = InternetButton();

// The code in setup() runs once when the device is powered on or reset. Used for setting up states, modes, etc
void setup() {
    // Tell b to get everything ready to go
    // Use b.begin(1); if you have the original SparkButton, which does not have a buzzer or a plastic enclosure
    // to use, just add a '1' between the parentheses in the code below.
    b.begin();
}

/* loop(), in contrast to setup(), runs all the time. Over and over again.
Remember this particularly if there are things you DON'T want to run a lot. Like Particle.publish() */
void loop() {
    // Let's turn an LED on. How about #6, which is at the 6 o'clock position? Let's make it blue and bright.
    b.ledOn(6, 0, 0, 255);
    // The format here is (LED, red, green, blue), so we're making a color with no red or green, but ALL the blue
    // You should know that the range of brightness here is 0-255, so 0 is off and 255 is the most possible.
    // After you use this code, try making the LED white- all the red, green, and blue.

    // Since the LED is now on, let's have it stay that way for one second
    // Delay pauses the code for the amount of time given, in milliseconds- so 1000 millis is one whole second
    delay(1000);

    // And to blink the LED, we'll need to turn it back off and then pause for another second
    b.ledOff(6);
    delay(1000);

    // Now you're blinking! Play with which LED is blinking (1-11), the delays between, and the color.
}
Blink all LEDs
#include "InternetButton/InternetButton.h"

/* This SparkButton library has some useful functions.
Here we blink ALL the LEDs instead of just one.*/

InternetButton b = InternetButton();

void setup() {
    // Tell b to get everything ready to go
    // Use b.begin(1); if you have the original SparkButton, which does not have a buzzer or a plastic enclosure
    // to use, just add a '1' between the parentheses in the code below.
    b.begin();
}

void loop(){
    b.allLedsOn(0,20,20);
    delay(1000);
    b.allLedsOff();
    delay(1000);

    // Notice that I made them much dimmer, so it's a bit less painful
}
Buttons and LEDs
#include "InternetButton/InternetButton.h"

/* How about we make this interactive? */

InternetButton b = InternetButton();

void setup() {
    // Tell b to get everything ready to go
    // Use b.begin(1); if you have the original SparkButton, which does not have a buzzer or a plastic enclosure
    // to use, just add a '1' between the parentheses in the code below.
    b.begin();
}

void loop(){

    // When you click the second button (at the 3 o'clock position) let's turn that LED on
    if(b.buttonOn(2)){
        b.ledOn(3, 255, 255, 255);
    }
    // And if the button's not on, then the LED should be off
    else {
        b.ledOff(3);
    }

    /* Much like the LEDs, there are also functions to check if all the buttons are on- b.allButtonsOn()
    or if all the buttons are off- b.allButtonsOff() */
}
Button/Light combo
#include "InternetButton/InternetButton.h"

/* Here's a nice combination of features that I like to use.
Note the use of the allButtons function. */

InternetButton b = InternetButton();

bool rainbow_mode = false;

void setup() {
    // Tell b to get everything ready to go
    // Use b.begin(1); if you have the original SparkButton, which does not have a buzzer or a plastic enclosure
    // to use, just add a '1' between the parentheses in the code above.
    b.begin();
}

void loop(){

    // If this calls for a full spectrum situation, let's go rainbow!
    if(b.allButtonsOn()) {
        // Publish the event "allbuttons" for other services like IFTTT to use
        Particle.publish("allbuttons",NULL, 60, PRIVATE);
        b.rainbow(5);
        rainbow_mode = true;

        // If all buttons are on, don't try to process
        // the individual button responses below.  Just return.
        return;
    }

    // If we are not in rainbow mode anymore, turn the LEDs off
    if (rainbow_mode == true) {
        b.allLedsOff();
        rainbow_mode = false;
    }

    // Process individual buttons and LED response
    if (b.buttonOn(1)) {
        b.ledOn(12, 255, 0, 0); // Red
        // Publish the event "button1" for other services like IFTTT to use
        Particle.publish("button1",NULL, 60, PRIVATE);
        delay(500);
    }
    else {
        b.ledOn(12, 0, 0, 0);
    }

    if (b.buttonOn(2)) {
        b.ledOn(3, 0, 255, 0); // Green
        // Publish the event "button2" for other services like IFTTT to use
        Particle.publish("button2",NULL, 60, PRIVATE);
        delay(500);
    }
    else {
        b.ledOn(3, 0, 0, 0);
    }

    if (b.buttonOn(3)) {
        b.ledOn(6, 0, 0, 255); // Blue
        // Publish the event "button3" for other services like IFTTT to use
        Particle.publish("button3",NULL, 60, PRIVATE);
        delay(500);
    }
    else {
        b.ledOn(6, 0, 0, 0);
    }

    if (b.buttonOn(4)) {
        b.ledOn(9, 255, 0, 255); // Magenta
        // Publish the event "button4" for other services like IFTTT to use
        Particle.publish("button4",NULL, 60, PRIVATE);
        delay(500);
    }
    else {
        b.ledOn(9, 0, 0, 0);
    }

    if(b.allButtonsOff()) {
        // Do something here when all buttons are off
    }
}
Using the accelerometer
#include "InternetButton/InternetButton.h"
#include "math.h"

/*Did you know that the SparkButton can detect if it's moving? It's true!
Specifically it can read when it's being accelerated. Recall that gravity
is a constant acceleration and this becomes very useful- you know the orientation!*/


InternetButton b = InternetButton();

void setup() {
    //Tell b to get everything ready to go
    // Use b.begin(1); if you have the original SparkButton, which does not have a buzzer or a plastic enclosure
    // to use, just add a '1' between the parentheses in the code below.
    b.begin();
}

void loop(){

    //How much are you moving in the x direction? (look at the white text on the board)
    int xValue = b.readX();

    //How about in the y direction?
    int yValue = b.readY();

    //And the z!
    int zValue = b.readZ();

    //This will make the color of the Button change with what direction you shake it
    //The abs() part takes the absolute value, because negatives don't work well
    b.allLedsOn(abs(xValue), abs(yValue), abs(zValue));

    //Wait a mo'
    delay(50);
}
Orientation awareness
#include "InternetButton.h"
#include "math.h"

/* Did you know that the Internet Button can detect if it's moving? It's true!
Specifically it can read when it's being accelerated. Recall that gravity
is a constant acceleration and this becomes very useful- you know the orientation!*/

InternetButton b = InternetButton();
int ledPos = 0;

void setup() {
    // Tell b to get everything ready to go
    // Use b.begin(1); if you have the original SparkButton, which does not have a buzzer or a plastic enclosure
    // to use, just add a '1' between the parentheses in the code below.
    b.begin();

    // reduce to less than full eye-blazing brightness
    b.setBrightness(95);

    Particle.variable("ledPos",ledPos);
}

void loop(){
    // previous LED off (or 'null' LED0 off the first time through)
    b.ledOn(ledPos, 0, 0, 0);

    // Want to figure out which LED is the lowest?
    // We've hidden the necessary trigonometry in this function.
    ledPos = b.lowestLed();

    // give some time for human retinal response
    delay(330);

    // Now turn the lowest LED on
    b.ledOn(ledPos, 0, 30, 30);

    // Wait a mo'
    delay(330);
}
Connecting to the Internet
#include "InternetButton/InternetButton.h"
#include "math.h"

/* Let me show you how easy it is to put the Button on the Internet.
Useful info, like how to access the data from your browser, can be
found here: https://docs.particle.io/photon/firmware/#particle-function-
The code to control the number of illuminated LEDs is here:
https://github.com/particle-iot/InternetButton/blob/master/controlKnob.html
Try naming one of your devices "InternetButton" and running controlKnob in your browser or on your phone!
Note that the Core or Photon *must* be named "InternetButton" because the javascript looks for it.
*/

InternetButton b = InternetButton();
float brightness = 0.1;
int red, green, blue;
int howMany = 6;
int whichColor = 100;
bool changed = false;

void setup() {
    // Use b.begin(1); if you have the original SparkButton, which does not have a buzzer or a plastic enclosure
    // to use, just add a '1' between the parentheses in the code below.
    b.begin();

    //This is all you need to make the function controller() available to the internet
    //The API name and the local name don't need to be the same; just my style
    Particle.function("controller", controller);

    //This function figures out what combination color, brightness and LEDs to display
    makeColors();

}

void loop(){
    //Clicking "up" makes the LEDs brighter
    if(b.buttonOn(1)){
        if(brightness < 1){
            brightness += 0.005;
            changed = true;
        }
    }
    //Clicking "down" makes the LEDs dimmer
    else if (b.buttonOn(3)){
        if(brightness > 0){
            brightness -= 0.005;
            if(brightness < 0){
                brightness = 0;
            }
            changed = true;
        }
    }
    //Clicking "right" and "left" change the color
    else if (b.buttonOn(2)){
        if(whichColor < 255){
            whichColor += 1;
            changed = true;
        }
    }
    else if (b.buttonOn(4)){
        if(whichColor > 0){
            whichColor -= 1;
            changed = true;
        }
    }

    //If anything's been altered by clicking or the Particle.function, update the LEDs
    if(changed){
        delay(10);
        makeColors();
        changed = false;
    }
}

//Uses the brightness and the color values to compute what to show
void makeColors(){
  uint8_t x = whichColor;
  if(x < 85) {
    red = brightness * x * 3;
    green = brightness * (255 - x * 3);
    blue = 0;
  } else if(x < 170) {
     x -= 85;
     red = brightness * (255 - x * 3);
     green = 0;
     blue = brightness * x * 3;
  } else {
     x -= 170;
     red = 0;
     green = brightness * x * 3;
     blue = brightness * (255 - x * 3);
  }

  b.allLedsOff();
  for(int i = 1; i <= howMany; i++){
    b.ledOn(i, red, green, blue);
  }
}

/*
controller() is the local function that is executed when the API function "controller" is called.
It changes how many LEDs on the Button are illuminated.
*/
int controller(String command){
    //parse the string into an integer
    int state = atoi(command.c_str());

    //Check that the value it's been given is in the right range
    if (state > 11) {state = 11;}
    else if (state < 0) {state = 0;}

    howMany = state;

    changed = true;

    return 1;
}