
Getting started with leak detection
Note: The leak detection kit has been discontinued. Additionally, it is no longer possible to set up the mesh network to use the Xenon, see mesh deprecation for more information. The Argon can still be used as a single-sensor leak detector.
Water might be the source of all life, but it can also be the source of a lot of discomfort if it gets to places it shouldn’t. A flooded basement, mold growth, damaged floors and ceilings, are all expensive problems that can result from leaks.
In the Particle Leak Detection Kit, you'll learn how to build a local network that distributes the tasks of alerting and monitoring between three different devices. You'll first create a small Particle Mesh network using the Particle Argon and two Xenons. The Argon will function as the gateway of the mesh network and facilitate communication from other mesh devices — like the two Xenons — as well as connect to the Particle Device Cloud.
Low-power, cheap, and Mesh-capable Xenons will be used with water sensors to detect the presence of water. They will then relay that information to a Wi-Fi connected Argon which will act as a communication and notification hub. Thanks to the ease of use of the Grove system, this should be a simple and quick project, even if you’re just starting out.
Leak detection kit contents
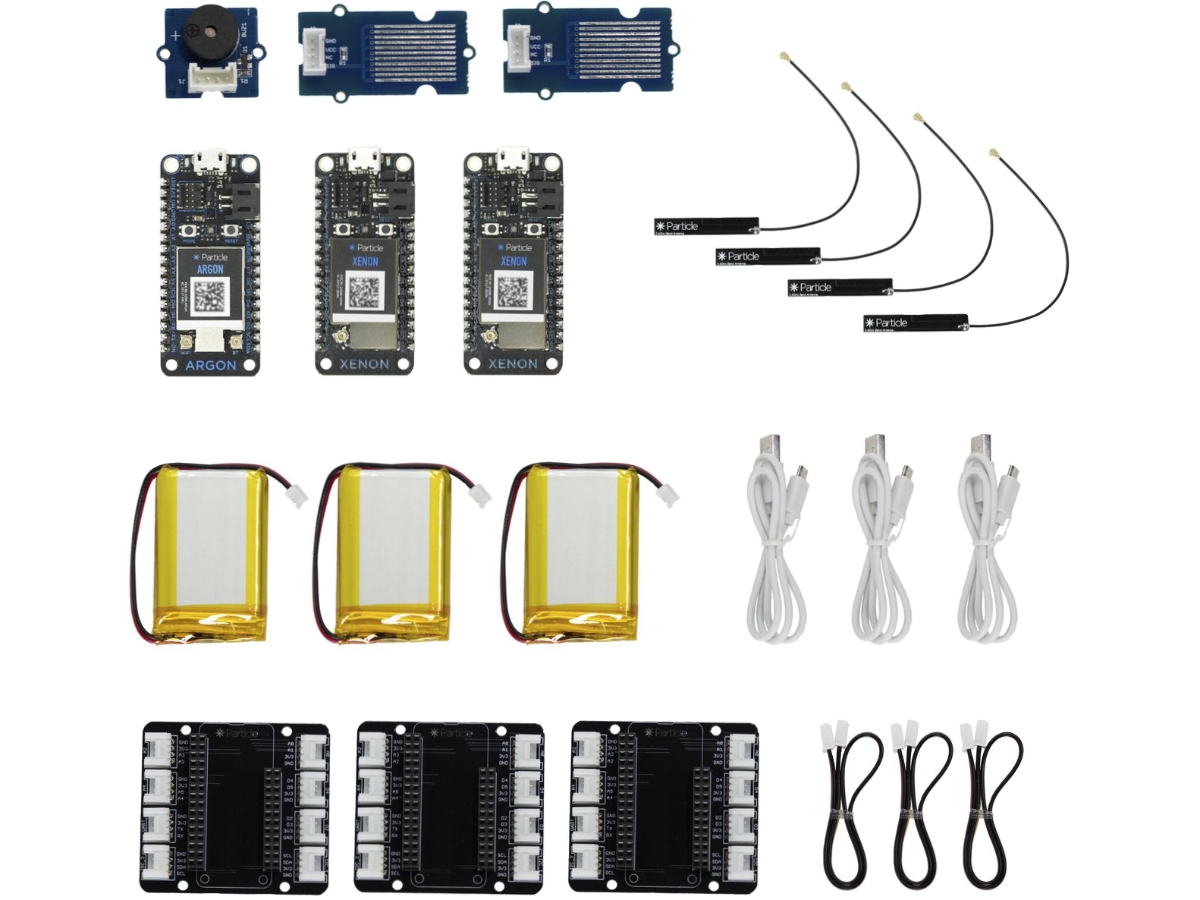
- Particle Argon
- Particle Xenon (2)
- LiPo battery (3)
- **2.4 GHz antenna
- Micro-USB cable (3)
- Grove FeatherWing Adapter (3)
- Grove modules:
- Water sensor (2)
- Grove wires (3)
1. Set up your Argon and Xenons
To begin this project you'll need to set up your new Argon and Xenons in a mesh network. Click the button below and follow the onscreen instructions. Once you've completed the setup you will be able to program your device, send over-the-air (OTA) updates, and monitor your devices from the Particle Console.
2. Assembly the hardware
With your devices powered off and disconnected from power, connect the Grove FeatherWing Adapter to your Argon and two Xenons. This adapter let's you use Grove modules — such as the buzzer and water sensors included in this kit — to quickly prototype without the need for soldering.
Argon assembly
- Insert your Argon into the Grove Shield for Particle Mesh.
- Connect the Grove Buzzer to the A0 Port using a Grove wire.
Xenon assembly (x2)
Wire both of your Particle Xenons as follows.
- Insert your Xenon into the Grove Shield for Particle Mesh.
- Connect the Grove Water Sensor to the A0 Port using a Grove wire.
Once you have all three Particle development kits wired, you're ready to begin programming your leak detection system.
3. Programming the leak detection system
In this project, you are building two different subsystems — one that can detect the presence of liquid and a second subsystem that can listen on a mesh network for broadcast messages which meet a certain criteria and sound an alarm.
As you might have guessed already, the two Xenons with the water sensors will make up the sensing portion of the leak detection system. And, the lone Argon in the kit will function as alarm subsystem and handle the mesh networking responsibility of a gateway. Combine all three devices and should a Xenon detect a few drops of water, a message will be sent over the local mesh network, and the Argon will sound the attached buzzer.
Programming the Xenons
Each of the two Xenons in your leak detection system will use the same firmware. Click this link to access the code in the Web IDE. From there you'll be able to duplicate the project to your Particle account as well as flash each of your Xenons.
Xenon firmware: basic configuration and setup()
The setup portion of the firmware is where you'll specify how the hardware should be access by the software. It's where you'll want to name which pins as well as create global variables that can be used throughout the rest of the code.
The SYSTEM_THREAD(ENABLED); enables the mesh network to function independently of an internet connection, so your local warning still get issued even when the internet is down.
SYSTEM_THREAD(ENABLED);

// used to count the state of the alarm
int counterOn = 0;
int counterOff = 0;

// sensor pin to be used.
int sensorPin = A0;
In the setup() function, you'll prepare the sensor pin, set the speed of serial communication (in baudrate), and configure how the onboard LED behaves.
void setup()
{
  // start/enable serial communications.
  Serial.begin(9600);
  // set sensor pin as an input.
  pinMode(sensorPin, INPUT);
  // enables control over the onboard RGB LED.
  RGB.control(true);
  // Set the onboard LED to green.
  RGB.color(0, 255, 0);
}
Xenon firmware: the main() loop
The final major block of code is the main() loop, which runs indefinitely and contains the main logic of the leak detection program.
At a high level, this code will evaluate the state of the water sensor and then compare it to a predetermined level. Should the level exceed the predefined value
In an effort to rule out false-positives, the sensor needs to detect water for a certain time. To determine that, you make the loop run in 1 second increments by using delay(1000). You can then count the times the sensor reads either high or low. If it’s low too many times, it will reset the ‘high’ counter. If the high counter reaches a set threshold, it will broadcast a warning over the Mesh network.
void loop()
{
    // check the sensor for the state.
    // The argument determines whether to use Digital or Analog read.
    // 1/true for Digital, 0/false for Analog.
    if (checkSensor(0)){
        RGB.color(255, 0, 0);           // set RGB LED to red.
        counterOn++;                    // increase on counter.
        counterOff = 0;                 // reset off counter.
    }
    else {                              // if no water detected.
        RGB.color(0, 255, 0);           // set RGB LED to green.
        counterOff++;                   // increase off counter.
    }

    // if the sensor has been triggered for 10 seconds, act accordingly.
    if (counterOn == 10){                   // if water detected for 10 seconds.
        Serial.println("Mesh publishing");  // Serial debugging statement.
        Mesh.publish("waterAlert", "1");    // send alert.
        counterOn = -20;                    // reset on counter.
    }

    // if the sensor has not been triggered for 5 seconds, reset all counters.
    if (counterOff == 5){               // if no water detected for 5 seconds.
        counterOn = 0;                  // reset on counter.
        counterOff = 0;                 // reset off counter.
    }

    // debug prints to the Serial port. You can see these using the CLI
    // 'particle serial monitor --follow' shows you these.
    Serial.printlnf("Counter ON : OFF ~~~ %u : %u", counterOn, counterOff);

    delay(1000);    // delay the loop for 1 second (we use this to count time)
}
Additional Xenon firmware functions:
In order to keep the loop() clean, and make it easier to use either an analog or digital sensor, the sensor readings happen in a separate function. This function expects a boolean arguments to choose between digital(1) or analog(0). This is also where the analog threshold is set.
// read the sensor to check if it's currently active.
// if the argument is true, it will use digital read, analog otherwise.
bool checkSensor(bool digital){
    if (digital){
        bool value = digitalRead(sensorPin);
        Serial.print("digitalRead:"); Serial.println(value);
        return value;
    }
    else {
        int value = analogRead(sensorPin);
        Serial.print("analogRead:"); Serial.println(value);
        return value > 750 ? 1 : 0; // analog threshold 750/4095
    }
}
Programming the Argon
Firmware for the Argon is accessible here and will open in the Web IDE. Once you're in the IDE, duplicate the project into your Particle account and flash it to you Argon.
Argon firmware: basic configuration and setup()
As with the Xenon firmware, you'll see the first portion of Argon firmware deals with the configuration and setup() function. Again, note the use of the SYSTEM_THREAD(ENABLED); to enable the mesh network to function independently of an internet connection. Enabling this feature will allow for your local network to continue to route messages even if your internet connection is down.
SYSTEM_THREAD(ENABLED);

// counters to serve timing purposes for the alarms.
int alarm1 = 0;
int alarm2 = 0;
int alarm3 = 0;

// the pin you've connected the buzzer to.
int buzzerPin = A0;

// the interval in which the device should do things,
// such as buzzing, or checking for values.
unsigned long interval = 1000;
unsigned long previousMillis = 0;
In the setup() function, you prepare the buzzer pin, the serial communication, configure the onboard LED, and subscribe to the messages the Xenons will be broadcasting over the local mesh network.
void setup() {
  // enable control over the onboard RGB LED.
  RGB.control(true);
  // configure the buzzer pin as an output.
  pinMode(buzzerPin, OUTPUT);
  // start and enable serial communication for debugging.
  Serial.begin(9600);
  // subscribe to the 'waterAlert' Mesh Publishes.
  Mesh.subscribe("waterAlert", alertHandler);
}
Argon firmware: the main loop
At a high level, it checks whether either alarm is active, followed by a check to see if enough time has passed since the last action, the ‘interval’ from the pre-setup above.
If an alarm is active, it will turn the LED red as an indicator, and proceed to check which alarms are active. For alarm1 it will buzz single beeps, twice for alarm2, and three times for both alarms. If both alarms are active for an extended period it will send out a Particle Publish for external notifications, after which it will reset all alarms.
By decrementing the alarm counters, it will only sound the alarm for as long as the sensors are detecting water, with a small margin. Unless the counters are renewed by a new Mesh publish, they will eventually run out, and stop alerting.
void loop(){
  unsigned long currentMillis = millis();

  // check to see if the alarm is anything but disabled.
  if (alarm1 + alarm2 > 0) {
    // set the RGB LED to red to indicate an alarm status.
    RGB.color(255, 0, 0);
    // check to see if enough time has passed since we last did something.
    if ((unsigned long)(currentMillis - previousMillis >= interval)) {
      // print out the alarm states over serial for debugging purposes.
      char data[100];
      sprintf(data, "alarm1: %u, alarm2: %u, alarm3: %u", alarm1, alarm2, alarm3);
      Serial.println(data);

      // if both alarms are triggered, start the notification counter,
      // decrease both alarm counters, and buzz 3 times.
      if (alarm1 != 0 && alarm2 != 0){
        alarm1--;
        alarm2--;
        alarm3++;
        buzz(3);
      }
      // if only the first alarm is active, decrease its counter and buzz once.
      else if (alarm1 != 0) {
        alarm1--;
        buzz(1);
      }
      // if only the first alarm is active, decrease its counter and buzz twice.
      else if (alarm2 != 0){
        alarm2--;
        buzz(2);
      }
      // if the notification counter has reached 10, send a Particle Publish,
      // and reset all alarm states.
      if (alarm3 > 10){
        alarm1 = 0;
        alarm2 = 0;
        alarm3 = 0;
        Serial.println("warning published, resetting");
        Particle.publish("water!", PRIVATE);
      }

      // stop alarm counters from decreasing below 0;
      if (alarm1 < 0) {
        alarm1 = 0;
        alarm3 = 0;
      }
      if (alarm2 < 0) {
        alarm2 = 0;
        alarm3 = 0;
      }

      // reset our timer. This is the new time 'when last done something'.
      previousMillis = currentMillis;
    }
  }
  // if both alarms are off set the RGB LED to green, and turn of the buzzer.
  if (alarm1 == 0 && alarm2 == 0) {
    RGB.color(0, 255, 0);
    analogWrite(buzzerPin, 0);
  }
}
Additional functions:
In order to keep the loop() clean, and to avoid writing duplicate code, the buzzer is delegated to a separate function. Its argument determines how many times to beep, and the timing can be adjusted by changing the delays.
// beeps a variable amount of times
// depending on which alarm state is active.
void buzz(int n){
  for (int i = 0; i < n; i++){
    analogWrite(buzzerPin, 255);
    delay(50);
    analogWrite(buzzerPin, 0);
    delay(100);
  }
}
The alertHandler that listens to the Mesh publishes coming from the Xenons. The differentiate between Xenons, they publish either a 1 or 2 as data. This is then used to check who sent the message, and prime the alarm timer accordingly.
// listens to the mesh publishes, and uses the data field
// to determine which devices is triggered.
// If the alarm is active already, extend its timer by 10,
// otherwise start the alarm timer with 50 seconds.
void alertHandler(const char *event, const char *data)
{
  Serial.printlnf("event=%s data=%s", event, data ? data : "NULL");
  int number = atoi(data);        // convert the char data to an integer
  Serial.println(String(number)); // print the data over serial for debugging.
  if (number == 1){
    alarm1 == 0 ? alarm1 += 50 : alarm1 += 10;
  }
  else if (number == 2){
    alarm2 == 0 ? alarm2 += 50 : alarm2 += 10;
  }
}
4. Going further
Congratulations, you should now have a working leak detection system that operates using Particle Mesh networking. which can be placed in or around your property. Areas most commonly affected by water leakages include some of the following, which are good candidates for this system:
- Washing machines.
- Dishwashers.
- Refrigerators with ice makers and water dispensers.
- Hot water heaters.
- Sinks.
- Toilets.
- Furnaces connected to water systems, including hot air system humidifiers.
While this is great for a leakage detections, there’s no reason you couldn’t apply the same to a moisture sensor for your plants. Perhaps you want to monitor other thresholds in your house such as temperature and humidity. Take a look at Hackster for some inspirational projects you could build. Maybe use IFTTT with a Particle.publish to alert you by text or email if the value exceeds a certain limit? Having data available on the internet opens up a whole now realm of possibilities. It’s up to you to figure out where to go next with the tools you’ve now got.