
OTA Firmware Updates
Over-the-air (OTA) firmware updates are a vital component of any IoT system. Over-the-air firmware updates refers to the practice of remotely updating the code on an embedded device.

Particle's all-in-one IoT platform offers industry leading OTA update capabilities
The value of incorporating OTA update capabilities into a connected product include:
- The ability to add new software features to a product after a device has been deployed in the field to improve functionality over time
- The opportunity to rapidly respond to bugs and security vulnerabilities without the need for physical recalls of devices or truck rolls
- Ensuring embedded developers can quickly prototype and seamlessly roll out new versions of device firmware, speeding up innovation cycles
OTA Updates with Particle
Particle's platform is uniquely positioned to provide industry-leading OTA update capabilities for embedded devices. Using Particle for OTA updates give you the following benefits:
A complete solution
A successful OTA update requires complex coordination between IoT hardware, device firmware, network connectivity, and an IoT device cloud. Trust us, this is a very hard problem to solve correctly.
Lucky for you and your team, this is where Particle's fully integrated IoT platform shines. These four parts of the "IoT stack" are core pillars of Particle's platform, and enable you to seamlessly deliver OTA updates to devices at any scale.

Hardware: All Particle dev kits and systems-on-a-module (SoMs) support OTA updates right out of the box. Device and cloud-side safeguards are combined to ensure that devices only receive compatible firmware that can run on its unique hardware platform.
Device OS: Our embedded operating system which runs on all Particle devices, Device OS, is architected to reliably and resiliently accept firmware updates from the Device Cloud.
Connectivity: OTA updates work seamlessly across Particle's suite of connectivity offerings. Devices connecting over Wi-Fi and Cellular can receive firmware updates using our OTA feature set.
Device Cloud: The Device Cloud tightly integrates with Device OS to safely and effectively deliver OTA updates. It also provides a variety of flexible management tools to choose how OTA updates should be applied based on your needs.
In fact, one must have visibility and control over all four of these components of an IoT system to successfully deliver an OTA update. Without any one of these parts, or the integration of these parts, an OTA update is not possible.
Other IoT platforms may market an OTA feature, but in reality only provide a small sliver of the functionality required perform a complete, reliable, and secure update — leaving your team to piece together a bespoke solution that distracts them from spending valuable time on the features that make your IoT product unique.
Particle OTA
Particle OTA is a fully-integrated over-the-air software update system that is built into the Particle IoT PaaS and Device OS. It allows customers to safely and reliably push software updates to single devices or entire fleets of devices directly from Particle’s device management console and developer tools, with no implementation work necessary.
Particle OTA allows you to update your entire IoT device (both the Particle device and any other components) by delivering three kinds of updates:
Application OTA allows users to update the firmware application they are running on the Particle device in order to introduce new features, fix bugs, and generally improve the software application over time.
Device OS OTA allows users to update Device OS to the latest version alongside an application update so that Device OS can be kept up to date with improvements and bug fixes while properly testing against the user-generated software application.
Asset OTA allows users to include bundled assets in an OTA software update that can be delivered to other processors and components in the electronics system so that the Particle device can be responsible not just for updating itself but also the system that surrounds the device.
Asset OTA
Asset OTA (available in Device OS 5.5.0 and later), makes it easy to include bundled assets that can be delivered to other processors and components in your system, such as:
- Coprocessors
- Graphics and fonts for external displays
- Sound samples for device with audio output capabilities
Including assets is as easy as including an directory in your project, specifying it in the project.properties and building and flashing using Particle Workbench, the Particle CLI, or fleet-wide OTA for a product. Bundled assets can be up to 1 MB to 1.5 MB in size, after compression, depending on the platform, and do not use additional data operations.
The compression algorithm is similar to gzip, so using a gzip program on the assets folder on your computer will yield the approximate size after compression.
- Particle Workbench and the Particle CLI will automatically generated bundled assets when the
project.propertiesfile contains anassetOtaDirkey and a value containing a valid directory.
assetOtaDir=assets
- When using Particle: Compile Application or
particle compileprojects with bundled assets are built into a .zip file. This file contains both the firmware binary (.bin) as well as the assets. - The asset bundle .zip can be uploaded to the console as product firmware binary.
- When using Particle: Flash application or
particle flashthe same process is followed, except the device is flashed. - When flashing OTA, the asset bundle is transmitted using resumable OTA and compression for efficient data use.
- You will need to include code in your application firmware to process the additional assets, such as sending them to a coprocessor or saving them to the file system.
- Creating bundled assets will not be not possible in the Web IDE. Particle Workbench is recommended.
The application can register a callback using System.onAssetOta(handler) that will be called by Device OS when the device has received all the bundled assets. For more information, see the Asset OTA Device OS API.
Full examples of using Asset OTA can be found on the GitHub repository asset-ota-examples.
Reliable and resilient
Sending an OTA update is arguably one of the riskiest actions you can take on a connected device. Mishandling OTA updates could at a minimum cause temporary disruption, or at worst force the device into an unrecoverable state.
Particle's OTA updates have been built from the ground up to be reliable and resilient to allow your team to deploy quickly while keeping your fleet functioning healthily:
Atomic updates: A Particle device will only run a new version of firmware it has received after empirically verifying that it has successfully received the entire file from the cloud. Additionally, your firmware application can be updated independently of the Device OS.
Automatic rollbacks: If for some reason an OTA is interrupted (like a disruption in connectivity or a device losing power), the device will fail gracefully by automatically reverting to the previous version of working firmware.
Minimal disruption: A Particle device continues to run its current version of firmware while it receives an OTA update. After a brief reset, the device seamlessly begins running the new firmware. If at this point the version of Device OS running on the device is older than the minimum version of Device OS to run the user application, the device will enter safe mode and download the required Device OS. Once this is complete, the device will reset and begin running the new firmware on the updated Device OS.
Application and Device OS version management: Particle's OTA capabilities make it easy to manage both the firmware applications your team writes, and the low-level Device OS that Particle manages. This lets you send updates to your device logic, but also enables you to stay up-to-date with the latest features and improvements in Device OS. You are in complete control of your adoption of Device OS versions.
Support for updates for sleeping devices: Some applications use sleep modes to reduce power consumption on battery-powered devices. OTA updates can be released and applied when the device wakes up from sleep mode automatically.
Secure
Given the risk associated with an OTA update, it is especially critical that these updates are performed securely and safely.
Encrypted communications: All messages between Particle devices and the Device Cloud are always encrypted, including firmware files. This eliminates potential man-in-the-middle attacks that seek to send fraudulent firmware to the device.
Sender verification: Every OTA update attempt is first verified to ensure the identity of the sender is an approved device manager.
Scalable
Particle provides your team with tools as part of the Device Cloud that give you full control and flexibility in how OTA updates are delivered to your fleet. Particle offers different OTA tools that are appropriate at different phases of fleet basic.
Prototyping
When prototyping, you want to enable your development team with the ability to iterate quickly to provide viability and value in as little time as possible.
Particle's single device OTA functions help enable your embedded development team to rapidly prototype and innovate. OTA updates can be sent with a click of a button in our IDEs (available both in Workbench and our Web IDE), or via our developer-approved REST API.
Moving to production
As you begin to deploy large numbers of devices, it is imperative to have the ability to safely batch OTA updates to many devices at one time. This is what allows you to roll out new software features, fix bugs, or patch security holes across your fleet.
For this purpose, Particle offers fleet-wide OTA updates. A variety of tools are available in the Particle Console to apply fleet-wide updates without sacrificing fine-grained control.
- Firmware releases: Cut a version of firmware that will be automatically sent to your fleet, with sensible safeguards to roll out an update responsibly and monitor fleet health for changes.
- Release by device groups: Target a subset of your fleet to receive a new version of firmware. This is useful when your product has variants that require different device behaviors, or when wanting to phase out a single release over time to reduce risk.
- Intelligent firmware releases: Instead of waiting for devices to re-connect to receive an update, push a fleet-wide update as quickly as possible while still allowing the device control over the appropriate time to update.
The firmware stack
Device OS
The Particle Device OS provides the foundation for your application. It provides many features including:
- Core networking and communication APIs
- Standard C and C++ libraries
- Hardware abstraction layer, allowing your code to be run on a variety of devices
- Real-time operating system (RTOS)
The Device OS can be updated over-the-air as needed, however you are always in control over updates. You can choose whether you want to upgrade or not for any release.
Application firmware
Application firmware provides the features for your specific use case and support for any additional peripheral hardware like sensors, actuators, etc..
Particle application firmware is programmed in C/C++ using industry-standard gcc C++11 compilers.
Furthermore, to facilitate moving from prototyping to production, an Arduino compatibility layer allows the use of hardware libraries for sensors, displays, etc. that were designed for Arduino to be easily used on Particle devices.
Application firmware is designed to make it easy to compile your firmware with little or no modification when switching between devices. You can start prototyping with the Boron in prototyping breadboards and move to mass-production on the B series SoM (system on a module).
Splitting the firmware between application part (up to 128 Kbytes) and system parts (384K to 656K bytes, depending on the device) allows for faster updates of application firmware, with reduced data usage when only updating application firmware.
Single device OTA
During development, there are a variety of ways to OTA flash individual Particle devices to rapidly send firmware to test devices for rapid iteration.
OTA in the IDEs
From Particle Workbench you select the device using Particle: Configure Workspace for Device and compile and flash using Particle: Cloud Flash.
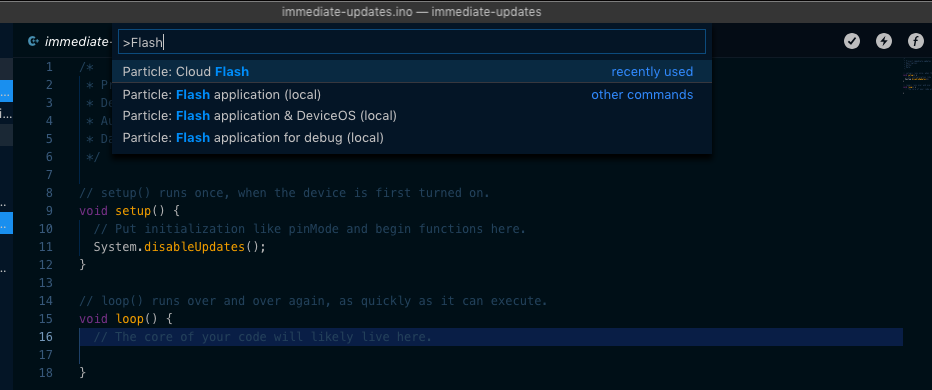
From the Particle Web IDE, you simply select the device you want to flash from the Devices tab (circle with 4 lines) and click the Flash icon.
OTA in the CLI
From the Particle CLI, you use a command like:
cd MyProject
particle flash boron3 .
The first parameter is a device name or Device ID (24-character hex).
The second parameter is typically a directory path, or in this case . for the current directory, which is typically the directory containing the project.properties file, src directory, and application source.
When used with products, the device must not only be marked as a development device, but also claimed to your Particle account. For this reason, we recommend each developer have their own device, claimed to their own account, and often on their desk with each access to buttons and the USB debug serial port, for ease of development.
With Device OS 5.5.0 and later, you can also flash a device with both a firmware binary and additional assets for Asset OTA using the Particle CLI.
Flash via the rest API
It is also possible to flash devices using the REST API.
For example, you can use the flash a device with a pre-compiled binary API to program a device.
$ curl -X PUT "https://api.particle.io/v1/devices/0123456789abcdef01234567?" \
       -H "Authorization: Bearer f8a4d380cb6ffffffffffffffffffaf5e496ddf0c0" \
       -F file=@my-firmware-app.bin \
       -F file_type=binary
With products, as a team member you can flash product development devices that are part of the product but not claimed to your account using the API. This allows for shared pools of devices across team members.
In order to use the product REST API you'll need a product bearer token. To get started, the easiest way to get one is to open the console, your product, click Events (1) within your product, View events from a terminal (2), then copy and paste the token (highlighted).
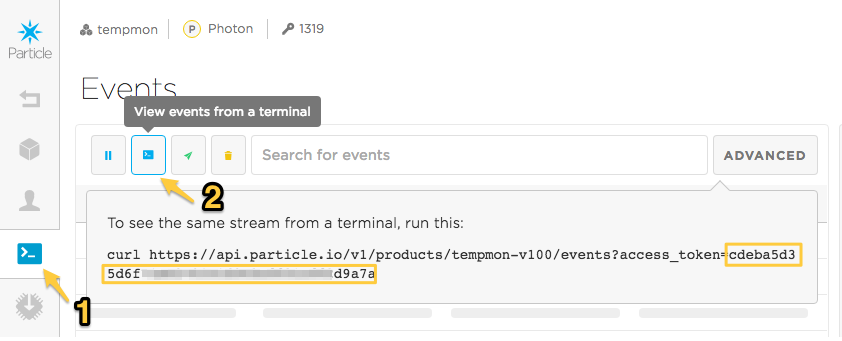
Note that this token is short-lived and will be invalided when you log out of the console, so for permanent use you may want to create one using the API directly but this is useful for testing.
You'll use the product variation of the flash a device with a pre-compiled binary API.
$ curl -X PUT "https://api.particle.io/v1/products/:productIdOrSlug/devices/0123456789abcdef01234567" \
       -H "Authorization: Bearer f8a4d380cb6ffffffffffffffffffaf5e496ddf0c0" \
       -F file=@my-firmware-app.bin \
       -F file_type=binary
The device must still be marked as a development device, otherwise the cloud will update to the currently released firmware for that device immediately after you manually flash code.
Flash via SDKs
In addition to just the cloud REST API directly or using curl, you can also use the particle-api-js Javascript API from node.js. This can make automating complex tasks much easier.
The flashDevice method makes it easy to compile and flash or flash a pre-built binary:
particle.flashDevice({ deviceId: 'DEVICE_ID', files: { file1: './path/file1' }, auth: token }).then(function(data) {
  console.log('Device flashing started successfully:', data);
}, function(err) {
  console.log('An error occurred while flashing the device:', err);
});
The Particle Device SDKs for iOS and Android are also able to flash code. Note that when using the SDKs the code is flashed from the Particle Device Cloud. While initiated from the mobile device, the actual transfer is done securely through the Particle Device Cloud, not directly with your mobile device. This can only be done for devices claimed to your account, and for products, marked as a development device.
Fleet-wide OTA
Particle offers tools to deliver OTA updates to a fleet of IoT devices, at any scale.
Firmware releases
Firmware Releases are the primary mechanism of delivering fleet-wide OTA updates to a deployment of Particle devices. With a single action, you can target devices in the fleet to automatically receive a new version of product firmware.
Standard vs. Intelligent Firmware Releases
Particle offers two types of firmware releases, Standard and Intelligent.
Standard Firmware Releases are delivered as devices reconnect to the cloud. In order to avoid interrupting critical behaviors of deployed units, the Device Cloud waits until the next time targeted devices handshake (beginning a new secure session) to deliver the OTA update to the new version of firmware. This occurs a few seconds after the cloud connection is established. Standard Releases are the default mode of firmware releases, and delivery to all target devices is completed over an average period of about one week.
Intelligent Firmware Releases are delivered based on individual device readiness**. It enables your team to predictably deliver fleet-wide firmware updates at exactly the right time. Intelligent Releases add context awareness to the deployment — devices that signal that they are available for an OTA receive the update immediately, while "busy" devices performing critical activities can defer the update until the next time they are ready. This results in maximum control and speed in fleet-wide firmware updates while still avoiding disrupting active devices. Check out this graphic for the differences in how Standard vs. Intelligent Releases function:

Release process
When releasing firmware your fleet, it's helpful to first understand Particle's recommended release flow. This flow has been designed to minimize risk when deploying new firmware to devices:
- For initial testing, you might deploy to only one device. This might be the device sitting on your desk, for easy access to the debugging USB serial port, for example.
- Once you've verified the functionality, you may choose to deploy to a subset of your devices using groups.
- Finally, you can roll out the release to all of your devices.
Specifically, we recommend the below flow for rolling out an update to your fleet:
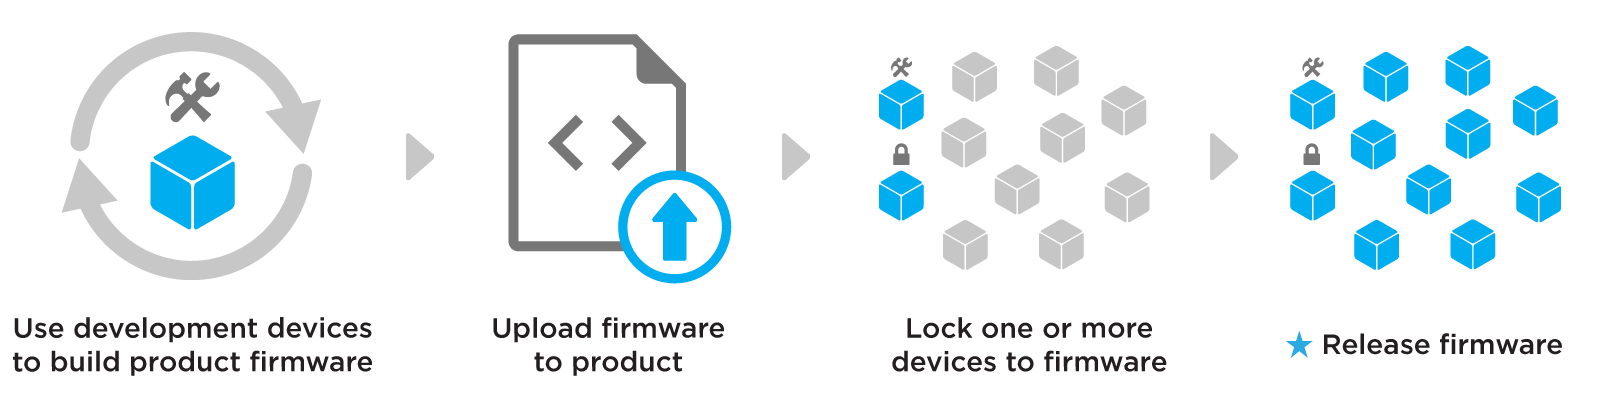
The recommended flow for releasing firmware
The first step of the release flow is using development devices to rapidly develop and iterate on product firmware. These are special product devices marked specifically for internal testing. This gives you the flexibility to experiment with new firmwares while still simulating behaviors of deployed devices in the production fleet. For information on marking a device as a development devices, check out the guide.
When you have finalized a firmware that you feel confident in releasing to your fleet, prepare the binary and upload it to your product.
Before releasing, you will need to ensure that the uploaded product firmware is running on at least one device in your product fleet. Your development device(s) may already be running the firmware, but we also recommend locking one or more devices to the newly updated firmware and ensure that it re-connects successfully to the cloud. This is because locking more closely represents a release action, with the specific firmware being delivered to a product device. If you find a problem at this step, delete the firmware version, recompile it and reupload it. It is only possible to delete a firmware version before marking it as released.
Mark the firmware as released. This will target product devices to automatically download and run the firmware. The Particle Device Cloud will respect the precedence rules to determine which firmware is delivered to a given device. Device groups, allow you to more safely roll out the firmware by targeting a subset of the fleet for release.
The rest of this section contains details around how to go through this process.
Preparing an application firmware binary
Click the Firmware icon in the left sidebar to get started. This will direct you to your product's firmware page, your centralized hub for viewing and managing firmware for your product's devices. If you haven't yet uploaded any firmware for this Product, your page will look like this:
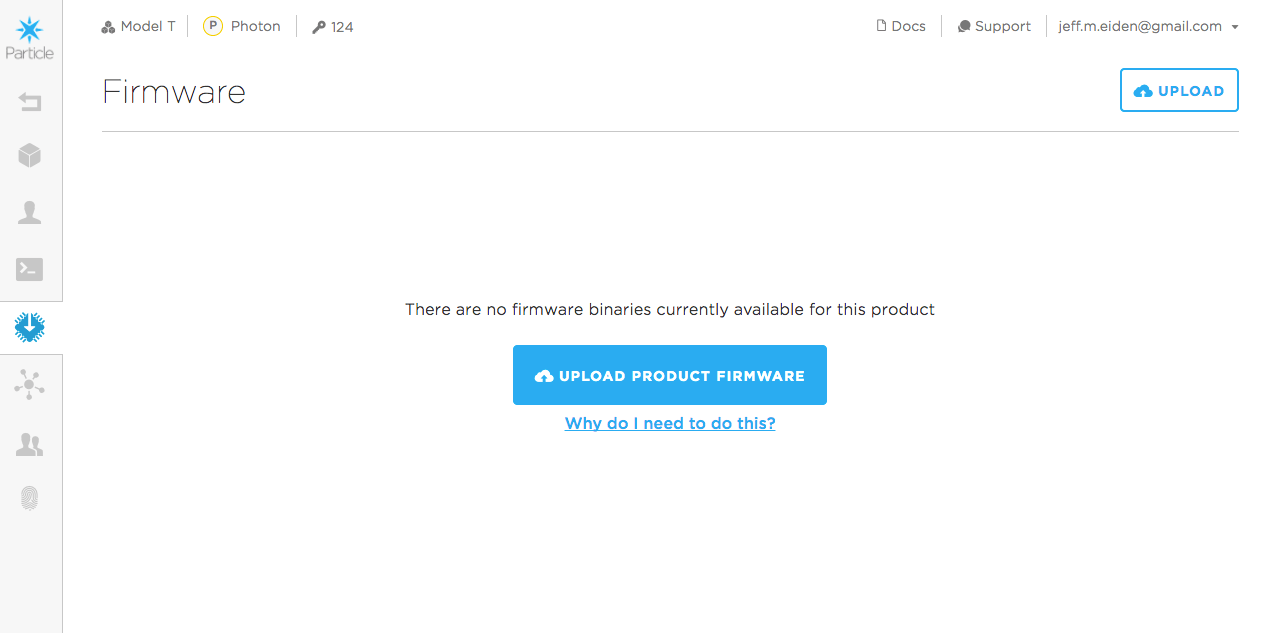
If you have been using the Web IDE to develop firmware, you are used to the process of writing, compiling, and then flashing firmware. You will follow the same high-level process here, but altered slightly to work with a fleet of devices. The first thing you'll need to do is compile a firmware binary that you will upload to your Console.
Preparing firmware (4.x and later)
Unlike compiling a binary for a single device, it is critical that the firmware version is included in the compiled binary when targeting Device OS 4.0 or later.
Add the PRODUCT_VERSION macro to your main application .ino
file, below #include "Particle.h" if it includes that line. For more information, see PRODUCT_VERSION.
The firmware version must be an integer that increments each time a new binary is uploaded to the Console. This allows the Particle Device Cloud to determine which devices should be running which firmware versions.
Here is an example of Blinky with the correct product version details:
#include "Particle.h"

PRODUCT_VERSION(1);

int led = D0;  // You'll need to wire an LED to this one to see it blink.

void setup() {
  pinMode(led, OUTPUT);
}

void loop() {
  digitalWrite(led, HIGH);   // Turn ON the LED pins
  delay(300);               // Wait for 1000mS = 1 second
  digitalWrite(led, LOW);    // Turn OFF the LED pins
  delay(300);               // Wait for 1 second in off mode
}
Preparing firmware (3.x and earlier)
Unlike compiling a binary for a single device, it is critical that the product ID and a firmware version are included in the compiled binary. Specifically, you must add PRODUCT_ID([your product ID]) and PRODUCT_VERSION([version]) into the application code of your firmware. For more information, see PRODUCT_VERSION.
Add these two macros near the top of your main application .ino
file, below #include "Particle.h" if it includes that line. Remember
that your product ID can be found in the navigation
of your Console. The firmware version must be an integer that increments
each time a new binary is uploaded to the Console. This allows the
Particle Device Cloud to determine which devices should be running which firmwares.
Here is an example of Blinky with the correct product and version details:
PRODUCT_ID(94);
PRODUCT_VERSION(1);

int led = D0;  // You'll need to wire an LED to this one to see it blink.

void setup() {
  pinMode(led, OUTPUT);
}

void loop() {
  digitalWrite(led, HIGH);   // Turn ON the LED pins
  delay(300);               // Wait for 1000mS = 1 second
  digitalWrite(led, LOW);    // Turn OFF the LED pins
  delay(300);               // Wait for 1 second in off mode
}
Development devices
Development devices are special class of product devices marked specifically for internal testing, separate from the production fleet. Development devices are prevented from receiving any automatic product firmware updates from the Particle Device Cloud. These devices will ignore both released product firmware as well as any firmware version it has been locked to run.
The Product Tools Development Devices Guide explains how to set devices as development devices.
Upload firmware binary
Back on the firmware page, click on the Upload button in the top-right corner of the page. This will launch the upload firmware modal:
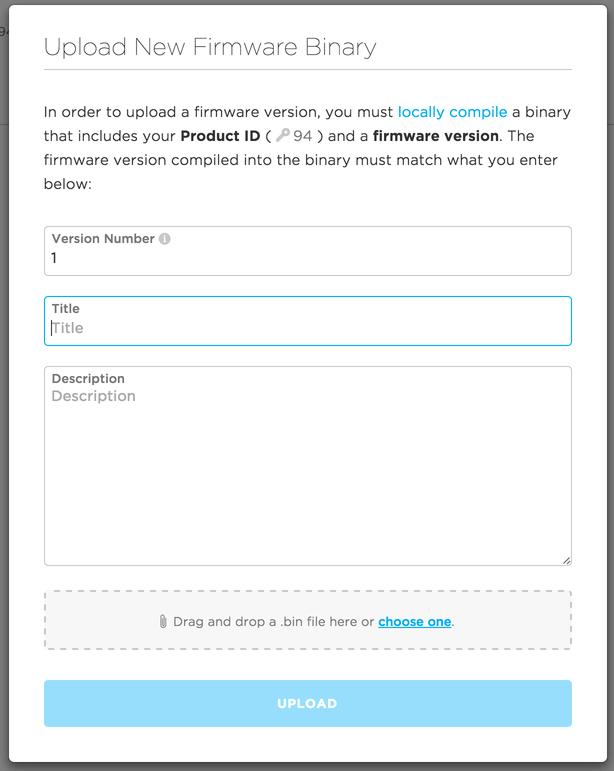
A few things to keep in mind here:
- The firmware version that you enter into this screen must match what you just compiled into your binary. Madness will ensue otherwise!
- You should give your firmware a distinct title that concisely describes how it differs from other versions of firmware. This name will be important in how firmware is rolled out to devices
- Attach your newly compiled
.binfile in the gray box
Click upload. Congrats! You've uploaded your first version of product firmware! You should now see it appear in your list of firmware versions.
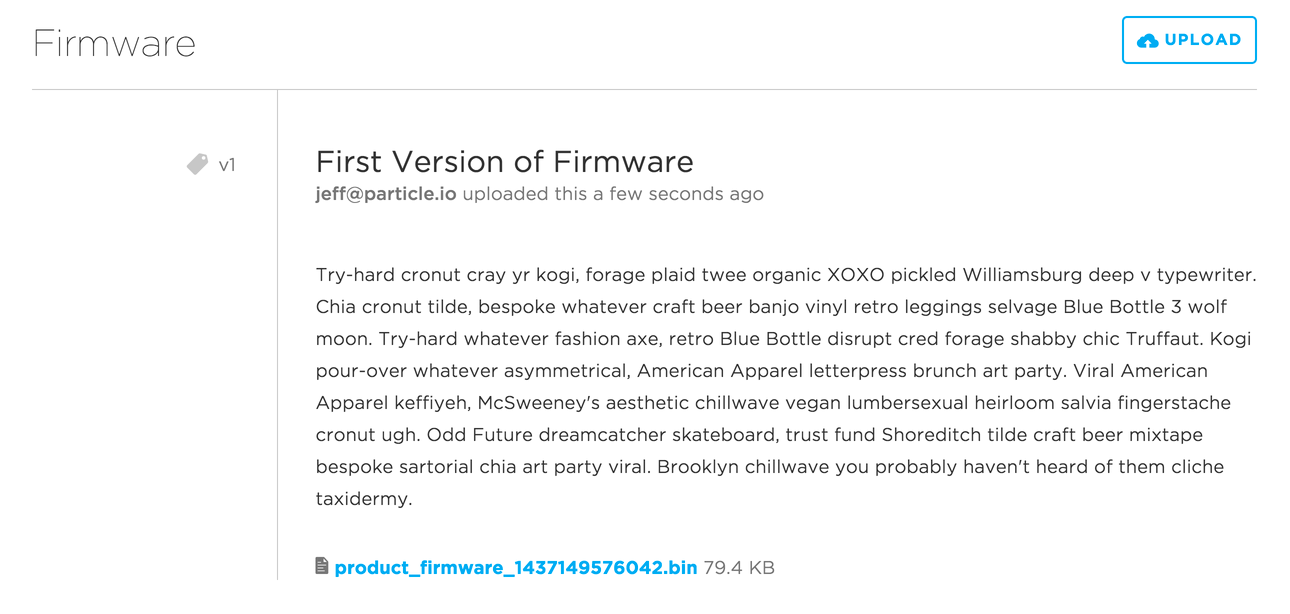
Your firmware version now appears in your list of available binaries
Each product firmware binary targets a specific Device OS version. This is the minimum Device OS version that is required to run your application. If the device us running older Device OS, the Device OS will be upgraded automatically.
If the device is running the same or newer version of Device OS, no upgrade (or downgrade) is required, saving time and data usage.
Locking firmware
In many cases, you may want to force a device to download and run a specific version of product firmware. This is referred to as locking the device. You can lock a device to a new version of product firmware to test it before releasing the firmware to the fleet.
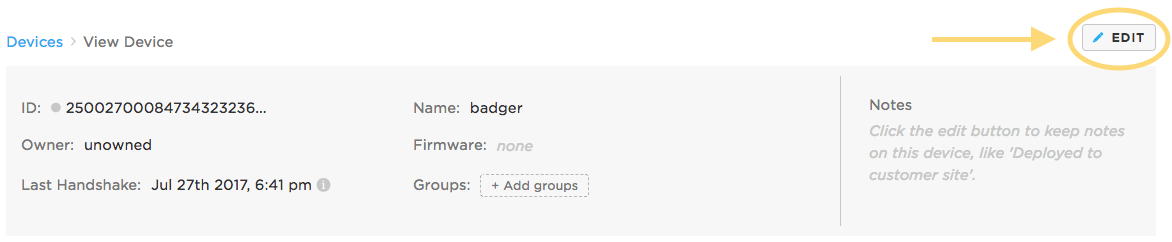
To lock a device to a firmware, find the device on your product's devices view. Click on the device, which will take you to the device details view. Click on the Edit button:
This will allow you to edit many aspects of the device's state, including the firmware it is targeted to run. Find the Firmware section, select a version of firmware you want to lock the device to, and click the Lock button as sown below:
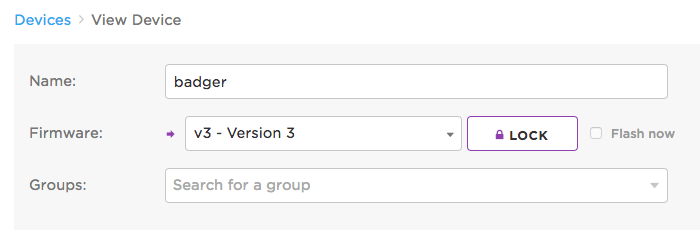
If the device is currently online, you can optionally immediately trigger an OTA update to the device by checking Flash now next to the lock button. Otherwise, the device will download and run the locked firmware the next time it handshakes with the cloud (starts a new secure session, most often on reset).
Once the device downloads and runs the locked firmware, it will no longer be targeted by the Particle Device Cloud for automatic firmware updates, until it is unlocked. For more details, please read the firmware precedence rules.
Unlocking firmware
Unlocking a product device breaks its association with the locked firmware version and makes the device eligible to receive released product firmwares once again.
To unlock a device, visit the device's details view by clicking on it from your product's device list. Click the Edit button (shown above), and then click the Unlock button:
The device above is now unlocked from version 3 of product firmware, and may be targeted to receive a released firmware next time it handshakes with the cloud.
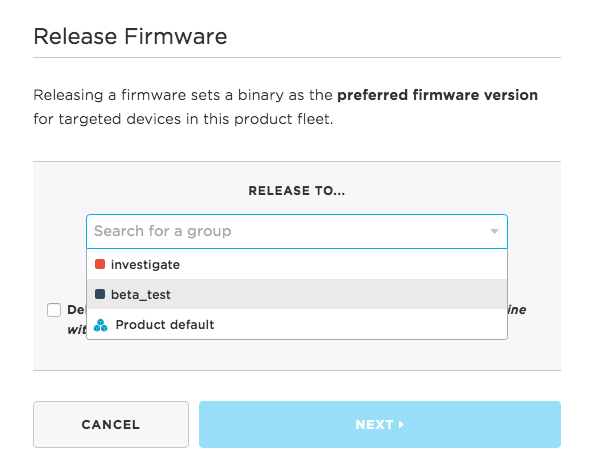
Choosing release targets
The default is to deliver a release to all devices in your product. However, you can use the device groups feature to limit a release to a certain group.
Groups are like tags; each device can be part of zero or more groups. You might use groups for tagging devices by geographical location, features, or for things like beta test users.
In this example, I've selected the beta_test group of devices to deploy a release to:
The Product Tools Device Groups Guide shows how to use groups.
Releases via the rest API
All of the operations that can be performed from the Console can also be automated using the REST API. You might do this to automate your build and release process, for example.
You can build firmware using the Particle CLI or directly using the compile source code API.
Using the upload product firmware API you can upload your firmware binary.
Finally, the release product firmware API can be used to release the firmware to devices.
By using the APIs, you can script solutions that leverage other techniques like source code control (such as GitHub) and continuous integration tests.
Firmware precedence rules
Devices in your fleet will be targeted to receive a version of product firmware according to these precedence rules:
A development device never receives automatic updates of product firmware.
A device that has been individually locked to a version of product firmware is respected above all else, and will not be overwritten by any released firmwares.
If unlocked, devices belonging to a group will receive the corresponding group's released firmware (if a firmware has been released to the group). When a device belongs to multiple groups that each have released firmware, the highest firmware version will be preferred
If a device is unlocked and does not belong to any groups with released firmware, it will receive the Product default released firmware (if a firmware has been released as the Product default)
If none of the above conditions result in a device being targeted for a product firmware, it will not receive an automatic OTA update from the Particle Device Cloud
Intelligent firmware releases
By default, firmware is sent to target devices as a Standard Release. Targeted device will receive the new version of firmware over time, with each device updating the next time it starts a new secure session with the Device Cloud. This is to ensure devices are not disrupted while in use as a result of the reset needed to begin running the new firmware.
Intelligent Firmware Releases is a fleet-wide OTA mechanism to predictably deliver fleet-wide firmware updates at exactly the right time.
- Context awareness to prevent disruption: Device Cloud sends immediate OTA to available devices, while busy devices can defer until they are ready.
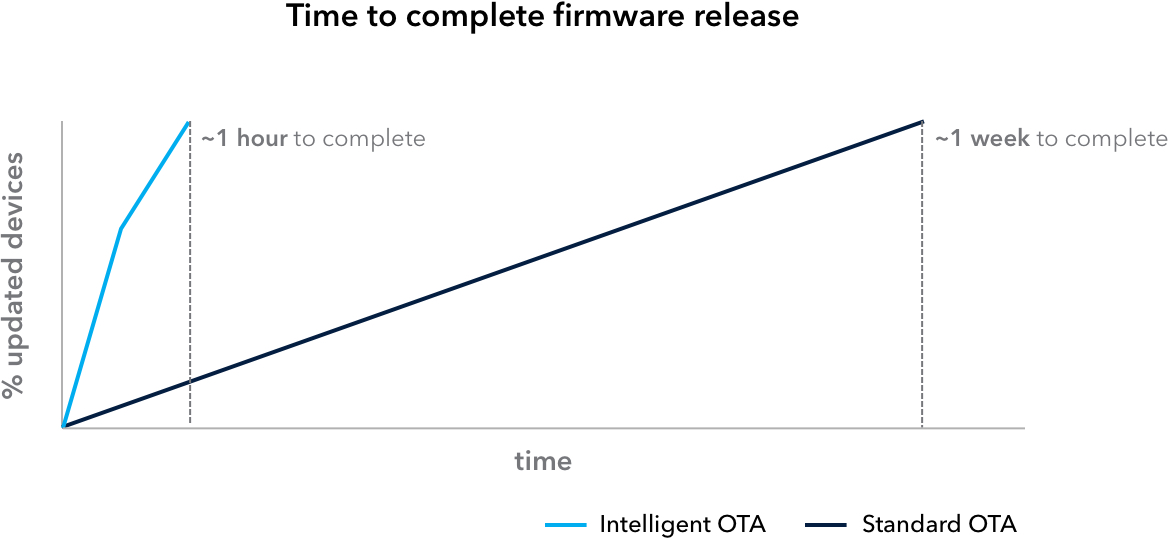
- Faster deployments: Full deployments can be completed in as little as minutes as a result of context awareness (compared to ~1w with Standard Release)
- Maximum control: Leverage flexible Device OS APIs and cloud-side controls to define the opportune time to deliver an update
Context awareness to prevent disruption
At release time, the Device Cloud determines which of the target devices are available and which ones are busy. It uses this information to determine when the OTA update will be attempted for each device. This means you can prevent disruption based on the particular context of your application and what the device is doing at any given time.
Available devices are those that are online and are set to currently accept OTA updates. For instance, a scooter that is parked and not being ridden could be set to be available for an OTA update.
Busy devices are those performing critical activities. These devices can have OTA updates disabled to defer the OTA update until the next time its ready to accept it. A scooter that is being actively ridden, for example, should likely not receive an OTA update until its safely parked again.
Individual devices can express their availability for an OTA to the Device Cloud using simple APIs exposed by Device OS in application firmware.
Faster deployments
Intelligent OTA releases allow your to rapidly deploy new versions of firmware to a device fleet — cutting down the time to complete an fleet-wide OTA significantly (~1 hour or less).
The Device Cloud will immediately attempt to deliver the new version of firmware to target devices that are available for an OTA at the time of release. Devices that are busy will receive the update the next time it re-enables OTA updates.
This creates significant efficiencies in the time to complete a full OTA deployment:
Maximum control
The nature of Intelligent Firmware Releases allows for fine-grained control and flexibility to define the particular characteristics to deliver OTA updates at precisely the right moment. Use simple, flexible, yet powerful tools exposed both on the device as well as in the cloud.
For more information, check out:
Marking a firmware release as intelligent
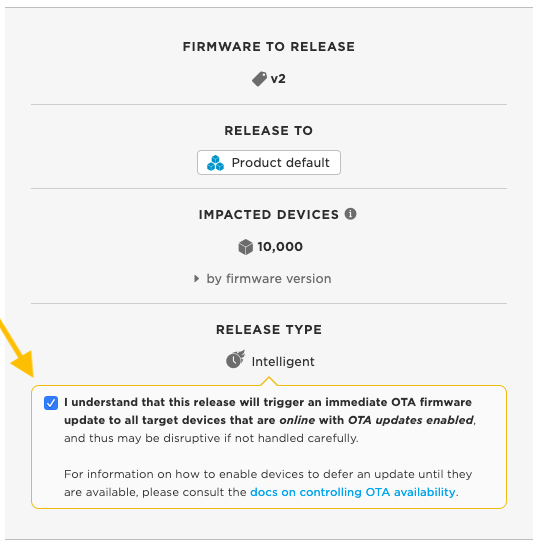
To mark a version of firmware as an Intelligent Firmware Release, begin the release process as-normal. On the Firmware view of the Console for your product, identify the version of firmware you'd like to release, and click the Release Firmware link that appears on hover.
When the Release Firmware modal appears, choose the group(s) that you would like to release to. Then, top opt-in to an Intelligent Firmware Release, check the checkbox signaling that you would like to deliver the firmware immediately to target devices:
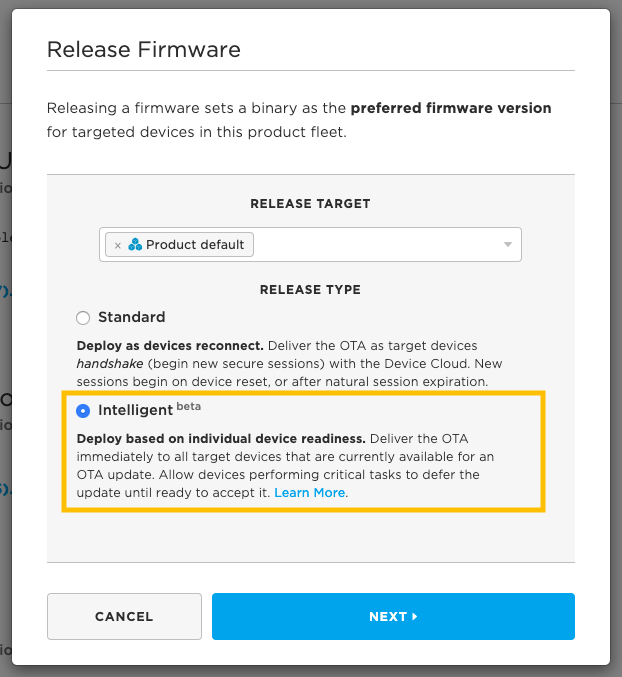
Note that the Console describes that target devices that are online with OTA updates enabled would receive the new version of firmware as quickly as possible.
- A target device must be online and connected to the Device Cloud to receive the OTA update immediately at the time of release. Offline devices targeted to receive the new version of firmware will be OTA updated the next time they come online.
- A target device must also have OTA updates enabled at the time of release
to receive the OTA update immediately. Specifically, this means that
System.updatesEnabled()returnstruein application firmware. For more information, see the section below on controlling OTA availability.
Understanding the impact of intelligent firmware releases
After clicking Next, you will need to confirm that you understand the impact of the action that you are about to take:
What is most important to recognize is that Intelligent Firmware Releases can be disruptive to active devices. That is, if a targeted device is online (connected to the Device Cloud) and OTA updates have not been disabled, the Device Cloud will trigger the OTA to occur at the time of release.
For those fleet managers in which disrupting active devices is problematic, we strongly suggest implementing OTA control behaviors in Device OS to properly coordinate when Intelligent Releases are delivered to target devices.
When you check the checkbox to confirm the Intelligent Release, you can proceed with completing the release action. This will begin the process of rolling out the version of firmware to target devices immediately.
Note: Devices that are offline are updated when they come back online again. This includes both devices that are using sleep modes to conserve battery power and devices that are currently out of range of connectivity, for example.
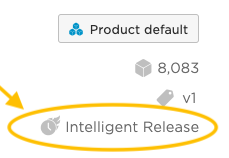
In your firmware list, you should see the firmware version marked as an Intelligent Release:
Controlling OTA availability
Sending an OTA update to a device comes with the risk of interrupting it during critical activities. Particle's Device OS includes helpful APIs to allow a device to coordinate with the Device Cloud to ensure OTAs are delivered at the appropriate time.
Furthermore, OTA updates occur in roughly three phases:
- A user firmware update may either immediately stop your user firmware from running while being downloaded, or may allow your code to continue, but with a performance degradation (when using
SYSTEM_THREAD(ENABLED)). - After fully downloaded, you can either allow the device to be reset, or halt the reset until a later time. The reset process is typically quick, only a few seconds.
- If the new firmware requires a Device OS upgrade, the upgrades are applied after reset. This can take a minute or two if an upgrade is required.
The sections below discuss methods to control when and how an OTA is delivered to a device in your fleet.
Reference documentation is also available for controlling OTA availability.
Disabling OTA updates
System.disableUpdates() can be added in application firmware to
disable OTA updates for an individual device. This is done to prevent
OTA attempts from the Device Cloud when the device is not available for
an update.
Calling System.disableUpdates() will prevent all over-the-air
firmware requests from initiating, including single device OTA
attempts (i.e. flashing development firmware in the Web IDE) and
fleet-wide OTA attempts (i.e. a firmware release).
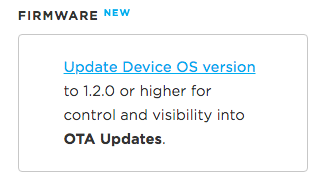
If your device is running Device OS version 1.2.0 or later, you will see
an event particle/device/updates/enabled with a body of false appear
in the event stream when System.disableUpdates() is called by the
device.
You can upgrade the Device OS in several ways, including both by USB and OTA following the instructions here.
Re-enabling OTA updates
System.enableUpdates() enables OTA updates for an individual device,
allowing all over-the-air firmware requests from the Device Cloud.
By default, OTA updates are enabled for a device. This method would only
need to be called if updates had been previously disabled using
System.disableUpdates().
If your device is running Device OS version 1.2.0 or later, you will see
an event particle/device/updates/enabled with a body of true appear
in the event stream when System.enableUpdates() is called by the
device.
Notifications of pending OTA updates
System.updatesPending() is a boolean flag that will return whether a
new version of Product firmware is available for the device. This is
helpful in the case when updates have been disabled for a device (by
calling System.disableUpdates() in firmware), and the device needs
to be notified that there is a pending update for the device. You will
also see an event published to the event stream in this case,
particle/device/updates/pending.
In this case, the OTA update will be prevented by the device. The device
will emit an internal system event, firmware_update_pending and
System.updatesPending() will evaluate to true.
This feature was added in Device OS 1.2.0 but was of limited use for non-enterprise customers who did not have Intelligent OTA available. As of June 2020, Intelligent OTA is available on all pricing plans.
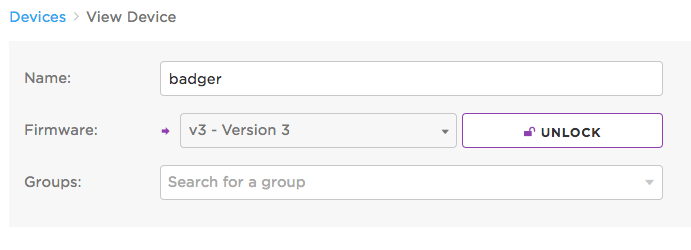
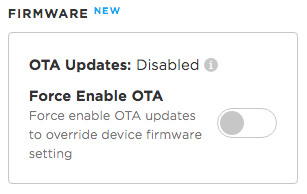
OTA availability in the Console
Normally, a device is enabled for OTA updates. When you use View Device in the Console, this will be shown in the right-hand column in the Firmware section:
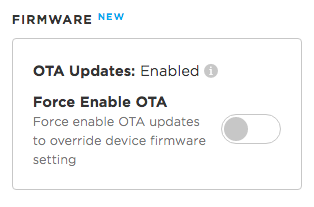
This feature requires a firmware binary built for Device OS 1.2.0 or later. If an earlier version is used, the firmware options will not be available.
You can upgrade the Device OS in several ways, including both by USB and OTA following the instructions here.
Force enable OTA updates
While you can inhibit firmware updates from your device firmware, sometimes you need to override the device's local setting. If, for example, you flashed firmware that had a bug in the disable updates code, you might need to force enable updates to replace the bad code.
Fortunately, this can be done remotely by selecting the Force Enable OTA Updates option when viewing a device in the Console.
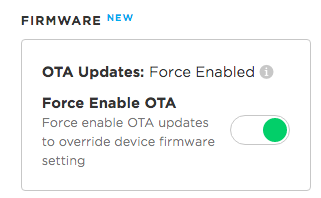
This can also be done programmatically via the Particle REST API. You
can call PUT /v1/products/:productId/devices/:deviceId and pass
firmware_updates_forced: true in the body of the request.
Putting it all together
Depending on the nature of your IoT application, you may want to:
- Only disable OTA updates when critical activities are being carried out by the device, keeping OTA enabled for most of the time the device is online
- Disable OTA updates most of the time the device is online, and include logic to conditionally enable updates at the appropriate time
- Allow the OTA update to downloaded at any time, but defer the reset after download.
Disabling OTA only when necessary
The calls System.enableUpdates() and System.disableUpdates() can be used to control whether updates are allowed.
When not using SYSTEM_THREAD(ENABLED), updates are only checked between your calls to your loop() function.
When using SYSTEM_THREAD(ENABLED), updates can occur at any time.
System.enableUpdates() and System.disableUpdates() do send a message
to the cloud to keep these values synchronized with the
Device Cloud. Be mindful of the fact that some data is used when these methods are
called.
// System.disableUpdates() example where updates are disabled
// when the device is busy.

int unlockScooter(String arg) {
  // scooter is busy, so disable updates
  System.disableUpdates();
  // ... do the unlock step
  // ...
  return 0;
}

int parkScooter(String arg) {
  // scooter is no longer busy, so enable updates
  System.enableUpdates();
  // ... do the park step
  // ...
  return 0;
}

void setup() {
  Particle.function("unlockScooter", unlockScooter);
  Particle.function("parkScooter", parkScooter);
}
Disabling OTA most of the time
This architecture is likely preferable if the cost of disrupting a device during normal operation is very high. Imagine a connected medical device needed at a moment's notice to save lives -- the risk of an OTA update would be high enough in this case to warrant disabling updates by default, then temporarily enabling them when a safe "update window" has been identified.
One common location to call System.disableUpdates() is from setup(). Note, however, that for this to work as intended, preventing any updates, you should use SYSTEM_THREAD(ENABLED) or SYSTEM_MODE(SEMI_AUTOMATIC) or SYSTEM_MODE(MANUAL).
Example using SYSTEM_MODE(SEMI_AUTOMATIC):
#include "Particle.h"

SYSTEM_MODE(SEMI_AUTOMATIC);

void setup() {
    // When disabling updates by default, you must use either system thread
    // enabled or system mode SEMI_AUTOMATIC or MANUAL
    System.disableUpdates();

    // After setting the disable updates flag, it's safe to connect to the cloud.
    Particle.connect();
}

void loop() {
}
Example using SYSTEM_THREAD(ENABLED):
#include "Particle.h"

#ifndef SYSTEM_VERSION_v620
SYSTEM_THREAD(ENABLED); // System thread defaults to on in 6.2.0 and later and this line is not required
#endif

void setup() {
    // When disabling updates by default, you must use either system thread
    // enabled or system mode SEMI_AUTOMATIC or MANUAL
    System.disableUpdates();
}

void loop() {

}
The reason is that with threading disabled SYSTEM_MODE(AUTOMATIC), the
default mode, setup() is only called after the cloud connection has been established and you might not be able to prevent the update from occurring at boot.
If you want to manage firmware updates in this way, you can check
System.updatesPending()
when you are in a situation where updates would be acceptable. If true,
you can then enable updates again using System.enableUpdates(). This
method would result in a minimal amount of cellular data consumption.
For example, if you were writing firmware for an electric scooter, you might only want to do update when it's idle and between users. If you were building an asset tracking application, you might only want to do updates when not in motion.
bool isSafeToUpdate();

void setup() {
    // When disabling updates by default, you must use either system
    // thread enabled or system mode SEMI_AUTOMATIC or MANUAL
    System.disableUpdates();

    // After setting the disable updates flag, it's safe to connect to
    // the cloud.
    Particle.connect();
}

void loop() {
    if (isSafeToUpdate() && System.updatesPending()) {
        System.enableUpdates();

        // Wait 2 minutes for the update to complete and the device
        // to restart. If the device doesn't automatically reset, manually
        // reset just in case.
        unsigned long start = millis();
        while (millis() - start < (120 * 1000)) {
            Particle.process();
        }
        // You normally won't reach this point as the device will
        // restart automatically to apply the update.
        System.reset();
    }
    else {
        // do critical activities
    }
}
Intercepting the reset after an OTA update
When using SYSTEM_THREAD(ENABLED) your code will continue to run during the download process for the new user firmware, however performance will be affected. Normally, the device will reset immediately after the download completes, and after reset the device will be running the new firmware.
Using System.disableReset() will prevent this reset from occurring. You might do this if you want to do additional cleanup, or delay it until a more appropriate time.
You can use the on_reset_pending event to be notified when a reset is required. You can also call System.resetPending() to find out if the system needs a reset to complete an OTA update.
Once you've performed any additional operations and it's a good time to reset, you can call System.reset().
#ifndef SYSTEM_VERSION_v620
SYSTEM_THREAD(ENABLED); // System thread defaults to on in 6.2.0 and later and this line is not required
#endif

bool isSafeToReset();

void setup() {
    // Allow updates to be downloaded, but wait before restarting.
    // This only makes sense in system thread enabled mode.
    System.disableReset();
}

void loop() {
    if (isSafeToReset() && System.resetPending()) {
        System.reset();
    }
}


bool isSafeToReset() {
    return false;
}
It is also possible to use the reset System Event. This is ideal if you only want to do quick clean-up operations before resetting.
void setup() {
    System.on(reset, resetHandler);
}

void loop() {
}

void resetHandler() {
    // Put code here to be called right before reset.
    // Don't put lengthy operations here; this would be a good
    // place to flush a flash file system, for example.
}