


 Go to console

 Change theme


 Edit Account
 Logout
Cloud button
This section creates new firmware that sends a Particle event when you triple-tap the MODE button on your device.
Events
Particle events are one of the Particle primitives used to communicate between devices and the Particle cloud. They can be sent in all four directions: device-to-cloud, cloud-to-device, device-to-device, and cloud-to-cloud. It is a one-to-many message that is temporal, not stored in the cloud. The delivery is best-effort, not guaranteed.
There's an event name (a short string), and data. Data is often a string, but can be structured data such as JSON or binary data up to 16 Kbytes on some devices and Device OS versions.
When you send an event from the device to cloud, the destination is typically:
- An integration (webhook) to send data to an external service
- The server-sent-events (SSE) data stream
- Another device that subscribed to the event name
- Particle logic, a cloud-based solution for processing event data without requiring an external server
Events flow in the same manner with a common API regardless of network transmission method: Wi-Fi, cellular, or Ethernet. Devices with multiple networks can switch between them, for example using Wi-Fi with cellular backup on the M-SoM.
You don't specify a destination for your event - you just send it to the cloud, and whomever is interested in it will receive it. Events are always private, scoped to your account or product, so you don't need to worry about other users being able to see your events, or send you unsolicited events.
All Particle cloud communication is mutually authenticated (using RSA public-private key pairs) and encrypted (using DTLS for most devices).
Firmware
As in the previous section, you can either:
- Particle: Create New Project, create CloudButton, and paste the contents CloudButton.cpp file into your file.
- Download the zip file, extract, then Particle: Import Project.
As in the previous section, also do:
- Particle: Configure project for device
- Particle: Flash application (local)
Once the new firmware is running, you can test the functionality by triple-tap of the MODE button on the device.
Monitoring events in the console
I've opened console.particle.io, then my product (Chivalrous Pink Borons), the product device list, then my device (wombat_magnetic).
In the Events section you can see cloudButtonTest every time the button is pressed. Clicking on the row will show other details including the device that sent the event and a timestamp.
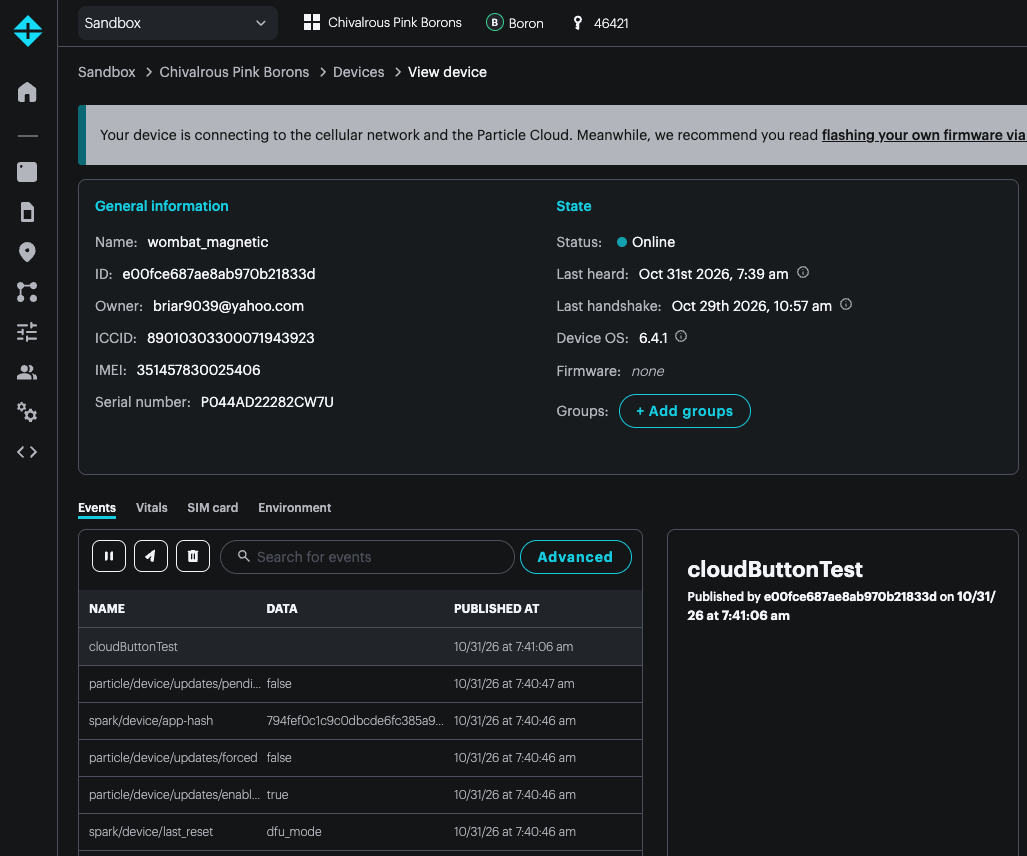
Below it you can see the rows that were generated when the device was flashed and restarted.
USB serial debugging
There is a USB serial debugging log window built into Workbench using Particle: Serial Monitor.
You may find it useful to open a separate Terminal (Linux and Mac) or Command Prompt (Windows) window, outside of Workbench, and use the Particle CLI command:
particle serial monitor --follow
The CLI is installed when you install Workbench and should be available in your terminal window automatically. The --follow option retries connecting to the device when it disconnects. This occurs whenever you reset the device or flash new firmware. Press Ctrl+C or close the window to disconnect when you are done.
Here's a portion of the USB serial debug log.
You can see the INFO: published event cloudButtonTest message that corresponds to the Log.info() line in the code above.
Above (before) it, you can see the internal messages for sending. After it, you can see when the message was acknowledged from the cloud.
0000009073 [system] INFO: Cloud connected
0000009074 [comm.coap] TRACE: Sending CoAP message
0000009075 [comm.coap] TRACE: CON 0.00  size=4 token= id=180
0000009183 [comm.coap] TRACE: Received CoAP message
0000009184 [comm.coap] TRACE: ACK 0.00  size=4 token= id=180
0000009516 [comm.coap] TRACE: Received CoAP message
0000009517 [comm.coap] TRACE: CON POST /E/particle/device/updates/pending size=47 token=01 id=718
0000009519 [comm.coap] TRACE: Sending CoAP message
0000009520 [comm.coap] TRACE: ACK 0.00  size=4 token= id=718
0000026814 [comm.coap] TRACE: Sending CoAP message
0000026815 [comm.coap] TRACE: CON POST /E/cloudButtonTest size=23 token= id=181
0000026817 [app] INFO: published event cloudButtonTest, result=1
0000027915 [comm.coap] TRACE: Received CoAP message
0000027916 [comm.coap] TRACE: ACK 0.00  size=4 token= id=181
If you used LOG_LEVEL_INFO instead of LOG_LEVEL_TRACE in the SerialLogHandler line, all of the TRACE messages would be hidden from the log.
Explaining the code
In this example, I use LOG_LEVEL_TRACE. Previously, this was LOG_LEVEL_INFO. The trace level is more verbose, and can be useful for troubleshooting issues.
SerialLogHandler logHandler(LOG_LEVEL_TRACE);
At the top I declare some variables, one for the event name to send, and a flag that I set when I want to send an event (triple-tap MODE button).
const char *eventName = "cloudButtonTest";
bool sendEvent = false;
This is a forward declaration, required in C++ when you use a function before it has been declared.
void buttonHandler(system_event_t event, int param);
In setup(), which is called once when the device starts up, it registers a system event function. The reason for the forward declaration above is that the function buttonHandler hasn't been implemented yet, it's implemented later in the file.
void setup()
{
    System.on(button_final_click, buttonHandler);
}
As before, the loop function is called frequently, normally 1000 times per second.
I check that the device is connected to the Particle cloud and that the sendEvent flag is set.
void loop()
{
    if (Particle.connected()) {
        if (sendEvent) {
            sendEvent = false;
The reason for the Particle.connected check is that I'm about to publish an event, which requires being connected to the cloud. By adding the check, the code will work even if you triple-tap the mode button before being cloud connected.
The code uses Particle.publish to publish an event to the cloud. This example uses the classic style of the publish call, but for sending structured (JSON) and large data, see typed and extended publish.
It also prints a log message to the USB serial debug log.
            bool bResult = Particle.publish(eventName);

            Log.info("published event %s, result=%d", eventName, bResult);
        }
    }
}
Finally, this is the implementation of the button click handler. If the button is clicked 3 times (triple-tap) it sets the sendEvent flag.
The only reason triple-tap is used is that the device itself uses single-tap for network signal strength and double-tap for putting the device into sleep mode, so those are already taken.
If you are trying this and the status LED goes off, the device probably detected a double-tap. Tap the reset button to get out of sleep mode.
void buttonHandler(system_event_t event, int param) {
    int times = system_button_clicks(param);

    if (times == 3) {
        sendEvent = true;
    }
}
Debugging connection issues
Hopefully your device will just connect to cellular and cloud successfully, but if it doesn't, enabling trace logging can help troubleshoot:
SerialLogHandler logHandler(LOG_LEVEL_TRACE);
The Web device doctor uses trace logging for its debugging log.
You'll see message like this during the connection process:
0000034831 [ncp.at] TRACE: > AT+CCID
0000034833 [ncp.at] TRACE: < +CCID: 89883070000006408551
0000034834 [ncp.at] TRACE: < OK
0000034835 [ncp.at] TRACE: > AT+UMNOPROF?
0000034839 [ncp.at] TRACE: < +UMNOPROF: 100
0000034839 [ncp.at] TRACE: < OK
0000034840 [ncp.at] TRACE: > AT+UBANDMASK?
0000034843 [ncp.at] TRACE: < +UBANDMASK: 0,6170,1,524420
0000034843 [ncp.at] TRACE: < OK
0000034844 [ncp.at] TRACE: > AT+COPS=3,2
0000034847 [ncp.at] TRACE: < OK
0000034847 [ncp.at] TRACE: > AT+CGEREP=1,0
0000034849 [ncp.at] TRACE: < OK
0000034849 [ncp.at] TRACE: > AT+URAT?
0000034852 [ncp.at] TRACE: < +URAT: 7
0000034852 [ncp.at] TRACE: < OK
The Debug Log Decoder can help decode some of the commands:
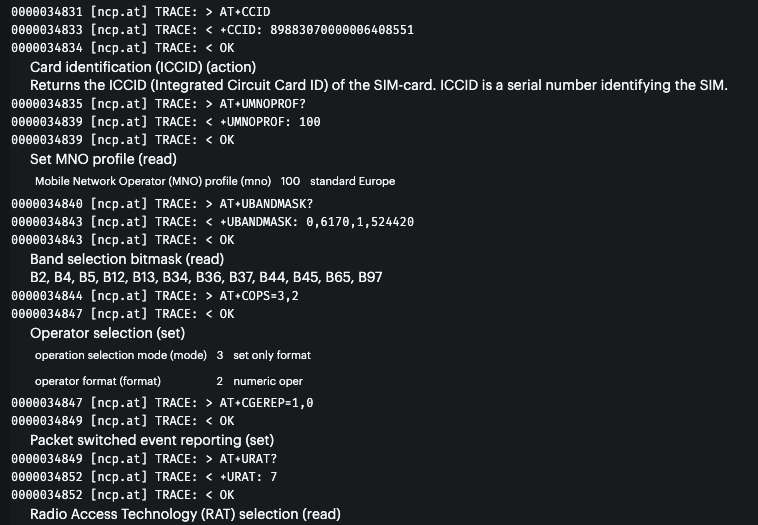
You can also find more information in Interpreting cloud debug logs.
What about HTTP?
Using Particle.publish is typically much more efficient than making a direct HTTP and HTTPS (TLS/SSL) connection from the device. You can still communicate with an external server using HTTP, but it's best to do so using a webhook from the cloud.
Neither HTTP nor TLS/SSL are built into Device OS, making using them directly more difficult, but also establishing an HTTPS connection may use up to 5 Kbytes of data. Doing a single publish has an overhead in the tens of bytes, and this difference can add up, especially for cellular devices.
Next steps
Once the event goes to the cloud you can use integrations (webhooks) to do things like: