
Tracker configuration
The Tracker provides a customizable configuration system:
- Standard configuration allows features like publish intervals, sleep settings, etc. to be configured from the console.
- Customized configuration makes it possible to extend this to your own custom parameters and custom tabs in the console!
Additionally:
- Devices that are currently online receive the configuration updates immediately.
- Devices that are offline, because of poor cellular coverage or use of sleep modes, receive configuration updates when they reconnect to the Particle cloud, if there were changes.
- On device, the configuration is cached on the flash file system, so the last known configuration can be used before connecting to the cloud again.
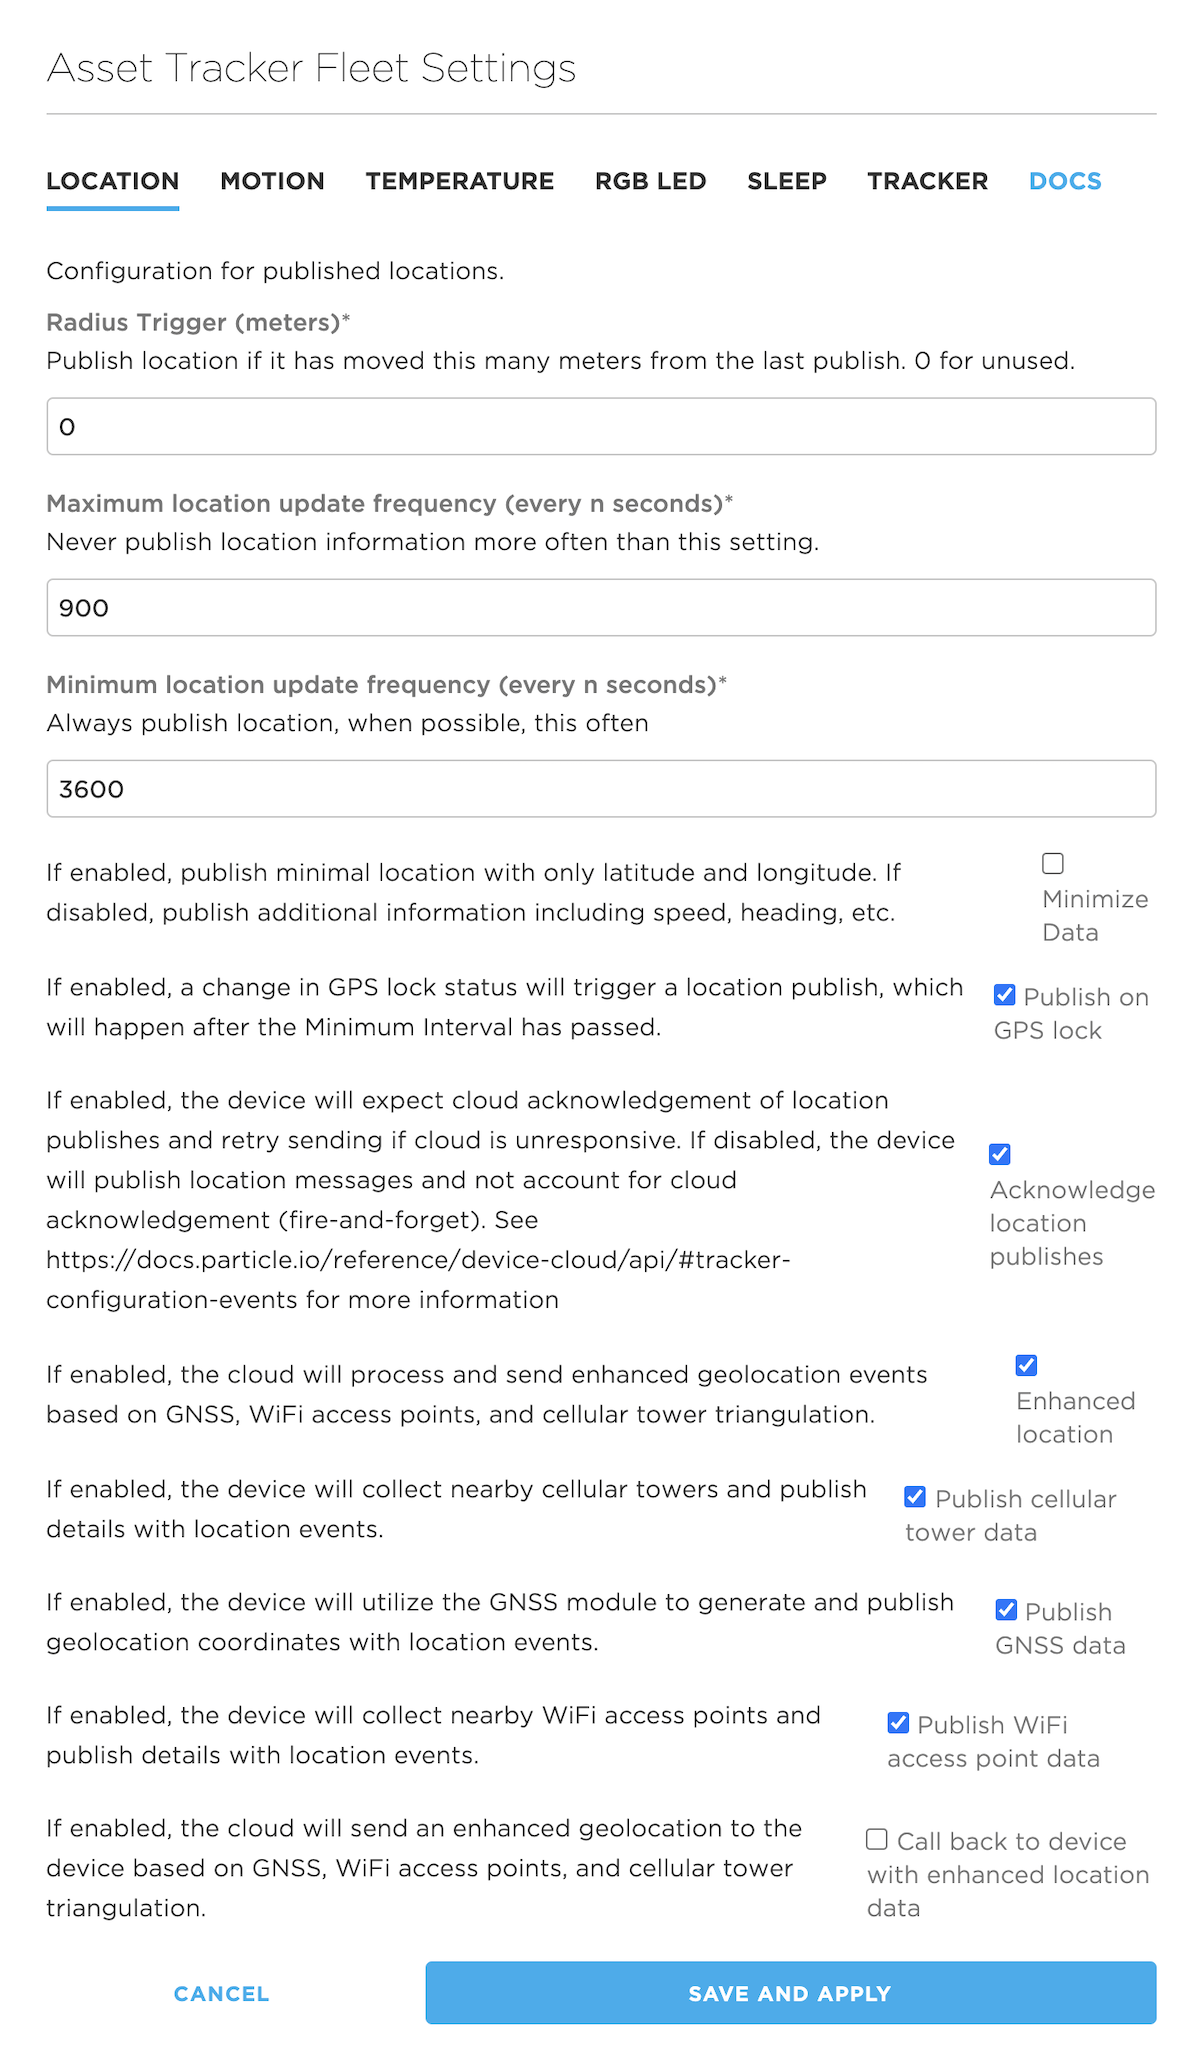
Configuration
Configuration is scoped so you can have:
- Fleet-wide configuration so all devices in your product have a common setting.
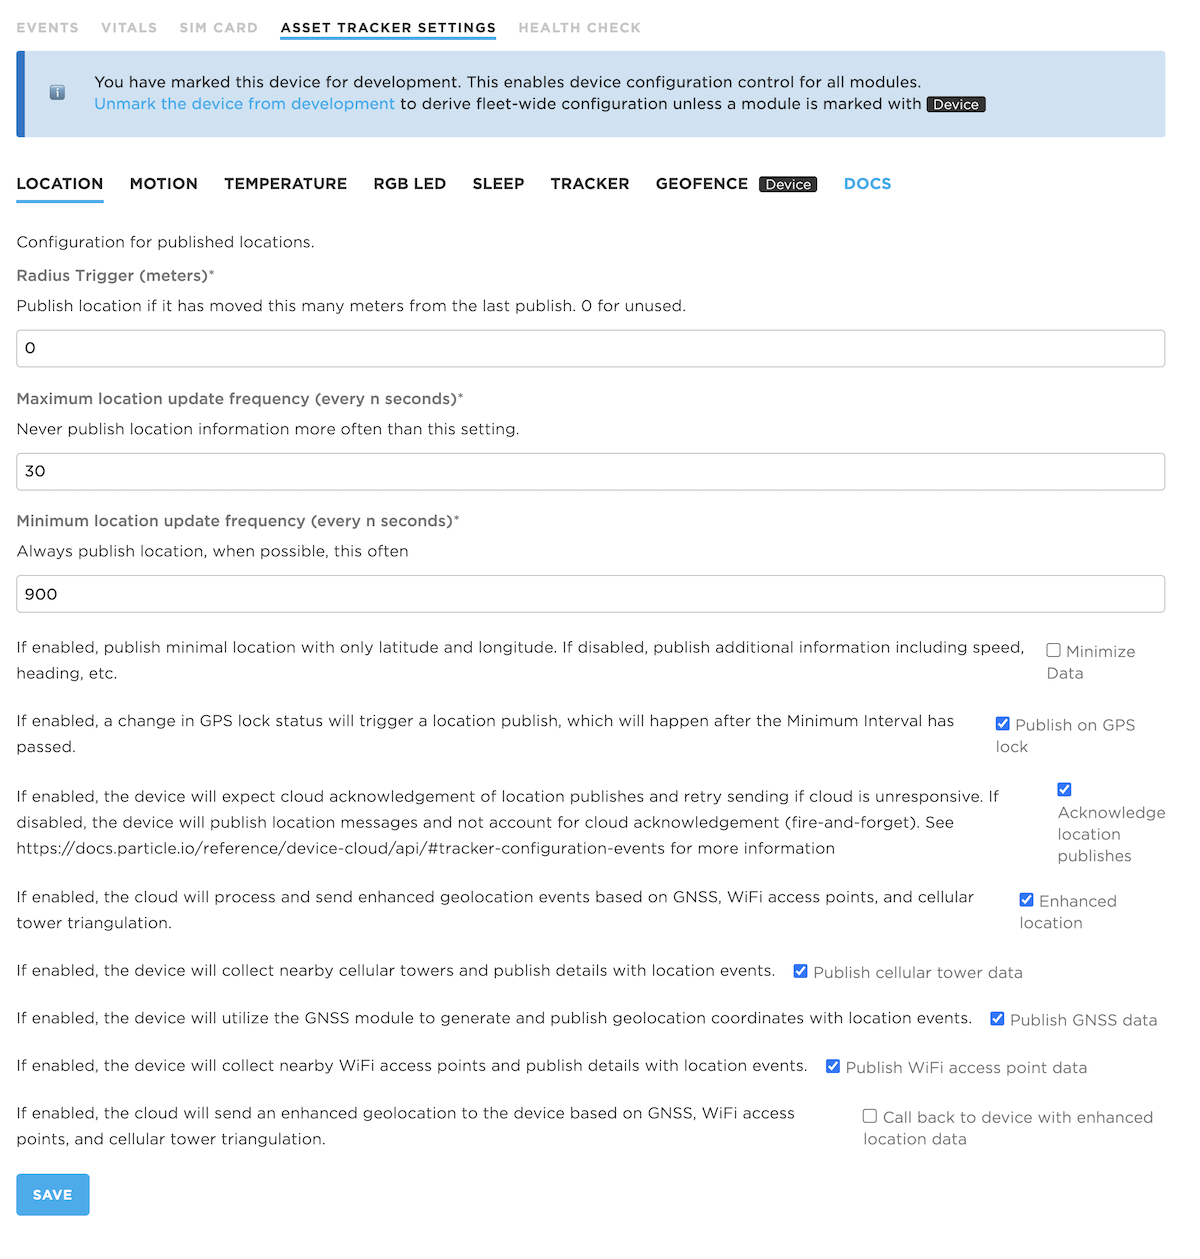
- Per-device configuration for certain settings, like geofence settings, that are always specific to a single device. It is also possible override settings for a specific device in your product, when marked as a development device.
In addition to setting values directly from the console, you can get and set values from the Particle Cloud API.
The configuration is hierarchical. The top level items (location, sleep, geofence) are known as "modules."
- location
- radius
- interval_min
- interval_max
- min_publish
- ...
- imu_trig
- ...
- temp_trig
- ...
- rgb
- ...
- sleep
- mode
- exe_min
- conn max
- ...
- geofence
- interval
- zone1
- enable
- shape_type
- lat
- lon
- radius
- inside
- outside
- enter
- leave
- verif
- zone2
- ...
- zone3
- ...
- zone4
- ...
Monitor One configuration
If you are using the Monitor One, you need to upload a configuration schema to change the console panels from the standard Tracker One options to Monitor One options. You can do this with a couple clicks in the configuration schema tool.
For an explanation of the console settings, see Monitor One settings.
Per-device configuration
Certain configuration modules are per-device only. The geofence configuration is the only built-in module set up this way. You can add your own custom modules that include the deviceLevelOnly flag which will make your configuration always per-device only. When a configuration module is per-device only it does not appear in the product fleet-wide settings, only per-device.
Additionally, if a device is marked as a development device, then per-device configuration is allowed for all configuration items. The per-device settings will always override the fleet-wide settings if present.
Device level only configuration
- Settings are only configurable for the device, not in fleet settings
- Always device level, regardless of whether a development device or not
- Example: geofence configuration
- Also available for custom configuration schemas
Regular device configuration
- Upon adding a device, the device gets default settings from the fleet settings
- When fleet settings are updated, the device settings will be updated immediately if online
- Or after reconnecting if offline or in sleep mode
Development device configuration
- All modules are editable for a given device while in development mode
- Device settings take precedence in all cases
Note: If you go from development mode back to regular mode, the product settings do not override the settings that were set in development mode until the next time product settings are changed. This is the current behavior, but may change in the future.
Schemas
The configuration format is specified using JSON Schema. This section is not intended to be a complete reference to writing a schema, as there is literally a whole book devoted to this, available to read online for free at the link above. This should be enough to begin writing your own custom schema, however.
The schema serves several purposes:
- Documenting the options
- Instructing the console how to display the options
- Validating the configuration
Using a custom schema, you can add additional configuration elements, either to an existing group (location, sleep, etc.) or to a new custom group for your product (recommended). The new tabs or options are presented to all team members who have access to the product.
If you are familiar with JSON Schema:
- We do not support the
patternorpatternPropertieskeywords - Remote schemas are not allowed
additionalPropertiesis always set to false for top-level fields- We've added two custom JSON Schema keywords:
minimumFirmwareVersionandmaximumFirmwareVersionthat can be used to scope given settings to specific versions of the firmware
Console
The settings panels in the fleet configuration and device configuration, including all of the built-in settings, are defined using the configuration schema.
You can also use this technique to create your own custom configuration panels!
This picture shows how elements in the schema directly map to what you can see in the console:
![]()
A custom schema replaces the existing schema. This means that as new features are added to Tracker Edge you will want to periodically merge your changes into the latest schema so you will get any new options.
Default schema
This is the full schema for Tracker Edge (v19). You won't need to understand the whole thing yet, but this is what it looks like:
- The
geofencemodule was added in schema v13. - The
deviceLevelOnlyboolean flag was added in v13. This allows a configuration module to only be configured per-device, regardless of whether it's a development device or not. - The
monitormodule (MemFault) was added in schema v18. - The schema version does not change with every Tracker Edge version, and does not match. For example, Tracker Edge v17 is used with schema v13.
Data types
The schema and support in Tracker Edge can include standard JSON data types, including:
- Boolean values (true or false, a checkbox)
- Integer values (optionally with a range of valid values)
- Floating point values (optionally with a range of valid values)
- Strings
- Enumerations (a string with fixed options, a dropdown menu)
- JSON objects (of the above types, with some limitations)
There is a limit to the size of the data, as it needs to fit in a publish. You should keep the data of a reasonable size and avoid overly lengthy JSON key names for this reason. The publish size varies from 622 to 1024 bytes of UTF-8 characters depending on Device OS version; see API Field Limits.
Adding to the schema
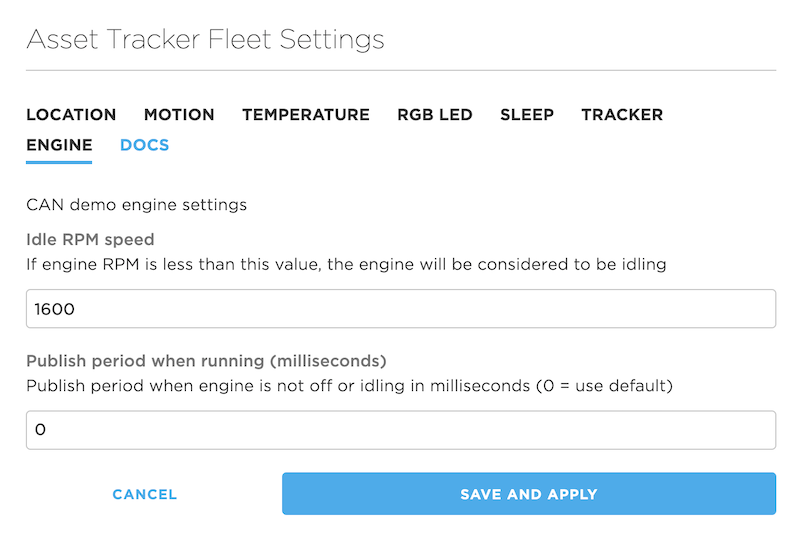
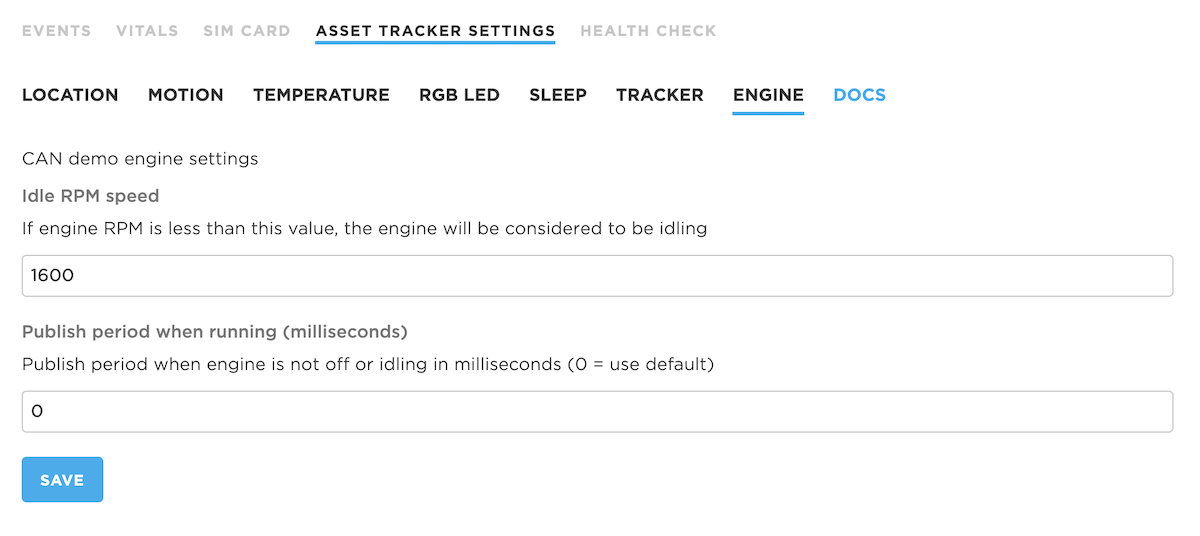
Here's an example from the AN017 Tracker CAN application note. This is the new schema fragment we'll add to the console:
Of note:
- Since adding a custom schema replaces the default schema, you must include all of the elements from the default schema. It does not merge the two automatically for you. The whole file is included below.
- The new engine block goes directly in line and below the tracker block, which is the last configuration block (at the time of writing).
- The new engine configuration includes two elements: Idle RPM speed and Publish period when running (milliseconds); both are integers.
Complete schema
Here's the whole file so you can see exactly where the data goes when merged with the default schema.
| Product | |
| Device | |
If you set this schema you can go to the console and view your fleet configuration with the new panel!
Restore default schema
To restore a default schema, use the Configuration schema tool.
Viewing in the console
This is what it looks like in the console:
Schema editor
This is an interactive schema editor that makes it much easier to work with custom schemas:
| Product | ||
| Edit mode | ||
| Edit existing tab | ||
| New tab JSON name | ||
| Update product schema | ||
| Download backup |
Manually
You can also do these steps manually:
Getting an access token
One easy way to get a temporary access token is to:
- Open the console.
- Open your Tracker product.
- Click on Devices.
- Open your device.
- In the Events tab, click on View events from a terminal (it's a button).
- Copy and paste the access token from the end of the command that is displayed.
- This token is invalidated when your close the console.
You can also generate a token using oAuth client credentials. You can adjust the expiration time using this method, including making it non-expiring.
Backing up the schema
At this time, the schema can only be set using the Particle Cloud API. Examples are provided using curl, a common command-line program for making API calls.
It's a good idea to make a backup copy of the schema before you modify it. The feature to delete the custom schema and revert to the factory default is planned but not currently implemented.
curl -X GET 'https://api.particle.io/v1/products/:productId/config' -H "Authorization: Bearer :access_token" -H 'Accept: application/schema+json' -o backup-schema.json
:productIdwith your product ID:accessTokenwith a product access token, described above.
This will return a big block of JSON data and save it in the file backup-schema.json.
Setting a custom schema
There is no UI for setting the configuration in the console; you will need to set it using curl:
curl -X PUT 'https://api.particle.io/v1/products/:productId/config' -H "Authorization: Bearer :access_token" -H 'Content-Type: application/schema+json' -d @engine-schema.json
:productIdwith your product ID:accessTokenwith a product access token, described above.
Setting configuration
You can also set the values using the API directly, such as by using curl:
curl -X PUT 'https://api.particle.io/v1/products/:productId/config/:deviceId' -H "Authorization: Bearer :access_token" -H 'Content-Type: application/json' -d '{"engine":{"idle":1550,"fastpub":30000}}'
Be sure to update:
:productIdwith your product ID:deviceIdwith your Device ID that is set as a development device. If you want to change the setting across your whole product leave off the slash and device ID.:accessTokenwith a product access token, described above.
This sets this configuration object:
{
    "engine":{
        "idle":1550,
        "fastpub":30000
    }
}
You should always get the entire configuration, change values, and set the whole configuration back. In HTTP REST APIs, POST and PUT do not merge changes with the existing data.
Getting configuration
curl -X GET 'https://api.particle.io/v1/products/:productId/config/:deviceId?access_token=:accessToken' -H "Accept: application/json"
Be sure to update:
:productIdwith your product ID:deviceIdwith your Device ID that is set as a development device. If you want to change the setting across your whole product leave off the slash and device ID.:accessTokenwith a product access token, described above.
Firmware
And finally, this is how you access the data from your application firmware:
// Configuration settings, synchronized with the cloud
int fastPublishPeriod = 0;
int idleRPM = 1600;
Create some global variables for your settings.
// Set up configuration settings
static ConfigObject engineDesc("engine", {
    ConfigInt("idle", &idleRPM, 0, 10000),
    ConfigInt("fastpub", &fastPublishPeriod, 0, 3600000),
});
ConfigService::instance().registerModule(engineDesc);
In setup(), associate the variables with the location in the configuration schema. While just a couple lines of code, this automatically takes care of:
- Loading the saved configuration from the file system during setup(), in case the device is offline.
- When the device comes online, getting any updates that occurred while offline.
- If the device is already online and the settings are changed, they are pushed to the device automatically.
For the full example, see the AN017 Tracker CAN, the CAN bus application note.
Example
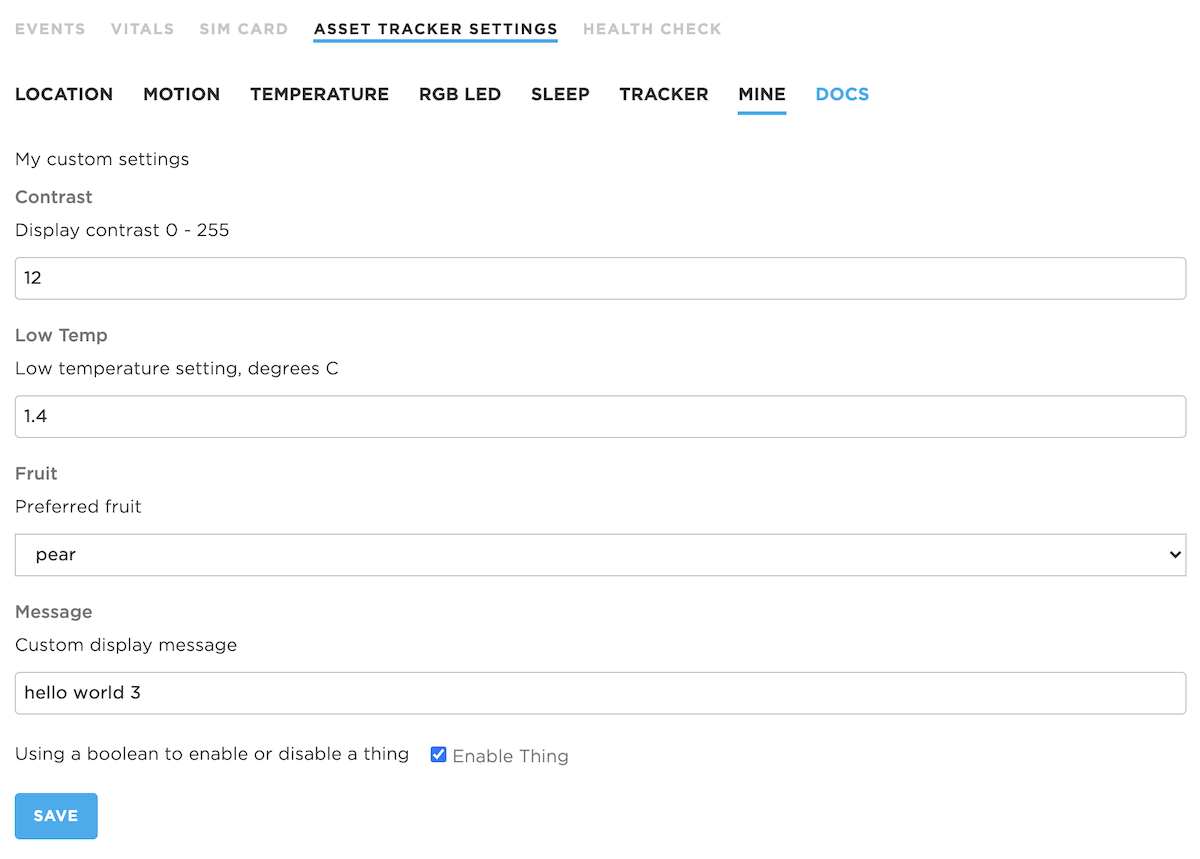
Here's an example of how you set up a custom schema and use it from firmware. It includes many of the available types of data.
It is recommended that you experiment with custom configurations and schemas is a dedicated test product. It can be difficult to successfully remove the custom configuration and schema data from all devices and the cloud, which causes harmless but mildly annoying warnings when changing the configuration after removing a custom schema.
Schema - Example
Here's the whole schema:
| Product | |
| Device | |
You can also set it using curl or another tool to call the API:
curl -X PUT 'https://api.particle.io/v1/products/:productId/config?access_token=:accessToken' -H 'Content-Type: application/schema+json' -d @test-schema.json
:productIdwith your product ID:accessTokenwith a product access token, described above.
Be sure to use the full schema, not just the part with "Mine" as a custom schema replaces the default schema!
To remove the Mine panel and restore the default schema use the Restore Default Schema button:
Note: The tools in this page are intended only for learning with test product, not for fleet management, and thus only work with sandbox products.
Console - Example
This is what it looks like in the console.
Getting the Tracker Edge firmware
You can download a complete project for use with Particle Workbench as a zip file here:
Version:
- Extract tracker-config-example.zip in your Downloads directory
- Open the tracker-config-example folder in Workbench using File - Open...; it is a pre-configured project directory.
- From the Command Palette (Command-Shift-P or Ctrl-Shift-P), use Particle: Configure Project for Device.
- If you are building in the cloud, you can use Particle: Cloud Flash or Particle: Cloud Compile.
- If you are building locally, open a CLI window using Particle: Launch CLI then:
particle library copy
Manually
The Tracker Edge firmware can be downloaded from GitHub:
https://github.com/particle-iot/tracker-edge
You will probably want to use the command line as there are additional commands you need to run after cloning the source:
git clone https://github.com/particle-iot/tracker-edge
cd tracker-edge
git submodule update --init --recursive
- Open Particle Workbench.
- From the command palette, Particle: Import Project.
- Run Particle: Configure Workspace for Device, select version 2.0.1, or later, Tracker, and your device.
main.cpp
This is the Tracker Edge main source file. There are only three lines (all containing "MyConfig") added to the default main.cpp.
MyConfig.h
The C++ header file for the custom configuration class.
MyConfig.cpp
The C++ implementation file for the custom configuration class.
Digging in - Example
Member variables in the C++ class
int32_t contrast = 12;
double tempLow = 0.0;
int32_t fruit = (int32_t) Fruits::APPLE;
String message;
bool thing = false;
The settings that you can configure in the console are all added as member variables in the MyConfig class.
Accessing member variables
int32_t contrast = MyConfig::instance().getContrast();
To access configuration settings, get the MyConfig instance, and call the accessor method getContrast(). There are accessors for all of the variables above.
int32_t getContrast() const { return contrast; };
double getTempLow() const { return tempLow; };
Fruits getFruit() const { return (Fruits)fruit; };
const char *getMessage() const { return message; };
bool getThing() const { return thing; };
C++ getter functions are provided for convenience in the .h file.
Defining an enumeration
enum class Fruits : int32_t {
    APPLE = 0,
    GRAPE,
    ORANGE,
    PEAR
};
The Fruits example is a bit more complicated. It's an enumeration. In the console, this shows up as a popup menu (combo box) with a pre-selected list of options. The data sent back and forth between the cloud and device and saved on the cloud side is a string.
However, in device firmware, it's sometimes easier to work with numeric constants instead of strings. The ConfigStringEnum takes care of mapping between numeric and string enumerations. It's optional - you can work directly with the strings if you prefer.
The declaration above creates a Fruits enumeration. MyConfig::Fruits::APPLE has a value of 0 as in int32_t. GRAPE is 1, and so on.
init() function
void MyConfig::init() {
    static ConfigObject mineDesc("mine", {
        ConfigInt("contrast", &contrast, 0, 255),
        ConfigFloat("tempLow", &tempLow, -100.0, 200.0),
        ConfigStringEnum(
            "fruit",
            {
                {"apple",  (int32_t) Fruits::APPLE},
                {"grape",  (int32_t) Fruits::GRAPE},
                {"orange", (int32_t) Fruits::ORANGE},
                {"pear",   (int32_t) Fruits::PEAR}
            },
            [this](int32_t &value, const void *context) {
                // Get fruit from class
                value = this->fruit;
                return 0;
            },
            [this](int32_t value, const void *context) {
                // Set fruit in class
                this->fruit = value;
                return 0;
            }
        ),
        ConfigString("message",
            [this](const char * &value, const void *context) {
                // Get message from class
                value = message.c_str();
                return 0;
            },
            [this](const char * value, const void *context) {
                // Set message in class
                this->message = value;
                Log.info("set message to %s", value);
                return 0;
            }
        ),
        ConfigBool("thing",
            [this](bool &value, const void *context) {
                // Get thing from class
                value = this->thing;
                return 0;
            },
            [this](bool value, const void *context) {
                // Set thing in class
                this->thing = value;
                Log.info("set thing to %s", value ? "true" : "false");
                return 0;
            }
        )
    });
    ConfigService::instance().registerModule(mineDesc);

    logSettings();
}
The init() method maps between the member variables and the configuration data. It also registers the module, which also:
- Loads the configuration from the flash memory file system at startup, so the previously configured values are available even before the cloud has connected.
- Upon connecting to the cloud, checks to see if there are configuration updates.
- While connected, if the configuration changes, immediately updates the location configuration and saved data in the file system.
Simple mappings
ConfigInt("contrast", &contrast, 0, 255),
ConfigFloat("tempLow", &tempLow, -100.0, 200.0),
Some of these are very straightforward. These map the keys to the variables that hold the configuration data.
ConfigStringEnum
ConfigStringEnum(
    "fruit",
    {
        {"apple",  (int32_t) Fruits::APPLE},
        {"grape",  (int32_t) Fruits::GRAPE},
        {"orange", (int32_t) Fruits::ORANGE},
        {"pear",   (int32_t) Fruits::PEAR}
    },
    [this](int32_t &value, const void *context) {
        // Get fruit from class
        value = this->fruit;
        return 0;
    },
    [this](int32_t value, const void *context) {
        // Set fruit in class
        this->fruit = value;
        return 0;
    }
),
This is how the string enum is mapped to the actual enumeration contents. The last two items get and set the value in the class based on the string converted into an int32_t (integer) value. That is C++11 lambda syntax which allows you to define the function inline; the body of the function gets executed later.
[this](int32_t value, const void *context) {
    // Set fruit in class
    this->fruit = value;
    Log.info("fruit updated to %ld!", value);
    return 0;
}
One handy trick is that you can add more code to the setter so you will know when the value is updated by the cloud. In the contrast and lowTemp examples above the underlying value changes, but your code is not notified. Using a custom setter makes it easy to notify your code when a configuration change occurs.
ConfigString
ConfigString("message",
    [this](const char * &value, const void *context) {
        // Get message from class
        value = message.c_str();
        return 0;
    },
    [this](const char * value, const void *context) {
        // Set message in class
        this->message = value;
        Log.info("set message to %s", value);
        return 0;
    }
),
You need to also provide a getter and setter for String variables so save the data in the underlying class. In this case, we use a String object so it's easy, but you can also use a pre-allocated buffer.
Singleton
The MyConfig class is modeled after the Tracker Edge classes that are a Singleton: there is only one instance of the class per application.
MyConfig::instance().init();
To use it, you get an instance of it using MyConfig::instance() and call the method you want to use, in this case init().
Like other Tracker Edge classes, you call:
| Method | Call it from |
|---|---|
MyConfig::instance().init() |
setup() |
MyConfig::instance().loop() |
loop() |
In the C++ class, the variable to hold the instance is declared like this:
static MyConfig *_instance;
And there's an implementation of it at the top of the MyConfig.cpp file:
MyConfig *MyConfig::_instance;
Since it's a static class member, which is essentially a global variable, it's always initialized to 0 at startup.
MyConfig &MyConfig::instance() {
    if (!_instance) {
        _instance = new MyConfig();
    }
    return *_instance;
}
The function to get the instance checks to see if it has been allocated. If it has not been allocated, it will be allocated using new. This should happen during setup(). In either case, the instance is returned.
Per-device configuration
Tracker devices with device level only configuration (such as geofencing) and devices that are marked as development devices can have per-device configuration. In addition to using the console or curl, above, this tool makes it easy to view and edit the configuration in JSON format: