
Node-RED
Introduction
Node-RED is an open-source visual programming tool. Particle created the Particle IoT Rules Engine, based on Node-RED, hosted on Particle's servers, and included the custom Particle node for interacting with the Particle Cloud API and devices.
We've now open-sourced the Particle node allowing anyone to use these features on their own cloud-hosted or locally-hosted Node-RED installation.
The Particle-hosted Rules Engine has been discontinued and the Particle node is now a community-supported project.
The Node-RED is an IF/THEN workflow builder specifically designed for IoT data. It lets anyone on your team easily create conditional business logic using a visual interface.

Node-RED can trigger activities in the cloud based on something that is happening in a device's environment. That is:
IF certain conditions are met in the physical world, THEN take an action in the digital world.
Some of the specific ways you could use the Node-RED in this way include:
- Notify a device owner when sensor readings leave a healthy range
- Open a new case in your CRM of choice when a hardware component stops functioning
- Alert your on-call engineers when the error rate of your fleet exceeds a certain threshold
The opposite goal can also be achieved:
IF certain conditions are met in the digital world, THEN take an action in the physical world.
Some of the specific ways you could use the Node-RED in this way include:
- Send an over-the-air firmware update to a device when it has been added to a device group
- Activate certain features of your product when customer payment information is collected
- Disable access to using a broken device when a service-person is en-route to fix it
Key terms
There are some key terms that will help you get started with the Rules Engine:
Nodes

The building blocks of the Node-RED are called nodes. Each node represents a distinct piece of logic and has a well-defined purpose: it gets some data, does something with that data, and then passes that data on.
There are many different types of nodes that carry out specific functions. Each node can be configured with pre-defined properties to work to your specifications.
There are 3 main types of nodes:
- Input nodes that inject data into a flow. These nodes are placed at the beginning of a flow and trigger flow execution.
- Output nodes that send data out of a flow. These nodes are place at the end of a flow.
- Processing nodes that receive data from the previous node, execute some logic, then send the result onto the next node. These nodes are place in the middle of a flow.
Flows

Multiple nodes are connected to one another, creating networks called flows. The flow is responsible for moving data between the nodes.
If nodes are the building blocks of the Node-RED, flows are the end-products. They represent the combination of many pieces of logic into an end-to-end workflow.
You can import, export, and share flows with other users, as well.
Palette
The "menu" of available nodes available to you when assembling flows is known as a palette. From the palette, you can drag nodes onto the workspace and incorporate them into a flow.
Message
Node-RED executes a flow by passing messages from node to node. These messages are simple objects that always have an ID, and often also have a set of associated properties.
In Node-RED, a message object is normally referred to as msg.
Associated properties are most commonly stored in msg.payload.
Getting started
Let's get you up and running with Node-RED. You can either run it using a cloud service, or run it locally on your computer.
Using a cloud service
There are a number of cloud services that support Node-RED. You can start from the Node-RED Instructions for cloud-based services such as:
- AWS EC2
- Microsoft Azure
Then follow the instructions below for Getting started with Node-RED to add the Particle Node to your instance and begin creating workflows.
Running locally
It's also possible to run Node-RED on your own computer, either natively or in a Docker container.
If you are running Node-RED locally, you generally do not need to open firewall ports. The Particle cloud connection for subscribe is outgoing TLS/SSL (port 443), which allows the cloud to send data to Node-RED without firewall modifications.
If you want to access the Node-RED flow editor (port 1880) or dashboard from outside your local network you would need to configure port forwarding for most home networks. However, be sure to require logging in if you enable access!
Running locally - Docker
The Node-RED Docker instructions are a good place to start.
Using Docker is especially convenient since it's less likely to be affected by node.js versions and such. Once you've installed Docker, it can be as easy as:
- Make a named data volume to hold the Node-RED data. The second command lists all volumes so you can verify that it was created. You should only do this once; you can create and destroy containers and keep your data volume, which contains your flows, so you won't lose those.
$ docker volume create --name node_red_user_data
$ docker volume ls
And then build the container and run it:
$ docker run -it -p 1880:1880 -v node_red_user_data:/data --name mynodered nodered/node-red
And then open it in your browser: http://127.0.0.1:1880/!
Follow the instructions below for Getting started with Node-RED to add the Particle Node to your instance and begin creating workflows.
To detach the session from your terminal, type ctrl-p ctrl-q and the container will continue to run in the background.
To reattach to the terminal run:
$ docker attach mynodered
If you need to restart the container, such as after a reboot or restart of the Docker daemon:
$ docker start mynodered
And stop it:
docker stop mynodered
And delete it:
docker rm mynodered
Running locally - native
This method is also a good way to run Node-RED on a Raspberry Pi, allowing you to use an inexpensive Raspberry Pi as your Node-RED server!
The Node-RED local install documentation is a good place to start.
For Mac and Linux, it may be as easy as:
$ sudo npm install -g node-red
To start:
$ node-red
The data directory should be .node-red in your home directory.
To connect to the server open it in your browser: http://127.0.0.1:1880/.
Follow the instructions below for Getting started with Node-RED to add the Particle Node to your instance and begin creating workflows.
For Windows, the process is similar; just leave out the sudo.
To uninstall:
$ sudo npm uninstall -g node-red
Getting started with Node-RED
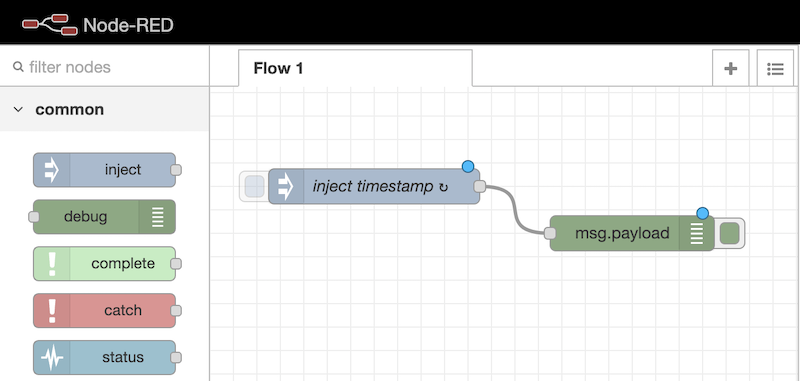
After connecting your Node-RED instance in your web browser you'll see a window like this. Depending on the service you used, there may be additional nodes in the palette or in your first flow already.
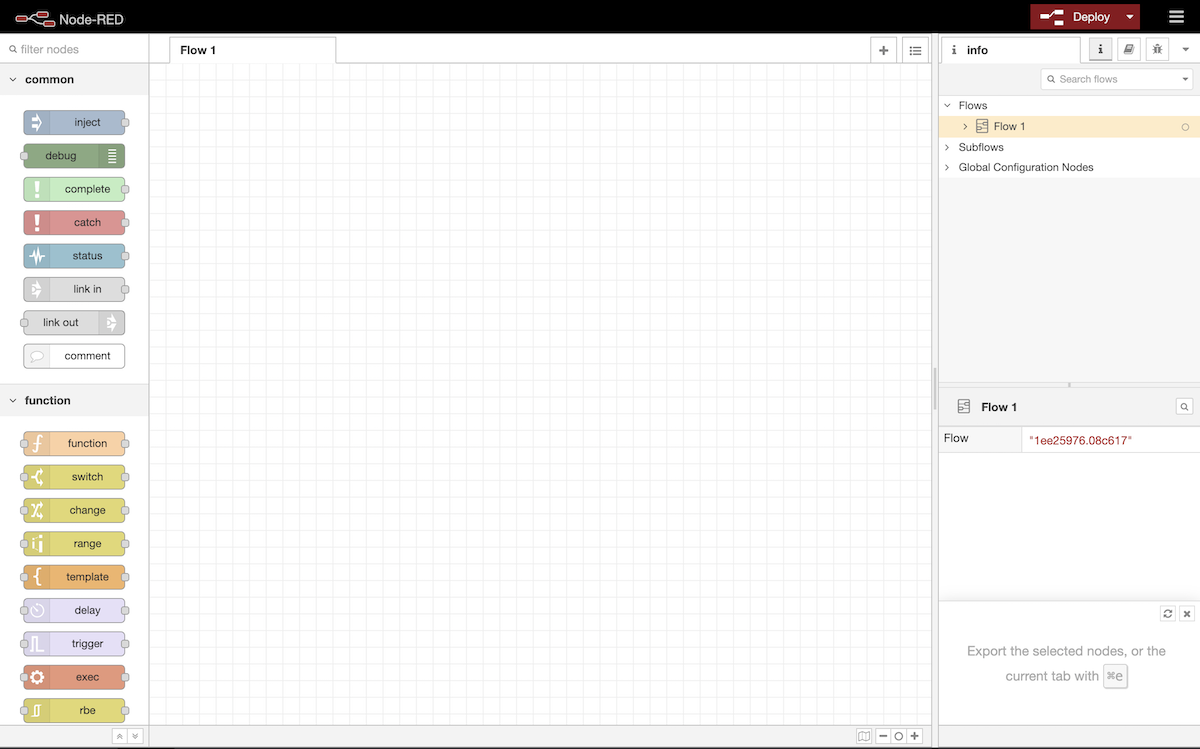
On the left, you'll see the palette of nodes available to you. Nodes in the palette are categorized, and can be filtered using the search box above the palette pane.
On the right-hand side of the screen, you'll notice an info pane that can provide you with context and instructions as you build flows. By default, you will see metadata on the flow you're currently working on, including its name and ID. The right pane can also be toggled from info to debug, which can provide helpful debugging information.
The majority of the screen is dedicated to your flow-builder. Drag-and-drop any node onto the grid to incorporate it into a flow. Your flow is given a default name of "Flow 1." Double-click the tab at the top of the flow builder to rename it at any time. You can also click on the + button in the top-right corner of the flow builder to create new flows.
Adding the Particle node
Since presumably you're wanting to use this with Particle devices, you'll want to install the Particle node.
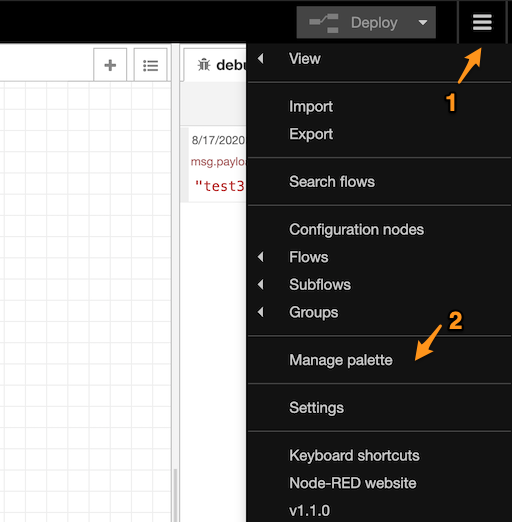
- Click the hamburger icon in the upper right (1), then select Manage Palette (2).
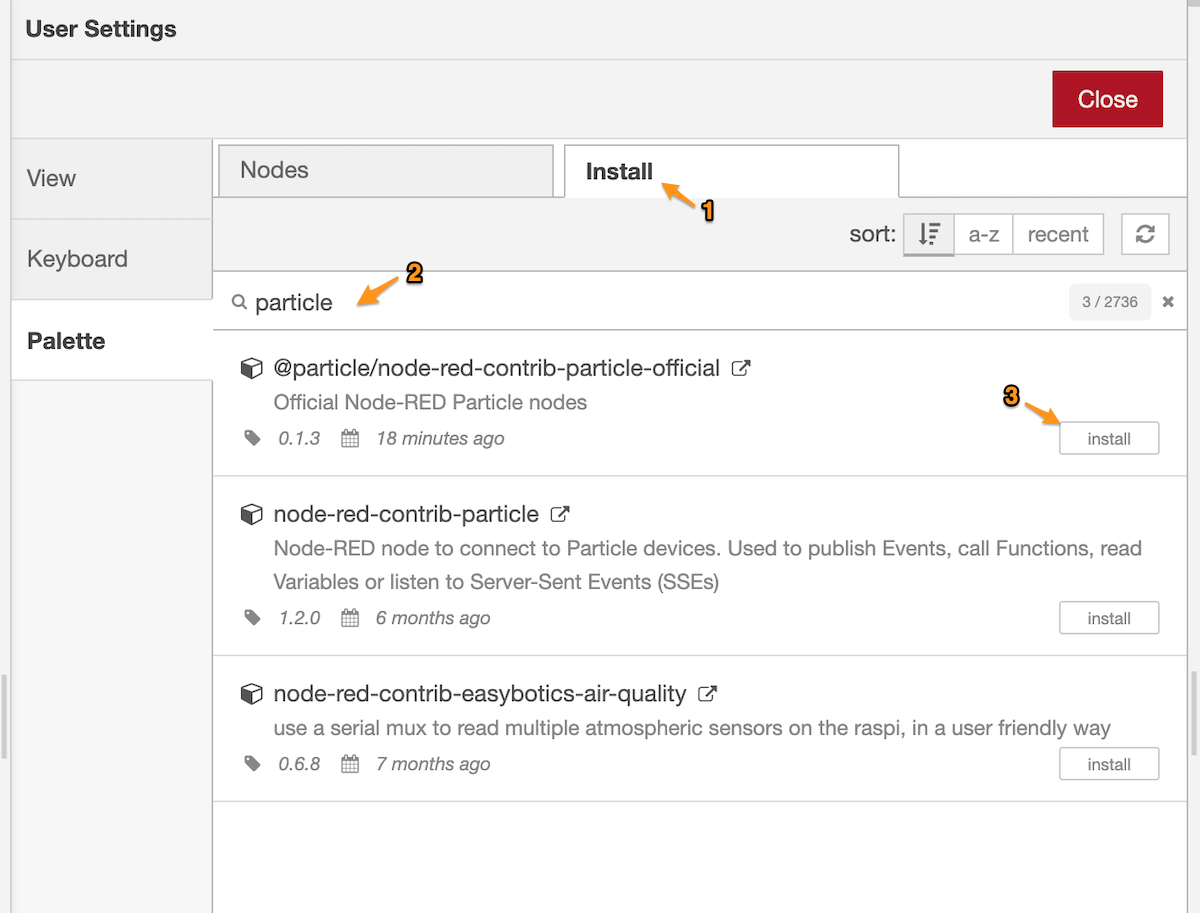
- In the User Settings window in the Palette tab, select Install (1) then enter the name, like particle in the search box (2). Then add the @particle/node-red-contrib-particle-official node by clicking Install (3).
- The Particle nodes will appear at the bottom of the palette:

Hello world flow
We can start with the simplest flow possible: injecting some data in, and logging it out using the debug node.
First, find the inject node in your palette on the left pane. The inject node does what you would expect — injects a message to initiate a flow. The message can take on different flavors, like a piece of text, a number, a timestamp, or a more complex structured data object.
Drag the inject node onto your flow builder grid. You should see the right pane change to include information about the inject node.
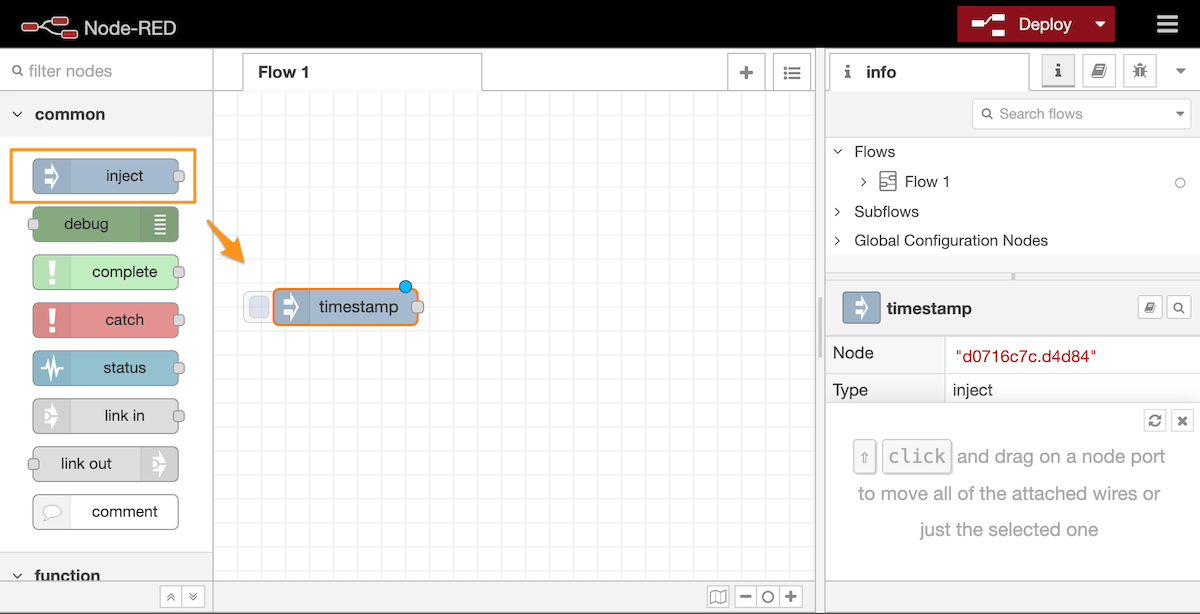
Click and drag the inject node onto the grid to add it to your flow
By default, the inject node will initiate a flow with a timestamp. Double click on the inject node to customize its behavior. Let's inject the current time at an interval of every 5 seconds as shown below:

Click Done to save the node and return to the flow builder. Nice! You've added your first node. You'll notice that the inject node has a blue dot in the top-right corner. This means that there have been changes to this node that need to be deployed (more on that later).
Next, find the green debug node and drag that onto the grid. Note the node connectors on the right edge of the inject node, and the left edge of the debug node. Connect the inject node to the debug node by drawing a line from one node connector to the other with your mouse. This is the method by which you connect nodes to one another to allow them to pass data through the flow.
Nodes are connected to one another to pass data through the flow
In order to the flow to begin running, you must deploy it. Deploying the flow saves any pending changes and begins processing inbound messages. Whenever there are pending changes, the deploy button will illuminate in the nav bar.
Click the deploy button to get our Hello World flow up and running:
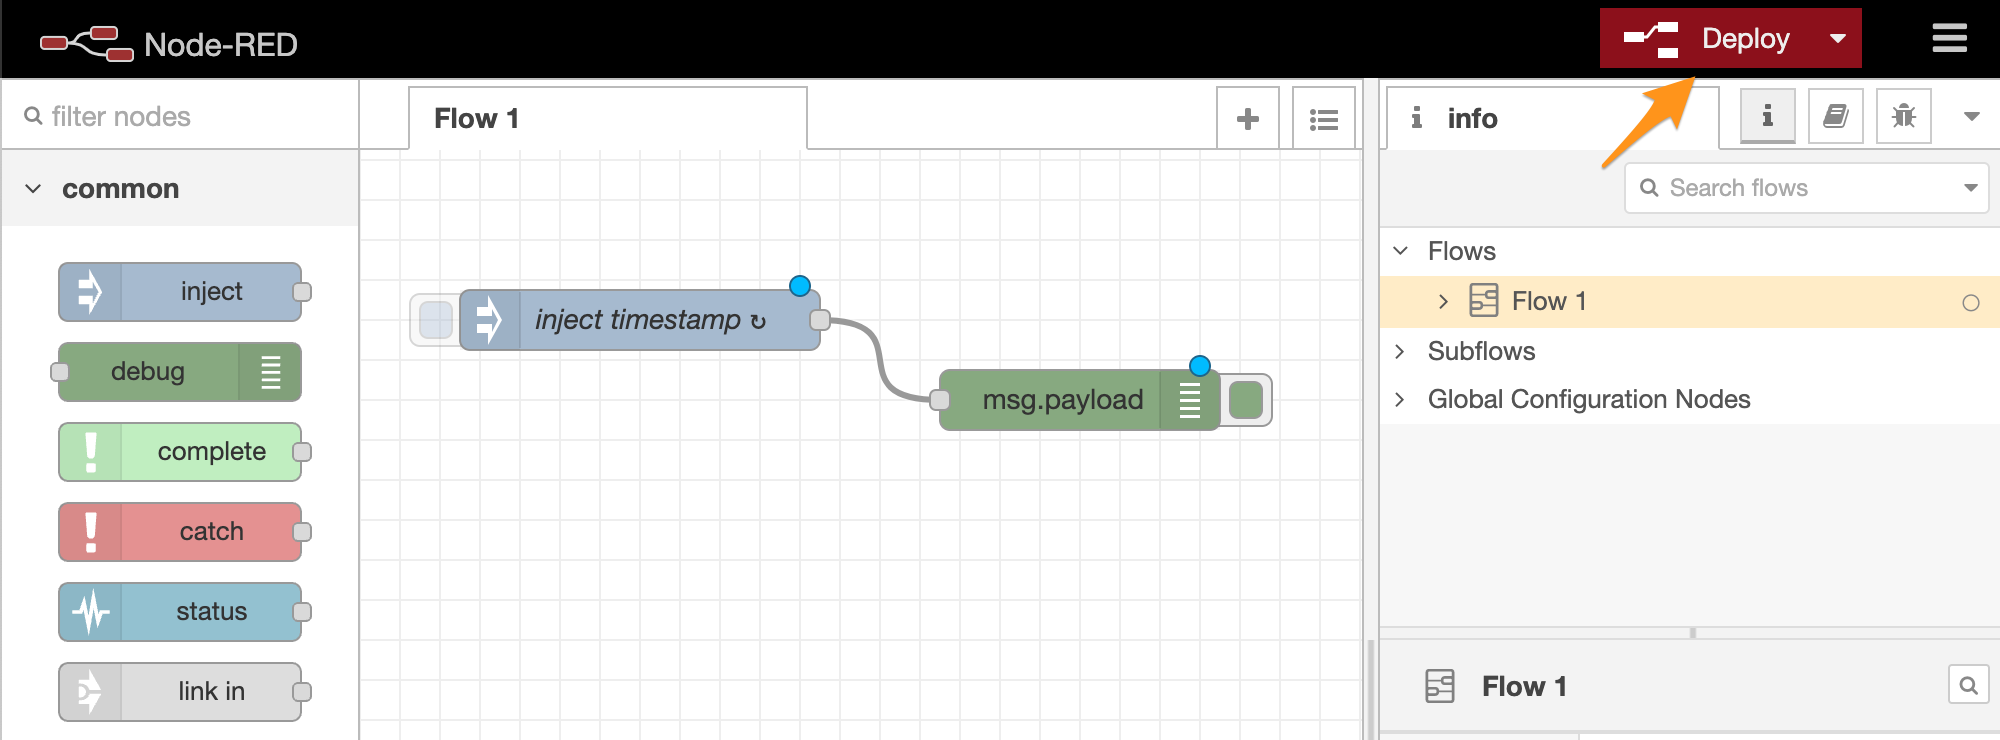
Deploy flows to begin processing messages and pick up on any pending changes
You should receive notification that your flow has been successfully deployed. In addition, the blue dots have disappeared, suggesting the pending changes have been deployed.
At the top of the right pane, click on the debug tab. Voila! You should see a new up-to-date timestamp added to the debug logs every 5 seconds.

At any time, you can click on the trash can icon to clear the debug log. You can also filter the logs to all nodes, selected nodes, or the current flow.
Note that the debug pane is actually logging msg.payload. The
timestamp is being attached to the payload key of the message
object. This method of accessing properties of a message using
msg.[property] is a very common nomenclature in the Node-RED.
Congrats! You've built your first flow successfully.
Adding nodes to your palette
Beyond the nodes included with the default palette, you have the ability to install a variety of open-source nodes that have been contributed to Node-RED by the community.
There are thousands of community-contributed nodes and flows that extend the capability of the Node-RED. Many of these nodes provide integrations with 3rd-party tools and services.
To explore the library of open-source nodes available to you, click on > Settings in the top nav bar.
From here, click Palette, then the Install tab. You now can search the library of nodes to find the one that suits your needs:
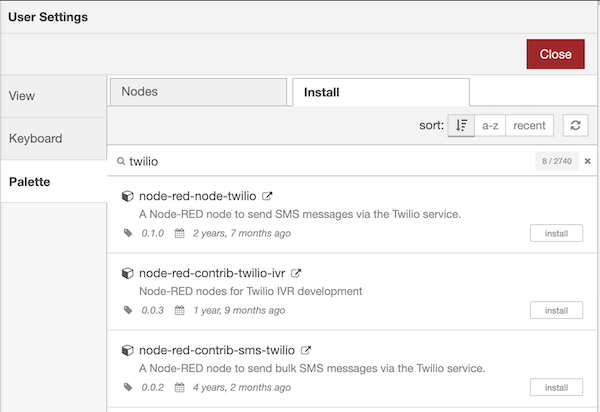
When you find the node you're looking for, click the install button to add it to your palette. You will need to confirm this action.
A table of the nodes that were installed with the Particle Rules Engine by default can be found below.
The Particle nodes
The Particle Nodes include:
- publish - Publish an event to the Particle cloud. Useful for sending to devices.
- subscribe - Receive events from the Particle cloud. Useful for getting data from devices.
- variable - Retrieve a variable from a specific device.
- function - Make a function call on a specific device. Useful for affecting a change on one device.
- particle api - Make any Particle API call.
To add the nodes you need into your new Node-RED instance, click the hamburger icon in the upper right (1), then select Manage Palette (2).
In the User Settings window in the Palette tab, select Install (1) then enter the name, like particle in the search box (2). Then add the @particle/node-red-contrib-particle-official node by clicking Install (3).
In order to use the Particle Nodes you will need to first set up authentication.
Setting up authentication
The Particle Nodes will need access to your Particle account in order to interact with your devices.
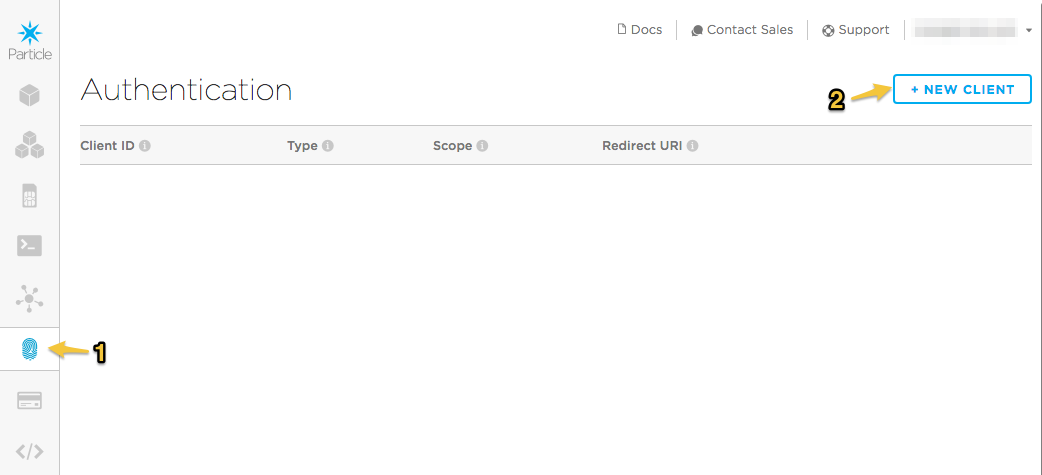
- Log into the console.
- Select Authentication (1)
- Click New Client (2)
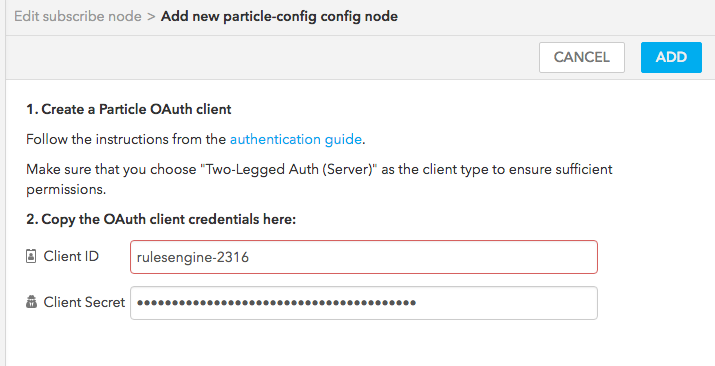
- In the New OAuth Client window, select Two-Legged Auth (Server)
- Enter a name. I called mine Rules Engine.
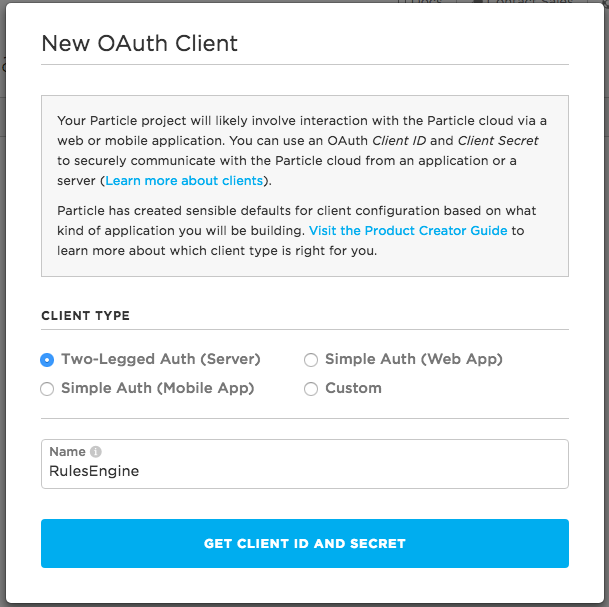
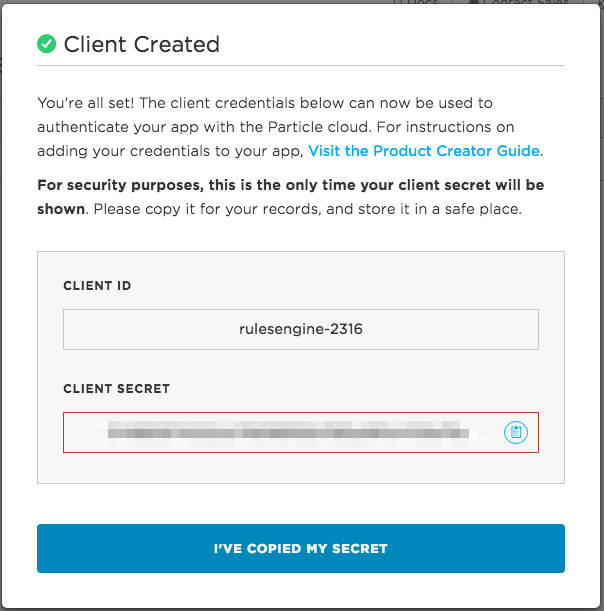
- Copy the Client ID (rulesengine-2316 in my example)
- Copy the Client Secret. Note that this should be kept secret, and this is the only chance you have to copy it. Once you close this window you can't get the secret back!
Setting up a debugging subscription flow
We'll be using a subscribe node. This allows Node-RED to listen for Particle events posted by devices in your account.
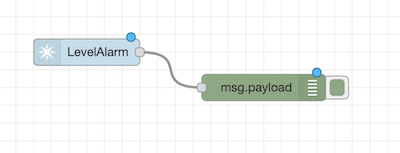
This is the flow we'll be creating in this section:
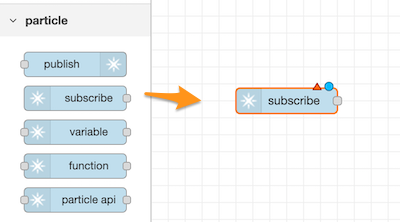
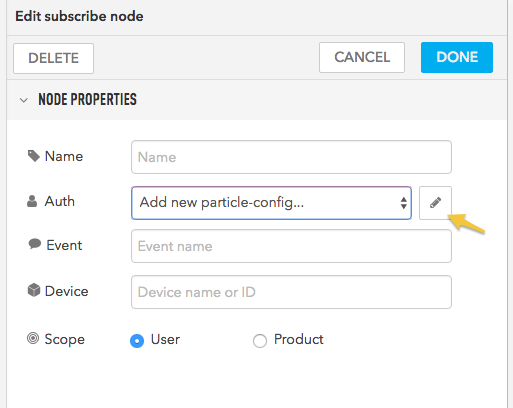
- In the Rules Engine, from the Particle section of the palette, drag a subscribe node to the flow. You'll notice it has an red triangle, so it needs to be configured.
- Click the pencil icon to Add Particle config.
- Enter your Client ID and Client Secret from the console into the Particle config window.
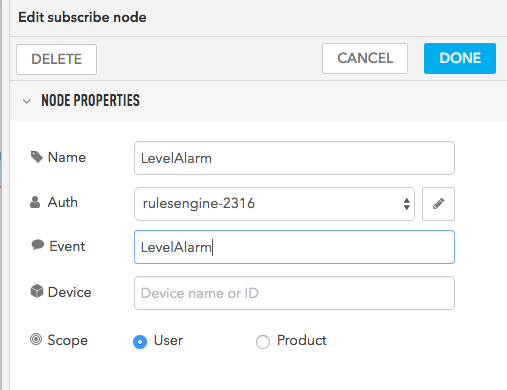
- Fill in the rest of the subscribe node configuration.
- Set Name and Event to "LevelAlarm".
- Leave the Device field blank.
- The Scope should be be left the default of User.
- From the Output section of the palette, drag a debug node next to your subscribe node.
- Then click on one of the handles and drag to the other to connect them.
- Click the Deploy button to start your flows running.
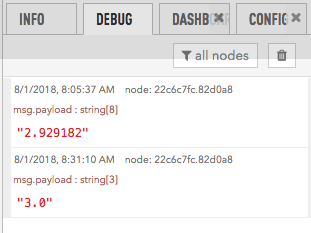
View the Debug tab on the right hand side of the Rules Engine.
Send an event using the Particle CLI, or from the console
particle publish "LevelAlarm" "3.0" --private
Migrating From the Rules Engine
Nodes in Particle Rules Engine
| Node | Description |
|---|---|
| @particle/node-red-contrib-particle-official | Particle Node |
| node-red-dashboard | Dashboards |
| Storage | |
| node-red-node-mongodb | MongoDB |
| node-red-contrib-postgres | PostgreSQL |
| node-red-node-mysql | MySQL |
| node-red-contrib-influxdb | InfluxDB |
| Cloud Platforms | |
| node-red-contrib-salesforce | Salesforce |
| node-red-contrib-aws | Amazon AWS |
| NodeRedIoTHub | Azure IoT Hub |
| node-red-contrib-ibm-watson-iot | IBM Watson Internet of Things Platform |
| node-red-contrib-google-pubsub | Google Cloud Pubsub |
To add the nodes you need into your new Node-RED instance, click the hamburger icon in the upper right (1), then select Manage Palette (2).
In the User Settings window in the Palette tab, select Install (1) then enter the name, like particlel in the search box (2). Then add the @particle/node-red-contrib-particle-official node by clicking Install (3).
Exporting your rules
To export your rules from the Particle Rules Engine:
Log into your Rules Engine instance.
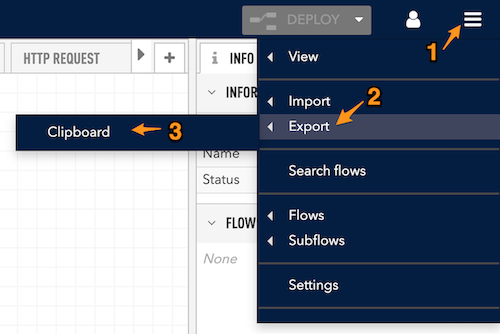
Select the Hamburger Menu in the upper right corner of the window (1). Then Export (2). Then Clipboard (3).
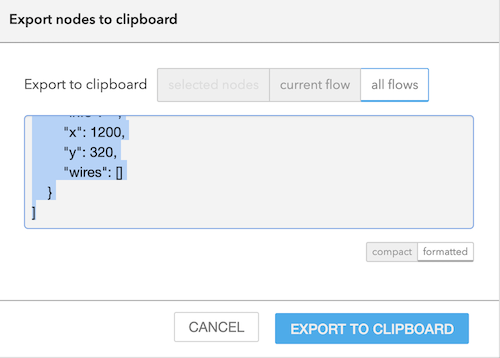
- From the Export to nodes Clipboard window, you'll probably want to select All Flows, or if you only want some, individually select and save the flows you want to keep.
- Open your use Node-RED instance and select Hamburger Menu then Import. You can import directly from the clipboard or save to a file first.
Note: The exported rules contain any passwords you saved when you configured your nodes, along with the secret for your Particle authentication. Keep this secure.
Original documentation
Snapshots of the original Rules Engine documentation have been taken and saved as PDFs below, however the instructions may vary slightly when used on Node-RED directly.