
Manufacturing - Cellular
This document is designed to identify best practices for manufacturing products with Particle cellular devices at scale. The following information should be interpreted as a series of informed suggestions, not as prescribed rules, and we have done our best to account for the various exceptions we might expect from the following workflow.
Assumptions & caveats
The following assumptions are made for using this document:
The assembly is using a Particle cellular device.
It is assumed that you have incorporated one of the following Particle SKUs into your end product:
| Device | Generation | SKUs |
|---|---|---|
| B-Series SoM | Gen 3 | B404, B402, B524, B523 |
| Boron | Gen 3 | BRN404, BRN402, BRN314, BRN310 |
| Tracker One | Gen 3 | ONE404, ONE402, ONE524, ONE523 |
| Tracker SoM | Gen 3 | T404, T402, T524, T523 |
| E-Series | Gen 2 | E404, E402, E314, E313, E310 |
| Electron | Gen 2 | ELC404, ELC314, E270, E260, E350 |
There is one contract manufacturer (CM) handling assembly of the product.
For small-scale deployments and testing you could also be taking assembled circuit boards and preparing the final assembly, such as putting the circuit boards in the enclosure and connecting any cables, yourself.
Devices are programmed via SWD/JTAG where possible.
While OTA is the preferred solution for releasing firmware updates in the field, local flashing is the recommended technology for manufacturing.
SWD/JTAG is the most efficient approach for flashing firmware to Particle devices at scale. Using a Segger J/LINK on a Gen 3 device it's possible to flash the bootloader, SoftDevice, Device OS, and user firmware binary in under 10 seconds total.
Alternative workflows using the Particle CLI and a USB connection are supported as well. This is the recommended method for the Tracker One, which does not have SWD/JTAG available in the M8 connector. See the programming devices for more information.
The device provisioning process is not necessarily performed simultaneously with the manufacturing process.
Device provisioning (device claiming & import, SIM activation & import) is typically done one of two ways:
- (Customer) Bulk SIM activation and provisioning performed in advance of manufacturing process.
- (CM) Assembly and programming.
or:
- (Customer) Bulk SIM activation performed in advance of manufacturing process.
- (CM) Assembly and programming.
- (Customer) Device Import/Claiming/Renaming/Group Assignment performed simultaneously with or after the manufacturing process.
Manufacturing test firmware has been prepared in accordance with the principles of incoming quality control.
Incoming Quality Control or IQC is the step of validating that each part in the assembly is functional and meets quality requirements prior to assembly into the finished product. This step may not be necessary if the part is simply removed and swapped for a new one. However, if the part is soldered into the product thus making it difficult to remove and swap a new one into the finished product, then IQC may be required to first test the component before installing. This is typically done for every part if the consequence of a faulty device is expensive, and done as spot-checking if less so. The IQC test rig is typically a ZIF socket used to plug in a device, press a button and visually see a pass/fail.
Manufacturing firmware should exercise the electronics on your production board, testing all analog connections and peripherals. This firmware should be compatible with your target production Device OS version.
It is recommended that Particle Workbench be used to develop this manufacturing firmware (and your application firmware as well).
Particle does not have an example of manufacturing test firmware, given the variety of forms it may take.
For E-Series and B-Series implementations, an RGB Status LED is connected to the device in some way.
Particle recommends putting an LED on all baseboards; without one it can be difficult to quickly assess the functionality of the Particle device. At the very least, we strongly recommend adding a test header or test points on the board so one can access the RGB LEDs, reset, mode, and USB from a debugging adapter.
Manufacturing procedure
The following procedure involves commands from the host computer via the Particle Command Line Interface (CLI) and via curl to a series of Particle Cloud API endpoints. The CLI performs device programming and curl commands perform device provisioning. It is typical for each suite of commands to be wrapped into a shell script (such as bash for Linux, Mac, or Windows with Windows Subsystem for Linux enabled), MSDOS batch file (.bat), or a node.js script.
This procedure is divided into the following sections:
- SIM Activation
- Assembly and Test
- Programming
- Provisioning
- Scripting the Provisioning Process
SIM Activation
SIM Activation can be performed asynchronously to the manufacturing process, unless cellular connectivity tests are undertaken during manufacturing.
In some cases, such as using LTE Cat M1 devices (B-Series B404/B402, Boron BRN404/BRN402, E-Series E404/E402, Electron LTE ELC404/ELC402) it will be impossible to do a full end-to-end test of cellular at the CM if your CM is based in China, as these devices are unable to connect to cellular in China.
The recommended manufacturing flow uses the bulk-import function in the provisioning process to facilitate the activation of SIMs. Doing so will greatly simplify the process and you can skip the steps in this section.
It can take up to an hour to activate a SIM card, and in some cases longer, so pre-activation of SIMs in bulk is recommended as it can significantly slow the manufacturing process if done one-by-one.
If the manufacturer’s desired flow involves activating each individual SIM just prior to manufacturing, without adding the device to your product, you can use the following setup flow. This may be desirable if your manufacturing firmware connects to cellular and does end-to-end tests but not using your normal production servers, for example.
- You can use a data-matrix scanner to scan the Particle serial number sticker on the Particle device.
This sticker contains the serial number. On Gen 3 devices, it also contains a space character, followed by the mobile secret, which you do not need for activation. You can then use the Particle Cloud API to find the ICCID for the serial number.
curl "https://api.particle.io/v1/serial_numbers/<serial_number>?access_token=$ACCESS_TOKEN"
Then activate the SIM:
curl "https://api.particle.io/v1/products/$PRODUCT_NUM/sims"
-d 'sims[]=$ICCID'
-H "Authorization: Bearer $ACCESS_TOKEN"
There are numerous wireless scanners that emulate a USB keyboard, which is handy for scanning the number directly into a manufacturing script.
- If you are building a product with the Electron 3G (ELC314, E260, or E270), insert the 4FF Nano SIM card.
With these SKUs you typically purchase a pack of 50 SIM cards at the same time you purchased trays of 50 Electron devices, but the are not associated with each other until you come online with the SIM card in the device.
Find the ICCID of your Particle SIM card. The ICCID is visible on the back of the larger plastic card that contains the Nano SIM card. you can also capture it by USB, as in the following step.
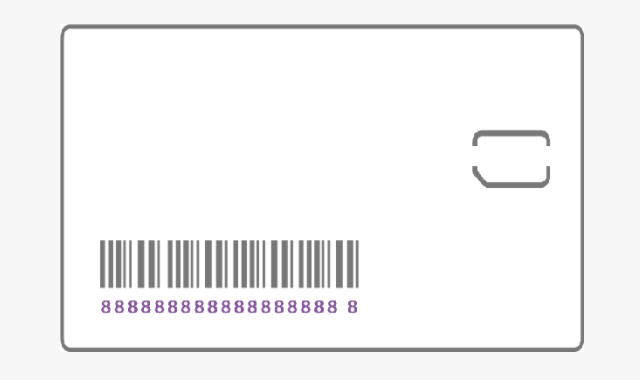
The ICCID is the number underneath the barcode, beginning with 89.
- You can capture the data using the Particle CLI and USB connection
If you are programming the device by USB using the Particle CLI, one of the first steps is typically to use the particle identify command. This will show the Device ID of the Particle device and ICCID of the SIM card. See the programming devices for more information.
Then you can activate the SIM:
curl "https://api.particle.io/v1/products/$PRODUCT_NUM/sims"
-d 'sims[]=$ICCID'
-H "Authorization: Bearer $ACCESS_TOKEN"
Assembly and test
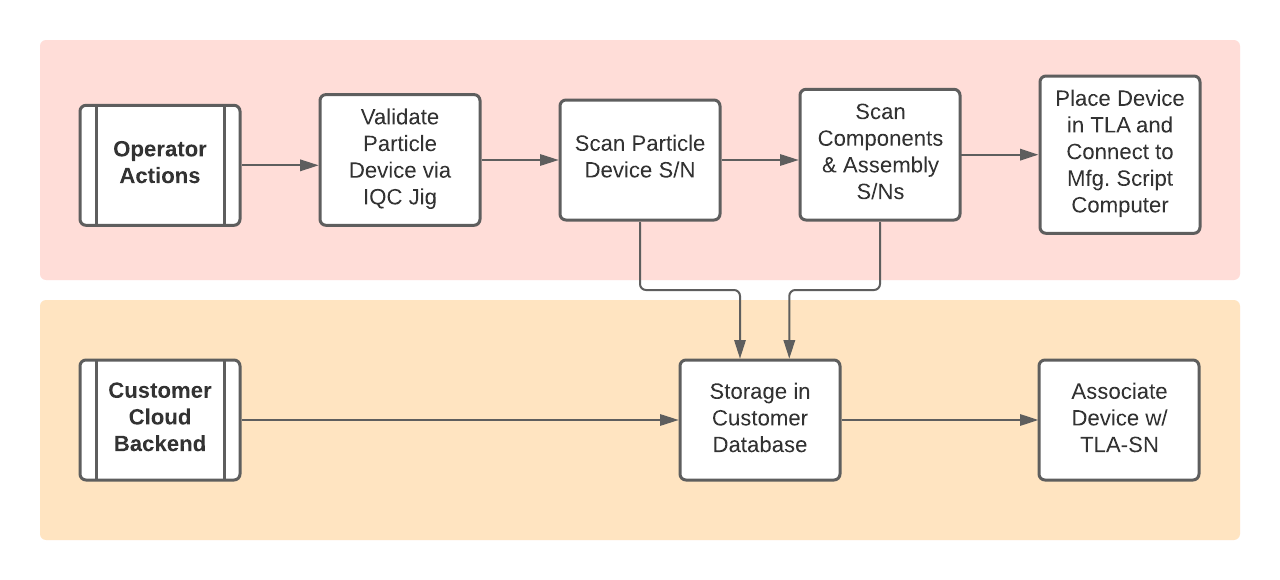
Our recommended practice suggests that each key component part of your assembly receives a QR/barcode. These identifiers should be linked to each other and to the Particle device serial number via some internal database of your design. In the provisioning section below, Particle recommends further storing the Serial Number as the device’s "Device Name" as it makes it easy to identify in the Particle console.
The operator scans each part, capturing the serial number as an input to a script running on the host computer. This script may hit an API endpoint to your Cloud (and therefore to this potential database of your design).
The product is assembled and connected to your manufacturing test rig.
Programming
As stated above, programming is best done using JTAG, if possible.
Prepare your test application and production application images.
Particle offers a Hex Generator Tool, allowing you to easily assemble images for target devices and Device OS versions.
For Gen 3 devices (Boron, B-Series) running Device OS 3.x and earlier, you will need to set the setup done bit as you are bypassing the conventional mobile provisioning flow. This is ideally done by adding the following lines of code to your manufacturing test firmware; this only needs to be done once.
// Only necessary for Device OS 3.0 and earlier. Skip this for 4.0.0-alpha.1 and later.
#ifndef SYSTEM_VERSION_v400ALPHA1
uint8_t val = 0;
if(!dct_read_app_data_copy(DCT_SETUP_DONE_OFFSET, &val, DCT_SETUP_DONE_SIZE) && val != 1){
  val = 1;
  dct_write_app_data(&val, DCT_SETUP_DONE_OFFSET, DCT_SETUP_DONE_SIZE);
}
#endif
It is also possible to do this using the Particle CLI and USB if you are using a USB-based setup flow. If you skip this step, Gen 3 devices (Boron, B-Series SoM, and Tracker SoM) will start in listening mode (blinking dark blue). See Programming devices for more information.
- For the Tracker One and Tracker SoM, you will need to update the NCP (ESP32) firmware if you intend to use the Device OS 3.0.0 or later. It is not required for 2.x, but it is backwards compatible if you need to revert to 2.x from 3.x for any reason. This must be done over USB in listening mode (blinking dark blue, --serial). See Argon and Tracker NCP for more information.
- All Monitor One devices ship the correct NCP version already.
Once your hex files are with your CM, enable your CM to pursue one of the following programmer strategies as detailed within our docs:
- Particle Debugger with OpenOCD (using Particle Workbench)
- Particle Debugger with OpenOCD (standalone)
- Particle Debugger with drag-and-drop (Gen 3 only)
- Particle Debugger with web browser flash (experimental, Gen 3 only)
- Segger J-Link with Nordic nrfjprog (Gen 3 only)
- Segger J-Link with Segger Tools (Both Gen 2 and Gen 3)
- ST-LINK/V2 with ST-LINK Software (Windows, Gen 2 only)
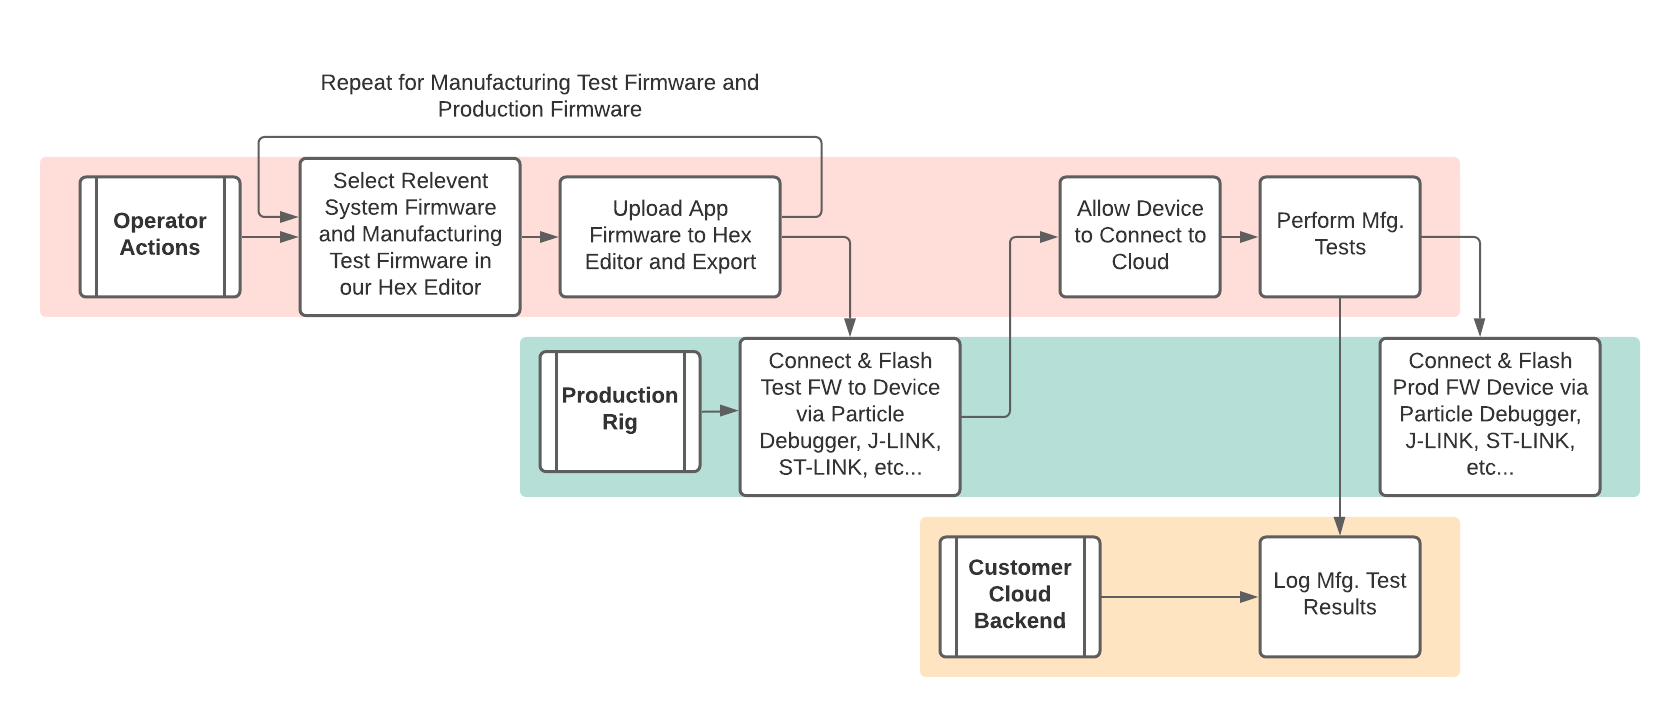
Flash manufacturing test application hex and allow your device to connect to the Particle Cloud.
In some cases, you will not want to enable cellular at manufacturing time:
- Your CM is located out of the area of service for the device (for example, LTE Cat M1 when your CM is in China)
- You do not want to start the billing on the device until later.
In this case, your manufacturing test firmware can use manual mode and only locally test the hardware and peripherals. It's still a good idea to perform antenna-related testing at this time, including a visual inspection of the U.FL connector and/or using an RF meter to test the viability of this connection.
If you do activate the SIM and use normal connectivity mode, the device will go through the sequence of blinking green, blinking cyan, fast blinking cyan, and finally breathing cyan. This provides the greatest confidence in the correct operation of the device, however it could also take up to 20 minutes.
Perform your suite of manufacturing tests, including on-board hardware tests, calibration and configuration processes, production tests, and/or power consumption tests.
This is also a good time to record the firmware versions that you flashed to the device, as well as board versions.
At test completion, push the result of the manufacturing tests to your internal database. If a test fails, perform the relevant failure analysis and take necessary action and retest as needed.
Flash your production application firmware, verify that the production binary was successfully flashed, and log the process as complete.
Provisioning
Device provisioning is typically performed asynchronously with the manufacturing process. This can be done prior to the manufacturing process if SIM activation is required, or afterward in the case of an out-of-region CM.
When you order Particle devices from the wholesale store in trays of 50, you will be emailed a list of the Device IDs and ICCIDs in your order. This can be uploaded to the Particle console in just a few clicks. In the Devices tab of your product select Add Devices then Add Many Devices.
For the Electron 2G/3G only: the SIM 4FF plastic nano SIM cards are not automatically associated with the device and you also must add the SIMs to your product separately. From the SIM Cards tab of your product, select Import SIMs. You will be emailed a file of the ICCIDs in your SIM card order when you order SIM cards in packs of 50 from the Particle wholesale store.
The device provisioning process can be performed with scripts as needed on devices, one-by-one. If that is your intention, consider the following steps an abstraction of the contents of a potential script, and see the next section for scripting suggestions.
Obtain the Device ID or serial number
This can be done through various means:
From the list of Device IDs provided with your tray.
Using a data-matrix scanner to scan the Particle serial number sticker on the Particle device.
This sticker contains the serial number. On Gen 3 devices, it also contains a space character, followed by the mobile secret, which you do not need for activation.
- Use the Particle CLI
particle identifycommand with your device connected via USB and in listening mode (blinking dark blue).
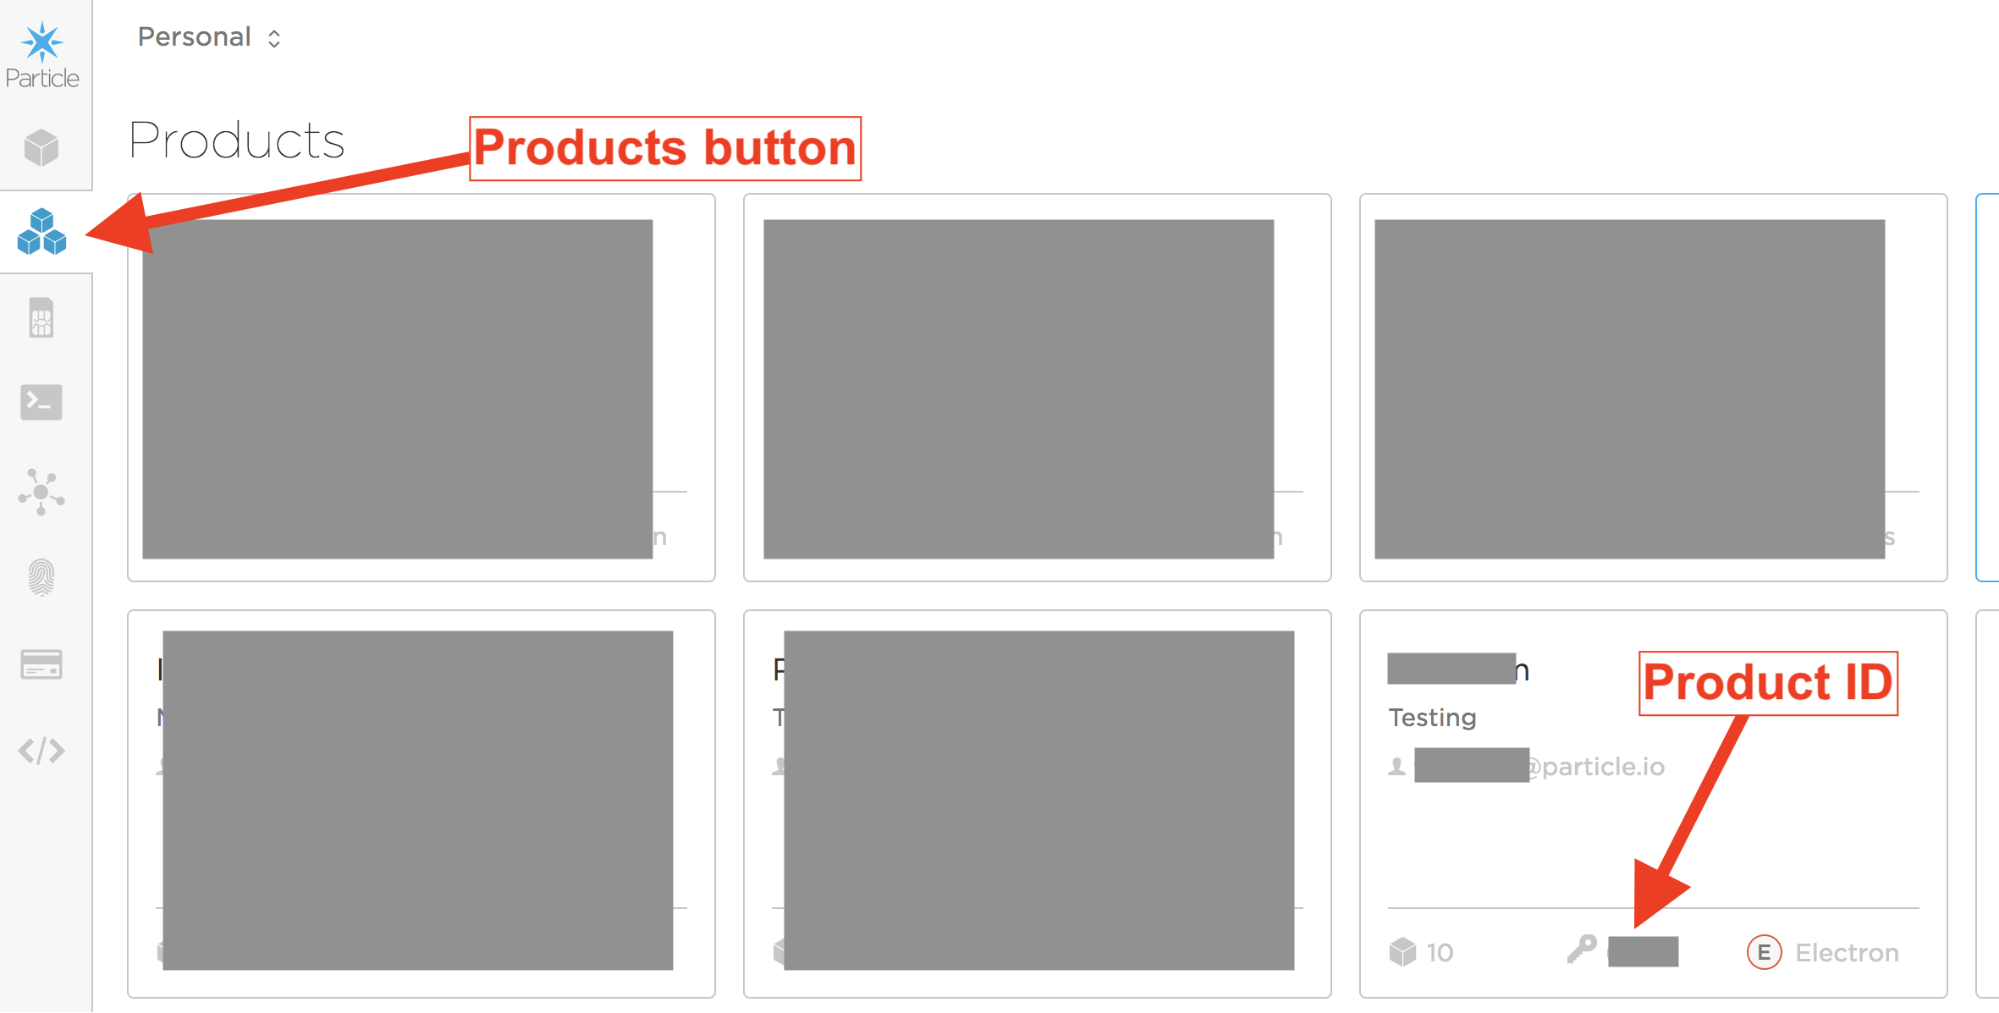
Add the device to the destination Product, providing the following curl command the $PRODUCT_NUM value that corresponds to your Product ID and the $DEVICE_ID_OR_SERIAL_NUMBER value that corresponds to your Device ID or serial number. You can find your Product ID on the top left-hand corner of your Console Product page, or via the “key” symbol in your Console Products view:
The curl command:
curl "https://api.particle.io/v1/products/$PRODUCT_NUM/devices" \
-H "Authorization: Bearer f8a4d380cb6ffffffffffffffffffaf5e496ddf0c0" \
-d id=$DEVICE_ID_OR_SERIAL_NUMBER
Replace the access token with a valid access token, such as from particle token create.
Note: importing your device into a product will also activate its SIM card (for all devices except 2G/3G Electron).
Assign a device group
In addition to adding your device to a Product, we further recommend adding your device to a Product Device Group for a higher degree of control. Device Groups assist with targeted application firmware upgrades to smaller subsections of a Product Fleet, and can be of further use tracking manufacture build dates for easier debugging. This is optional.
Many customers choose to apply a Group name of YYYYMMDD_XXXX denoting the year month day and quantity of devices in the shipment. Some customers will include a hardware version number Group name, or one describing which number of sensors are included with the assembly.
Follow the guidelines on group naming.
- Create the group name, and if it exists take no actions:
curl "https://api.particle.io/v1/products/$3/groups" \
-d name=$GROUP_NAME \
-d description="added via mfg script" \
-d color="#cae6f6" \
-H "Authorization: Bearer $ACCESS_TOKEN"
- Add the group name to the device:
curl -X PUT "https://api.particle.io/v1/products/$PRODUCT_ID/devices" \
-H "authorization: Bearer $ACCESS_TOKEN" \
-H 'content-type: application/json' \
-d "{ \"action\": \"groups\", \"devices\": [\"$DEVICE_ID\"], \"metadata\": { \"add\": [\"$GROUP_NAME\"] }}";
Assign a device name
It is also recommended to give your device the same name as its serial number for easy mapping between the physical device and that seen in the Particle Console. This is optional, and of course you can choose a different naming scheme.
This can be done by passing the Serial Number from step as the variable $DEVICE_NAME within the following curl command:
curl -X PUT "https://api.particle.io/v1/products/$PRODUCT_ID/devices/$DEVICE_ID" \
    -d name=$DEVICE_NAME \
    -H "Authorization: Bearer $ACCESS_TOKEN"
Claim the device
It's generally best to use unclaimed product devices at this time.
- Prior to March 2023, claiming was required if the device firmware subscribed to events on-device. This is no longer necessary.
- You still need to claim a device is if you are using a webhook in the sandbox of the user who claimed the device. It is recommended that you use product webhooks instead, which do not require claiming.
- If you are using a device with Mark as Development device, you may want to claim the device to your account so you can easily OTA flash it from Particle Workbench or other development environments.
- If you previously had firmware that subscribed to events but was the device was unclaimed, the events previously disappeared. This is no longer the case and the device will now start receiving those events, and each event will count as a data operation.
- Claiming is still allowed, if you prefer to continue to use claiming, but not recommended.
If you do wish to continue to claim devices, claim the device to an administrator email associated with the product.
A generic administrator account is strongly recommended (particle@company.com, for example) across your entire Product and/or Organization structure for easy transfer of ownership and centralized billing.
curl "https://api.particle.io/v1/devices
-d id=$DEVICE_ID
-H "Authorization: Bearer $ACCESS_TOKEN"
Scripting the provisioning process
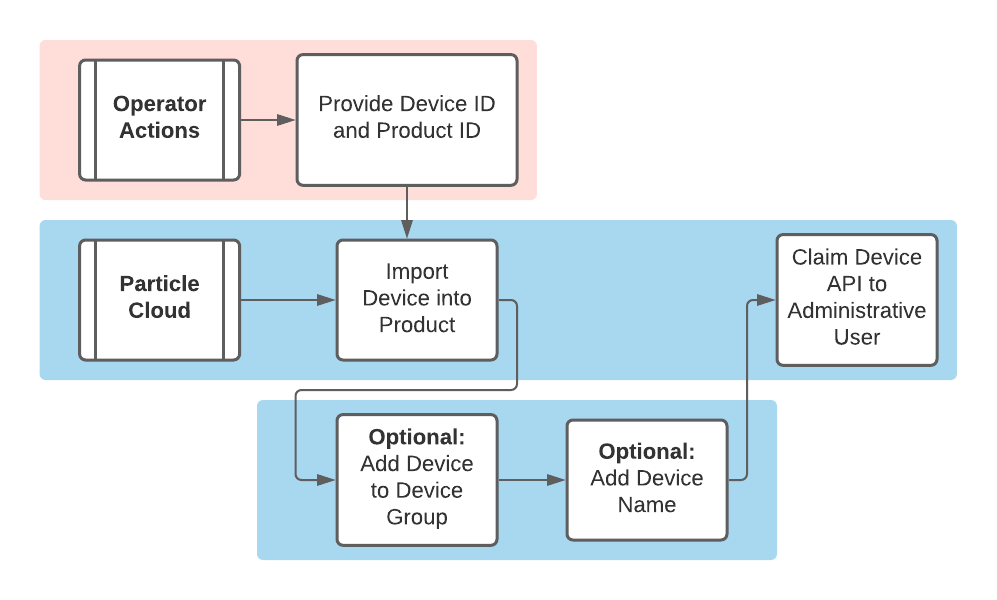
After the Device ID has been retrieved, the provisioning process as outlined above has several key steps:
- The device is imported to a product
- The device is added to a group
- The device is given a name (optional)
- The device is claimed (optional)
These steps can be automated using a script which can greatly speed up the process of performing the steps on multiple devices.
Be aware of the Particle API rate limits when designing your scripts to do batch processing of many devices.
The following script is intended as an example for the batch provisioning of a list of devices. It is written in Bash and the first line has a -x that will produce a verbose output for debugging purposes. In the manufacturing flow it may be necessary to remove this -x in order to capture only the responses from each API endpoint call.
The Bash script will work as-is on Mac and Linux, but on Windows will require Windows Subsystem for Linux, also known as WSL, on Windows 10. It is also possible to use Cygwin on earlier versions of Windows.
This is an example of running the script on the Bash command line:
./claim_and_group.sh group_name_noSpaces <access_token> <productID> filename_deviceIDs.csv
But before running the script, it may be required to run this command after the script is copied to the host computer to make it executable on that computer:
chmod +x claim_and_group.sh
To break down the script command’s arguments:
./claim_and_group.shThis command executes the script.<group_name_noSpaces>This is the chosen group name associated with this shipment of devices. Suggested YYYYMMDD_XXXX where XXXX is the count of devices in shipment.<access_token>The access token received from step 1 of the Provisioning process (see above).<productID>See step 3 of the Provisioning process (see above) for information about how to find this value.filename_deviceIDs.csvThis is a list of device IDs generated from step 2 of the Provisioning process (see above), collected into a .csv file.
The APIs contained in the example script may change, and for this reason this script provided is designed as a structural example of Bash batch processing and not as an authoritative account of best practices for scripted interactions with the Particle Cloud API.