
Creating a product
Even if you're not ready to scale your product yet, it's worthwhile to start by creating a product. In order to use the Basic or Enterprise plan to scale to more than 100 devices, or add additional cellular data, you'll need a product.
But even if you won't be scaling, you will almost certainly want one for other reasons:
- Fleet deployment, so you can release firmware to many devices at the same time.
- Upgrade firmware on offline devices, so devices can receive updates when they reconnect to the cloud.
- Teams, so multiple users can work with the product devices.
- API users, to allow fine-grained access control to Particle APIs from your servers.
Starting out by creating a product first will simplify things later, and also prevent having to reconfigure things, especially if you plan on using webhooks or external servers. For example, if you are using the Particle cloud API from an external server, the API endpoints are different for products than developer devices. However, once you start with product endpoints (even for a product with a single device), you can scale through the free and basic plans, all the way up to enterprise, without having to change your code.
You can create products in the free plan, and the product and devices are still free. There is a limit of 100 devices in a product in the free developer sandbox, but there are no limits in the basic and enterprise plans.
Setting up your product
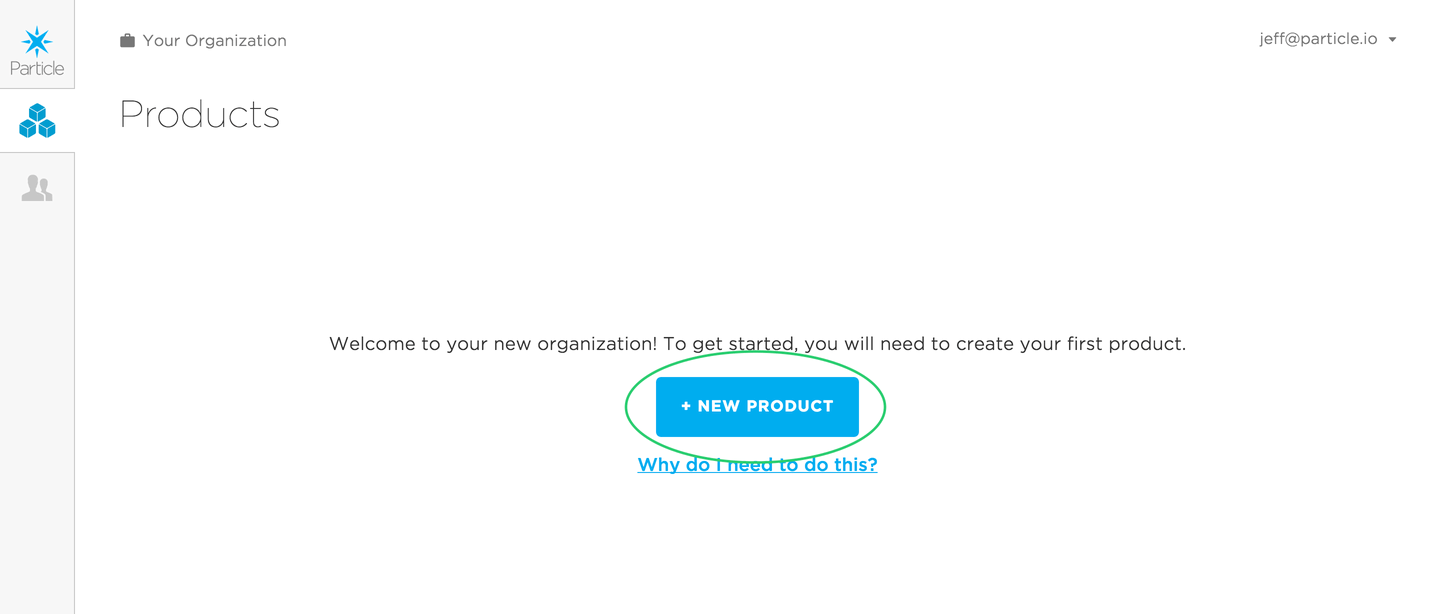
Create a product
To create a product, open the Particle console and click on the New Product button.
This will open up a modal where you can add basic details about your product:
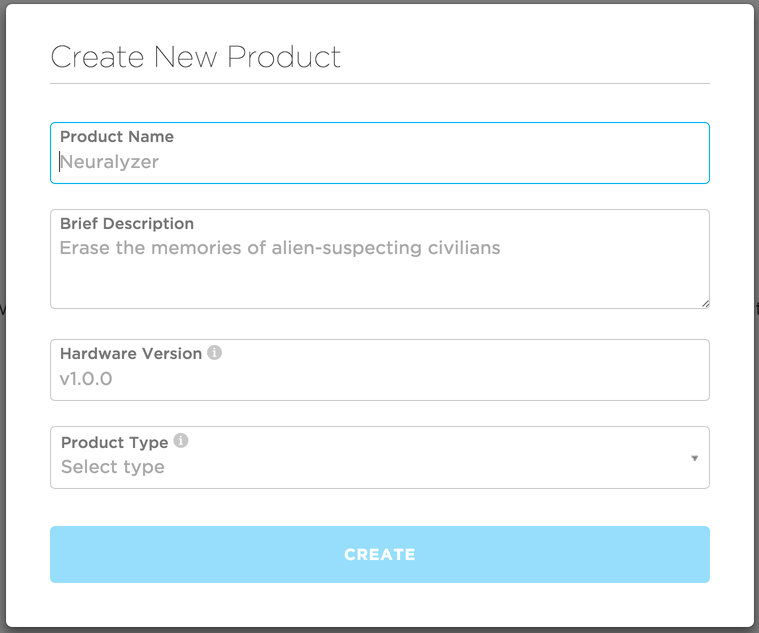
Note that the product name must be unique across all products and users of the Particle cloud. It is possible to change the display name later from the Settings tab of the product.
Each product can only contain one type of device
For example, the Boron, B-Series SoM (4xx), and B-Series SoM (5xx) are three different device types and thus must be in separate products. The reason is that different device types are compiled for different platforms, and a product can only have a single binary for each version released.
The Electron and E-Series, however, are the same platform and can share a single product. The Tracker SoM and Tracker One are also the same platform and can share a product.
Each product has an owner
The owner is the user who initially created the product. To transfer a product to another user later requires a support ticket, so it's best to choose this wisely to begin. Some common scenarios:
If you're a sole proprietor, you may create the product with your own email and Particle account, or create a separate account for better security.
If you're a company, you may want to create a shared email or group to be the owner of all of the company products. This eliminates the need to transfer ownership if the person who created the account leaves the company.
If you're a contractor creating a product for another company, you may want to create a new Particle account for the company to own the products. One handy trick: Create this account in an email domain that you control for initial development. When you're ready to transfer ownership of the completed project, change the email to the destination company's email domain. Doing it this way is easier than trying to extract a single product out of your account.
When you get to the basic or enterprise plan you have an organization, which is your collection of products that belong to your company. Products can be moved into that organization easily from the product configuration.
Changing the owner of a product from one user to another requires a support ticket. Changing the email address of an account, which moves all of the devices, webhooks, products, and source in the Web IDE, can be done from account settings.
Team setup
Each team member will have their own email and Particle account. You can add their Particle accounts to the product from the product Team Configuration.
It works best if each developer has at least one device on their desk, separate from the product device fleet. This allows easy access to the buttons on the device and the USB serial debug log. It also makes flashing the device easier.
You may have a testing device fleet in your product for quality assurance testing that is shared by multiple team members, but also having individual developer devices makes the workflow easier.
In the basic and enterprise plans the organization also has a team. You can have organization team members as well as product-specific team members that only have access to a specific product.
Device claiming
One major difference between developer devices and products is with device claiming. There are several options:
Leave product devices unclaimed. This is the recommended method.
Claim all devices to a single account. This was a common option for cellular products prior to full support for unclaimed product devices. The single owner account, which could also be the product owner account, claims all devices.
Customer claiming. This is a more common for Wi-Fi products that create separate customer accounts for each customer. These can either be simple auth or two-legged shadow customers. It is also possible, but less common, to use this option for cellular devices. It is not recommended unless absolutely necessary.
Developer team members may want to claim the test devices on their desks to their own account rather than a single account or customer account. This simplifies flashing firmware to their devices.
If you are using integrations, the choices made here affect where to put your integration. In most cases, you should put the integration in your product. If you are claiming all devices to a single account you could possibly put the integration there, however it's still generally better to put the integration in the product. If you are using unclaimed product devices or customer claiming, you must put the integration in your product.
- Prior to March 2023, claiming was required if the device firmware subscribed to events on-device. This is no longer necessary.
- You still need to claim a device is if you are using a webhook in the sandbox of the user who claimed the device. It is recommended that you use product webhooks instead, which do not require claiming.
- If you are using a device with Mark as Development device, you may want to claim the device to your account so you can easily OTA flash it from Particle Workbench or other development environments.
- If you previously had firmware that subscribed to events but was the device was unclaimed, the events previously disappeared. This is no longer the case and the device will now start receiving those events, and each event will count as a data operation.
- Claiming is still allowed, if you prefer to continue to use claiming, but not recommended.
Adding devices to a product
It is recommended that you add, in advance, the device IDs of all devices you want to add to your product. This is desirable for several reasons, including:
- If the device is a cellular device, this is necessary to associate the SIM ICCID with your account for billing purposes. If this is not done, the device cannot connect to cellular.
- If you do not pre-add device IDs, the device will be stopped from joining your product and go into quarantine when it first connects to the cloud. This is usually a bad user experience as it requires the product creator to manually approve each device as it comes online.
- If auto-approve devices is used to prevent quarantine, this allows any device to join your product, including any random developer devices that knows your product ID. This is not recommended.
- If you do not pre-add the device IDs, you cannot pre-claim devices if you are claiming to a single account.
- If you are using wildcard product IDs, you must pre-add device IDs
Fortunately, it's easy to pre-add device IDs when you order in tray or reel quantities from the Particle wholesale store. You will be emailed a file containing the device IDs of all of the devices in your order. You can upload the file in the console with just a few clicks.
For all devices with built-in Particle SIMs, importing the device ID also imports the SIMs, so you only have to do one step. The exception are the older Electron 2G/3G devices (E260, E270, E350, ELC314) that use a separate plastic 4FF SIM card. In this case, when you order 50 packs of Particle SIM cards, you will also be mailed a file of ICCIDs that you can import as well.
Billing for added devices
Adding product devices - free plan
Adding a device to a product in the free plan will increase the number of devices in the account by one immediately. There is a limit of 100 devices across all types (cellular, tracker, or Wi-Fi) in a free account. As the account is free, there are no billing implications, other than contributing to the free plan usage limits.
The limit is 100 devices per account, including non-product devices and all products owned by that user. Thus it's possible for the number of devices allowed in a free plan product to be less than 100. If you have more devices, you may want to upgrade to the basic plan.
Adding product devices - basic plan
Adding a device to a product in the basic plan can be done in advance, and in bulk. The basic plan has the concept of metered devices which includes all devices that have connected to the cloud at least once. Thus you can add many devices to your product at once, and only when you first turn them on and connect to the cloud does billing start. This allows devices to be assembled and configured without starting billing yet.
Once a device comes online once, it will count against the 100 devices per block limit, even if does not connect to the cloud during the billing month.
It's possible to set up the device by USB or JTAG/SWD, as long as it does not connect to the Particle cloud. Thus you can use your own manufacturing firmware to test your circuit board, custom sensors, etc. without starting billing.
We recommend flashing the desired version of Device OS and your product firmware by USB or SWD/JTAG before shipping it to your end-users, as well.
In order to remove a device from the billable device count, you must Remove device from the product and Release ownership of the SIM card.
Adding product devices - enterprise plan
Adding a device to a product in the enterprise plan can be done in advance, and in bulk. The enterprise plan has the concept of metered devices which includes all devices that have connected to the cloud at least once. Thus you can add many devices to your product at once, and only when you first turn them on and connect to the cloud does billing start. This allows devices to be assembled and configured without starting billing yet.
Once a device connects to the cloud the first time it will be counted as a billable device even if it does not connect to the cloud in future months.
It's possible to set up the device by USB or JTAG/SWD, as long as it does not connect to the Particle cloud. Thus you can use your own manufacturing firmware to test your circuit board, custom sensors, etc. without starting the billing process.
We recommend flashing the desired version of Device OS and your product firmware by USB or SWD/JTAG before shipping it to your end-users, as well.
In order to remove a device from the billable device count, you must Remove device from the product and Release ownership of the SIM card.
Connecting during device testing
In some cases, you may want to do an end-to-end test that also tests cellular or Wi-Fi connectivity. This provides the greatest assurance that the device will work out-of-the-box for your end-user but in some cases is impossible or impractical, in which case the connecting by end-user may be a better choice.
Adding to the product first
Importing the devices to the product is easy when you order in tray or reel quantities from the Particle wholesale store. You'll be emailed a list of device IDs, which can be imported into the console in a few clicks. This both adds the devices to the product and activates the SIM card for cellular devices.
You can also add devices individually using the Particle cloud API. And example of this technique can be found in the device cloud setup example script. Two common methods are connecting by USB to read the Device ID, or scanning the serial number sticker on the device.
Using a test account
Another option is to use a test account during initial device testing. This makes it easy to run test firmware and test cellular or Wi-Fi connectivity.
Only after successfully completing the tests do you flash the final user firmware and associate the device with the product.
This method is more complicated and must be done with care to prevent long activation times when the SIM is activated later. See SIM activation speed.
Connecting by end-user
Another option is to not connect to the cloud until the end-user uses the device for the first time. The disadvantage is that you will not complete and end-to-end test, however you can still test your device except for the cellular or Wi-Fi connectivity part. There are several reasons you might want to do this:
- Your devices are assembled an tested out of the cellular area they will be used, for example assembly in China with US LTE Cat M1 devices that cannot connect there.
- Your supply chain from assembly to end-user exceeds 6 months, and you want the simplest solution to reduce costs.
It's possible to set up the device by USB or JTAG/SWD, as long as it does not connect to the Particle cloud. Thus you can use your own manufacturing firmware to test your circuit board, custom sensors, etc. without starting the billing process.
We recommend flashing the desired version of Device OS and your product firmware by USB or SWD/JTAG before shipping it to your end-users, as well.
Development tools
Workbench
Particle Workbench is the recommended tool for creating and building product firmware. Using a source code control system like git with Workbench has a number of benefits:
- Full log of every code change that has been made.
- Great support for teams, including merging changes made by multiple team members.
- Release management to keep track of your software releases to your product device fleet.
- Better flexibility for libraries and shared code.
Additionally, there is good integration between git and Microsoft Visual Studio Code (vscode, which is what underlies Particle Workbench), making it easy to use git.
One popular provider of git source code repositories is GitHub. You can have private projects (repositories) in GitHub where you only allow certain users access, even in the free plan of GitHub. Each developer will have their own GitHub account. This could either be the same account email used for their Particle account, or a separate GitHub account at a different email. They do not need to be the same.
Or course you can use other source code control systems if you prefer.
Compilers for Workbench
Particle Workbench supports two ways of compiling your source code:
Cloud compile uses the same compilers that are used by the Web IDE and the Particle CLI. Your source code is uploaded to the cloud servers, compiled, and the resulting binary either flashed to devices OTA directly from the cloud, or a binary is downloaded back to your computer.
Local compiler toolchain uses the same compiler toolchain (gcc ARM) as the cloud compiler, but loads the native versions of the toolchain for Windows, Linux, or Mac onto your computer and does the compilation on your computer. Your source code does not leave your computer in this scenario.
The local compiler may be necessary for very large projects, but otherwise you can generally switch back and forth between cloud and local without difficulties. On Windows in particular, the first build will take a very long time because all of Device OS needs to be built. The launching of the compiler, which must be done a very large number of times, occurs much more quickly under Linux and Mac, which is why those local builds are faster. When possible, we recommend using Linux or Mac for this reason.
Web IDE
The Particle Web IDE can be used to create product firmware, but it's recommended that you use Particle Workbench. It's difficult to share code between multiple users in the Web IDE, and there is no version control.
If you are currently using the Web IDE and want to migrate to using Workbench, you can use the Web IDE Export Tool to export your projects for use with Workbench.
Particle CLI
It's also possible to use a different code editor and version control system and still use the Particle command line interface and cloud compilers to build your code.
Libraries
In many cases you will use third-party libraries in your product firmware.
Particle library system
It is possible to use libraries as you have with development devices. In the Web IDE, using the Libraries icon. In Particle Workbench, Particle: Install Library. You can also use particle library add in the Particle CLI, or manually edit the project.properties file in your Workbench or Particle CLI project.
One thing to beware of: If you have a project.properties file containing a library in the dependencies section of the file, and you also installed a copy using Particle: Install Library or particle library copy you will end up with both the source code in the lib directory, and a definition in project.properties. When you build locally, the version in the lib directory is used. When you cloud build, the lib directory is uploaded, but the official version in project.properties is used. If you are locally modifying libraries in the lib directory, be sure the remove the library from project.properties to avoid building the wrong version.
You can search popular public libraries from the library search tool.
GitHub (single project)
In some cases, instead of committing the project.properties file to your GitHub repository, you may prefer to commit the lib directory instead. This allows a single git clone operation to obtain all of the files for building your application. It also assures consistent building for both local and cloud builds.
GitHub (submodules)
However, if you have more than one project, this will result in a large number of copies of common files, which is best to avoid. Fortunately, git supports submodules, which allows a project repository to include a reference to another git repository, along with the version to use. Then when the library is cloned, you simply also clone all of the submodules:
git submodule update --init --recursive
- This is the technique used by the Tracker Edge firmware to pull in libraries into the lib directory of Tracker Edge projects.
- It leverages git for storing libraries, instead of the Particle library system.
- Because of this, it's significantly easier to use your own fork of a public library with your own changes.
- It's a good way to share proprietary code between your own projects.
For example, if you have a custom set of proprietary utilities in your company that are shared between multiple projects, the Particle library system is not ideal because there are only two levels of access: public (everyone) and private (one account). Since there are no team or organization libraries, using git is often a better way to control access to the libraries that are not public.
It works well to create the lib directory in your project, then use submodules for each "library" that you want to include in your project. This is how the Tracker Edge firmware is designed. Within each "library" it should follow the format of Particle libraries, that is to say containing a directory called "src" with the source code for that submodule.
GPL and LGPL
Beware of libraries that have GPL (GNU public license) or LGPL licensing if your project will be closed-source. In almost all cases, this will violate the license of the library. This is true even for LGPL, because of the static linking restriction.
Particle Device OS contains code that is LGPL licensed, but can be used in closed-source projects because Device OS is dynamically linked to your project.
Libraries, on the other hand, are statically linked to your application. Thus you cannot use the library exemption in LGPL to avoid open-sourcing your proprietary source code.
Build workflow
Individual developer
Individual developers generally test with a device on their desk, when possible. This allows easy access to the buttons and the USB serial debug console output. If you have more than one product, one product per device is ideal, but you could switch between products if specialized hardware is not required.
- The device is still added to its product so it can have access to product webhooks and other product features.
- However, it is marked as Development Device so firmware flashing is not controlled from the console, but allows for local USB and OTA flashing of the single device.
- Often, the developer will claim the device to their own account, not a product shared account or left unclaimed. This allows for OTA flashing of the device by the developer.
- If you are flashing by USB you don't have to claim the device to your own account, but you do still need to mark it as a Development Device in the product, otherwise as soon as it connects to the cloud the cloud will flash the standard product firmware to it.
- This provides the most rapid write-test-debug cycles, but is not the only way to develop product software.
QA testing
Once the product firmware passes the development and initial testing, it may be desirable to deploy it to a test fleet.
To do this, you build a firmware binary (in Workbench, Web IDE, or CLI), then upload it to the console. Then you can release it to a single device or device group. This exercises the whole upgrade process in the same way that it would be for your customers.
If you don't have a dedicated QA department, you still could use this model if you have a team of developers that share devices for testing code before wide-scale deployment.
Release to fleet
Finally, once you've tested the binary and upgrade process, you can then flash to a large device group, or to the entire fleet of product devices.
Events
Events, using Particle.publish(), from a device or from the cloud API, are a way to communicate from one device to many subscribers. By default, events are private, meaning they go only to the same owner account as it was sent from. For devices, this is the account that claimed the device. For the API, this is the account that created the access token.
Additionally, when a device is in a product, when it publishes events they not only go to the private event stream of the device owner (if claimed), but also to the product event stream.
You typically use product events to handle events from devices by webhooks or the server-sent-events stream. This allows the product creator to handle events from any device in the product, regardless of who claimed it, or if it's unclaimed.
Viewing events
Within the console there are a number of Events pages, so make sure you are viewing the correct one:
Developer events
In the top level of the console, Events tab displays the events for that account, including from devices claimed to that account or generated from the API using the developer events endpoint and an access token for this user. You will not see unclaimed product device events here.
In the top level of the console, if you select the Devices tab and then open the device, there will be a log of events generated by that device. Note that this will not show integration response events.
In Integrations in your developer sandbox, when you open an integration you can see the 10 most recent requests and response that triggered the integration, but no other events.
Product events
If you open a product (either sandbox or organization), you will see similar tabs within the product including the Devices, Events, and Integration icons, but these are for that specific product, not the developer account!
Inside a product, Events displays product events, including events generated by devices within the product, as well as integration responses generated for product integrations. This includes events generated by unclaimed product devices.
Inside a product, if you select the Devices tab and then open the device, there will be a log of events generated by that device. Note that this will not show integration response events. Note that Tracker products do not have a per-device event log; instead the device map and settings appear here.
Inside a product, if you select Integrations, when you open an integration you can see the 10 most recent requests and response that triggered the integration, but no other events.
Communicating with your servers
A common need is to have events from your Particle devices trigger external services, possibly in your own server or cloud server, or a 3rd-party service.
Integrations
If you are using Integrations, including Webhooks, there are two different places you can create them, which can lead to confusion.
Product integrations
The recommended location for webhooks for product devices is within the product configuration. Product integrations can be triggered for any device in the product device fleet, including development devices and unclaimed devices. Make sure you are opening the Integrations tab after going into the product to see this list.
This is necessary if you are using product customers, where claiming will occur to many accounts. Since product customers cannot log into the console, they do not have customer-specific integrations.
Device owner integrations
An integration in the device owner's account can also trigger for a product device event. This is generally not the best place to put the integration, even if you are claiming devices to a single account, as it means development devices must be claimed to the shared account, which is inconvenient for OTA flashing during development.
Also all team members can access product integrations with their own login. They would need to log in as the device owner account to see a device owner integration.
Beware: If you have two integrations, one in the owner account and one in the product, both can fire if they have the same event trigger!
To copy or move a device owner integration into a product, see Product vs. sandbox integrations.
Server-Sent Events (SSE)
Two common ways Particle devices can trigger external services are webhooks and Server-Sent Events (SSE).
The SSE event stream works by having your server make an outbound https (encrypted) connection to the Particle API service. This connection is kept open, and if new events arrive, they are immediately passed down this stream. There are a number of advantages to this:
- Works for developer and product event streams.
- Can get all events, or a subset of events by prefix filter.
- Works from a network behind a firewall or NAT typically with no changes required (no port forwarding required).
- You do not need TLS/SSL server certificates for encrypted communication, because the connection is outbound.
- You do not need separate authentication; Particle API tokens are used for authentication.
- It's efficient - the connection only needs to be established and authenticated once.
While this sounds great, there are some issues that can occur that make it less than ideal for large device fleets and make webhooks more attractive:
- You can only have one server accepting events with SSE. With webhooks you can have multiple servers behind a load balancer for both server redundancy as well as load sharing.
- If the SSE stream fails for any reason, you could end up losing events. It can take up to a minute to detect that this has happened in some cases.
| SSE | Webhooks |
|---|---|
| Works from behind a firewall | Requires a public IP address |
| Encrypted without a SSL certificate | Requires a SSL certificate for the server to support https |
| Best if lost events are not critical | Event delivery is more reliable |
| Only allows a single server | Can use load balancing and redundant servers |
When using SSE, we recommend using the particle-api-js library with node.js, however any language can be used. We recommend using a good, well-tested SSE library as there are some things to beware of when implementing the SSE protocol:
- The connection can be closed at any time by the SSE server. You must be able to handle this and reconnect.
- The connection can stop receiving data because the TCP connection is losing all packets when crossing the Internet. You can detect this because the SSE client will not get any events or the 60 second ping, and it should try reconnecting. This also means that you could lose up to 60 seconds of events in the case of an Internet outage.
- Beware of excessively reconnecting and rate limits.
There is a limit of 100 requests to open an SSE connection in each 5 minute period per public IP address. If rate limiting occurs, you will get a 529 error and you must wait before retrying the connection or you will never be able to successfully connect again. There is also a limit of 100 simultaneous SSE connections from each public IP address. This is not separated by device, access token, etc.; it applies to the public IP address the requests come from.
Because of the simultaneous connection limit, if you want to subscribe to multiple events, you should establish one SSE connection to handle all events, and filter the results for the events that you want to handle. While this seems less efficient, it is the preferred method because the overhead of handling multiple SSE sessions is far higher than the incremental overhead of sending many events across a single event stream. Using a common prefix to group multiple events that need to be received from a single SSE event stream is also a good technique to use if possible.
Google Pubsub
One option that's somewhere between SSE and webhooks is Google Publish and Subscribe (pubsub). This uses a feature of the Google cloud, which may incur additional charges from Google but has a number of advantages:
- The Google pubsub receiver is redundant, load-balanced, and highly available.
- Your server can be network behind a firewall or NAT typically with no changes required (no port forwarding).
- Or your server can be in the Google cloud, if you prefer.
- You do not need TLS/SSL server certificates for encrypted communication, because the connection is outbound.
- You do not need separate authentication; Google cloud authentication is used.
- Google subscriptions have confirmed delivery. If your server is down, the events will be queued in the Google cloud and will be received when you next connect.
- Because of confirmed delivery, you can have multiple servers receiving the events and they will round-robin handling events with each event only being handled once.
Changing the product owner
The product owner is the account that owns a product. It can either be a user account (sandbox product), or it can be an organization (basic or enterprise product). When you migrate to basic, you provide a list of products you want to move into the organization:
- Billing for the organization will be the responsibility of organization.
- The product will no longer be limited to 100 devices.
- Exceeding the data operation or cellular data limits will add additional blocks instead of pausing the account.
- Device connectivity will continue uninterrupted.
Device claiming is not affected by the move. If the devices were claimed to the original product owner that will remain unchanged. However even though the devices appear in the product owner's sandbox device list, devices that are part of the organization product do not count against the 100 device limit! You can use the device list details tool to see which devices count against the limits.
Integrations such as webhooks defined in the old product owner account will continue to function if the devices are still claimed to the product owner.
Changing the product owner email
Another possibility is changing the product owner's email. This affects:
- All products owned by that user will now be associated with the new email.
- All device claims will be will now be associated with the new email.
- All access tokens continue to function unchanged.
- Integrations move the new account email.
- Applications in the Web IDE are moved to the new account email.
- Devices stay online uninterrupted.
- API access remains unchanged.
This option is ideal if you are contractor developing a product for a company, then handing it off.
- You create a Particle account for each project you are working on using a unique email in your domain, Google mail, etc.
- Upon completion of the project and handoff, you change the account email to a domain controlled by the company that now owns the project, products, devices, etc.
- Before transferring, disable multi-factor authentication (MFA), if enabled.
- Upon transferring the password will be unchanged, but the receiver can reset the password using their email.
In the scenario where the contractor passes off ownership but still needs access for maintenance, the contractor can add themselves as a team member using a different email that will continue to work after changing the product owner email.
Device lists
The device lists can be confusing because there are multiple device lists with sometimes confusing information.
Sandbox devices
When you first open the console the sandbox device view is what you see.

When Sandbox (1) is selected, you will see the devices in your personal sandbox, vs. your basic or enterprise organization.
Clicking the Devices icon (2) shows the Device List.
If the Show sandbox devices only checkbox (3) is not checked, then the list will be like the old, pre-checkbox, behavior and will show devices that are claimed to your account, both in your free developer sandbox as well as product devices in free, basic, and enterprise organization products.
When checked, the list will only include non-product devices claimed to your account in the free developer sandbox.
- Total personal devices is the number of non-product devices in your free developer sandbox.
- Total claimed product devices is the total number of devices claimed to your account that are in a product.
The 100-device limit in the free plan is the total of the devices claimed to your account in the developer sandbox, plus all devices in any free plan products that you are the owner of.
Sandbox products
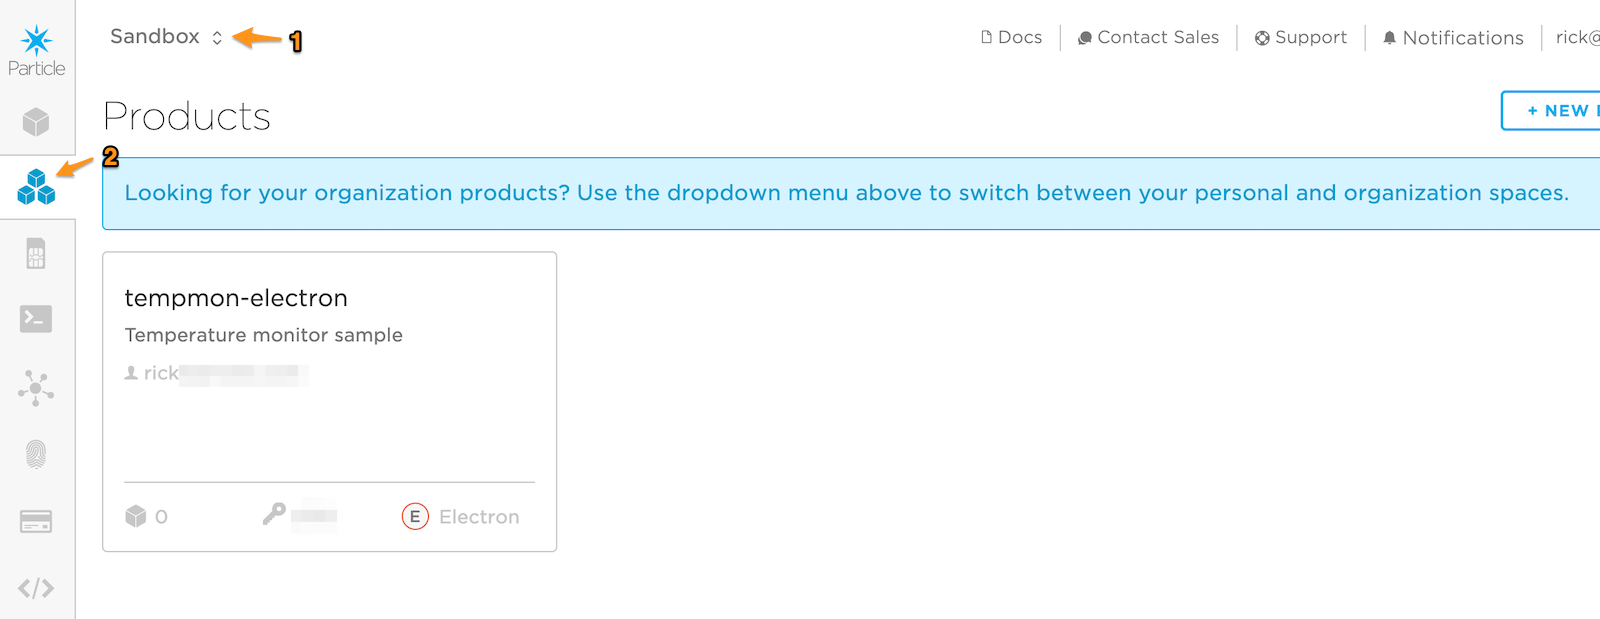
The sandbox product icon (2) shows all of the products you have access to, either as the product owner, or as a team member of a sandbox product that another user owns.
When you start out developing products, this is likely where they will appear.
If the product is an organization product, see below.
Organization product devices
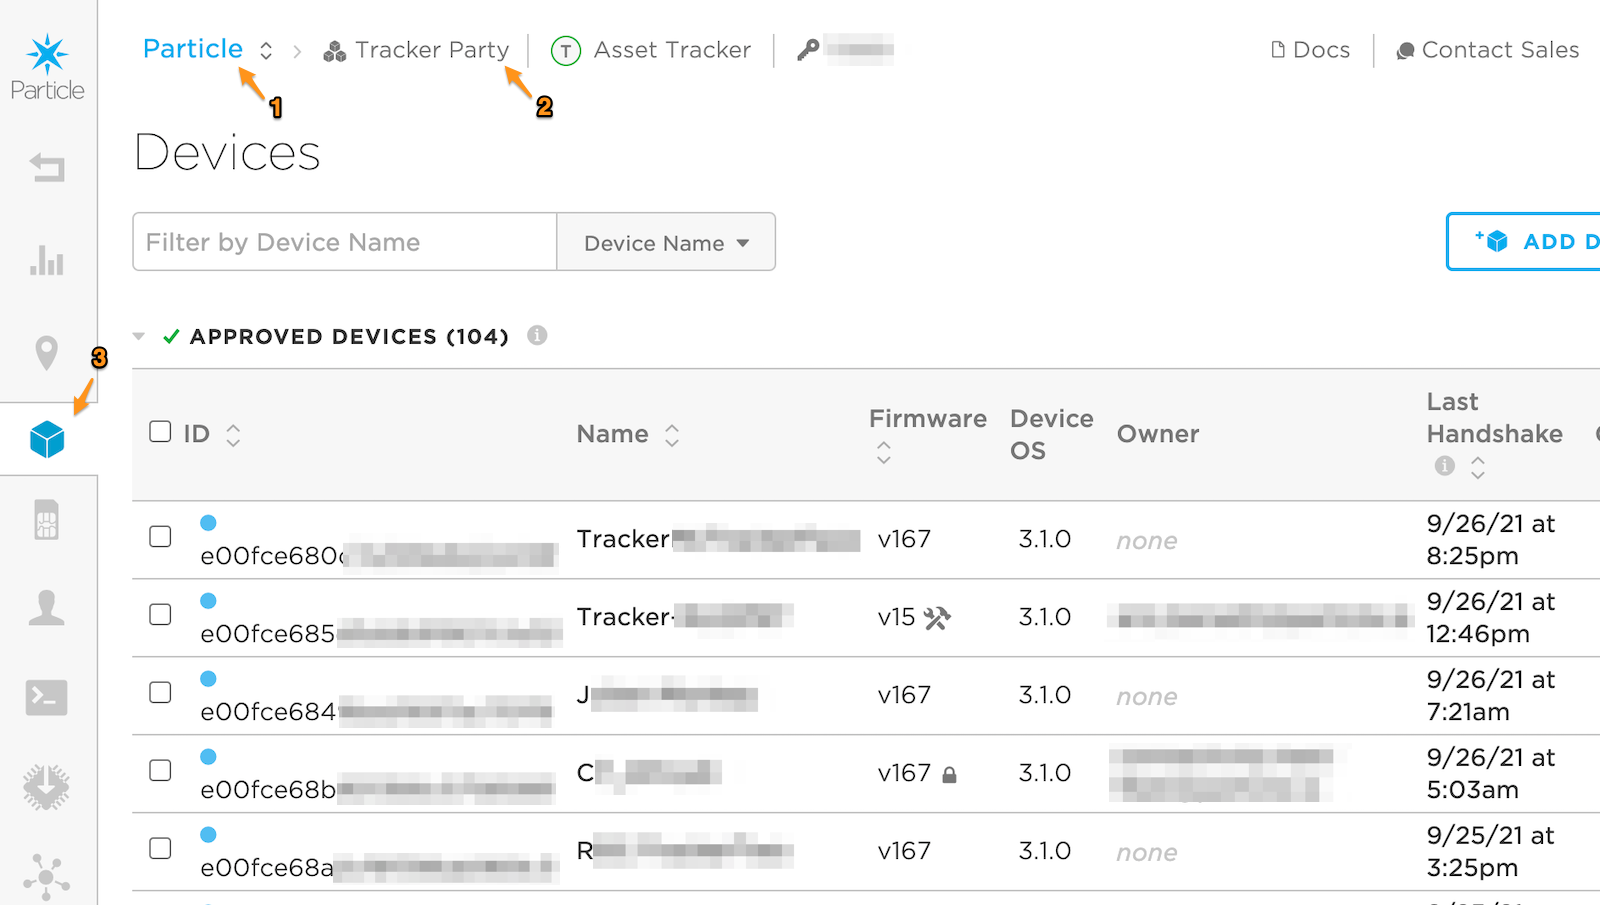
If you have access to organizations and select your organization (1), then select a product (2), and the product devices icon (3), then you'll see the device list for that organization product.
In a product (organization or sandbox), it's often possible to leave the devices unclaimed. This is the case for all Tracker devices with the default Tracker Edge software. Thus none is a valid value in the Owner column. Another common scenario is for all product devices to be claimed to a single account, in which case the owner will be the same for most devices.
Note that if you have an organization product device claimed to your account, it will appear here as well as in your sandbox devices view! This is the organization product view for the product Rick-Tracker, which contains devices that also show up in Rick's sandbox device list (above).

Device list details
This tool can help you decode what's being displayed in the sandbox device list for you account:
Next steps
When you're ready to expand beyond prototyping, see scaling your product for tips of growing your product.