


 Go to console

 Change theme


 Edit Account
 Logout
Sensors
In this section, I'll make a fleet of temperature sensors and discuss other kinds of sensors you may be interested in.
Hardware
This section uses an inexpensive SHT31 (SHT3x) temperature and humidity sensor. I got a package of 3 sensors from Amazon. It the time of writing, it was $13.99. Searching for "SHT31 Arduino" will return many results on Amazon, eBay, and AliExpress.
This vendor does not solder the pin headers on the bottom of the module, so you will need to do that yourself. If you don't have a soldering iron, you may be able to find completely pre-assembled modules.
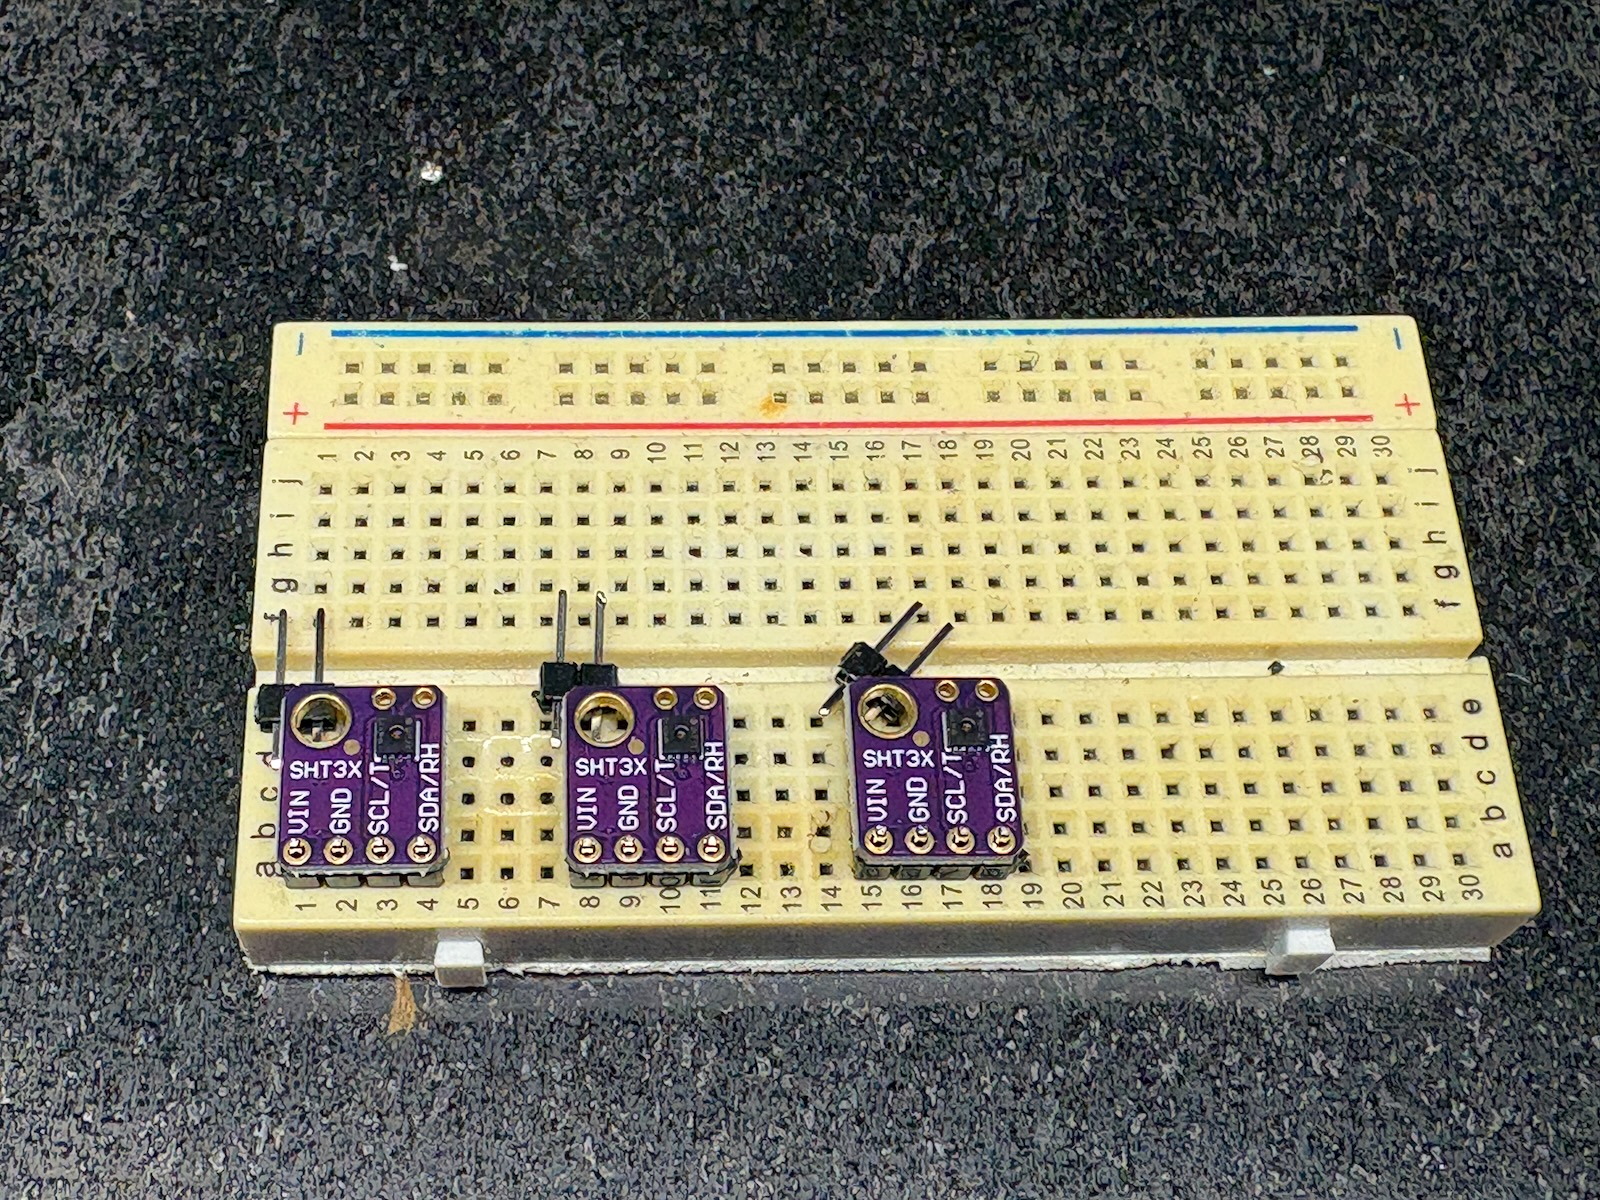
You will also need:
- A solderless breadboard
- Connecting wires
- 2x 4.7K resistors
The flexible wires shown are often called "Dupont wires" and have stiff connecting pins at both ends.
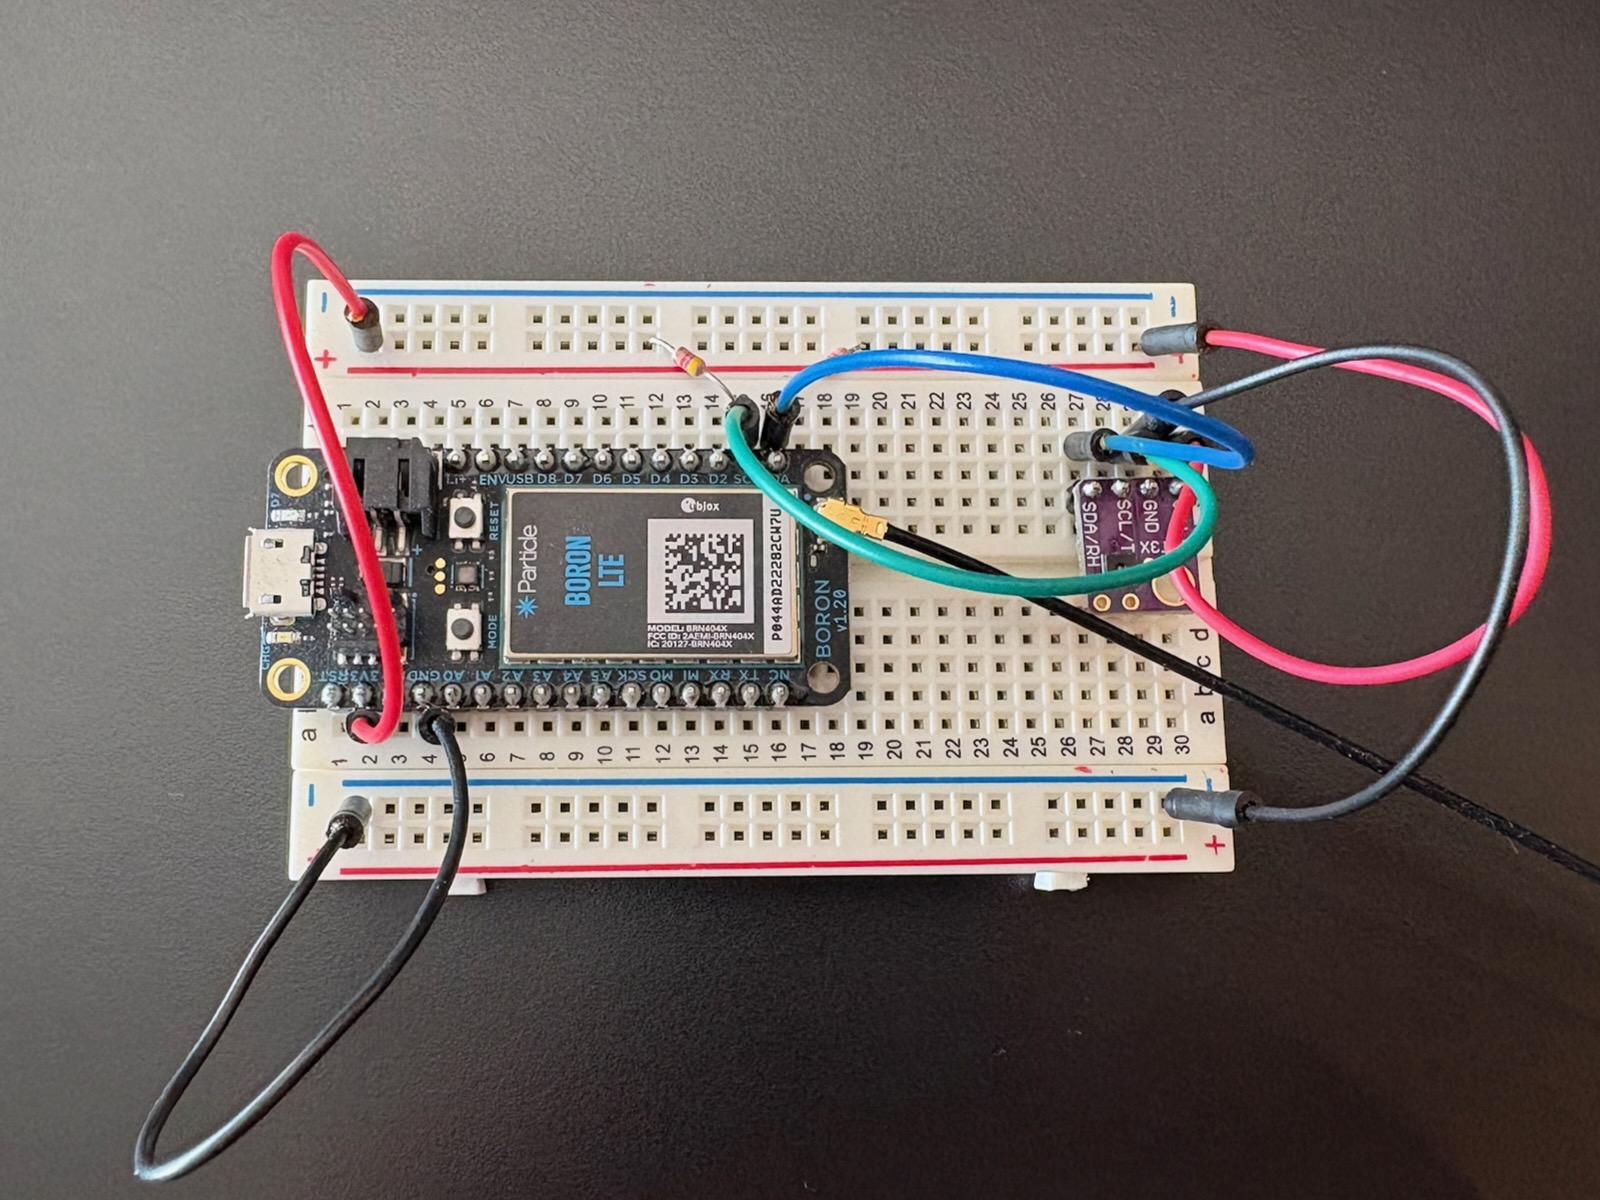
- SDA (D0) connects to 3V3 with a 4.7K resistor. It also connects to the sensor SDA (blue).
- SCL (D1) connects to 3V3 with a 4.7K resistor. It also connects to the sensor SCL (green).
- 3V3 connects to the red power rail, and the sensor VIN (red).
- GND connects to the blue power rail, and the sensor GND (black).
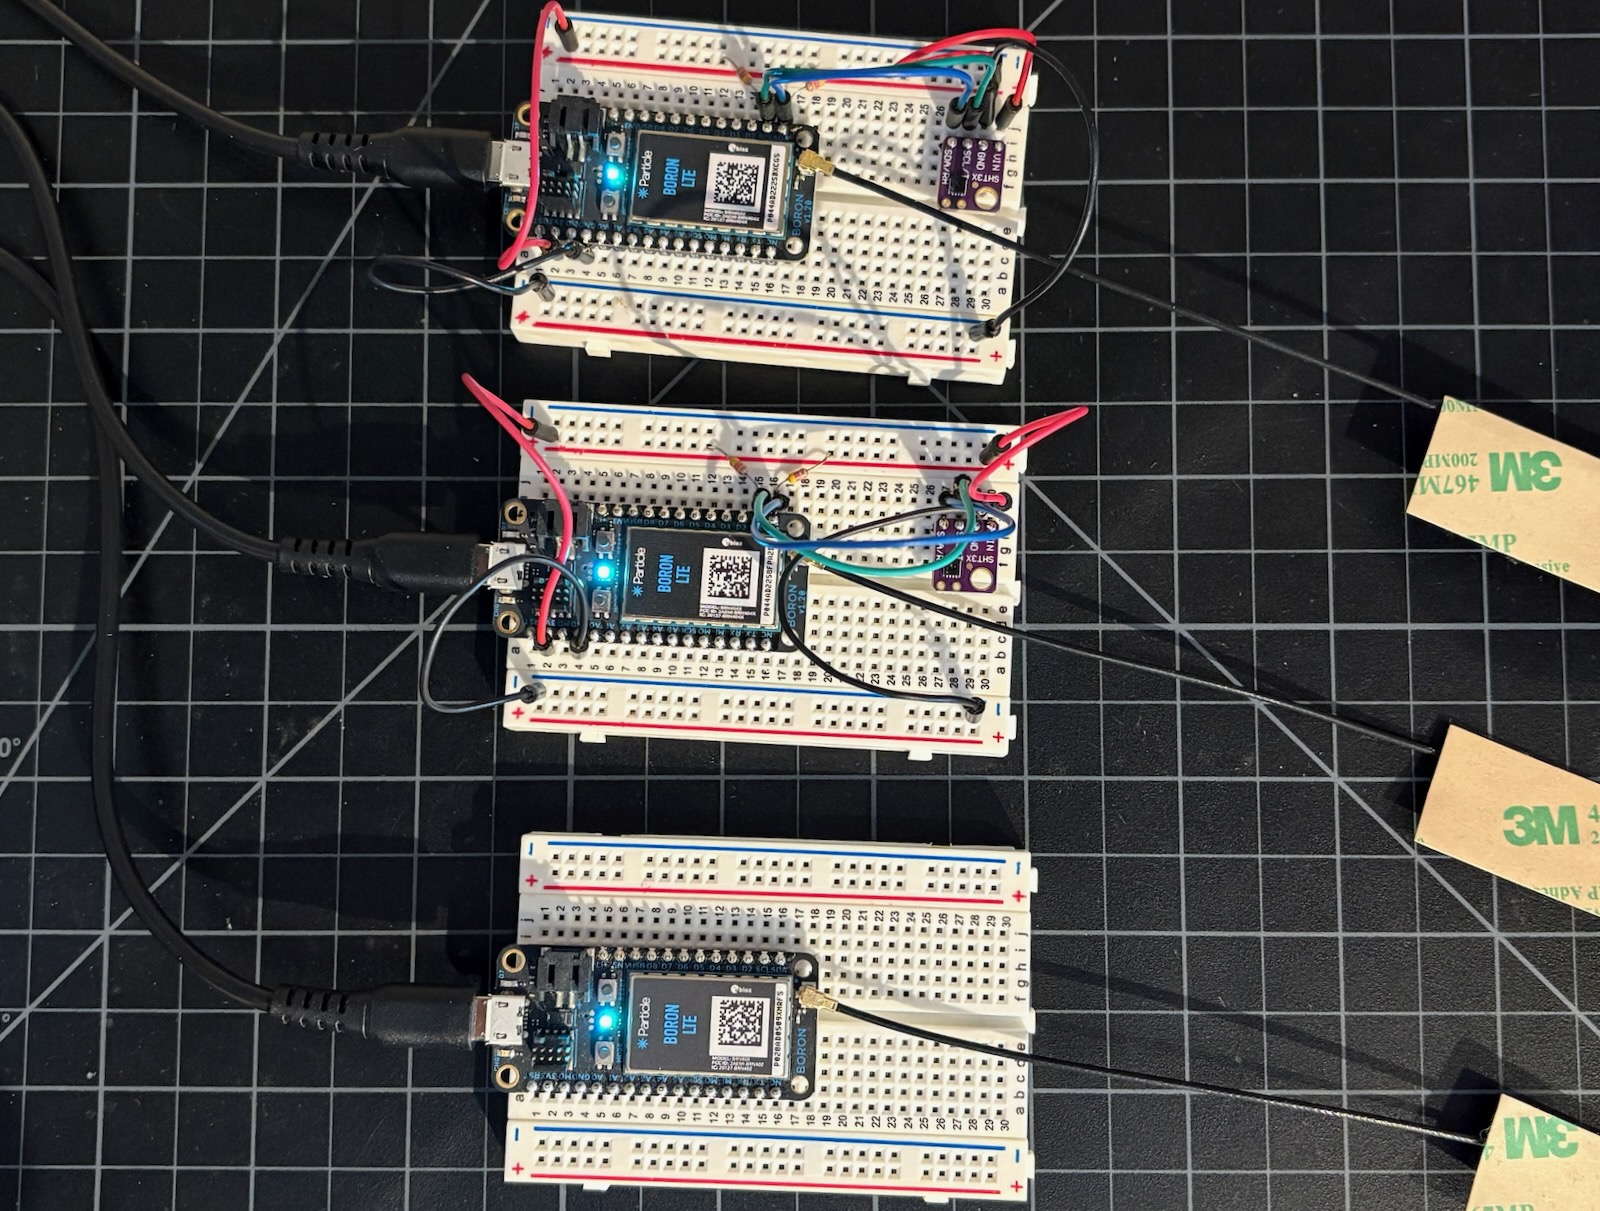
The rest of the device fleet with 2 more sensors. I didn't order enough for the last device.
Firmware
As in the previous section, you can either:
- Particle: Create New Project, create TemperatureSensor, and paste the contents TemperatureSensor.cpp file into your file.
- Download the zip file, extract, then Particle: Import Project.
As in the previous section, also do:
- Particle: Configure project for device
- Particle: Flash application (local)
If you have not already done so, if you flash a device directly from Workbench make sure you set the Mark as development device option in the product, otherwise the firmware that you flash will likely be immediately replaced with the product default firmware!
Gen 2 Devices (STM32) (E-Series, Electron, Photon, and P1; does not include E404X):
The code in this section uses extended publish that is only available in Device OS 6.3.0 and later, and cannot be used on Gen 2 devices. While the sensors are compatible with Gen 2 devices, the code would need to be modified to use the older style of publish, used in the CloudButton example.
Explaining the code
Include the library header line. It's typically the same as the library name.
Note that on Linux and also cloud compiles (which run on Linux) filenames including header file names are case-sensitive.
#include "sht3x-i2c.h"

PRODUCT_VERSION(2);
There are a few configurable parameters in the code including the event name and the period to check and publish the data. Be sure to set the period large enough that you don't publish an excessive number of measurements. Each publish uses a data operation, and you have a limited number of data operations per month.
const char *eventName = "temperatureSensorTest";

unsigned long lastSensorCheck = 0;
const std::chrono::milliseconds sensorCheckPeriod = 5min;
The loop() function checks after connecting to the cloud and periodically, based on the sensorCheckPeriod.
It generates a JSON object containing temp and humid values for the temperature (in °C) and relative humidity (0-100%), and publishes it as eventName.
This example uses the classic style of the publish call for compatibility with older devices. If you are using a Gen 3 or Gen 4 device with Device OS 6.3.0 or later, see typed and extended publish for a more efficient way of sending JSON data.
void loop()
{
    if (Particle.connected()) {
        if (lastSensorCheck == 0 || millis() - lastSensorCheck >= sensorCheckPeriod.count()) {
            lastSensorCheck = millis();

            char buf[256];
            JSONBufferWriter writer(buf, sizeof(buf) - 1);

            writer.beginObject();
            bool checkResult = checkSensor(writer);
            writer.endObject();

            writer.buffer()[std::min(writer.bufferSize(), writer.dataSize())] = 0;

            if (checkResult) {
                Particle.publish(eventName, buf);
                Log.info("published %s", buf);
            }
        }
    }
}
The checkSensor() function initializes the sensor if it has not already been initialized. I do that here, instead of at startup, in case the sensor is plugged in later. I2C isn't fully intended to be a live-pluggable bus, but it does generally work. This is less likely in a solderless breadboard, but on the Tracker One, the I2C bus is exposed via an external connector and you might plug the M8 temperature cable in later.
It includes a retry function. It's likely that the first read of the value will fail after initializing the sensor, and it's generally a good defensive programming practice.
If a reading is successfully obtained, it adds it to the JSON data object.
If the sensor is unable to be read, an i2cscan() is done for troubleshooting. It is possible that your sensor will be configured for address 0x45 instead of 0x44, and the I2C scan will make this obvious.
bool checkSensor(JSONWriter &writer)
{
    double temp, humid;

    if (!sensorStarted) {
        sensor.begin(CLOCK_SPEED_400KHZ);
        sensor.start_periodic();

        sensorStarted = true;
    }

    for(int tries = 1; tries <= 3; tries++) {
        int err = sensor.get_reading(&temp, &humid);
        if (err == 0)
        {
            // Log.info("temp=%.2lf hum=%.2lf", temp, humid);

            writer.name("temp").value(temp);
            writer.name("humid").value(humid);

            return true;
        }

        Log.info("failed to get reading try=%d result=%d", tries, err);
        delay(1000);
    }

    sensorStarted = false;
    i2cscan(Wire);

    return false;
}
The i2cscan() function is only called if the temperature cannot be found. Using an I2C scanner is a good idea when troubleshooting I2C issues to see what the device can see on the I2C bus.
In the console
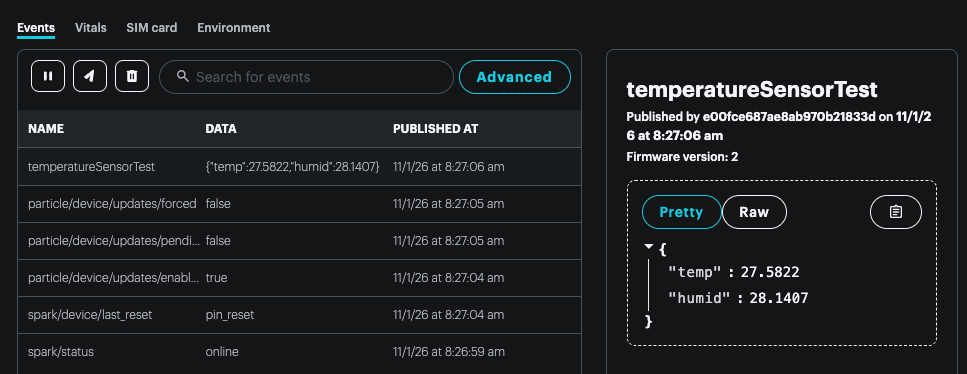
I've opened console.particle.io, then my product (Chivalrous Pink Borons), the product device list, then my device (wombat_magnetic).
USB serial debug log
0000011748 [system] INFO: Cloud connected
0000011752 [app] INFO: failed to get reading try=1 result=-1
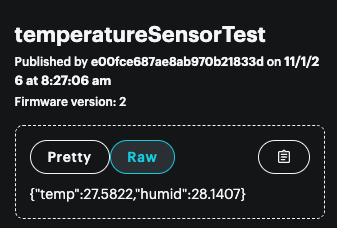
0000012755 [app] INFO: published {"temp":27.5822,"humid":28.1407}
If you switch the event detail view in the console from Pretty to Raw you'll see the same data as the USB serial debug log.
Using libraries
Use Particle: Install library to install the sht3x-i2c library.

You can find libraries using Library search. There are a large number of community libraries available. These were written or ported by community members and may vary in quality and support, however they will typically be a good starting point. Many of the popular libraries are high-quality and suitable even for use in commercial projects.
If you get a red squiggle for the #include statement with this error, make sure you have done Particle: Configure project for device. The include files may not show up until you do this. If you opened a folder in Workbench when Particle: Import Project was required, this error can also occur. You may also have to compile or flash the project once before Intellisense will detect library includes.

You can find more information about libraries in firmware libraries.
Assigning device groups
In this example, since one of the devices does not have a temperature sensor, I'll only release to some devices using a device group.
I've opened console.particle.io, then my product (Chivalrous Pink Borons). It opens to the device list, which is where I want to be.
Use the New group button to create the device group.
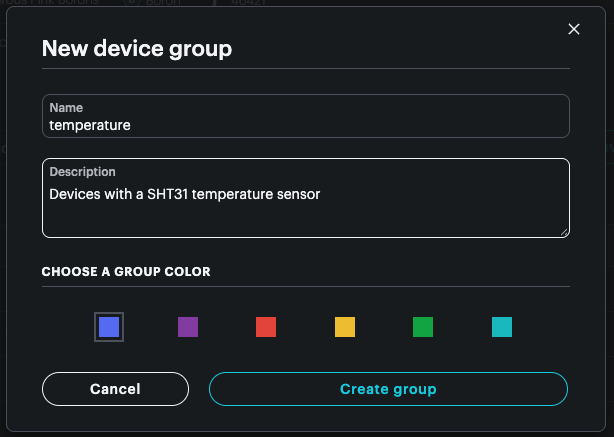
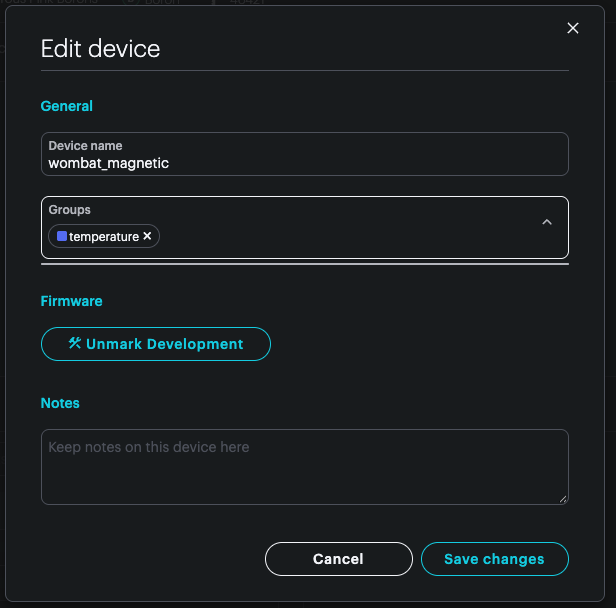
For each device, open the device and click the Edit button in the upper left of the window. From there, you can select a group for the device. Each device can be a member of more than one group, if desired.
Uploading to the device fleet
The process is like the earlier section:
- Obtain the .bin file for the firmware
- Upload to the console
- Release the firmware to the fleet
I've opened console.particle.io, then my product (Chivalrous Pink Borons), then Cloud services - Firmware. Click the Upload firmware button.
Prepare to upload the firmware.
The firmware is now in the list of firmware that can be released.
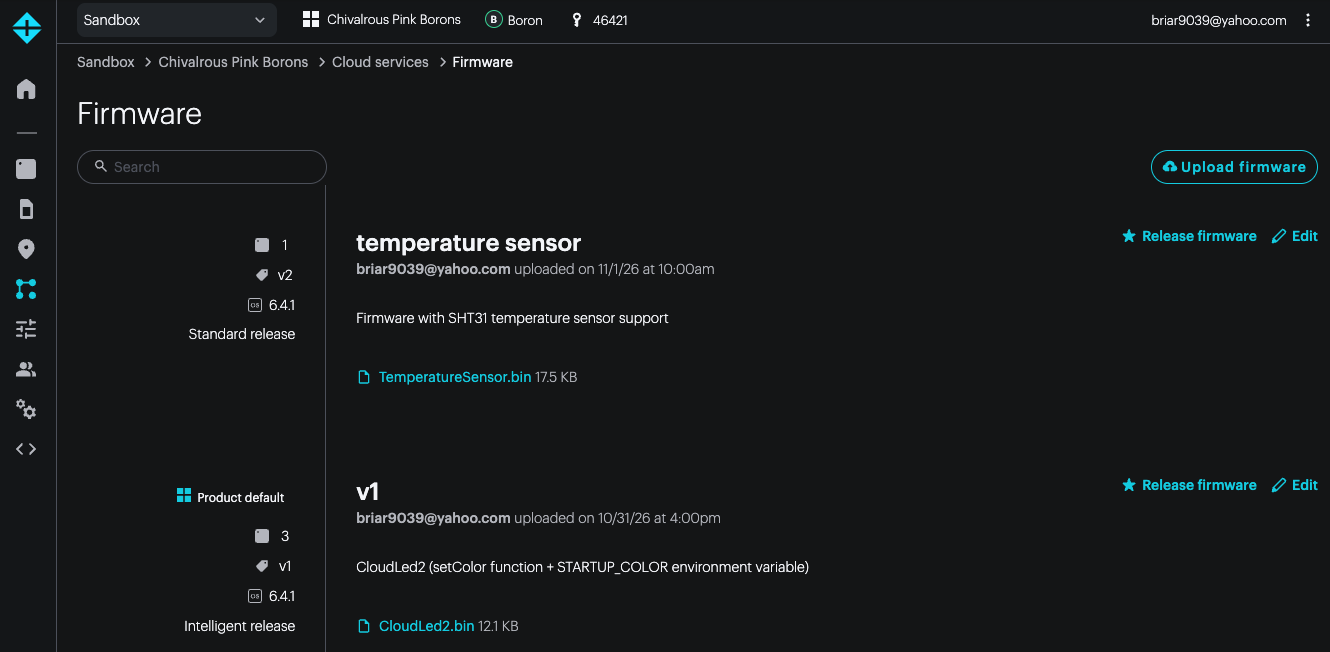
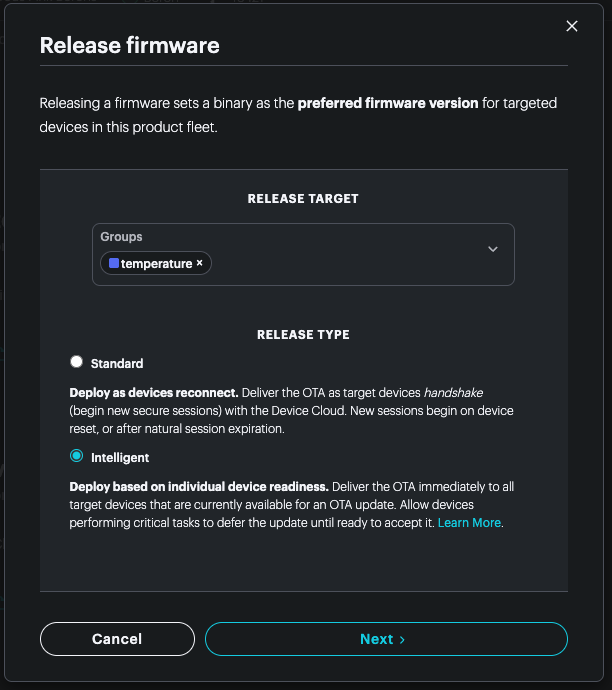
Click Release for v2 of the firmware.
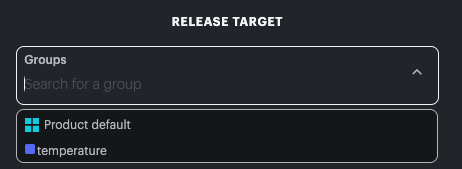
Since I've added the device group, there is an additional option, temperature as well as Product default in the menu.
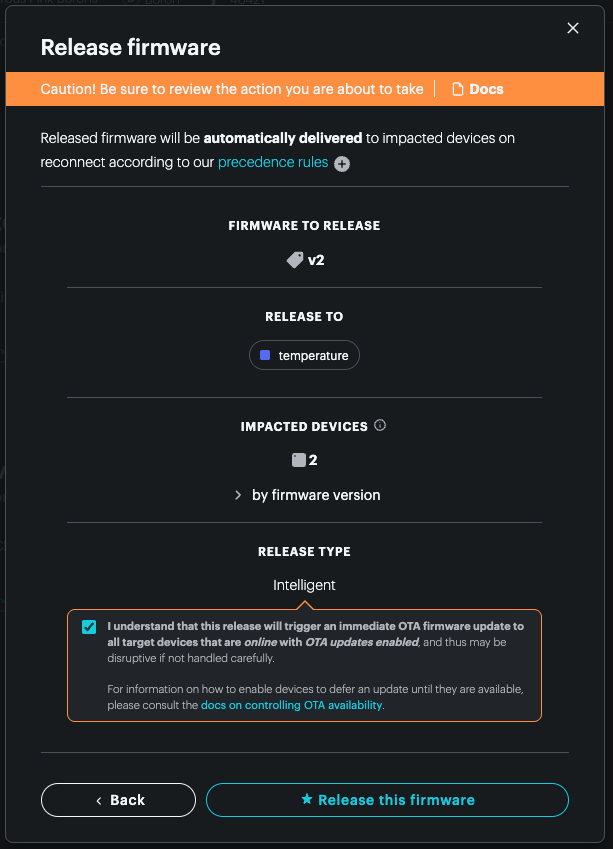
Now it can be released to the rest of the temperature fleet.
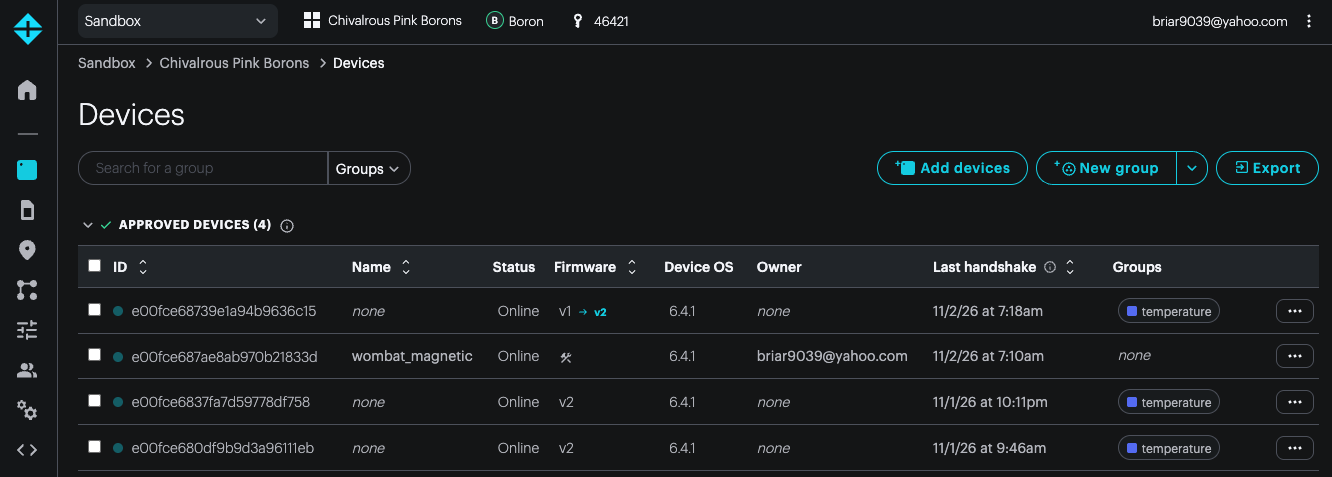
If you later add the temperature group to a new device, that device will automatically be scheduled for the latest firmware upgrade from that group. In this screenshot you can see that an update to v2 has been scheduled for the device whose Device ID ends in 6c15.
Product events
In addition to the per-device events that I've shown earlier, there is a product event stream.
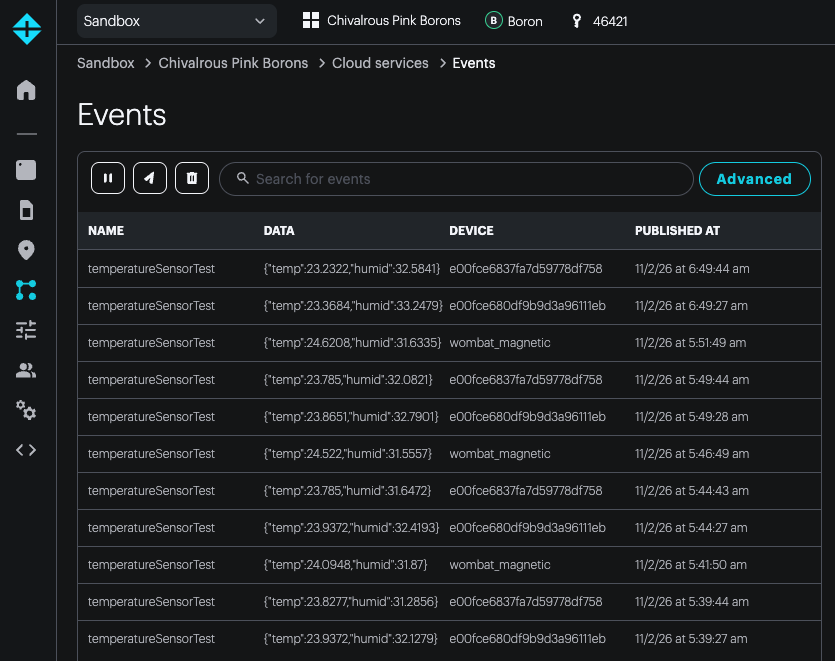
When in my product (Chivalrous Pink Borons), I can select Cloud services - Events in the left navigation. This will show all events in my product as they arrive. Note that the event lists in the console do not show historical events, only the ones that occur after opening the panel.
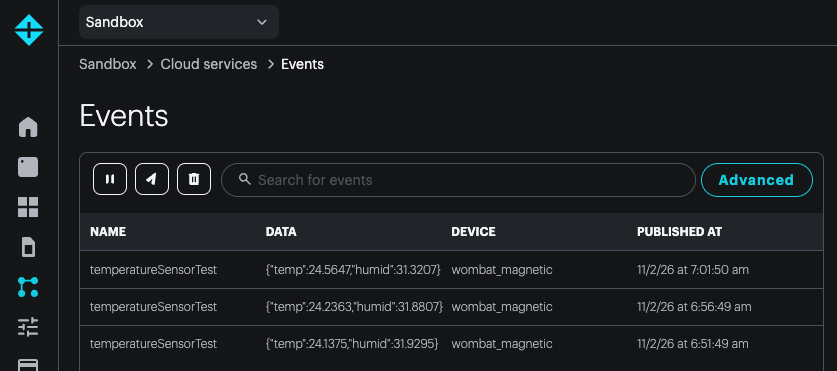
Also note that there is a user event stream in Sandbox then Cloud services - Events. Be careful using this with products, because it will only show events that are claimed to your account. In my case, it will only show events generated by wombat_magnetic because the other devices are not claimed to my account.
Other interfaces for sensors
Particle devices work with many kinds of sensors. Most sensors that work with Arduino also work with Particle devices. They can connect by a number of technologies.
I2C is a popular bus topology for short distances for connecting sensors and small displays. Qwiic and STEMMA-QT use a standardized connector for 3.3V I2C to connect devices without loose wires, soldering, etc..
UART serial is another popular sensor connection method. Particle devices run at 3.3V so you may need a level shifter for 5V or RS232C, which use higher voltages. Gen 3 devices have a limited number of available serial ports.
Modbus requires additional interface hardware, but is a common way to attach multiple sensors to a single UART serial port. It's common in industrial settings.
CAN bus is a standard typically used in automotive and some industrial monitoring. Only the Tracker One has built-in support for CAN, but other devices can add it with interface hardware.
4-20mA is an analog standard, but since it's based on current instead of voltage, it's less susceptible to electrical noise and works over longer distances.
Bluetooth LE (BLE) is a standard for wirelessly connected sensors. There are standards for things like heart rate sensors that are generally compatible, but some devices use a proprietary protocol that may not be easily supported.
SPI is a short-range connection method that is generally much faster than I2C but requires more pins. It's often used to connect high-speed chips like CAN controllers, external analog-to-digital converters, etc..
USB sensors are generally incompatible with Particle devices. Those sensors require a USB host port, and the USB port on Particle devices cannot be a USB host.
Temperature sensors
There are many options for temperature sensors on Particle devices:
A thermistor is a variable resistance semiconductor that connects to an analog pin of your Particle device, along with an additional resistor. The Tracker One includes one on the carrier board.
Other analog temperature sensors like the TMP36 also connect to an analog pin, but include additional circuitry for better linearity, which results in more accurate readings.
I2C temperature sensors like the SHT3x in this section, TMP112, and the DS75, use digital communication over I2C. In some cases, you can connect a limited number of sensors to a single I2C bus. The BME280 (and others) measure temperature, atmospheric pressure, and relative humidity.
Proprietary protocol digital sensors like the DHT11, DHT22, and SHT11 are not recommended. They are not compatible with Gen 4 devices like the P2, Photon 2, and M-SoM, and can be unreliable on Gen 3 devices.
1Wire sensors including the popular DS18B20, allow many sensors to be connected to a single bus. They are not recommended, however, because Gen 4 devices require an 1Wire-to-I2C bridge chip to implement 1Wire; software implementations are not compatible with these devices.
Sensor compatibility
In addition to having a compatible interface (like I2C), sensors must be the correct voltage.
All Particle devices run at 3.3V. Most sensors are compatible with this, but some require 5V. Gen 3 and Gen 4 devices are not 5V tolerant so sensors that have a 5V digital output should never be used.
Except for the simplest of sensors, you will probably want to select one with a compatible library. You can use Library search to search for a Particle library for the chip.
In many cases, if an Arduino library is available, you can easily port it. Libraries from Sparkfun and Adafruit generally work with little or no modification, and other common library porting issues are easily resolved.
Some sensors intended for use with a Raspberry Pi can work, but since the driver library architecture is completely different, it may be difficult to make it work properly.
Why not MQTT?
MQTT provides some similar functionality to the Particle cloud primitives, but implemented in a different way.
There is no built-in support for MQTT in Device OS, though there is a third-party library for it. Because TLS/SSL for user applications is also not built-in, doing secure MQTT is not plug-and-play.
Since the MQTT connection is separate from the cloud connection, it cannot take advantage of the built-in RSA public-private key pairs for mutual authentication and instead requires a separate method of authenticating users and devices.
Next steps
This section only describes the device-side part and sending the data to the cloud. There are many options for things to do with the data in the Integration gallery.
- Display it on a dashboard using Blynk
- Store the data in a InfluxDB or QuestDB database
- Analyze it in ThingSpeak or Ubidots
There's also a continuation of this section later in low-power that includes using sleep modes to lower power consumption for battery-powered use.