
Google maps
Particle and Google Maps can now be used in tandem to easily find the location of Particle devices without the need for any additional hardware. The Geolocation API from Google Maps returns a location and accuracy radius from visible Wi-Fi access points or cell towers collected by Particle devices.

Geolocate Particle devices using the Google Maps Geolocation API
Geolocating devices has many potential applications in an IoT deployment, including:
- Improve operating efficiency via remote tracking of assets in a company's supply chain, including improving demand forecasting and reducing operating expenses. For more details, please check out our whitepaper on supply chain management
- Delight customers via providing visibility into the location of connected devices to end-users in real-time
- Discover business insights via collecting and identifying device location data
This tutorial will explore how to get started with the Particle + Google Maps integration.
Geolocation basics
There are four common ways to find a location of a device, described below. It is important to note that while these methods are distinct from one another, it is possible (and often preferable) to use multiple geolocation methods together to enhance end-user experience and/or increase the likelihood of successfully locating a device.
GPS (Global Positioning System)
The Global Positioning System (GPS) is generally the most accurate and it can provide device location continuously. Under normal conditions, GPS can locate a device with an accuracy of ~4 meters.
While very accurate, the disadvantage is that GPS requires additional hardware like the Particle Electron Asset Tracker module. It may also take some time to establish a satellite fix, and may have trouble establishing a location where the view is obstructed, such as downtown in cities.
The Particle + Google Maps integration does not use GPS, but rather cell towers or Wi-Fi networks to geolocate a device. Read on for a description of these two geolocation methods.
Cellular tower location
Cell tower geolocation is ideal for cellular IoT deployments that require approximate locations and do not wish to include additional hardware to support GPS.
Every cell tower has an identifier, and this can be looked up using the Google Geolocation API to find its location. This process is fast and provides a general location, usually within 4000 meters or a couple miles.
The Google Maps integration can be used in tandem with a Particle Electron to geolocate devices using visible cellular networks.
Wi-Fi location
For the Particle Photon and P1, Wi-Fi geolocation is another option. Google maintains a database of known Wi-Fi base stations and can use this to determine a device's location by what networks it can see.
The database is generated by information from Android smart phones with location services enabled. They periodically record both the visible Wi-Fi access points and GPS locations when location services is enabled. (Apple uses the same technique with iPhones for their Wi-Fi location database, but it's a different database than Google's database.) Not all Wi-Fi access points are included in these databases, but if a device is near one, it can provide accurate location information.
The Google Maps integration also supports this method of geolocation. Particle Photon and P1 (Wi-Fi) devices can collect visible Wi-Fi access points, and send these to the geolocation API in exchange for its location. Often times, Wi-Fi geolocation is more precise than cellular geolocation, often with an accuracy radius of 50 meters or less.
IP address location
The Google Maps Device Locator does not use this technique, but for home Wi-Fi networks it's often possible to get an approximate location (city or nearby city), based on the public IP address. Particle Wi-Fi devices report their last IP address to the cloud, which could be used for this geolocation method. This is most often the least accurate of the 4 methods described in this section.
Preconfiguration steps
Sign up for a Google account
If you do not already have an account, visit the Google signup page. Follow the instructions to register for a new account. A Google account is needed to successfully authenticate with the Google Maps Geolocation API.
Get a Google Geolocation API key
In order to use the Google Geolocation API, you need an API key. In many cases, you'll be able to take advantage of the free usage tier.
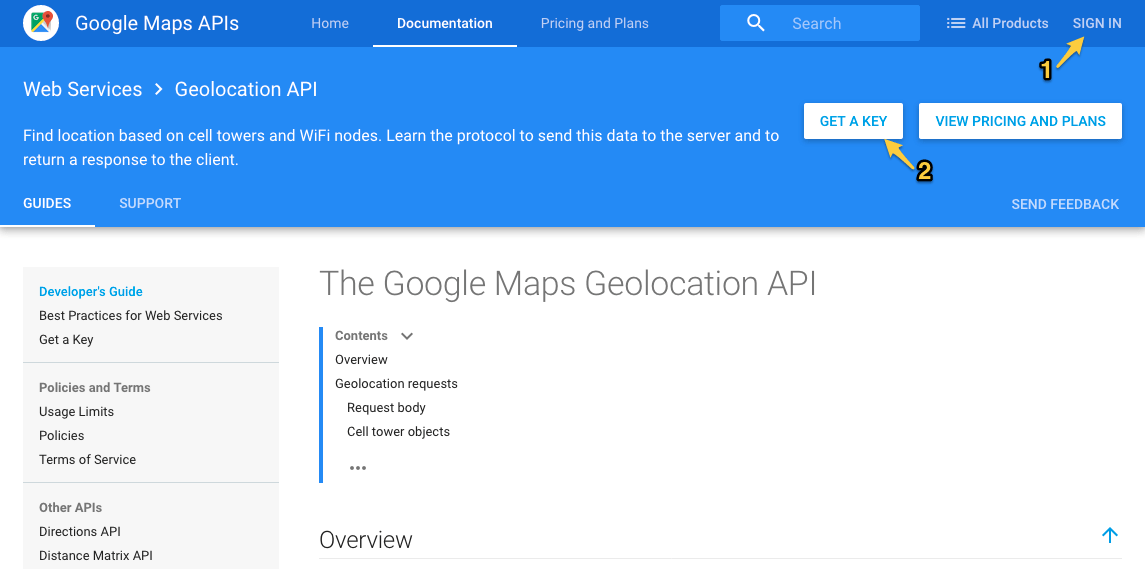
Go to the Google Geolocation API page.
If you are not signed into Google already, sign in (1).
Use the Get a Key button (2) to request a new API key.
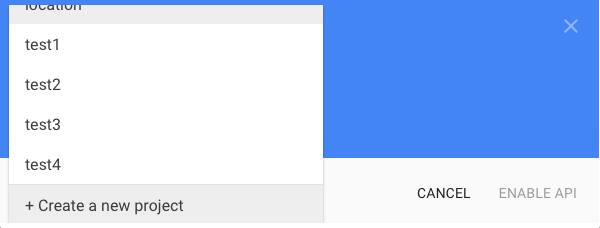
- Select or create a project.
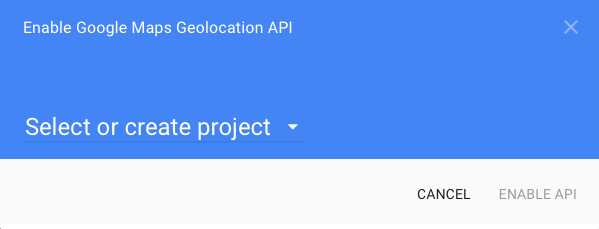
- In many cases you'll want to Create a new project. Every key is associated with one project, though a project can have a number of different keys, and also be enabled for multiple services.
- I created a new project location and use the Enable API button to enable it.
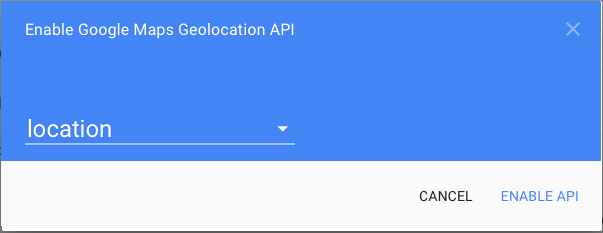
- And then you'll be presented with your API key.
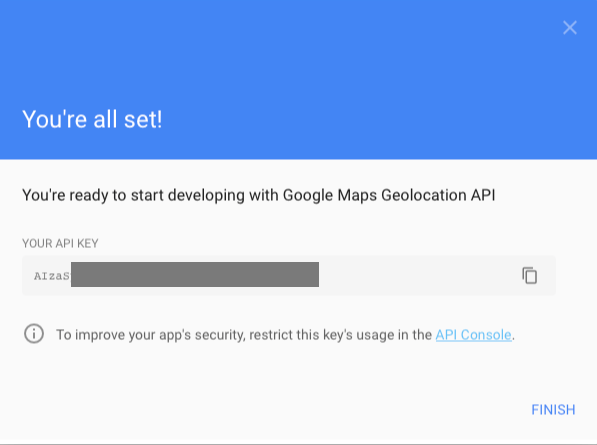
Copy your key to the clipboard because you'll need it when you enable your integration.
To view, edit or delete your credentials later, you can use the Google Developer Credentials Console.
Enable billing
Make sure you enable billing on your Google account. Even if you don't exceed the limits of the free plan, you'll get an error 403 if you don't enable billing.
The instructions can be found here.
Run the Google maps firmware library on your devices
The final preconfiguration step is the firmware that you flash to your Particle device. In order for Google Maps to geolocate a device, the device must collect a list of currently visible networks (access points for Wi-Fi, and towers for Cellular) and send information about these networks to the cloud.
A verified Particle library must be added to a device's firmware to collect and send network info to successfully fetch its location from Google Maps.
Using the Particle Web IDE
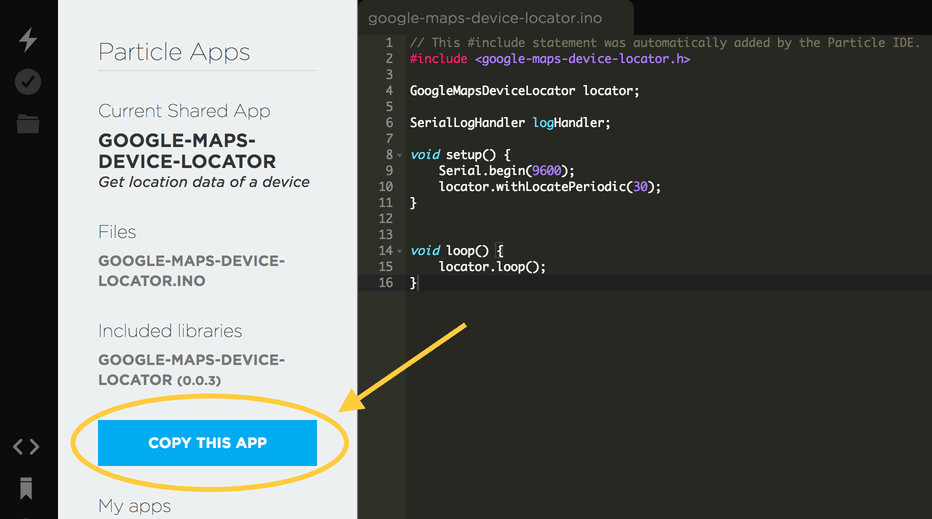
The quickest way to add the Google Maps firmware library is to start with the sample firmware application in the Web IDE. This sample app will locate the device periodically, every 30 seconds. The Google Maps firmware library is automatically added to your project when using the sample app.
This example publishes the location every 30 seconds. It works on the Particle Photon, P1, and Core (Wi-Fi) and also the Electron (cellular).
Navigate to the sample app, then click Copy this App to fork the sample code into a new app associated with your account, as shown below:
By changing a few options you can have it publish once at boot, which might be appropriate for Wi-Fi devices that are not battery powered. You can also post location on demand, when you make a call from your code.
For more information on how to customize the library, or integrate the library in an existing firmware application, check out the firmware library API.
Enabling the integration
Particle Console
Now that you've done all of the pre-configuration, you are now ready to enable the Google Maps integration on the Particle Console.
Start by going to the integrations hub by clicking on the integrations icon in the sidebar (), or by simply following this link. If you'd like to enable the integration for a product, you'll need to visit the integrations hub for the desired product. Do this by clicking the products icon () in the sidebar, finding your product, then clicking on the integrations icon () in the product context.
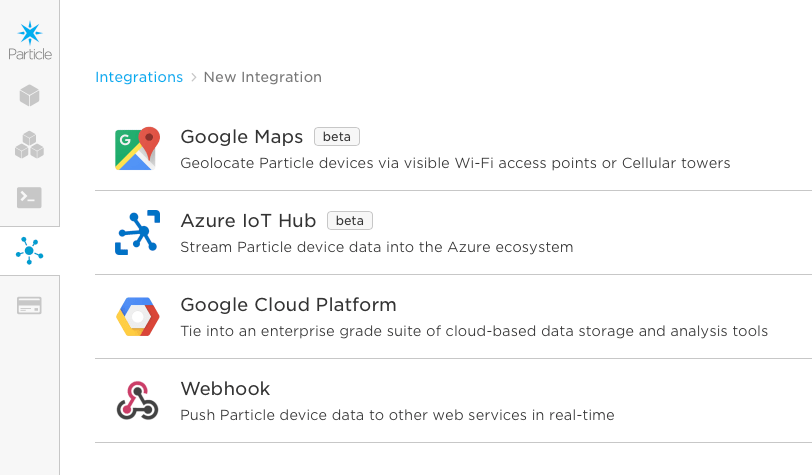
Once in the integrations hub, click on the "New Integration" button. From the list of available integrations, click on "Google Maps."
You'll see a reminder that setup is required before continuing to enable the integration. If you have followed the steps above, you should be good to go. Click the "I have done all these things" button to advance.
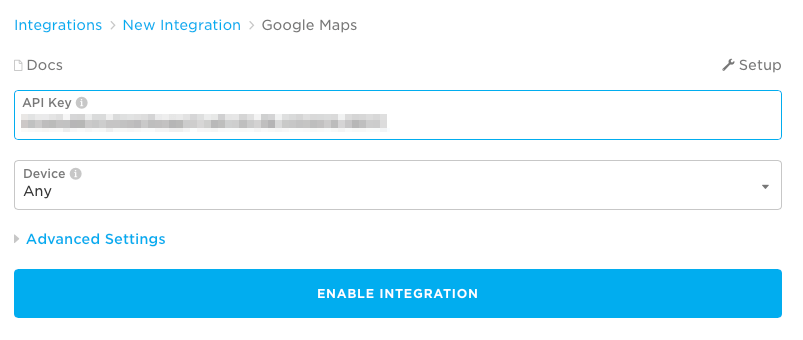
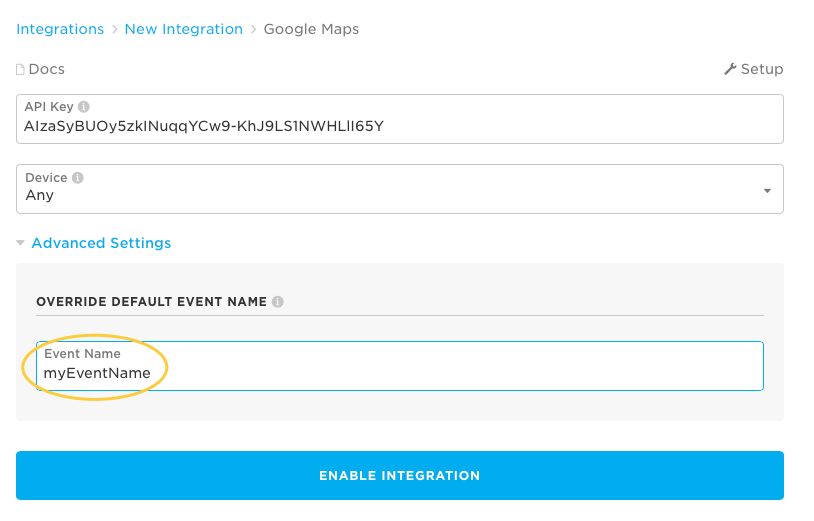
The next step is configuring the integration. Fill out the following fields:
API Key: Enter the API key you created above.
Device: Select which of your devices will trigger publishing to Google. If you'd like the publish to trigger from any of the devices you own, select 'Any.'
If you expand Advanced Settings the following option appears:
- Override Default Event Name: The name of the event that will
trigger publishing an event to Google Maps. This is the name of your event set using
locator.withEventName("differentEventName").
Testing it out
Once you have the firmware installed on your device and the integration enabled, you can check the Events in the console.

From the bottom to the top:
- The deviceLocator event is what was sent from the Particle device
- The hookSent/deviceLocator is what the Particle cloud sent to the Google Geolocation service. The data is always undefined; that's the normal behavior.
- The hook- is the response data: latitude,longitude,uncertainty. The uncertainty radius is in meters.
If the location is not known by the Google geolocation service, a 404 error appear in the logs instead:

Make sure you're viewing the top-level Events tab. If you view the device-specific event list, the hook events won't appear, because they're not generated by the device itself (directly).
Example: Google Maps Visualization
For most of us, latitudinal and longitudinal coordinates don't give us a clear understanding of where something is located in the world. Seeing those coordinates plotted on a map helps provide that clarity.
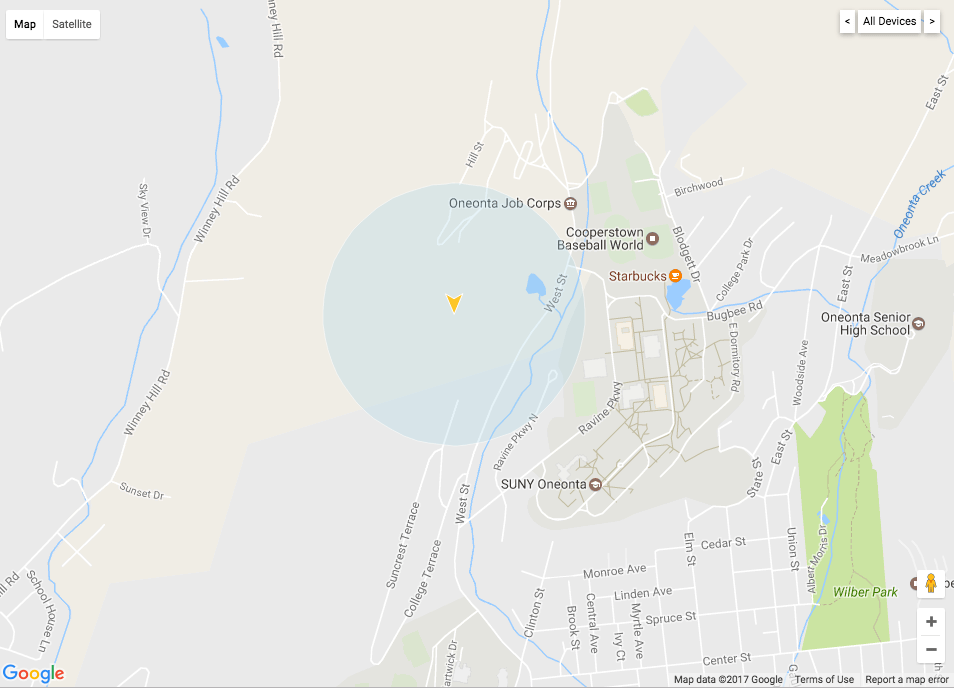
This example demonstrates how to visualize your Particle devices' locations using Node.js in a Google App Engine Flexible Environment and the Google Maps Javascript API. This sample also uses the Express web framework, websockets, and the Particle Javascript API.
Devices that are running the proper firmware and trigger the Google Maps integration will have its returned location displayed with a marker on a map. An radius will also be drawn around the reported coordinates to represent the precision of the reading.
The Google Maps team has created an open-source visualization application, which you can find here:
The README of the app has all the information you need to both run the application locally, or deploy it to Google Cloud App Engine.
Example: Location OLED Display
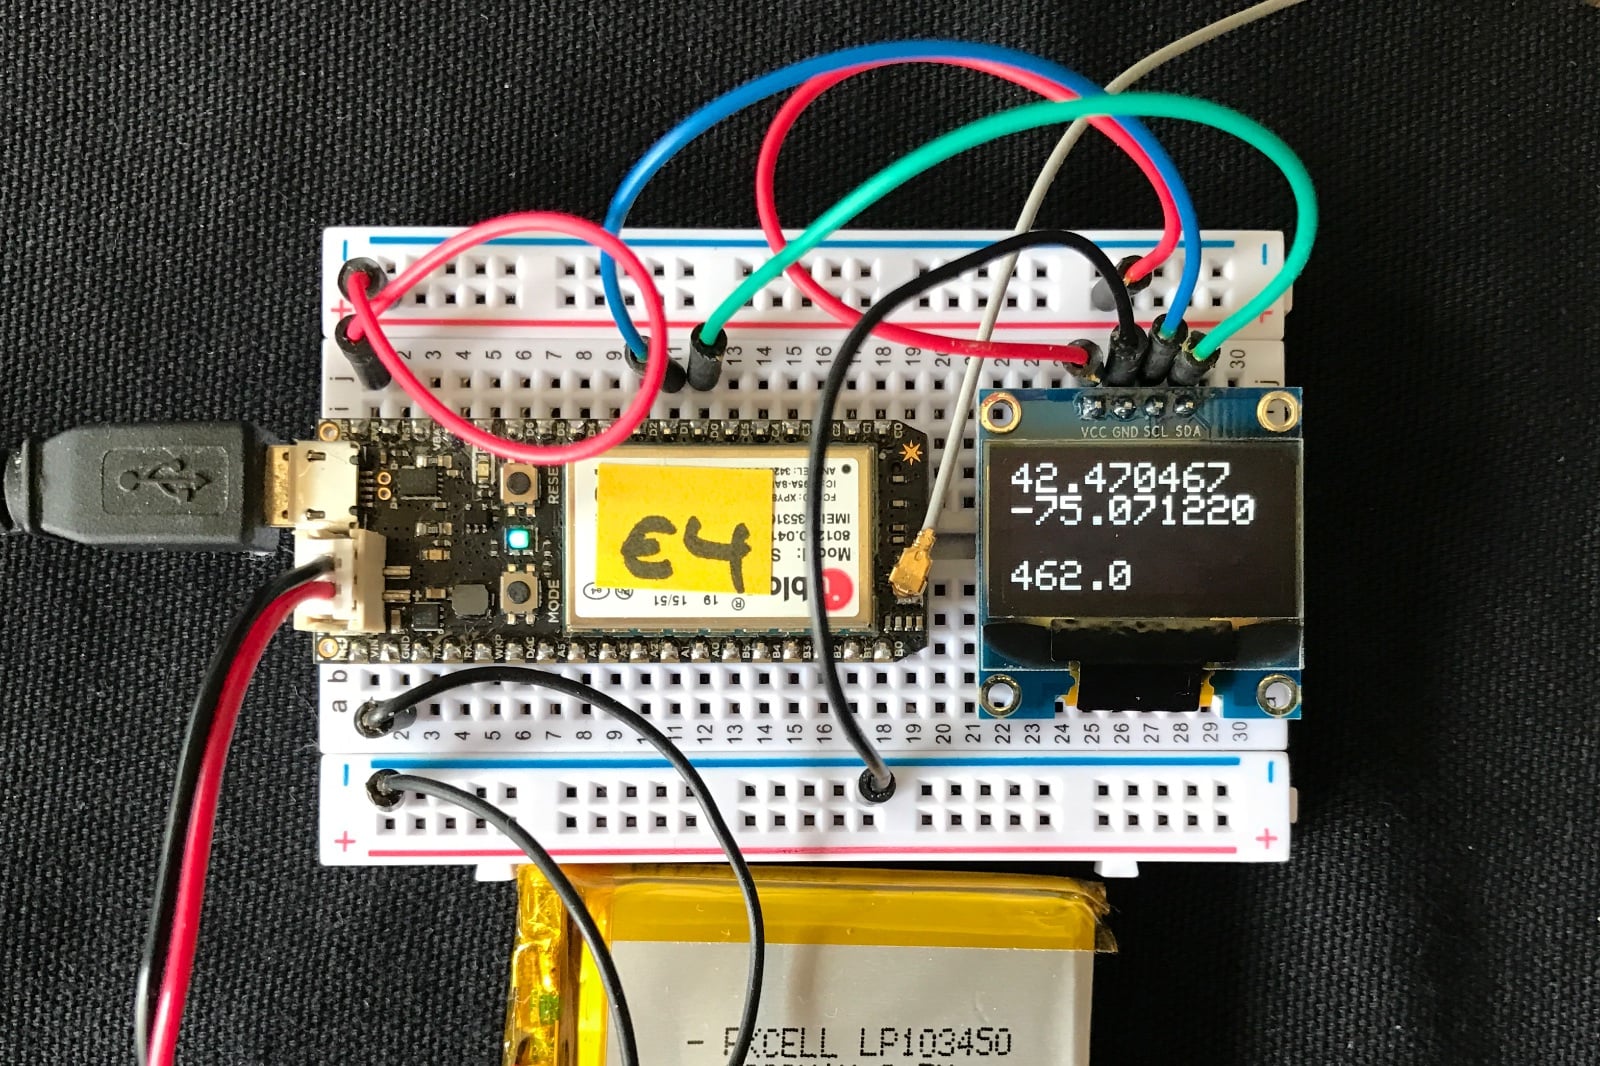
This example displays your current location on a small SSD1306-compatible OLED display to show your latitude, longitude, and uncertainty radius (in meters).
The connections are:
- VCC to 3V3 red
- GND to GND black
- SCL to D1 (SCL) blue
- SDA to D0 (SDA) green
Firmware
The firmware to power displaying a device's location on an OLED display can be found in the Google Maps device locator examples repository.
To use this firmware example, you should download the repo, either by
clone or download zip. Then, cd into the oled-locator directory.
Using the Particle CLI
Using the Particle CLI is an easy to flash this firmware to a device.
For example, if you wanted to flash the oled-locator example to the device you named "test2" then you'd use the commands:
cd oled-locator
particle flash test2 .
That will automatically include the necessary libraries for you.
For an Electron, you'll probably want to do:
cd oled-locator
particle compile electron . --saveTo firmware.bin
particle flash --usb firmware.bin
This will flash the firmware to your electron locally (over USB) to prevent consuming data from over-the-air firmware updates.
Using the Particle Web IDE
If you want to use the examples in the Particle Web IDE, you need to copy and paste the example source into a new project and then add each of the libraries that it needs.
For example, the oled-locator project has this project.properties.
name=oled-locator
dependencies.google-maps-device-locator=0.0.2
dependencies.Adafruit_SSD1306_RK=1.1.2
You would have to add the libraries google-maps-device-locator and Adafruit_SSD1306_RK to your project in order to run the sample code.
Firmware library API
Creating an object
You normally create an locator object as a global variable in your program:
GoogleMapsDeviceLocator locator;
Operating modes
There are three modes of operation:
If you want to only publish the location once when the device starts up, use withLocateOnce from your setup function.
locator.withLocateOnce();
To publish every n seconds while connected to the cloud, use withLocatePeriodic. The value is in seconds.
locator.withLocatePeriodic(120);
To manually connect, specify neither option and call publishLocation when you want to publish the location
locator.publishLocation();
The loop
With periodic and locate once modes, you must call:
locator.loop();
from your loop. It doesn't hurt to always call it, even in manual location mode. It gives the library time to process the data.
Customizing the event name
The default event name is deviceLocator. You can change that in setup using:
locator.withEventName("myEventName");
This also must be updated in the integration, since the eventName is what triggers the webhook.
Subscription
You can also have the library tell your firmware code what location was found. Use the withSubscribe option with a callback function.
This goes in setup() for example:
locator.withSubscribe(locationCallback).withLocatePeriodic(120);
The callback function looks like this:
void locationCallback(float lat, float lon, float accuracy)
One possibility is that you could display this information on a small OLED display, for example.
Debugging
The library uses the logging feature of Device OS version 0.6.0 or later when building for 0.6.0 or later. Adding this line to the top of your .ino file will enable debugging messages to the serial port.
SerialLogHandler logHandler;